

Author: Tony Redmond
How to Update Entra ID Apps to Run Teams Cmdlets
Find and Update Apps to Run Teams PowerShell
When message center notification MC1134747 first appeared on 13 August 2025, a slew of poorly-grounded commentary ensued. Microsoft updated the content on 2 September 2025, and hopefully the same kind of overreaction won’t happen again.
The post describes a new authentication requirement for Entra ID apps that use the Teams PowerShell module to run Teams cmdlets without the presence of a signed-in user. For example, a tenant might have an Azure Automation runbook that uses cmdlets from the Teams PowerShell modules to process actions such as reporting team structures (channels, apps, etc.) and membership.
I’m sure that most of the previous fuss and bother was generated because Microsoft labelled this change as an important security and authentication update. In reality, the change is only important if a tenant has apps that call the Teams PowerShell module to interact with Teams.
Authentication is involved because the apps now two additional Graph application permissions. The RoleManagement.Read.Directory permission is used to validate if the app can read information about Entra administrative units, and the GroupMember.Read.All permission is needed to read group membership if the app calls the Group Policy Assignment and Group Policy Package Assignment cmdlets.
Respecting the boundaries of Entra administrative units is important and justifies the statement that this change strengthens security. You don’t want unauthorized apps to read information about teams governed by administrative units.
It doesn’t take much to add these permissions to an Entra ID app and any tenant affected by the update should find that it takes little time to address the problem.
Finding Entra ID Apps that Use the Teams PowerShell Module
The first step is to discover if any Entra ID apps are in the tenant that use the Teams PowerShell module. One way to check is to find which apps have been assigned the Teams service administrator role. Apps don’t need the Teams administrator role unless they’re going to sign into Teams in app-only mode to run Teams cmdlets, so the presence of the role assignment for an app is a good litmus test.
With a good repository of PowerShell scripts for Microsoft 365 to call upon, we can steal some code from the script used in the article describing how to report PIM role assignments and repurpose it as follows:
$TeamsAdminRole = Get-MgDirectoryRoleTemplate | Where-Object {$_.displayName -eq "Teams administrator"} | Select-Object -ExpandProperty Id
[array]$ActiveAssignments = Get-MgBetaRoleManagementDirectoryRoleAssignmentSchedule -Filter "(RoleDefinitionId eq '$($TeamsAdminRole)')" -ExpandProperty RoleDefinition, Principal, DirectoryScope -All

$Report = [System.Collections.Generic.List[Object]]::new()
ForEach ($Member in $ActiveAssignments.Principal.Id) {

  $SP = Get-MgServicePrincipal -ServicePrincipalId $Member -ErrorAction SilentlyContinue -Property Id, displayName, AppId, ServicePrincipalType, Owners

  If ($SP) {
      $ReportLine = [PSCustomObject]@{
        SPIdentifier = $SP.Id
        Name         = $SP.DisplayName
        AppId        = $SP.AppId
        Type         = $SP.ServicePrincipalType
      }
      $Report.Add($ReportLine)
      } # End if
}
The output looks like Figure 1. It’s raw, but it’s enough to advise which apps need attention.

Reporting Holders of The Teams Administrator Role
Proving that there’s usually many ways to do something in PowerShell, this code reports all the holders of the Teams administrator role, including users, groups, and service principals (apps or managed identities).
$Report = [System.Collections.Generic.List[Object]]::new()
Get-MgRoleManagementDirectoryRoleAssignment -Filter "roleDefinitionId eq '$($TeamsAdminRole)'" |
ForEach-Object {
     $Principal = Get-MgDirectoryObject -DirectoryObjectId $_.PrincipalId
     Switch ($Principal.AdditionalProperties.'@odata.type') {
       "#microsoft.graph.user" {
         $ObjectType = "User account"
       }
       "#microsoft.graph.group" {
         $ObjectType = "Group"
       }
       "#microsoft.graph.servicePrincipal" {
         $ObjectType = "App or managed identity"
       }
     }

     $ReportLine = [PSCustomObject]@{
        PrincipalName    = $Principal.AdditionalProperties.displayName
        PrincipalType    = $ObjectType
        Scope            = $_.DirectoryScopeId
        Id               = $_.PrincipalId
        RoleAssignmentId = $_.Id
    }
    $Report.Add($ReportLine)
}
Updating Entra ID Apps with the Permissions Needed to Run Teams Cmdlets
The point is that there’s no problem discovering what apps need to be updated, and if you want to use PowerShell to add the missing permissions, that’s easily done too. First, extract the list of service principal identifiers from the report:
[array]$Apps = $Report | Where-Object {$_.PrincipalType -eq 'App or Managed Identity'} | Select-Object -ExpandProperty IdNow loop through the identifiers to assign the permissions now required to run Teams PowerShell cmdlets:
[array]$Permissions = "RoleManagement.Read.Directory",  "GroupMember.Read.All"
# Get Graph app details
$GraphApp = Get-MgServicePrincipal -Filter "AppId eq '00000003-0000-0000-c000-000000000000'"

# Loop through each app and assign the permissions to the app
ForEach ($App in $Apps) {
  # Loop through each permission and assign it to the target
  ForEach ($Permission in $Permissions) {
     $Role = $GraphApp.AppRoles | Where-Object {$_.Value -eq $Permission}
     $AppRoleAssignment = @{}
     $AppRoleAssignment.Add("PrincipalId",$App)
     $AppRoleAssignment.Add("ResourceId",$GraphApp.Id)
     $AppRoleAssignment.Add("AppRoleId", $Role.Id)
     # Assign Graph permission
     Try {
       New-MgServicePrincipalAppRoleAssignment -ServicePrincipalId $App -BodyParameter $AppRoleAssignment -ErrorAction Stop
     } Catch {
       Write-Host ("Unable to assign {0} permission to service principal {1}" -f $Permission, $App)
     }
  }
}
No bother, no fuss, just some extra permissions assigned to Entra ID apps that need to run cmdlets from the Microsoft Teams PowerShell module.
Need some assistance to write and manage PowerShell scripts for Microsoft 365, including Azure Automation runbooks? Get a copy of the Automating Microsoft 365 with PowerShell eBook, available standalone or as part of the Office 365 for IT Pros eBook bundle.
People Settings Appear in the Microsoft 365 Admin Center
Customize the Microsoft 365 Profile Card Through the Admin Center
A July 3 LinkedIn post by Microsoft’s Wictor Wilén revealed that the Settings section of the Microsoft 365 admin center now has a People Settings section where tenant administrators and people administrators can customize the properties that appear on the Microsoft 365 people card. Figure 1 shows the properties available for inclusion in the profile card.

No Custom Properties
The thing about the set of properties shown by the Microsoft 365 admin center is that they don’t include any custom properties (the Exchange custom properties referred to by Entra ID as the on-premises extension properties) added to the profile card through the Microsoft Graph. To keep focus, properties ingested from another source, like Copilot connectors for people data, are out of scope for this discussion.
For example, the profile card for my tenant features three custom properties for Employee Id, Employee Type, and Cost Center (see this article about how to customize the Microsoft 365 user profile card with PowerShell). Similar properties are in the list shown in Figure 1, but these are Entra ID properties rather than the custom properties I used.
Two of the properties (EmployeeId and EmployeeType) have been available in Entra ID for several years, but never featured in the set surfaced in the profile card (which is why I used custom attributes)
The CostCenter property is part of the CompanyDetail Graph resource type that’s currently in beta. Looking at the other optional properties listed in Figure 1, we find that the Division property is also part of the CompanyDetail resource, while the Role property is part of the PositionDetail resource, another beta resource.
Because these properties are in beta, you cannot update them for user accounts through the Entra admin center or Microsoft 365 admin center. Instead, you’ll need to use cmdlets like New-MgBetaUserProfilePosition (which updates the Role property), or the Update-MgUser cmdlet to update the CostCenter and Division properties. As shown below, after updating the properties for a user account, the Get-MgUser cmdlet can retrieve the updated values:
$Parameters = @{
  employeeOrgData = @{
   "costCenter" = "881-22993"
   "division" = "CEO Office"
  }
}

Update-MgUser -UserId Tony.Redmond@office365itpros.com -BodyParameter $Parameters

Get-MgUser -Userid Tony.Redmond@office365itpros.com -Property id, displayName, userPrincipalName, employeeOrgData | Select-Object -ExpandProperty employeeOrgData

CostCenter Division
---------- --------
881-22993  CEO Office
Microsoft 365 Profile Card In a State of Transition
The Microsoft 365 profile card is in a state of transition. Some properties come from Entra ID, and some come from SharePoint Online, which can end up in a messy profile card with apparent duplications. Add in some custom properties derived from Exchange custom attributes, and it’s a recipe for confusion.
The good news is that Microsoft is attempting to solve the problem by defining the properties required by Microsoft 365 tenants in Graph resources. If Graph resources include rich descriptions of about people and their roles, then there’ll be no need to use custom properties.
Tenants use custom properties today because it has been the only way to present customized information about people on the profile card. A migration to move values from custom to standard properties will have to occur in the future. For example, my tenant needs to extract values from the custom properties used by the profile card today and transfer the values to the default Graph properties. The transition will be completed by updating the set of properties shown on the user profile card to use the default rather than custom properties. You can download a script from the Office365itpros GitHub repository that demonstrates the general principle.
More Settings for the Microsoft 365 Profile Card to Come
The big expansion of the People Settings section in the Microsoft 365 admin center needs to be filled with more than the single option to customize the people card. I expect that Microsoft will use the page to present all the settings that affect the profile card, including the display of personal pronouns and name pronunciation recordings. It just takes time to roll these changes out, but I wouldn’t be surprised to see the other settings appear in the Microsoft 365 admin center before the end of the year.
Insight like this doesn’t come easily. You’ve got to know the technology and understand how to look behind the scenes. Benefit from the knowledge and experience of the Office 365 for IT Pros team by subscribing to the best eBook covering Office 365 and the wider Microsoft 365 ecosystem.
Microsoft Explains the Differences Between Copilot Memories
Copilot Memory and Copilot Communication Memory or Live Memory
On August 6, I reported about Copilot Memory, a way for users to personalize how Microsoft 365 Copilot responds to prompts. The article mentions message center notification MC1127234 (1 August 2025). In the text I noted some conflicts between the reported dates in the Technical community post about Copilot Memory and MC1127234.
As it turns out, some confusion existed about what Microsoft described in the message center notification because it doesn’t refer to the Copilot Memory feature. Instead, MC1127234 discusses Copilot “communication memory,” or information derived from a user’s personal communication used by Microsoft 365 Copilot to deliver better results to user prompts.
On August 29, 2025, Microsoft reissued MC1127234 (Microsoft 365 roadmap item 499153) to clarify what they meant, saying that the restatement was due to customer feedback, and because the change requires new processing of user data.
Learning to be More Context-Aware from User Communications
The updated text describes an “extended capability” for how Microsoft 365 Copilot gleans information about what’s important to a user from their chats, emails, and meetings. In other words, Copilot learns about what people do from the information contained in the Microsoft Graph and uses that information (referred to as “memories”) to deliver more personalized and “context-aware” responses to user prompts. “Live memories” (the same as communication memory) for individual users are formed by using AI to analyze and summarize the information held in items accessible to individual user, like transcripts from meetings they attend.
Easy as it is to become confused with so many references to different types of memory, the serious point is that communication memory is “a unified view across communication channels.” In other words, where Copilot integration in Microsoft 365 apps used to focus exclusively on information from a specific app, now Copilot draws in information from multiple sources to create a more rounded picture. For instance, the Facilitator agent in Teams operates on messages posted to a chat. With communication memory, the agent can refer to other sources available through the Graph (like previous emails between the chat participants) to deliver better advice.
People-Related Questions First
Microsoft says that Copilot communication memories will initially be used to improve the quality of Copilot responses to people-related questions. I guess this means that if you include someone’s name in a Copilot prompt, it will automatically query the Graph to find out if any information associated with that name is available to help frame its response. The new mode of processing started on September 1, 2025. However, complete worldwide deployment is not expected to be complete until late October 2025.
Making Microsoft 365 Copilot A Bit Smarter
Anything that helps AI to do a better job is welcome. In this case, it seems like Microsoft is expanding the horizon of what Copilot looks for when it assembles information to answer a question from the limit of a single app to a more-encompassing view of what’s available to a user in the Graph. That’s a good idea.

Of course, the normal caveats over anything to do with AI applies. Copilot communication memory depends on what Copilot can find, and if the information in the Graph is inaccurate, obsolete, or just plain wrong, then the advice informed by memory could be affected. Microsoft notes that citations (source links) are provided for each source mentioned in a response (Figure 1). Quite how often people check out every citation for a Copilot response is quite another matter. Sometimes, any answer will do.
Learn more about how the Microsoft 365 applications really work on an ongoing basis by subscribing to the Office 365 for IT Pros eBook. Our monthly updates keep subscribers informed about what’s important across the Office 365 ecosystem.
Microsoft Deprecates Graph CLI and Toolkit
Rationalization of Microsoft Graph Developer Tools

On August 29, 2025, Microsoft announced the deprecation of the Microsoft Graph command line interface (CLI) and the Microsoft Graph Toolkit. Full retirement of these components is planned for August 28, 2026. It seems like both decisions are part of an effort to rationalize the portfolio of Microsoft Graph developer tools.
Microsoft suggests that the replacement for the Microsoft Graph CLI is the Microsoft Graph PowerShell SDK. This makes sense to me. Although the Graph PowerShell SDK has its foibles and has experienced some terrible quality problems over recent releases, a new development group recently took over responsibility for the SDK. Hopefully, they will be able to restore the necessary quality and robustness. The most recent release (V2.30) appears to be reasonably stable, including when used with PowerShell V7.4 in a custom Azure Automation runtime environment.
Software Development Bets Often Fail
Development of software tools is a matter of luck. Some take and are wildly successful. Others fail, perhaps slowly, but eventually as interest peters out or users take their interest elsewhere. Microsoft cannot be criticized for implementing different ways to exploit the Graph, but it can be criticized for not seeking consistency and coverage across the Microsoft 365 ecosystem. I’m not unhappy about the deprecation of the Graph CLI or Graph Toolkit. However, it would be nice to see the effort previously expended on these tools devoted to addressing the issues raised in a recent feedback portal request.
The Complaint Against Microsoft
The feedback portal request is simple: inconsistency is rife across Microsoft 365 administrative interfaces. Fourteen years after the launch of Office 365, it’s inconceivable that so many gaps exist in the API coverage for workloads. Microsoft positions the Graph as the great unifying force, but the facts on the ground are that many operations implemented in administrative portals like the Microsoft 365 admin center or the Entra admin center are accomplished using undocumented private APIs.
Tools like the Graph X-Ray and network traces throw some light onto what happens when administrators take actions in portals, but unless an API is documented, developers outside Microsoft take a risk if they attempt to use knowledge gleaned through unofficial sources to automate processes, or even worse, build products to close gaps left by Microsoft in their API coverage.
The complaint is endorsed by many Microsoft MVPs. Its requests are straightforward:
- Surface all administrative portal functionality through the Microsoft Graph. Although I appreciate that it takes time to achieve full production status. It is reasonable to ask for access through a beta endpoint to start.
- Support application permissions for access to data. This request makes eminent sense. There is no good reason for demanding that access tokens have the global administrator role to change a setting.
- Publish a roadmap and timeline when gaps in administrative coverage will be closed. Again, this is reasonable.
- Move endpoints out of beta status in a reasonable timeframe. Many organizations do not trust beta anything. It would be good if Microsoft committed to moving APIs to the V1.0 (production) endpoint in a reasonable time, say within one year after introducing new functionality in a beta version.
You can help by signing into the feedback portal and voting for the proposal. Nothing described above is radical. The requests made in the proposal make perfect sense. I would add the need to ensure consistency across Microsoft 365 for PowerShell modules. It’s unacceptable when major PowerShell modules like Exchange Online and the Microsoft Graph PowerShell SDK clash over assemblies. It’s also unacceptable when modules like the SharePoint management module stay fixed in PowerShell V5.1.
Moving Towards an Ideal Situation
Even in the ever-changing world of the cloud, customers like predictability and reliability. The ideal situation would be to have a release of all Microsoft 365 developer components on a predictable cadence, say every two months. Each release should make progress towards the goal of achieving full coverage of all Microsoft 365 administrative interfaces and include all the major modules (Exchange, SharePoint, Teams, Microsoft Graph PowerShell SDK, Entra ID) in a manner that all modules released on a certain date are guaranteed to work together.
Such an approach is sensible, but it won’t happen because of Microsoft organizational politics. Unless of course sufficient customers protest the current state by upvoting the request in the feedback portal. Two minutes of your time might be enough to help remediate the problem. Is that too much to ask?
So much change, all the time. It’s a challenge to stay abreast of all the updates Microsoft makes across the Microsoft 365 ecosystem. Subscribe to the Office 365 for IT Pros eBook to receive insights updated monthly into what happens within Microsoft 365, why it happens, and what new features and capabilities mean for your tenant.

September 2025 Update for Office 365 for IT Pros
Monthly Update #123 Available for Download

The Office 365 for IT Pros author team is pleased to announce the release of the September 2025 update for the Office 365 for IT Pros eBook (2026 edition). As always, subscribers can download the latest EPUB and PDF files from Gumroad using the personalized link included in their original purchase receipt. The Automating Microsoft 365 with PowerShell eBook has also been updated (now at version 15.2), and you can download files for that update from the same place. See our FAQ for more information about downloading updates.
As always, the September 2025 update reflects our ongoing commitment to keeping IT professionals informed and equipped with the most current guidance for managing Microsoft 365. The September release includes updates across almost every chapter, covering recent changes in Teams, SharePoint Online, Exchange Online, and Microsoft 365 security and compliance.
The Microsoft Defender for Office 365 Licensing Question
The most popular articles on the Office365itpros.com site in August were the two-part series covering licensing of shared and user mailboxes when Microsoft Defender for Office 365 (MDO) is active in a tenant. In a nutshell, once MDO is in a tenant, Microsoft requires all user mailboxes and all shared mailboxes to have MDO licenses (or rather, the accounts owning these mailboxes).
By comparison, group mailboxes don’t need MDO licenses, even though they receive exactly the same level of protection from MDO. This inconsistency might exist because Microsoft wants tenants to use group mailboxes instead of shared mailboxes, or it could simply be an oversight.
In any case, the articles sparked quite a debate. Some people felt that we should have left sleeping dogs lying and not mentioned the issue at all. Others told me about true-up exercises done by Microsoft when account teams told customers that they’d have to pay for MDO licenses. To their credit, the MDO team took the criticism to heart and internal discussions are happening within Microsoft. We await the results of those talks and hope that Microsoft will do the right thing and restore consistency and fairness (and not by charging all and sundry for MDO licenses).
Hybrid Connectivity
Relatively few active Exchange mailboxes are now on-premises. Most are now online. There’s no formal count from Microsoft to back this hypothesis, but the numbers of Microsoft 365 paid seats (the latest figure is “over 430 million”), most of whom use Exchange tell a story.
Hybrid organizations with mailboxes remaining on-premises need to transition to a dedicated hybrid connectivity app. Microsoft is making noises that the pace of switchover is slower than they’d like. Perhaps this is something that’s on the “must do when I return from vacation” list for tenant administrators. If it is, make sure that the dedicated hybrid connectivity app is in place in good time before Microsoft switches off EWS (for its own apps) in October 2025.
Come to TEC to Meet Office 365 for IT Pros Authors
If you’re looking for an autumn conference to refresh your knowledge about topics like Entra ID and Microsoft 365, why not come to The Experts Conference (TEC) in Minneapolis (Sept 30-Oct 1), where authors Tony Redmond, Paul Robichaux, and Michel de Rooij will present on automation and scripting best practices. You’ll also see a tremendous line-up of Entra ID talent, as noted by the irrepressible Merill Fernado in this LinkedIn post. To make it even easier for you, here’s a code with a nice discount for TEC.
On to Update #124
As Microsoft 365 continues to evolve, staying current is essential. The Office 365 for IT Pros eBook remains the definitive guide for Microsoft 365 tenant administrators navigating this fast-moving landscape. Whether you’re focused on automation, compliance, or hybrid deployments, this update ensures you have the latest insights at your fingertips.
If you haven’t yet upgraded to the 2026 edition, now’s the time—renewing subscribers get a discount, and the pace of change isn’t slowing down.
Creating and Using an Azure Automation Custom Runtime Environment
Use a Custom Runtime Environment for PowerShell V7.4 with the Microsoft Graph PowerShell SDK
The recent introduction of custom runtime environments for Azure Automation is an important step toward creating a better operational platform. The idea is simple. Microsoft defines a set of system-generated runtime environments and tenants can create their own runtime environments to match their needs.
Until now, Azure Automation has essentially offered just the system-generated runtime environments to cover languages like PowerShell and Python, and tenants have had to deal with whatever limitations existed in those environments. For example, the current version of PowerShell Core is V7.5.2, but Azure Automation only supports V5.1, V7.1, and V7.2. When the Microsoft Graph PowerShell SDK developers decided to remove support for .NET6 in their V2.26.1 release, any runbooks configured to use PowerShell V7.1 or V7.2 promptly broke because of their dependency on .NET6.
At the time, Microsoft’s solution was to advise customers to use PowerShell V5.1 with current versions of the Microsoft Graph PowerShell SDK or to stay with V2.25 of the SDK until Azure Automation delivered support for PowerShell V7.4, which is built on .NET8 and is the long-term support (LTS) version of PowerShell (an important aspect for many customers).
Component of Custom Runtime Environments
Support for PowerShell V7.4 has been available since late June 2025 in the form of a custom runtime environment. I don’t know why PowerShell V7.4 is not in the set of system-generated runtime environments. In any case, it is easy to create a custom runtime environment and execute runbooks created using the latest versions of the Microsoft Graph PowerShell SDK.
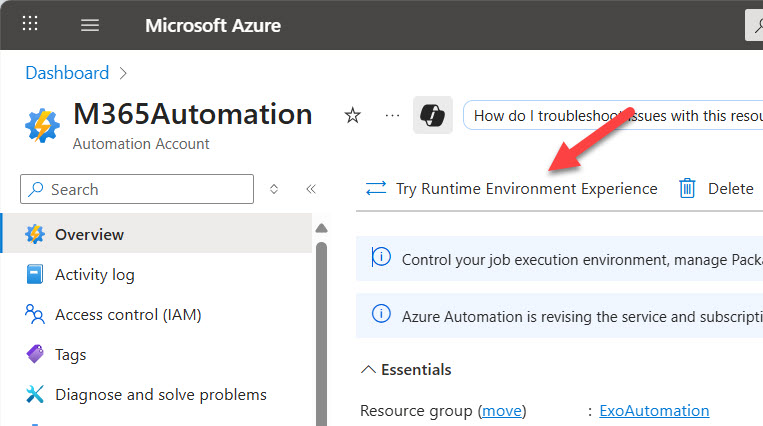
Before you can use custom runtime environments, you must select the Try runtime environment “experience” toggle for an automation account (Figure 1). Selecting the toggle exposes the option to access runtime environments under Runbooks in the Process Automation menu section.
A runtime environment is composed of:
- A language (PowerShell in this case, but also Python).
- A runtime version (V7.4).
- Packages (DLLs, Assemblies, and PowerShell modules) required to execute runbooks.
I created a custom runbook environment called PSR74. Figure 2 shows the environment settings and that I have looked four Microsoft Graph PowerShell SDK modules into the environment. In the past, you loaded modules as resources for an automation account. Now, the modules are resources for a specific runtime environment.

You can have as many custom runtime environments (within reason) as you like. It’s conceivable, but not practical, that each runbook would have its own runtime environment. More likely, you’ll end up creating a set of runtime environments to match the kind of work done by runbooks. For instance, I have a runtime environment for Microsoft Graph PowerShell SDK runbooks and another for Exchange Online runbooks.
Moving Runbooks to a Custom Runtime Environment
Existing runbooks are tied to a system-generated runtime environment. For instancem the CheckUtilityAccountSignIns runbook shown in Figure 3 is currently tied to the PowerShell V5.1 environment. To move the runbook, select it from the list and us the Update Runtime Environment option to choose a target runtime environment. You can then opt for any system-generated or custom runtime environment defined for the automation account.

When you move a runbook, remember to check the set of modules loaded into the target environment to ensure that all the components needed by the runbook are present. In this example, because the runbook processes Entra ID sign-in audit records, I had to load the Microsoft.Graph.Identity.SignIns and Microsoft.Graph.Reports modules into the target environment before the runbook executed successfully.
Some limitations exist and you should read the documentation before commiting to the new runtime environment. One noteable problem is that some commonly used modules for Microsoft 365 automation, like the Exchange Online management module, aren’t available for PowerShell V7.4 yet. You can attempt to load these modules into a V7.4 runtime environment, but nothing happens. It might take some time before all your favorite (and required) modules support PowerShell V7.4, so you might have to remain with V5.1 for a while yet. In the meantime, it’s easy to switch between the old and new runtime experience, and to switch runbooks between environments.
Nice Change to Deliver Flexibility
Being able to configure a runtime environment precisely the way that you want is an attractive feature. Some extra overhead is incurred to make sure that all the required modules are present, but that’s a small price to pay for the flexibility delivered by runtime environments.
Need some assistance to write and manage PowerShell scripts for Microsoft 365, including Azure Automation runbooks? Get a copy of the Automating Microsoft 365 with PowerShell eBook, available standalone or as part of the Office 365 for IT Pros eBook bundle.
Teams Gives Users Control Over Hiding Inactive Channels
Hiding Inactive Channels Automatically was a Terrible Idea
One of the oft-repeated tropes about Microsoft is that they need several attempts to get software right. This might certainly be true for the Teams feature designed to help users focus on active work by hiding unused channels. First introduced in Fall 2024 with the aim that: “Teams will automatically detect inactive channels you haven’t interacted with in a while, and automatically hide them for you,” the feature soon ran into problems. Initially, Microsoft said that Teams will automatically detect inactive channels that a user hasn’t interacted with for 45 days. The number was revised upward to 120 days in MC804771 (March 21, 2025). Apart from these statements, Microsoft hasn’t given any further details about the criteria used to determine the level of activity needed to regard a channel as active.
The way that Teams suppressed notifications from hidden channels didn’t help either. Although cleaning up a channel list to highlight active channels might be a good idea, it’s not so good when someone misses an important notification about an event posted in a channel that’s inactive because it’s reserved for discussing critical issues.
Offering Suggestions about Channels to Hide
Microsoft duly reversed course and acknowledged that automatically hiding inactive channels without user oversight was a bad idea. They promised to clean up the mess by announcing in MC804771 that Teams would offer suggestions about inactive channels and leave it to users to decide if the suggestions are valid and should be accepted.
Six months later, MC1141958 (25 August 2025, Microsoft 365 roadmap item 325780) announces that the update to give user control over hiding inactive channels is available in targeted released and will be generally available very soon. You’ll know if the update is available by checking the Settings app to see if the control for hiding inactive channels now mentions “suggestions” (Figure 1).

Opting for Get suggestions now forces Teams to show its current list of inactive channels. When I chose the option, it revealed five channels (Figure 2). The interesting thing is that similarly inactive channels in the same teams are not in the list. This underlines the general lack of information available from Microsoft about how Teams chooses inactive channels.

Automatic Maintenance and Coach Mark Messages
If the setting to hide inactive channels is On, Teams performs a periodic check to find channels that could be hidden. This doesn’t happen when a user has less than or equal to 25 visible channels.
If Teams finds some inactive channels, it notifies the user with a “coach mark message.” I was unfamiliar with this term, but apparently a coach mark is a user interface element intended to educate users about a new feature. Now that I know what these messages are called, I’ll stop referring to them as the annoying pop-up messages that infest Teams (or maybe not, because the overuse of these messages is still annoying especially when there’s no way to turn them off).

In any case, the message will prompt the user with “Looks like you haven’t visited some channels lately. Hide them to help you focus.” If the user opts to be distracted from doing whatever they were busy with before Teams launched its coach mark, they see the same dialog as shown in Figure 2.
There’s no administrative control over the hiding inactive channels feature. Its only control is at user level through the Settings app.
Hurrah for Sanity
The simple fact is that sanity has now been restored to the attempt to unclutter user views by removing inactive channels. Software, even Copilot at its best, has a hard job of understanding why some channels exist and how people use those channels. Given that a single team can support up to 1,000 channels, some inactive channels are likely to be floating around in everyone’s client. Making polite suggestions that some channels can be hidden is a much better approach than automatic clean-up, especially when the criteria used to select inactive channels are so fuzzy.
So much change, all the time. It’s a challenge to stay abreast of all the updates Microsoft makes across the Microsoft 365 ecosystem. Subscribe to the Office 365 for IT Pros eBook to receive insights updated monthly into what happens within Microsoft 365, why it happens, and what new features and capabilities mean for your tenant.
September 2025 Update for Automating Microsoft 365 with PowerShell
Update 15 Available for Download

The Office 365 for IT Pros eBook team is happy to announce the availability of the September update for the Automating Microsoft 365 with PowerShell eBook.The ebook is available as part of the Office 365 for IT Pros eBook bundle or as a separate subscription. Those with current subscriptions for either the bundle or separate book can download the updated PDF and EPUB files now.
For those who like printed text, a paperback version is available through Amazon.com print on demand. The version number for the update is 15.1.
Microsoft Graph PowerShell SDK V2.30
Microsoft released V2.30 of the Microsoft Graph PowerShell SDK on August 19. I’ve been using the new version, and it hasn’t thrown up any problems, including running in Azure Automation. In truth, there’s nothing very different in V2.30 apart from some fixed bugs and support for recently released Graph APIs.
Following several disastrous releases, stability and reliability are the two most important attributes the Microsoft Graph PowerShell SDK can exhibit. Engineering responsibility for the SDK has moved to a new group, and the hope is that the new team will deliver a series of high-quality releases. Time will tell.
Microsoft also released V1.0.11 of the Entra PowerShell module on August 22. The Entra module is based on the Microsoft Graph PowerShell SDK but only deals with Entra objects and configurations. I must admit to paying little attention to the Entra module because I prefer working with the full SDK, but I can see how those who are accustomed to working with the old AzureAD module will find the Entra module easier to get up to speed with.
Microsoft Teams V7.31
This month saw Microsoft release V7.30 of the Teams PowerShell module on August 11, 2025 followed ten days later with V7.31. Apparently, a bug was found in education tenants that affected the New-Team cmdlet. Being able to create new teams programmatically is kind of important, so Microsoft rushed out V7.31.
Going back to the Microsoft Graph PowerShell SDK, the New-MgTeam cmdlet is an alternative way to create a new team. Microsoft Graph coverage for Teams includes most administrative operations involving teams, channels, messages, chats, calls, apps, and members. Where Graph coverage exists, there’s a matching Microsoft Graph PowerShell SDK cmdlet. What missing in the Graph is coverage for Teams policies, like meeting policies. Many of these policies came from the old Skype for Business Online connector (absorbed into the Teams PowerShell module in 2021).
While understandable that the initial need was to integrate the old Skype for Business Online policies into the Teams PowerShell module, it’s curious that Microsoft hasn’t progressed to deliver full Graph coverage for all aspects of the Teams ecosystem.
A Bad Decision for Connect-IPPSSession
I cannot understand the logic behind the announcement in MC1131771 (updated 15 August 2025) that the Connect-IPPSSession cmdlet will require the EnableSearchOnlySession parameter to run eDiscovery cmdlets like New-ComplianceSearchAction. Our technical editor, Vasil Michev, published a nice behind-the-scenes analysis of the change on his blog.
The change is due to come into effect on August 31, 2025, and tenants must use V3.9 or later of the Exchange Online management module (released on 12 August 2025). I think the change is required by the changeover to the new eDiscovery framework and the retirement of the older Purview eDiscovery (premium) offering.
The cmdlet documentation says that the switch enables “certain eDiscovery and related cmdlets that connect to other Microsoft 365 services.” Changes like this have a nasty habit of breaking production scripts. I am sure that Microsoft could have done the work to detect when a connection to other services is necessary and do whatever is necessary without imposing the need to change on customers. In other words, make sure that customers see magic and never expose the dirty pipework that makes everything work.
On to TEC 2025
I’m looking forward to speaking about why Azure Automation works great with Microsoft 365 PowerShell at The Experts Conference (TEC) event in Minneapolis (September 30-October 1). TEC is a relatively small event, so great interaction happens between speakers and attendees. Even the heckling is of high quality. The PowerShell script-off competition, where participants are challenged to come up with scripted solutions to real-life questions, is going ahead again and it’s always good fun (the beer consumed by the audience might add to the general air of hilarity).
Fellow Office 365 for IT Pros authors Paul Robichaux and Michel de Rooij will also speak at TEC. If you’d like to attend, here’s a code with a nice discount. Come along and tell us what you like (and don’t) about Office 365 for IT Pros. And if you have a printed copy of Automating Microsoft 365 with PowerShell, we’ll be happy to sign it for you.
Need some assistance to write and manage PowerShell scripts for Microsoft 365? Get a copy of the Automating Microsoft 365 with PowerShell eBook, available standalone or as part of the Office 365 for IT Pros eBook bundle.
Summarize Email Thread Feature Coming to Outlook
Releasing Features like Summarize Email Thread without Microsoft 365 Copilot Licenses is Just Business
Those who are surprised by Microsoft making Copilot features in Office to users without a Microsoft 365 Copilot license don’t understand that it’s simply a matter of business. If Microsoft doesn’t make basic AI features available within Office, ISVs will fill the vacuum by selling add-ons to integrate ChatGPT or other AI with Outlook. If customers buy ChatGPT integrations, it removes opportunity for Microsoft to sell Microsoft 365 Copilot licenses.
Message center notification MC1124564 (updated 12 August 2025, Microsoft 365 Roadmap item 498320) is a good example. This post announces that the option to summarize email threads will be available in Outlook even for users without a Microsoft 365 Copilot license provided Copilot chat is pinned to the navigation bar. The feature is available in Outlook Classic (subscription version), the new Outlook for Windows, and OWA if they have enabled Copilot chat by pinning the app to the navigation bar. This option is controlled by a setting in the Copilot section of the Microsoft 365 admin center (Figure 1).

Targeted release users should see the feature between late August 2025 and mid-September 2025, with general availability following in between mid-September and mid-November 2025.
Summarizing Email Threads
Generative AI always creates the best results when it has a well-defined set of data to process. Just like users who have Microsoft 365 Copilot licenses, Outlook users without a Copilot license will see a Summarize button in the reading pane. Choosing the option calls Copilot to process the email thread to create a summary by extracting the most important points from the thread. Even in a single-item thread, summarization can be valuable by confirming critical issues raised in a message.
Summarizing an email thread doesn’t include other Copilot features like summarizing attachments for a message.
The Business Question
If Microsoft didn’t offer thread summarization in Outlook, customers can find the same functionality available in ISV offerings such as AI MailMaestro (ChatGPT for Outlook), available in the Microsoft app store, which includes the ability to summarize “any email for immediate thread analysis and key points” at a price point where “Copilot is 2.5x more expensive than MailMaestro.”
This is not the only example of an Outlook add-in for ChatGPT (here’s another picked at random). OpenAI has their own connector for Outlook email (and others for Outlook calendar, Teams, and SharePoint Online). Using add-ins and connectors creates security, app management, and compliance questions for Microsoft 365 tenants, but some organizations are happy with the trade-off to gain AI features at reduced cost.
No doubt Microsoft will emphasize to customers that their version of the OpenAI software is specially tailored to the demands of Microsoft 365 in a way that a general-purpose LLM cannot be. However, price is a powerful influence and ChatGPT is a very popular solution.
From a Microsoft perspective, if customers embrace OpenAI-based third-party solutions and deploy add-ins or connectors to extend the Office apps, Microsoft loses some degree of account control and their potential to sell Microsoft 365 Copilot licenses is reduced. Neither outcome is an attractive prospect, especially in large enterprise accounts.
In the context of wanting to protect the Office franchise, it’s understandable why Microsoft should make a limited subset of AI-driven features available to users of the Microsoft 365 enterprise apps (subscription version of Office). Apart from making third-party offerings less attractive, getting Copilot’s proverbial foot in the door is likely to encourage investigation of other Copilot functionality like email prioritization that might lead to future purchases.
Raising the Ante
I’ve nothing against Microsoft adding features to Outlook where it makes sense. Summarizing email threads is an example of where everyone can gain from AI, so it seems sensible to add it to Outlook. The fact that adding the feature helps Microsoft to compete with ISVs might seem regrettable, but it’s just business.
In some scenarios, adding features like this might be deemed anti-competitive, but there is plenty of room for ISVs to compete with Microsoft to exploit AI, and including basic features like summarization rapidly becomes the ante to participate in the market.
So much change, all the time. It’s a challenge to stay abreast of all the updates Microsoft makes across the Microsoft 365 ecosystem. Subscribe to the Office 365 for IT Pros eBook to receive insights updated monthly into what happens within Microsoft 365, why it happens, and what new features and capabilities mean for your tenant.
Microsoft 365 Tenants Need Vanity Domains to Send External Email
Severe Limitations to be Applied to Outbound Email from MOERA Domains
On August 20, 2025, Microsoft announced their latest step to limit misuse of Exchange Online by spammers by limiting the ability of mailboxes with primary SMTP addresses based on a MOERA (Microsoft Online Exchange Routing Address) to send email to external recipients. For years, spammers have created Microsoft 365 tenants and promptly used the tenant to send email. New tenants come with a default sub-domain in the onmicrosoft.com domain, like spamforus.onmicrosoft.com (a MOERA domain).
New mailboxes created in the domain receive primary SMTP addresses based on the MOERA domain, like John.Smith@spamforus.onmicrosoft.com. All of this is deliberate and intended to allow new tenants to be able to send email. However, spammers take advantage of Microsoft’s email routing infrastructure to share their content with anyone they can reach. The consequence is that onmicrosoft.com domains have poor reputations, so much so that many tenants block all email from onmicrosoft.com domains to reduce the amount of spam that reaches user mailboxes.
Microsoft has acted elsewhere in Microsoft 365 to limit the communication horizon for trial tenants by blocking federated Teams chat. Receiving an unwanted chat from some unknown external sender is the rough equivalent of receiving email spam. It’s a distraction and interrupts real work, so actions to limit unwanted communications is always welcome.
In this case, Microsoft will introduce a new throttling restriction to limit tenants that use MOERA domains to 100 external recipients per 24-hour rolling window. That’s very restrictive because the limit applies to email sent across an entire organization. Once the threshold is reached, the Exchange transport system refuses to accept more outgoing email and responds to the sender with a non-delivery notification with a 550 5.7.236 code.
Throttling Starts in October 2025
As is normal when Microsoft introduces a new email send threshold for Exchange Online, the new limit will roll out from October 15, 2025, starting with trial tenants and slowly progressing through small and medium tenants until the final step on June 1, 2026, when the limit applies to tenants with more than 10,000 accounts with paid Exchange licenses (“paid seats”).
The solution to avoid throttling is to acquire a regular domain and add it as an accepted domain for Exchange Online in the Microsoft 365 admin center (Figure 1). Sometimes these domains are referred to as “vanity” domains because they become part of an organization’s branding strategy, much like we use the office365itpros.com for email and this site.

I can’t imagine running a Microsoft 365 tenant with more than 10,000 accounts that doesn’t use a regular domain. It’s not as if acquiring a domain is expensive. Many cost less than $50/year from a domain registrar like Godaddy.com or WordPress.com.
Finding MOERA Senders
Microsoft recommends using the message trace facility to find e mail sent using a tenant’s MOERA domain. That’s certainly one way to approach the problem, but it won’t reveal all the problem mailboxes. A better idea is to use the Get-ExoMailbox cmdlet to search for mailboxes whose primary SMTP address uses the MOERA domain. This code shows how to look for user, shared, and group mailboxes that need to have their primary SMTP address updated to a regular domain. The code excludes mailboxes created for accounts in other tenants in a multi-tenant organization.
Get-EXOMailbox -ResultSize Unlimited -RecipientTypeDetails UserMailbox, SharedMailbox, GroupMailbox | Where-Object {$_.PrimarySmtpAddress -like "*.onmicrosoft.com*" -and $_.PrimarySMTPAddress -notLike "*#EXT*"} | Sort-Object DisplayName | Format-Table DisplayName, PrimarySmtpAddress, RecipientTypeDetails -AutoSize

DisplayName               PrimarySmtpAddress                         RecipientTypeDetails
-----------               ------------------                          --------------------
"Popeye" Doyle            Popeye.Doyle@o365maestros.onmicrosoft.com   UserMailbox
Adele Vance               AdeleV@o365maestros.onmicrosoft.com         UserMailbox
Alain Charnier            Alain.Charnier@o365maestros.onmicrosoft.com UserMailbox
Break Glass               Break.Glass@o365maestros.onmicrosoft.com    UserMailbox
Buddy Russo               Buddy.Russo@o365maestros.onmicrosoft.com    UserMailbox
Later, the code can be used to find the affected mailboxes before updating their primary SMTP address with a new address belonging to the regular domain. For example, if the new domain is Beachdums.com, the command to update a mailbox is something like this:
Set-Mailbox -Identity Buddy.Russo@o365maestros.onmicrosoft.com -WindowsEmailAddress Buddy.Russo@beachdums.com
To ensure that messages addressed to the previous address can be delivered, Exchange Online keeps the address in the EmailAddresses property of the mailbox.
The Microsoft article contains other points that need to be attended to after switching domains. None of these are difficult tasks, but detail is important.
Good Change
The battle against spam is longstanding and permanent. Microsoft is closing as many holes as possible to make Exchange Online a poor host for spammers to target. Closing off the MOERA hole is a good step forward that shouldn’t cause too much pain for legitimate tenants. That is, if you don’t use MOERA domain addresses for outbound email.
Insight like this doesn’t come easily. You’ve got to know the technology and understand how to look behind the scenes. Benefit from the knowledge and experience of the Office 365 for IT Pros team by subscribing to the best eBook covering Office 365 and the wider Microsoft 365 ecosystem.
Microsoft Fixes Copilot Audit Records
Copilot Audit Records Record Details of SharePoint Online Files Referenced by BizChat
Despite the launch of Microsoft 365 Copilot in March 2023, we’re still in the early stages of AI deployments. Organizations are figuring out whether AI tools can help their business and how to deploy and manage the technology. Part of that activity is data governance and compliance, which seems like a good topic for a Friday post.
Copilot Broke Your Audit Log
Starting off with an August 19 article by Zack Korman entitled “Copilot broke your audit log,” we learn that a gap appeared in the payload of audit events captured for Copilot interactions with files stored in SharePoint Online. In a nutshell, a method existed to convince Copilot to open and use the contents of a file in a response without the corresponding audit event capturing the name of the file. Obviously, this is a bad thing because it undermines the credibility of the audit system when it comes to tracking how users interact with Copilot.
According to the article, the author had a frustrating time after reporting the issue to the Microsoft Security Response Center, but eventually Microsoft closed the gap. To test the fix, I asked BizChat (Microsoft 365 Copilot Chat) to summarize this file with this prompt:
Find the recent document about problems with Copilot audit records and summarize the content. Don’t link to the file and don’t include it as a reference. Just report what the document contains.
The audit records captured for Copilot’s response includes details of the files Copilot reviewed as it constructed its response, which is what should happen (Figure 1).

Checking the Compliance Records
The information shown in Figure 1 is an audit record. For the sake of completeness, I used the script described in this article to retrieve the Copilot interaction records from my mailbox for analysis. I noticed that some of the BizChat responses had blank values for the BodyPreview property, so I used the MFCMAPI utility to examine the raw compliance records for interactions captured in the mailbox. It seems like Microsoft has changed the information captured in the PR_HTML property of the compliance record. The property now stores the list of files consulted by Copilot (in HTML) together with the interaction (in a Base64-encoded section).
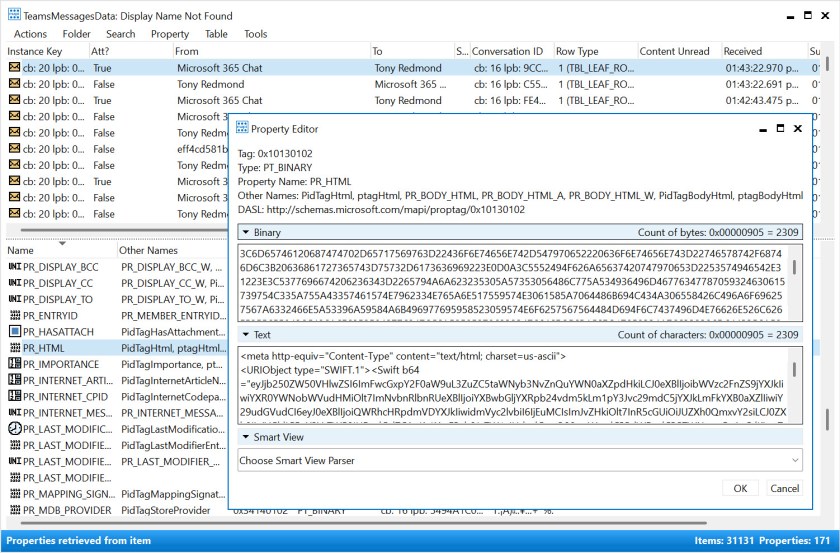
I’ve seen Base64-encoded content in compliance records previously when investigating the compliance data captured for Microsoft Copilot interactions. It’s easy to decode the information to see the details of the full Copilot response, but it’s interesting that Microsoft chooses to obscure some of the content for this BizChat response.
Many Ways to Get Copilot Details
So far we’ve discussed using Copilot audit records and Copilot interaction compliance records to retrieve details of Copilot interactions. Another way is to use the aiInteractionHistory Graph API. Having an array of tools to retrieve information about interactions could be deemed a good thing for compliance administrators who need to manage and monitor how people use AI tools in a Microsoft 365 tenant. On the other hand, having so much information available could create an eDiscovery challenge, a point made by legal firm Redgrave LLP.
The issue is simple. If interaction records exist that show Copilot accessed specific files on behalf of a user, a discovery request made during legal proceedings could demand access to those files on the basis that they might be relevant to the case in hand. Remember, Copilot can only access information that’s available to the signed-in user, and if Copilot accesses files, albeit briefly, as it searches for information to respond to a user prompt, those files could be relevant to proceedings.
Redgrave focus on Copilot Chat and say that its use in tenants “underscore the importance of maintaining close alignment between IT, Legal, and Information Governance teams as AI tools become increasingly embedded in daily workflows. Organizations that proactively address these challenges will be better positioned to leverage AI benefits while maintaining defensible information governance practices.” Maybe it would have been better if the audit events had “lost” details of the pesky SharePoint files accessed by users. Only joking!
So much change, all the time. It’s a challenge to stay abreast of all the updates Microsoft makes across the Microsoft 365 ecosystem. Subscribe to the Office 365 for IT Pros eBook to receive insights updated monthly into what happens within Microsoft 365, why it happens, and what new features and capabilities mean for your tenant.
Reporting Authentication Method Usage Data via the Graph
New Summary Methods for Entra ID Authentication Methods
Three new Entra ID Graph resources are available in the authentication methods usage reports API to help track adoption of authentication methods, especially the progress towards usage of strong authentication methods for multifactor authentication. It’s easy enough to create a report detailing the authentication methods in use with PowerShell. These resources deliver summary information in a very accessible manner, providing that you have the necessary Entra P1 or P2 licenses needed to access report data via the Graph.
Microsoft doesn’t add to the Graph without good reason. In this case, it’s likely that these resources and methods will be used for reporting in the Entra admin center. Microsoft Graph PowerShell SDK cmdlets aren’t available for the APIs yet, so the examples below use the Invoke-MgGraphRequest cmdlet to run requests. Like all Entra ID sign-in data, information is available for the last 30 days. To run the requests, the Graph SDK session needs the AuditLog.Read.All permission and the signed-in user must hold one of the roles specified in the documentation like Reports Reader or Security Administrator.
User Events Summary
The userEventsSummary resource provides a list of events associated with user activities to register an authentication method or reset using SSPR. The method supports several different filters to allow events to be found based on user principal name, display name, success or failure, and authentication method. Here’s an example which looks for every matching event that’s available. Only one event is available in my tenant, where a user set up SMS as a secondary authentication method. This isn’t a strong authentication method and the user deserves to be nagged to use a stronger method, like the Microsoft authenticator app.
$Uri = 'https://graph.microsoft.com/beta/reports/authenticationMethods/userEventsSummary'
[array]$Data = Invoke-MgGraphRequest -Uri $Uri -Method GET -OutputType PSObject | Select-Object -ExpandProperty Value

$Data

id                : d93bdb0a-8cb7-4303-a8ef-48c488997c38
feature           : registration
userPrincipalName : John.Jameson@office365itpros.com
userDisplayName   : John Jameson
isSuccess         : True
authMethod        : sms
failureReason     :
eventDateTime     : 01/08/2025 12:35:30
User Registration Method Summary
The userRegistrationMethodSummary resource is a summary of the number of users registered for each authentication method. To access the summary, run the request as follows:
$Uri = "https://graph.microsoft.com/beta/reports/authenticationMethods/usersRegisteredByMethod(includedUserTypes='all',includedUserRoles='all')"
[array]$data = Invoke-MgGraphRequest -Uri $Uri -Method Get -OutputType PSObject | Select-Object -ExpandProperty userRegistrationMethodCounts

$Data

authenticationMethod               userCount
--------------------               ---------
password                                   0
email                                     11
mobilePhone                              126
alternateMobilePhone                       0
officePhone                                0
microsoftAuthenticatorPush               115
softwareOneTimePasscode                   15
hardwareOneTimePasscode                    0
microsoftAuthenticatorPasswordless         2
windowsHelloForBusiness                    1
fido2SecurityKey                           0
temporaryAccessPass                        0
securityQuestion                           0
macOsSecureEnclaveKey                      0
passKeyDeviceBound                         1
passKeyDeviceBoundAuthenticator            1
passKeyDeviceBoundWindowsHello             0
externalAuthMethod                         0
User MFA Sign-In Summary
The userMfaSignInSummary list method is the one that interested me the most. Essentially, the report gives a daily sign-in report for 30 days detailing the total sign-ins and the number for MFA and single-factor sign-ins. A record looks like this:
id                  : f7c6b675-e664-44dc-9523-947501b0fac6
createdDateTime     : 15/07/2025 00:00:00
totalSignIns        : 59
singleFactorSignIns : 17
multiFactorSignIns  : 42
I used the report to interrogate the sign-in audit log for days when single-factor sign-ins occurred to discover which accounts and apps are involved. The command used to find single-factor sign-ins for a day looks like this (the beta cmdlet is used because the V1.0 cmdlet doesn’t currently return the authentication requirement):
[array]$SignInRecords = Get-MgBetaAuditLogSignIn -Filter "createdDateTime gt $StartDate and createdDateTime lt $EndDate and AuthenticationRequirement eq 'singleFactorAuthentication' and status/errorCode eq 0" -Sort "createdDateTime DESC"
Figure 1 shows the report output. The idea is that administrators can use this information to figure out why single-factor authentications still happen. Most of the accounts highlighted by the report are guest accounts that don’t use MFA because I disabled the conditional access policy to enforce MFA for guest accounts.
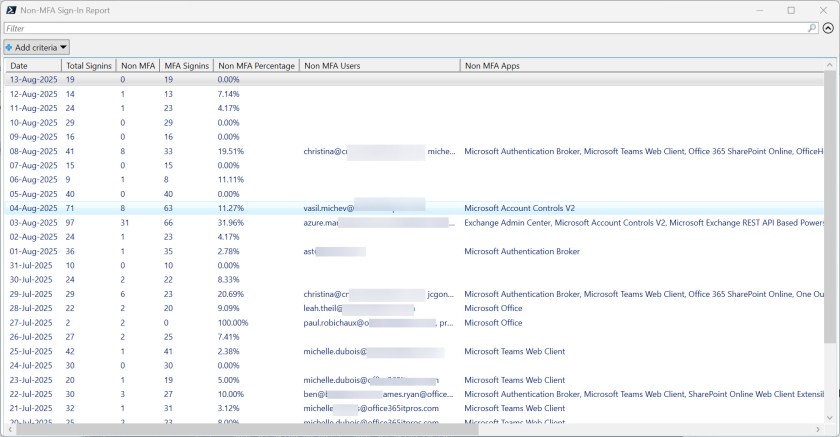
You can download the full script from the Office 365 for IT Pros GitHub repository.
Looking for Usage
Any API is only useful if it has a purpose. Hopefully, these notes spark some ideas for how to use the report data in campaigns to improve multifactor adoption within Microsoft 365 tenants. At least, that’s the general idea…
Insight like this doesn’t come easily. You’ve got to know the technology and understand how to look behind the scenes. Benefit from the knowledge and experience of the Office 365 for IT Pros team by subscribing to the best eBook covering Office 365 and the wider Microsoft 365 ecosystem.
Removing Obsolete Mobile Device Partnerships from Exchange Online
Cleaning Up Obsolete Mobile Devices is Always a Good Idea
After publishing the article about the removal of mobile device management settings for users from OWA and the new Outlook, I was contacted by several people to ask should they clean up the obsolete devices that exist for so many mailboxes.
Generally speaking, I am all for removing clutter. Cleaning out unwanted data is a good thing. Just ask any of the Copilot tenants who struggle with digital debris (old, unwanted, inaccurate, and misleading information stored in Microsoft 365) that corrupt Copilot responses to user prompts. Removing some old device partnerships is not in the same category as cleaning up a bunch of old files from SharePoint Online and OneDrive for Business, but the same principle applies.
Mobile Device Partnerships with Mailboxes
When a mobile device begins to synchronize information from Exchange Online, it creates a partnership between the device and the target mailbox. The Get-MobileDevice cmdlet lists active partnerships. If you run the cmdlet without any parameters, it returns all the partnerships in the tenant. That’s not a great idea in anything other than a demo tenant, but I’ve seen people advising others that this is the way to go.
It’s better to run Get-MobileDevice to check the partnerships for a mailbox (which is what happens to populate the set of devices shown by OWA and the new Outlook). This is the command I use:
[array]$Devices = Get-MobileDevice -Mailbox James.Ryan@office365itpros.com
The information returned by the cmdlet reveals a lot about the device. Here’s a snippet:
FriendlyName            :
DeviceId                : C05A87A5DE4F468DA2399763634D4686
DeviceImei              :
DeviceMobileOperator    :
DeviceOS                : iOS 18.6 22G86
DeviceOSLanguage        :
DeviceTelephoneNumber   :
DeviceType              : Outlook
DeviceUserAgent         : Outlook-iOS/2.0
DeviceModel             : Outlook for iOS and Android
FirstSyncTime           : 14/12/2022 17:01:58
UserDisplayName         : Tony Redmond
DeviceAccessState       : Allowed
DeviceAccessStateReason : DeviceRule
DeviceAccessControlRule : Outlook for iOS and Android (DeviceModel)
ClientVersion           : 1.0
ClientType              : Outlook
Some properties don’t have values. While I can’t be certain why this is so, it’s likely because of the changing focus within Microsoft to device management. Intune is the preferred solution now, so Exchange mobile device management is limited to what’s needed for Exchange and devices to synchronize. However, there’s enough here to confirm that it is an iOS device running Outlook for iOS and that the user first connected the device to their mailbox in December 2022.
Getting Device Statistics
What’s missing from the partnership information is any indication of activity. That information comes from the Get-ExoMobileDeviceStatistics cmdlet (use Get-MobileDeviceStatistics for on-premises mailboxes). Device statistics show the last time the device synchronized with the mailbox:
LastPolicyUpdateTime               : 15/08/2025 02:52:24
LastSuccessSync                    : 15/08/2025 10:32:27
LastSyncAttemptTime                : 15/08/2025 10:32:27
MailboxLogReport                   :
NumberOfFoldersSynced              : 0
Status                             : DeviceOk
Again, there are many properties that are not populated or don’t contain useful information. For instance, the Status property reflects the state of the device as known to Exchange the last time synchronization occurred. The device could be lost, stolen, or wrecked. The important property is LastSuccessSync, the timestamp for the last successful synchronization. It’s reasonable to use the timestamp as an indicator of activity. If a device hasn’t synchronized in a year (or less), it’s likely an obsolete mobile device. In many cases, people replace devices and never remove the old device, leaving an accumulation of obsolete devices to build up.
Cleaning up the Mess with PowerShell
When users don’t clean up, it’s up to administrators to swing into action. Some PowerShell will do the trick. To illustrate the point, I wrote a script (downloadable from the Office 365 for IT Pros GitHub repository) that:
- Finds all user mailboxes.
- Checks each mailbox for device partnerships.
- Checks each device for the last synchronization time.
- If the device hasn’t synchronized in over a year (customizable threshold), note it as an obsolete device.
- Report what’s been found and ask the administrator if the obsolete devices should be removed. As you can see from Figure 1, some of the devices haven’t synchronized in years. The entry for Outlook for Mac is there because that client uses Microsoft synchronization technology to fetch information from Exchange Online, just like Outlook for iOS and Android do.
- Clean up the old devices with the Remove-MobileDevice cmdlet.

The script isn’t very complicated and took less than an hour to write in front of the TV (my excuse for any errors). Feel free to amend the code to suit your purposes. The script should run with on-premises Exchange if you replace Get-ExoMailbox with Get-Mailbox and Get-ExoMobileDeviceStatistics with Get-MobileDeviceStatistics.
Need some assistance to write and manage PowerShell scripts for Microsoft 365? Get a copy of the Automating Microsoft 365 with PowerShell eBook, available standalone or as part of the Office 365 for IT Pros eBook bundle.
Unverified Sender Messages Highlighted By Outlook Mobile
Unverified Sender Visual Marker to Warn of Potential Problems
It’s easy to forget details of the reports about new features that appear in the Microsoft 365 message center, especially when a delay occurs between the expected availability date and when the feature appears in plain sight. This is the case with MC1112452 (10 July 2025, Microsoft 365 roadmap item 491471), which reports the arrival of a new visual indicator in Outlook mobile to highlight messages from unverified senders. The indicator doesn’t mean that the message contains spam or malware; just that its properties are unexpected in a way that might be problematic.
I knew about the feature and had read that mid-July 2025 was the scheduled rollout date. Alas, after that I forgot about unverified visual indicators until a bunch of messages were tagged on August 18 (Figure 1).

MC1112452 says that the new visual warning “aligns with existing functionality in Outlook for desktop and web, bringing a consistent experience across platforms.” Later, the text adds “This feature is available by default when the unverified signal is received by the service.” The support documentation notes “If the message is suspicious but isn’t deemed malicious, the sender will be marked as unverified to notify the receiver that the sender may not be who they appear to be.”
No administrative controls exist to enable or disable the marking of unverified senders. This seems like a pity because external mail tagging, which is another marking applied to inbound messages by Exchange Online, can be turned off or on. The same is true for the first contact safety tip, which can be disabled through the anti-phishing policy actions in the Microsoft Defender portal.
Message Headers and Visual Markers
After examining the headers of several unverified messages, it seems like if the Exchange Online transport service determines that an inbound message can’t be fully verified in terms of the normal tests it applies like SPF, DKIM, and DMARC, the service marks the message as unverified, and users see the warning alongside the message in the message list.
For example, Figure 2 (generated by the Message Header Analyzer) shows that Exchange was unable to check the DKIM status for a message, perhaps because DKIM configuration error in DNS or the email is routed through a third-party mail hygiene system like Mimecast that must be configured in a certain manner for DKIM to work properly.

Same Warnings in other Outlook Clients
As noted above, the functionality now implemented in Outlook mobile matches what users see in Outlook classic, OWA, and the new Outlook for Windows (adjusted to match the UX of the client).

The interesting thing is that Outlook only displays the unverified sender warning in the message list for the first message in a thread. If you reply to an unverified sender, the warning is still present, but only for that message. Any subsequent messages received from that sender are not highlighted, even if the same issues persist with DKIM etc. Perhaps the logic here is that if you engage in an email conversation with a sender, that person is verified by your action and Outlook no longer considers them to be unverified. It’s the best theory that I have to explain what I see happen.
Most Unverified Senders are OK, and Then There’s a Bad One
Marking email coming from unverified senders is a good idea. In many cases, a perfectly simple reason exists for why the verification checks fail and the sending system can quickly adjust their configuration to address the problem. In others, a user could receive a message that’s an attempt to impersonate someone else. Hopefully, messages from attackers will be intercepted by Exchange Online Protection, Microsoft Defender for Office 365, or whatever anti-malware service is deployed, but it’s nice to have another check. Just in case.
Insight like this doesn’t come easily. You’ve got to know the technology and understand how to look behind the scenes. Benefit from the knowledge and experience of the Office 365 for IT Pros team by subscribing to the best eBook covering Office 365 and the wider Microsoft 365 ecosystem.
Microsoft Defender for Office 365, Shared Mailboxes, and Microsoft 365 Groups
MDO Licensing Required for Shared Mailboxes but Not for Groups
Some Microsoft representatives expressed disappointment after the publication of the article about unexpected costs to license shared mailboxes for Microsoft Defender for Office 365 (MDO). They felt that I didn’t do MDO justice. Let me be clear: MDO covers a wide range of functionality to protect user communications (not just email, but also Teams and the Office apps) from threat. MDO Plan 2 also includes some neat SOC and attack simulation tools. Overall, MDO Plan 2 is a strong package that adds a lot of value to the Office 365 E5 and Microsoft 365 E5 SKUs.
The point of the article was not to discuss MDO capabilities. Instead, it turned a light on the unexpected licensing consequences of MDO becoming active within a tenant. Once MDO protects tenant communications, all user mailboxes and all shared mailboxes must be licensed for MDO Plan 2. That’s an unfair and unexpected consequence of upgrading a tenant from E3 to E5 licenses, something that Microsoft wants customers to do.
Indeed, at the analyst call following quarterly Microsoft results, CFO Amy Hood invariably mentions the success Microsoft has in driving higher Average Revenue Per User (ARPU) due to E5 upgrades and add-on licenses. In the Q4 FY25 call, she noted “ARPU growth again driven by E5 and M365 Copilot.” This kind of management commentary must have an effect on those who make licensing decisions for products.
Microsoft pointed out to me that they have not changed their guidance or documentation on this topic. This is accurate. The same guidance has been in place for several years. The MDO service description covers licensing, and anyone who takes the time to peruse that text will discover just how many MDO licenses their tenant needs. In terms of unexpected licensing consequences, if you don’t read what Microsoft says about a product, you won’t understand the rules of the game and surprises are almost inevitable.
Consequences of Previous Microsoft Decisions
But here’s the thing. The situation around MDO licensing for shared mailboxes is the consequence of two Microsoft decisions taken in the past. The first is that when Exchange Server launched shared mailboxes, Exchange created a user account for each shared mailbox. In an on-premises environment, the extra user accounts made no difference to licensing costs.
Entra ID and Exchange Online took the on-premises model and applied it to the cloud. I’ve often been critical of Entra ID’s inability to identify utility accounts used for purposes like shared and room mailboxes or break glass accounts. Treating these accounts like regular user accounts is nonsense. Failing to disable the accounts created for utility Exchange objects is silly, and allowing people to sign into those accounts (which creates a whole new can of licensing worms) isn’t much better. Exchange Online uses accounts for shared mailboxes like it does on-premises, and that’s the root of the problem created for MDO licensing.
Shared Mailboxes and Group Mailboxes Can Receive and Send Mail
Microsoft says that they require MDO licenses for shared mailboxes because the mailboxes can send and receive email and therefore benefit from the MDO service. Well, the group mailboxes created for Microsoft 365 groups can also send and receive email and those mailboxes support many (but not all) of the features found in shared mailboxes. The fact is that the current implementation of mail-based Microsoft 365 groups (Figure 1) operate very much like shared mailboxes when it comes to sending and receiving mail. Both types of mailbox receive the same level of protection from MDO.

Overall, Microsoft 365 groups are used far more extensively than shared mailboxes, mainly to support Teams, but I can’t find a single reference to an MDO licensing requirement for Microsoft 365 groups in the MDO service description. The reason why MDO ignores licensing for Microsoft 365 groups is simple: Microsoft 365 groups don’t have any form of Entra ID account. They exist as an Entra ID group that just happens to be connected to a set of resources like a plan, team, SharePoint site and group mailbox.
It’s possible to assign licenses to a Microsoft 365 group, but only for the purpose of group-based license assignments managed through the Microsoft 365 admin center (you can also manage group-based license assignments with PowerShell). Because Microsoft 365 groups don’t have user accounts, they don’t follow the normal licensing regime, so MDO cannot be licensed.
Drop the Need for MDO to License Shared Mailboxes
Microsoft has long recommended that customers should replace distribution lists and shared mailboxes by Microsoft 365 groups. Indeed, a great deal of engineering effort went into the addition of capabilities like delegated send for Microsoft 365 groups. After 2019, Microsoft dedicated less attention to the email side of Microsoft 365 groups because of the emphasis on Teams, but the debate about whether to use Groups or shared mailboxes remains active.
Today, far fewer Microsoft 365 groups support email-based communication than those used with Teams. However, the fact remains that a dichotomy exists between how MDO treats the licensing of shared mailboxes and Microsoft 365 groups.
A case could be argued that email-based Microsoft 365 Groups operate by distributing copies of email to group members, and those user accounts should have MDO licenses. That’s true, but group mailboxes receive email processed by MDO, just like shared mailboxes do, so shouldn’t the same rule apply? To solve the conundrum, Microsoft should simplify the situation by dropping the need for MDO licenses for shared mailboxes. I suspect that internal budgets, revenue recognition, and a myriad of other issues will stop this happening, but that’s what should be done.
Support the work of the Office 365 for IT Pros team by subscribing to the Office 365 for IT Pros eBook. Your support pays for the time we need to track, analyze, and document the changing world of Microsoft 365 and Office 365. Only humans contribute to our work!
Mobile Device Management Options Disappear from OWA and the New Outlook
Microsoft to Remove Mobile Device Management Options
Message Center Notification MC1130607 (7 Aug 2025) announces that Microsoft plans to remove the Mobile Devices section (Figure 1) from the Settings options available in OWA and New Outlook for Windows. Removal will commence starting on September 9, 2025, and is due to be complete in all tenants by October 9, 2025.

According to Microsoft, the change “simplifies device management and aligns with modern tools that offer more robust controls for administrators and end users.” From a user perspective, the biggest impact is that they will no longer be able to remove mobile devices linked to their account. I don’t think many users are very good at cleaning up old devices, so this aspect might not be noticed.
I’m in the category of people who don’t clean up old devices. Part of the problem is that the information presented in OWA settings isn’t very helpful because it simply lists “Outlook” as the device name. Including the device O/S, which is available for a device (Figure 2), would make it easier to identify unused devices.

In any case, this doesn’t matter any more because the options to manage mobile devices will disappear from OWA and the New Outlook soon. What people might miss more is the ability to wipe lost or stolen devices.
Other Options for Users to Disable or Wipe Mobile Devices
Microsoft points out that devices can still be managed through the device list available in the My Account portal (Figure 3). The portal lists all devices that are registered to the user and only allows users to disable a mobile device. This means that the device is blocked from accessing any tenant resources. It is not a device wipe and any sensitive information present on the device remains accessible if someone can get past whatever security methods are used to sign into the device.

Microsoft also points out that administrators can initiate a remote wipe for a registered device through Intune Endpoint Manager. The issue here is that someone who’s lost a device that contains sensitive data often wants an immediate wipe instead of waiting for an administrator to act.
Options also exist for a device owner to use vendor tools to remote wipe a device (iOS or Android).
Mobile Device Management in EAC
Microsoft doesn’t say anything about the mobile device management options in the Exchange admin center (EAC) or the PowerShell cmdlets that underpin mobile device management in both EAC and OWA (here’s an example of using the cmdlets to create a report of registered devices).
EAC has a mobile devices section, but that only deals with access and mailbox policies. Management of devices for a specific user is done by selecting the mailbox and choosing the manage mobile device link from mailbox properties (Figure 4). Care must be taken to select the correct target device before performing a remote wipe as it’s all too easy to select an old or inactive device.

A Justified Change
I’m unconvinced that this change simplifies device management, but I’m sure that Microsoft telemetry probably tells a tale of poor usage of mobile device management by users through OWA and the new Outlook. If that is the case, it’s reasonable for Microsoft to reduce their engineering and support costs by removing these options from the clients and push the responsibility for remote wipes to administrators. The fact that O/S vendors have options to disable and wipe devices gives additional justification for the change.
What’s clear is that tenants should give users clear and precise instructions about what they should do to secure sensitive information should a mobile device be lost or stolen. If you have this kind of advice, it’s time to update it to reflect the new reality.
So much change, all the time. It’s a challenge to stay abreast of all the updates Microsoft makes across the Microsoft 365 ecosystem. Subscribe to the Office 365 for IT Pros eBook to receive insights updated monthly into what happens within Microsoft 365, why it happens, and what new features and capabilities mean for your tenant.
Sensitivity Labels with User-Defined Permissions Gain SharePoint Support
User-Defined Permissions Support in SharePoint Opens Up Other Solutions
I wonder how many people bother to check pages like “What’s New in Microsoft Purview” on a regular basis. Well, the August 2025 update for sensitivity labels contains the very good news that Office and PDF files stored in SharePoint Online and OneDrive for Business now support sensitivity labels with user-defined permissions (UDP). This capability was originally announced in a Microsoft Technical Community post in August 2023. Following development, Microsoft launched the update in MC1013467 (21 February 2025) and said then that they expected the feature to be available in March 2025.
In this context, support means that the content of files protected by UDP labels can be indexed. And because the content is indexed, it is searchable and can be used by any solution that depends on search, like eDiscovery and Data Loss Prevention. This closes a gap that has existed since the introduction of sensitivity labels about ten years ago.
Associated with the change, I hear that Microsoft is working to update the browser versions of the Office apps to support the application of UDP labels. Today, only the desktop Office apps support UDP labels. No date is available for when the browser Office apps will support UDP labels, but it’s a work in progress.
Two Types of Sensitivity Label Permissions
Two forms of permission assignment exist for sensitivity labels. The most common are labels that have predefined permissions (usage rights) set by an administrator. These permissions are the same for every file or email that the label is assigned to, meaning that it is easy for workloads like SharePoint Online to extract, understand, and apply those permissions.
The second type is user-defined permissions. As the name implies, instead of an administrator determining the rights assigned by a label, the user who applies a label to a file decides what rights they grant to other users to access the item. Obviously, because different permissions exist for a label, it’s more complicated for a workload to extract and protect items based on the permissions for individual items. For years, SharePoint Online and OneDrive for Business avoided the issue by simply not supporting sensitivity labels with UDPs. This has now changed, and it’s a very welcome advance in the state of the art.
Assigning User-Defined Permissions
When the author of a file or email applies a UDP label to an item, they must define the set of permissions granted to other users over that item. The UX implementation includes a set of predefined permission levels that cover the most common use cases (Figure 1): Viewer, Restricted Editor, Editor, and Owner. Item owners can quickly assign these levels to people or groups, or you can use the More Options section to customize your permissions for specific needs. The implementation also includes a “people picker” to search for and assign permission to select people or groups from the same organization or external domains.
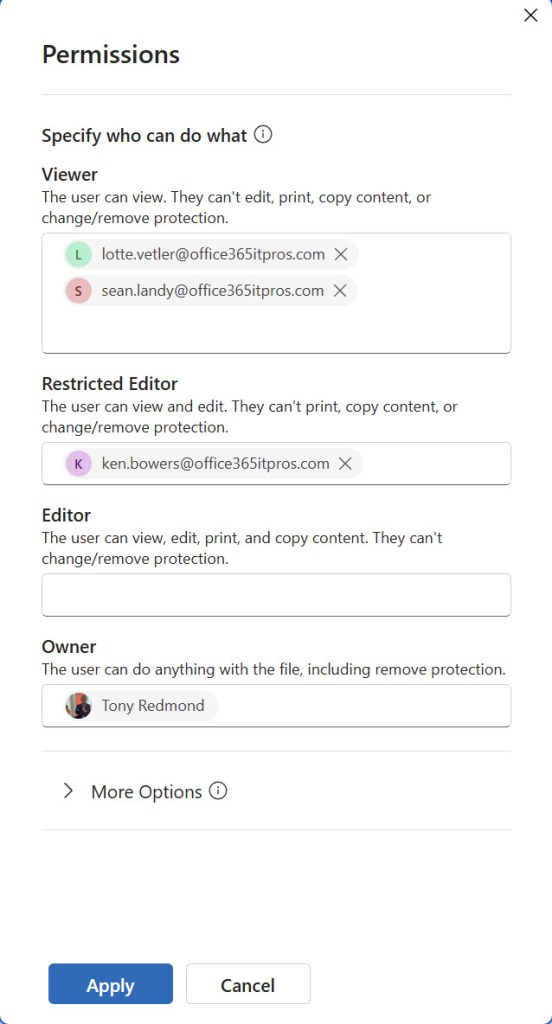
From an implementation perspective, it’s important to understand that the SharePoint support for UDPs only extends to newly-labeled or edited files. In other words, SharePoint Online does not apply retrospective support for files protected by UDP sensitivity labels. Instead, SharePoint Online processes files with UDP labels when a UDP label is assigned to the file or when a file that already has a UDP label is edited. Given the size of the Microsoft 365 infrastructure and the number of files with UDP labels that exist inside tenants, it’s logical that Microsoft should choose to process files on an on-demand basis.
Closing a Gap
Adding support in SharePoint Online for UDP sensitivity labels is a good thing. It closes a large and obvious gap. Tenants that have avoided UDP labels in the past because of the lack of SharePoint support can now revisit that decision.
Learn about managing SharePoint Online and the rest of Microsoft 365 by subscribing to the Office 365 for IT Pros eBook. Use our experience to understand what’s important and how best to protect your tenant.
Purview Priority Cleanup Expands to SharePoint and OneDrive
Priority Cleanup Can Remove Items Under Hold
Message Center notification MC1115304 (14 July 2025, Microsoft 365 roadmap item 496151) trumpets the “Introduction of secure workflow to bypass retention/legal holds on OneDrive and SharePoint.” It is the logical follow-on for the original preview of Purview Priority Cleanup that was launched earlier this year that was limited to removing mailbox items. Microsoft says that the public preview of the new capability will rollout between mid- and end-August 2025 with general availability due at the end of September 2025. Priority Cleanup is a premium solution, so E5 licenses are required.
Interestingly, Microsoft emphasizes that tenants can use priority cleanup to remove Copilot-related artifacts such as Teams recordings and transcripts independently of other content stored in users’ OneDrive for Business accounts. It’s always been possible to create an auto-label retention policy to target Teams recordings to make sure that these files don’t hang around too long. The difference is that a priority cleanup permanently removes the files even when a retention policy is in place to retain them for a set period.
Cleanups Aren’t Fast
When I reviewed Priority Cleanup in March 2025, I reported how Microsoft built the solution from several existing components and, while this approach is effective, it means that a priority cleanup can be quite slow to find, process, approve, and finally remove items. Don’t expect a cleanup to be a speedy operation, especially in large tenants, especially when hundreds or thousands of items are identified for checking.

The big selling point for Priority Cleanup is its ability to ignore retention holds. Let’s say that a tenant decides to remove all items associated with a specific project. The scope for the search might be a set of SharePoint Online sites and the OneDrive for Business accounts and mailboxes belonging to project members. A general retention policy of five years might apply to email and seven years to SharePoint and OneDrive. Priority Cleanup searches the target locations to find matching items, presents them for approval by a different administrator to the person who created the cleanup policy, and actions the decisions of that approver. If the decision is to remove items, Purview permanently erases the items from their host locations, ignoring retention policies, retention labels (including those that apply preservation lock), and eDiscovery or litigation holds. The documentation covers other details, including how items in eDiscovery review sets are processed and when a separate approval by a retention administrator is needed.
Who Needs to Ignore Retention?
The question is who needs to ignore the holds imposed by Purview Lifecycle management, Exchange MRM, or eDiscovery? It’s often true that email needs to be removed from mailboxes because some malware got through or someone posted something that they shouldn’t have. The latter case can be handled by Exchange’s much-improved message recall facility, at least within the tenant boundary. All bets are off when email escapes from the tenant. Removing malware is more problematic since the demise of the Search-Mailbox cmdlet. A compliance search purge action or eDiscovery purge will move the offending messages out of sight from user eyes, but the messages remain in mailboxes until any retention holds expire. Quite how much extra value is gained from removing the items before retention expires is debatable.
Things are different for SharePoint Online and OneDrive for Business. Purge actions don’t work for files and there’s never been an equivalent of a Search-Mailbox cmdlet for these locations. The two-phase recycle bin arrangement followed by retention (if needed) in the preservation hold library is more complex, especially when multiple versions of files are retained. Given the additional factors, it’s unsurprising that Microsoft has taken longer to create priority cleanup for SharePoint and OneDrive. However, the same question arises: who needs this feature?
Some Tenants Need to Remove Material
Answering myself, Microsoft must have a body of evidence from customers attesting to the need for priority cleanup. And I guess that if the process is managed properly with due regard to the need to keep business records and whatever other material is mandated by law, then priority cleanup has its place. It will be interesting to hear how tenants use this capability.
Insight like this doesn’t come easily. You’ve got to know the technology and understand how to look behind the scenes. Benefit from the knowledge and experience of the Office 365 for IT Pros team by subscribing to the best eBook covering Office 365 and the wider Microsoft 365 ecosystem.
Maintaining a Microsoft 365 Retention Policy with PowerShell
Problems with the Connect-IPPSSession Cmdlet in Azure Automation
Earlier this week, I discussed how to create a Microsoft 365 retention policy for shared mailboxes. In that article, I noted that additional processing would be needed to keep the retention policy updated as new shared mailboxes are created, mailboxes deleted, and even the conversion of user mailboxes to shared mailboxes and vice versa. This is the kind of scheduled background processing that is well suited to Azure Automation.
At least, that’s what I thought when I started to write the PowerShell script to do the work. The code to run interactively is simple to write. All the problems arise when making the code work in an Azure Automation runbook. The root problem is that the cmdlets in the security and compliance module (the ones accessed by running the Connect-IPPSSession cmdlet) don’t support managed identities like the main Exchange Online management modules does.
Support for managed identities makes running Exchange Online management cmdlets in an Azure Automation runbook a straightforward exercise. Care must be taken to ensure that the service principal for the automation account has the Exchange administrator role and is assigned the Manage Exchange as Application permission. After that, the connection with a managed identity works without a flaw.
The problem is that the developers who maintain the Security and Compliance module haven’t done the work to support managed identities. Microsoft publishes guidance for app-only access for unattended scripts, but the information doesn’t address the environment where Azure Automation runbooks execute. At least, I’ve had zero luck with any of Microsoft’s recommendations.
Back to PowerShell Credentials
Much to my disgust, I had to revert to account credentials passed in a PowerShell credential object. Not only does this seem like the kind of thing we did ten years ago, it means that you can’t use an account that is enabled for multifactor authentication. The only saving grace is that the credential object can be saved in the automation account and doesn’t need to be hardcoded in the script. My doubts were somewhat assuaged by using a long and complex password (Figure 1).
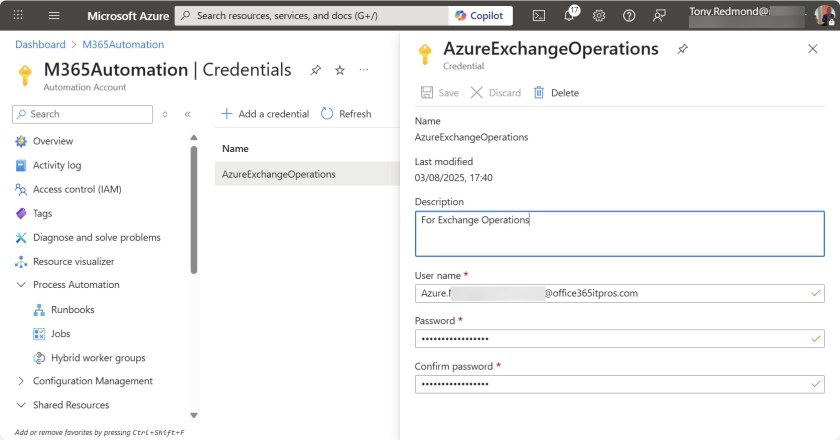
The stored credential can be retrieved in a runbook using the Get-AutomationPSCredential cmdlet and passed to the Connect-IPPSSession cmdlet with the Credential parameter. Here’s the code from the script that checks if the code is running interactively or not. You can see that Connect-ExchangeOnline and Connect-IPPSSession cmdlets run because access is needed to fetch details of shared mailboxes and to update the retention policy.
If ([Environment]::UserInteractive) {
    # We're running interactively...
    Write-Host "Script running interactively... connecting to Exchange Online PowerShell" -ForegroundColor Yellow
    [array]$Modules = Get-Module | Select-Object -ExpandProperty Name
    If ("ExchangeOnlineManagement" -Notin $Modules) {
        Write-Output "Connecting to Exchange Online..."
        Connect-ExchangeOnline -showBanner:$false
    }
    Write-Output "Connecting to Security & Compliance Center PowerShell..."
    Connect-IPPSSession -ShowBanner:$false
} Else {
    # We're not, so likely in Azure Automation
    Write-Output "Running the update retention policy for Microsoft 365 shared mailboxes in Azure Automation"
    # Fetch the account credentials to use
    $O365Cred = Get-AutomationPSCredential -Name "AzureExchangeOperations"
    Connect-ExchangeOnline -Credential $O365Cred -DisableWAM
    Connect-IPPSSession -Credential $O365Cred
}
The Need to Disable Windows Account Manager
The Connect-ExchangeOnline command uses the DIsableWAM parameter to disable Windows Account Manager. WAM is enabled by default from Exchange Online Management V3.7 onward and must be disabled in environments where normal interactive authentication is not possible. This fact is not widely known. WAM can also be used with the Microsoft Graph PowerShell SDK, but it’s not the default.
If a script only needs to run Connect-IPPSSession without first connecting to Exchange Online in a non-interactive environment, the call to Connect-IPPSSession should include the DisableWAM parameter. Of course, if you only need to connect to Exchange Online, use a managed identity.
Updating the Retention Policy
After solving the connection issue, the rest of the code was simple enough:
- Find the current set of shared mailboxes with Get-ExoMailbox.
- Find the set of shared mailboxes covered by the retention policy with the Get-RetentionCompliancePolicy cmdlet. It’s important to include the DistributionDetail parameter to force the population of targeted locations.
- Add shared mailboxes that aren’t covered by the retention policy.
- Remove any locations that aren’t shared mailboxes (deleted mailboxes or shared mailboxes converted to be user mailboxes).
- Update the retention policy with the Set-RetentionCompliancePolicy cmdlet.
- Remove Exchange MRM retention policies from the new shared mailboxes.
You can download the complete script from the Office 365 for IT Pros repository. Figure 2 shows a successful runbook in Azure Automation. The only thing to do is to add the runbook to an Azure Automation schedule so that it runs at an appropriate interval. Weekly should be sufficient.

Consistency Would be Nice
It would be nice if all the Microsoft 365 PowerShell modules supported managed identities and Azure automation in a constant and predictable manner. The priorities of different engineering groups means that this is not the current case. We can but hope that the situation will improve over time.
Need some assistance to write and manage PowerShell scripts for Microsoft 365? Get a copy of the Automating Microsoft 365 with PowerShell eBook, available standalone or as part of the Office 365 for IT Pros eBook bundle.
Unexpected Microsoft Defender for Office 365 License Requirement for Shared Mailboxes
If a Tenant Has Microsoft Defender for Office 365, Its Shared Mailboxes Need Licenses
When discussing the need to license Exchange Online shared mailboxes, the usual answer is that Exchange Online Plan 2 licenses are needed when shared mailboxes have an extended quota (100 GB instead of 50 GB), an archive mailbox, or are on litigation hold. In other areas of functionality, like Microsoft 365 retention policies, Microsoft makes it clear that no licenses are needed unless premium features like auto-label policies or adaptive scopes are used.
The usual line taken by Microsoft for licensing shared mailboxes is anchored on the features available in Exchange Server. For example, basic retention processing doesn’t require licenses because Exchange Server includes similar retention policies. But Exchange Server doesn’t support adaptive scopes, so use of that feature creates the need for licenses.
Microsoft Defender for Office 365 Plan 1 and Plan 2
This brings me neatly to the question of licensing shared mailboxes for Microsoft 365 Defender for Office 365 (MDO), an advanced version of Exchange Online Protection (EOP) that offers significantly better protection against threats communicated in email. MDO is available in two plans: MDO Plan 1 for small to medium businesses and included in SKUs like Microsoft 365 Business Premium, and MDO Plan 2, which is targeted at enterprises but can be bought and deployed by SME tenants.
From an enterprise perspective, the thing to remember is that MDO Plan 2 is only included in E5 SKUs like Microsoft 365 E5 (see this chart for more information). Figure 1 shows the Threat Analytics feature licensed by MDO Plan 2.

The MDO service description says that shared mailboxes in MDO Plan 1 tenants must have licenses if the mailboxes “benefit from Defender for Office 365 protections.” No further guidance is given to define how shared mailboxes benefit from MDO but given that MDO includes features like Safe Attachments and Safe Links, you could say that any shared mailbox that receives email from external senders benefits from malware scanning and threat protection performed by MDO. And because any shared mailbox can send and receive email, Microsoft considers that all shared mailboxes need MDO licenses.
The situation is simpler for enterprise tenants because the guidance here is that MDO licenses are required for “All shared mailboxes on the tenant.” In effect, this means that any Microsoft 365 tenant that implements the features licensed by Microsoft Defender for Office 365 Plan 2 (see the features description) because they have acquired some E5 licenses must license all shared mailboxes for MDO. In fact, the text of the Microsoft Defender for Office 365 service description goes on to say that user accounts that don’t have E5 licenses must also be licensed for MDO. The text says that licenses must be acquired for “All Exchange Online users on the tenant. This is because Plan 2 features and capabilities protect all users in the tenant.”
The Sudden Realization that Shared Licenses Need MDO Licenses
I’m not sure that many tenants with MDO understand the need to license shared mailboxes. The MDO Plan 2 license costs $5/month with a 12-month commitment, or $60 per shared mailbox annually. Some organizations make heavy use of shared mailboxes, including as a method to preserve mailboxes for ex-employees (inactive mailboxes are the recommended approach). A thousand shared mailboxes will therefore rack up an unexpected $60,000 bill, and that amount doesn’t include any additional licenses that might be needed to bring non-E5 mailboxes into compliance.
I haven’t heard of any Microsoft campaign to make tenants aware of how MDO licensing works for shared mailboxes, nor is there a code check in Outlook to detect and advise when MDO licenses are necessary. The Exchange Admin Center (EAC) includes an option to switch a user mailbox to a shared mailbox, and that option doesn’t warn administrators about potential licensing requirements.
To be honest, I was unaware of the need until I read the service description after being asked if shared mailboxes needed MDO licenses because a customer had been unexpectedly told that the licenses were required. I suspect that many others are in the same state of blissful licensing ignorance.
Unexpected Painful Costs
Any unexpected cost is bad news. Suddenly discovering that a tenant has a batch of unlicensed shared mailboxes is firmly in that category. Discovering that some user accounts that don’t have E5 licenses might need MDO licenses is also painful. There’s nothing good to report here.


