

Category: Microsoft
Category Archives: Microsoft
MDTI Standalone Portal Retirement and Transition to Defender XDR
On June 30th, 2024, the Microsoft Defender Threat Intelligence (MDTI) standalone portal will reach end-of-life and the Microsoft Defender XDR portal will become MDTI’s exclusive home for both standard and premium users. In this blog, we’ll guide customers using the standalone portal that wish to continue using MDTI in Defender XDR through the simple migration process. We’ll also help customers, and their teams, prepare to take advantage of the benefits MDTI brings to Microsoft’s XDR, SIEM, and AI solutions.
What is happening to the MDTI standalone portal?
On June 30th, 2024, the MDTI standalone portal at ti.defender.microsoft.com will be decommissioned. However, customers can seamlessly use the same features and content from MDTI’s permanent home in the Microsoft Defender XDR portal in both free and premium capacities. All existing MDTI licenses will carry over to the new portal. Customers can also access this information via natural language prompts by purchasing Copilot for Security.
How do I use MDTI within the Defender XDR portal?
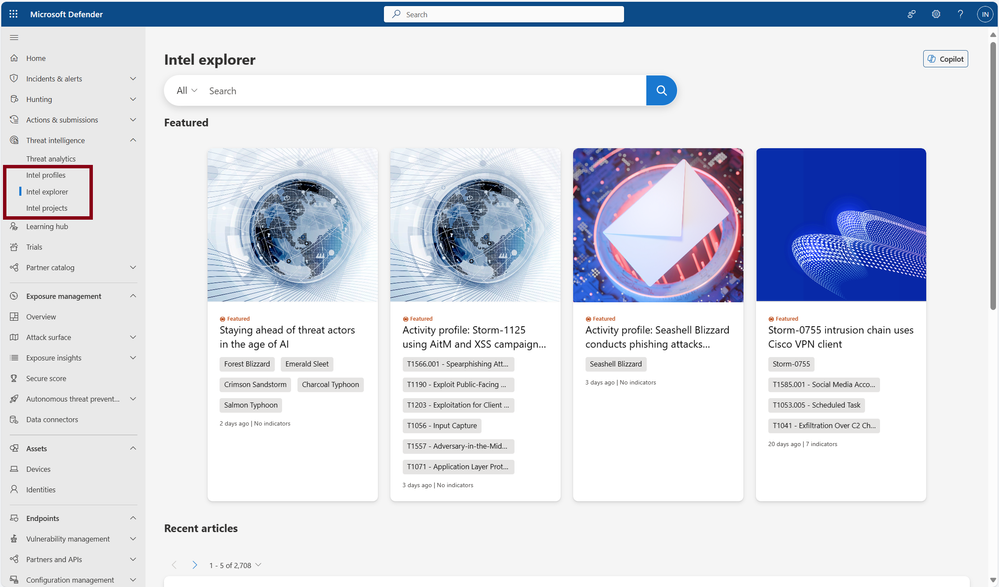
Within Microsoft Defender XDR, users will see the familiar MDTI pages under the “Threat Intelligence” blade in the left navigation menu:
Microsoft Defender Threat Intelligence resources are accessible under the Threat Intelligence blade within the left navigation menu, on the “Intel profiles”, “Intel explorer”, and “Intel projects” tabs.
On the “Intel explorer” tab within Defender XDR (pictured above), you will find the same features and content from the standalone portal Home page. This includes Threat Intelligence Search, Featured Articles, and Recent Threat Article streams.
The content from the Profiles page on the standalone portal is available on the “Intel profiles” tab in Defender XDR.
You can create or access your team and individual projects from the “Intel projects” tab. You can continue working on the same projects you created on the standalone portal by logging into Defender XDR with the same account.
Customers with an MDTI license may begin using the premium experience within Defender XDR immediately. Those without a license can continue using the standard version at no cost in the Defender portal or explore MDTI licensing options to receive unlimited access to Microsoft’s award-winning intelligence.
If you do not have Defender XDR but want to continue using MDTI, explore licensing options or set up a trial environment.
Note: Please talk to your tenant administrator if you believe you should have access to Defender XDR within your organization, but do not. The Microsoft Entra roles which grant access to Defender XDR can be found here.
What else can I do with MDTI within Defender XDR?
Since launching MDTI into the XDR portal early last year at Microsoft Secure and opening the standard version to all XDR customers at Microsoft Ignite in November, thousands of MDTI and Defender XDR customers have experienced the benefits of aligning the high-fidelity threat intelligence in MDTI with their investigation and response tools under a single pane of glass.
MDTI enhances and complements a variety of other products and features in Defender XDR:
Use Threat Analytics to prioritize threats and content related to ongoing campaigns and your organization’s top exposures.
Find MDTI results from anywhere in the Defender portal using Defender XDR global search functionality (search bar at the top of the page in Defender XDR). MDTI results will appear under the “Intel Explorer” tab, alongside results from Microsoft Defender for Endpoint, Office, Identity, Cloud Apps, Vulnerability Management, and more on other tabs.
Enrich discovered artifacts (IP addresses, domains, hosts, URLs and more) from Microsoft Defender incidents and alerts with more information by searching in MDTI.
In Advanced Hunting, use IOCs sourced from MDTI to hunt across logs and events in your environment (see “Use Cases” section in this blog).
MDTI also enhances other Microsoft security products to help deliver a unified threat intelligence experience for customers:
In Microsoft Defender for Cloud, proactively discover vulnerable assets in Cloud Security Explorer using knowledge from MDTI content.
In Microsoft Sentinel, improve your mean time to detect (MTTD) by:
Enabling the MDTI data connector to ingest, monitor, alert and hunt based on MDTI’s IOCs.
Configuring MDTI analytics rules to create alerts and incidents when your logs match our domain, IP and URL indicators.
And installing our pre-built Microsoft Sentinel Playbooks to enrich incidents with reputation scores and other data from MDTI (users with MDTI API license only).
Parlayed with Sentinel’s analytic or automation rules, incidents can be automatically enriched against these MDTI playbooks, which facilitate incident triage and provide context to those observed IP and host entities. This greatly improves your SOC’s mean time to respond (MTTR).
How do I use MDTI through Copilot for Security?
Microsoft Copilot for Security enables customers to access, operate on, and integrate Microsoft’s raw and finished threat intelligence via natural language. With Copilot for Security, users can leverage MDTI’s data sets and content anytime, anywhere within Defender XDR to provide additional context and aid in investigations.
MDTI powers Copilot for Security via a wide range of Threat Intelligence skills and promptbooks.
MDTI powers Copilot for Security via a wide range of Threat Intelligence skills, enabling you to quickly retrieve information on indicators including IP addresses and domains, and contextualize artifacts with content such as threat articles and intel profiles. Additionally, out-of-the-box promptbooks correlate MDTI content and data with other security information from Defender XDR, such as incidents and hunting activities, to help customers quickly understand the broader scope of an attack. These capabilities will be available within both the standalone and embedded Copilot for Security experiences.
Learn more about the MDTI skills available in Copilot here, and check back to this blog following Microsoft Secure next week to learn more about MDTI’s role in Copilot for Security.
New to MDTI? Here’s where to start
If you are interested in learning more about MDTI and how it can help you unmask and neutralize modern adversaries and cyberthreats such as ransomware, and to explore the features and benefits of MDTI please visit the MDTI product web page.
Also, be sure to contact our sales team to request a demo or a quote.
Microsoft Tech Community – Latest Blogs –Read More

How to Manage and Scale AI Models with Workload Orchestration
In this fifth and final blog post in our MLOps Production series, guest blogger Martin Bald, Senior Manager Developer Community from one of our startup partners Wallaroo.AI will go through model workload orchestration and show how to continue the journey for building scale and ease of management for deploying sustainable and value producing models into production.
Introduction
Throughout this blog series we have seen how we can easily and quickly get our ML models into production, validate them for desired outcomes, proactively monitor for data drift and take swift proactive action to ensure we have optimal model output. As we scale and deploy more models into this production process across multiple cloud environments, Data Scientists and ML Engineers are burdened with spending too many valuable cycles on the data plumbing and repetitive tasks needed just to get models to run and produce business reports – often using tools not designed for AI workloads.
Data engineers are also spending far too many cycles supporting data scientists as they try to run and analyze ML pipelines instead of building robust upstream data pipelines to ensure business continuity. In attempting to achieve value from their AI efforts, they soon find bottlenecks preventing them from realizing the production demands they need.
ML Workload Orchestration flow works within 3 tiers:
Tier
Description
ML Workload Orchestration
User created custom instructions that provide automated processes that follow the same steps every time without error. Orchestrations contain the instructions to be performed, uploaded as a .ZIP file with the instructions, requirements, and artifacts.
Task
Instructions on when to run an Orchestration as a scheduled Task. Tasks can be Run Once, where it creates a single Task Run, or Run Scheduled, where a Task Run is created on a regular schedule based on the Kubernetes cronjob specifications. If a Task is Run Scheduled, it will create a new Task Run every time the schedule parameters are met until the Task is killed.
Task Run
The execution of a task. These validate business operations and successfully identify any unsuccessful task runs. If the Task is Run Once, then only one Task Run is generated. If the Task is a Run Scheduled task, then a new Task Run will be created each time the schedule parameters are met, with each Task Run having its own results and logs.
Fig 1.
We can manage our models and pipelines and control how we deploy and undeploy resources and invite collaborators to work on projects with us.
We see from Fig 1 above that at its core orchestration is a Python file, one or more Python files to be exact. These Python files can contain any kind of processing code, other dependencies that we need. Essentially these files will contain references to one or more deployed pipelines. This allows us to schedule runs of these files and reference these pipelines that are deployed as needed.
It also fully supports the connections that we make so I can have as many of those connections as we need. We often see people using these automations to take live input feeds into the pipelines and write the results to another external data source or file store.
Once these are set up I can wrap them all in this orchestration and register that orchestration in the platform. This means that I can then create what is called Tasks or Runs of this Orchestration. These can be done On Demand or Ad Hoc or can be scheduled to run on a regular basis. For example we could schedule it to run every minute, day, week, month etc,.
This means that we can easily define, automate, and scale recurring production AI workloads that ingest data from predefined data sources, run inferencing, and deposit the results to a predefined location efficiently and easily with added flexibility for the needs of your business.
The remainder of this blog post will show practical examples of setting up Run Once and Schedule Run Tasks. You can access the tutorial ML Workload Orchestration Simple Tutorial and use the free Wallaroo.AI Community Edition which you can install to GitHub Codespaces, or Azure. There are also Free Inference Servers available on the Azure Marketplace to try out.
AI Workload Orchestration Example.
This example provides a quick set of methods and examples regarding Wallaroo Connections and Wallaroo ML Workload Orchestration.
In this example we will we will step through:
Create a Wallaroo connection to retrieving information from an external source.
Upload Wallaroo ML Workload Orchestration.
Run the orchestration once as a Run Once Task and verify that the information was saved in the pipeline logs.
Schedule the orchestration as a Scheduled Task and verify that the information was saved to the pipeline logs.
The first step is to import the various libraries we’ll use for this example.
import wallaroo
from wallaroo.object import EntityNotFoundError, RequiredAttributeMissing
# to display dataframe tables
from IPython.display import display
# used to display dataframe information without truncating
import pandas as pd
pd.set_option(‘display.max_colwidth’, None)
import pyarrow as pa
import time
# Used to create unique workspace and pipeline names
import string
import random
# make a random 4 character suffix
suffix= ”.join(random.choice(string.ascii_lowercase) for i in range(4))
display(suffix)
The next step is to connect to Wallaroo through the Wallaroo client and set up the variables we will use. The Python library is included in the Wallaroo install and available through the Jupyter Hub interface provided with your Wallaroo environment.
Note: If logging into the Wallaroo instance through the internal JupyterHub service, use wl = wallaroo.Client() as seen below.
wl = wallaroo.Client()
# Setting variables for later steps
workspace_name = f’simpleorchestrationworkspace{suffix}’
pipeline_name = f’simpleorchestrationpipeline{suffix}’
model_name = f’simpleorchestrationmodel{suffix}’
model_file_name = ‘./models/rf_model.onnx’
inference_connection_name = f’external_inference_connection{suffix}’
inference_connection_type = “HTTP”
inference_connection_argument = {‘host’:’https://github.com/WallarooLabs/Wallaroo_Tutorials/raw/main/wallaroo-testing-tutorials/houseprice-saga/data/xtest-1k.arrow’}
The following helper methods are used to either create or get workspaces, pipelines, and connections.
# helper methods to retrieve workspaces and pipelines
def get_workspace(name):
workspace = None
for ws in wl.list_workspaces():
if ws.name() == name:
workspace= ws
if(workspace == None):
workspace = wl.create_workspace(name)
return workspace
def get_pipeline(name):
try:
pipeline = wl.pipelines_by_name(name)[0]
except EntityNotFoundError:
pipeline = wl.build_pipeline(name)
return pipeline
Next we will create our workspace and pipeline for the tutorial. If this tutorial has been run previously, then this will retrieve the existing ones with the assumption they’re for us with this tutorial.
We’ll set the retrieved workspace as the current workspace in the SDK, so all commands will default to that workspace.
workspace = get_workspace(workspace_name)
wl.set_current_workspace(workspace)
pipeline = get_pipeline(pipeline_name)
We’ll now upload our model into our sample workspace, then add it as a pipeline step before deploying the pipeline to it’s ready to accept inference requests.
# Upload the model
housing_model_control = (wl.upload_model(model_name,
model_file_name,
framework=wallaroo.framework.Framework.ONNX)
.configure(tensor_fields=[“tensor”])
)
# Add the model as a pipeline step
pipeline.add_model_step(housing_model_control)
Fig 2.
deploy the pipeline
pipeline.deploy()
Output:
Waiting for deployment. This will take up to 45s……………….ok
Fig 3
We will create the data source connection via the Wallaroo client command create_connection.
We’ll also create a data connection named inference_results_connection with our helper function get_connection that will either create or retrieve a connection if it already exists.
wl.create_connection(inference_connection_name, inference_connection_type, inference_connection_argument)
Fig 4.
The method Workspace add_connection(connection_name) adds a Data Connection to a workspace. We’ll add connections to our sample workspace, then list the connections available to the workspace to confirm.
workspace.add_connection(inference_connection_name)
workspace.list_connections()
With the pipeline deployed and our connections set, we will now generate our ML Workload Orchestration. Orchestrations are uploaded to the Wallaroo instance as a ZIP file. Orchestrations are uploaded with the Wallaroo client upload_orchestration(path) method.
We will loop until the uploaded orchestration’s status displays ready.
orchestration = wl.upload_orchestration(path=”./remote_inference/remote_inference.zip”)
while orchestration.status() != ‘ready’:
print(orchestration.status())
time.sleep(5)
Output:
pending_packaging
pending_packaging
packaging
packaging
packaging
packaging
packaging
packaging
packaging
packaging
wl.list_orchestrations()
Fig 5.
Once an Orchestration has the status ready, it can be run as a task. The task runs options can be scheduled or run once.
Run Once Task
We’ll do both a Run Once task and generate our Run Once Task from our orchestration.
Tasks are generated and run once with the Orchestration run_once(name, json_args, timeout) method. Any arguments for the orchestration are passed in as a Dict. If there are no arguments, then an empty set {} is passed.
# Example: run once
import datetime
task_start = datetime.datetime.now()
task = orchestration.run_once(name=”simpletaskdemo”,
json_args={“workspace_name”: workspace_name,
“pipeline_name”: pipeline_name,
“connection_name”: inference_connection_name
})
The list of tasks in the Wallaroo instance is retrieved through the Wallaroo Client list_tasks() method. This returns an array list of the following:Fig 6.
For this example, the status of the previously created task will be generated, then looped until it has reached status started.
while task.status() != “started”:
display(task.status())
time.sleep(5)
Output:
‘pending’
‘pending’
‘pending’
We can view the inferences from our logs and verify that new entries were added from our task. We can do that with the task logs() method.
In our case, we’ll assume the task once started takes about 1 minute to run (deploy the pipeline, run the inference, undeploy the pipeline). We’ll add in a wait of 1 minute, then display the logs during the time period the task was running.
time.sleep(60)
task_end = datetime.datetime.now()
display(task_end)
pipeline.logs(start_datetime = task_start, end_datetime = task_end)
Output:
datetime.datetime(2023, 5, 23, 15, 28, 30, 718361)
Warning: Pipeline log size limit exceeded. Please request logs using export_logs
Fig 7.
Output:
492 rows × 4 columns
Scheduled Run Task
The other method of using tasks is as a scheduled run through the Orchestration run_scheduled(name, schedule, timeout, json_args). This sets up a task to run on a regular schedule as defined by the schedule parameter in the cron service format.
e.g.
This task runs on the 42nd minute of every hour.
schedule={’42 * * * *’}
The following schedule runs every day at 12 noon from February 1 to February 15 2024 – and then ends.
schedule={‘0 0 12 1-15 2 2024’}
For our example we will create a scheduled task to run every 5 minutes, display the inference results, then use the Orchestration kill task to keep the task from running any further.
It is recommended that orchestrations that have pipeline deploy or undeploy commands be spaced out no less than 5 minutes to prevent colliding with other tasks that use the same pipeline.
scheduled_task_start = datetime.datetime.now()
scheduled_task = orchestration.run_scheduled(name=”simple_inference_schedule”,
schedule=”*/5 * * * *”,
timeout=120,
json_args={“workspace_name”: workspace_name,
“pipeline_name”: pipeline_name,
“connection_name”: inference_connection_name
})
while scheduled_task.status() != “started”:
display(scheduled_task.status())
time.sleep(5)
Output:
‘pending’
wait 420 seconds to give the scheduled event time to finish
time.sleep(420)
scheduled_task_end = datetime.datetime.now()
pipeline.logs(start_datetime = scheduled_task_start, end_datetime = scheduled_task_end)
492 rows × 4 columns
Fig 8.
Finally you can use the below commands to list the scheduled run tasks, and end them using the kill task command.
wl.list_tasks()
scheduled_task.kill()
Conclusion
In this final blog post in our series we have addressed a very common set of challenges that AI teams face with production AI workloads and how to solve them through Model Workload Orchestration. This means that we can easily define, automate, and scale recurring production AI workloads that ingest data from predefined data sources, run inferencing, and deposit the results to a predefined location efficiently and easily.
If you want to try the steps in this blog post series you can access the tutorials at this link and use the free inference servers available on the Azure Marketplace. Or you can download a free Wallaroo.AI Community Edition and .
Wallaroo.AI is a unified production AI platform built for Data Scientists and ML Engineers for easily deploying, observing, and optimizing machine learning in production at scale – in any cloud, on-prem, or at the edge.
Microsoft Tech Community – Latest Blogs –Read More

Tick-tock! Upgrade your App Service Environment before time runs out
Attention, procrastinators! The deadline to complete your upgrade to App Service Environment v3 is approaching fast. By now you know about how we’re retiring App Service Environment v1 and v2 and that your organization needs to upgrade version 3 before Aug. 31, 2024. Failure to do so means losing your environments, running apps, and all app data—so we recommend starting the migration process as soon as possible!
Ensuring your services run smoothly is our top priority, so in this article we will review new and existing tools and services available from Microsoft to speed up your upgrade process.
Eliminate downtime with our new side by side migration feature
Customers have been busy completing self-service upgrades using our free, in-place migration feature. This option upgrades your existing App Service Environment in the same subnet. It offers minimal changes to your networking configuration and requires about an hour of application downtime.
But what if you don’t have an hour of downtime to spare? Provided you also have another subnet handy or can create one, then you can use side-by-side migration, our newest automated offering.
Currently in preview, side-by-side migration’s key benefit is zero downtime. Existing applications continue to run in the original environment while the migration to the new environment takes place, ensuring no disruption to your services. This feature is ideal for migrating development or staging environments first, allowing you to test the process and familiarize yourself with the new environment before migrating production workloads. Plus, if any issues arise during the migration, you can easily roll back to the original environment with minimal impact.
It’s important to note that side-by-side migration won’t be the right approach for everyone. For example, the feature is not recommended for production environments as a first attempt, and we advise testing it with non-production environments before using it for critical workloads. Also bear in mind that while there’s no cost to migrate your App Service Environment, with side-by-side migration you will be billed for both your existing version 2 environment and the new version 3 environment while both are up and running. It’s important that you quickly validate and complete the final step of the migration to prevent excess charges.
Read more about the steps to complete a side by side migration at Microsoft Learn, or contact your Microsoft account team or Microsoft partner to see if side by side migration is a good fit for your organization.
What support exists to help me upgrade?
If side-by-side migration isn’t right for you, we have a comprehensive set of technical resources available to facilitate a smooth upgrade to App Service Environment v3.
The App Service Environment v3 upgrade landing page is your one-stop shop to learn more about the features, benefits, and migration resources related to App Service Environment v3. In addition to learning more about the previously mentioned free automated migration features, you will learn about the pre-flight checks to help you determine if your environment meets the prerequisites to automate your upgrade. Otherwise you can follow the instructions for a manual upgrade.
For customers seeking hands-on support, FastTrack is a service we provide to help companies successfully migrate to Azure and accelerate the deployment of Azure solutions, including App Service Environment v3. We highly recommend our Learn Live session with Azure FastTrack Architects, available to watch on demand, that gives viewers a comprehensive overview of the steps to complete the upgrade.
Finally, Microsoft Learn provides walkthroughs, tutorials, and links to help you get familiar with the options for upgrading to App Service Environment v3. The Microsoft developer community is a vibrant space where experts and peers gather to share insights, experiences, and solutions. By participating in these forums, developers can seek help and gain valuable insights from others who have already upgraded to App Service Environment v3.
Why should I upgrade to App Service Environment v3?
An App Service Environment is an Azure App Service feature that provides a fully isolated and dedicated environment for running App Service apps securely at high scale. App Service Environment v3 is the latest version of App Service Environment. It’s easier to use, with reduced deployment times and running on more powerful infrastructure that can go up to 64 cores and 256-GB RAM. It also has a simpler network topology, with scaling speeds averaging under 10 minutes for both Windows and Linux, which is a huge advantage compared to older versions.
The new capabilities in version 3 also lead to tangible financial benefits, and our Senior Product Manager, Jordan Selig, has a great blog post about how you can calculate your estimated cost savings.
In addition to continued operation of your services, this upgrade will also improve your business outcomes. You can get a detailed overview with our App Service Environment version comparison, but here’s a quick recap:
Enhanced scalability: Leverage the increased scalability of version 3 to seamlessly handle growing workloads and traffic demands compared to older versions.
Improved performance: Experience enhanced performance and responsiveness with the optimized infrastructure changes.
Simplified management: Reduce administrative overhead with more streamlined management tools and simplified configurations in version 3.
Enhanced security: Benefit from robust security features that safeguard your sensitive data and applications.
Future-proof your environment: Ensure your App Service Environment remains aligned with the latest advancements and capabilities.
We’re here to make your upgrade process a success
What are you waiting for? Prioritize your App Service Environment upgrade today to safeguard the continued operation of your services and position your environment for future success.
With our new side by side migration feature, customers can achieve a seamless migration with minimal downtime and a rollback option, providing a safe and controlled approach to transitioning to a new environment.
To get started, follow any of the options listed above. If you have questions, don’t hesitate to contact your Microsoft account team or Microsoft partner for further assistance.
We’d also love if you could share your experience and feedback with us in this quick anonymous poll. We value your time, so it shouldn’t take more than 2 minutes. Thank you!
Microsoft Tech Community – Latest Blogs –Read More

How to troubleshoot mail flow rules used to inspect attachments
When troubleshooting mail flow rules related to attachments, it’s crucial to ensure the rules are set up correctly. At times, rules may not work as expected either due to misconfiguration or because behavior related to certain attachments isn’t immediately obvious. This blog will delve into some common issues encountered with attachment-related mail flow rules, provide a systematic approach to diagnosing issues, and offer practical solutions to rectify them.
To address an issue with a message that wasn’t evaluated correctly, first begin by saving the message as a file. We’ll use this file in later steps. Then let’s go through different investigation stages…
Confirm the defined file extensions in each of your mail flow rules
Utilizing one of the options below, inspect the rule’s properties in either PowerShell or the Exchange Admin Center (EAC). This will provide you with an overall list of attachment extensions defined in your mail flow rules.
From PowerShell:
Connect to Exchange Online PowerShell.
Use Get-TransportRule cmdlet to identify the rule in question.
To view attachment-related conditions and exceptions, execute the following commands:
$rule = Get-TransportRule <rule guid or rule name>
$rule.AttachmentExtensionMatchesWords
$rule.ExceptIfAttachmentExtensionMatchesWords
From EAC:
Log in at https://admin.exchange.microsoft.com/
In the menu on the left side, navigate to “Mail Flow” and click on “Rules”.
Locate each rule that inspects attachment extensions, and select it to view its details:
If you have a longer list of attachments, you can expand it by clicking on the pencil icon:
Review extracted attachment extensions
Run the Test-Message cmdlet against the previously exported message that was not processed as expected. This report will display attachment extensions found in the message that are being evaluated by a specific transport rule. You can then compare to the information collected above.
Additional information related to running the Test-Message cmdlet is available in this article: How to troubleshoot Exchange Online Transport Rules using the Test-Message cmdlet
Note the specific Test-Message output for the desired rule that is of interest in this case is:
Identify message attachments
To gain a better understanding of which attachments the message contains per the rule evaluation, run Test-TextExtraction from PowerShell to determine the attachments contained in the message. This will require the original message file (.msg or .eml) that was not properly evaluated.
For example:
The output of the Test-TextExtraction cmdlet will show all parts of the message separately. Every part of the message has its own StreamId, and every part of the message contains these 4 parameters:
ExtractedStreamText contains text that was extracted from the message part.
StreamTextLength shows the number of the characters in the extracted text.
StreamName shows the attachment name with an extension and a path where it is located.
StreamId represents the serial number of the attachment in the message.
For example, let’s analyze part of the message with StreamId = 6 (the dark blue section from the image above)
The name of the attachment is “AttachmentTextFileInZipFile.txt”.
Extension of this attachment is “.txt” which means it is attachments in text format.
Path to the attachment is: “Message Body/AttachmentZipFile.zip/AttachmentTextFileInZipFile.txt” which means that this attachment is nested in “AttachmentZipFile.zip” attachment.
Extracted text from the attachment is: “This Text file is inside the .zip file.”
If you need to extend the output so you can see whole fields, run the command $te.ExtractedResults | fl.
And you will see an extended list like this:
Now that you have gathered both extracted results from the message and the values used in certain rules, you can compare and see whether the list of extracted attachment extensions contain values from the rule and if they do, then the rule should be matched.
In the example used in this article we can see the value from the rule itself:
The Test-Message output for the rule evaluation in this case is:
We can conclude that this rule should match because the Test-Message report has at least one attachment extension that is in the rule itself.
Additional cases where this investigation applies
In a very similar way, you can investigate scenarios where ContainsWords and MatchesPatterns predicates are used as well, such as:
-AttachmentContainsWords/-ExceptIfAttachmentContainsWords
-AttachmentMatchesPatterns/-ExceptIfAttachmentMatchesPatterns
-AttachmentNameMatchesPatterns/-ExceptIfAttachmentNameMatchesPatterns
In addition, if you need further understanding on how to create patterns/regex that will suit your purpose, please see Regular expressions in mail flow rules.
Important notes
If the mail flow rule has been changed (with the values that should be considered for the evaluation), you must wait for up to 30 minutes for the change to be applied before sending a message, otherwise the rule may not behave as expected. More on that here.
Inline attachments, as well as pictures within message signatures are considered attachments as well. More on that here.
Attachments nested inside other attachments are also evaluated against mail flow rules, as documented here.
By following these steps, you can troubleshoot and understand the evaluation of attachment extensions against your mail flow rules.
References:
Mail flow rules (transport rules) in Exchange Online
Mail flow rule conditions and exceptions (predicates) in Exchange Online
Common attachment blocking scenarios for mail flow rules in Exchange Online
Use mail flow rules to block messages with executable attachments in Exchange Online
Use mail flow rules to inspect message attachments in Exchange Online
Regular expressions in mail flow rules | Microsoft Learn
Test-Message (ExchangePowerShell)
Test-TextExtraction (ExchangePowerShell)
Milos Nestorovic
Microsoft Tech Community – Latest Blogs –Read More
Como gerenciar conexões SQL no .NET Core
Gerenciamento de conexões SQL é um tema que sempre quis abordar, mas acreditava ser desnecessário, pois não havia me deparado com muitos problemas desse tipo.
Porém, recentemente, deparei com um caso bem desafiador, onde uma aplicação extremamente crítica estava caindo, e adivinhe só? A causa raiz era o gerenciamento de conexões SQL.
O objetivo desse artigo é explicar e demonstrar através de provas de conceito o que fazer para evitar esse tipo de problema.
SQL Connection Pool no ADO.NET
Um objeto de SqlConnection representa uma conexão física com um banco de dados, onde o método Open é utilizado para abrir a conexão e o método Close é utilizado para fechar a conexão.
Abrir e fechar conexões é uma operação cara, pois envolve algumas etapas, como:
Estabelecer um canal físico, como um socket ou um pipe nomeado.
Realizar o handshake inicial com o servidor.
Analisar as informações da cadeia de conexão (connection string).
Autenticar a conexão no servidor.
Realizar verificações para a inclusão na transação atual.
Executar outras verificações e procedimentos necessários durante a conexão.
Em resumo, é um processo que envolve muitas etapas que podem e devem ser evitadas. A biblioteca ADO.NET, implementa o Connection Polling, onde as conexões são criadas sob demanda, e reutilizadas durante o ciclo de vida da aplicação.
O pool reduz a necessidade de criação de novas conexões, quando a aplicação chamar o método Open, ele irá verificar se já existe uma conexão aberta disponível antes de abrir uma nova. Quando o método Close é chamado, a conexão é devolvida ao pool.
Problemas comuns
O problema mais comum que ocorre com o gerenciamento de conexões SQL é o vazamento de conexões. Isso ocorre quando a aplicação não fecha a conexão corretamente. Os impactos no desempenho e escalabilidade da aplicação são significativos, pois o pool de conexões é limitado, e quando uma conexão não é fechada corretamente, ela fica indisponível pois, uma vez que o pool atinga o número máximo de conexões, a aplicação irá esperar até que uma conexão seja liberada.
Exemplo de vazamento de conexão
O código a seguir é um exemplo de vazamento de conexão:
public int ExecuteNonQuery(string command)
{
SqlConnection connection = new SqlConnection(“connectionString”);
DbCommand dbCommand = Connection.CreateCommand();
dbCommand.CommandText = command;
dbCommand.Connection = connection;
return dbCommand.ExecuteNonQuery();
}
Vamos executar os seguintes passos para simular o problema e entender qual é o problema dessa implementação:
Implementar o código acima em um projeto de prova de conceito
Simular o problema através de um teste de carga
Coletar e analisar um dump de memória
O código de referência está disponível em: https://github.com/claudiogodoy99/Sql-Demo
Para reproduzir o problema vou utilizar o k6 como ferramenta de deste de carga, e vou utilizar o seguinte script:
import http from “k6/http”;
export default function () {
const response = http.get(“<http://localhost:5096/exemplo>”);
}
O comando que utilizei para rodar o teste foi: k6 run -u 100 -d 120s .loadTest.js. Ele simula 100 usuários acessando a url http://localhost:5096/exemplo durante 120 segundos.
O resultado do teste foi o seguinte:
execution: local
script: loadTest.js
output: –
scenarios: (100.00%) 1 scenario, 100 max VUs, 2m30s max duration (incl. graceful stop):
http_req_duration……….: avg=33.44s min=1.53s med=33.21s max=1m0s p(90)=51.56s p(95)=57.29s
http_req_failed…………: 100.00% ✓ 390 ✗ 0
running (2m30.0s), 000/100 VUs, 390 complete and 19 interrupted iterations
Em linhas gerais foi um resultado muito ruim, o tempo médio de resposta foi de 33 segundos.
Utilizei o dotnet-dump para gerar e analisar o dump de memória, através dos comandos:
dotnet-dump collect -p PID
dotnet-dump analyze .NOME-DO-ARQUIVO-GERADO.dmp
Com o dump aberto no terminal, vou rodar o comando clrthreads que vai listar todas as pilhas de execuções gerenciadas, enumerando suas respectivas threads:
…
System.Threading.WaitHandle.WaitMultiple
Microsoft.Data.ProviderBase.DbConnectionPool.TryGetConnection
Microsoft.Data.ProviderBase.DbConnectionPool.TryGetConnection
Microsoft.Data.ProviderBase.DbConnectionFactory.TryGetConnection
Microsoft.Data.ProviderBase.DbConnectionInternal.TryOpenConnectionInternal
Microsoft.Data.SqlClient.SqlConnection.TryOpen
Microsoft.Data.SqlClient.SqlConnection.Open
UnityOfWork.OpenConnection
UnityOfWork.BeginTransaction
ExemploRepository.AlgumaOperacao
pocSql.Controllers.ExemploController.Get
….
==> 48 threads with 7 roots
Repare que todas as threads gerenciadas que estavam processando alguma requisição estavam esperando uma resposta do método: Microsoft.Data.ProviderBase.DbConnectionPool.TryGetConnection(DbConnection, UInt32, Boolean, Boolean, DbConnectionOptions, DbConnectionInternal ByRef).
Isto significa que todas as threadsaguardavam uma conexão ao
banco de dados ser liberada para que pudessem continuar o processamento da requisição.
Solução
Neste exemplo a utilização da palavra reservada using já resolveria o problema:
public int ExecuteNonQuery(string command)
{
using SqlConnection connection = new SqlConnection(“connectionString”);
DbCommand dbCommand = Connection.CreateCommand();
dbCommand.CommandText = command;
dbCommand.Connection = connection;
return dbCommand.ExecuteNonQuery();
}
A palavra reservada using garante uso correto de objetos que implementam a interface IDisposable, em outras palavras, quando o programa finalizar o escopo do método acima, o método Dispose da conexão será chamado, garantindo que a conexão seja fechada corretamente, mesmo que ocorra uma exceção.
Segue o resultado do teste após a implementação da correção:
script: .pocSqlloadTest.js
output:
scenarios: (100.00%) 1 scenario, 100 max VUs, 2m30s max duration (incl. graceful stop):
http_req_connecting……..: avg=77.15µs min=0s med=0s max=9.22ms p(90)=0s p(95)=0s
http_req_duration……….: avg=1.38s min=286.15ms med=1.14s max=17.94s p(90)=1.99s p(95)=2.6s
http_req_failed…………: 100.00% ✓ 8689 ✗ 0
running (2m01.3s), 000/100 VUs, 8689 complete and 0 interrupted iterations
A diferença é gritante, o tempo médio de resposta caiu de 33 segundos para 1,38 segundos.
Padrão Dispose
Infelizmente nem toda implementação do ADO.NET é tão simples como a que demonstrei nesse artigo. Em diversos casos, deparei-me com classes que implementam o objeto SqlConnection como propriedade para reutilizar a conexão em diversos métodos, controlar transações, entre outras coisas.
Para esses casos, a utilização do using é inviável, e a implementação do padrão Dispose pode ser necessária. Para nossa sorte, as versões recentes do container de injeção de dependência no .NET Core o Microsoft.Extensions.DependencyInjection, já resolve boa parte do problema.
Imagine que temos a seguinte classe:
public class Connection
{
private readonly SqlConnection _connection;
public Connection(SqlConnection connection)
{
_connection = connection;
}
}
Se a classe acima foi registrada corretamente, o container de injeção de dependência irá chamar o método Dispose da conexão quando a aplicação finalizar o escopo do método que a utilizou.
Para registrar a classe corretamente:
services.AddScoped<IDbConnection>((sp) => new SqlConnection(dbConnectionString));
services.AddScoped<Connection>();
Como a conexão foi injetada como uma dependência, a classe Connection não precisa implementar a interface Dispose.
Agora um exemplo onde o método construtor é responsável por instânciar o objeto _connection:
public class ExemploRepository
{
private readonly IDbConnection _connection;
public ExemploRepository()
{
_connection = new SqlConnection(“connectionString”);
}
}
A classe ExemploRepository precisa implementar a interface IDisposable, e chamar o método Dispose da conexão, caso contrário o container de injeção de dependência não conseguiria identificar que a propriedade _connectio implementa a interface IDisposable.
public class ExemploRepository : IDisposable
{
private readonly IDbConnection _connection;
public ExemploRepository()
{
_connection = new SqlConnection(“connectionString”);
}
public void Dispose()
{
_connection.Dispose();
}
}
Conclusão
Os objetos do tipo SqlConnection são objetos que representam uma conexão física com um banco de dados, e devem ser gerenciados corretamente para evitar problemas de desempenho e escalabilidade. A utilização da palavra reservada using é a forma mais simples de garantir que a conexão seja fechada corretamente, mesmo que ocorra uma exceção. Em casos mais complexos, a implementação do padrão Dispose pode ser necessária.
Embora sutil, o gerenciamento de conexões SQL é um tema que merece atenção, pois pode impactar significativamente o desempenho e escalabilidade de uma aplicação.
Microsoft Tech Community – Latest Blogs –Read More
RAG techniques: Function calling for more structured retrieval
Retrieval Augmented Generation (RAG) is a popular technique to get LLMs to provide answers that are grounded in a data source. When we use RAG, we use the user’s question to search a knowledge base (like Azure AI Search), then pass along both the question and the relevant content to the LLM (gpt-3.5-turbo or gpt-4), with a directive to answer only according to the sources. In psuedo-code:
user_query = “what’s in the Northwind Plus plan?”
user_query_vector = create_embedding(user_query, “ada-002”)
results = search(user_query, user_query_vector)
response = create_chat_completion(system_prompt, user_query, results)
If the search function can find the right results in the index (assuming the answer is somewhere in the index), then the LLM can typically do a pretty good job of synthesizing the answer from the sources.
Unstructured queries
This simple RAG approach works best for “unstructured queries”, like:
What’s in the Northwind Plus plan?
What are the expectations of a product manager?
What benefits are provided by the company?
When using Azure AI Search as the knowledge base, the search call will perform both a vector and keyword search, finding all the relevant document chunks that match the keywords and concepts in the query.
Structured queries
But you may find that users are instead asking more “structured” queries, like:
Summarize the document called “perksplus.pdf”
What are the topics in documents by Pamela Fox?
Key points in most recent uploaded documents
We can think of them as structured queries, because they’re trying to filter on specific metadata about a document. You could imagine a world where you used a syntax to specify that metadata filtering, like:
Summarize the document title:perksplus.pdf
Topics in documents author:PamelaFox
Key points time:2weeks
We don’t want to actually introduce a query syntax to a a RAG chat application if we don’t need to, since only power users tend to use specialized query syntax, and we’d ideally have our RAG just do the right thing in that situation.
Using function calling in RAG
Fortunately, we can use the OpenAI function-calling feature to recognize that a user’s query would benefit from a more structured search, and perform that search instead.
If you’ve never used function calling before, it’s an alternative way of asking an OpenAI GPT model to respond to a chat completion request. In addition to sending our usual system prompt, chat history, and user message, we also send along a list of possible functions that could be called to answer the question. We can define those in JSON or as a Pydantic model dumped to JSON. Then, when the response comes back from the model, we can see what function it decided to call, and with what parameters. At that point, we can actually call that function, if it exists, or just use that information in our code in some other way.
To use function calling in RAG, we first need to introduce an LLM pre-processing step to handle user queries, as I described in my previous blog post. That will give us an opportunity to intercept the query before we even perform the search step of RAG.
For that pre-processing step, we can start off with a function to handle the general case of unstructured queries:
tools: List[ChatCompletionToolParam] = [
{
“type”: “function”,
“function”: {
“name”: “search_sources”,
“description”: “Retrieve sources from the Azure AI Search index”,
“parameters”: {
“type”: “object”,
“properties”: {
“search_query”: {
“type”: “string”,
“description”: “Query string to retrieve documents from azure search eg: ‘Health care plan'”,
}
},
“required”: [“search_query”],
},
},
}
]
Then we send off a request to the chat completion API, letting it know it can use that function.
chat_completion: ChatCompletion = self.openai_client.chat.completions.create(
messages=messages,
model=model,
temperature=0.0,
max_tokens=100,
n=1,
tools=tools,
tool_choice=”auto”,
)
When the response comes back, we process it to see if the model decided to call the function, and extract the search_query parameter if so.
response_message = chat_completion.choices[0].message
if response_message.tool_calls:
for tool in response_message.tool_calls:
if tool.type != “function”:
continue
function = tool.function
if function.name == “search_sources”:
arg = json.loads(function.arguments)
search_query = arg.get(“search_query”, self.NO_RESPONSE)
If the model didn’t include the function call in its response, that’s not a big deal as we just fall back to using the user’s original query as the search query. We proceed with the rest of the RAG flow as usual, sending the original question with whatever results came back in our final LLM call.
Adding more functions for structured queries
Now that we’ve introduced one function into the RAG flow, we can more easily add additional functions to recognize structured queries. For example, this function recognizes when a user wants to search by a particular filename:
{
“type”: “function”,
“function”: {
“name”: “search_by_filename”,
“description”: “Retrieve a specific filename from the Azure AI Search index”,
“parameters”: {
“type”: “object”,
“properties”: {
“filename”: {
“type”: “string”,
“description”: “The filename, like ‘PerksPlus.pdf'”,
}
},
“required”: [“filename”],
},
},
},
We need to extend the function parsing code to extract the filename argument:
if function.name == “search_by_filename”:
arg = json.loads(function.arguments)
filename = arg.get(“filename”, “”)
filename_filter = filename
Then we can decide how to use that filename filter. In the case of Azure AI search, I build a filter that checks that a particular index field matches the filename argument, and pass that to my search call. If using a relational database, it’d become an additional WHERE clause.
Simply by adding that function, I was able to get much better answers to questions in my RAG app like ‘Summarize the document called “perksplus.pdf”‘, since my search results were truly limited to chunks from that file. You can see my full code changes to add this function to our RAG starter app repo in this PR.
Considerations
This can be a very powerful technique, but as with all things LLM, there are gotchas:
Function definitions add to your prompt token count, increasing cost.
There may be times where the LLM doesn’t decide to return the function call, even when you thought it should have.
The more functions you add, the more likely the LLM will get confused about which one to pick, especially if functions are similar to each other. You can try to make it more clear to the LLM by prompt engineering the function name and description, or even providing few shots.
Here are additional approaches you can try:
Content expansion: Store metadata inside the indexed field and compute the embedding based on both the metadata and content. For example, the content field could have “filename:perksplus.pdf text:The perks are…”.
Add metadata as separate fields in the search index, and append those to the content sent to the LLM. For example, you could put “Last modified: 2 weeks ago” in each chunk sent to the LLM, if you were trying to help it’s ability to answer questions about recency. This is similar to the content expansion approach, but the metadata isn’t included when calculating the embedding. You could also compute embeddings separately for each metadata field, and do a multi-vector search.
Add filters to the UI of your RAG chat application, as part of the chat box or a sidebar of settings.
Use fine-tuning on a model to help it realize when it should call particular functions or respond a certain way. You could even teach it to use a structured query syntax, and remove the functions entirely from your call. This is a last resort, however, since fine-tuning is costly and time-consuming.
Microsoft Tech Community – Latest Blogs –Read More

Stories of Women Empowerment with Microsoft MVPs
March 8 is celebrated globally as International Women’s Day, a day dedicated to honoring the progress towards gender equality and the empowerment of women worldwide.
Today, we would like to showcase a compilation of stories from Microsoft MVPs who have supported the advancement of women in the IT industry over the past year. Please read the stories of community leaders who act as role models and allies for women in technology support women’s technical learning.
Jessica’s Fantastic Achievement in Women Empowerment
Inspiring story of the Women Who Code’s Top 100 Technologists to Watch in 2023, Jessica Engström in Sweden.
Mixed Reality, Metaverse, and Diversity in Tech
MVPs guided diverse audiences in Berlin to new dimensions and discussed diversity in the tech industry.
WoMakersCode Conference Empowers Tech Women
Brazilian MVPs collaborated with WoMakersCode, inspiring women in tech through shared expertise and enthusiasm.
MPPC23: MVPs Unveiled the Future of Power Platform
Business Applications MVP, Azure McFarlane, joined the panel on Women & Allies in Low Code explored the stories, achievements, and obstacles of women and allies in the low-code field.
MVP Jonah Andersson, Nordic Women in Tech Winner
Introducing Azure MVP Jonah Andersson‘s journey to date and her passion for community activities.
Ryan O’Connell Making a Difference in Inclusive Skilling
MVP Ryan O’Connell, a Microsoft Azure MVP, is helping thousands of people around the world to learn and grow in tech, including a Microsoft New Zealand initiative called 10kWomen.
Microsoft Tech Community – Latest Blogs –Read More
![Azure Verified Modules – Monthly Update [February]](https://techcommunity.microsoft.com/t5/image/serverpage/image-id/557729i5254AA0767A025C8/image-size/large?v=v2&px=999)
Azure Verified Modules – Monthly Update [February]
New To This Series?
For Azure Verified Modules, we will be producing monthly updates in which, we will share with you the latest news and features of Azure Verified Modules, including:
Module updates
Common updates to the AVM framework.
Our community engagement
For some months we may focus on a highlight module this could be a pattern or a workflow in which the community (You!) would like to know more about from the module owner.
In you haven’t already go check out the Introduction to Azure Verified Modules below!
AVM Module Summary
The AVM team are excited that our community have been busy building AVM Modules. As of February 29th the AVM Footprint currently looks like:
Language
Published
In development
Bicep
91
23
Terraform
26
38
Bicep Resource Modules Published In February:
Full list of Bicep Resource Modules are available here: AVM Bicep Resource Index
compute/availability-set
desktop-virtualization/application-group
desktop-virtualization/host-pool
desktop-virtualization/scaling-plan
desktop-virtualization/workspace
dev-test-lab/lab
insights/private-link-scope
machine-learning-services/workspace
management/management-group
network/ip-group
network/network-manager
network/private-link-service
network/virtual-hub
network/virtual-wan
purview/account
synapse/private-link-hub
synapse/workspace
virtual-machine-images/image-template
Terraform Resource Modules Published In February:
Full list of Terraform Resource Modules are available here: AVM Terraform Resource Index
app-managedenvironment
avs-privatecloud
cognitiveservices-account
compute-virtualmachinescaleset
network-bastionhost
network-networksecuritygroup
network-privatednszone
network-publicipaddress
storage-storageaccount
web-site
web-staticsite
Updates and Improvements
We have also made some updates and improvements to the existing Azure Verified Modules, based on your feedback and suggestions. Some of the highlights are:
Bicep
All Azure Verified Bicep Modules have been published with the `with-source` function enabling you to access the module source in Visual Studio Code while consuming the module
All new issue and pull request templates
Announces on the Bicep Community call the retirement of the Public Bicep Registry Modules started, with Azure Verified Modules replacements in Development or Published!
Alignment of resources with the new version of the Private Endpoints interface
Fix for implicit dependencies to all module
Improved robustness of region rotation for bicep test deployments
Terraform
Fully implemented GREPT tool for repository linting
59+ Rules have been added to the TFLint tool which is currently being implemented
GitHub App – being developed by Engineering to support post push events and auto fix code
MVP in place for the AVM Terraform Testing Framework
AVM General
Contribution Guides have been updated for both Bicep and Terraform aligning to the latest processes.
@jtracey93msft features on the Ctrl+Alt+Azure | 226 – Azure Verified Modules discussing all things AVM!
For more resources about Azure Verified Modules Resources page containing all the useful content the AVM Team is generating Resources | Azure Verified Modules
Microsoft Tech Community – Latest Blogs –Read More
RAG techniques: Function calling for more structured retrieval
Retrieval Augmented Generation (RAG) is a popular technique to get LLMs to provide answers that are grounded in a data source. When we use RAG, we use the user’s question to search a knowledge base (like Azure AI Search), then pass along both the question and the relevant content to the LLM (gpt-3.5-turbo or gpt-4), with a directive to answer only according to the sources. In psuedo-code:
user_query = “what’s in the Northwind Plus plan?”
user_query_vector = create_embedding(user_query, “ada-002”)
results = search(user_query, user_query_vector)
response = create_chat_completion(system_prompt, user_query, results)
If the search function can find the right results in the index (assuming the answer is somewhere in the index), then the LLM can typically do a pretty good job of synthesizing the answer from the sources.
Unstructured queries
This simple RAG approach works best for “unstructured queries”, like:
What’s in the Northwind Plus plan?
What are the expectations of a product manager?
What benefits are provided by the company?
When using Azure AI Search as the knowledge base, the search call will perform both a vector and keyword search, finding all the relevant document chunks that match the keywords and concepts in the query.
Structured queries
But you may find that users are instead asking more “structured” queries, like:
Summarize the document called “perksplus.pdf”
What are the topics in documents by Pamela Fox?
Key points in most recent uploaded documents
We can think of them as structured queries, because they’re trying to filter on specific metadata about a document. You could imagine a world where you used a syntax to specify that metadata filtering, like:
Summarize the document title:perksplus.pdf
Topics in documents author:PamelaFox
Key points time:2weeks
We don’t want to actually introduce a query syntax to a a RAG chat application if we don’t need to, since only power users tend to use specialized query syntax, and we’d ideally have our RAG just do the right thing in that situation.
Using function calling in RAG
Fortunately, we can use the OpenAI function-calling feature to recognize that a user’s query would benefit from a more structured search, and perform that search instead.
If you’ve never used function calling before, it’s an alternative way of asking an OpenAI GPT model to respond to a chat completion request. In addition to sending our usual system prompt, chat history, and user message, we also send along a list of possible functions that could be called to answer the question. We can define those in JSON or as a Pydantic model dumped to JSON. Then, when the response comes back from the model, we can see what function it decided to call, and with what parameters. At that point, we can actually call that function, if it exists, or just use that information in our code in some other way.
To use function calling in RAG, we first need to introduce an LLM pre-processing step to handle user queries, as I described in my previous blog post. That will give us an opportunity to intercept the query before we even perform the search step of RAG.
For that pre-processing step, we can start off with a function to handle the general case of unstructured queries:
tools: List[ChatCompletionToolParam] = [
{
“type”: “function”,
“function”: {
“name”: “search_sources”,
“description”: “Retrieve sources from the Azure AI Search index”,
“parameters”: {
“type”: “object”,
“properties”: {
“search_query”: {
“type”: “string”,
“description”: “Query string to retrieve documents from azure search eg: ‘Health care plan'”,
}
},
“required”: [“search_query”],
},
},
}
]
Then we send off a request to the chat completion API, letting it know it can use that function.
chat_completion: ChatCompletion = self.openai_client.chat.completions.create(
messages=messages,
model=model,
temperature=0.0,
max_tokens=100,
n=1,
tools=tools,
tool_choice=”auto”,
)
When the response comes back, we process it to see if the model decided to call the function, and extract the search_query parameter if so.
response_message = chat_completion.choices[0].message
if response_message.tool_calls:
for tool in response_message.tool_calls:
if tool.type != “function”:
continue
function = tool.function
if function.name == “search_sources”:
arg = json.loads(function.arguments)
search_query = arg.get(“search_query”, self.NO_RESPONSE)
If the model didn’t include the function call in its response, that’s not a big deal as we just fall back to using the user’s original query as the search query. We proceed with the rest of the RAG flow as usual, sending the original question with whatever results came back in our final LLM call.
Adding more functions for structured queries
Now that we’ve introduced one function into the RAG flow, we can more easily add additional functions to recognize structured queries. For example, this function recognizes when a user wants to search by a particular filename:
{
“type”: “function”,
“function”: {
“name”: “search_by_filename”,
“description”: “Retrieve a specific filename from the Azure AI Search index”,
“parameters”: {
“type”: “object”,
“properties”: {
“filename”: {
“type”: “string”,
“description”: “The filename, like ‘PerksPlus.pdf'”,
}
},
“required”: [“filename”],
},
},
},
We need to extend the function parsing code to extract the filename argument:
if function.name == “search_by_filename”:
arg = json.loads(function.arguments)
filename = arg.get(“filename”, “”)
filename_filter = filename
Then we can decide how to use that filename filter. In the case of Azure AI search, I build a filter that checks that a particular index field matches the filename argument, and pass that to my search call. If using a relational database, it’d become an additional WHERE clause.
Simply by adding that function, I was able to get much better answers to questions in my RAG app like ‘Summarize the document called “perksplus.pdf”‘, since my search results were truly limited to chunks from that file. You can see my full code changes to add this function to our RAG starter app repo in this PR.
Considerations
This can be a very powerful technique, but as with all things LLM, there are gotchas:
Function definitions add to your prompt token count, increasing cost.
There may be times where the LLM doesn’t decide to return the function call, even when you thought it should have.
The more functions you add, the more likely the LLM will get confused about which one to pick, especially if functions are similar to each other. You can try to make it more clear to the LLM by prompt engineering the function name and description, or even providing few shots.
Here are additional approaches you can try:
Content expansion: Store metadata inside the indexed field and compute the embedding based on both the metadata and content. For example, the content field could have “filename:perksplus.pdf text:The perks are…”.
Add metadata as separate fields in the search index, and append those to the content sent to the LLM. For example, you could put “Last modified: 2 weeks ago” in each chunk sent to the LLM, if you were trying to help it’s ability to answer questions about recency. This is similar to the content expansion approach, but the metadata isn’t included when calculating the embedding. You could also compute embeddings separately for each metadata field, and do a multi-vector search.
Add filters to the UI of your RAG chat application, as part of the chat box or a sidebar of settings.
Use fine-tuning on a model to help it realize when it should call particular functions or respond a certain way. You could even teach it to use a structured query syntax, and remove the functions entirely from your call. This is a last resort, however, since fine-tuning is costly and time-consuming.
Microsoft Tech Community – Latest Blogs –Read More

Evolving user enablement in the era of AI
Our work in driving adoption is focused on nurturing business users, stakeholders, and organizations as a whole to get the maximum benefit from their selected technology experiences. This work manifests our #PeopleFirst strategy by being grounded in empathy for the user journey and the change fatigue that can be experienced when features are shared without the proper use case context and support. In the era of AI, this work must evolve to meet the moment and the needs of ourselves and our stakeholders. At Microsoft over the last year, we have been focused on learning how AI is influencing this critical area by listening and learning from customers, partners, and experts around the globe who are taking this journey with us.
Today marks an important milestone. We have launched the Copilot Success Kit, which integrates many new and existing resources and is based on our engagement with customers around the world. It covers the three core elements of AI enablement – the leadership journey, user enablement and technical readiness – with real world guidance and tools to support your implementation. You can read the blog in our Microsoft 365 Copilot community or go directly to the experience via our Copilot Hub at adoption.microsoft.com/copilot
Our overall implementation framework has evolved into the four phases shown below; get ready, onboard & engage, deliver impact and extend & optimize:
User Enablement model for Microsoft 365
Horizontally aligned to these phases are the three core workstreams: the leadership journey, user enablement, and technical readiness. They are now expressed as distinct and equally important components of implementation. To be clear, user enablement is not a “bolt on” to technical readiness but both its own body of work and professional discipline. This now represents the new Microsoft 365 Implementation Framework, which we are publishing first in the context of Copilot. Over the coming months, you will see our existing documentation and guidance materials for other areas such as the new Microsoft Teams, Microsoft Viva, and others align to this model.
You will note our transition to the term “user enablement” from “adoption.” The adoption phrase will continue to be used from an overall executive leadership perspective in the context of “driving AI adoption” for an organization. However, our work with business users and group managers of an organization has a different outcome. We strive to create user satisfaction as a primary objective encouraging people to remain on a continuous path of progressive skilling. Consequently, our work is better described by the term user enablement, and you will see this reflected across the Microsoft 365 content going forward, as evidenced first with our Copilot Success Kit resources.
This further reflects the cyclical nature of our work. In the most successful user enablement programs, there is a lifecycle of reviewing technology capabilities to build technical acumen, applying them to stated business goals through the employee engagement driven by Champions, and ongoing skilling programs. This progressive skilling journey is at the heart of what we do and is augmented by the flow of user feedback we receive.
In addition to these new resources, we have also launched the interactive Scenario Library on adoption.microsoft.com. This interactive methodology of aligning business scenarios to Microsoft 365 capabilities has long been planned for our site. Our work on Copilot enablement made clear the need to expand from our existing Day in the Life assets to an online experience that can be used interactively with customers and stakeholders. This is supported by downloadable content that can be customized and used in your own organizations. We’d love to hear your feedback in using it to train Champions and others on how to think of Copilot and Microsoft 365 apps.
Copilot for Microsoft 365 interactive scenario library
This community has long been a source of inspiration and learning for Microsoft, and we invite you to give feedback on our newly documented approach. Those of you who utilized the Microsoft Teams Success Kit will recognize some of this approach, but we have also evolved our content to support the unique needs of those on the journey to utilize Copilot across Microsoft 365 apps. Join us in the upcoming Microsoft 365 Champion community call to hear more discussion on this direction and what’s next for our supporting tools across other user enablement opportunities.
Microsoft Tech Community – Latest Blogs –Read More
Instant File Initialization for the transaction log | SQL Server 2022 Hidden Gems | Data Exposed
Next in the SQL Server 2022 hidden gems series you’ll learn about Instant file Initialization (IFI) behavior for Log file growth even with TDE enabled (does not require special privilege).
Resources:
What’s new in SQL Server 2022 – SQL Server | Microsoft Learn
Microsoft Tech Community – Latest Blogs –Read More


