

Category: Microsoft
Category Archives: Microsoft

How to remove/hide white space in SharePoint?
Hi, I’m new to SharePoint.
I wonder if the blank white space on our landing page/section can be removed? I’m stuck here :’) I’ve done some research, and there’s no out-of-the-box solution that can be used to hide this. However, I believe we can use CSS or something similar to solve this issue. Has anyone tried using a CSS injector to solve this? Would you mind sharing how to do this?
I’ve attached sample image below so that you can visualize it. Appreciate it if there is any help! Thanks
Hi, I’m new to SharePoint. I wonder if the blank white space on our landing page/section can be removed? I’m stuck here :’) I’ve done some research, and there’s no out-of-the-box solution that can be used to hide this. However, I believe we can use CSS or something similar to solve this issue. Has anyone tried using a CSS injector to solve this? Would you mind sharing how to do this? I’ve attached sample image below so that you can visualize it. Appreciate it if there is any help! Thanks Read More

What to Do When QuickBooks Automatic Backup not working
Troubleshooting QuickBooks Automatic Backup Not Working: Causes, Symptoms, and Solutions
QuickBooks Automatic Backup is a critical feature that helps safeguard your financial data by automatically creating backup copies of your company file. However, encountering issues where QuickBooks Automatic Backup is not working can be concerning for users. In this article, we’ll explore the possible reasons behind this problem, its symptoms, and effective solutions to ensure your data remains protected.
What is QuickBooks Automatic Backup?
QuickBooks Automatic Backup is a feature that allows users to schedule regular backups of their company file without manual intervention. These backups provide a safety net in case of data loss due to system failures, corruption, or other unforeseen circumstances.
Reasons for QuickBooks Automatic Backup Not Working:
Backup Settings Misconfiguration: Incorrect configuration of backup settings within QuickBooks can prevent the automatic backup feature from working as intended. This includes improper scheduling, incorrect backup locations, or disabled backup options.
Interruptions in Network Connectivity: QuickBooks relies on stable network connectivity to perform automatic backups. If there are interruptions or issues with the network connection, the backup process may fail or become unreliable.
Insufficient Disk Space: If the destination drive where QuickBooks is set to save automatic backups runs out of disk space, the backup process will fail. Insufficient disk space can prevent QuickBooks from creating new backup files or overwrite existing ones.
Corrupted QuickBooks Installation: Issues with the QuickBooks installation itself, such as corrupted program files or missing components, can interfere with the automatic backup process. A damaged installation can lead to various errors and malfunctions, including backup failures.
Conflicts with Third-Party Software: Certain third-party applications or security software installed on the computer may conflict with QuickBooks, causing issues with the automatic backup process. This can include antivirus programs, firewalls, or backup utilities that interfere with QuickBooks operations.
Symptoms of QuickBooks Automatic Backup Not Working:
No backup files are created at the scheduled times.Error messages or notifications indicating backup failures.Manual attempts to initiate backup result in errors or unexpected behavior.
Solutions to QuickBooks Automatic Backup Not Working:
Verify Backup Settings: Review the backup settings within QuickBooks to ensure they are configured correctly. Check the backup schedule, destination folder, and any other relevant settings to confirm they match your requirements.
Check Network Connectivity: Ensure that the computer running QuickBooks has a stable and reliable network connection. Troubleshoot any network issues that may be causing interruptions or delays in the backup process.
Free Up Disk Space: Check the available disk space on the drive where QuickBooks saves backup files. Delete any unnecessary files or move existing backups to a different location to free up space. Consider increasing the storage capacity if disk space is consistently low.
Repair QuickBooks Installation: If QuickBooks is experiencing issues due to a corrupted installation, repair the installation using the QuickBooks Install Diagnostic Tool or by reinstalling QuickBooks. This can help resolve any underlying software issues affecting the automatic backup feature.
Disable Conflicting Software: Temporarily disable or adjust settings for any third-party software that may be interfering with QuickBooks operations. This includes antivirus programs, firewalls, or backup utilities that may be blocking or interrupting the backup process.
Manually Initiate Backup: If automatic backups are not working reliably, manually initiate backups from within QuickBooks as a temporary workaround. This ensures that you have recent backup copies of your company file until the automatic backup feature is restored.
Conclusion:
QuickBooks Automatic Backup is a valuable feature that helps protect your financial data from loss or corruption. However, when this feature is not working correctly, it can jeopardize the integrity of your backups and leave your data vulnerable. By identifying the possible reasons for automatic backup failures and implementing the solutions outlined in this article, you can ensure that your data remains safe and secure in QuickBooks. Regularly monitor backup processes and address any issues promptly to maintain data integrity and peace of mind.
Troubleshooting QuickBooks Automatic Backup Not Working: Causes, Symptoms, and SolutionsQuickBooks Automatic Backup is a critical feature that helps safeguard your financial data by automatically creating backup copies of your company file. However, encountering issues where QuickBooks Automatic Backup is not working can be concerning for users. In this article, we’ll explore the possible reasons behind this problem, its symptoms, and effective solutions to ensure your data remains protected.What is QuickBooks Automatic Backup?QuickBooks Automatic Backup is a feature that allows users to schedule regular backups of their company file without manual intervention. These backups provide a safety net in case of data loss due to system failures, corruption, or other unforeseen circumstances.Reasons for QuickBooks Automatic Backup Not Working:Backup Settings Misconfiguration: Incorrect configuration of backup settings within QuickBooks can prevent the automatic backup feature from working as intended. This includes improper scheduling, incorrect backup locations, or disabled backup options.Interruptions in Network Connectivity: QuickBooks relies on stable network connectivity to perform automatic backups. If there are interruptions or issues with the network connection, the backup process may fail or become unreliable.Insufficient Disk Space: If the destination drive where QuickBooks is set to save automatic backups runs out of disk space, the backup process will fail. Insufficient disk space can prevent QuickBooks from creating new backup files or overwrite existing ones.Corrupted QuickBooks Installation: Issues with the QuickBooks installation itself, such as corrupted program files or missing components, can interfere with the automatic backup process. A damaged installation can lead to various errors and malfunctions, including backup failures.Conflicts with Third-Party Software: Certain third-party applications or security software installed on the computer may conflict with QuickBooks, causing issues with the automatic backup process. This can include antivirus programs, firewalls, or backup utilities that interfere with QuickBooks operations.Symptoms of QuickBooks Automatic Backup Not Working:No backup files are created at the scheduled times.Error messages or notifications indicating backup failures.Manual attempts to initiate backup result in errors or unexpected behavior.Solutions to QuickBooks Automatic Backup Not Working:Verify Backup Settings: Review the backup settings within QuickBooks to ensure they are configured correctly. Check the backup schedule, destination folder, and any other relevant settings to confirm they match your requirements.Check Network Connectivity: Ensure that the computer running QuickBooks has a stable and reliable network connection. Troubleshoot any network issues that may be causing interruptions or delays in the backup process.Free Up Disk Space: Check the available disk space on the drive where QuickBooks saves backup files. Delete any unnecessary files or move existing backups to a different location to free up space. Consider increasing the storage capacity if disk space is consistently low.Repair QuickBooks Installation: If QuickBooks is experiencing issues due to a corrupted installation, repair the installation using the QuickBooks Install Diagnostic Tool or by reinstalling QuickBooks. This can help resolve any underlying software issues affecting the automatic backup feature.Disable Conflicting Software: Temporarily disable or adjust settings for any third-party software that may be interfering with QuickBooks operations. This includes antivirus programs, firewalls, or backup utilities that may be blocking or interrupting the backup process.Manually Initiate Backup: If automatic backups are not working reliably, manually initiate backups from within QuickBooks as a temporary workaround. This ensures that you have recent backup copies of your company file until the automatic backup feature is restored.Conclusion:QuickBooks Automatic Backup is a valuable feature that helps protect your financial data from loss or corruption. However, when this feature is not working correctly, it can jeopardize the integrity of your backups and leave your data vulnerable. By identifying the possible reasons for automatic backup failures and implementing the solutions outlined in this article, you can ensure that your data remains safe and secure in QuickBooks. Regularly monitor backup processes and address any issues promptly to maintain data integrity and peace of mind. Read More

Multiplication with Formulas and VLookup incorrect
I have a workbook utilizing VLookup that the results display correctly i.e., 0.53 is the correct answer in the amount column. I want to multiply that against 14 (number of supplement pills). My formula for the total of 0.53 x 14 equals $7.47 but really the answer should be $7.42.
I have a workbook utilizing VLookup that the results display correctly i.e., 0.53 is the correct answer in the amount column. I want to multiply that against 14 (number of supplement pills). My formula for the total of 0.53 x 14 equals $7.47 but really the answer should be $7.42. Read More
Update on Labs Security Impacts (5/3)
Hello TSPs,
As outlined in today’s blog post by Charlie Bell (Executive Vice President, Microsoft Security), Microsoft continues to make security a top priority internally as well as with our partners and customers. Unfortunately, the unintended consequence of this focus continues to impact labs within our training ecosystem. We are keenly aware how these tenant issues are impacting your training business, from reducing the richness of the overall training experience all the way to potentially cancelled classes.
We have updated the previously shared FAQ (attached) to provide additional details and answer your questions. While we’ve reached a resolution in some courses (see below), the larger question regarding when tenant access will be broadly available is still an unknown. As meaningful updates become available, we will share them here on our Training Services Partner Community (Forum).
Today’s update (8 courses):
SC-300: tenants are now being made available to the Authorized Lab Hosters (ALHs). We are working on creating stockpiles to support the quantity of classes
PL-300 & DP-605: ALHs are now offering these labs via their own Azure subscriptions, and not the M365 tenants
PL-100, PL-900, PL-7001, PL-7002, PL-7003: Skillable has created an M365 tenant solution which is now available to TSPs
Our team is working hard behind the scenes to reinstate tenants or create workarounds for all impacted courses. If you have further questions, please post them via this thread.
Thank you for your partnership,
Dan
Hello TSPs,
As outlined in today’s blog post by Charlie Bell (Executive Vice President, Microsoft Security), Microsoft continues to make security a top priority internally as well as with our partners and customers. Unfortunately, the unintended consequence of this focus continues to impact labs within our training ecosystem. We are keenly aware how these tenant issues are impacting your training business, from reducing the richness of the overall training experience all the way to potentially cancelled classes.
We have updated the previously shared FAQ (attached) to provide additional details and answer your questions. While we’ve reached a resolution in some courses (see below), the larger question regarding when tenant access will be broadly available is still an unknown. As meaningful updates become available, we will share them here on our Training Services Partner Community (Forum).
Today’s update (8 courses):
SC-300: tenants are now being made available to the Authorized Lab Hosters (ALHs). We are working on creating stockpiles to support the quantity of classes
PL-300 & DP-605: ALHs are now offering these labs via their own Azure subscriptions, and not the M365 tenants
PL-100, PL-900, PL-7001, PL-7002, PL-7003: Skillable has created an M365 tenant solution which is now available to TSPs
Our team is working hard behind the scenes to reinstate tenants or create workarounds for all impacted courses. If you have further questions, please post them via this thread.
Thank you for your partnership,
Dan Read More

What to Do When Getting QuickBooks error 6000 1074
QuickBooks is an indispensable tool for businesses, simplifying financial management and streamlining accounting processes. However, like any software, it can encounter errors that disrupt workflow and cause frustration. One such error is QuickBooks Error 6000 1074, which can arise due to various reasons. In this article, we’ll delve into the causes, symptoms, and solutions for this error to help you resolve it efficiently.
What is QuickBooks Error 6000 1074?
QuickBooks Error 6000 1074 is a company file error that typically occurs when users try to open a company file in QuickBooks Desktop. It indicates that QuickBooks is unable to access the company file, leading to disruption in operations. This error can prevent users from accessing their financial data, thereby hindering crucial accounting tasks.
Causes of QuickBooks Error 6000 1074:
Corrupted Company File: One of the primary reasons for this error is a corrupted company file. Corruption can occur due to various factors such as improper shutdowns, network issues, or malware.
Incorrect Folder Permissions: Insufficient permissions for the folder containing the company file can also trigger this error. QuickBooks requires specific permissions to access and modify company files. If these permissions are not set correctly, it can lead to error 6000 1074.
Damaged Network Data Files: Issues with network data files, such as the .ND or .TLG files, can result in QuickBooks errors. These files facilitate multi-user access to the company file, and any damage to them can cause errors during file access.
Outdated QuickBooks Version: Using an outdated version of QuickBooks can also contribute to errors. Intuit regularly releases updates and patches to fix bugs and enhance performance. Failure to update QuickBooks can leave you vulnerable to various errors, including error 6000 1074.
Symptoms of QuickBooks Error 6000 1074:
Inability to open the company file.QuickBooks freezes or crashes when attempting to access the company file.Error message prompts displaying “Error -6000, -1074” or similar.
Solutions to QuickBooks Error 6000 1074:
Run QuickBooks File Doctor: Start by running the QuickBooks File Doctor, a diagnostic tool designed to identify and fix file-related errors in QuickBooks. This tool can automatically detect and repair issues with company files, network connectivity, and folder permissions.
Verify Folder Permissions: Ensure that the folder containing the company file has the correct permissions set for all users. You can adjust folder permissions through the Windows File Explorer by right-clicking on the folder, selecting “Properties,” and navigating to the “Security” tab.
Rename .ND and .TLG Files: Renaming the network data (.ND) and transaction log (.TLG) files associated with the company file can sometimes resolve errors. QuickBooks automatically recreates these files when you open the company file. Locate these files in the same directory as your company file and add “.old” to their file extensions (e.g., company_file.qbw.nd.old).
Update QuickBooks: Ensure that you are using the latest version of QuickBooks Desktop. Check for updates within QuickBooks by navigating to the “Help” menu and selecting “Update QuickBooks Desktop.” Download and install any available updates to patch known issues and improve compatibility.
Restore from Backup: If the above steps fail to resolve the error and you have a recent backup of the company file, consider restoring the backup to a previous working state. This can help eliminate any corruption or data integrity issues causing the error.
Conclusion:
QuickBooks Error 6000 1074 can disrupt your workflow and impede critical accounting tasks. However, with the right troubleshooting steps, you can effectively diagnose and resolve this error. By understanding the causes, symptoms, and solutions outlined in this article, you can minimize downtime and ensure smooth operation of QuickBooks for your business.
QuickBooks is an indispensable tool for businesses, simplifying financial management and streamlining accounting processes. However, like any software, it can encounter errors that disrupt workflow and cause frustration. One such error is QuickBooks Error 6000 1074, which can arise due to various reasons. In this article, we’ll delve into the causes, symptoms, and solutions for this error to help you resolve it efficiently.What is QuickBooks Error 6000 1074?QuickBooks Error 6000 1074 is a company file error that typically occurs when users try to open a company file in QuickBooks Desktop. It indicates that QuickBooks is unable to access the company file, leading to disruption in operations. This error can prevent users from accessing their financial data, thereby hindering crucial accounting tasks.Causes of QuickBooks Error 6000 1074:Corrupted Company File: One of the primary reasons for this error is a corrupted company file. Corruption can occur due to various factors such as improper shutdowns, network issues, or malware.Incorrect Folder Permissions: Insufficient permissions for the folder containing the company file can also trigger this error. QuickBooks requires specific permissions to access and modify company files. If these permissions are not set correctly, it can lead to error 6000 1074.Damaged Network Data Files: Issues with network data files, such as the .ND or .TLG files, can result in QuickBooks errors. These files facilitate multi-user access to the company file, and any damage to them can cause errors during file access.Outdated QuickBooks Version: Using an outdated version of QuickBooks can also contribute to errors. Intuit regularly releases updates and patches to fix bugs and enhance performance. Failure to update QuickBooks can leave you vulnerable to various errors, including error 6000 1074.Symptoms of QuickBooks Error 6000 1074:Inability to open the company file.QuickBooks freezes or crashes when attempting to access the company file.Error message prompts displaying “Error -6000, -1074” or similar.Solutions to QuickBooks Error 6000 1074:Run QuickBooks File Doctor: Start by running the QuickBooks File Doctor, a diagnostic tool designed to identify and fix file-related errors in QuickBooks. This tool can automatically detect and repair issues with company files, network connectivity, and folder permissions.Verify Folder Permissions: Ensure that the folder containing the company file has the correct permissions set for all users. You can adjust folder permissions through the Windows File Explorer by right-clicking on the folder, selecting “Properties,” and navigating to the “Security” tab.Rename .ND and .TLG Files: Renaming the network data (.ND) and transaction log (.TLG) files associated with the company file can sometimes resolve errors. QuickBooks automatically recreates these files when you open the company file. Locate these files in the same directory as your company file and add “.old” to their file extensions (e.g., company_file.qbw.nd.old).Update QuickBooks: Ensure that you are using the latest version of QuickBooks Desktop. Check for updates within QuickBooks by navigating to the “Help” menu and selecting “Update QuickBooks Desktop.” Download and install any available updates to patch known issues and improve compatibility.Restore from Backup: If the above steps fail to resolve the error and you have a recent backup of the company file, consider restoring the backup to a previous working state. This can help eliminate any corruption or data integrity issues causing the error.Conclusion:QuickBooks Error 6000 1074 can disrupt your workflow and impede critical accounting tasks. However, with the right troubleshooting steps, you can effectively diagnose and resolve this error. By understanding the causes, symptoms, and solutions outlined in this article, you can minimize downtime and ensure smooth operation of QuickBooks for your business. Read More
Dev Channel update to 126.0.2552.0 is live.
Hello Insiders! We released 126.0.2552.0 to the Dev channel! This includes numerous fixes. For more details on the changes, check out the highlights below.
Added Features:
Implemented a mute button on the taskbar.
The capture menu toolbar has been added to the PDF file.
Improved Reliability:
Fixed an issue where the browser would crash when users clicked on ‘Leave workspace’.
Fixed a browser crash on android.
Fixed an issue that caused the browser to crash upon closing the final tab.
Changed Behavior:
Resolved an issue where the share box would briefly appear blank and then vanish after a few seconds.
Fixed an issue where tabs that had been deleted reappeared after restarting.
Resolved a problem where there were visual style discrepancies on the product detail page, including issues with margins, colors, border radius, and shadows, within the extension.
Resolved a problem that caused visual distortions when tabs were grouped in a vertical layout.
Fixed an issue where horizontal scroll bar and vertical bar appeared in FRE.
The issue where the side pane would unexpectedly open after FRE has been resolved.
Fixed an issue where the page at edge://settings/appearance/CustomizeToolbar was displaying as blank.
Fixed an issue that prevented the sharing of screenshots via Outlook.
iOS: Fixed an issue where the string in the toolbar settings page needed to be changed.
Mac: Resolved an issue where the Send Feedback feature initially displayed a blank screenshot. Subsequent attempts would then show the previously captured screenshot on Mac.
Android:
Resolved a problem where the keyboard focus was not moving to the ‘Earn More Rewards’ link within the Microsoft Rewards section on Android.
Fixed an issue when altering the background color, the page no longer flashes on Android.
See an issue that you think might be a bug? Remember to send that directly through the in-app feedback by heading to the … menu > Help and feedback > Send feedback and include diagnostics so the team can investigate.
Thanks again for sending us feedback and helping us improve our Insider builds.
~Gouri
Hello Insiders! We released 126.0.2552.0 to the Dev channel! This includes numerous fixes. For more details on the changes, check out the highlights below.
Leading in the era of AI: How Microsoft’s platform differentiation and Copilot empowerment are driving AI Transformation – The Official Microsoft Blog
Added Features:
Implemented a mute button on the taskbar.
The capture menu toolbar has been added to the PDF file.
Improved Reliability:
Fixed an issue where the browser would crash when users clicked on ‘Leave workspace’.
Fixed a browser crash on android.
Fixed an issue that caused the browser to crash upon closing the final tab.
Changed Behavior:
Resolved an issue where the share box would briefly appear blank and then vanish after a few seconds.
Fixed an issue where tabs that had been deleted reappeared after restarting.
Resolved a problem where there were visual style discrepancies on the product detail page, including issues with margins, colors, border radius, and shadows, within the extension.
Resolved a problem that caused visual distortions when tabs were grouped in a vertical layout.
Fixed an issue where horizontal scroll bar and vertical bar appeared in FRE.
The issue where the side pane would unexpectedly open after FRE has been resolved.
Fixed an issue where the page at edge://settings/appearance/CustomizeToolbar was displaying as blank.
Fixed an issue that prevented the sharing of screenshots via Outlook.
iOS: Fixed an issue where the string in the toolbar settings page needed to be changed.
Mac: Resolved an issue where the Send Feedback feature initially displayed a blank screenshot. Subsequent attempts would then show the previously captured screenshot on Mac.
Android:
Resolved a problem where the keyboard focus was not moving to the ‘Earn More Rewards’ link within the Microsoft Rewards section on Android.
Fixed an issue when altering the background color, the page no longer flashes on Android.
See an issue that you think might be a bug? Remember to send that directly through the in-app feedback by heading to the … menu > Help and feedback > Send feedback and include diagnostics so the team can investigate.
Thanks again for sending us feedback and helping us improve our Insider builds.
~Gouri Read More
All about SQL drivers and access tokens
We often get support escalations related to failures around expired access tokens when using Microsoft Entra ID (formerly Azure Active Directory) authentication. There is a lot of nuance in the various drivers about how and when access tokens are used and when they get renewed after expiring. I’m going to do a deep-dive and try to explain some of the details here.
This post is mainly targeted at people who have to troubleshoot issues in this area or those who are building large services and need to understand the impact of their authentication choices.
The Problem
Errors related to expired access tokens usually involve an error like “Login failed for user ‘xxxxxx’.” (Pretty generic and unhelpful. Security minded folks don’t want to give potential attackers clues when authentication fails.) The error could happen either on connection open or statement execution.
Background
Connections to SQL use the MS-TDS protocol and it’s important to keep in mind that TDS is a stateful connection. Meaning the client authenticates at the beginning of the connection and the connection is maintained until the client closes it. There is no mechanism to re-authenticate (send a new access token) in TDS at any point other than at the beginning of a connection. Applications can execute many queries over long periods of time while the connection is open. Opening a connection and authenticating is also a relatively expensive operation. So, connection pools are often used to maximize performance, keeping connections open for a relatively long period.
Connection pools return a “logical” connection to applications that open a new connection. Each logical connection is serviced by a “physical” connection from the connection pool. When a logical connection is “closed” by the application, the physical connection is returned to the pool but remains open behind the scenes.
Obviously, the database validates access tokens when a connection is first opened. Another common point when tokens are validated is on a RESETCONNECTION event. A RESETCONNECTION event happens when a driver sets the RESETCONNECTION status in the next packet header. This is meant to be used in the context of connection pooling. A driver can set the flag in the header of the next statement execution on a logical connection coming out of a pool. When the server sees that status, it resets the environment prior to executing the statement. This helps prevent “dirty” physical connections from impacting different logical connections. It also helps prevent connection pools from persisting connections for security contexts that no longer should have access to the database. For example, you wouldn’t want a security context whose access has been revoked to continue to be able to create new logical connections. Relatedly, if an access token is near expiration or expired, a driver can close a physical connection from the pool instead of reusing it since an expired token would result in an error. It can then open a new physical connection with a new token to service the new logical connection request.
Speaking of connection pooling, not all drivers do connection pooling the same, so clarifying how connection pooling works is relevant to access tokens.
ODBC: Connection pooling in ODBC is handled by the ODBC driver manager, which is what is responsible for loading the correct ODBC driver requested by the application. The ODBC driver manager signals an ODBC driver when a connection is going into and out of the connection pool, so the ODBC driver for SQL Server knows when to set the RESETCONNECTION status. At the same time, it also knows if it needs to obtain a new access token and open a new connection on this event.
JDBC: In JDBC, connection pooling is handled by 3rd party libraries. There are connection pool specific JDBC classes that need to be used by the connection pool library. Those classes include APIs to let a driver know when a connection is going into or out of a connection pool. This signal is required for the driver to be able to set the RESETCONNECTION status. Unfortunately, not all connection pool libraries utilize those classes. HikariCP is the most notable one here that doesn’t use them. The implication is that, if you are using HikariCP, connections will live as long as their max lifetime as defined in HikariCP. You’ll need to manage that lifetime relative to the access token lifetime. Additionally, if an application encounters the “Login failed for user ’xxxxxx’.” error, the application or the connection pool will need to ensure the underlying connection is closed so that it isn’t reused by a subsequent connection request. This issue can be alleviated by adding a validation query to the connection pool settings that is run before the pool hands the connection out. This does come with a small performance penalty, though.
(Sidebar: HikariCP and others offer a lot of knobs to tune your connection pool. Don’t overload your authentication server with those settings. For example, say you have a microservice architecture with 200 nodes. Each node has its own connection pool with a minimum of 30 connections and a 20 minute connection lifetime. You’ll be hitting your authentication endpoint with an average of 200n * 30c / 20m = 300 requests per minute. Not necessarily spaced evenly over each minute because each set of 30 connections per node will be renewed simultaneously. You will most likely see intermittent authentication failures, if you do something like this. If you use the built-in authentication methods, the driver will try to serialize the authentication attempts and cache the access token for reuse. But this is not guaranteed across all versions.)
.NET: SqlClient (specifically, System.Data.SqlClient, or SDS, and Microsoft.Data.SqlClient, or MDS) implements connection pooling internally. It also uses the RESETCONNECTION status to indicate a connection coming out of a pool. If the pool uses token-based authentication, SqlClient will check the expiration date of the token before handing the connection to the application. If the token is expired or close to it (10 minutes), all connections in the pool are recycled and a new connection is created with a new token. All connections in the pool reuse the same cached token.
This all works pretty well when using the built-in token authentication methods (Authentication=ActiveDirectoryXXX). But let’s talk about access tokens passed from the application.
The SQL drivers also have a connection property that allows an application to pass an access token to them one way or another. What is the implication when applications do this? Well, that access token doesn’t have expiration information with it (at least not the part that is handed to the driver). This means the driver doesn’t know if a token is expired. You need to carefully manage connection lifetime in this scenario. If a connection is taken from a pool with an expired access token and the server sees RESETCONNECTION in the header, the server will validate the access token before executing the query that’s being sent (remember, we said above that RESETCONNECTION is sent in the header of the next statement execution). This will result in an execution error that the application will need to handle. This won’t invalidate the connection so it’s important that applications recognize this and stop using the expired token or the error will simply keep repeating as long as pooled connections persist. To correct the situation at runtime, the application will need to obtain a new token and create a new connection with the token. This creates a new pool because when the application passes the access token, the token is part of the pool key (it’s not part of the pool key when using the built-in methods). If you are using a driver that allows you to specify a minimum connection pool size, be sure to clear any pools using expired tokens in this scenario, or you might find them lingering forever (essentially a memory leak).
In the Microsoft JDBC Driver 12.4 for SQL Server, we’ve added an AccessTokenCallback on the connection to address this drawback of the AccessToken property. The MDS library added the same thing in 5.2. The callback allows the application to provide an access token and its expiration whenever the driver needs it.
All that said, I’ve heard of instances where customers say long running sessions (with lots of statement executions) result in token expired errors (Login failed for user ‘xxxxxx’. A severe error occurred on the current command. The results, if any, should be discarded.) on statement execution. However, after explaining the above, they usually go silent. I can’t tell for sure if the server might be validating access tokens on a query execution without RESETCONNECTION, or if they realize they are in one of the above scenarios. (The error and stack trace will be the same.) But the more you know, the easier it will be to figure out where the problem lies.
David Engel
Microsoft Tech Community – Latest Blogs –Read More
Dynamic sql within stored procedure security context
Hello,
We have stored procedure in database dbA, that runs (among other things) dynamic sql. It accesses several dbs, not just the one where stored procedure is (dbA). Db user domainnameusername has EXECUTE permission on this stored procedure.
When user runs this stored procedure, it is failing with the error that says “the server principle “domainnameusername” is not able to access the database “dbB” under the current security context“
Note that domainnameusername clearly exists in database dbB, it is not disabled, and following sql proves it:
select * from dbB.sys.sysusers where name = ‘domainnameusername’
I know that dynamic sql within stored procedure changes security context of its execution, but I would expect that since this user exists in all dbs (including dbB) it should not be the problem.
Does anybody have any idea what could be the issue?
Thanks
Hello, We have stored procedure in database dbA, that runs (among other things) dynamic sql. It accesses several dbs, not just the one where stored procedure is (dbA). Db user domainnameusername has EXECUTE permission on this stored procedure. When user runs this stored procedure, it is failing with the error that says “the server principle “domainnameusername” is not able to access the database “dbB” under the current security context” Note that domainnameusername clearly exists in database dbB, it is not disabled, and following sql proves it: select * from dbB.sys.sysusers where name = ‘domainnameusername’ I know that dynamic sql within stored procedure changes security context of its execution, but I would expect that since this user exists in all dbs (including dbB) it should not be the problem. Does anybody have any idea what could be the issue? Thanks Read More
What to Do When Getting QuickBooks Error 6123
QuickBooks is a powerful accounting software used by millions of businesses worldwide. However, like any complex software, QuickBooks is susceptible to errors that can disrupt your workflow. One such error is QuickBooks Error 6123, which can occur unexpectedly and cause frustration for users. In this article, we’ll explore what QuickBooks Error 6123 is, its common causes, and practical solutions to resolve it.
Understanding QuickBooks Error 6123
QuickBooks Error 6123 is a common error that typically occurs when opening or working with a company file in QuickBooks. It may manifest in different forms, such as error messages like “Error -6123, 0” or “Connection to the QuickBooks company file has been lost.” This error can prevent users from accessing their company files and may result in data loss if not addressed promptly.
Common Reasons for QuickBooks Desktop Error 6123
Damaged Company File: The most common cause of QuickBooks Error 6123 is a damaged or corrupted company file. This can happen due to various reasons, including improper shutdowns, network issues, or malware infections.
Firewall or Antivirus Interference: Sometimes, firewall or antivirus software installed on your computer may block QuickBooks from accessing the company file, leading to Error 6123.
Outdated QuickBooks Software: Using an outdated version of QuickBooks can also trigger Error 6123. It’s essential to keep your QuickBooks software up to date to avoid compatibility issues and errors.
Incomplete QuickBooks Installation: If QuickBooks is not installed correctly or some components are missing, it can result in Error 6123 when opening company files.
Multiple Users Accessing the Company File Simultaneously: When multiple users try to access the same company file simultaneously over a network, it can sometimes lead to file corruption and trigger Error 6123.
Solutions to QuickBooks Error 6123
Run QuickBooks File Doctor: QuickBooks File Doctor is a built-in tool designed to diagnose and fix common QuickBooks file-related issues, including Error 6123. Run the tool and follow the on-screen instructions to repair the damaged company file.
Update QuickBooks Software: Ensure that your QuickBooks software is updated to the latest version. QuickBooks releases regular updates and patches to address bugs and compatibility issues. Updating to the latest version may resolve Error 6123.
Disable Firewall and Antivirus Temporarily: Temporarily disable your firewall and antivirus software and try opening the company file again in QuickBooks. If the error doesn’t occur after disabling these programs, you may need to adjust their settings to allow QuickBooks access to the company file.
Copy Company File to a Different Location: Copy the company file from its current location to a different folder or drive on your computer. Sometimes, file path issues or permissions issues in the original location can cause Error 6123.
Rename .ND and .TLG Files: .ND (Network Data) and .TLG (Transaction Log) files are auxiliary files created by QuickBooks to access company files in multi-user mode. Renaming these files can sometimes resolve Error 6123. Locate the company file folder, find the .ND and .TLG files associated with your company file, and rename them by adding “.old” at the end of the file names.
Use QuickBooks Auto Data Recovery: If you have enabled QuickBooks Auto Data Recovery, you can attempt to recover lost data using this feature. QuickBooks creates a backup of your company file at regular intervals, which can be used to restore data in case of file corruption or errors like Error 6123.
Seek Professional Assistance: If none of the above solutions work or if you’re uncomfortable performing troubleshooting steps on your own, consider seeking help from QuickBooks experts or professional consultants. They can provide tailored solutions and guidance based on your specific situation.
Conclusion
QuickBooks Error 6123 can be a frustrating roadblock for users, but it’s not insurmountable. By understanding the common causes of this error and implementing the suggested solutions, you can effectively troubleshoot and resolve Error 6123, restoring access to your company files and minimizing downtime. Remember to take preventive measures such as regular backups and software updates to mitigate the risk of encountering such errors in the future. With the right approach and resources, you can keep your QuickBooks software running smoothly and focus on managing your finances effectively.
Related Searches:
6123 0 QuickBooks
6123 error QuickBooks
But QuickBooks Can’t Open your Company File
error 6123 0 QuickBooks
Error 6123 0 Restoring QuickBooks Backup
Error 6123 in QuickBooks
error 6123 in QuickBooks Desktop
error 6123 QuickBooks Desktop
Error 6123 While Restoring Company File
error code 6123 0 QuickBooks Desktop
error code 6123 in QuickBooks desktop
Get Help with QuickBooks Error 6123
I am Getting Error 6123 0 in QuickBooks
Problem Connecting to Server Error -6123 0
QB error 6123 0
QuickBooks -6123 0 error
QuickBooks 6123 error
QuickBooks Desktop Error 6123
QuickBooks desktop error 6123 0
QuickBooks error 6123
QuickBooks error code 6123
QuickBooks error message 6123 0
QuickBooks is a powerful accounting software used by millions of businesses worldwide. However, like any complex software, QuickBooks is susceptible to errors that can disrupt your workflow. One such error is QuickBooks Error 6123, which can occur unexpectedly and cause frustration for users. In this article, we’ll explore what QuickBooks Error 6123 is, its common causes, and practical solutions to resolve it. Understanding QuickBooks Error 6123 QuickBooks Error 6123 is a common error that typically occurs when opening or working with a company file in QuickBooks. It may manifest in different forms, such as error messages like “Error -6123, 0” or “Connection to the QuickBooks company file has been lost.” This error can prevent users from accessing their company files and may result in data loss if not addressed promptly. Common Reasons for QuickBooks Desktop Error 6123 Damaged Company File: The most common cause of QuickBooks Error 6123 is a damaged or corrupted company file. This can happen due to various reasons, including improper shutdowns, network issues, or malware infections.Firewall or Antivirus Interference: Sometimes, firewall or antivirus software installed on your computer may block QuickBooks from accessing the company file, leading to Error 6123.Outdated QuickBooks Software: Using an outdated version of QuickBooks can also trigger Error 6123. It’s essential to keep your QuickBooks software up to date to avoid compatibility issues and errors.Incomplete QuickBooks Installation: If QuickBooks is not installed correctly or some components are missing, it can result in Error 6123 when opening company files.Multiple Users Accessing the Company File Simultaneously: When multiple users try to access the same company file simultaneously over a network, it can sometimes lead to file corruption and trigger Error 6123. Solutions to QuickBooks Error 6123 Run QuickBooks File Doctor: QuickBooks File Doctor is a built-in tool designed to diagnose and fix common QuickBooks file-related issues, including Error 6123. Run the tool and follow the on-screen instructions to repair the damaged company file.Update QuickBooks Software: Ensure that your QuickBooks software is updated to the latest version. QuickBooks releases regular updates and patches to address bugs and compatibility issues. Updating to the latest version may resolve Error 6123.Disable Firewall and Antivirus Temporarily: Temporarily disable your firewall and antivirus software and try opening the company file again in QuickBooks. If the error doesn’t occur after disabling these programs, you may need to adjust their settings to allow QuickBooks access to the company file.Copy Company File to a Different Location: Copy the company file from its current location to a different folder or drive on your computer. Sometimes, file path issues or permissions issues in the original location can cause Error 6123.Rename .ND and .TLG Files: .ND (Network Data) and .TLG (Transaction Log) files are auxiliary files created by QuickBooks to access company files in multi-user mode. Renaming these files can sometimes resolve Error 6123. Locate the company file folder, find the .ND and .TLG files associated with your company file, and rename them by adding “.old” at the end of the file names.Use QuickBooks Auto Data Recovery: If you have enabled QuickBooks Auto Data Recovery, you can attempt to recover lost data using this feature. QuickBooks creates a backup of your company file at regular intervals, which can be used to restore data in case of file corruption or errors like Error 6123.Seek Professional Assistance: If none of the above solutions work or if you’re uncomfortable performing troubleshooting steps on your own, consider seeking help from QuickBooks experts or professional consultants. They can provide tailored solutions and guidance based on your specific situation.Conclusion QuickBooks Error 6123 can be a frustrating roadblock for users, but it’s not insurmountable. By understanding the common causes of this error and implementing the suggested solutions, you can effectively troubleshoot and resolve Error 6123, restoring access to your company files and minimizing downtime. Remember to take preventive measures such as regular backups and software updates to mitigate the risk of encountering such errors in the future. With the right approach and resources, you can keep your QuickBooks software running smoothly and focus on managing your finances effectively.Related Searches:6123 0 QuickBooks6123 error QuickBooksBut QuickBooks Can’t Open your Company Fileerror 6123 0 QuickBooksError 6123 0 Restoring QuickBooks BackupError 6123 in QuickBookserror 6123 in QuickBooks Desktoperror 6123 QuickBooks DesktopError 6123 While Restoring Company Fileerror code 6123 0 QuickBooks Desktoperror code 6123 in QuickBooks desktopGet Help with QuickBooks Error 6123I am Getting Error 6123 0 in QuickBooksProblem Connecting to Server Error -6123 0QB error 6123 0QuickBooks -6123 0 errorQuickBooks 6123 errorQuickBooks Desktop Error 6123QuickBooks desktop error 6123 0QuickBooks error 6123QuickBooks error code 6123QuickBooks error message 6123 0 Read More
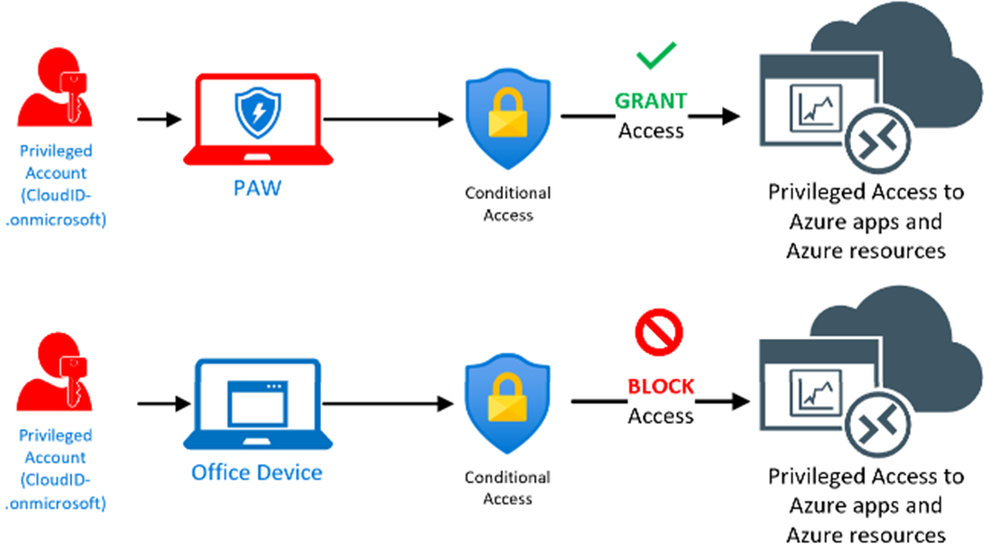
How to enforce usage of Privileged Access Workstations for Admins
Intro
You probably already came across the challenge to make sure that administrators using a highly privileged administrative role in Entra ID or an Azure RBAC role which allows control over sensitive resources should be only allowed if administrators use a dedicated administrative workstation. At Microsoft we call those devices Privileged Access Workstations (PAW). PAWs are highly restricted and protected devices with the single purpose to secure and protect the admin’s credentials following Zero Trust and Clean Source Principle. Now, the issue is that Admins could either employ that device or simply ignore it and use their office computers instead, which seems to be much more convenient. The same applies for the attackers, because admins not using a PAW makes their life much easier as they would have a direct attack path at hand. This is not what you want! (This article assumes you already have implemented a PAW for cloud services management.)
So, how do you make sure that highly privileged users must use their PAWs for working with highly privileged roles in Azure?
Let me show you some cool things to get there, as there are several technologies involved like Conditional Access, Microsoft Graph and some others like Microsoft Graph Explorer, PowerShell and a bit of Kusto for monitoring queries to give you a more complete picture. Let’s get started.
Solution Summary
What we do here is using Conditional Access with a block rule to deny all logons from non-PAW-devices targeting all members of a certain Entra ID security group. Since there is no way at this time to set the ExtensionAttribute1 via the Entra ID Portal we explore two options to set this attribute. One is using Graph Explorer, and the other one is using PowerShell.
Interested? Let’s get started.
Mission
First of all, we set the stage for our main actors.
PAWDevice1 – Privileged Administrative Workstation (PAW) Entra ID device.
Admin1 – Privileged administrative Entra ID account.
PAW-Users – Entra ID security group having Admin1 as member.
Mission: We want to make sure that Admin1 can only login using their PAW.
Solution Overview detailed
The question is, how do we enable Conditional Access to distinguish between a PAW and an Office device to enforce PAW usage and how do we target the right users or roles?
First goal – ‘Tagging’ the PAW device
First task is setting the ExtensionAttribute1 for the PAW device object in Entra ID. We are going to use Microsoft Graph Explorer and PowerShell for this task.
A brief explanation of the ExtensionAttribute1 attribute: Microsoft Entra ID offers a set of 15 extension attributes with predefined names on the user and device resources. These properties were initially custom attributes provided in on-premises Active Directory (AD) and Microsoft Exchange. However, they can now be used for more than syncing on-premises AD and Microsoft Exchange data to Microsoft Entra ID through Microsoft Graph.
Getting started with Microsoft Graph Explorer
Let’s start using Microsoft Graph Explorer (https://developer.microsoft.com/en-us/graph/graph-explorer). It is a great tool to dig deeper into all the information Microsoft Graph can provide you with. Besides, and this is very helpful, you can exactly determine the Microsoft Graph permissions needed for certain Microsoft Graph related operations via the tab “Modify permissions”.
Speaking of “permissions for Microsoft Graph Explorer”. You might have to set permissions for the tasks you want to perform within the app, because it performs tasks on your behalf. We deal with this just a little bit further down the line.
Now, let’s first find our device using Microsoft Graph Explorer.
The first thing we need to do when starting to use Microsoft Graph Explorer is to log on using credentials for the tenant in which the device is managed, because if not logged on you only would see the “Sample Tenant”! And yes, it is highly recommended that we use a PAW for the tasks below.
In Microsoft Graph Explorer make sure you are using the latest features by selecting “Beta”.
Then we change the address line to:
https://graph.microsoft.com/beta/devices
This should give you a list of all devices from Entra ID.
Important: If you have never used Microsoft Graph Explorer before, it might throw an error when running this query for devices, because that app is not automatically allowed to perform tasks on your behalf.
The error looks like this:
As you can see it says that this app does not have sufficient privileges.
In this case you would need to consent for the permissions you need.
Consent to delegated permissions for Microsoft Graph Explorer
To be allowed to consent to permissions needed by this application within Entra ID you have to elevate to either Global Administrator or Security Administrator Entra ID role.
Entra ID Account (your account) permission needed for consenting: microsoft.directory/servicePrincipals/managePermissionGrantsForAll.microsoft-company-admin
How to consent
Click on the tab “Modify permissions”.
It will show you exactly which permissions are needed to query for devices or even do more.
It is always highly recommended to use least privilege. For reading device information we must consent to “Device.Read.All”. The button “Consent” is in the same line at the right-hand side and you will be prompted to consent as shown below.
Tick the box “Consent on behalf of your organization” and then click on the button “Accept”.
Now “Modify permission” should look like this:
Now re-run the query. You should get a list of all devices in the “Response preview”
Find PAWDevice1
Now, we want to query for PAWDevice1.
For that we change the address to include a filter.
=================================================================================
Tip: as soon as you enter a ? at the end of the web address it will show you a list of available commands to use.
https://graph.microsoft.com/beta/devices?$filter=displayName eq ‘PAWDevice1’
=================================================================================
After running the query filtering for the display name of the device we get a single device entry with all its attributes as a result. Here we can also verify that none of the extension attributes has a value set.
What we need now is the value for “id”, which is the ObjectID of this device. Don’t confuse the value “id” with the value “deviceId” which is also in the list of values.
We copy the Object ID into VS Code (or any other editor), because we need it for setting the ExtensionAttribute1 for this device.
Set ExtensionAttribute1 for PAWDevice1
Open Microsoft Graph Explorer in your web browser and log on with your Entra ID account of your tenant. Make sure that you have the Entra ID role “Intune Administrator” activated to perform the task of setting the device’s ExtensionAttribute1.
Entra ID Account (your account) permission needed for this task: microsoft.directory/devices/extensionAttributeSet1/update
(see reference for role permissions here: https://learn.microsoft.com/en-us/entra/identity/role-based-access-control/permissions-reference?toc=%2Fgraph%2Ftoc.json#intune-administrator)
The next operation we perform is a PATCH operation. Remember we had to consent to certain permissions for the GET operation. Now we need to consent for permissions for the PATCH operation (if not already done).
The URL needed for the next step is built of two parts:
https://graph.microsoft.com/beta/devices
The unique device ID GUID. Remember: That ID should have been copied into the editor VS Code (or any other editor you like).
After we enter the URL including the device id like this (mind that each device ID is unique), switch to PATCH on the left-hand side and select the “Modify permissions” tab, you’ll likely see the below:
Here we need to consent to “Directory.AccessAsUser.All” permissions.
What does that mean in terms of permissions?
The description says “Allows the app to have the same access to information in your work or school directory as you do.” We ask the app to do something for us. And it does it for us with the same permissions we have at that moment.
After consenting, click on the tab “Request body” and enter the following JSON code to update the value for ExtensionAttribute1.
{
“extensionAttributes”: {
“extensionAttribute1”: “PAW”
}
}
After entering the JSON code click on the blue button (upper right-hand side) “Run query”.
It should show this if successful:
If we change from PATCH back to GET we can just click on Run query and it will show us the device entry again.
Now we scroll down to look for the value of ExtensionAttribute1.
Now it has the value “PAW.
Wasn’t that fun! This was an exercise to give you some hands-on experience on Microsoft Graph Explorer. This tool is especially helpful when trying to get the right information for automating such tasks via PowerShell.
Setting ExtensionAttribute1 with PowerShell
When using PowerShell to access Microsoft Graph it is a similar process when it comes to consenting to permissions needed for an application which will then act on behalf of the user. In this case it is another application than for Graph Explorer. Its name is Microsoft Graph Command Line Tools. The former name was Microsoft Graph PowerShell and it had been changed to the new name in May 2023.
With this script and the correct activated role (same as for Graph Explorer) we can easily set a device’s ExtensionAttribute1 value or instead we could even do it as bulk for an Entra ID device group.
To be able to run the script we want to make sure we have the following PowerShell modules installed on our device.
Microsoft.Graph.Authentication
Microsoft.Graph.Identity.DirectoryManagement
Microsoft.Graph.Groups
More information on how to install the modules:
https://learn.microsoft.com/en-us/powershell/microsoftgraph/installation?view=graph-powershell-1.0
PowerShell Code for Set-DeviceExtensionAttribute.ps1
<#
.SYNOPSIS
Sets the ExtensionAttribute1 on devices.
.DESCRIPTION
.PARAMETER TargetGroup
Assign the ExtensionAttribute1 to all devices in a group
.PARAMETER DeviceName
Assign the ExtensionAttribute1 to a specific device
.PARAMETER ExtensionAttributeValue
The string value of the extension attribute. Default in this script is “PAW”
.EXAMPLE
Set-DeviceExtensionAttribute -DeviceName mydevice -ExtensionAttributeValue “PAW”
Set-DeviceExtensionAttribute -TargetGroup DeviceGroupName -ExtensionAttributeValue “PAW”
.NOTES
Disclaimer
The sample scripts provided here are not supported under any Microsoft
standard support program or service. All scripts are provided AS IS without
warranty of any kind. Microsoft further disclaims all implied warranties
including, without limitation, any implied warranties of merchantability or
of fitness for a particular purpose. The entire risk arising out of the use
or performance of the sample scripts and documentation remains with you. In
no event shall Microsoft, its authors, or anyone else involved in the
creation, production, or delivery of the scripts be liable for any damages
whatsoever (including, without limitation, damages for loss of business
profits, business interruption, loss of business information, or other
pecuniary loss) arising out of the use of or inability to use the sample
scripts or documentation, even if Microsoft has been advised of the
possibility of such damages.
#>
[CmdletBinding()]
param (
[Parameter(ParameterSetName = ‘GroupAssign’, Mandatory = $True)]
[String]
$TargetGroup,
[Parameter(ParameterSetName = ‘DeviceAssign’, Mandatory = $True)]
[String]
$DeviceName, #not case-sensitive
[Parameter()]
[String]
$ExtensionAttributeValue = “PAW”
)
# \\\\\\\\\\\\\\\\\\\\\\\\\\\\\\\\\\
#region Functions
# ////////////////////////////////////////////////////////////////////
function Connect-ToGraph {
$Parameter = @{
‘Scopes’ = “Device.ReadWrite.All”
}
try {
Connect-MgGraph @Parameter
}
catch {
Write-Error -Exception $_.Exception
break
}
}
Function Set-DeviceExtensionAttribute {
[cmdletbinding(DefaultParameterSetName = ‘All’)]
param (
[Parameter(Mandatory, ParameterSetName = ‘DeviceId’)]
[String]
$DeviceId,
[Parameter(Mandatory = $true)]
[String]
$ExtensionAttributeValue
)
$graphApiVersion = “Beta”
$Resource = “devices/$DeviceId”
$Uri = “https://graph.microsoft.com/$graphApiVersion/$($Resource)”
$JSON = @”
{
“extensionAttributes”: {
“extensionAttribute1”: “$ExtensionAttributeValue”
}
}
“@
# Important. The last curly bracket in the above JSON must be without any space before it!
try {
Invoke-MgGraphRequest -Uri $Uri -Method PATCH -Body $JSON -ContentType ‘application/json’
Write-Host
Write-Host “Success – Wait a moment until changes have been synced to the tenant.” -ForegroundColor Green
}
catch {
Write-Host “PATCH operation failed with error.”
Write-Host “Error: ” $Error
Write-Host “=============================================”
Write-Host “JSON BODY: $JSON”
Write-Host “URI: $uri”
}
}
Function Get-Devices {
param(
[Parameter(Mandatory, ParameterSetName = ‘GroupName’)]
[string] $GroupName
)
try {
Write-Host “Getting Group ‘$GroupName’.”
$Group = Get-MgGroup -Filter “displayName eq ‘$GroupName'” -ErrorAction SilentlyContinue
if ($Group) {
$GroupMembers = Get-MgGroupMember -GroupId $Group.Id
return $GroupMembers
}
else {
Write-Host “Group ‘$GroupName’ NOT FOUND in tenant!” -ForegroundColor Red
return $false
}
}
catch {
return $false
}
}
#endregion Functions
# \\\\\\\\\\\\\\\\\\\\\\\\\\\\\\\\\\
#region MAIN
# ////////////////////////////////////////////////////////////////////
Connect-ToGraph
# Setting the value for a single device
if ($DeviceName) {
Write-Host “Getting Device ‘$DeviceName’.”
$Device = Get-MgDevice -Filter “DisplayName eq ‘$DeviceName'” -ErrorAction SilentlyContinue
if ($Device.Id) {
Set-DeviceExtensionAttribute -DeviceId $Device.id -ExtensionAttributeValue $ExtensionAttributeValue
}
else {
Write-Host “Device ‘$DeviceName’ does not exist.” -ForegroundColor Red
}
}
# Setting the value for all member devices of an Entra ID security group
If ($TargetGroup) {
$Devices = Get-Devices -GroupName $TargetGroup
foreach ($Device in $Devices) {
Set-DeviceExtensionAttribute -DeviceId $Device.id -ExtensionAttributeValue $ExtensionAttributeValue
}
}
#endregion MAIN
When running the script for the first time and if we did not consent for any permission for Microsoft Graph Command Line Tools the following consent prompt will appear.
Again, here you tick the box “Consent on behalf of your organization” and click the button “Accept”.
The scope for the permissions is defined in the script function “Connect-ToGraph”.
$Parameter = @{
‘Scopes’ = “Device.ReadWrite.All”
}
Overview of Function Set-DeviceExtensionAttribute
The main function in this script is “Set-DeviceExtensionAttribute”.
It performs what we did using Graph Explorer.
It builds up the URI:
$graphApiVersion = “Beta”
$Resource = “devices/$DeviceId”
$Uri = “https://graph.microsoft.com/$graphApiVersion/$($Resource)”
It creates the JSON:
$JSON = @”
{
“extensionAttributes”: {
“extensionAttribute1”: “$ExtensionAttributeValue”
}
}
“@@
It runs the PATCH operation:
Invoke-MgGraphRequest -Uri $Uri -Method PATCH -Body $JSON -ContentType ‘application/json’
Conditional Access
Brief overview
First a brief overview of the elements of Conditional Access policies we use for our POC.
We have four main sections to be considered for our policy:
Assignment to Users, groups or directory roles
Target resources we want to protect ( in our case this will be applications)
The condition under which the policy is applied
The grant control will be set to BLOCK
Important: You want to move slowly and carefully because you don’t want to lock yourself and everyone else out.
Prerequisites
First we must make sure that you have the appropriate permissions to create Conditional Access policies.
To Create a device-based Conditional Access policy our account must have one of the following permissions in Microsoft Entra:
Global administrator
Security administrator
Conditional Access administrator
Create Policy
Let’s move on to create the device-based Conditional Access policy.
Open the Microsoft Entra Admin Center and browse to
Protection > Conditional Access
Link: https://entra.microsoft.com/#blade/Microsoft_AAD_ConditionalAccess/ConditionalAccessBlade/fromNav/
Under ConditionalAccess click on “Policies” and then on “New policy”
Policy Name
First we give it a name and call it “PAW-Block-Device-Filter”
Assignments
Let’s first decide who will be excluded from this Conditional Access Policy.
Break Glass Accounts (validated emergency accounts if everyone is locked out – those accounts must be excluded from all CA policies)
Entra ID Connect Account(s) – (Accounts for AD user synchronization)
Your account – During testing phase
Who to include in this Conditional Access Policy:
We only target the group “PAW-Users”.
Important note: We do not want to include any roles in this example/demo configuration, because this could have an instant impact on all members of a targeted role (that is tenant wide. Example: If you would target the role Global Administrators the Conditional Access policy would be effective for all user accounts who currently are having the role active -> except the ones in the list of excluded users/groups) and for a start we only want to target our Admin1 account which is member of PAW-Users. Remember this is for demonstrating how the approach works.
Target resources
We want to enforce usage of a PAW device for Microsoft admin portals in Entra targeting PAW-Users. There is a handy way to do this.
(see also the related Microsoft Learn article for more information:
https://learn.microsoft.com/en-us/entra/identity/conditional-access/concept-conditional-access-cloud-apps#microsoft-admin-portals
Under Target resources we select “Cloud apps” from the pull-down menu. Then we select the radio button “Select apps” and under “Select” we clock on the link with the name “None”. (That is because at this point in time no app had been selected.)
Should look like this now:
Conditions
The condition we define tells Conditional Access when to be applied. Keep in mind that we only target the members of the group PAW-Users. No Entra ID roles.
Condition: The condition defines the rules under which the Conditional Access policy engine applies what is configured under “Grant”.
To configure the condition click on “0 conditions selected” in the category “Conditions”.
The condition uses a device filter. To configure the device filter first click on “Yes” under “Configure”. Then select the radio button “Exclude filtered devices from policy”.
Now we configure the filter. Under “Property” select the pull-down menu and select ExtensionAttribute1 as value. Operator must be set to “Equals” and the value must be “PAW”.
To finish the configuration, click on the button “Done”.
Grant control
To configure the Grant control to block access we select the radio button “Block access” and then click on the button “Select”.
The whole policy would read:
When members of the group PAW-Users log on to one of the Microsoft admin portals and their logon is coming from a device that has not set ExtensionAttribute1 to “PAW” the logon will be denied. If they logon from a device with ExtenstionAttribute1 set to “PAW” then the logon will be allowed.
Important: For the start we only set this Condition Access policy to Report-only.
That mode doesn’t block anything but allows for monitoring before introducing a restrictive policy like this.
Monitoring Conditional Access policies in Report-only mode
To be able to use Kusto (Link: https://learn.microsoft.com/en-us/azure/data-explorer/kusto/query) queries on Entra ID Sign-In logs you must configure Entra ID to store Sign-In logs in a Log Analytics workspace. When done you can easily query for Sign-In events where the new policy would have blocked a logon attempt for the targeted users.
Here is an example of a short Kusto query to find all cases where a Conditional Access policy which is set to Report-only would have blocked a logon attempt.
SigninLogs
| extend CAP = parse_json(ConditionalAccessPolicies)
| mv-expand CAP
| extend DeviceName = parse_json(DeviceDetail)
| where CAP.result contains “reportOnlyFailure”
| project TimeGenerated, UserDisplayName, ConditionalAccessPolicyName=CAP.displayName, DeviceDisplayName=DeviceName.displayName, ResultDescription, Location, IPAddress, NetworkLocationDetails, ResourceDisplayName
| sort by TimeGenerated desc
Now we could test the new created Conditional Access policy with the test user Admin1.
Testing it out
Let’s try to logon with user Admin1 to a Microsoft admin portal of your choice. Say, we would try the Azure Portal. Let’s also assume that this user account has already gone through the process of registering for MFA.
In the browser type in “portal.azure.com”. Logon will be allowed as long as the Conditional Access policy is set to Report-only.
In Log Analytics you could see the following when using the Kusto query from above:
If we enable the Conditional Access policy (set it from “Report-Only” to “ON”), Admin1 would not be allowed to log on from a device that has not set ExtensionAttribute1. In that case the account Admin1 would see the following:
I hope this blog was helpful and it could give you some insights and ideas on how to make your environment more secure. Thanks for reading.
Microsoft Tech Community – Latest Blogs –Read More
SCVMM 2022 Install failure – MSSQL database connectivity issue
Hello, I’m trying to install SCVMM 2022 on a brand new Windows Server 2019 system. The SQL database is SQL Server 2016 version 13.0.6435.1. The SQL server is already in use in production with numerous other databases, using the default instance MSSQLSERVER
No issues with prerequisites when I use the Wizard setup.exe, but things have failed so many times now I have switched to using the CLI install method.
I pre-create a new database on the SQL server, named VirtualManagerDB, per the instructions here. The account I want to use as a service account is called COMPANYCitrixRunAS – it is not a SQL admin account, but it does have dbo privileges just on this one Database. The instructions do not state that I need to give this service account any higher level permissions on the SQL server itself like sysadmin, etc.
Then I setup VMServer.ini to do a CLI install with the following parameters, following this guide:
[OPTIONS]
ProductKey=<redacted>
UserName=Citrix-VMM
CompanyName=Company
SqlInstanceName=MSSQLSERVER$
SqlMachineName=sql1.company.com
CreateNewSqlDatabase=0
SqlDatabaseName=VirtualManagerDB
SqlServerPort=1433
RemoteDatabaseImpersonation=1
CreateNewLibraryShare=1
LibrarySharePath=C:VMMLibrary
LibraryShareDescription=Citrix VMM Library Files
VmmServiceLocalAccount=0
TopContainerName=OU=VMM,OU=Distributed Key Management,OU=Service,DC=company,DC=com
Upgrade=0
Then, I use the following install script:
setup.exe /server /i /f C:temp2022VMServer.ini /sqldbadmindomain company /sqldbadminName CitrixRunAs /sqldbadminpassword redacted /vmmservicedomain company /vmmserviceusername CitrixRunAs /vmmserviceuserpassword redacted /iacceptsceula
and follow along in the log file located at “C:ProgramDatavmmlogsSetupWizard.log”
Things progress fine until right after the Windows Features get checked for.
02:42:02:ProcessInstalls: Install Item VMM management server was successful. We will launch the post process delegate.
02:42:18:Windows feature RSAT-Clustering-PowerShell already enabled, skipping
02:42:20:Windows feature WindowsStorageManagementService already enabled, skipping
02:42:22:Windows feature UpdateServices-API already enabled, skipping
02:42:24:Windows feature FabricShieldedTools already enabled, skipping
02:42:26:Windows feature RSAT-Storage-Replica already enabled, skipping
02:42:26:We are going to impersonate as companyCitrixRunAs.
02:42:26:Out of Impersonation
02:42:26:We are going to impersonate as companyCitrixRunAs.
02:42:26:Out of Impersonation
02:42:26:We are going to impersonate as companyCitrixRunAs.
02:43:33:Out of Impersonation
02:43:33:GetSqlLoginName: TThe login name for the vmm server service is [companyCitrixRunAs]
02:43:33:We are going to impersonate as companyCitrixRunAs.
02:43:33:Out of Impersonation
02:43:33:GetSqlLoginName: TThe login name for the vmm server service is [companyCitrixRunAs]
02:43:33:We are going to impersonate as companyCitrixRunAs.
02:43:34:Out of Impersonation
02:43:34:VMMPostinstallProcessor threw an exception: Threw Exception.Type: Microsoft.VirtualManager.Setup.Exceptions.DatabaseConfigurationException, Exception.Message: Setup could not configure the database VirtualManagerDB.
Ensure service MSSQL$ is started by running “services.msc”, find the service, and then verify that the service is started.
02:43:34:StackTrace: at Microsoft.VirtualManager.Setup.DBConfigurator.GrantSetupUserDBAccess(Boolean install)
at Microsoft.VirtualManager.Setup.VirtualMachineManagerHelpers.GrantSetupUserDBAccess(Boolean install)
at Microsoft.VirtualManager.Setup.InstallItemCustomDelegates.PangaeaServerPostinstallProcessor()
02:43:34:InnerException.Type: Microsoft.VirtualManager.DB.CarmineSqlException, InnerException.Message: Unable to connect to the VMM database because of a general database failure.
Ensure that the SQL Server is running and configured correctly, then try the operation again.
02:43:34:InnerException.StackTrace: at Microsoft.VirtualManager.DB.SqlRetryCommand.ExecuteNonQuery()
at Microsoft.VirtualManager.Setup.SetupDatabaseHelper.CreateSqlLogin(String loginName, SqlContext ctx)
at Microsoft.VirtualManager.Setup.SetupDatabaseHelper.CreateSqlLogin(String connStr, String loginName)
at Microsoft.VirtualManager.Setup.DBConfigurator.CreateCarmineLoginAndDBUser(String loginName, String userName)
at Microsoft.VirtualManager.Setup.DBConfigurator.GrantSetupUserDBAccess(Boolean install)
02:43:34:InnerException.Type: System.Data.SqlClient.SqlException, InnerException.Message: User does not have permission to perform this action.
02:43:34:InnerException.StackTrace: at System.Data.SqlClient.SqlConnection.OnError(SqlException exception, Boolean breakConnection, Action`1 wrapCloseInAction)
at System.Data.SqlClient.TdsParser.ThrowExceptionAndWarning(TdsParserStateObject stateObj, Boolean callerHasConnectionLock, Boolean asyncClose)
at System.Data.SqlClient.TdsParser.TryRun(RunBehavior runBehavior, SqlCommand cmdHandler, SqlDataReader dataStream, BulkCopySimpleResultSet bulkCopyHandler, TdsParserStateObject stateObj, Boolean& dataReady)
at System.Data.SqlClient.SqlCommand.RunExecuteNonQueryTds(String methodName, Boolean async, Int32 timeout, Boolean asyncWrite)
at System.Data.SqlClient.SqlCommand.InternalExecuteNonQuery(TaskCompletionSource`1 completion, String methodName, Boolean sendToPipe, Int32 timeout, Boolean& usedCache, Boolean asyncWrite, Boolean inRetry)
at System.Data.SqlClient.SqlCommand.ExecuteNonQuery()
at Microsoft.VirtualManager.DB.SqlRetryCommand.ExecuteNonQuery()
02:43:34:ProcessInstalls: Running the PostProcessDelegate returned false.
02:43:34:ProcessInstalls: Running the PostProcessDelegate for PangaeaServer failed…. This is a fatal item. Setting rollback.
02:43:34:ProcessInstalls: Rollback is set and we are not doing an uninstall so we will stop processing installs
02:43:34:****************************************************************
02:43:34:****Starting*RollBack*******************************************
02:43:34:****************************************************************
Then it begins the rollback process. Some other relevant looking lines here in the rollback:
02:44:04:vitalfailure = Installing, Uninstalling, MicrosoftInstaller, PostInstallItem
02:44:04:FailureReason = Microsoft.VirtualManager.Setup.Exceptions.DatabaseConfigurationException: Setup could not configure the database VirtualManagerDB.
Ensure service MSSQL$ is started by running “services.msc”, find the service, and then verify that the service is started. —> Microsoft.VirtualManager.DB.CarmineSqlException: Unable to connect to the VMM database because of a general database failure.
Ensure that the SQL Server is running and configured correctly, then try the operation again. —> System.Data.SqlClient.SqlException: User does not have permission to perform this action.
at System.Data.SqlClient.SqlConnection.OnError(SqlException exception, Boolean breakConnection, Action`1 wrapCloseInAction)
at System.Data.SqlClient.TdsParser.ThrowExceptionAndWarning(TdsParserStateObject stateObj, Boolean callerHasConnectionLock, Boolean asyncClose)
at System.Data.SqlClient.TdsParser.TryRun(RunBehavior runBehavior, SqlCommand cmdHandler, SqlDataReader dataStream, BulkCopySimpleResultSet bulkCopyHandler, TdsParserStateObject stateObj, Boolean& dataReady)
at System.Data.SqlClient.SqlCommand.RunExecuteNonQueryTds(String methodName, Boolean async, Int32 timeout, Boolean asyncWrite)
at System.Data.SqlClient.SqlCommand.InternalExecuteNonQuery(TaskCompletionSource`1 completion, String methodName, Boolean sendToPipe, Int32 timeout, Boolean& usedCache, Boolean asyncWrite, Boolean inRetry)
at System.Data.SqlClient.SqlCommand.ExecuteNonQuery()
at Microsoft.VirtualManager.DB.SqlRetryCommand.ExecuteNonQuery()
— End of inner exception stack trace —
at Microsoft.VirtualManager.DB.SqlRetryCommand.ExecuteNonQuery()
at Microsoft.VirtualManager.Setup.SetupDatabaseHelper.CreateSqlLogin(String loginName, SqlContext ctx)
at Microsoft.VirtualManager.Setup.SetupDatabaseHelper.CreateSqlLogin(String connStr, String loginName)
at Microsoft.VirtualManager.Setup.DBConfigurator.CreateCarmineLoginAndDBUser(String loginName, String userName)
at Microsoft.VirtualManager.Setup.DBConfigurator.GrantSetupUserDBAccess(Boolean install)
— End of inner exception stack trace —
at Microsoft.VirtualManager.Setup.DBConfigurator.GrantSetupUserDBAccess(Boolean install)
at Microsoft.VirtualManager.Setup.VirtualMachineManagerHelpers.GrantSetupUserDBAccess(Boolean install)
at Microsoft.VirtualManager.Setup.InstallItemCustomDelegates.PangaeaServerPostinstallProcessor()
*** Carmine error was: DatabaseConfigurationFailed (334)
*** VirtualManagerDB ** MSSQL$ **
[s#2751] ExecuteNonQuery(this: (SqlRetryCommand#[2706]) { cmd = (SqlCommand#e56c6b) System.Data.SqlClient.SqlCommand, errorTitle = (string) “errorTitle”, sqlContext = (SqlContext#[d]) { [rw] CreateSqlLoginconstructionIdentity = (WindowsIdentity#974e1f) System.Security.Principal.WindowsIdentity commandList: { n=1 { NQ:”DECLARE @user_Account AS NVARCHAR(MAX)
SELECT @user_Account = SUSER_SNAME(0x0105000000000005150000003F53277FF531D637A224EC6E62760000)
EXEC(‘create login [‘ + @user_Account + ‘] from windows’)”, @5/3/2024 2:43:34 PM } } , conn = (SqlConnection#151bf1b) { State: Open Database: master DataSource: sql1.ads.ssc.wisc.eduMSSQLSERVER$,1433 PacketSize: 8000 ServerVersion: 13.00.6435 StatisticsEnabled: False WorkstationId: VMM-2024 } }, behavior = Default, failFast = (bool) False }) in C:__w1ssrcproductcommonUtilsDbSqlRetryCommand.cs:line 331
[s#1b] InstallActionProcessor.DoPostInstallTask() in C:__w1ssrcproductsetupbootstrappermanagedSetupWizHelperClassesInstallActionProcessor.cs:line 380
[s#1] AccountHelper.IsGMSAUser(userName: (string) “CitrixRunAs”, domainLdapDN: (string) “DC=primo”) in C:__w1ssrcproductcommonUtilsAccountHelper.cs:line 1739
Full call stack from when the exception was thrown: at System.Data.SqlClient.TdsParser.ThrowExceptionAndWarning(TdsParserStateObject stateObj, Boolean callerHasConnectionLock, Boolean asyncClose)
Why are the logs mentioning a MSSQL$ entry? That looks like a SQL instance but I very specifically told it to use the default MSSQLSERVER instance. That bit “Ensure service MSSQL$ is started by running “services.msc”, find the service, and then verify that the service is started. —> Microsoft.VirtualManager.DB.CarmineSqlException: Unable to connect to the VMM database because of a general database failure.” is what shows up in the GUI install attempts.
When I go to the SQL server and I look at the contents of VirtualManagerDB database – I can see that new tables were created by the installer. So the installer was able to reach into the correct instance, and the correct database and modify it. But apparently it was not able to modify it enough to be satisfied.
On the SQL server, when I look in services.msc I can see that “SQL Server (MSSQLSERVER)” is a service that is running. Obviously. It’s what’s running my dozen other databases on this server. But there is no “MSSQL” service and I don’t understand why VMM thinks there should be because I explicitly told it to to use MSSQLSERVER!
What could the problem possibly be? I do not think I missed any setup steps.
Hello, I’m trying to install SCVMM 2022 on a brand new Windows Server 2019 system. The SQL database is SQL Server 2016 version 13.0.6435.1. The SQL server is already in use in production with numerous other databases, using the default instance MSSQLSERVER No issues with prerequisites when I use the Wizard setup.exe, but things have failed so many times now I have switched to using the CLI install method. I pre-create a new database on the SQL server, named VirtualManagerDB, per the instructions here. The account I want to use as a service account is called COMPANYCitrixRunAS – it is not a SQL admin account, but it does have dbo privileges just on this one Database. The instructions do not state that I need to give this service account any higher level permissions on the SQL server itself like sysadmin, etc. Then I setup VMServer.ini to do a CLI install with the following parameters, following this guide:[OPTIONS]ProductKey=<redacted>UserName=Citrix-VMMCompanyName=CompanySqlInstanceName=MSSQLSERVER$SqlMachineName=sql1.company.comCreateNewSqlDatabase=0SqlDatabaseName=VirtualManagerDBSqlServerPort=1433RemoteDatabaseImpersonation=1CreateNewLibraryShare=1LibrarySharePath=C:VMMLibraryLibraryShareDescription=Citrix VMM Library FilesVmmServiceLocalAccount=0TopContainerName=OU=VMM,OU=Distributed Key Management,OU=Service,DC=company,DC=comUpgrade=0 Then, I use the following install script:setup.exe /server /i /f C:temp2022VMServer.ini /sqldbadmindomain company /sqldbadminName CitrixRunAs /sqldbadminpassword redacted /vmmservicedomain company /vmmserviceusername CitrixRunAs /vmmserviceuserpassword redacted /iacceptsceulaand follow along in the log file located at “C:ProgramDatavmmlogsSetupWizard.log” Things progress fine until right after the Windows Features get checked for.02:42:02:ProcessInstalls: Install Item VMM management server was successful. We will launch the post process delegate.02:42:18:Windows feature RSAT-Clustering-PowerShell already enabled, skipping02:42:20:Windows feature WindowsStorageManagementService already enabled, skipping02:42:22:Windows feature UpdateServices-API already enabled, skipping02:42:24:Windows feature FabricShieldedTools already enabled, skipping02:42:26:Windows feature RSAT-Storage-Replica already enabled, skipping02:42:26:We are going to impersonate as companyCitrixRunAs.02:42:26:Out of Impersonation02:42:26:We are going to impersonate as companyCitrixRunAs.02:42:26:Out of Impersonation02:42:26:We are going to impersonate as companyCitrixRunAs.02:43:33:Out of Impersonation02:43:33:GetSqlLoginName: TThe login name for the vmm server service is [companyCitrixRunAs]02:43:33:We are going to impersonate as companyCitrixRunAs.02:43:33:Out of Impersonation02:43:33:GetSqlLoginName: TThe login name for the vmm server service is [companyCitrixRunAs]02:43:33:We are going to impersonate as companyCitrixRunAs.02:43:34:Out of Impersonation02:43:34:VMMPostinstallProcessor threw an exception: Threw Exception.Type: Microsoft.VirtualManager.Setup.Exceptions.DatabaseConfigurationException, Exception.Message: Setup could not configure the database VirtualManagerDB.Ensure service MSSQL$ is started by running “services.msc”, find the service, and then verify that the service is started.02:43:34:StackTrace: at Microsoft.VirtualManager.Setup.DBConfigurator.GrantSetupUserDBAccess(Boolean install)at Microsoft.VirtualManager.Setup.VirtualMachineManagerHelpers.GrantSetupUserDBAccess(Boolean install)at Microsoft.VirtualManager.Setup.InstallItemCustomDelegates.PangaeaServerPostinstallProcessor()02:43:34:InnerException.Type: Microsoft.VirtualManager.DB.CarmineSqlException, InnerException.Message: Unable to connect to the VMM database because of a general database failure.Ensure that the SQL Server is running and configured correctly, then try the operation again.02:43:34:InnerException.StackTrace: at Microsoft.VirtualManager.DB.SqlRetryCommand.ExecuteNonQuery()at Microsoft.VirtualManager.Setup.SetupDatabaseHelper.CreateSqlLogin(String loginName, SqlContext ctx)at Microsoft.VirtualManager.Setup.SetupDatabaseHelper.CreateSqlLogin(String connStr, String loginName)at Microsoft.VirtualManager.Setup.DBConfigurator.CreateCarmineLoginAndDBUser(String loginName, String userName)at Microsoft.VirtualManager.Setup.DBConfigurator.GrantSetupUserDBAccess(Boolean install)02:43:34:InnerException.Type: System.Data.SqlClient.SqlException, InnerException.Message: User does not have permission to perform this action.02:43:34:InnerException.StackTrace: at System.Data.SqlClient.SqlConnection.OnError(SqlException exception, Boolean breakConnection, Action`1 wrapCloseInAction)at System.Data.SqlClient.TdsParser.ThrowExceptionAndWarning(TdsParserStateObject stateObj, Boolean callerHasConnectionLock, Boolean asyncClose)at System.Data.SqlClient.TdsParser.TryRun(RunBehavior runBehavior, SqlCommand cmdHandler, SqlDataReader dataStream, BulkCopySimpleResultSet bulkCopyHandler, TdsParserStateObject stateObj, Boolean& dataReady)at System.Data.SqlClient.SqlCommand.RunExecuteNonQueryTds(String methodName, Boolean async, Int32 timeout, Boolean asyncWrite)at System.Data.SqlClient.SqlCommand.InternalExecuteNonQuery(TaskCompletionSource`1 completion, String methodName, Boolean sendToPipe, Int32 timeout, Boolean& usedCache, Boolean asyncWrite, Boolean inRetry)at System.Data.SqlClient.SqlCommand.ExecuteNonQuery()at Microsoft.VirtualManager.DB.SqlRetryCommand.ExecuteNonQuery()02:43:34:ProcessInstalls: Running the PostProcessDelegate returned false.02:43:34:ProcessInstalls: Running the PostProcessDelegate for PangaeaServer failed…. This is a fatal item. Setting rollback.02:43:34:ProcessInstalls: Rollback is set and we are not doing an uninstall so we will stop processing installs02:43:34:****************************************************************02:43:34:****Starting*RollBack*******************************************02:43:34:**************************************************************** Then it begins the rollback process. Some other relevant looking lines here in the rollback:02:44:04:vitalfailure = Installing, Uninstalling, MicrosoftInstaller, PostInstallItem02:44:04:FailureReason = Microsoft.VirtualManager.Setup.Exceptions.DatabaseConfigurationException: Setup could not configure the database VirtualManagerDB.Ensure service MSSQL$ is started by running “services.msc”, find the service, and then verify that the service is started. —> Microsoft.VirtualManager.DB.CarmineSqlException: Unable to connect to the VMM database because of a general database failure.Ensure that the SQL Server is running and configured correctly, then try the operation again. —> System.Data.SqlClient.SqlException: User does not have permission to perform this action.at System.Data.SqlClient.SqlConnection.OnError(SqlException exception, Boolean breakConnection, Action`1 wrapCloseInAction)at System.Data.SqlClient.TdsParser.ThrowExceptionAndWarning(TdsParserStateObject stateObj, Boolean callerHasConnectionLock, Boolean asyncClose)at System.Data.SqlClient.TdsParser.TryRun(RunBehavior runBehavior, SqlCommand cmdHandler, SqlDataReader dataStream, BulkCopySimpleResultSet bulkCopyHandler, TdsParserStateObject stateObj, Boolean& dataReady)at System.Data.SqlClient.SqlCommand.RunExecuteNonQueryTds(String methodName, Boolean async, Int32 timeout, Boolean asyncWrite)at System.Data.SqlClient.SqlCommand.InternalExecuteNonQuery(TaskCompletionSource`1 completion, String methodName, Boolean sendToPipe, Int32 timeout, Boolean& usedCache, Boolean asyncWrite, Boolean inRetry)at System.Data.SqlClient.SqlCommand.ExecuteNonQuery()at Microsoft.VirtualManager.DB.SqlRetryCommand.ExecuteNonQuery()— End of inner exception stack trace —at Microsoft.VirtualManager.DB.SqlRetryCommand.ExecuteNonQuery()at Microsoft.VirtualManager.Setup.SetupDatabaseHelper.CreateSqlLogin(String loginName, SqlContext ctx)at Microsoft.VirtualManager.Setup.SetupDatabaseHelper.CreateSqlLogin(String connStr, String loginName)at Microsoft.VirtualManager.Setup.DBConfigurator.CreateCarmineLoginAndDBUser(String loginName, String userName)at Microsoft.VirtualManager.Setup.DBConfigurator.GrantSetupUserDBAccess(Boolean install)— End of inner exception stack trace —at Microsoft.VirtualManager.Setup.DBConfigurator.GrantSetupUserDBAccess(Boolean install)at Microsoft.VirtualManager.Setup.VirtualMachineManagerHelpers.GrantSetupUserDBAccess(Boolean install)at Microsoft.VirtualManager.Setup.InstallItemCustomDelegates.PangaeaServerPostinstallProcessor()*** Carmine error was: DatabaseConfigurationFailed (334)*** VirtualManagerDB ** MSSQL$ ** [s#2751] ExecuteNonQuery(this: (SqlRetryCommand#[2706]) { cmd = (SqlCommand#e56c6b) System.Data.SqlClient.SqlCommand, errorTitle = (string) “errorTitle”, sqlContext = (SqlContext#[d]) { [rw] CreateSqlLoginconstructionIdentity = (WindowsIdentity#974e1f) System.Security.Principal.WindowsIdentity commandList: { n=1 { NQ:”DECLARE @user_Account AS NVARCHAR(MAX)SELECT @user_Account = SUSER_SNAME(0x0105000000000005150000003F53277FF531D637A224EC6E62760000)EXEC(‘create login [‘ + @user_Account + ‘] from windows’)”, @5/3/2024 2:43:34 PM } } , conn = (SqlConnection#151bf1b) { State: Open Database: master DataSource: sql1.ads.ssc.wisc.eduMSSQLSERVER$,1433 PacketSize: 8000 ServerVersion: 13.00.6435 StatisticsEnabled: False WorkstationId: VMM-2024 } }, behavior = Default, failFast = (bool) False }) in C:__w1ssrcproductcommonUtilsDbSqlRetryCommand.cs:line 331[s#1b] InstallActionProcessor.DoPostInstallTask() in C:__w1ssrcproductsetupbootstrappermanagedSetupWizHelperClassesInstallActionProcessor.cs:line 380[s#1] AccountHelper.IsGMSAUser(userName: (string) “CitrixRunAs”, domainLdapDN: (string) “DC=primo”) in C:__w1ssrcproductcommonUtilsAccountHelper.cs:line 1739Full call stack from when the exception was thrown: at System.Data.SqlClient.TdsParser.ThrowExceptionAndWarning(TdsParserStateObject stateObj, Boolean callerHasConnectionLock, Boolean asyncClose) Why are the logs mentioning a MSSQL$ entry? That looks like a SQL instance but I very specifically told it to use the default MSSQLSERVER instance. That bit “Ensure service MSSQL$ is started by running “services.msc”, find the service, and then verify that the service is started. —> Microsoft.VirtualManager.DB.CarmineSqlException: Unable to connect to the VMM database because of a general database failure.” is what shows up in the GUI install attempts. When I go to the SQL server and I look at the contents of VirtualManagerDB database – I can see that new tables were created by the installer. So the installer was able to reach into the correct instance, and the correct database and modify it. But apparently it was not able to modify it enough to be satisfied. On the SQL server, when I look in services.msc I can see that “SQL Server (MSSQLSERVER)” is a service that is running. Obviously. It’s what’s running my dozen other databases on this server. But there is no “MSSQL” service and I don’t understand why VMM thinks there should be because I explicitly told it to to use MSSQLSERVER! What could the problem possibly be? I do not think I missed any setup steps. Read More
Is there a way we can hide certain URLs coming up in Bing search?
I’m trying to prevent some URLs popping up in search engine results. I tried a robots.txt file, which didn’t work.
I’m trying to prevent some URLs popping up in search engine results. I tried a robots.txt file, which didn’t work. Read More
Repeating a task
Hi all,
We are currently using Power Automate to create on-prem users. The problem we’ve hit is that the UPN suffix is blank (different issue).
To get around this, I’ve made a PowerShell script that runs every 5 mins on a scheduled task. As I’ve found this evening, if there is more than one user that is missing a UPN suffix, it fails.
$LocalUsers = Get-ADUser -Filter {UserPrincipalName -notlike ‘*@*’} -Properties UserPrincipalName -ResultSetSize $null
$UPN = $LocalUsers.UserPrincipalName + “@tww-lab.co.uk”
Set-ADUser -Identity $LocalUsers.SamAccountName -UserPrincipalName $UPN
We want the script to find an entry missing a UPN suffix and correct it to Firstname.Lastname @ UPN
Is there a way we can do this or is there a better way to do this?
Hi all, We are currently using Power Automate to create on-prem users. The problem we’ve hit is that the UPN suffix is blank (different issue). To get around this, I’ve made a PowerShell script that runs every 5 mins on a scheduled task. As I’ve found this evening, if there is more than one user that is missing a UPN suffix, it fails. $LocalUsers = Get-ADUser -Filter {UserPrincipalName -notlike ‘*@*’} -Properties UserPrincipalName -ResultSetSize $null
$UPN = $LocalUsers.UserPrincipalName + “@tww-lab.co.uk”
Set-ADUser -Identity $LocalUsers.SamAccountName -UserPrincipalName $UPN We want the script to find an entry missing a UPN suffix and correct it to Firstname.Lastname @ UPN Is there a way we can do this or is there a better way to do this? Read More
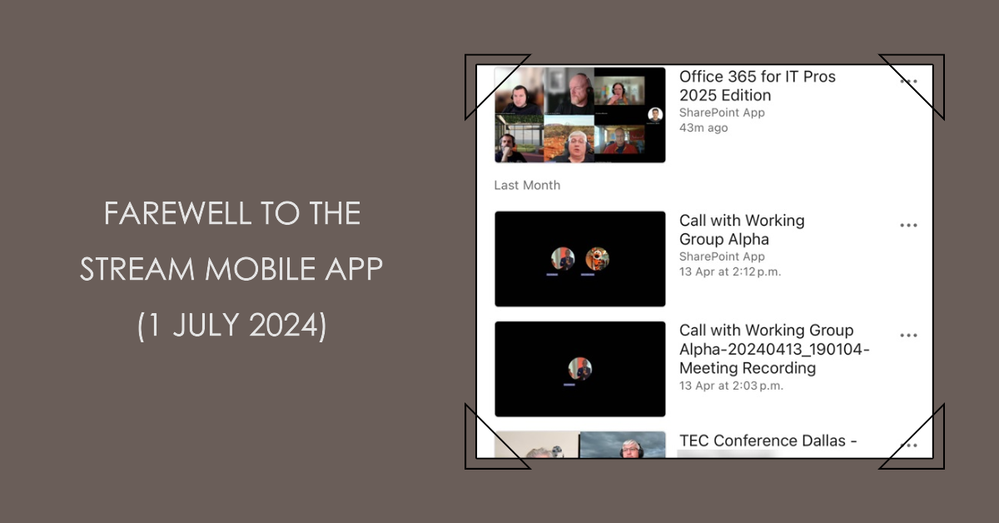
Microsoft Retires Stream Mobile App
On May 2, 2024, Microsoft announced the retirement of the Stream Mobile app on July 1, 2024. It’s all to do with rationalization and focus, or so Microsoft says. In any case, the suggested replacements are the OneDrive and Microsoft 365 apps, both of which are capable of handling video uploads, management, and playback.
https://office365itpros.com/2024/05/03/stream-mobile-app-retires/
Read More
Introducing Mistral Small: Empowering Developers with Efficient LLMs on Azure AI Models as a Service
Microsoft’s collaboration with Mistral AI continues to accelerate AI innovation. After the successful launch of Mistral Large, Mistral AI’s flagship model, we’re thrilled to unveil Mistral Small – a compact yet powerful language model designed for efficiency.
Available in the Azure AI model catalog, Mistral Small joins our growing collection of LLMs. Developers can access it through Models as a Service (MaaS), enabling seamless API-based interactions.
Mistral Small
As per insights provided by Mistral AI, Mistral Small is Mistral AI’s smallest proprietary Large Language Model (LLM). It can be used on any language-based task that requires high efficiency and low latency.
Mistral Small is:
A small model optimized for low latency: Very efficient for high volume and low latency workloads. Mistral Small is Mistral’s smallest proprietary model, it outperforms Mixtral 8x7B and has lower latency.
Specialized in RAG: Crucial information is not lost in the middle of long context windows. Supports up to 32K tokens.
Strong in coding: Code generation, review and comments with support for all mainstream coding languages.
Multi-lingual by design: Best-in-class performance in French, German, Spanish, and Italian – in addition to English. Dozens of other languages are supported.
Efficient guardrails baked in the model, with additional safety layer with safe prompt option.
Get started with Mistral Small on Azure AI
Provision an API Endpoint: Create your Mistral Small API endpoint in seconds.
Experiment: Try it out in the Azure AI Studio playground or integrate it with popular LLM app development tools.
Build Safely: Leverage dual-layer safety mechanisms to create reliable and secure Generative AI applications.
Here are the prerequisites:
If you don’t have an Azure subscription, get one here: https://azure.microsoft.com/en-us/pricing/purchase-options/pay-as-you-go
Create an Azure AI Studio hub and project. Make sure you pick East US 2/Sweden Central as the Azure region for the hub.
Next, you need to create a deployment to obtain the inference API and key:
Open the Mistral Small model card in the model catalog: https://aka.ms/aistudio/landing/mistral-small
Click on Deploy and select the Pay-as-you-go option.
Subscribe to the Marketplace offer and deploy. You can also review the API pricing at this step.
You should land on the deployment page that shows you the API and key in less than a minute. You can try out your prompts in the playground.
The prerequisites and deployment steps are explained in the product documentation: https://learn.microsoft.com/en-us/azure/ai-studio/how-to/deploy-models-mistral.
You can use the API and key with various clients. Review the API schema if you are looking to integrate the REST API with your own client: https://learn.microsoft.com/en-us/azure/ai-studio/how-to/deploy-models-mistral#reference-for-mistral-large-deployed-as-a-service. Let’s review samples for some popular clients.
Basic CLI with curl and Python web request sample: https://github.com/Azure/azureml-examples/blob/main/sdk/python/foundation-models/mistral/webrequests.ipynb
Mistral clients: Azure APIs for Mistral Small are compatible with the API schema offered on the Mistral AI ‘s platform which allows you to use any of the Mistral AI platform clients with Azure APIs. Sample notebook for the Mistral python client: https://github.com/Azure/azureml-examples/blob/main/sdk/python/foundation-models/mistral/mistralai.ipynb
LangChain: API compatibility also enables you to use the Mistral AI’s Python and JavaScript LangChain integrations. Sample LangChain notebook: https://github.com/Azure/azureml-examples/blob/main/sdk/python/foundation-models/mistral/langchain.ipynb
LiteLLM: LiteLLM is easy to get started and offers consistent input/output format across many LLMs. Sample LiteLLM notebook: https://github.com/Azure/azureml-examples/blob/main/sdk/python/foundation-models/mistral/litellm.ipynb
Prompt flow: Prompt flow offers a web experience in Azure AI Studio and VS code extension to build LLM apps with support for authoring, orchestration, evaluation and deployment. Learn more: https://learn.microsoft.com/en-us/azure/ai-studio/how-to/prompt-flow. Out-of-the-box support for Mistral AI APIs on Azure is coming soon, but you can create a custom connection using the API and key, and use the SDK of your choice Python tool in prompt flow.
Explore the power of Mistral Small – where efficiency meets innovation!
Microsoft Tech Community – Latest Blogs –Read More

Create the Future at Microsoft Azure HPC + AI Infrastructure Summit with AMD.
HPC AI Infrastructure Summit
Discover how Microsoft, AMD, and your peers are revolutionizing their infrastructure with HPC+AI
Join us for the “HPC + AI Infrastructure Summit with Microsoft and AMD,” a premier event designed to elevate your understanding and capabilities in HPC and AI. This 3-day summit will open doors to not only broaden your knowledge but also to harness the potential of cutting-edge innovations in HPC and AI.
This is an unmissable opportunity to hear from top industry leaders like Nidhi Chappell, VP of Azure HPC + AI Infrastructure and recipient of a recipient of the HPCWire’s 2023 People to Watch, and Andrew Jones, who leads our Future HPC + AI Capabilities. They, along with other distinguished speakers from AMD and our industry partners, will provide invaluable insights into the advancements driving our sector forward.
Who should attend
This event is designed for IT decision-makers, engineers, data scientists, and tech leaders focused on implementing cutting-edge technology solutions within their organizations.
Why attend
Expert Insights: Hear directly from executives and top minds at Microsoft, AMD, and other leading tech firms sharing their visions for the future of HPC and AI technologies.
Advanced Technology Showcases: Discover the latest innovations in CPU and GPU technology that are accelerating computations and enabling advanced projects.
Customized Learning Tracks: Sessions tailored for the automotive, financial services, energy, life sciences, and manufacturing sectors addressing industry-specific challenges and advancements.
Interactive Experiences: Participate in hands-on labs, demos, and technical deep dives to see the latest technologies in action.
Real-World Applications: Understand through case studies how HPC and AI are solving actual industry problems.
Networking Opportunities: Connect with industry leaders, innovators, and peers through networking breakfasts, lunches, and a special reception.
Featured keynote speakers
Nidhi Chappell
VP, Azure HPC and AI infrastructure, Microsoft
Erin Chapple
CVP, Azure Core Product and Design, Microsoft
Robert Hormuth
CVP, Architecture and Strategy of the Data Center Solutions Group, AMD
Prith Banerjee
CTO, Ansys
Kiran Bhageshpur
CTO, Qumulo
Tailor your summit journey
Customize your event experience with sessions for automotive, financial, energy, life sciences, and manufacturing sectors, including relevant cross-industry solutions.
HPC Industry Track
Key benefits of attending
Learn from the best: Direct insights from industry leaders.
Hands-on technology exposure: Get up close with the latest innovations; bring your device to work out solutions labs.
Expand your network: Meet potential collaborators and industry peers.
Industry-relevant sessions: Tailored insights that apply directly to your sector.
Event agenda overview
Day 1: Keynote sessions from Microsoft, AMD, and partner executives followed by interactive panels and breakout sessions. End the day with a networking reception.
Day 2: Continue with impactful keynotes, specialized track sessions for various industries, and a general session featuring an open mic Q&A.
Day 3: Bring your device and engage in hands-on labs provided by top tech firms, demonstrations, and technical deep dives. The event concludes with a networking lunch.
Sponsors logos
Thank you to our event partners: A heartfelt thank you to AMD and all our sponsors for their pivotal roles in shaping this summit, providing invaluable insights into the latest HPC technology.
Click Here to Reserve Your Spot Today!
For more information: Please contact Lisa Downey, Americas HPC GTM Business Lead
Registration deadline: May 28, 2024
Microsoft Tech Community – Latest Blogs –Read More

Difficulty connecting to datasource in PowerApps
There are a couple of ways to connect to a datasource. One method is to create a Canvas App with the Datasource itself is part of the creation process of the Canvas App. I will describe my experience with this method soon. Another method is to create a blank canvas app from scratch, then add a form to that canvas app and then connect to thea torm using your shareport List (or Microsoft List) as its Data Source.
When I tried the first method I have mentioned here, when it came time to connect to my Microsoft List data, I got a page describing a problem. At the top of the page was this information:
(image of page data)
The session id is: 89fce4a0-089b-11ef-9c95-17cf2d841331
I have used it as a search string in the suggested support site but I did not get any results.
And now for the second method of connecting a data source to a Power App which is to start with a blank Canvas App and then add a database connection to the app by way of a form. This method is described in this video https://www.youtube.com/watch?v=H11RFxiDltw which I followed. But when it came time to add the connection, I got this connection waithing message that has now been on the screen for a couple of hours.
(please wait)
I guess there is nothing to do but wait. It is a good thing it is Friday. Maybe by Monday it will have loaded and made the connecion. I am thinking that perhaps since there were many columns in the Microsoft List, it will take a while. But it was not exactly an exhorbanant number of columns. It was around 30 or so. But not thirty thousand. Is it normal for it to take hours? I have seen some strange things in the software world like this where, eventhough computations happen at virtually the speed of light, no one accounted for nested loops and the exponential nature of processes like this.
What are your suggestion? Does the session id, 89fce4a0-089b-11ef-9c95-17cf2d841331, mean anthing? How can I make use of i t?
This is part of the low-code or n-code world. Is there any way I can break that and actually use code to access the Microsoft List?
Is the problem in part due to the fact that I am using a Microsoft List as a database instead of an actual SharePoint List?
Is there a soultion or another option that I can not imagine, think of, or exists but I am not aware of it?
I made a recording just in case one might not believe that this is taking a long time to process. Here is at least the first 40 minutes.
There are a couple of ways to connect to a datasource. One method is to create a Canvas App with the Datasource itself is part of the creation process of the Canvas App. I will describe my experience with this method soon. Another method is to create a blank canvas app from scratch, then add a form to that canvas app and then connect to thea torm using your shareport List (or Microsoft List) as its Data Source. When I tried the first method I have mentioned here, when it came time to connect to my Microsoft List data, I got a page describing a problem. At the top of the page was this information: (image of page data) The session id is: 89fce4a0-089b-11ef-9c95-17cf2d841331 I have used it as a search string in the suggested support site but I did not get any results. And now for the second method of connecting a data source to a Power App which is to start with a blank Canvas App and then add a database connection to the app by way of a form. This method is described in this video https://www.youtube.com/watch?v=H11RFxiDltw which I followed. But when it came time to add the connection, I got this connection waithing message that has now been on the screen for a couple of hours. (please wait) I guess there is nothing to do but wait. It is a good thing it is Friday. Maybe by Monday it will have loaded and made the connecion. I am thinking that perhaps since there were many columns in the Microsoft List, it will take a while. But it was not exactly an exhorbanant number of columns. It was around 30 or so. But not thirty thousand. Is it normal for it to take hours? I have seen some strange things in the software world like this where, eventhough computations happen at virtually the speed of light, no one accounted for nested loops and the exponential nature of processes like this. What are your suggestion? Does the session id, 89fce4a0-089b-11ef-9c95-17cf2d841331, mean anthing? How can I make use of i t? This is part of the low-code or n-code world. Is there any way I can break that and actually use code to access the Microsoft List? Is the problem in part due to the fact that I am using a Microsoft List as a database instead of an actual SharePoint List? Is there a soultion or another option that I can not imagine, think of, or exists but I am not aware of it? I made a recording just in case one might not believe that this is taking a long time to process. Here is at least the first 40 minutes.https://youtu.be/dPEmlaVdGY4 Read More
Loop App Unable to Pin on Left Rail of Microsoft Teams
I have tried to pin Microsoft Loop app on the left rail of Teams, but it does not stay pinned. Other apps do. See image below. Is this a known issue?
I have tried to pin Microsoft Loop app on the left rail of Teams, but it does not stay pinned. Other apps do. See image below. Is this a known issue? Read More
Installing Hyper V on a DC to migrate DC roles to VMs
Hi all,
I have taken on a small side project to get more experience in sysadmin. I had configured a server with Server 2022 installed and configured Active Directory before moving the server to where it needs to be.
I also started preparing for my AZ800 exam alongside it and just discovered its best practice to have 2 DCs, and to use Hyper V to host them. I want to be able to do that, but, as I said, I have already configured AD for it, with the GPs as well.
What I want to know is, if I installed Hyper V Manager on that server, can I create a VM for another DC and have it replicate AD data to it, transfer FSMO roles to the VM, and the demote that server so it only acts as a host for Hyper V VMs and then create another DC VM.
Is that possible, or would it be better to just reinstall Windows and try it again?
Thanks again, and sorry if I sound like I dont know what I am talking about.
Hi all,I have taken on a small side project to get more experience in sysadmin. I had configured a server with Server 2022 installed and configured Active Directory before moving the server to where it needs to be.I also started preparing for my AZ800 exam alongside it and just discovered its best practice to have 2 DCs, and to use Hyper V to host them. I want to be able to do that, but, as I said, I have already configured AD for it, with the GPs as well. What I want to know is, if I installed Hyper V Manager on that server, can I create a VM for another DC and have it replicate AD data to it, transfer FSMO roles to the VM, and the demote that server so it only acts as a host for Hyper V VMs and then create another DC VM.Is that possible, or would it be better to just reinstall Windows and try it again? Thanks again, and sorry if I sound like I dont know what I am talking about. Read More
multiple retention policies
Hello,
I am new to compliance, and below is the ask:
Delete files that was last modified 12 months ago.
Disposition review for files last modified 6 months ago.
I was exploring some options, and I need some guidance on how to get this accomplished by retention policies. All the files are in a single sharepoint site.
Hello,I am new to compliance, and below is the ask:Delete files that was last modified 12 months ago.Disposition review for files last modified 6 months ago. I was exploring some options, and I need some guidance on how to get this accomplished by retention policies. All the files are in a single sharepoint site. Read More


