

Category: Microsoft
Category Archives: Microsoft
How not-for-profits can use Microsoft 365 to support their volunteer management
In the lead up to Australia’s National Volunteer Week (20-26 May), Motive Consulting are sharing tips on how not-for-profits can use Microsoft 365 applications to support their volunteer management.
From the Shifts app in Microsoft Teams to SharePoint, Power Apps and Power BI, there are many apps that can help make your volunteer programs more effective.
What other tips can you share?
In the lead up to Australia’s National Volunteer Week (20-26 May), Motive Consulting are sharing tips on how not-for-profits can use Microsoft 365 applications to support their volunteer management. From the Shifts app in Microsoft Teams to SharePoint, Power Apps and Power BI, there are many apps that can help make your volunteer programs more effective. What other tips can you share? Read More
Hotmail HELP!!! 2010-2016 emails badly needed help!!!
Hello,
Pleae help me…..im no expert but i need help and cant find any help or solutions to my problem of old history emails.
Does anyone have any idea how i can access my hotmail emails from like 2010-2016 i can get some 2016 ones but the ones i badly need i cant seem to get and i cant find any info or help reharding it and its really getting to me!!! Pleae help or give me directions where to go.
Appreciate anything to get them back
Thank you so much
Hello, Pleae help me…..im no expert but i need help and cant find any help or solutions to my problem of old history emails.Does anyone have any idea how i can access my hotmail emails from like 2010-2016 i can get some 2016 ones but the ones i badly need i cant seem to get and i cant find any info or help reharding it and its really getting to me!!! Pleae help or give me directions where to go.Appreciate anything to get them backThank you so much Read More
Add another account list of usernames
The list of usernames that appear when clicking on Add another account, where is it coming from? I am trying to delete a previously added account but I am unable to.
The list of usernames that appear when clicking on Add another account, where is it coming from? I am trying to delete a previously added account but I am unable to. Read More
How to Use Azure Virtual Network Manager’s UDR Management Feature
What will you learn in this blog?
What is Azure Virtual Network Manager’s UDR management feature?
How UDR management simplifies route settings
How you can automate routing behavior for the following scenarios:
Spoke virtual networks communicate to each other in a hub and spoke topology via a firewall in the hub
Spoke virtual networks in two hub and spoke topologies communicate via firewalls in the hubs
What is Azure Virtual Network Manager?
Azure Virtual Network Manager (AVNM) is a highly scalable and available network management solution that allows customers to simplify and scale their networks in Azure.
Learn more about AVNM in our public documentation.
What is AVNM’s UDR management feature and what is it solving?
User-defined route (UDR) management is a feature in AVNM that allows customers to describe their desired routing behavior via routing configurations that consist of routing rules. Upon deployment of the routing configuration, AVNM orchestrates UDRs to create the desired behavior.
AVNM aims to make managing routing behaviors easier and faster. Customers usually want to achieve different routing behaviors, and they usually create UDRs by hand or use custom scripts – however, these methods are complex and can cause mistakes, especially at scale. AVNM’s UDR management can simplify the process for you.
How does UDR management work?
UDR management configuration and rule collections
Similar to AVNM’s security admin feature, the UDR management feature is structured as a configuration that can contain multiple routing rule collections, which each can contain multiple routing rules.
Users create a routing configuration to define the desired routing behavior. Eventually, the user will need to deploy the routing configuration for the routing behavior described in its rules to take effect.
Within a routing configuration, there can be multiple rule collections. The function of the rule collection is to associate its rules with one or more target network groups, enabling users to achieve reusability and simplicity without recreating the same UDRs across several resources.
In a rule collection, route rules specify the desired routing behavior for all the members of its rule collection’s target network group(s), which can consist of subnets or virtual networks (VNets).
After the routing configuration (containing rule collection(s) targeting network group(s)) is deployed to the desired regions, then all the targeted subnets will receive the UDRs described in the routing configuration. Even after deployment, subnets that are newly created or added to the target network group(s) will receive the routing configuration’s UDRs – meaning users do not need to manually touch route tables.
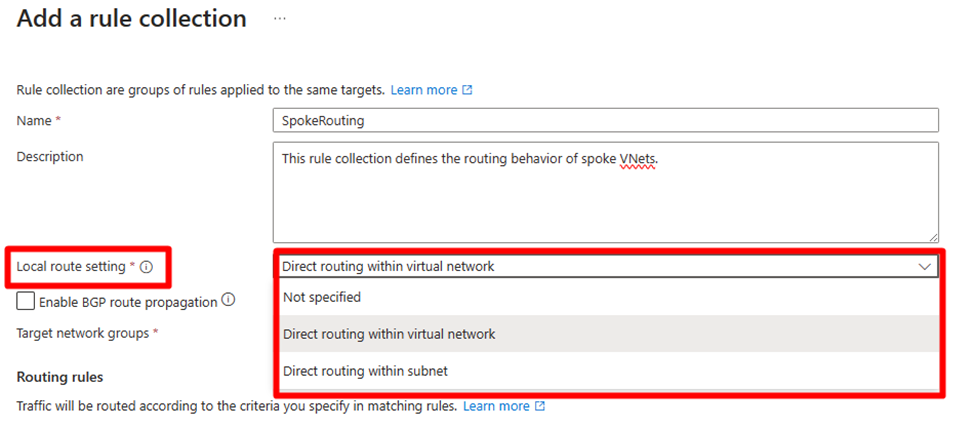
Local route setting
You can select whether you want to create a local routing behavior so that if the source and destination are in the same VNet or subnet, then traffic routes directly to the destination.
You can choose from the following behaviors:
If the source and destination are in the same VNet, route to the destination directly.
If the source and destination are in the same subnet, route to the destination directly.
None of the above behavior.
The local route setting is especially useful when you create a routing configuration, intending for “traffic to go to 0/0 via an NVA but not when the destination is in the same VNet or subnet.”
Selecting “Direct routing within virtual network” or “Direct routing within subnet” creates a UDR with a “virtual network” next hop for local traffic routing within the same VNet or subnet. However, if the destination CIDR is fully contained within the source CIDR under these selections and direct routing is selected, a UDR specifying a network appliance as the next hop won’t be set up.
Route rule
Each route rule consists of the following attributes:
Name
Destination type
IP address
Destination IP addresses/CIDR ranges
Service tag
Next hop type
Virtual network gateway
Virtual network
Internet
Virtual appliance
Next hop address
Use Azure Firewall as the next hop
In AVNM’s UDR management, you can also easily choose an Azure Firewall as the next hop by importing Azure Firewall private IP address in your AVNM’s scope. AVNM will use the IP of the Azure Firewall you choose as the next hop.
For each type of next hop, please refer to the public documentation on UDRs.
Sample use cases
Below, we are going to demonstrate how you can use AVNM’s UDR management to create common routing behaviors.
Scenario I – route all traffic to Azure Firewall in a hub and spoke topology but not in the local VNet
Many customers want to route all traffic to an Azure Firewall, except the destination is in the same VNet since workloads in the same VNet are trusted.
Traditionally, creating such settings are cumbersome as new UDRs need to be created for each new subnets, and all route tables have different UDRs.
AVNM’s UDR management can achieve this scenario shown below in just a few steps.
Step 1. Create Network Manager
In the Azure Portal, click “Create network manager” and enable the user-defined routing feature.
Step 2. Create a spoke network group
After the successful creation of your Azure Virtual Network Manager resource, in the Network Groups page, select the button “Add a network group.”
Create a network group by naming it and adding VNets to the group. You can add VNets manually as static group members, or automatically as dynamic group members through conditional statements.
Here, we are going to create a network group of spoke VNets in the hub and spoke topology with the condition of VNets’ name containing “ANMDemo-Spoke.”
Step 3. Create a routing configuration and rule collection
Navigate to the Configurations page under Settings and select “Create” with the type “Routing configuration,” and add a rule collection, where the target network group is your spoke network group.
Step 4. Create routing rules
Create the following rule.
By using the above rule, you can easily route all traffic to an Azure Firewall, except the destination is in the same VNet to reduce latency for routing and inspection cost if the traffic within the same VNet is trusted. All new subnets in the VNets belonging to the spoke network group can automatically get the necessary UDRs to make this routing behavior happen.
Step 5. Commit the configuration
Deploy the configurations, and the target regions to commit your desired configuration(s).
Variation – route all traffic to Azure Firewall in a hub and spoke topology but trusted VNets can communicate directly
In this topology, some spoke VNets are directly connected by using AVNM’s direct connectivity, unlike the hub and spoke topology above. This topology helps some trusted VNets communicate directly without the hub’s firewall. This way, the latency between these VNets can be reduced. You can monitor the traffic between these VNets by using virtual network flow logs.
Step 1. Create a network group of trusted VNets
In your Network Manager resource, navigate to the Network groups page under Settings and select Create and create a network group with the member type Virtual network.
In the newly created network group, select Group members and click Add to add existing VNets.
Step 2. Create a connectivity configuration
In your Network Manager resource, navigate to the Configurations page under Settings and select Create – Connectivity configuration and create connectivity configurations.
In the Topology tab, select the Hub and spoke option and choose a hub VNet where the trusted spoke VNet is selected, and add the network group created in Step 1. Also check the Enable connectivity within network group option to enable direct connectivity within trusted VNets.
Step 3. Commit the configuration
Deploy the connectivity configuration to the target region to commit your desired configuration.
In your Network Manager resource, navigate to the Deployments page under Settings and click Deploy configurations – Connectivity configuration.
In Connectivity configurations, select Connectivity configuration you have created, and select the target regions where the configuration to be deployed.
Click Next and review the configuration to be deployed, then click Deploy.
Scenario II – spoke to spoke across two hubs (two hub and spoke topologies)
Some customers use a hub and spoke architecture for each region. It required many manual operations to do cross-hub and spoke with FWs/NVAs in the past because users needed many UDRs to be set up by hand, and when there were changes in spoke VNets, such as adding new spoke VNets and subnets, they also needed to change UDRs and route tables.
With UDR management, you can create the following:
Route rule collection for spoke network group 1:
Target network group = spoke network group 1
Add a route rule for each spoke VNet in hub and spoke 2: go to the spoke via FW1 in region 1
Route rule collection for AzFw1 network group 1 (network group of subnets):
Target network group = network group consisting of only AzFw1 subnet
Add a route rule for: go to the spokes via FW2 in region 2
Route rule collection for spoke network group 2:
Target network group = spoke network group 2
Add a route rule for each spoke VNet in hub and spoke 1: go to the spoke via FW2 in region 2
Route rule collection for AzFw network group 2 (network group of subnets):
Target network group = network group consisting of only AzFw2 subnet
Add a route rule: go to the spokes via FW2 in region 2
Note: you can create a network group of subnets for the subnet of Azure Firewall or any other firewall.
You need to add a route rule to the associated rule collection and deploy the configuration when there is a new spoke VNet in the environment. The rest will be orchestrated by AVNM.
In this scenario, we’ll create the following multi-hub and spoke topologies to work with a routing configuration.
Prerequisites:
VNets and Azure Firewall instances already exist. Please reference Azure Firewall’s tutorial for setup.
Azure Firewall needs to have network rules to allow cross-region traffic.
VNets in each hub are connected to each other and connect to the spoke VNets in the local region. You can reference AVNM’s connectivity configuration documentation to configure a hub and spoke topology in each region.
Create a VM in a spoke VNet to confirm network connectivity across regions.
Note: if you manually create VNet peerings, you need to check the “Allow <VNet name> to receive forwarded traffic from the peered virtual network” option, otherwise the forwarded traffic received from your Azure Firewall will be dropped. See the VNet peering public documentation for more information.
Step 1. Create network groups
Create these four network groups to archive multiple hub and spoke topologies in your existing network manager resource. Also, in this demo, we assume that each spoke has two VNets.
Network group for spoke VNets in WestUS2
Network group for AzureFirewallSubnet in WestUS2
Network group for spoke VNets in EastUS
Network group for AzureFirewallSubnet in EastUS
Create network group for spoke VNets in WestUS2
In your Network Manager resource, navigate to the Network groups page under Settings and select Create and create a network group with member type Virtual Network.
After successfully creating the network group, add spoke VNets in WestUS2 as group members.
Note: In this demo, we’re manually adding members, but it’s also possible to adopt a configuration where VNets are automatically added using Azure Policy.
Create network group for AzureFirewallSubnet in WestUS2
In your Network Manager resource, navigate to the Network groups page under Settings and select Create and create a network group with member type Subnet.
After successfully creating the network group, add AzureFirewallSubnet in WestUS2 as a group member.
Create network group for spoke VNets in EastUS
Repeat the same procedure outlined in (1) for EastUS.
Create network group for AzureFirewallSubnet in EastUS
Repeat the same procedure outlined in (2) for EastUS.
Done! Now we have created four network groups with the appropriate VNets and subnets included. We’ll create routing rules for each of these network groups in a later step.
Step 2. Create a routing configuration and rule collections
Create a routing configuration with four rule collections. Each rule collection needs to be attached to a corresponding network group created in Step 1.
Note: A routing configuration is a resource that contains multiple rule collections, and each rule collection includes rule(s) that describes actual routing information. The relationship of these resources are as follows:
Create routing configuration
In your Network Manager resource, navigate to the Configurations page under Settings and select Create and select Routing configuration.
In the Create a routing configuration pane, input a configuration name, and click Next.
In the Rule collections tab, click Add to create rule collections.
Create four rule collections as follows without rules. Each rule collection has a 1:1 relationship with the network groups created in Step 1.
Click Next and Create the routing configuration.
We have attached a rule collection to each network group, but there are no routing rules yet in the rule collections. Now we need to create the actual routing rules for each rule collection in the next step to achieve cross-region connectivity.
Step 3. Create routing rules for each rule collection
In this step, we’ll create routing rules in the following Rule collections which was created in the previous step.
RuleCol-Spoke-WestUS2
RuleCol-FWSubnet-WestUS2
RuleCol-Spoke-EastUS
RuleCol-FWSubnet-EastUS
Routing rules for RuleCol-Spoke-WestUS2
We need to add routing rules for the WestUS2 spoke VNets. For this example, we’ll create a 0/0 route (default route) with the local Firewall as the next hop. This configuration not only allows filtering of traffic towards the internet but also enables using the local Firewall as a router to facilitate communication between spokes across regions.
In your Network Manager resource, navigate to the Configurations page under Settings and select the rule configuration created in Step 2.
In the rule configuration, select the rule collection for the spoke VNets in WestUS2.
Click Add to create a rule. Destination IP addresses/CIDR ranges is the default route (0/0), Next hop type is Virtual appliance, and Next hop address is your Azure Firewall IP Address in WestUS2.
Click Add to create the rule.
Routing rules for RuleCol-FWSubnet-WestUS2
We need to add routing rules for the Azure Firewall subnet. We need to add the address prefix used in the remote region, because spoke VNets in each region don’t know any of the address prefixes in the remote region. Therefore, to facilitate communication between spokes in different regions, it’s necessary to relay traffic to the firewall in each region, and we’ll create a routing rule here for that purpose.
Note: In this demo, we create a summary of the address prefixes used in the remote region instead of creating each VNet’s address prefix (e.g. address prefixes used in the remote region are 10.0.0.0/22, 10.0.11.0/0, 10.0.12.0/24, and these prefixes can be summarized by 10.0.0.0/16).
Summarizing address prefixes offers the benefit of not needing to change the routing rules for the firewall subnet even if new spokes are added to each region. However, it’s important to pre-define the address prefixes used in each region, including for future use.
In the rule configuration, select the rule collection for the Azure Firewall subnet in WestUS2.
Click Add to create the rule. Destination IP addresses/CIDR ranges is a summary of the address prefixes used in the remote region, Next hop type is Virtual appliance, and Next hop address is your remote Azure Firewall IP Address in EastUS.
Click Add to create the rule.
The AzureFirewallSubnet has a requirement to have a default route (0.0.0.0/0) with next hop type internet. Then we have to add this rule in this rule collection.
Routing rules for RuleCol-Spoke-EastUS
Repeat the same procedure outlined in (1) for EastUS.
Routing rules for RuleCol-FWSubnet-EastUS
Repeat the same procedure outlined in (2) for EastUS.
From the above steps, we have defined the configurations, but there have been no changes in the actual environment yet. In the next step, we will deploy the defined configuration and ensure that routing is operational.
We can see all the defined rules at a glance from Routing Configuration – Rules.
Step 4. Commit the configuration
Deploy the routing configuration to the target region to commit your desired configuration.
In your Network Manager resource, navigate to the Deployments page under Settings and click Deploy configurations – Routing configuration.
In User defined routing configurations, select the routing configuration you have created, and select the target regions where the configuration needs to be deployed.
Click Next and review the configuration to be deployed, then click Deploy.
Once the configuration is successfully deployed, you’ll be able to see the route tables created by Network Manager are automatically linked to the subnet(s).
Select one of the VNets targeted by the routing configuration and navigate to Subnets and select the link of the route table attached to the subnet.
You’ll be able to confirm the defined routes exist in this route table.
You can also check if VMs located in different regions can connect to each other.
Step 5. Adding spoke VNet to the existing multi-hub-spoke topologies
All you need to do is add the new spoke VNet to the existing network group, and network manager will automatically detect the membership change and apply defined routing rules to the new VNet. Similarly, when removing a VNet from the network group, the applied routing rule will be automatically removed as well.
In summary
By using UDR management, you can simplify the configuration and maintenance of routing behaviors. With network groups and routing rules, you can define and apply routing rules to multiple VNets without manually configuring route tables for each VNet or subnet. You can also easily add or remove VNets from the network groups and have the routing rules automatically update route tables for you accordingly. This makes it easy for users to manage various routing behaviors for different topologies.
Microsoft Tech Community – Latest Blogs –Read More
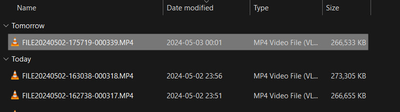
Day based grouping groups new file as “Tomorrow” if you have folder open when clock hits midnight
steps to recreate:
– open a folder before midnight
– wait until midnight passes
– add a file to folder from external source
Labels will be incorrect for the groups, after refresh it’s correct again.
Group labels should be refreshed upon adding the file even from an external source.
steps to recreate:- open a folder before midnight- wait until midnight passes- add a file to folder from external sourceLabels will be incorrect for the groups, after refresh it’s correct again. Group labels should be refreshed upon adding the file even from an external source. Read More
I want to create a dynamic SharePoint “thing” that updates when my Excel workbook updates
Hi,
Do I want a Site, a Page, an App, a Something Else? I don’t know.
What I do know is this: I want a central place where the employees can visit to figure out who is authorized to access parts of the company. This will change (dynamic), and I want to display this information based on the source data from an Excel workbook. As the workbook changes, the “thing” in SharePoint changes.
This has nothing to do with SharePoint access, so if that’s how you came away with this, get that out of your head. This has to do with employee access to different departments of the company. For example, John Smith has access to Departments A, B, and C, while employee Jane Johnson has access to Departments B and D. So, maybe I want to display that by employee name, or maybe I want to display that by department with authorized employees underneath.
However I want to display it, it needs to be dynamic and a touch-one situation: Update the Excel workbook, and the SharePoint “thing” changes – no need to update multiple locations. How do I make it dynamic, and am I looking to create a Site, or a Page, or what?
Feel free to paste links and examples and all that you can. I’m not against reading up on this – I just dont know where to begin.
Thanks.
Hi, Do I want a Site, a Page, an App, a Something Else? I don’t know. What I do know is this: I want a central place where the employees can visit to figure out who is authorized to access parts of the company. This will change (dynamic), and I want to display this information based on the source data from an Excel workbook. As the workbook changes, the “thing” in SharePoint changes. This has nothing to do with SharePoint access, so if that’s how you came away with this, get that out of your head. This has to do with employee access to different departments of the company. For example, John Smith has access to Departments A, B, and C, while employee Jane Johnson has access to Departments B and D. So, maybe I want to display that by employee name, or maybe I want to display that by department with authorized employees underneath. However I want to display it, it needs to be dynamic and a touch-one situation: Update the Excel workbook, and the SharePoint “thing” changes – no need to update multiple locations. How do I make it dynamic, and am I looking to create a Site, or a Page, or what? Feel free to paste links and examples and all that you can. I’m not against reading up on this – I just dont know where to begin. Thanks. Read More
Auto-populate dates
Hello!
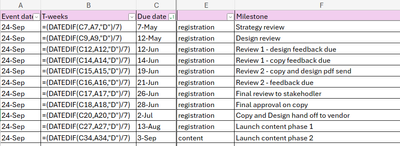
I need assistance with automating updates for the remaining dates in the ‘Due date’ column (Column C). Currently, we use a DateDif formula in Column B to determine the T-weeks schedule, which influences the milestones listed in Column F. For instance, if I modify the date of a milestone like the strategy review from May 7th to May 12th, I want the subsequent due dates to adjust accordingly based on the T-weeks schedule.
Thank you!
Hello! I need assistance with automating updates for the remaining dates in the ‘Due date’ column (Column C). Currently, we use a DateDif formula in Column B to determine the T-weeks schedule, which influences the milestones listed in Column F. For instance, if I modify the date of a milestone like the strategy review from May 7th to May 12th, I want the subsequent due dates to adjust accordingly based on the T-weeks schedule.Thank you! Read More

Microsoft 365 Community Conference: Keynote – The Age of Copilots
Session: Keynote: The Age of Copilots
Speaker: Jeff Teper, President – Microsoft 365 Collaborative Apps & Platforms
The Microsoft 365 Community Conference is a premier event that brings together professionals from around the globe to explore the latest innovations in Microsoft 365, including Copilot, Microsoft Viva, Teams, and more. The conference took place April 30 to May 2, 2024, at the Swan & Dolphin Resort in Orlando, Florida, the conference offered over 150 sessions, workshops, and unparalleled networking opportunities.
The conference keynote was headlined by Microsoft’s Jeff Teper, President – Microsoft 365 Collaborative Apps & Platforms. Jeff focused on three foundational elements: AI, collaboration, and content management, integrating Copilot with Teams and SharePoint for a seamless experience. The underlying technology, a Large Language Model (LLM) like GPT-4 but hosted by Microsoft, offers enhanced security, and is integrated with user data through the Microsoft Graph and Microsoft 365 apps, including web search capabilities.
Security, compliance, privacy, and responsible AI are at the forefront of Copilot’s design. Demonstrations by Miceile Barrett showcased the versatility of Copilot, from personal to work accounts, and the ease of switching between tasks, whether it’s choosing new colors for a product or finding the right document with a OneDrive query. Copilot Studio stands out by allowing the creation of tailored Copilots, leveraging over 1,000 data sources, including the Microsoft Graph, with customizable logic and management capabilities. With Visual Studio, users can further personalize their experience by building customizations, connections, and models, making Copilot a truly adaptable and powerful tool for the modern workplace.
The new Microsoft Teams desktop client is set to deliver a reimagined experience with a focus on performance and simplicity. Boasting over 320 million monthly active users, the updated client promises to be twice as fast and features a more streamlined user interface. A significant update is on the horizon, which will merge personal and work accounts into a single client. Derek Snyder showed key highlights, including the introduction of a Discover feed, akin to social media but designed to be genuinely useful, and the ability to archive channels. Users will appreciate the enhanced search capabilities within chats and the option to forward messages.
Naomi Moneypenny took the stage and told us how SharePoint Online is set to undergo its most significant transformation in 24 years, introducing Copilot in SharePoint to revolutionize content creation and management. These new features will allow users to create natural language prompts as a column to automatically summarize each document’s content, streamlining workflows and enhancing productivity. The platform is also introducing SharePoint eSignature to digitize document approval workflows securely. With “The New SharePoint Experience,” users can expect custom fonts, new page designs, and a more personalized approach to content management.
Moreover, Copilot will enable the creation of pages based on content with a specific focus and audience, catering to diverse needs. Viva Amplify assists in distributing content and monitoring the performance of campaigns, further extending SharePoint’s capabilities. In addition, Copilot in Stream is set to redefine the future of video communication by offering features like removing filler words and bad takes, ensuring that users present their best selves in virtual meetings. These innovations represent a leap forward for SharePoint Online, cementing its status as a flexible and dynamic content management platform.
OneDrive is undergoing a significant transformation as well, leveraging SharePoint’s updates for its backend to enhance its capabilities. This change aims to unify the user experience across various Microsoft platforms, ensuring that OneDrive offers the same experience in Teams, Outlook, the web, and soon, the Microsoft 365 web app. A notable addition is Copilot in OneDrive, bringing with it the ability to summarize content, including within PDFs. The General Availability (GA) of Copilot in OneDrive is scheduled for this summer, marking a milestone in the platform’s evolution. This integration is part of a broader initiative that encompasses OneDrive, SharePoint, Viva Amplify, and Stream, indicating a concerted effort to streamline and amplify productivity within the Microsoft ecosystem.
It is evident that the future of workplace collaboration and productivity is being reshaped by the integration of AI and user-centric design. The Microsoft 365 Community Conference not only showcased the latest advancements in Microsoft 365 but also set the stage for a new era of intelligent and seamless work experiences. With the promise of enhanced performance, deeper collaboration, and innovative content management solutions, Microsoft is paving the way for organizations and individuals to achieve more.
Daniel Glenn (Microsoft MVP); Speaker; CollabFront Owner and Microsoft 365 Consultant
Microsoft Tech Community – Latest Blogs –Read More

Bitlocker encryption issues over Intune
Hi,
I have an Hybrid AD deployment and use Intune to deploy security settings to our endpoints.
I set up a Device Configuration policy to deploy Bitlocker on all our Windows devices, and this was done quite some time ago. Now I created a powershell script to audit if the bitlocker keys are in AzureAD and Intune, and found out that around 500 out of 2000 devices do not have keys, so I guess that they are not encrypted. I looked at a couple of cases to analyze and I’ve got some conflicting information. If I look at the device on Intune, I can see that my Device Configuration policy was “Succeeded”, like shown here:
But then if I go to “Endpoint Security” -> “Disk Encryption”, I can see my policy named “Bitlocker_All_Devices” there, and entering the policy, looking at “Device Status”, I have the list of “Succeeded” devices, and the device is not there.
So on the device, the policy seems to have been applied, but in fact no encryption happened. How can I debug what’s going on here? Without having to look individually to 500 devices of course.
Thanks
Hi,I have an Hybrid AD deployment and use Intune to deploy security settings to our endpoints.I set up a Device Configuration policy to deploy Bitlocker on all our Windows devices, and this was done quite some time ago. Now I created a powershell script to audit if the bitlocker keys are in AzureAD and Intune, and found out that around 500 out of 2000 devices do not have keys, so I guess that they are not encrypted. I looked at a couple of cases to analyze and I’ve got some conflicting information. If I look at the device on Intune, I can see that my Device Configuration policy was “Succeeded”, like shown here:But then if I go to “Endpoint Security” -> “Disk Encryption”, I can see my policy named “Bitlocker_All_Devices” there, and entering the policy, looking at “Device Status”, I have the list of “Succeeded” devices, and the device is not there.So on the device, the policy seems to have been applied, but in fact no encryption happened. How can I debug what’s going on here? Without having to look individually to 500 devices of course. Thanks Read More

Dial 800-845-9666 Fix QuickBooks Payroll Update Error 15270
QuickBooks is renowned for its comprehensive payroll management features, helping businesses streamline their payroll processes efficiently. However, encountering errors during payroll updates, such as Error 15270, can disrupt workflow and cause frustration. In this article, we’ll delve into what QuickBooks Payroll Update Error 15270 is, its possible causes, and effective solutions to resolve it, ensuring seamless payroll operations.
What is QuickBooks Payroll Update Error 15270?
QuickBooks Payroll Update Error 15270 is a common issue that occurs when users attempt to download payroll updates but encounter a failure during the process. The error message typically states, “Error 15270: The (payroll) update did not complete successfully. The update is missing a file.”
Reasons for QuickBooks Payroll Update Error 15270:
Incomplete Installation: One of the primary reasons for Error 15270 is an incomplete installation of QuickBooks or the payroll update. This could be due to interrupted internet connectivity, system shutdowns during the update process, or other installation errors.
User Account Control Settings: User Account Control (UAC) settings in Windows may prevent QuickBooks from accessing necessary files or completing the update process. If UAC settings are too strict, they can interfere with QuickBooks’ ability to install updates properly.
Corrupted Windows Registry: Issues with the Windows registry, such as corrupted registry entries related to QuickBooks or payroll updates, can lead to Error 15270. Registry corruption may occur due to improper system shutdowns, malware infections, or other system errors.
Solutions to QuickBooks Payroll Update Error 15270:
Restart QuickBooks and Update: Sometimes, simply restarting QuickBooks and attempting the payroll update again can resolve Error 15270. Ensure that all other applications are closed, restart QuickBooks, and then initiate the update process to see if the issue persists.
Disable User Account Control (UAC): Adjusting UAC settings in Windows can help alleviate issues with QuickBooks updates. To do this, navigate to the Control Panel, select User Accounts, and then choose Change User Account Control settings. Lower the UAC settings to a level that allows QuickBooks to install updates without interference.
Download and Install Update Manually: If Error 15270 persists despite restarting QuickBooks, consider downloading the payroll update manually from the Intuit website. Visit the QuickBooks Downloads & Updates page, select your QuickBooks version, and download the latest payroll update. After downloading, install the update manually by following the on-screen instructions.
Repair QuickBooks Installation: If the issue persists, repairing the QuickBooks installation may help resolve Error 15270. Close QuickBooks and navigate to the Control Panel, then select Programs and Features. Locate QuickBooks in the list of installed programs, right-click on it, and choose Repair. Follow the prompts to repair the QuickBooks installation.
Check Windows Registry for Errors: Use a reliable registry cleaner tool to scan for and repair any errors or inconsistencies in the Windows registry. Be cautious when modifying the registry, as incorrect changes can cause system instability. Always back up the registry before making any changes.
Conclusion:
QuickBooks Payroll Update Error 15270 can be frustrating to encounter, but with the right troubleshooting steps, it can be resolved effectively. By understanding the potential causes of the error and implementing the appropriate solutions outlined in this article, users can ensure uninterrupted payroll updates and maintain smooth operations in QuickBooks.
QuickBooks is renowned for its comprehensive payroll management features, helping businesses streamline their payroll processes efficiently. However, encountering errors during payroll updates, such as Error 15270, can disrupt workflow and cause frustration. In this article, we’ll delve into what QuickBooks Payroll Update Error 15270 is, its possible causes, and effective solutions to resolve it, ensuring seamless payroll operations. What is QuickBooks Payroll Update Error 15270? QuickBooks Payroll Update Error 15270 is a common issue that occurs when users attempt to download payroll updates but encounter a failure during the process. The error message typically states, “Error 15270: The (payroll) update did not complete successfully. The update is missing a file.”Reasons for QuickBooks Payroll Update Error 15270:Incomplete Installation: One of the primary reasons for Error 15270 is an incomplete installation of QuickBooks or the payroll update. This could be due to interrupted internet connectivity, system shutdowns during the update process, or other installation errors.User Account Control Settings: User Account Control (UAC) settings in Windows may prevent QuickBooks from accessing necessary files or completing the update process. If UAC settings are too strict, they can interfere with QuickBooks’ ability to install updates properly.Corrupted Windows Registry: Issues with the Windows registry, such as corrupted registry entries related to QuickBooks or payroll updates, can lead to Error 15270. Registry corruption may occur due to improper system shutdowns, malware infections, or other system errors.Solutions to QuickBooks Payroll Update Error 15270: Restart QuickBooks and Update: Sometimes, simply restarting QuickBooks and attempting the payroll update again can resolve Error 15270. Ensure that all other applications are closed, restart QuickBooks, and then initiate the update process to see if the issue persists.Disable User Account Control (UAC): Adjusting UAC settings in Windows can help alleviate issues with QuickBooks updates. To do this, navigate to the Control Panel, select User Accounts, and then choose Change User Account Control settings. Lower the UAC settings to a level that allows QuickBooks to install updates without interference.Download and Install Update Manually: If Error 15270 persists despite restarting QuickBooks, consider downloading the payroll update manually from the Intuit website. Visit the QuickBooks Downloads & Updates page, select your QuickBooks version, and download the latest payroll update. After downloading, install the update manually by following the on-screen instructions.Repair QuickBooks Installation: If the issue persists, repairing the QuickBooks installation may help resolve Error 15270. Close QuickBooks and navigate to the Control Panel, then select Programs and Features. Locate QuickBooks in the list of installed programs, right-click on it, and choose Repair. Follow the prompts to repair the QuickBooks installation.Check Windows Registry for Errors: Use a reliable registry cleaner tool to scan for and repair any errors or inconsistencies in the Windows registry. Be cautious when modifying the registry, as incorrect changes can cause system instability. Always back up the registry before making any changes.Conclusion:QuickBooks Payroll Update Error 15270 can be frustrating to encounter, but with the right troubleshooting steps, it can be resolved effectively. By understanding the potential causes of the error and implementing the appropriate solutions outlined in this article, users can ensure uninterrupted payroll updates and maintain smooth operations in QuickBooks. Read More
How can I add a bounding box around that text using these coordinates in PowerApps Canvas
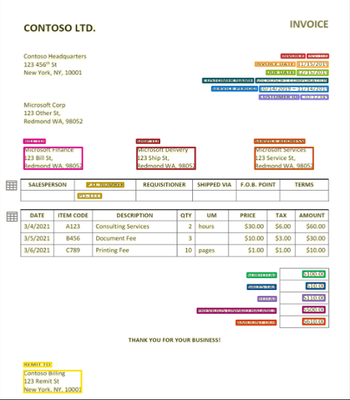
I have the coordinates of the polygon for a text in a pdf. How can I add a bounding box around that text using these coordinates in PowerApps Canvas? I have tried using PDFViewer in the canva app but couldn’t find any properties that does it. Here is an example.
Here is a sample of the bounding region. “boundingRegions”: [ { “pageNumber”: 3, “polygon”: [3.4096, 6.5217, 4.5317, 6.5217, 4.5317, 6.684, 3.4096, 6.684] } ]
How to make it interactive with form data in canvas app?
I have the coordinates of the polygon for a text in a pdf. How can I add a bounding box around that text using these coordinates in PowerApps Canvas? I have tried using PDFViewer in the canva app but couldn’t find any properties that does it. Here is an example. Here is a sample of the bounding region. “boundingRegions”: [ { “pageNumber”: 3, “polygon”: [3.4096, 6.5217, 4.5317, 6.5217, 4.5317, 6.684, 3.4096, 6.684] } ] How to make it interactive with form data in canvas app? Read More
Partner Alert: Business Applications Partner Activities Update
Summary
We’ve seen an incredibly strong demand for FY24 Business Applications Partner Activities. To date, we’ve funded over 2,500 activities designed to help partners close deals.
Due to this strong demand and engagement, a few of our activity thresholds were exceeded and some workshops were temporarily paused. We’re pleased to let you know we’ve increased the limits for the following engagements, which are all now back online and available:
AIM Assessment – Fixed Fee
Power Platform – Needs Assessment
Business Central – Needs Assessment
Tailored Demo – Variable Payout
Business Value Assessment – Variable Payout
Envisioning – Variable Payout
We’ve got some exciting new workshops in the works – based on your continued feedback. You’ll see these new activities beginning in July 2024. We will be sharing more details in the upcoming weeks.
The Business Applications Partner Activities program is a partner-led, structured incentives program offering high-value activities designed to both encourage customers to pursue Microsoft Business Applications solutions and prove Microsoft solution value. To see the complete list of engagements that are supported, review the Microsoft Commercial Partner Incentives Guide.
Thank you to all our partners for your continued support of the Business Applications Partner Activities program. We are excited for a strong finish to FY24!
Call to Action
Bookmark the Business Applications Partner Activities page to stay updated with the latest resources, updates, and program announcements for FY24
Submit a query to https://aka.ms/partnercentersupport for Partner Activities Tier 1 support and any other feedback or questions
Stay Connected with Business Applications Partner Resources
NEW! Sign up for the Dynamics 365 and Power Platform Partner Newsletters
Follow the Dynamics 365 and Power Platform partner LinkedIn channels
Bookmark the Dynamics 365 and Power Platform Partner Hub pages
Join and engage in the Business Applications Microsoft Partner Community
Summary
We’ve seen an incredibly strong demand for FY24 Business Applications Partner Activities. To date, we’ve funded over 2,500 activities designed to help partners close deals.
Due to this strong demand and engagement, a few of our activity thresholds were exceeded and some workshops were temporarily paused. We’re pleased to let you know we’ve increased the limits for the following engagements, which are all now back online and available:
AIM Assessment – Fixed Fee
Power Platform – Needs Assessment
Business Central – Needs Assessment
Tailored Demo – Variable Payout
Business Value Assessment – Variable Payout
Envisioning – Variable Payout
We’ve got some exciting new workshops in the works – based on your continued feedback. You’ll see these new activities beginning in July 2024. We will be sharing more details in the upcoming weeks.
The Business Applications Partner Activities program is a partner-led, structured incentives program offering high-value activities designed to both encourage customers to pursue Microsoft Business Applications solutions and prove Microsoft solution value. To see the complete list of engagements that are supported, review the Microsoft Commercial Partner Incentives Guide.
Thank you to all our partners for your continued support of the Business Applications Partner Activities program. We are excited for a strong finish to FY24!
Call to Action
Bookmark the Business Applications Partner Activities page to stay updated with the latest resources, updates, and program announcements for FY24
Submit a query to https://aka.ms/partnercentersupport for Partner Activities Tier 1 support and any other feedback or questions
Stay Connected with Business Applications Partner Resources
NEW! Sign up for the Dynamics 365 and Power Platform Partner Newsletters
Follow the Dynamics 365 and Power Platform partner LinkedIn channels
Bookmark the Dynamics 365 and Power Platform Partner Hub pages
Join and engage in the Business Applications Microsoft Partner Community Read More
New Blog | Microsoft Entra announcements and demos at RSAC 2024
The Microsoft Entra team is looking forward to connecting with you next week at RSA Conference 2024 (RSAC) from May 6 to 9, 2024, in San Francisco! As we enter the age of AI and there are more identities and access points to protect, identity security has never been more paramount. From protecting workforce and external identities to non-human identities—that outnumber human identities 10 to 1—the task of securing access and the interactions between them requires taking a more comprehensive approach.
To help customers protect every identity and every access point, I’d like to highlight recent innovations that we’ll be showcasing at this upcoming event:
Expanded passkey support for Microsoft Entra ID
Microsoft Entra ID external authentication methods
Microsoft Entra External ID general availability
Microsoft Entra Permissions Management and Microsoft Defender for Cloud integration general availability
Our vision for cloud access management to strengthen multicloud security
We will be demonstrating these new innovations and sharing more about how to take a holistic approach to identity and access at RSA Conference 2024 (see the table at the end of this blog for more information). Now, let’s take a closer look at Microsoft Entra innovations that we’ll be showcasing at RSAC.
Expanded passkey support for Microsoft Entra ID
In addition to supporting sign-ins via a passkey hosted on a hardware security key, Microsoft Entra ID now includes additional support for device-bound passkeys in the Microsoft Authenticator app on iOS and Android. This will bring strong and convenient authentication to mobile devices for customers with the strictest security requirements.
A passkey is a strong, phishing-resistant authentication method you can use to sign in to any internet resource that supports the W3C WebAuthN standard. Passkeys represent the continuing evolution of the FIDO2 standard aimed at creating a secure and user friendly passwordless experience for everyone.
To learn more about using passkeys in the Microsoft Authenticator app, check out this blog.
By Irina Nechaeva
The Microsoft Entra team is looking forward to connecting with you next week at RSA Conference 2024 (RSAC) from May 6 to 9, 2024, in San Francisco! As we enter the age of AI and there are more identities and access points to protect, identity security has never been more paramount. From protecting workforce and external identities to non-human identities—that outnumber human identities 10 to 1—the task of securing access and the interactions between them requires taking a more comprehensive approach.
To help customers protect every identity and every access point, I’d like to highlight recent innovations that we’ll be showcasing at this upcoming event:
Expanded passkey support for Microsoft Entra ID
Microsoft Entra ID external authentication methods
Microsoft Entra External ID general availability
Microsoft Entra Permissions Management and Microsoft Defender for Cloud integration general availability
Our vision for cloud access management to strengthen multicloud security
We will be demonstrating these new innovations and sharing more about how to take a holistic approach to identity and access at RSA Conference 2024 (see the table at the end of this blog for more information). Now, let’s take a closer look at Microsoft Entra innovations that we’ll be showcasing at RSAC.
Expanded passkey support for Microsoft Entra ID
In addition to supporting sign-ins via a passkey hosted on a hardware security key, Microsoft Entra ID now includes additional support for device-bound passkeys in the Microsoft Authenticator app on iOS and Android. This will bring strong and convenient authentication to mobile devices for customers with the strictest security requirements.
A passkey is a strong, phishing-resistant authentication method you can use to sign in to any internet resource that supports the W3C WebAuthN standard. Passkeys represent the continuing evolution of the FIDO2 standard aimed at creating a secure and user friendly passwordless experience for everyone.
To learn more about using passkeys in the Microsoft Authenticator app, check out this blog.
Read the full post here: Microsoft Entra announcements and demos at RSAC 2024

New Blog | Monthly news – May 2024
By Yura Lee
Microsoft Defender for Cloud
Monthly news
May 2024 Edition
This is our monthly “What’s new” blog post, summarizing product updates and various new assets we released over the past month. In this edition, we are looking at all the goodness from April 2024.
Read the full post here: Monthly news – May 2024
By Yura Lee
Microsoft Defender for Cloud
Monthly news
May 2024 Edition
This is our monthly “What’s new” blog post, summarizing product updates and various new assets we released over the past month. In this edition, we are looking at all the goodness from April 2024.
Read the full post here: Monthly news – May 2024 Read More

Dial Now 800-845-9666 Fix QuickBooks Migrator Tool Not Working
QuickBooks Migrator Tool is a valuable utility designed to facilitate the seamless transition of data from one QuickBooks version to another. However, encountering issues where the migrator tool fails to work as expected can be frustrating for users. In this article, we’ll explore what the QuickBooks Migrator Tool is, common reasons behind it not working, and effective solutions to address these issues, ensuring a smooth data migration process.
What is the QuickBooks Migrator Tool?
The QuickBooks Migrator Tool is a software utility provided by Intuit that allows users to transfer their data, including company files, transactions, and settings, from an older version of QuickBooks to a newer one. This tool is particularly useful when upgrading to a newer QuickBooks version to ensure data continuity and compatibility.
Reasons for QuickBooks Migrator Tool Not Working:
Compatibility Issues: One of the primary reasons why the QuickBooks Migrator Tool may not work is compatibility issues between the source and destination QuickBooks versions. If the migrator tool is not updated to support the specific versions of QuickBooks being used, it may encounter errors or fail to initiate the migration process.
Corrupted or Incomplete Installation: Problems with the installation of the QuickBooks Migrator Tool itself, such as corrupted files or incomplete installation, can prevent the tool from functioning properly. This could be due to interruptions during the installation process or conflicts with other software on the system.
Data File Errors: Issues with the QuickBooks company file, such as corruption or data integrity issues, can interfere with the migrator tool’s ability to transfer data successfully. If the company file contains errors or inconsistencies, the migrator tool may encounter errors or fail to complete the migration process.
Solutions to QuickBooks Migrator Tool Not Working:
Ensure Compatibility: Before using the QuickBooks Migrator Tool, verify that it is compatible with both the source and destination versions of QuickBooks. Check Intuit’s website or documentation for information on supported versions and any updates or patches available for the migrator tool.
Reinstall the Migrator Tool: If the QuickBooks Migrator Tool is not working due to a corrupted or incomplete installation, try reinstalling the tool to resolve the issue. Uninstall the existing version of the migrator tool, download the latest version from Intuit’s website, and reinstall it following the installation instructions.
Verify Company File Integrity: Prior to using the migrator tool, ensure that the QuickBooks company file is free from errors or corruption. Use the built-in QuickBooks File Doctor tool to scan and repair any issues with the company file. Alternatively, restore a backup of the company file from a known good state and attempt the migration again.
Check for Updates: Regularly check for updates to the QuickBooks Migrator Tool to ensure that you are using the latest version with all available bug fixes and improvements. Intuit frequently releases updates and patches to address issues and enhance functionality, so keeping the migrator tool up to date is essential for optimal performance.
Contact QuickBooks Support: If you continue to experience issues with the QuickBooks Migrator Tool not working despite trying the above solutions, consider reaching out to QuickBooks support for assistance. Intuit’s support team can provide further troubleshooting guidance and help resolve any underlying issues preventing the migrator tool from functioning correctly.
QuickBooks Migrator Tool is a valuable utility designed to facilitate the seamless transition of data from one QuickBooks version to another. However, encountering issues where the migrator tool fails to work as expected can be frustrating for users. In this article, we’ll explore what the QuickBooks Migrator Tool is, common reasons behind it not working, and effective solutions to address these issues, ensuring a smooth data migration process. What is the QuickBooks Migrator Tool? The QuickBooks Migrator Tool is a software utility provided by Intuit that allows users to transfer their data, including company files, transactions, and settings, from an older version of QuickBooks to a newer one. This tool is particularly useful when upgrading to a newer QuickBooks version to ensure data continuity and compatibility. Reasons for QuickBooks Migrator Tool Not Working: Compatibility Issues: One of the primary reasons why the QuickBooks Migrator Tool may not work is compatibility issues between the source and destination QuickBooks versions. If the migrator tool is not updated to support the specific versions of QuickBooks being used, it may encounter errors or fail to initiate the migration process.Corrupted or Incomplete Installation: Problems with the installation of the QuickBooks Migrator Tool itself, such as corrupted files or incomplete installation, can prevent the tool from functioning properly. This could be due to interruptions during the installation process or conflicts with other software on the system.Data File Errors: Issues with the QuickBooks company file, such as corruption or data integrity issues, can interfere with the migrator tool’s ability to transfer data successfully. If the company file contains errors or inconsistencies, the migrator tool may encounter errors or fail to complete the migration process.Solutions to QuickBooks Migrator Tool Not Working:Ensure Compatibility: Before using the QuickBooks Migrator Tool, verify that it is compatible with both the source and destination versions of QuickBooks. Check Intuit’s website or documentation for information on supported versions and any updates or patches available for the migrator tool.Reinstall the Migrator Tool: If the QuickBooks Migrator Tool is not working due to a corrupted or incomplete installation, try reinstalling the tool to resolve the issue. Uninstall the existing version of the migrator tool, download the latest version from Intuit’s website, and reinstall it following the installation instructions.Verify Company File Integrity: Prior to using the migrator tool, ensure that the QuickBooks company file is free from errors or corruption. Use the built-in QuickBooks File Doctor tool to scan and repair any issues with the company file. Alternatively, restore a backup of the company file from a known good state and attempt the migration again.Check for Updates: Regularly check for updates to the QuickBooks Migrator Tool to ensure that you are using the latest version with all available bug fixes and improvements. Intuit frequently releases updates and patches to address issues and enhance functionality, so keeping the migrator tool up to date is essential for optimal performance.Contact QuickBooks Support: If you continue to experience issues with the QuickBooks Migrator Tool not working despite trying the above solutions, consider reaching out to QuickBooks support for assistance. Intuit’s support team can provide further troubleshooting guidance and help resolve any underlying issues preventing the migrator tool from functioning correctly. Read More
Azure Linux now supports Azure Kubernetes Service LTS
A common challenge for customers running Kubernetes is keeping up with the rapid pace of bug fixes and security updates for all the software running on their clusters. To help address this, in April last year, Azure Kubernetes Service (AKS) added support for Long Term Support (LTS) for certain Kubernetes versions. Based on overwhelming customer feedback, the Azure Linux team is excited to announce that Azure Linux 2.0 will support AKS LTS for v1.27. With Azure Linux support for AKS LTS, customers benefit from having a stable and regularly serviced node operating system in addition to Kubernetes. To get started, simply run the following commands:
Create new Azure Linux cluster with LTS support enabled
az aks create –resource-group myResourceGroup –name myAKSCluster –tier premium –k8s-support-plan AKSLongTermSupport –kubernetes-version 1.27 –os-sku AzureLinux
Update an existing Azure Linux cluster to add LTS support
az aks update –resource-group myResourceGroup –name myAKSCluster –tier premium –k8s-support-plan AKSLongTermSupport
What are the benefits of Azure Linux support for AKS LTS?
Customers can benefit from having a stable Kubernetes version as well as a stable OS version receiving security patches for the whole duration (July 2025).
Components like the kernel, containerd, and systemd will all remain on stable versions receiving backported patches where necessary.
This significantly reduces the risk of breaking changes or compatibility issues that may arise from upgrading critical OS components along with the Kubernetes version.
Any gotchas?
One notable caveat is that Azure Linux did not switch to using cgroupsv2 until AKS version 1.29 due to issues with memory accounting in runc with older versions that was patched with runc version (1.1.9) incorporated in Kubernetes v1.29. Therefore, cgroupsv1 remains the default on AKS version 1.27 for the extended support duration. Customers who want to use cgroupsv2 features or applications that require cgroupsv2 will need to upgrade to a newer AKS version that supports Azure Linux with cgroupsv2.
How to get started with Azure Linux support for AKS LTS?
Support for Azure Linux with LTS is rolling out with the 2024-04-28 release. Please check the release tracker for the availability of the release in specific regions.
To get started with Azure Linux support for AKS LTS, customers can create a new AKS cluster with Azure Linux 2.0 as the OS and AKS version 1.27 as the Kubernetes version or upgrade their existing AKS clusters to AKS version 1.27 and Azure Linux 2.0.
To learn more about Azure Linux support for AKS LTS, customers can visit the AKS LTS documentation page.
If there are any issues, customers can file an issue with the AKS GitHub Repo or open a support case.
Microsoft Tech Community – Latest Blogs –Read More
Call a SharePoint 2013 Site Workflow from Power Automate
Hello!
Trying to build a HTTP Request in Power Automate to trigger a SharePoint 2013 Site Workflow (not list).
I can retrieve the SubscriptionId easily with a POST:
_api/SP.WorkflowServices.WorkflowSubscriptionService.Current/EnumerateSubscriptions()
And my goal is calling a workflow with a specific SubscriptionId to run on an specific ProjectId.
Any hints?
Thanks in advance!
Hello! Trying to build a HTTP Request in Power Automate to trigger a SharePoint 2013 Site Workflow (not list). I can retrieve the SubscriptionId easily with a POST: _api/SP.WorkflowServices.WorkflowSubscriptionService.Current/EnumerateSubscriptions() And my goal is calling a workflow with a specific SubscriptionId to run on an specific ProjectId. Any hints? Thanks in advance! Read More
Dynamically auto-populate list based on cell values
Hi
I wondered if anyone could possibly help. In my quest to make a more dynamic assessment system for my school, I’m stuck on a formula. I’ve searched and search and just can’t quite find exactly what I need.
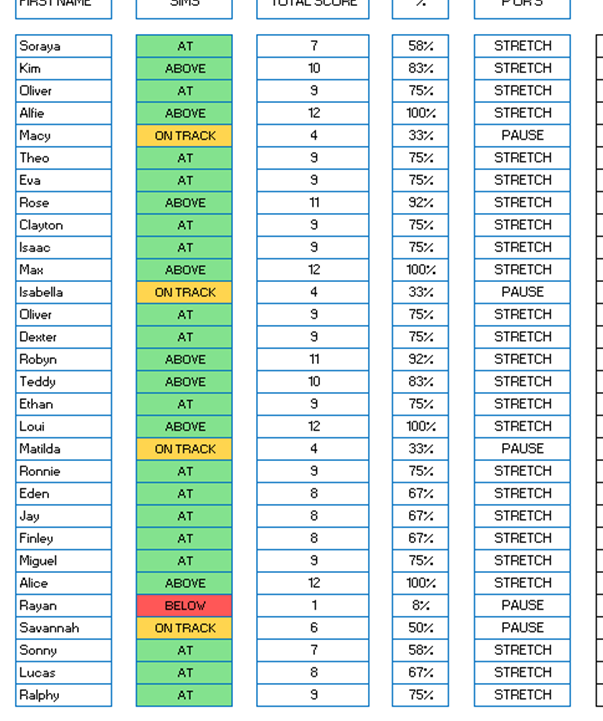
All pupils are given either the value of STRETCH or PAUSE as can be seen in the image below. I need to, based on these values, create two lists on another sheet which are dynamically populated by these pupils; one list of pupils with STRETCH against their name and another list of pupils with PAUSE against their name.
Could anybody help? I’d be so grateful.
HiI wondered if anyone could possibly help. In my quest to make a more dynamic assessment system for my school, I’m stuck on a formula. I’ve searched and search and just can’t quite find exactly what I need.All pupils are given either the value of STRETCH or PAUSE as can be seen in the image below. I need to, based on these values, create two lists on another sheet which are dynamically populated by these pupils; one list of pupils with STRETCH against their name and another list of pupils with PAUSE against their name.Could anybody help? I’d be so grateful. Read More
Google sheets to Excel
Hello all.
When saving a Google sheets doc to Excel all of the formulas that are referencing other tab values are giving me the #REF. The document converts fine in viewing / read only but as soon as I “enable editing” all of the values in boxes referencing other tabs change to #REF.
I reached out to Microsoft Office for help and they were unable to resolve my issue and referred me here.
Thank you in advance for any help!
Evan
Hello all.When saving a Google sheets doc to Excel all of the formulas that are referencing other tab values are giving me the #REF. The document converts fine in viewing / read only but as soon as I “enable editing” all of the values in boxes referencing other tabs change to #REF. I reached out to Microsoft Office for help and they were unable to resolve my issue and referred me here. Thank you in advance for any help!Evan Read More
External User Opening Shared Editable File is Forced to Request Access
Why are my external users forced to request permission to open a file that I have shared with them for editing from within SharePoint? Here is the scenario:
The user receives the editable sharepoint link from me in their email, clicks on the link, requests a one-time code that is sent to their email, enters that code and then sees this message:
“You need permission to access this item.” and a box where they can type in a message and a button labeled “Request Access”
If I have sent them the link with edit permissions, why are they being asked to request permission? That request would go to me who is the person who sent them the editable link in the first place. As the admin, do I need to change some setting in our SharePoint?
Why are my external users forced to request permission to open a file that I have shared with them for editing from within SharePoint? Here is the scenario:The user receives the editable sharepoint link from me in their email, clicks on the link, requests a one-time code that is sent to their email, enters that code and then sees this message:”You need permission to access this item.” and a box where they can type in a message and a button labeled “Request Access” If I have sent them the link with edit permissions, why are they being asked to request permission? That request would go to me who is the person who sent them the editable link in the first place. As the admin, do I need to change some setting in our SharePoint? Read More


