

Category: News
SQL Server Networking troubleshooting documentation expanded
The SQL Server CSS (technical support) and Content teams have been publishing documentation on troubleshooting SQL Server networking issues.
Here is a list of articles that have been produced over the past few months.
Much of the content for these articles was the work of Malcolm Stewart – a tenured SQL Networking Escalation Engineer who has left a large legacy of documentation and troubleshooting tools in the SQL networking domain. Also, the following individuals contributed many hours of reviews, ideas, improvements, and content creation and organization: Pradeep Madheshiya, Padma Jayaraman, Seven Dong, Haiying Yu, and Joseph Pilov.
Hope you find these useful. Please share with others and don’t hesitate to provide feedback at the bottom of each article page by clicking on “Was this page helpful?”. Also be on the look-out for more as we are not finished yet.
You can’t use Kerberos unconstrained delegation in certain versions of Windows – SQL Server | Microsoft Learn
Certificate validation failure – SQL Server | Microsoft Learn
Determine the authentication type – SQL Server | Microsoft Learn
Troubleshooting Windows user profile issue in SQL Server – SQL Server | Microsoft Learn
Troubleshooting the explicit misplaced SPN issue in SQL Server – SQL Server | Microsoft Learn
Troubleshooting the Kerberos tickets issue in SQL Server – SQL Server | Microsoft Learn
Troubleshoot LSASS errors with SQL Server authentication – SQL Server | Microsoft Learn
Troubleshooting linked server connectivity errors in SQL Server – SQL Server | Microsoft Learn
Troubleshooting Named Pipes connection error in SQL Server – SQL Server | Microsoft Learn
TLS 1.2 upgrade workflow – SQL Server | Microsoft Learn
Consistent SQL Server network connectivity issues – SQL Server | Microsoft Learn
Intermittent or periodic authentication issues – SQL Server | Microsoft Learn
MSSQLSERVER_18456 – SQL Server | Microsoft Learn (updated)
Windows user profile can’t be loaded in SQL Server – SQL Server | Microsoft Learn
Local SQL Server can’t connect to a linked server when RSA encryption is used – SQL Server | Microsoft Learn
Connection to the linked server fails – SQL Server | Microsoft Learn
Connectivity issues occur when SQL Server Integration Services packages fail to run – SQL Server | Microsoft Learn
SQL Server Agent fails to start while connecting to SQL Server due to misconfigured TLS protocol – SQL Server | Microsoft Learn
Intermittent connection errors occur in SQL Server – SQL Server | Microsoft Learn
Linked server couldn’t be created after moving on-premises SQL Server to Azure – SQL Server | Microsoft Learn
Client is unable to connect after implementing cipher suite policies on a SQL Server – SQL Server | Microsoft Learn
Troubleshooting the SSL_PE_NO_CIPHER error – SQL Server | Microsoft Learn
Troubleshooting intermittent connection errors using SQLCMD – SQL Server | Microsoft Learn
Explicit misplaced SPN error in SQL Server – SQL Server | Microsoft Learn
Kerberos tickets – KRB_AP_ERR_TKT_EXPIRED error in SQL Server – SQL Server | Microsoft Learn
Intermittent or periodic issues with connecting to SQL Server – SQL Server | Microsoft Learn
JDBC configuration and troubleshooting – SQL Server | Microsoft Learn
Troubleshooting network login issues in SQL Server – SQL Server | Microsoft Learn
Errors in the local security subsystem in SQL Server – SQL Server | Microsoft Learn
Linked server connectivity errors in SQL Server – SQL Server | Microsoft Learn
Named Pipes connection failure to SQL Server – SQL Server | Microsoft Learn
The certificate chain was issued by an authority that isn’t trusted – SQL Server | Microsoft Learn
Timeout expired messages when connecting to SQL Server – SQL Server | Microsoft Learn
Thank you!
Microsoft Tech Community – Latest Blogs –Read More
Oribital elements from ECI to ECEF
Hello,
I have 6 orbital elements in ECI frame, but I need them to be in Earth fixed (ECEF).
Is there any MATLAB function available to get position, velocity vectors from 6 orbital elements and connvert them to ECEF position and velocity vectors?
Thanks in advanceHello,
I have 6 orbital elements in ECI frame, but I need them to be in Earth fixed (ECEF).
Is there any MATLAB function available to get position, velocity vectors from 6 orbital elements and connvert them to ECEF position and velocity vectors?
Thanks in advance Hello,
I have 6 orbital elements in ECI frame, but I need them to be in Earth fixed (ECEF).
Is there any MATLAB function available to get position, velocity vectors from 6 orbital elements and connvert them to ECEF position and velocity vectors?
Thanks in advance matlab MATLAB Answers — New Questions
Equal arc discretization method code
%% Archimedean spiral points with Equal angle discretization method
clear all
clc
% Parameters
R2 = 30; %outer radius (between this radius and R1 is constant arc increment)
b = 2; %incerement per rev, equivalent to feed
a = 0; %inner radius
n = round((R2 – a)./(b)); %number of revolutions and number of
th = 2*n*pi; %angle obtained for n number of revolution, for one revoultion 2*pi
%% parameters defined for constant angle like incremental x value and theta value
dtheta= 1; %% incremental angle (degree)
eqangle= dtheta* pi/(180); %% equal angle obtianed for each spiral revolution
npt= 2*pi/(eqangle); %% number of points in each spiral
tpoints= (npt*n)+1; %% total number of points in n number of revolutions
theta = linspace(0,th,tpoints);
r= a + b.*theta./(2*pi);
% Convert polar coordinates to Cartesian coordinates
xr = r.* cos(theta);
yr = r.* sin(theta);
plot(xr, yr, ‘-o’);
NOTE:
The above code works well for equal angle discretization method. The code consists the information about equal angle i.e, 1 degree, the total number of points, number of points in each spiral, total angle obtained, etc.
Simialry the code for equal arc length discretization method should cosnsists the following information such as for incremental arc length i.e., 1 mm, what is number of points around the edge, spiral length, total number of points etc
Please help to developed the code based on the above information.
Looking forward for the improvement in above code%% Archimedean spiral points with Equal angle discretization method
clear all
clc
% Parameters
R2 = 30; %outer radius (between this radius and R1 is constant arc increment)
b = 2; %incerement per rev, equivalent to feed
a = 0; %inner radius
n = round((R2 – a)./(b)); %number of revolutions and number of
th = 2*n*pi; %angle obtained for n number of revolution, for one revoultion 2*pi
%% parameters defined for constant angle like incremental x value and theta value
dtheta= 1; %% incremental angle (degree)
eqangle= dtheta* pi/(180); %% equal angle obtianed for each spiral revolution
npt= 2*pi/(eqangle); %% number of points in each spiral
tpoints= (npt*n)+1; %% total number of points in n number of revolutions
theta = linspace(0,th,tpoints);
r= a + b.*theta./(2*pi);
% Convert polar coordinates to Cartesian coordinates
xr = r.* cos(theta);
yr = r.* sin(theta);
plot(xr, yr, ‘-o’);
NOTE:
The above code works well for equal angle discretization method. The code consists the information about equal angle i.e, 1 degree, the total number of points, number of points in each spiral, total angle obtained, etc.
Simialry the code for equal arc length discretization method should cosnsists the following information such as for incremental arc length i.e., 1 mm, what is number of points around the edge, spiral length, total number of points etc
Please help to developed the code based on the above information.
Looking forward for the improvement in above code %% Archimedean spiral points with Equal angle discretization method
clear all
clc
% Parameters
R2 = 30; %outer radius (between this radius and R1 is constant arc increment)
b = 2; %incerement per rev, equivalent to feed
a = 0; %inner radius
n = round((R2 – a)./(b)); %number of revolutions and number of
th = 2*n*pi; %angle obtained for n number of revolution, for one revoultion 2*pi
%% parameters defined for constant angle like incremental x value and theta value
dtheta= 1; %% incremental angle (degree)
eqangle= dtheta* pi/(180); %% equal angle obtianed for each spiral revolution
npt= 2*pi/(eqangle); %% number of points in each spiral
tpoints= (npt*n)+1; %% total number of points in n number of revolutions
theta = linspace(0,th,tpoints);
r= a + b.*theta./(2*pi);
% Convert polar coordinates to Cartesian coordinates
xr = r.* cos(theta);
yr = r.* sin(theta);
plot(xr, yr, ‘-o’);
NOTE:
The above code works well for equal angle discretization method. The code consists the information about equal angle i.e, 1 degree, the total number of points, number of points in each spiral, total angle obtained, etc.
Simialry the code for equal arc length discretization method should cosnsists the following information such as for incremental arc length i.e., 1 mm, what is number of points around the edge, spiral length, total number of points etc
Please help to developed the code based on the above information.
Looking forward for the improvement in above code equal arc discretization MATLAB Answers — New Questions
Error: File: untitled7 Line: 78 Column: 14 Function ‘lim’ has already been declared within this scope.
disp(‘Problem 1’)
disp(‘Part A’)
b = 5;
a = [1 6 11];
G_e = tf(b,a)
% Open-loop transfer function (OLTF)
T_e = feedback(G_e,1)
syms s;
num = b;
den = poly2sym(a,s);
Gs_e = num/den
% b) Steady-state error
es = 8/(1+lim(Gs_e))
er = 8/lim(s*Gs_e)
% a) Closed-loop transfer function (CLTF)
% Symbolic representation of OLTF
% b) Steady-state error with step input
% b) Steady-state error with ramp input
ep = 8/lim(s^2*Gs_e)
% b) Steady-state error with parabola input
% c) Static error constants
Kp = lim(Gs_e)
Kv = lim(s*Gs_e)
Ka = lim(s^2*Gs_e)
% c) Position constant, Kp
% c) Velocity constant, Kv
% c) Acceleration constant, Ka
% d) Determine system type
checkSystemType(Kp,Kv,Ka);
% User-defined functions
function y = lim(f)
syms s;
y = limit(f,s,0);
if isnan(y)
y = inf;
end
end
function checkSystemType(Kp,Kv,Ka)
if ~isinf(Kp) && Kv == 0 && Ka == 0
disp(‘System type: 0’);
elseif isinf(Kp) && ~isinf(Kv) && Ka == 0
disp(‘System type: 1’);
elseif isinf(Kp) && isinf(Kv) && ~isinf(Ka)
disp(‘System type: 2’);
end
end
%%
%% Example 2
disp(‘Example2’);
b = 12;
a = conv([1 6],[1 9]);
G_e = tf(b,a)
% Open-loop transfer function (OLTF)
T_e = feedback(G_e,1)
syms s;
num = b;
den = poly2sym(a,s);
Gs_e = num/den
% b) Steady-state error
es = 8/(1+lim(Gs_e))
er = 8/lim(s*Gs_e)
% a) Closed-loop transfer function (CLTF)
% Symbolic representation of OLTF
% b) Steady-state error with step input
% b) Steady-state error with ramp input
ep = 8/lim(s^2*Gs_e)
% b) Steady-state error with parabola input
% c) Static error constants
Kp = lim(Gs_e)
Kv = lim(s*Gs_e)
Ka = lim(s^2*Gs_e)
% c) Position constant, Kp
% c) Velocity constant, Kv
% c) Acceleration constant, Ka
% d) Determine system type
checkSystemType(Kp,Kv,Ka);
% User-defined functions
function y = lim(f)
syms s;
y = limit(f,s,0);
if isnan(y)
y = inf;
end
end
function checkSystemType(Kp,Kv,Ka)
if ~isinf(Kp) && Kv == 0 && Ka == 0
disp(‘System type: 0’);
elseif isinf(Kp) && ~isinf(Kv) && Ka == 0
disp(‘System type: 1’);
elseif isinf(Kp) && isinf(Kv) && ~isinf(Ka)
disp(‘System type: 2’);
end
end disp(‘Problem 1’)
disp(‘Part A’)
b = 5;
a = [1 6 11];
G_e = tf(b,a)
% Open-loop transfer function (OLTF)
T_e = feedback(G_e,1)
syms s;
num = b;
den = poly2sym(a,s);
Gs_e = num/den
% b) Steady-state error
es = 8/(1+lim(Gs_e))
er = 8/lim(s*Gs_e)
% a) Closed-loop transfer function (CLTF)
% Symbolic representation of OLTF
% b) Steady-state error with step input
% b) Steady-state error with ramp input
ep = 8/lim(s^2*Gs_e)
% b) Steady-state error with parabola input
% c) Static error constants
Kp = lim(Gs_e)
Kv = lim(s*Gs_e)
Ka = lim(s^2*Gs_e)
% c) Position constant, Kp
% c) Velocity constant, Kv
% c) Acceleration constant, Ka
% d) Determine system type
checkSystemType(Kp,Kv,Ka);
% User-defined functions
function y = lim(f)
syms s;
y = limit(f,s,0);
if isnan(y)
y = inf;
end
end
function checkSystemType(Kp,Kv,Ka)
if ~isinf(Kp) && Kv == 0 && Ka == 0
disp(‘System type: 0’);
elseif isinf(Kp) && ~isinf(Kv) && Ka == 0
disp(‘System type: 1’);
elseif isinf(Kp) && isinf(Kv) && ~isinf(Ka)
disp(‘System type: 2’);
end
end
%%
%% Example 2
disp(‘Example2’);
b = 12;
a = conv([1 6],[1 9]);
G_e = tf(b,a)
% Open-loop transfer function (OLTF)
T_e = feedback(G_e,1)
syms s;
num = b;
den = poly2sym(a,s);
Gs_e = num/den
% b) Steady-state error
es = 8/(1+lim(Gs_e))
er = 8/lim(s*Gs_e)
% a) Closed-loop transfer function (CLTF)
% Symbolic representation of OLTF
% b) Steady-state error with step input
% b) Steady-state error with ramp input
ep = 8/lim(s^2*Gs_e)
% b) Steady-state error with parabola input
% c) Static error constants
Kp = lim(Gs_e)
Kv = lim(s*Gs_e)
Ka = lim(s^2*Gs_e)
% c) Position constant, Kp
% c) Velocity constant, Kv
% c) Acceleration constant, Ka
% d) Determine system type
checkSystemType(Kp,Kv,Ka);
% User-defined functions
function y = lim(f)
syms s;
y = limit(f,s,0);
if isnan(y)
y = inf;
end
end
function checkSystemType(Kp,Kv,Ka)
if ~isinf(Kp) && Kv == 0 && Ka == 0
disp(‘System type: 0’);
elseif isinf(Kp) && ~isinf(Kv) && Ka == 0
disp(‘System type: 1’);
elseif isinf(Kp) && isinf(Kv) && ~isinf(Ka)
disp(‘System type: 2’);
end
end
Error: File: untitled7 Line: 78 Column: 14
Function ‘lim’ has already been declared within this scope.disp(‘Problem 1’)
disp(‘Part A’)
b = 5;
a = [1 6 11];
G_e = tf(b,a)
% Open-loop transfer function (OLTF)
T_e = feedback(G_e,1)
syms s;
num = b;
den = poly2sym(a,s);
Gs_e = num/den
% b) Steady-state error
es = 8/(1+lim(Gs_e))
er = 8/lim(s*Gs_e)
% a) Closed-loop transfer function (CLTF)
% Symbolic representation of OLTF
% b) Steady-state error with step input
% b) Steady-state error with ramp input
ep = 8/lim(s^2*Gs_e)
% b) Steady-state error with parabola input
% c) Static error constants
Kp = lim(Gs_e)
Kv = lim(s*Gs_e)
Ka = lim(s^2*Gs_e)
% c) Position constant, Kp
% c) Velocity constant, Kv
% c) Acceleration constant, Ka
% d) Determine system type
checkSystemType(Kp,Kv,Ka);
% User-defined functions
function y = lim(f)
syms s;
y = limit(f,s,0);
if isnan(y)
y = inf;
end
end
function checkSystemType(Kp,Kv,Ka)
if ~isinf(Kp) && Kv == 0 && Ka == 0
disp(‘System type: 0’);
elseif isinf(Kp) && ~isinf(Kv) && Ka == 0
disp(‘System type: 1’);
elseif isinf(Kp) && isinf(Kv) && ~isinf(Ka)
disp(‘System type: 2’);
end
end
%%
%% Example 2
disp(‘Example2’);
b = 12;
a = conv([1 6],[1 9]);
G_e = tf(b,a)
% Open-loop transfer function (OLTF)
T_e = feedback(G_e,1)
syms s;
num = b;
den = poly2sym(a,s);
Gs_e = num/den
% b) Steady-state error
es = 8/(1+lim(Gs_e))
er = 8/lim(s*Gs_e)
% a) Closed-loop transfer function (CLTF)
% Symbolic representation of OLTF
% b) Steady-state error with step input
% b) Steady-state error with ramp input
ep = 8/lim(s^2*Gs_e)
% b) Steady-state error with parabola input
% c) Static error constants
Kp = lim(Gs_e)
Kv = lim(s*Gs_e)
Ka = lim(s^2*Gs_e)
% c) Position constant, Kp
% c) Velocity constant, Kv
% c) Acceleration constant, Ka
% d) Determine system type
checkSystemType(Kp,Kv,Ka);
% User-defined functions
function y = lim(f)
syms s;
y = limit(f,s,0);
if isnan(y)
y = inf;
end
end
function checkSystemType(Kp,Kv,Ka)
if ~isinf(Kp) && Kv == 0 && Ka == 0
disp(‘System type: 0’);
elseif isinf(Kp) && ~isinf(Kv) && Ka == 0
disp(‘System type: 1’);
elseif isinf(Kp) && isinf(Kv) && ~isinf(Ka)
disp(‘System type: 2’);
end
end disp(‘Problem 1’)
disp(‘Part A’)
b = 5;
a = [1 6 11];
G_e = tf(b,a)
% Open-loop transfer function (OLTF)
T_e = feedback(G_e,1)
syms s;
num = b;
den = poly2sym(a,s);
Gs_e = num/den
% b) Steady-state error
es = 8/(1+lim(Gs_e))
er = 8/lim(s*Gs_e)
% a) Closed-loop transfer function (CLTF)
% Symbolic representation of OLTF
% b) Steady-state error with step input
% b) Steady-state error with ramp input
ep = 8/lim(s^2*Gs_e)
% b) Steady-state error with parabola input
% c) Static error constants
Kp = lim(Gs_e)
Kv = lim(s*Gs_e)
Ka = lim(s^2*Gs_e)
% c) Position constant, Kp
% c) Velocity constant, Kv
% c) Acceleration constant, Ka
% d) Determine system type
checkSystemType(Kp,Kv,Ka);
% User-defined functions
function y = lim(f)
syms s;
y = limit(f,s,0);
if isnan(y)
y = inf;
end
end
function checkSystemType(Kp,Kv,Ka)
if ~isinf(Kp) && Kv == 0 && Ka == 0
disp(‘System type: 0’);
elseif isinf(Kp) && ~isinf(Kv) && Ka == 0
disp(‘System type: 1’);
elseif isinf(Kp) && isinf(Kv) && ~isinf(Ka)
disp(‘System type: 2’);
end
end
%%
%% Example 2
disp(‘Example2’);
b = 12;
a = conv([1 6],[1 9]);
G_e = tf(b,a)
% Open-loop transfer function (OLTF)
T_e = feedback(G_e,1)
syms s;
num = b;
den = poly2sym(a,s);
Gs_e = num/den
% b) Steady-state error
es = 8/(1+lim(Gs_e))
er = 8/lim(s*Gs_e)
% a) Closed-loop transfer function (CLTF)
% Symbolic representation of OLTF
% b) Steady-state error with step input
% b) Steady-state error with ramp input
ep = 8/lim(s^2*Gs_e)
% b) Steady-state error with parabola input
% c) Static error constants
Kp = lim(Gs_e)
Kv = lim(s*Gs_e)
Ka = lim(s^2*Gs_e)
% c) Position constant, Kp
% c) Velocity constant, Kv
% c) Acceleration constant, Ka
% d) Determine system type
checkSystemType(Kp,Kv,Ka);
% User-defined functions
function y = lim(f)
syms s;
y = limit(f,s,0);
if isnan(y)
y = inf;
end
end
function checkSystemType(Kp,Kv,Ka)
if ~isinf(Kp) && Kv == 0 && Ka == 0
disp(‘System type: 0’);
elseif isinf(Kp) && ~isinf(Kv) && Ka == 0
disp(‘System type: 1’);
elseif isinf(Kp) && isinf(Kv) && ~isinf(Ka)
disp(‘System type: 2’);
end
end
Error: File: untitled7 Line: 78 Column: 14
Function ‘lim’ has already been declared within this scope. disp(‘Problem 1’)
disp(‘Part A’)
b = 5;
a = [1 6 11];
G_e = tf(b,a)
% Open-loop transfer function (OLTF)
T_e = feedback(G_e,1)
syms s;
num = b;
den = poly2sym(a,s);
Gs_e = num/den
% b) Steady-state error
es = 8/(1+lim(Gs_e))
er = 8/lim(s*Gs_e)
% a) Closed-loop transfer function (CLTF)
% Symbolic representation of OLTF
% b) Steady-state error with step input
% b) Steady-state error with ramp input
ep = 8/lim(s^2*Gs_e)
% b) Steady-state error with parabola input
% c) Static error constants
Kp = lim(Gs_e)
Kv = lim(s*Gs_e)
Ka = lim(s^2*Gs_e)
% c) Position constant, Kp
% c) Velocity constant, Kv
% c) Acceleration constant, Ka
% d) Determine system type
checkSystemType(Kp,Kv,Ka);
% User-defined functions
function y = lim(f)
syms s;
y = limit(f,s,0);
if isnan(y)
y = inf;
end
end
function checkSystemType(Kp,Kv,Ka)
if ~isinf(Kp) && Kv == 0 && Ka == 0
disp(‘System type: 0’);
elseif isinf(Kp) && ~isinf(Kv) && Ka == 0
disp(‘System type: 1’);
elseif isinf(Kp) && isinf(Kv) && ~isinf(Ka)
disp(‘System type: 2’);
end
end
%%
%% Example 2
disp(‘Example2’);
b = 12;
a = conv([1 6],[1 9]);
G_e = tf(b,a)
% Open-loop transfer function (OLTF)
T_e = feedback(G_e,1)
syms s;
num = b;
den = poly2sym(a,s);
Gs_e = num/den
% b) Steady-state error
es = 8/(1+lim(Gs_e))
er = 8/lim(s*Gs_e)
% a) Closed-loop transfer function (CLTF)
% Symbolic representation of OLTF
% b) Steady-state error with step input
% b) Steady-state error with ramp input
ep = 8/lim(s^2*Gs_e)
% b) Steady-state error with parabola input
% c) Static error constants
Kp = lim(Gs_e)
Kv = lim(s*Gs_e)
Ka = lim(s^2*Gs_e)
% c) Position constant, Kp
% c) Velocity constant, Kv
% c) Acceleration constant, Ka
% d) Determine system type
checkSystemType(Kp,Kv,Ka);
% User-defined functions
function y = lim(f)
syms s;
y = limit(f,s,0);
if isnan(y)
y = inf;
end
end
function checkSystemType(Kp,Kv,Ka)
if ~isinf(Kp) && Kv == 0 && Ka == 0
disp(‘System type: 0’);
elseif isinf(Kp) && ~isinf(Kv) && Ka == 0
disp(‘System type: 1’);
elseif isinf(Kp) && isinf(Kv) && ~isinf(Ka)
disp(‘System type: 2’);
end
end disp(‘Problem 1’)
disp(‘Part A’)
b = 5;
a = [1 6 11];
G_e = tf(b,a)
% Open-loop transfer function (OLTF)
T_e = feedback(G_e,1)
syms s;
num = b;
den = poly2sym(a,s);
Gs_e = num/den
% b) Steady-state error
es = 8/(1+lim(Gs_e))
er = 8/lim(s*Gs_e)
% a) Closed-loop transfer function (CLTF)
% Symbolic representation of OLTF
% b) Steady-state error with step input
% b) Steady-state error with ramp input
ep = 8/lim(s^2*Gs_e)
% b) Steady-state error with parabola input
% c) Static error constants
Kp = lim(Gs_e)
Kv = lim(s*Gs_e)
Ka = lim(s^2*Gs_e)
% c) Position constant, Kp
% c) Velocity constant, Kv
% c) Acceleration constant, Ka
% d) Determine system type
checkSystemType(Kp,Kv,Ka);
% User-defined functions
function y = lim(f)
syms s;
y = limit(f,s,0);
if isnan(y)
y = inf;
end
end
function checkSystemType(Kp,Kv,Ka)
if ~isinf(Kp) && Kv == 0 && Ka == 0
disp(‘System type: 0’);
elseif isinf(Kp) && ~isinf(Kv) && Ka == 0
disp(‘System type: 1’);
elseif isinf(Kp) && isinf(Kv) && ~isinf(Ka)
disp(‘System type: 2’);
end
end
%%
%% Example 2
disp(‘Example2’);
b = 12;
a = conv([1 6],[1 9]);
G_e = tf(b,a)
% Open-loop transfer function (OLTF)
T_e = feedback(G_e,1)
syms s;
num = b;
den = poly2sym(a,s);
Gs_e = num/den
% b) Steady-state error
es = 8/(1+lim(Gs_e))
er = 8/lim(s*Gs_e)
% a) Closed-loop transfer function (CLTF)
% Symbolic representation of OLTF
% b) Steady-state error with step input
% b) Steady-state error with ramp input
ep = 8/lim(s^2*Gs_e)
% b) Steady-state error with parabola input
% c) Static error constants
Kp = lim(Gs_e)
Kv = lim(s*Gs_e)
Ka = lim(s^2*Gs_e)
% c) Position constant, Kp
% c) Velocity constant, Kv
% c) Acceleration constant, Ka
% d) Determine system type
checkSystemType(Kp,Kv,Ka);
% User-defined functions
function y = lim(f)
syms s;
y = limit(f,s,0);
if isnan(y)
y = inf;
end
end
function checkSystemType(Kp,Kv,Ka)
if ~isinf(Kp) && Kv == 0 && Ka == 0
disp(‘System type: 0’);
elseif isinf(Kp) && ~isinf(Kv) && Ka == 0
disp(‘System type: 1’);
elseif isinf(Kp) && isinf(Kv) && ~isinf(Ka)
disp(‘System type: 2’);
end
end
Error: File: untitled7 Line: 78 Column: 14
Function ‘lim’ has already been declared within this scope. error MATLAB Answers — New Questions

What to Do When Getting QuickBooks Unexpected Error Code C=184
QuickBooks is a powerful accounting software used by businesses worldwide to streamline financial management tasks. However, like any software, QuickBooks is susceptible to errors that can disrupt your workflow. One such error is QuickBooks Error 184. In this article, we’ll delve into what QuickBooks Error 184 is, its potential causes, and provide comprehensive solutions to help you resolve it efficiently.
Understanding QuickBooks Error 184
QuickBooks Error 184 typically occurs when there’s an issue with the user’s bank account or when QuickBooks encounters difficulty processing a bank transaction. This error is usually accompanied by a message stating, “There is a problem with your account or you are using a type of account that QuickBooks Online does not support.”
Possible Causes of QuickBooks Error 184
Incorrect Bank Account Information: If the bank account details entered in QuickBooks are incorrect or outdated, it can lead to Error 184 when attempting to connect to the bank’s servers for transaction processing.
Bank Server Issues: Sometimes, the bank’s servers may experience downtime or connectivity issues, preventing QuickBooks from establishing a connection and resulting in Error 184.
Unsupported Account Type: Certain types of bank accounts may not be compatible with QuickBooks Online, leading to Error 184 when trying to sync transactions or access account information.
Security Settings: Security settings on the bank’s end or within QuickBooks Online may block the connection between the two platforms, triggering Error 184.
Solutions to Fix QuickBooks Unexpected Error Code C=184
Now that we’ve identified potential causes, let’s explore effective solutions to resolve QuickBooks Error 184:
Update Bank Account Information:
Log in to QuickBooks Online and navigate to the Banking tab.Select the affected bank account and click on the Edit ✎ icon.Verify that the bank account details, including account number, routing number, and account type, are correct and up to date.If any information is incorrect, update it accordingly and save the changes.
Check Bank Server Status:
Visit the website of the bank associated with the affected account and check for any announcements regarding server maintenance or outages.If the bank’s servers are experiencing downtime or issues, you may need to wait until they are resolved before attempting to connect QuickBooks Online.
Contact Bank Support:
If you suspect that the issue lies with the bank account itself, contact your bank’s customer support for assistance.Verify with the bank that the account is in good standing and that there are no restrictions or issues affecting its accessibility.
Try a Different Account Type:
If you’re using an account type that QuickBooks Online does not support, consider switching to a supported account type.Check QuickBooks Online’s list of supported banks and account types to ensure compatibility.
Disable Security Settings:
Temporarily disable any security settings or features on the bank’s website that may be blocking QuickBooks Online from accessing your account.Similarly, review the security settings within QuickBooks Online and adjust them if necessary to allow connections to the bank’s servers.
Reconnect Bank Account:
In QuickBooks Online, navigate to the Banking tab and select the affected bank account.Click on the Edit ✎ icon and choose “Disconnect this account on save.”After disconnecting the account, reconnect it by following the prompts and providing the necessary information.Once the account is reconnected, attempt to sync transactions again to see if Error 184 persists.
By following these solutions, you can effectively troubleshoot and resolve QuickBooks Error 184, ensuring seamless integration and synchronization of your bank accounts with QuickBooks Online. If the error persists despite attempting these solutions, consider reaching out to QuickBooks support or your bank’s customer service for further assistance. With the right approach, you can overcome Error 184 and continue utilizing QuickBooks for your accounting needs without interruptions.
Related Searches:
QuickBooks C=184 error fix
Troubleshoot QuickBooks Unexpected Error Code C=184
Resolve QuickBooks Error C=184
QuickBooks C=184 error message
QuickBooks desktop C=184 error
QuickBooks error code C=184 solution
QuickBooks C=184 error support
QuickBooks C=184 error troubleshooting
QuickBooks C=184 error help
QuickBooks C=184 error causes
How to fix QuickBooks Unexpected Error Code C=184?
QuickBooks Unexpected Error Code C=184 solutions
QuickBooks C=184 error troubleshooting guide
What causes QuickBooks Unexpected Error Code C=184?
QuickBooks Unexpected Error Code C=184 support
QuickBooks is a powerful accounting software used by businesses worldwide to streamline financial management tasks. However, like any software, QuickBooks is susceptible to errors that can disrupt your workflow. One such error is QuickBooks Error 184. In this article, we’ll delve into what QuickBooks Error 184 is, its potential causes, and provide comprehensive solutions to help you resolve it efficiently. Understanding QuickBooks Error 184 QuickBooks Error 184 typically occurs when there’s an issue with the user’s bank account or when QuickBooks encounters difficulty processing a bank transaction. This error is usually accompanied by a message stating, “There is a problem with your account or you are using a type of account that QuickBooks Online does not support.” Possible Causes of QuickBooks Error 184 Incorrect Bank Account Information: If the bank account details entered in QuickBooks are incorrect or outdated, it can lead to Error 184 when attempting to connect to the bank’s servers for transaction processing.Bank Server Issues: Sometimes, the bank’s servers may experience downtime or connectivity issues, preventing QuickBooks from establishing a connection and resulting in Error 184.Unsupported Account Type: Certain types of bank accounts may not be compatible with QuickBooks Online, leading to Error 184 when trying to sync transactions or access account information.Security Settings: Security settings on the bank’s end or within QuickBooks Online may block the connection between the two platforms, triggering Error 184. Solutions to Fix QuickBooks Unexpected Error Code C=184 Now that we’ve identified potential causes, let’s explore effective solutions to resolve QuickBooks Error 184:Update Bank Account Information:Log in to QuickBooks Online and navigate to the Banking tab.Select the affected bank account and click on the Edit ✎ icon.Verify that the bank account details, including account number, routing number, and account type, are correct and up to date.If any information is incorrect, update it accordingly and save the changes.Check Bank Server Status:Visit the website of the bank associated with the affected account and check for any announcements regarding server maintenance or outages.If the bank’s servers are experiencing downtime or issues, you may need to wait until they are resolved before attempting to connect QuickBooks Online.Contact Bank Support:If you suspect that the issue lies with the bank account itself, contact your bank’s customer support for assistance.Verify with the bank that the account is in good standing and that there are no restrictions or issues affecting its accessibility.Try a Different Account Type:If you’re using an account type that QuickBooks Online does not support, consider switching to a supported account type.Check QuickBooks Online’s list of supported banks and account types to ensure compatibility.Disable Security Settings:Temporarily disable any security settings or features on the bank’s website that may be blocking QuickBooks Online from accessing your account.Similarly, review the security settings within QuickBooks Online and adjust them if necessary to allow connections to the bank’s servers.Reconnect Bank Account:In QuickBooks Online, navigate to the Banking tab and select the affected bank account.Click on the Edit ✎ icon and choose “Disconnect this account on save.”After disconnecting the account, reconnect it by following the prompts and providing the necessary information.Once the account is reconnected, attempt to sync transactions again to see if Error 184 persists.By following these solutions, you can effectively troubleshoot and resolve QuickBooks Error 184, ensuring seamless integration and synchronization of your bank accounts with QuickBooks Online. If the error persists despite attempting these solutions, consider reaching out to QuickBooks support or your bank’s customer service for further assistance. With the right approach, you can overcome Error 184 and continue utilizing QuickBooks for your accounting needs without interruptions.Related Searches: QuickBooks C=184 error fixTroubleshoot QuickBooks Unexpected Error Code C=184Resolve QuickBooks Error C=184QuickBooks C=184 error messageQuickBooks desktop C=184 errorQuickBooks error code C=184 solutionQuickBooks C=184 error supportQuickBooks C=184 error troubleshootingQuickBooks C=184 error helpQuickBooks C=184 error causesHow to fix QuickBooks Unexpected Error Code C=184?QuickBooks Unexpected Error Code C=184 solutionsQuickBooks C=184 error troubleshooting guideWhat causes QuickBooks Unexpected Error Code C=184?QuickBooks Unexpected Error Code C=184 support Read More
why is this SO hard ……
Hi,
I’ve inherited a few docs from a person who left and I’m no MS WORD guru. (grin)
All I’m trying to do is pull out pages from a bigger doc and extract some forms from it.
There are these “Section Break (next page) things all over this place and I have no clue how to deal with them, when I go to delete an extra page, the formatting of the previous page goes nuts.
I tried to read a article about saving the formatting and then deleting a page but I couldn’t get it to work for the life of me.
I’ve attached an example, and I have about 5 of these forms I need to get from a two page document down to a one page document, because the next page break thing is blank and I don’t need it, its just this formatting saving stuff and page breaks.
It’s got a header and footer in it but there’s nothing the footer, so I have everything I need the entire document to be, but there is another blank page two that shows up with the same header.
If I try in any way to delete that second blank page, the previous page one screws up, I’m saying that because its child-proof and I’m dumb. (sigh)
PLEASE – could anyone just explain, exactly, step by step how to save the formatting in the document (whatever that is) and then let me delete the entire second page without wrecking the first page?
You can do it for me but I’d rather learn how! Thankings …….
Cheers’
Dave
Hi,I’ve inherited a few docs from a person who left and I’m no MS WORD guru. (grin) All I’m trying to do is pull out pages from a bigger doc and extract some forms from it.There are these “Section Break (next page) things all over this place and I have no clue how to deal with them, when I go to delete an extra page, the formatting of the previous page goes nuts. I tried to read a article about saving the formatting and then deleting a page but I couldn’t get it to work for the life of me. I’ve attached an example, and I have about 5 of these forms I need to get from a two page document down to a one page document, because the next page break thing is blank and I don’t need it, its just this formatting saving stuff and page breaks. It’s got a header and footer in it but there’s nothing the footer, so I have everything I need the entire document to be, but there is another blank page two that shows up with the same header. If I try in any way to delete that second blank page, the previous page one screws up, I’m saying that because its child-proof and I’m dumb. (sigh)PLEASE – could anyone just explain, exactly, step by step how to save the formatting in the document (whatever that is) and then let me delete the entire second page without wrecking the first page? You can do it for me but I’d rather learn how! Thankings ……. Cheers’Dave Read More
Trello Integration with Loop
Hi Microsoft 365 Insiders!
Exciting news! Trello is now integrated with Microsoft Loop. Your data can now stay in sync, across both platforms automatically, making teamwork a breeze. Learn how this works in our latest blog by Dimple, Product Manager on the Loop team > > Trello Integration with Loop
Thanks!
Perry Sjogren
Microsoft 365 Insider Social Media Manager
Become a Microsoft 365 Insider and gain exclusive access to new features and help shape the future of Microsoft 365. Join Now: Windows | Mac | iOS | Android
Hi Microsoft 365 Insiders!
Exciting news! Trello is now integrated with Microsoft Loop. Your data can now stay in sync, across both platforms automatically, making teamwork a breeze. Learn how this works in our latest blog by Dimple, Product Manager on the Loop team > > Trello Integration with Loop
Thanks!
Perry Sjogren
Microsoft 365 Insider Social Media Manager
Become a Microsoft 365 Insider and gain exclusive access to new features and help shape the future of Microsoft 365. Join Now: Windows | Mac | iOS | Android Read More
T-2 Weeks! Marketplace at Microsoft Build 2024
Register for marketplace-specific sessions to learn how the marketplace can keep you and customers ahead in the era of AI:
“Launch AI applications and get to market faster with marketplace” – in-person and online
“AI-powered commerce with the Microsoft commercial marketplace” – on-demand
“Maximize cloud investments with the Microsoft commercial marketplace” – on-demand
Exclusive evening social on May 22 for partners selling through the marketplace. Partners can engage with Microsoft leadership, meet other partners, and get insights into how to unlock benefits. Capacity is limited so complete this interest form to request passes. *Note, this does not include passes for Microsoft Build.
Connect with marketplace experts at our Community space at Microsoft Build. Marketplace experts will be staffed throughout all three days of the event, so stop by the Microsoft Cloud Platform Community space near Expert Meet-ups on the 5th floor to get your marketplace questions answered.
Marketplace at Microsoft Build 2024
Marketplace will be integrated as a core component at Microsoft Build for the first time with content for partners, developers, and customers. If you or your colleagues are attending Microsoft Build in-person this year, we encourage you to take part in these activities:
Register for marketplace-specific sessions to learn how the marketplace can keep you and customers ahead in the era of AI:
“Launch AI applications and get to market faster with marketplace” – in-person and online
“AI-powered commerce with the Microsoft commercial marketplace” – on-demand
“Maximize cloud investments with the Microsoft commercial marketplace” – on-demand
Exclusive evening social on May 22 for partners selling through the marketplace. Partners can engage with Microsoft leadership, meet other partners, and get insights into how to unlock benefits. Capacity is limited so complete this interest form to request passes. *Note, this does not include passes for Microsoft Build.
Connect with marketplace experts at our Community space at Microsoft Build. Marketplace experts will be staffed throughout all three days of the event, so stop by the Microsoft Cloud Platform Community space near Expert Meet-ups on the 5th floor to get your marketplace questions answered. Read More
Feature request: multiple windows share pinned tabs.
Edge enables us to pin tabs that frequently used. After closing and reopening Edge, the pinned tabs still exist. That’s great! However, I opened window 1 and pinned some tabs, and then I opened window 2. The window 2 did not share the pinned tabs, which was inconvenient. Even worse, if I close window 1 before window 2, all pinned tabs will lost! The reason is that Edge only saves the pinned tabs before exiting. So I hope that multiple windows share pinned tabs.
Edge enables us to pin tabs that frequently used. After closing and reopening Edge, the pinned tabs still exist. That’s great! However, I opened window 1 and pinned some tabs, and then I opened window 2. The window 2 did not share the pinned tabs, which was inconvenient. Even worse, if I close window 1 before window 2, all pinned tabs will lost! The reason is that Edge only saves the pinned tabs before exiting. So I hope that multiple windows share pinned tabs. Read More
Deploying Open OnDemand Portal with Azure CycleCloud
Dr. Wolfgang De Salvador – EMEA GBB HPC/AI Infrastructure Senior Specialist
Dr. Darko Mocelj – EMEA GBB HPC/AI Infrastructure Senior Specialist
Resources and references used in this article:
Repository of the Azure CycleCloud OnDemand project
Open OnDemand Portal
Open OnDemand Portal Documentation
OnDemand Job template for OpenFOAM
Visit us at ISC24 – Microsoft Booth #F30 for a live demo of this integration on Wednesday, the 15th | 9 AM – 12.30 PM
Introduction
As of today, several tools, frameworks and automations allow the deployment of HPC infrastructures in a cloud environment.
Azure CycleCloud enables users and IT administrators to run cloud-only or hybrid (bursting) clusters leveraging traditional HPC schedulers like OpenPBS, SGE, Altair PBS Professional and Slurm.
Azure CycleCloud provides the possibility to preserve standard submission interfaces from on-premises HPC systems, without the need to re-architect or alter by any means the standard simulation workflows. In this way, end users can keep running and using their standard applications without any disruption.
Azure CycleCloud provides out of the box the possibility for interaction and cluster operations only using a standard SSH connection for the end users or scheduler default APIs (e.g. Slurm APIs).
This blog post presents an Azure CycleCloud project allowing to deploy an Open OnDemand portal, an efficient open-source web portal for job submission, job monitoring, file management and remote desktop/application sessions.
This project allows to deploy an Open OnDemand Portal like az-hop, but allowing the user to just deploy a single VM with a portal to be attached to an already existing and configured Azure CycleCloud cluster.
What is required as prerequisites
The project requires a working installation of Azure CycleCloud.
At the same time, Open OnDemand portal is meant to be attached to an existing Slurm or OpenPBS cluster deployed in Azure CycleCloud. Support for additional schedulers is planned to be available in future releases.
The deployment relies on an Azure Key Vault and a Managed Identity for secret access during the deployment. The following elements need to be uploaded depending on the selected SSL and authentication mechanism need in the Azure Key Vault:
SSL certificate
Required to avoid using self-signed certificate.
Secret for the OIDC Client
This is required in case the authentication mechanism is OIDC. This will require an Entra ID app registration
LDAPS CA Certificate
This is required only in case of OIDC Dex LDAP if the LDAPS server requires a dedicated certification authority for SSL connections
LDAP Service Account BIND password
This is required only in case of OIDC Dex LDAP among with a read only account
Basic authentication option and self-signed SSL certificates should be considered only for test/development purpose, away from production systems because of the security concerns
How to deploy
The project can be deployed following the step-by-step guide provided in the README of the GitHub repository.
The steps involved in getting the project accessible inside Azure CycleCloud are:
Definition of a custom cluster-init project source in Azure CycleCloud
Import of the OnDemand Portal template in Azure CycleCloud
What the project will deliver
The project will deploy a single sever hosting an Open OnDemand portal allowing the users to specify:
The general server configuration in terms of Azure VM Size, Virtual Network, IP Address and server name.
The cluster to which the OnDemand Portal should be attached in terms of scheduler type (OpenPBS/Slurm) and scheduler version
The shared NFS file system to be attached in /shared and /sched as common shared file systems for users and file management
The OnDemand Portal configuration in terms of:
Authentication
OIDC
OIDC Dex LDAP
Basic PAM (insecure)
SSL termination
Bring-your-own certificate
Self-signed (insecure)
All the secrets and certificates involved in the configuration are safely stored inside an Azure Key Vault which is accessed by the Azure CycleCloud nodes through a Managed Identity.
After the cluster is successfully deployed, the user will be able to have a basic interface to access the main OnDemand functionality:
In-browser SSH connection
Ability to upload/download files
Possibility to customize the OnDemand portal configuration with dedicated Interactive Apps templates.
Additional considerations
Open OnDemand portal must be able to map the username provided by an external authentication mechanism like OIDC or OIDC Dex LDAP to a local Linux user account. This will be the Linux account that will be impersonating the user and interacting with the cluster through Open OnDemand.
This is something that remains responsibility of the user following the Open OnDemand documentation.
An easy way to realize this is to enable Azure CycleCloud EntraID and using the following additional configuration in Open OnDemand Portal:
user_map_match: ‘^([^@]+)@example.com$’
oidc_remote_user_claim: “email”
This will map the users authenticated from EntraID directly to a local user in the system. The configuration above can be inputted directly from Azure CycleCloud UI and respectively:
the user map match in the additional configuration
the OIDC Remote user claim in the authentication section
Creation of Interactive Desktop Sessions with auto-scaling in Azure CycleCloud
As already extensively implemented and developed in az-hop, Open OnDemand allows to create on-demand interactive Desktop Session or Interactive App session with nodes dynamically allocated by Azure CycleCloud.
The underlying concept is that a Desktop session will be submitted as a job to the scheduler and Azure CycleCloud will allocate the required nodes for the session duration.
In order to get this up in OnDemand, the steps are:
Defining a dedicated nodearray in Azure CycleCloud for the purpose. There is an example of a Slurm cluster template based on 3.0.6 version of the CycleCloud project inside the repository.
Building a dedicated OS image on Azure with the required Desktop environment. An example script for non-accelerated GPU environments is available in the repository. For GPU accelerated environment it is possible to install also the dedicated driver and VirtualGL.
Configuring Open OnDemand portal Desktop form attributes and enabling reverse proxy.
There is the plan in a future project release to integrate this configuration also in an automation.
Creation of a submission batch application
In a similar way of interactive session, Open OnDemand allows to define submission forms for specific batch submission logics.
For example, here an example of integrating OpenFOAM submission in the OpenOnDemand portal:
Once the job is finished, it can be visualized using a Desktop session GPU accelerated:
Visit us at ISC24 – Microsoft Booth #F30 for a live demo of this integration on Wednesday, the 15th | 9 AM – 12.30 PM
Microsoft Tech Community – Latest Blogs –Read More

Resolving QuickBooks Error 503: Causes and Solutions
QuickBooks is a versatile accounting software that helps businesses manage their finances efficiently. However, encountering errors like QuickBooks Error 503 can disrupt your workflow and hinder productivity. In this article, we’ll explore what QuickBooks Error 503 is, its potential causes, and provide detailed solutions to help you resolve it effectively.
Understanding QuickBooks Error 503
QuickBooks Error 503 typically occurs when users try to access the QuickBooks company file remotely, and the server is unable to handle the request. This error indicates that the QuickBooks server is temporarily unavailable or overloaded, preventing users from accessing the company file.
Possible Causes of QuickBooks Error 503
Server Overload: If the QuickBooks server is experiencing a high volume of requests or is overloaded due to heavy usage, it may result in Error 503.
Internet Connectivity Issues: Poor or unstable internet connection on the user’s end can also trigger Error 503 when trying to access QuickBooks remotely.
Firewall or Security Software: Sometimes, firewall or security software settings may block the connection to the QuickBooks server, leading to Error 503.
Corrupted QuickBooks Company File: If the QuickBooks company file is damaged or corrupted, it may cause issues when attempting to access it remotely, resulting in Error 503.
Solutions to Fix QuickBooks Error 503
Now that we’ve identified potential causes, let’s explore effective solutions to resolve QuickBooks Error 503:
Check QuickBooks Server Status:
Visit the Intuit QuickBooks status page or check the Intuit website for any announcements regarding server maintenance or outages.If the QuickBooks server is experiencing downtime or maintenance, you may need to wait until it’s back online before attempting to access your company file.
Verify Internet Connectivity:
Ensure that your internet connection is stable and functioning properly.If using a wireless connection, consider switching to a wired connection for a more stable connection.Test your internet connection by accessing other websites or services to confirm that it’s not a general connectivity issue.
Disable Firewall or Security Software:
Temporarily disable any firewall or security software on your computer.After disabling the firewall, try accessing QuickBooks again to see if Error 503 persists.If disabling the firewall resolves the issue, you may need to adjust the settings to allow QuickBooks access through the firewall.
Clear Browser Cache and Cookies:
If you’re accessing QuickBooks through a web browser, try clearing your browser’s cache and cookies.Cache and cookies can sometimes cause issues with website access, including QuickBooks, so clearing them may resolve Error 503.
Restart QuickBooks Server and Workstation:
Restart the QuickBooks server where the company file is stored.Restart the workstation or computer from which you’re trying to access QuickBooks.After restarting both the server and workstation, try accessing QuickBooks again to check if Error 503 persists.
Repair QuickBooks Installation:
Close QuickBooks and navigate to the Control Panel on your computer.Select “Programs and Features” or “Add/Remove Programs,” then locate QuickBooks in the list of installed programs.Right-click on QuickBooks and choose “Repair” to initiate the repair process.Once the repair is complete, restart your computer and attempt to access QuickBooks again.
By following these solutions, you can effectively troubleshoot and resolve QuickBooks Error 503, ensuring uninterrupted access to your company file. If the error persists despite attempting these solutions, consider reaching out to QuickBooks support for further assistance. With the right approach, you can overcome Error 503 and resume your accounting tasks with ease.
Related Searches:
How to fix QuickBooks Error 503?
QuickBooks Error 503 service unavailable solutions
QuickBooks Error 503 troubleshooting guide
What causes QuickBooks Error 503?
QuickBooks Error 503 support
QuickBooks is a versatile accounting software that helps businesses manage their finances efficiently. However, encountering errors like QuickBooks Error 503 can disrupt your workflow and hinder productivity. In this article, we’ll explore what QuickBooks Error 503 is, its potential causes, and provide detailed solutions to help you resolve it effectively. Understanding QuickBooks Error 503 QuickBooks Error 503 typically occurs when users try to access the QuickBooks company file remotely, and the server is unable to handle the request. This error indicates that the QuickBooks server is temporarily unavailable or overloaded, preventing users from accessing the company file. Possible Causes of QuickBooks Error 503 Server Overload: If the QuickBooks server is experiencing a high volume of requests or is overloaded due to heavy usage, it may result in Error 503.Internet Connectivity Issues: Poor or unstable internet connection on the user’s end can also trigger Error 503 when trying to access QuickBooks remotely.Firewall or Security Software: Sometimes, firewall or security software settings may block the connection to the QuickBooks server, leading to Error 503.Corrupted QuickBooks Company File: If the QuickBooks company file is damaged or corrupted, it may cause issues when attempting to access it remotely, resulting in Error 503. Solutions to Fix QuickBooks Error 503 Now that we’ve identified potential causes, let’s explore effective solutions to resolve QuickBooks Error 503:Check QuickBooks Server Status:Visit the Intuit QuickBooks status page or check the Intuit website for any announcements regarding server maintenance or outages.If the QuickBooks server is experiencing downtime or maintenance, you may need to wait until it’s back online before attempting to access your company file.Verify Internet Connectivity:Ensure that your internet connection is stable and functioning properly.If using a wireless connection, consider switching to a wired connection for a more stable connection.Test your internet connection by accessing other websites or services to confirm that it’s not a general connectivity issue.Disable Firewall or Security Software:Temporarily disable any firewall or security software on your computer.After disabling the firewall, try accessing QuickBooks again to see if Error 503 persists.If disabling the firewall resolves the issue, you may need to adjust the settings to allow QuickBooks access through the firewall.Clear Browser Cache and Cookies:If you’re accessing QuickBooks through a web browser, try clearing your browser’s cache and cookies.Cache and cookies can sometimes cause issues with website access, including QuickBooks, so clearing them may resolve Error 503.Restart QuickBooks Server and Workstation:Restart the QuickBooks server where the company file is stored.Restart the workstation or computer from which you’re trying to access QuickBooks.After restarting both the server and workstation, try accessing QuickBooks again to check if Error 503 persists.Repair QuickBooks Installation:Close QuickBooks and navigate to the Control Panel on your computer.Select “Programs and Features” or “Add/Remove Programs,” then locate QuickBooks in the list of installed programs.Right-click on QuickBooks and choose “Repair” to initiate the repair process.Once the repair is complete, restart your computer and attempt to access QuickBooks again.By following these solutions, you can effectively troubleshoot and resolve QuickBooks Error 503, ensuring uninterrupted access to your company file. If the error persists despite attempting these solutions, consider reaching out to QuickBooks support for further assistance. With the right approach, you can overcome Error 503 and resume your accounting tasks with ease. Related Searches: How to fix QuickBooks Error 503?QuickBooks Error 503 service unavailable solutionsQuickBooks Error 503 troubleshooting guideWhat causes QuickBooks Error 503?QuickBooks Error 503 support Read More

What to Do When Getting QuickBooks Error 50004
QuickBooks is a powerful accounting software trusted by millions of businesses worldwide for its comprehensive features and ease of use. However, encountering errors like QuickBooks Error 50004 can be frustrating and disruptive to your workflow. In this article, we’ll explore what QuickBooks Error 50004 is, its potential causes, and provide detailed solutions to help you resolve it effectively.
Understanding QuickBooks Error 50004
QuickBooks Error 50004 is a runtime error that typically occurs when users attempt to open or work with their company file. This error indicates an issue with the QuickBooks software or the company file itself, preventing users from accessing their financial data.
Possible Causes of QuickBooks Error 50004
Corrupted Company File: One of the most common reasons for QuickBooks Error 50004 is a corrupted company file. This can happen due to various factors such as improper shutdowns, power outages, or file system errors.
Outdated QuickBooks Version: Using an outdated version of QuickBooks can lead to compatibility issues and errors like Error 50004. It’s essential to keep your QuickBooks software up to date with the latest updates and patches released by Intuit.
Damaged QuickBooks Components: If certain components of the QuickBooks software are damaged or missing, it can result in runtime errors like Error 50004 when trying to access the company file.
Conflicting Software: Sometimes, other software installed on your computer may conflict with QuickBooks, leading to runtime errors. This could include antivirus programs, firewall settings, or other third-party applications.
Solutions to Fix QuickBooks Error 50004
Now that we’ve identified potential causes, let’s explore effective solutions to resolve QuickBooks Error 50004:
Run QuickBooks File Doctor:
QuickBooks File Doctor is a diagnostic tool provided by Intuit to troubleshoot and fix common QuickBooks issues, including company file errors.Download and install QuickBooks File Doctor from the Intuit website.Run the tool and follow the on-screen instructions to scan and repair your company file.Once the repair process is complete, attempt to open the company file again to see if Error 50004 persists.
Update QuickBooks Software:
Ensure that you’re using the latest version of QuickBooks by checking for updates within the software.Open QuickBooks and go to the “Help” menu, then select “Update QuickBooks Desktop.”Follow the on-screen instructions to download and install any available updates.After updating QuickBooks, try opening the company file again to see if the error is resolved.
Restore a Backup of the Company File:
If the company file is corrupted beyond repair, you can restore a backup copy of the file to resolve Error 50004.Locate a recent backup of the company file and restore it using the QuickBooks Backup and Restore feature.Ensure that the backup file is not corrupted and that it contains the most up-to-date financial data.
Reinstall QuickBooks Software:
If QuickBooks Error 50004 persists after trying the above solutions, consider reinstalling the QuickBooks software.Uninstall QuickBooks from your computer through the Control Panel or Applications folder.Download the latest version of QuickBooks from the Intuit website and reinstall it on your computer.After reinstalling QuickBooks, try opening the company file again to check if the error is resolved.
Check for Conflicting Software:
Review the list of installed programs on your computer and identify any software that may conflict with QuickBooks.Temporarily disable or uninstall conflicting software and then try opening the company file again to see if Error 50004 persists.
By following these solutions, you can effectively troubleshoot and resolve QuickBooks Error 50004, ensuring smooth access to your financial data. If the error persists despite attempting these solutions, consider reaching out to QuickBooks support for further assistance. With the right approach, you can overcome Error 50004 and continue utilizing QuickBooks’ powerful accounting features without interruption.
QuickBooks is a powerful accounting software trusted by millions of businesses worldwide for its comprehensive features and ease of use. However, encountering errors like QuickBooks Error 50004 can be frustrating and disruptive to your workflow. In this article, we’ll explore what QuickBooks Error 50004 is, its potential causes, and provide detailed solutions to help you resolve it effectively. Understanding QuickBooks Error 50004 QuickBooks Error 50004 is a runtime error that typically occurs when users attempt to open or work with their company file. This error indicates an issue with the QuickBooks software or the company file itself, preventing users from accessing their financial data. Possible Causes of QuickBooks Error 50004 Corrupted Company File: One of the most common reasons for QuickBooks Error 50004 is a corrupted company file. This can happen due to various factors such as improper shutdowns, power outages, or file system errors.Outdated QuickBooks Version: Using an outdated version of QuickBooks can lead to compatibility issues and errors like Error 50004. It’s essential to keep your QuickBooks software up to date with the latest updates and patches released by Intuit.Damaged QuickBooks Components: If certain components of the QuickBooks software are damaged or missing, it can result in runtime errors like Error 50004 when trying to access the company file.Conflicting Software: Sometimes, other software installed on your computer may conflict with QuickBooks, leading to runtime errors. This could include antivirus programs, firewall settings, or other third-party applications. Solutions to Fix QuickBooks Error 50004 Now that we’ve identified potential causes, let’s explore effective solutions to resolve QuickBooks Error 50004:Run QuickBooks File Doctor:QuickBooks File Doctor is a diagnostic tool provided by Intuit to troubleshoot and fix common QuickBooks issues, including company file errors.Download and install QuickBooks File Doctor from the Intuit website.Run the tool and follow the on-screen instructions to scan and repair your company file.Once the repair process is complete, attempt to open the company file again to see if Error 50004 persists.Update QuickBooks Software:Ensure that you’re using the latest version of QuickBooks by checking for updates within the software.Open QuickBooks and go to the “Help” menu, then select “Update QuickBooks Desktop.”Follow the on-screen instructions to download and install any available updates.After updating QuickBooks, try opening the company file again to see if the error is resolved.Restore a Backup of the Company File:If the company file is corrupted beyond repair, you can restore a backup copy of the file to resolve Error 50004.Locate a recent backup of the company file and restore it using the QuickBooks Backup and Restore feature.Ensure that the backup file is not corrupted and that it contains the most up-to-date financial data.Reinstall QuickBooks Software:If QuickBooks Error 50004 persists after trying the above solutions, consider reinstalling the QuickBooks software.Uninstall QuickBooks from your computer through the Control Panel or Applications folder.Download the latest version of QuickBooks from the Intuit website and reinstall it on your computer.After reinstalling QuickBooks, try opening the company file again to check if the error is resolved.Check for Conflicting Software:Review the list of installed programs on your computer and identify any software that may conflict with QuickBooks.Temporarily disable or uninstall conflicting software and then try opening the company file again to see if Error 50004 persists.By following these solutions, you can effectively troubleshoot and resolve QuickBooks Error 50004, ensuring smooth access to your financial data. If the error persists despite attempting these solutions, consider reaching out to QuickBooks support for further assistance. With the right approach, you can overcome Error 50004 and continue utilizing QuickBooks’ powerful accounting features without interruption. Read More
Intune Security Framework documentation?
Is the Intune Security Framework still a thing? The only documentation on Microsoft Learn seems to focus solely on App Protection Policies (https://learn.microsoft.com/en-us/mem/intune/apps/app-protection-framework).
The GitHub repo for Intune Config Frameworks (https://github.com/microsoft/Intune-Config-Frameworks) hasn’t been updated in 2 years. There have been enough new features added in Intune that the Github framework is missing or out of date.
Plus the CompliancePolicy_Import_FromJSON.ps1 and DeviceConfiguration_Import_FromJSON.ps1 scripts no longer function because they rely on modules and files that have been depreciated. I’m just looking for a good place to start backed up by security experts.
Is the Intune Security Framework still a thing? The only documentation on Microsoft Learn seems to focus solely on App Protection Policies (https://learn.microsoft.com/en-us/mem/intune/apps/app-protection-framework). The GitHub repo for Intune Config Frameworks (https://github.com/microsoft/Intune-Config-Frameworks) hasn’t been updated in 2 years. There have been enough new features added in Intune that the Github framework is missing or out of date. Plus the CompliancePolicy_Import_FromJSON.ps1 and DeviceConfiguration_Import_FromJSON.ps1 scripts no longer function because they rely on modules and files that have been depreciated. I’m just looking for a good place to start backed up by security experts. Read More
How Can I Fix QuickBooks Crashes when Opening a Company File?
QuickBooks Crashes when Opening a Company File can be incredibly frustrating and inconvenient, especially when you rely on the software to manage your finances. A sudden crash of QuickBooks on Windows 10 or any other operating system can ruin your business and result in data loss if not addressed Quickly.
Understanding the Issue:
If QuickBooks closes when opening company file, it usually indicates a problem with the software’s stability or compatibility with your system. Shutting down QuickBooks abruptly without a warning or error message can leave users confused and worried about the accuracy of their financial information.
Reasons Behind QuickBooks Crashes:
Several factors may contribute to QuickBooks Closes Unexpectedly:
Software Conflict: QuickBooks may conflict with other programs or background processes running on your computer, leading to instability and crashes.
Data Integrity Issues: Corrupted or damaged company files can cause QuickBooks to crash when attempting to open them, especially if the corruption affects critical data structures within the file.
Outdated Software: Running an outdated version of QuickBooks or not installing the latest updates and patches can leave the software vulnerable to bugs and stability issues that may result in crashes.
System Resources: Insufficient system resources, such as low memory or CPU overload, can cause QuickBooks to become unresponsive and crash when trying to handle complex tasks like opening large company files.
Solutions to Resolve QuickBooks Crashes:
To address QuickBooks Desktop Closes Unexpectedly, follow these solutions:
Update QuickBooks: Ensure that you’re using the latest version of QuickBooks by downloading and installing any available updates or patches from the Intuit website. Updating QuickBooks can often fix bugs and compatibility issues that may be causing crashes.
Run QuickBooks Repair Tool: QuickBooks comes with a built-in repair tool that can help diagnose and fix common issues. Run the repair tool to scan your company file for errors and attempt to repair any damage that may be causing crashes.
Check System Requirements: Verify that your computer meets the minimum system requirements for running QuickBooks, including sufficient RAM, disk space, and processor speed. Upgrading your hardware may be necessary if your system is struggling to handle QuickBooks’ resource demands.
Disable Add-ons and Plugins: Third-party add-ons or plugins installed in QuickBooks can sometimes cause conflicts and crashes. Temporarily disable any add-ons or plugins and see if QuickBooks stabilizes when opening company files.
Verify Data Integrity: Use the built-in Verify Data utility in QuickBooks to check the integrity of your company file. If errors are detected, use the Rebuild Data utility to attempt to repair them.
Clean Reinstall QuickBooks: If all else fails, perform a clean uninstall and reinstall of QuickBooks to ensure that any corrupted files or settings are completely removed. Be sure to back up your company file and any important data before reinstalling QuickBooks.
Conclusion:
QuickBooks crashing when opening a company file can be a significant inconvenience, but by understanding the underlying causes and implementing the solutions provided in this guide, you can resolve the issue and regain stability in your financial management processes.
QuickBooks Crashes when Opening a Company File can be incredibly frustrating and inconvenient, especially when you rely on the software to manage your finances. A sudden crash of QuickBooks on Windows 10 or any other operating system can ruin your business and result in data loss if not addressed Quickly. Understanding the Issue: If QuickBooks closes when opening company file, it usually indicates a problem with the software’s stability or compatibility with your system. Shutting down QuickBooks abruptly without a warning or error message can leave users confused and worried about the accuracy of their financial information. Reasons Behind QuickBooks Crashes: Several factors may contribute to QuickBooks Closes Unexpectedly: Software Conflict: QuickBooks may conflict with other programs or background processes running on your computer, leading to instability and crashes.Data Integrity Issues: Corrupted or damaged company files can cause QuickBooks to crash when attempting to open them, especially if the corruption affects critical data structures within the file.Outdated Software: Running an outdated version of QuickBooks or not installing the latest updates and patches can leave the software vulnerable to bugs and stability issues that may result in crashes.System Resources: Insufficient system resources, such as low memory or CPU overload, can cause QuickBooks to become unresponsive and crash when trying to handle complex tasks like opening large company files. Solutions to Resolve QuickBooks Crashes:To address QuickBooks Desktop Closes Unexpectedly, follow these solutions: Update QuickBooks: Ensure that you’re using the latest version of QuickBooks by downloading and installing any available updates or patches from the Intuit website. Updating QuickBooks can often fix bugs and compatibility issues that may be causing crashes.Run QuickBooks Repair Tool: QuickBooks comes with a built-in repair tool that can help diagnose and fix common issues. Run the repair tool to scan your company file for errors and attempt to repair any damage that may be causing crashes.Check System Requirements: Verify that your computer meets the minimum system requirements for running QuickBooks, including sufficient RAM, disk space, and processor speed. Upgrading your hardware may be necessary if your system is struggling to handle QuickBooks’ resource demands.Disable Add-ons and Plugins: Third-party add-ons or plugins installed in QuickBooks can sometimes cause conflicts and crashes. Temporarily disable any add-ons or plugins and see if QuickBooks stabilizes when opening company files.Verify Data Integrity: Use the built-in Verify Data utility in QuickBooks to check the integrity of your company file. If errors are detected, use the Rebuild Data utility to attempt to repair them.Clean Reinstall QuickBooks: If all else fails, perform a clean uninstall and reinstall of QuickBooks to ensure that any corrupted files or settings are completely removed. Be sure to back up your company file and any important data before reinstalling QuickBooks. Conclusion: QuickBooks crashing when opening a company file can be a significant inconvenience, but by understanding the underlying causes and implementing the solutions provided in this guide, you can resolve the issue and regain stability in your financial management processes. Read More

REGISTER TODAY: Microsoft 365 Product Connect for CSPs Virtual Event | May 16
In this 1-hour session, the Microsoft product and GTM team will talk about a variety of topics including, Inspire Pre-Day, the newly published Work Trend Index, product updates for Microsoft 365 Business and Copilot for M365 and more.
Join this valuable session on May 16th that promises to share a lot of exciting content and important news.
REGISTER TODAY Read More
Teams Telephony/Calling – Global Telephone Book
Is there a way to create a global telephone book for Teams Telephony? A search returns results for accounts with O365 licenses, but not shared mailboxes, contacts, etc.
Each individual having to enter a contact for critical numbers seems like a waste of time, when a search function is available and could search a global telephone book.
Is this feature being considered? Going to Teams for telephony is actually a step backwards from a PBX (which has a telephone book).
Is there a way to create a global telephone book for Teams Telephony? A search returns results for accounts with O365 licenses, but not shared mailboxes, contacts, etc.Each individual having to enter a contact for critical numbers seems like a waste of time, when a search function is available and could search a global telephone book. Is this feature being considered? Going to Teams for telephony is actually a step backwards from a PBX (which has a telephone book). Read More
What’s New in Copilot for Sales – April 2024
Microsoft Copilot for Sales is reimagining sales. Integrated seamlessly into your daily tools across Microsoft 365 and Teams, Copilot for Sales harnesses the power of generative AI and customer data to keep sellers in their flow of work so they can spend more time with customers.
This month we’re infusing Copilot for Sales with even more AI-powered capabilities to help sellers be more productive. In Microsoft Outlook, we’re making it faster and easier to add new contacts or leads from emails to the CRM, view existing CRM contact details, save emails to the CRM with email banners, and sign-in to 3rd party applications. In Microsoft Teams, we’re adding question detection and keywords in meeting recaps, and we now provide even more information in adaptive cards.
We’re also excited to announce the preview release of AI powered Planner tasks in Collaboration spaces! This new capability suggests tasks based on seller conversations, integrating with Microsoft Planner app in the flow of work to unlock advanced collaboration.
Outlook: Quick CRM actions from email banners
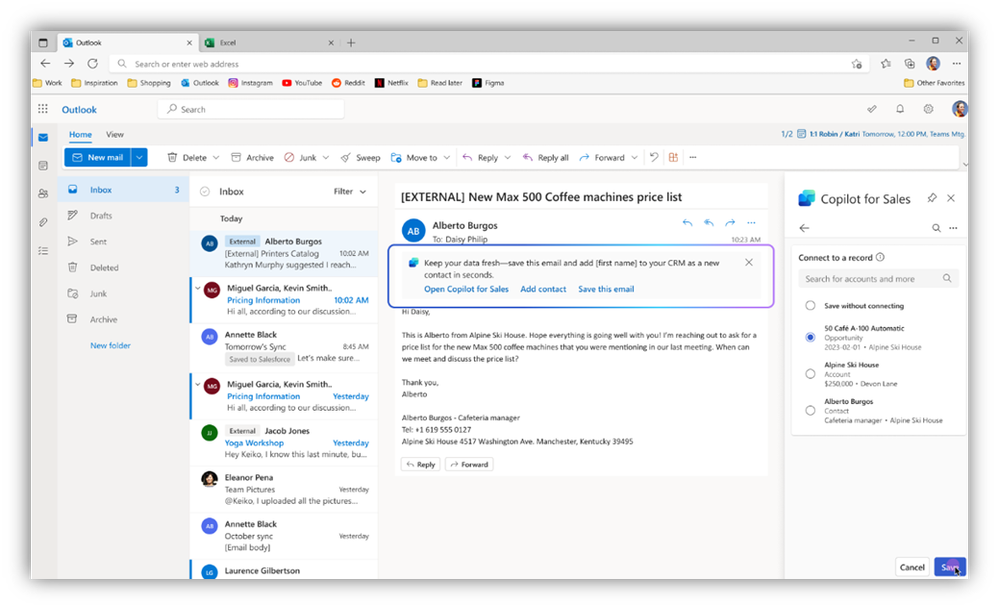
Sellers can now effortlessly boost their productivity by easily completing important CRM tasks pertaining to customer email communications – in their flow of work – from their Outlook inbox. Using quick CRM actions in the new actionable message banners that appear when reading external customer emails, you can seamlessly add new contacts or leads from emails to the CRM, access details of existing CRM contacts, and save emails to the CRM.
These banners will appear on up to 2 external customer emails per seller’s inbox per day. Some licensed users will begin to see this feature now; and it will gradually be made available to all users over the month of May.
Learn how to show saved contacts, add new contacts, and save outlook activities from email banners.
Screenshot demonstrating quick CRM actions from email banners.
Outlook: Sign-in to Copilot plugins from action cards (extensibility)
Today, to get insights from external applications, sellers have to go the plugin portal to log into 3rd party certified connector plugins. As part of that process, they have to select the plugin twice. With the April update, we’ve made it simpler to sign into 3rd party partner integrations through a guided sign-in experience.
Sellers can now quickly and easily login from within Copilot for Sales in Outlook by using action cards and the sign-in widget. The action card will be shown to prompt users to sign-in to 3rd party plugins enabled by their administrators.
Learn more about creating connections to partner applications.
Screenshot showing flow of sign-in to DocuSign from Copilot for Sales.
Teams: Question detection and keywords in meeting recap
Sellers need an easy way to quickly scan customer conversations and find points of interest, such as questions that were asked, or people and keywords that were mentioned. The Sales pill within the Teams meeting recap aims to deliver more value, similar to other Copilot for Sales surfaces.
With this release, we support:
Question detection. Easily view and navigate to questions asked by meeting participants.
Keywords and mentions. Quickly browse through points of interest including brands, time, people, and other implicit keywords.
To use this capability, simply select the Sales pill within the meeting recap, where you’ll now find the identified questions and keywords from the transcript!
Learn more about sales related insights in meeting recap.
Screenshot showing questions in Copilot for Sales from a Teams meeting recap.
Screenshot showing keywords in Copilot for Sales from a Teams meeting recap.
Teams: Adaptive cards with AI summaries
When sharing a CRM entity with a colleague in Teams, sometimes they need additional details – taking them out of the flow of their work and adding time and disruption.
With our April release, Copilot for Sales now provides an option to view an AI generated summary of the CRM entity within the flow of work! This helps provide a richer experience by providing additional details such as AI summarization as well as high value entity details right in Teams.
Screenshot demonstrating the new AI-generated summary in a Copilot for Sales Adaptive Card within Teams.
Teams: AI generated Planner tasks in Collaboration spaces (preview)
Now in preview, this new capability in Copilot suggests tasks based on seller conversations, integrating with Microsoft Planner app in the flow of work to unlock advanced collaboration.
As your sales teams collaborate, the Copilot for Sales bot in channel identifies crucial discussions to be tracked as tasks. From the Planner tab pinned in the channel you can see a comprehensive view of tasks associated with specific accounts and opportunities.
Sellers will see a curated list of suggested tasks (complete with task title and assigned owner) for review of the team members. Simply select all or some suggested tasks to be converted into Planner tasks, optionally customizing details before the tasks are finalized.
For added convenience, you can also access these tasks directly from the Microsoft Planner app once they are created.
Administrators can enable or disable AI powered Tasks in Collaboration spaces by using the Copilot for Sales app in Microsoft Teams. Simply navigate to the Collaboration spaces section within the admin settings. By default, the capability is enabled.
Learn more about collaboration spaces and see how you can set up an account team or deal room team to help your sales team collaborate.
Screenshot of AI-powered Planner Tasks in Copilot for Sales.
Get started
Ready to join us and other top-performing sales organizations worldwide? Reach out to your Microsoft sales team or visit our product web page.
Ready to install Copilot for Sales? Have a look at our deployment guide for Dynamics 365 Sales users or our deployment guide for Salesforce users.
Learn more
Ready for all the details? Check out the Copilot for Sales product documentation.
Ready for the latest tips…and more? Copilot for Sales Tip Time can serve as a foundation for your training of Copilot for Sales users, customers, or partners! This content includes use cases and demonstrates how each feature will benefit sellers, administrators, and sales managers.
Looking for the latest adoption resources? Visit the Copilot for Sales Adoption Center and find the latest information about how to go from inspiration to adoption.
Stay connected
Want to stay connected? Learn about the latest improvements before everyone else at https://aka.ms/salescopilotupdates. Join our community in the community discussion forum and we always welcome your feedback and ideas in our product feedback portal.
Microsoft Tech Community – Latest Blogs –Read More
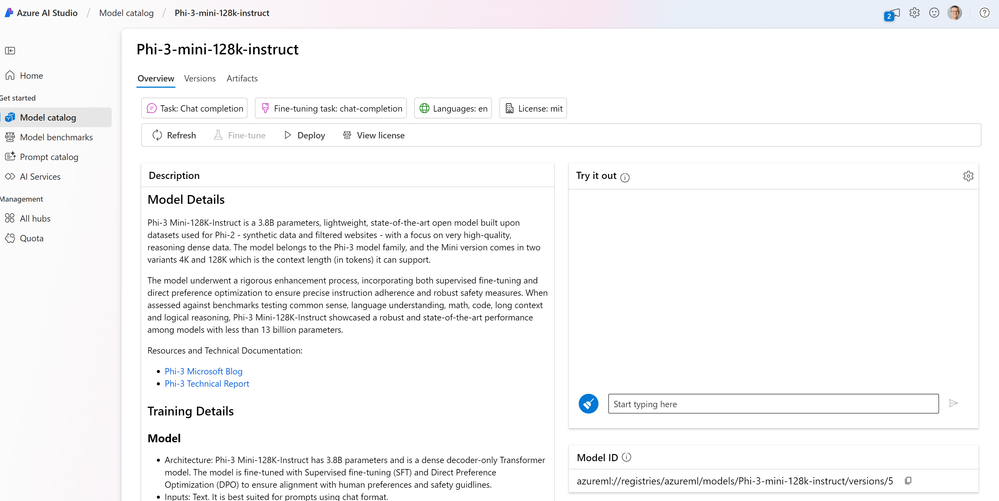
Exploring Microsoft’s Phi-3 Family of Small Language Models (SLMs) with Azure AI
Microsoft’s Phi-3 family of small language models (SLMs) has been gaining a lot of attention recently, and for good reason. These SLMs are powerful yet lightweight and efficient, making them perfect for applications with limited computational resources.
In this blog post, we will explore how to interact with Microsoft’s Phi-3 models using Azure AI services and the Model catalog. We’ll dive into the process of deploying and integrating these models into real-world applications, as well as practical exercises to solidify your understanding of the technology.
We’ll also create our own chatbot interface powered by Phi-3 using Gradio. This will allow you to interact with the model in a user-friendly way, helping you gain confidence in deploying and integrating AI into applications.
If you’re interested in learning more about Microsoft’s Phi-3 models and how to use them with Azure AI services, keep reading!
Step 1: Set Up Your Azure Account
Before you dive into using Phi-3, you’ll need to set up an Azure account if you don’t already have one. Visit the Azure website and follow the sign-up instructions. All students get Azure for Student with $100 of credit simply register at http://aka.ms/azure4student
Step 2: Access the Azure AI Model Catalog
Once your account is set up, navigate to the Azure AI Model Catalog where you’ll find the Phi-3 model(s) listed. You can also browse more than 1500+ frontier and open models from LLM providers including: HuggingFace, Meta, Mistral, Cohere and many more.
Step 3: How to deploy large language models with Azure AI Studio and Deploy to an online managed endpoint
Deploying a large language model (LLM) makes it available for use in a website, an application, or other production environments. This typically involves hosting the model on a server or in the cloud, and creating an API or other interface for users to interact with the model. You can invoke the deployment for real-time inference for chat, copilot, or another generative AI application.
Deploy Open Models to Azure AI Studio
Follow the steps below to deploy an open model such as distilbert-base-cased to a real-time endpoint in Azure AI Studio.
Choose a model you want to deploy from the Azure AI Studio model catalog. Alternatively, you can initiate deployment by selecting + Create from your project>deployments
Select Deploy to project on the model card details page.
Choose the project you want to deploy the model to.
Select Deploy.
You land on the deployment details page. Select Consume to obtain code samples that can be used to consume the deployed model in your application.
You can use the Azure AI Generative SDK to deploy an open model. In this example, you deploy a distilbert-base-cased model.
#Import the libraries
from azure.ai.resources.client import AIClient
from azure.ai.resources.entities.deployment import Deployment
from azure.ai.resources.entities.models import PromptflowModel
from azure.identity import DefaultAzureCredential
Credential info can be found under your project settings on Azure AI Studio. You can go to Settings by selecting the gear icon on the bottom of the left navigation UI.
credential = DefaultAzureCredential()
client = AIClient(
credential=credential,
subscription_id=”<xxxxxxxx-xxxx-xxxx-xxxx-xxxxxxxxxxxx>”,
resource_group_name=”<YOUR_RESOURCE_GROUP_NAME>”,
project_name=”<YOUR_PROJECT_NAME>”,
)
Define the model and the deployment. The model_id can be found on the model card on Azure AI Studio model catalog.
model_id = “azureml://registries/azureml/models/distilbert-base-cased/versions/10”
deployment_name = “my-distilbert-deployment”
deployment = Deployment(
name=deployment_name,
model=model_id,
)
Deploy the model. You can deploy to a real-time endpoint from here directly! Optionally, you can use the Azure AI Generative AI SDK to deploy any model from the model catalog.
client.deployments.create_or_update(deployment)
Deleting deployments and its associated endpoint isn’t supported via the Azure AI SDK. To delete deployments in Azure AI Studio, select the Delete button on the top panel of the deployment details page.
Deploying and inferencing with real-time endpoints can be done by consuming Virtual Machine (VM) core quota that is assigned to your subscription a per-region basis. When you sign up for Azure AI Studio, you receive a default VM quota for several VM families available in the region. You can continue to create deployments until you reach your quota limit. Once that happens, you can request for quota increase.
Recommended virtual machine skus: within Azure AI Studio to run Phi-3
Smallest VM $
Standard_NC6s_v3 *This is the max size for Azure for Students*
Standard_NC12s_v3,
Standard_NC24s_v3,
Standard_ND40rs_v2,
Standard_NC24ads_A100_v4,
Standard_NC48ads_A100_v4,
Standard_NC96ads_A100_v4,
Standard_ND96asr_v4,
Standard_ND96amsr_A100_v4
Largest $$$
NOTE: If your a student you can run a single VM with a maximum of 6GPUs so please select the Standard_NC6s_v3 phi-3-mini-instruct is small enough to run on a local device, so smaller VMs will work for this demo so save your credit or costs.
3. Setting up your Python Environment Make sure you have the following prerequisites:
An Azure Machine Learning workspace
The requirements.txt with the following Python Libraries which are required to be installed.
azure-ai-ml
azure-identity
datasets
gradio
pandas
Note: You can install the libraries into your existing environment by using pip install
pip install -r requirements.txt
An instance of the Phi-3 model deployed to an Online Endpoint
Note: You can immediately start using the Phi-3 model through an Azure Managed Online Endpoint. Azure Managed Online Endpoints allow you to deploy your models as a web service easily.
4. Getting Started on your code
#Importing Required Libraries
#We are importing the necessary libraries. MLClient is the main class that we use to #interact with Azure AI. DefaultAzureCredential and InteractiveBrowserCredential are used #for authentication purposes. The os library is used to access environment variables.
from azure.ai.ml import MLClient
from azure.identity import DefaultAzureCredential, InteractiveBrowserCredential
import os
Next, we will set up the credentials to authenticate with Azure. We first try to use the DefaultAzureCredential. If that fails (for example, if we are running the code on a machine that is not logged into Azure), we fall back to using InteractiveBrowserCredential, which will prompt the user to log in.
#Setting Up Credentials
#Here, we are setting up the credentials to authenticate with Azure.
#We first try to use the DefaultAzureCredential. If that fails, we fall back to using
#InteractiveBrowserCredential, which will prompt us to log in.
try:
credential = DefaultAzureCredential()
credential.get_token(“https://management.azure.com/.default”)
except Exception as ex:
credential = InteractiveBrowserCredential()
Finally, we create an MLClient for our Azure AI workspace. We use environment variables to get the subscription ID, resource group name, and workspace name.
#Creating an MLClient for Workspace
#In this cell, we create an MLClient for our Azure AI workspace.
#We use environment variables to get the subscription ID,
#resource group name,
#and workspace name.
workspace_ml_client = MLClient(
credential,
subscription_id=os.getenv(“SUBSCRIPTION_ID”),
resource_group_name=os.getenv(“RESOURCE_GROUP”),
workspace_name=os.getenv(“WORKSPACE_NAME”),
)
Loading and using other data sets with Phi-3
#Loading & using Dataset
#Experimenting with a dataset
#Step 1. Import the necessary python library we recommend pandas
import pandas as pd
from datasets import load_dataset
#Step 2. Load in your dataset
#example: we are using the ultrachat_200k dataset from Hugging Face
#select the test_sft split.
#Note:You can use other dataset simply replace the location and test_sft below
dataset = load_dataset(“HuggingFaceH4/ultrachat_200k”)[“test_sft”]
#Step 3.Convert the dataset into a pandas DataFrame
#Cleaning Data view: we want to make the data cleaner so we can additional drop columns. #Example: We want drop ‘prompt_id’ and the ‘messages’ columns. These columns are not needed for our current task.
df = pd.DataFrame(dataset).drop(columns=[“prompt_id”, “messages”])
#Step 4. Displaying a random sample of x rows from the DataFrame. T
#Note: This gives us a quick look at the data we’ll be working with.
#Example: In this case we are choosing 5 rows simply replace 5 with the number of rows required.
df.sample(5)
Next, we want to test our model with random sample, we want to ensures that we have a diverse range of topics to test our model with, and that the testing process is as unbiased as possible.
#Creating a Random Sample
#Random sample from our dataset for our test case for Phi-3.
#Step 1. First, we sample 5 random examples from the DataFrame and convert them to a list.
examples = df.sample(5).values.tolist()
#Step2. We convert the examples to a JSON string.
examples_json = json.dumps(examples, indent=2)
#Step 3. Selecting a random index from the examples.
#We use the random.randint function
#This returns a random integer within the specified range.
i = random.randint(0, len(examples) – 1)
#We use this random index to select an example from our list.
sample = examples[i]
print(sample)
Getting a response to the inputted prompt (user question)
#Getting the Phi-3 model to generate a response to a user’s question.
#Step 1. Define the input data.
# This includes the user’s message their prompt/question
# We also need some additional parameters for the Phi-3 model.
# The parameters control the randomness of the model’s output Temperature, top_p do_Sample, and max_new_tokens.
messages = {
“input_data”: { “input_string”: [ { “role”: “user”, “content”: “This is the users input question or prompt?” } ],
“parameters”: { “temperature”: 0.7, “top_p”: 0.9, “do_sample”: True, “max_new_tokens”: 500 } }
}
#Step 2. We write the input data to a temporary file.
#The invoke method of the workspace_ml_client.online_endpoints object
#requires a file as input.
with tempfile.NamedTemporaryFile(suffix=”.json”, delete=False, mode=’w’) as temp:
json.dump(messages, temp)
temp_file_name = temp.name
#Step 3. Invoking the Phi-3 model and providing the response.
#The invoke method sends the input data to the model and returns the model’s output.
response = workspace_ml_client.online_endpoints.invoke(
#You will find the endpoint_name and deployment_name details available under
#Build > Components > Deployments > then, select the deployment you created.
endpoint_name=”Replace this with your model Name”,
deployment_name=”Replace this with your deployment Name”,
request_file=temp_file_name,
)
#Step 4. We get the response from the model, parse it and add it to the input data.
#This allows us to build up the conversation history.
#Display the message back to the user we print the updated input data.
#This includes the user’s message and the model’s response.
response_json = json.loads(response)[“output”]
response_dict = {‘content’: response_json, ‘role’: ‘assistant’}
messages[‘input_data’][‘input_string’].append(response_dict)
print(json.dumps(messages[“input_data”][“input_string”],indent=2))
Now we want to test the model so we need to use the sample data we created.
#Step1. Importing the random data and files we created previously
import json
import tempfile
import random
#Step 2. Using a random sample from the examples
i = random.randint(0, len(examples) – 1)
sample = examples[i]
#Step 3. Define the input data
messages = { “input_data”: {
“input_string”: [{“role”: “user”, “content”: sample[0]}],
“parameters”: { “temperature”: 0.7, “top_p”: 0.9, “do_sample”: True, “max_new_tokens”: 500, }, }
}
#Step 4. Write the input data to a temporary file
with tempfile.NamedTemporaryFile(suffix=”.json”, delete=False, mode=”w”) as temp:
json.dump(messages, temp)
temp_file_name = temp.name
#Step 5. Invoking the Phi-3 model and get the response
response = workspace_ml_client.online_endpoints.invoke(
endpoint_name=”Replace with your endpoint”,
deployment_name=”Replace with your deployment”,
request_file=temp_file_name,
)
#Step 6. Parse the response and add it to the input data
response_json = json.loads(response)[“output”]
response_dict = {‘content’: response_json, ‘role’: ‘assistant’}
messages[‘input_data’][‘input_string’].append(response_dict)
#Step 7. Display the updated input data
print(json.dumps(messages[“input_data”][“input_string”],indent=2))
Now we want to create UI to experiement with our Model and Chat inputs and responses. This process creates a user-friendly chat interface for the Phi-3 model.
#Building the Chat Interface
#Step 1.Using Gradio to create a UI.
#Define a function predict this will takes a message/input
#Plus the history of previous messages as input.
#This function prepares the input data for the Phi-3 model
#Invokes the model, and processes the model’s response.
def predict(message, history):
messages = {
“input_data”: {
“input_string”: [ ],
“parameters”: { “temperature”: 0.6, “top_p”: 0.9, “do_sample”: True, “max_new_tokens”: 500, }, } }
for user, assistant in history:
messages[“input_data”][“input_string”].append({“content”: user, “role”: “user”})
messages[“input_data”][“input_string”].append({“content”: assistant, “role”: “assistant”})
messages[“input_data”][“input_string”].append({“content”: message, “role”: “user”})
…
#Step 2.Create a Gradio interface for it.
#This interface includes a textbox for the user to enter their message
gr.ChatInterface(
fn=predict,
textbox=gr.Textbox(
value=”Ask any questiom?”,
placeholder=”Ask me anything…”,
scale=5,
lines=3,
),
chatbot=gr.Chatbot(render_markdown=True),
examples=examples,
title=”Phi-3: This is a response example!”,
fill_height=True,
).launch()
As technical students, exploring Microsoft’s Phi-3 family of small language models (SLMs) and their integration into applications via the Azure AI Model catalog has revealed that powerful AI can be achieved with lighter and more efficient models. This blog post aimed to illustrate this concept by showcasing the benefits of using Phi-3 models, including step-by-step guidance for deploying and integrating AI into applications, as well as practical exercises like our Gradio-powered chatbot.
Don’t stop here – continue your exploration of AI with Azure AI and keep learning and building. We would love for you to share what your building and if you’d like to see more content, and consider sharing this tutorial with colleagues or through your professional network to help grow the field of AI for all. I look forward to seeing what you create with Azure AI and you can check out our new Phi-3 CookBook for getting started with Phi-3. Learn more about what you can do in Azure AI Studio
Microsoft Tech Community – Latest Blogs –Read More
How to plot different grouped boxplots in a shared x axis with different dimensions that are inconsistent?
Hi! I want to ask how to plot this 3 different grouped boxplots in a shared x-axis? because i plan to see the differences between them and add another secondary label to it. I want to make something like in the picture (attached), but I don’t know how to make it work because i keep on having an error that says "dimensions of arrays being concatenated are not consistent".
close all; clear all; clc;
%————————————————————————–
% Data from 1mm
a = load ("All-1mm.txt");
b = load ("Origin-1mm.txt");
% Data from 1mm
c = load ("All-2mm.txt");
d = load ("Origin-2mm.txt");
% Data from 1mm
e = load ("All-3mm.txt");
f = load ("Origin-3mm.txt");
%————————————————————————–
figure
boxplot (a, b);
ylabel ("Displacement (m)");
title(‘1 mm Displacement’);
% Set the x-axis tick labels
ax = gca;
ax.XAxis.TickLabelInterpreter = ‘none’; % To display labels without interpreting LaTeX or special characters
ax.XAxis.TickLabels = {‘X’, ‘Y’, ‘Z’, ‘Combined’}; % Assign secondary labels
figure
boxplot (c, d);
ylabel ("Displacement (m)");
title(‘2 mm Displacement’);
% Set the x-axis tick labels
ax = gca;
ax.XAxis.TickLabelInterpreter = ‘none’; % To display labels without interpreting LaTeX or special characters
ax.XAxis.TickLabels = {‘X’, ‘Y’, ‘Z’, ‘Combined’}; % Assign secondary labels
figure
boxplot (e, f);
ylabel ("Displacement (m)");
title(‘3 mm Displacement’);
% Set the x-axis tick labels
ax = gca;
ax.XAxis.TickLabelInterpreter = ‘none’; % To display labels without interpreting LaTeX or special characters
ax.XAxis.TickLabels = {‘X’, ‘Y’, ‘Z’, ‘Combined’}; % Assign secondary labelsHi! I want to ask how to plot this 3 different grouped boxplots in a shared x-axis? because i plan to see the differences between them and add another secondary label to it. I want to make something like in the picture (attached), but I don’t know how to make it work because i keep on having an error that says "dimensions of arrays being concatenated are not consistent".
close all; clear all; clc;
%————————————————————————–
% Data from 1mm
a = load ("All-1mm.txt");
b = load ("Origin-1mm.txt");
% Data from 1mm
c = load ("All-2mm.txt");
d = load ("Origin-2mm.txt");
% Data from 1mm
e = load ("All-3mm.txt");
f = load ("Origin-3mm.txt");
%————————————————————————–
figure
boxplot (a, b);
ylabel ("Displacement (m)");
title(‘1 mm Displacement’);
% Set the x-axis tick labels
ax = gca;
ax.XAxis.TickLabelInterpreter = ‘none’; % To display labels without interpreting LaTeX or special characters
ax.XAxis.TickLabels = {‘X’, ‘Y’, ‘Z’, ‘Combined’}; % Assign secondary labels
figure
boxplot (c, d);
ylabel ("Displacement (m)");
title(‘2 mm Displacement’);
% Set the x-axis tick labels
ax = gca;
ax.XAxis.TickLabelInterpreter = ‘none’; % To display labels without interpreting LaTeX or special characters
ax.XAxis.TickLabels = {‘X’, ‘Y’, ‘Z’, ‘Combined’}; % Assign secondary labels
figure
boxplot (e, f);
ylabel ("Displacement (m)");
title(‘3 mm Displacement’);
% Set the x-axis tick labels
ax = gca;
ax.XAxis.TickLabelInterpreter = ‘none’; % To display labels without interpreting LaTeX or special characters
ax.XAxis.TickLabels = {‘X’, ‘Y’, ‘Z’, ‘Combined’}; % Assign secondary labels Hi! I want to ask how to plot this 3 different grouped boxplots in a shared x-axis? because i plan to see the differences between them and add another secondary label to it. I want to make something like in the picture (attached), but I don’t know how to make it work because i keep on having an error that says "dimensions of arrays being concatenated are not consistent".
close all; clear all; clc;
%————————————————————————–
% Data from 1mm
a = load ("All-1mm.txt");
b = load ("Origin-1mm.txt");
% Data from 1mm
c = load ("All-2mm.txt");
d = load ("Origin-2mm.txt");
% Data from 1mm
e = load ("All-3mm.txt");
f = load ("Origin-3mm.txt");
%————————————————————————–
figure
boxplot (a, b);
ylabel ("Displacement (m)");
title(‘1 mm Displacement’);
% Set the x-axis tick labels
ax = gca;
ax.XAxis.TickLabelInterpreter = ‘none’; % To display labels without interpreting LaTeX or special characters
ax.XAxis.TickLabels = {‘X’, ‘Y’, ‘Z’, ‘Combined’}; % Assign secondary labels
figure
boxplot (c, d);
ylabel ("Displacement (m)");
title(‘2 mm Displacement’);
% Set the x-axis tick labels
ax = gca;
ax.XAxis.TickLabelInterpreter = ‘none’; % To display labels without interpreting LaTeX or special characters
ax.XAxis.TickLabels = {‘X’, ‘Y’, ‘Z’, ‘Combined’}; % Assign secondary labels
figure
boxplot (e, f);
ylabel ("Displacement (m)");
title(‘3 mm Displacement’);
% Set the x-axis tick labels
ax = gca;
ax.XAxis.TickLabelInterpreter = ‘none’; % To display labels without interpreting LaTeX or special characters
ax.XAxis.TickLabels = {‘X’, ‘Y’, ‘Z’, ‘Combined’}; % Assign secondary labels matlab, boxplot, multiple boxplot MATLAB Answers — New Questions
how to add booster converter in circuit
Hii, I want to add booster converter in my LLC resonant porposed model. Can anyone help me with connections?Hii, I want to add booster converter in my LLC resonant porposed model. Can anyone help me with connections? Hii, I want to add booster converter in my LLC resonant porposed model. Can anyone help me with connections? boost converter, matlab, llc resonant converter MATLAB Answers — New Questions


