

Category: News
MATLAb code to solve poission equation usinf finite element method for P2.?
How can i write MATLAB code to solve Poission equation using finite element method for P2?How can i write MATLAB code to solve Poission equation using finite element method for P2? How can i write MATLAB code to solve Poission equation using finite element method for P2? matlab, numerical analysis, finite element, poission equation, p2 MATLAB Answers — New Questions
Plot Stacked Surfaces with Coloring Appropriate for each Individual Surface
I’m trying to plot several surfaces on top of each other and have their coloring be appropriate for each individual surface based on the data range, i.e. not including the offset.
The surfaces should be offset as the data is (and how I show in the image below). I just want the surface coloring to be based on if each surface had a mean of zero. What I have tried is this, but it’s not getting the colors right.
initial = data{1};
climR = [min(initial(:)) max(initial(:))];
figure;
s1 = surf(data{1}); s1.EdgeColor = ‘none’; view([-10.5 15]); clim(climR);
hold on;
s2 = surf(data{2}); s2.EdgeColor = ‘none’; view([-10.5 15]);
s3 = surf(data{3}); s3.EdgeColor = ‘none’; view([-10.5 15]); hcb=colorbar; title(hcb,’Topo (nm)’);
%
Any suggestions? I’d like the figure to look somewhat like the cobbled together image pasted below. The cell array "data.mat" is attached.I’m trying to plot several surfaces on top of each other and have their coloring be appropriate for each individual surface based on the data range, i.e. not including the offset.
The surfaces should be offset as the data is (and how I show in the image below). I just want the surface coloring to be based on if each surface had a mean of zero. What I have tried is this, but it’s not getting the colors right.
initial = data{1};
climR = [min(initial(:)) max(initial(:))];
figure;
s1 = surf(data{1}); s1.EdgeColor = ‘none’; view([-10.5 15]); clim(climR);
hold on;
s2 = surf(data{2}); s2.EdgeColor = ‘none’; view([-10.5 15]);
s3 = surf(data{3}); s3.EdgeColor = ‘none’; view([-10.5 15]); hcb=colorbar; title(hcb,’Topo (nm)’);
%
Any suggestions? I’d like the figure to look somewhat like the cobbled together image pasted below. The cell array "data.mat" is attached. I’m trying to plot several surfaces on top of each other and have their coloring be appropriate for each individual surface based on the data range, i.e. not including the offset.
The surfaces should be offset as the data is (and how I show in the image below). I just want the surface coloring to be based on if each surface had a mean of zero. What I have tried is this, but it’s not getting the colors right.
initial = data{1};
climR = [min(initial(:)) max(initial(:))];
figure;
s1 = surf(data{1}); s1.EdgeColor = ‘none’; view([-10.5 15]); clim(climR);
hold on;
s2 = surf(data{2}); s2.EdgeColor = ‘none’; view([-10.5 15]);
s3 = surf(data{3}); s3.EdgeColor = ‘none’; view([-10.5 15]); hcb=colorbar; title(hcb,’Topo (nm)’);
%
Any suggestions? I’d like the figure to look somewhat like the cobbled together image pasted below. The cell array "data.mat" is attached. surf, surface MATLAB Answers — New Questions
Matlab example “Train Deep Learning Semantic Segmentation Network Using 3-D Simulation Data” doesn’t work.
Edit: I re-run the script through cloud rather than a local machine and the exact same error happened.
Original post: I have tested the example and found out that the data splitting of real data doesn’t properly happen despite the successful creation of its folders. This, in turn, makes the example broken and unusable. Since the split never happens, there is no splitted data in the folders and thus the error is a generic error as expected. I did not altered the code. The link for this example is https://www.mathworks.com/help/deeplearning/ug/train-deep-learning-semantic-segmentation-network-using-3d-simulation-data.html
Error using imageDatastore (line 139)
Folder ‘C:…AppDataLocalTempRealDatatrainimages’ does not have any files or is empty.
Use ‘IncludeSubfolders’ to include files in all subfolders.
This error comes from the line below:
realData = imageDatastore(realImagesFolder);
I want to be able to run this example.Edit: I re-run the script through cloud rather than a local machine and the exact same error happened.
Original post: I have tested the example and found out that the data splitting of real data doesn’t properly happen despite the successful creation of its folders. This, in turn, makes the example broken and unusable. Since the split never happens, there is no splitted data in the folders and thus the error is a generic error as expected. I did not altered the code. The link for this example is https://www.mathworks.com/help/deeplearning/ug/train-deep-learning-semantic-segmentation-network-using-3d-simulation-data.html
Error using imageDatastore (line 139)
Folder ‘C:…AppDataLocalTempRealDatatrainimages’ does not have any files or is empty.
Use ‘IncludeSubfolders’ to include files in all subfolders.
This error comes from the line below:
realData = imageDatastore(realImagesFolder);
I want to be able to run this example. Edit: I re-run the script through cloud rather than a local machine and the exact same error happened.
Original post: I have tested the example and found out that the data splitting of real data doesn’t properly happen despite the successful creation of its folders. This, in turn, makes the example broken and unusable. Since the split never happens, there is no splitted data in the folders and thus the error is a generic error as expected. I did not altered the code. The link for this example is https://www.mathworks.com/help/deeplearning/ug/train-deep-learning-semantic-segmentation-network-using-3d-simulation-data.html
Error using imageDatastore (line 139)
Folder ‘C:…AppDataLocalTempRealDatatrainimages’ does not have any files or is empty.
Use ‘IncludeSubfolders’ to include files in all subfolders.
This error comes from the line below:
realData = imageDatastore(realImagesFolder);
I want to be able to run this example. matlab, deep learning MATLAB Answers — New Questions
How define an Excel range in a conditional format with a range that increases
I have a spreadsheet with 1376 rows that is 6 years of daily data and with 2 columns: 1st=dates, 2nd=value. I want to do a conditional format that highlights the max value of the values for each year. I have this formula, and it works, but I want to add to the data set daily, which means I need to adjust the max row number every time I add a row of data. I would like a formula that adjusts to the size of the column automatically.
Here is my initial condition format that works, Column A are the dates. Col E is the data.
=$E2=MAX(IF(YEAR($A2)=YEAR($A$2:$A$1376),$E$2:$E$1376,””))
I could use count(A:A) to get the max row number, but how would I use that in the expression above? I tried to use the offset but I could not get that to work. Here is what I tried:
=$E2=MAX(IF(YEAR($A2)=YEAR(offset($A$2,0,0,count(A:A)+1,1)),offset($E$2,0,0,count(A:A)+1,1),””))
The +1 gets me past the title row.
Any help would be appreciated.
I have a spreadsheet with 1376 rows that is 6 years of daily data and with 2 columns: 1st=dates, 2nd=value. I want to do a conditional format that highlights the max value of the values for each year. I have this formula, and it works, but I want to add to the data set daily, which means I need to adjust the max row number every time I add a row of data. I would like a formula that adjusts to the size of the column automatically.Here is my initial condition format that works, Column A are the dates. Col E is the data.=$E2=MAX(IF(YEAR($A2)=YEAR($A$2:$A$1376),$E$2:$E$1376,””))I could use count(A:A) to get the max row number, but how would I use that in the expression above? I tried to use the offset but I could not get that to work. Here is what I tried:=$E2=MAX(IF(YEAR($A2)=YEAR(offset($A$2,0,0,count(A:A)+1,1)),offset($E$2,0,0,count(A:A)+1,1),””))The +1 gets me past the title row.Any help would be appreciated. Read More
How do you append to a matrix within a for loop?
Hi, I am using a for loop to process data (this part works fine). What I need to do is take the matrix (A) and after each loop update A to create one matrix. For instance, in the image below A is produced on the first loop, during loop 2 A "grows" to include the data from loop 1 and the data from loop 2, and so on.
<</matlabcentral/answers/uploaded_files/55762/Untitled.png>>
Loop 1 produces a matrix, on the next iteration I need to append to this matrix the results of that loop, and so on until all of the data is processed.
It should be noted that the number of rows on each loop is unknown. However, the number of columns is fixed to 7.
Any ideas would be greatly appreciated please.Hi, I am using a for loop to process data (this part works fine). What I need to do is take the matrix (A) and after each loop update A to create one matrix. For instance, in the image below A is produced on the first loop, during loop 2 A "grows" to include the data from loop 1 and the data from loop 2, and so on.
<</matlabcentral/answers/uploaded_files/55762/Untitled.png>>
Loop 1 produces a matrix, on the next iteration I need to append to this matrix the results of that loop, and so on until all of the data is processed.
It should be noted that the number of rows on each loop is unknown. However, the number of columns is fixed to 7.
Any ideas would be greatly appreciated please. Hi, I am using a for loop to process data (this part works fine). What I need to do is take the matrix (A) and after each loop update A to create one matrix. For instance, in the image below A is produced on the first loop, during loop 2 A "grows" to include the data from loop 1 and the data from loop 2, and so on.
<</matlabcentral/answers/uploaded_files/55762/Untitled.png>>
Loop 1 produces a matrix, on the next iteration I need to append to this matrix the results of that loop, and so on until all of the data is processed.
It should be noted that the number of rows on each loop is unknown. However, the number of columns is fixed to 7.
Any ideas would be greatly appreciated please. matrix manipulation, append matrix, for loop MATLAB Answers — New Questions

Laz Alonso Weight Loss: The Boys’ Who Plays Mother’s Milk (M.M.) Actor ‘Trimming Down
Laz Alonso, who plays Mother’s Milk (M.M.) on Amazon Prime Video’s hit superhero series The Boys, opened up on his weight loss journey ahead of Season 4. Following his work in films like Fast & Furious and Avatar, Alonso brings a sense of level-headedness to his character in The Boys while adding to the intensity seen by his team in the fight against Vought International.
Fans will see M.M. in a unique situation in Season 4 as the titular boys stand against their leader, Karl Urban’s Billy Butcher, although it also comes with an exciting change for Alonso’s look on-screen.
Laz Alonso, who plays Mother’s Milk (M.M.) on Amazon Prime Video’s hit superhero series The Boys, opened up on his weight loss journey ahead of Season 4. Following his work in films like Fast & Furious and Avatar, Alonso brings a sense of level-headedness to his character in The Boys while adding to the intensity seen by his team in the fight against Vought International. Fans will see M.M. in a unique situation in Season 4 as the titular boys stand against their leader, Karl Urban’s Billy Butcher, although it also comes with an exciting change for Alonso’s look on-screen. Read More

What To Do When Cannot communicate with QuickBooks Company File After Windows Update?
Troubleshooting Solutions: Cannot communicate with QuickBooks Company File
The Cannot communicate with QuickBooks Company File error can be frustrating, but several troubleshooting steps can help resolve the issue and get you back to work swiftly.
Check Network Connection: Ensure that your computer is properly connected to the network and that there are no issues with your internet connection. A weak or unstable network connection can cause communication problems with the QuickBooks company file.
Restart QuickBooks and Computer: Sometimes, simply restarting QuickBooks and your computer can resolve temporary glitches that may be causing the communication error. Close QuickBooks, shut down your computer, wait for a few minutes, and then restart both the computer and QuickBooks.
Update QuickBooks: Make sure you are using the latest version of QuickBooks. Updates often include bug fixes and improvements that can address communication issues with company files. Check for updates within QuickBooks or download the latest version from the official Intuit website.
Check Firewall and Antivirus Settings: Your firewall or antivirus software may be blocking QuickBooks from accessing the company file. Temporarily disable your firewall and antivirus software and then try accessing the company file again. If you can access the file without any issues, adjust the settings of your security software to allow QuickBooks to communicate freely.
Verify Hosting Settings: If you are using QuickBooks in a multi-user environment, ensure that hosting settings are correctly configured. Open QuickBooks on the computer where the company file is stored and go to the File menu. Select Utilities and then choose Host Multi-User Access. If this option is not available, it means hosting is already enabled.
Check File Permissions: Make sure you have the necessary permissions to access the QuickBooks company file. Navigate to the folder where the company file is located, right-click on it, and select Properties. Go to the Security tab and ensure that your user account has Full Control or Read/Write permissions.
Use QuickBooks File Doctor: QuickBooks File Doctor is a tool provided by Intuit to diagnose and repair various QuickBooks-related issues, including communication errors with company files. Download and run QuickBooks File Doctor, then follow the on-screen instructions to scan and fix any issues with the company file.
Copy File to Local Drive: Copy the company file from its current location to your local drive and try opening it from there. Sometimes, accessing the file from a different location can bypass communication issues caused by network or file path problems.
By following these troubleshooting solutions, you should be able to resolve the Cannot communicate with QuickBooks Company File error and resume your work in QuickBooks without further interruptions. If the issue persists after trying these steps, consider contacting QuickBooks support for further assistance.
Troubleshooting Solutions: Cannot communicate with QuickBooks Company File The Cannot communicate with QuickBooks Company File error can be frustrating, but several troubleshooting steps can help resolve the issue and get you back to work swiftly. Check Network Connection: Ensure that your computer is properly connected to the network and that there are no issues with your internet connection. A weak or unstable network connection can cause communication problems with the QuickBooks company file.Restart QuickBooks and Computer: Sometimes, simply restarting QuickBooks and your computer can resolve temporary glitches that may be causing the communication error. Close QuickBooks, shut down your computer, wait for a few minutes, and then restart both the computer and QuickBooks.Update QuickBooks: Make sure you are using the latest version of QuickBooks. Updates often include bug fixes and improvements that can address communication issues with company files. Check for updates within QuickBooks or download the latest version from the official Intuit website.Check Firewall and Antivirus Settings: Your firewall or antivirus software may be blocking QuickBooks from accessing the company file. Temporarily disable your firewall and antivirus software and then try accessing the company file again. If you can access the file without any issues, adjust the settings of your security software to allow QuickBooks to communicate freely.Verify Hosting Settings: If you are using QuickBooks in a multi-user environment, ensure that hosting settings are correctly configured. Open QuickBooks on the computer where the company file is stored and go to the File menu. Select Utilities and then choose Host Multi-User Access. If this option is not available, it means hosting is already enabled.Check File Permissions: Make sure you have the necessary permissions to access the QuickBooks company file. Navigate to the folder where the company file is located, right-click on it, and select Properties. Go to the Security tab and ensure that your user account has Full Control or Read/Write permissions.Use QuickBooks File Doctor: QuickBooks File Doctor is a tool provided by Intuit to diagnose and repair various QuickBooks-related issues, including communication errors with company files. Download and run QuickBooks File Doctor, then follow the on-screen instructions to scan and fix any issues with the company file.Copy File to Local Drive: Copy the company file from its current location to your local drive and try opening it from there. Sometimes, accessing the file from a different location can bypass communication issues caused by network or file path problems. By following these troubleshooting solutions, you should be able to resolve the Cannot communicate with QuickBooks Company File error and resume your work in QuickBooks without further interruptions. If the issue persists after trying these steps, consider contacting QuickBooks support for further assistance. Read More
Generally available: Automation Update Management to Azure Update Manager migration tool
Azure Automation Update Management will be deprecated on 31st August 2024 as the Log Analytics agent it uses, also known as the Microsoft Monitoring Agent (MMA), will be retired. Therefore, if you are using the Azure Automation Update Management solution, we recommend that you move to Azure Update Manager before 31st August 2024. Follow the guidance to move your machines and schedules from Automation Update Management to Azure Update Manager.
Methods to move from Automation Update Management to Azure Update Manager:
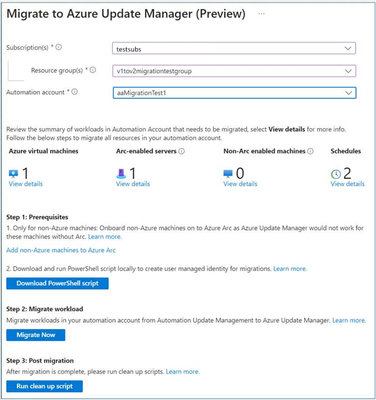
First Method: Using automated migration tool (GA): This provides a minimal click, automated way to move resources. This tool migrates machines and schedules at an automation account level. You can click on “Migrate Now” from the deprecation banner in the portal and subsequently select an automation account. The tool will list all resources in the selected automation account that need to be moved. You can view details of the resources that need to be moved. Post that, it is a 3-step process as also shown in the screenshot below. Learn more.
Step 1: Prerequisites:
Onboard Non-Azure machines on to Azure Arc: Arc connectivity is a prerequisite for Azure Update Manager and hence you need to onboard all non-Azure machines on to Azure Arc.
Create user managed identity: Download and run a PowerShell script locally on the machine to create user managed identity with necessary permissions to carry out the migration process.
Step 2: “Migrate Now” button: It imports MigrateToAzureUpdateManager runbook into your automation account and then you can run the script. It moves all machines and schedules from Automation Update Management to Azure Update Manager.
Step 3: “Run clean up script” button: It imports clean up script DeboardFromAutomationUpdateManagement into your automation account and you can run it to deboard resources from Automation Update Management.
Second Method: Using automated migration scripts: You can move resources using automated migration scripts. This allows you to move resources in an automation account to Azure Update Manager in an automated fashion instead of manually migrating each resource. It is a scripts version of the portal experience explained above. Learn more.
Third method: Using manual migration guidance: If you have built automation/customizations on top of your Automation Update management solution, then using portal migration tool or migration scripts might not make sense for you and you would need to move resources manually from Automation Update Management to Azure Update Manager. Learn more.
Coming soon!!!
Availability in Mooncake and Fairfax regions: Azure Update Manager is currently in Public Preview in Mooncake and Fairfax regions. Azure Update Manager, migration tool and scripts would soon be available in Mooncake and Fairfax regions in GA.
FAQs:
What will happen post 31st August 2024 if you do nothing?
Automation Update Management will no longer be supported by Microsoft and the service will work for an undetermined time before it is shut down. This means that customers won’t be able to create any support cases on Automation Update Management post 31st Aug 2024. We strongly recommend that you move to Azure Update Manager before 31st August 2024. Any new onboarding to Automation Update Management will be blocked. The following actions will be prevented after retirement on 31st August 2024:
Creating a new schedule in Automation Update Management
Adding a new machine to an existing schedule
Enabling Automation Update Management on a new machine
Enabling Automation Update Management on a new Log Analytics workspace
Note: This list is not exhaustive, and we will prevent any action considered as adding to the old solution in any way.
For more FAQs on retirement and move to Azure Update Manager, refer to Retirement FAQs.
Microsoft Tech Community – Latest Blogs –Read More
traitement d une image et un video
J’ai cette vidéo :
1- Je veux effacer la neige qui tombe afin d’obtenir l’image originale
2-puis je veux garder la neige qui tombe tout en changeant sa couleur en rouge.J’ai cette vidéo :
1- Je veux effacer la neige qui tombe afin d’obtenir l’image originale
2-puis je veux garder la neige qui tombe tout en changeant sa couleur en rouge. J’ai cette vidéo :
1- Je veux effacer la neige qui tombe afin d’obtenir l’image originale
2-puis je veux garder la neige qui tombe tout en changeant sa couleur en rouge. video processing MATLAB Answers — New Questions
How to normalize the baseline of multiple Differential Pulse Voltammetry Curves?
I have a few DPV curves for different concentration that I plotted in the same graph. But the baselines of the DPV curves do not match. So I want to normalize the baseline using Matlab. (So that the baseline is 0) My DPV curves looks like the following: Can someone please help me with this? I also added the excel file with the data here.
Thank you!I have a few DPV curves for different concentration that I plotted in the same graph. But the baselines of the DPV curves do not match. So I want to normalize the baseline using Matlab. (So that the baseline is 0) My DPV curves looks like the following: Can someone please help me with this? I also added the excel file with the data here.
Thank you! I have a few DPV curves for different concentration that I plotted in the same graph. But the baselines of the DPV curves do not match. So I want to normalize the baseline using Matlab. (So that the baseline is 0) My DPV curves looks like the following: Can someone please help me with this? I also added the excel file with the data here.
Thank you! normalize, baseline normalization, dpv, electrochemistry MATLAB Answers — New Questions

How To Change Payroll Direct Deposit Account in QuickBooks desktop?
Changing the direct deposit account for payroll in QuickBooks Desktop ensures that your employees receive their wages accurately and efficiently. Whether an employee has switched banks, closed an account, or simply wants their paycheck deposited into a different account, QuickBooks provides a straightforward process to update direct deposit details. In this article, we’ll guide you through the steps to change the payroll direct deposit account in QuickBooks Desktop.
Step-by-Step Guide:
Open QuickBooks Desktop: Launch QuickBooks Desktop software on your computer and log in to your company file.
Access Payroll Center: Navigate to the Employees menu at the top of the screen and select the Payroll Center option.
Select Employee Details: Within the Payroll Center, locate the employee whose direct deposit account you want to change. Click on the employee’s name to access their details.
Edit Employee Information: Once you’re in the employee’s details, look for the section related to direct deposit. This section typically includes fields for the employee’s bank name, account type, routing number, and account number. Click on the Edit button or the pencil icon to make changes.
Update Direct Deposit Details: Carefully update the direct deposit details based on the changes provided by the employee. Enter the new bank name, account type, routing number, and account number accurately to ensure seamless transactions.
Verify Changes: After updating the direct deposit details, review the information to confirm its accuracy. Double-check all entries to avoid any errors that could impact the employee’s pay.
Save Changes: Once you’ve verified the updated direct deposit details, click on the Save or Done button to apply the changes to the employee’s profile. QuickBooks will prompt you to confirm that you want to save the changes.
Notify Employee: It’s essential to inform the employee that their direct deposit information has been updated in QuickBooks Desktop. This ensures they are aware of the change and can verify that their pay is deposited into the correct account.
Conclusion: Changing the payroll direct deposit account in QuickBooks Desktop is a simple process that ensures accurate and timely payment to employees. By following the step-by-step guide outlined in this article, you can confidently update direct deposit details for employees and streamline the payroll process within QuickBooks Desktop. Remember to communicate any changes to employees and verify the accuracy of the updated information to prevent payment errors or delays.
Changing the direct deposit account for payroll in QuickBooks Desktop ensures that your employees receive their wages accurately and efficiently. Whether an employee has switched banks, closed an account, or simply wants their paycheck deposited into a different account, QuickBooks provides a straightforward process to update direct deposit details. In this article, we’ll guide you through the steps to change the payroll direct deposit account in QuickBooks Desktop. Step-by-Step Guide:Open QuickBooks Desktop: Launch QuickBooks Desktop software on your computer and log in to your company file.Access Payroll Center: Navigate to the Employees menu at the top of the screen and select the Payroll Center option.Select Employee Details: Within the Payroll Center, locate the employee whose direct deposit account you want to change. Click on the employee’s name to access their details.Edit Employee Information: Once you’re in the employee’s details, look for the section related to direct deposit. This section typically includes fields for the employee’s bank name, account type, routing number, and account number. Click on the Edit button or the pencil icon to make changes.Update Direct Deposit Details: Carefully update the direct deposit details based on the changes provided by the employee. Enter the new bank name, account type, routing number, and account number accurately to ensure seamless transactions.Verify Changes: After updating the direct deposit details, review the information to confirm its accuracy. Double-check all entries to avoid any errors that could impact the employee’s pay.Save Changes: Once you’ve verified the updated direct deposit details, click on the Save or Done button to apply the changes to the employee’s profile. QuickBooks will prompt you to confirm that you want to save the changes.Notify Employee: It’s essential to inform the employee that their direct deposit information has been updated in QuickBooks Desktop. This ensures they are aware of the change and can verify that their pay is deposited into the correct account.Conclusion: Changing the payroll direct deposit account in QuickBooks Desktop is a simple process that ensures accurate and timely payment to employees. By following the step-by-step guide outlined in this article, you can confidently update direct deposit details for employees and streamline the payroll process within QuickBooks Desktop. Remember to communicate any changes to employees and verify the accuracy of the updated information to prevent payment errors or delays. Read More

How to fix QuickBooks missing pdf component in Windows 11?
QuickBooks relies on various components to generate PDF files, which are essential for creating invoices, reports, and other important documents. However, users may encounter issues with missing PDF components, especially when upgrading to a new operating system like Windows 11. In this article, we’ll explore how to fix QuickBooks missing PDF component in Windows 11 with step-by-step instructions and troubleshooting tips.
Identify the Issue:
The first step in fixing the missing PDF component in QuickBooks is to identify the specific error or symptom. This might include error messages indicating that QuickBooks cannot create PDFs, missing PDF-related options in QuickBooks settings, or PDF-related errors when attempting to email or save documents.
Check QuickBooks Compatibility: Before proceeding with troubleshooting, ensure that your version of QuickBooks is fully compatible with Windows 11. Visit the Intuit website or contact QuickBooks support to verify compatibility and download any necessary updates or patches.
Repair QuickBooks Installation: Sometimes, missing PDF components in QuickBooks can be resolved by repairing the QuickBooks installation. To do this:
Close QuickBooks and any related processes.Go to Control Panel > Programs > Programs and Features.Select QuickBooks from the list of installed programs, then click “Repair” or “Change” at the top.Follow the prompts to repair the installation.
Install Microsoft XPS Document Writer: The Microsoft XPS Document Writer is a crucial component for generating PDFs in QuickBooks. If it’s missing, you’ll need to install it manually:
Go to Settings > Apps > Optional Features.Click “Add a feature” and select “Microsoft XPS Document Writer” from the list.Follow the on-screen instructions to complete the installation.
Set Microsoft Print to PDF as Default Printer: Setting Microsoft Print to PDF as the default printer ensures that QuickBooks can generate PDFs properly. Here’s how:
Go to Settings > Devices > Printers & scanners.Choose “Microsoft Print to PDF” from the list of printers.Click on “Manage” and select “Set as default.”
Check Printer Spooler Service: Ensure that the Print Spooler service is running on your computer. If it’s not, QuickBooks may encounter issues generating PDFs. To check and start the Print Spooler service:
Press Windows + R, type “services.msc,” and press Enter.Locate the “Print Spooler” service, right-click it, and select “Start” if it’s not already running.
Test PDF Generation: After implementing the above steps, test PDF generation in QuickBooks to ensure that the missing PDF component issue has been resolved. Create a sample invoice or report and attempt to save or email it as a PDF. If successful, the issue has been resolved.
Conclusion:
Fixing QuickBooks missing PDF component in Windows 11 is essential for uninterrupted workflow and efficient document management. By following the steps outlined in this guide, you can troubleshoot and resolve the issue, ensuring that you can generate PDFs seamlessly within QuickBooks. If the problem persists, consider reaching out to QuickBooks support for further assistance or consulting with IT professionals for advanced troubleshooting.
QuickBooks relies on various components to generate PDF files, which are essential for creating invoices, reports, and other important documents. However, users may encounter issues with missing PDF components, especially when upgrading to a new operating system like Windows 11. In this article, we’ll explore how to fix QuickBooks missing PDF component in Windows 11 with step-by-step instructions and troubleshooting tips. Identify the Issue:The first step in fixing the missing PDF component in QuickBooks is to identify the specific error or symptom. This might include error messages indicating that QuickBooks cannot create PDFs, missing PDF-related options in QuickBooks settings, or PDF-related errors when attempting to email or save documents.Check QuickBooks Compatibility: Before proceeding with troubleshooting, ensure that your version of QuickBooks is fully compatible with Windows 11. Visit the Intuit website or contact QuickBooks support to verify compatibility and download any necessary updates or patches.Repair QuickBooks Installation: Sometimes, missing PDF components in QuickBooks can be resolved by repairing the QuickBooks installation. To do this:Close QuickBooks and any related processes.Go to Control Panel > Programs > Programs and Features.Select QuickBooks from the list of installed programs, then click “Repair” or “Change” at the top.Follow the prompts to repair the installation.Install Microsoft XPS Document Writer: The Microsoft XPS Document Writer is a crucial component for generating PDFs in QuickBooks. If it’s missing, you’ll need to install it manually:Go to Settings > Apps > Optional Features.Click “Add a feature” and select “Microsoft XPS Document Writer” from the list.Follow the on-screen instructions to complete the installation.Set Microsoft Print to PDF as Default Printer: Setting Microsoft Print to PDF as the default printer ensures that QuickBooks can generate PDFs properly. Here’s how:Go to Settings > Devices > Printers & scanners.Choose “Microsoft Print to PDF” from the list of printers.Click on “Manage” and select “Set as default.”Check Printer Spooler Service: Ensure that the Print Spooler service is running on your computer. If it’s not, QuickBooks may encounter issues generating PDFs. To check and start the Print Spooler service:Press Windows + R, type “services.msc,” and press Enter.Locate the “Print Spooler” service, right-click it, and select “Start” if it’s not already running.Test PDF Generation: After implementing the above steps, test PDF generation in QuickBooks to ensure that the missing PDF component issue has been resolved. Create a sample invoice or report and attempt to save or email it as a PDF. If successful, the issue has been resolved. Conclusion:Fixing QuickBooks missing PDF component in Windows 11 is essential for uninterrupted workflow and efficient document management. By following the steps outlined in this guide, you can troubleshoot and resolve the issue, ensuring that you can generate PDFs seamlessly within QuickBooks. If the problem persists, consider reaching out to QuickBooks support for further assistance or consulting with IT professionals for advanced troubleshooting. Read More
What is technical SEO?
Technical SEO is all about improving a website’s technical aspects to increase its pages’ ranking in the search engines. Making a website faster, easier to crawl, and more understandable for search engines are the pillars of technical optimization.
Visit Here….
Technical SEO is all about improving a website’s technical aspects to increase its pages’ ranking in the search engines. Making a website faster, easier to crawl, and more understandable for search engines are the pillars of technical optimization. Visit Here…. Read More
Microsoft Power Platform Solution Architect Blueprint Survey Opportunity
Greetings!
Microsoft is updating a certification for Microsoft Power Platform Solution Architect, and we need your input through our exam blueprinting survey.
The blueprint determines how many questions each skill in the exam will be assigned. Please complete the online survey by May 22nd, 2024. Please also feel free to forward the survey to any colleagues you consider subject matter experts for this certification. If you have any questions, feel free to contact Rohan Mahadevan rmahadevan@microsoft.com or John Sowles at josowles@microsoft.com.
Microsoft Power Platform Solution Architect blueprint survey link:
https://microsoftlearning.co1.qualtrics.com/jfe/form/SV_6Dm7FppZcUYEepw
Read More
The Excel calculated value is not matching the VBA calculated value
The Excel calculated value is not matching the VBA calculated value. EXCEL: COS(RADIANS(90)) = 6,12574E-17 VBA: COS(90 * (4 * ATN(1))/180) = 6.12323E-17 VBA: COS(WorksheetFunction.RADIANS[…]
The Excel calculated value is not matching the VBA calculated value.
EXCEL: COS(RADIANS(90)) = 6,12574E-17
VBA: COS(90 * (4 * ATN(1))/180) = 6.12323E-17
VBA: COS(WorksheetFunction.RADIANS(90)) = 6.12323E-17
But why is the floating number then different calculated in an Excel cell and in VBA?
Because now there is little offset in the value.
Rounding it with 4 digits is not really a solution when using accurate calculation when there is an interaction with an Excel calculated value and a VBA value.
It would be better if Excel gave the same answer COS(RADIANS(90)) = 6.12323E-17
But it gives no an answer 6.12574E-17
My suggestion is to use the same IEEE calculation error everywhere in the program.
The Excel calculated value is not matching the VBA calculated value. EXCEL: COS(RADIANS(90)) = 6,12574E-17 VBA: COS(90 * (4 * ATN(1))/180) = 6.12323E-17 VBA: COS(WorksheetFunction.RADIANSThe Excel calculated value is not matching the VBA calculated value. EXCEL: COS(RADIANS(90)) = 6,12574E-17VBA: COS(90 * (4 * ATN(1))/180) = 6.12323E-17VBA: COS(WorksheetFunction.RADIANS(90)) = 6.12323E-17 But why is the floating number then different calculated in an Excel cell and in VBA?Because now there is little offset in the value.Rounding it with 4 digits is not really a solution when using accurate calculation when there is an interaction with an Excel calculated value and a VBA value.It would be better if Excel gave the same answer COS(RADIANS(90)) = 6.12323E-17But it gives no an answer 6.12574E-17 My suggestion is to use the same IEEE calculation error everywhere in the program. Read More
This Is The Best Time Yo Purchase For Zappify [ ONLINE & 25% OFF ]
https://www.facebook.com/zappity2.0/
https://www.facebook.com/groups/zappify
https://www.facebook.com/groups/zappify2.0
https://www.facebook.com/groups/zappifyreviews
https://www.facebook.com/groups/zappifymosquitokiller
Visit The Official Website Here To Order Your Zappify Zapper
Looking to keep those pesky mosquitoes at bay this summer? 🦟 Check out the new blog post on Zappify Mosquito Killer for some effective tips and tricks! Learn about mosquito control, insect repellent, and mosquito traps to keep your space bug-free. Click the link for all the details! #ZappifyMosquitoKiller #MosquitoControl #InsectRepellent #MosquitoTraps #BugFreeSummer
(EXCLUSIVE NEWS) Click Here to Order Zappify Amazon For The 25% Off Online.
https://www.facebook.com/zappity2.0/https://www.facebook.com/groups/zappifyhttps://www.facebook.com/groups/zappify2.0https://www.facebook.com/groups/zappifyreviewshttps://www.facebook.com/groups/zappifymosquitokillerVisit The Official Website Here To Order Your Zappify Zapper Looking to keep those pesky mosquitoes at bay this summer? 🦟 Check out the new blog post on Zappify Mosquito Killer for some effective tips and tricks! Learn about mosquito control, insect repellent, and mosquito traps to keep your space bug-free. Click the link for all the details! #ZappifyMosquitoKiller #MosquitoControl #InsectRepellent #MosquitoTraps #BugFreeSummer (EXCLUSIVE NEWS) Click Here to Order Zappify Amazon For The 25% Off Online. Read More

Does QuickBooks payroll do direct deposit?
Direct deposit has revolutionized the way businesses handle payroll, offering convenience and efficiency for both employers and employees. QuickBooks Payroll, a popular payroll solution, streamlines the direct deposit process, making it easy for businesses to pay their employees electronically. In this article, we’ll explore the functionality of QuickBooks Payroll in handling direct deposit and answer common questions about its implementation and benefits.
Does QuickBooks Payroll Offer Direct Deposit?
Yes, QuickBooks Payroll does indeed offer direct deposit functionality. With QuickBooks Payroll, businesses can set up and manage direct deposit for their employees, allowing for seamless electronic payment of wages directly into their bank accounts.
How Does Direct Deposit Work in QuickBooks Payroll?
Direct deposit in QuickBooks Payroll simplifies the payroll process by electronically depositing employees’ paychecks directly into their designated bank accounts. Here’s how it works:
Employee Setup: Employers can easily set up direct deposit for employees within QuickBooks Payroll by entering their banking information, including bank name, routing number, and account number.
Payroll Processing: When processing payroll, employers can select the direct deposit option for each employee who has opted for electronic payment. QuickBooks Payroll calculates the amount to be deposited based on the employee’s salary or wages, deductions, and any other applicable payments.
Funds Transfer: On the designated payday, QuickBooks Payroll initiates the transfer of funds from the employer’s bank account to the employees’ bank accounts. This process is typically completed within a few business days, depending on the banking institution and payment processing times.
Pay Stub Generation: QuickBooks Payroll automatically generates and distributes electronic pay stubs to employees, detailing their earnings, deductions, taxes withheld, and net pay. Employees can access their pay stubs securely online through the QuickBooks Payroll portal.
Benefits of Using Direct Deposit with QuickBooks Payroll: Implementing direct deposit with QuickBooks Payroll offers several benefits for businesses and employees alike:
Time and Cost Savings: Direct deposit eliminates the need for manual paycheck preparation, printing, and distribution, saving time and reducing administrative costs associated with paper-based payroll processing.
Convenience and Security: Employees enjoy the convenience of having their pay deposited directly into their bank accounts, eliminating the need to visit a bank to deposit or cash physical paychecks. Direct deposit also enhances security by reducing the risk of lost or stolen checks.
Accuracy and Compliance: QuickBooks Payroll ensures accurate and compliant payroll processing, including timely tax withholding and reporting. Direct deposit reduces the likelihood of errors associated with manual data entry and calculation, helping businesses maintain payroll accuracy and regulatory compliance.
Employee Satisfaction: Offering direct deposit as a payment option can enhance employee satisfaction and retention by providing a convenient and reliable method of receiving wages.
Conclusion:
Direct deposit is a valuable feature offered by QuickBooks Payroll, enabling businesses to streamline payroll processing and provide employees with a convenient and secure payment method. By leveraging direct deposit functionality, businesses can save time, reduce costs, ensure payroll accuracy, and enhance employee satisfaction. If you’re considering implementing direct deposit for your business, QuickBooks Payroll offers a user-friendly solution that simplifies the process and maximizes efficiency.
Direct deposit has revolutionized the way businesses handle payroll, offering convenience and efficiency for both employers and employees. QuickBooks Payroll, a popular payroll solution, streamlines the direct deposit process, making it easy for businesses to pay their employees electronically. In this article, we’ll explore the functionality of QuickBooks Payroll in handling direct deposit and answer common questions about its implementation and benefits. Does QuickBooks Payroll Offer Direct Deposit?Yes, QuickBooks Payroll does indeed offer direct deposit functionality. With QuickBooks Payroll, businesses can set up and manage direct deposit for their employees, allowing for seamless electronic payment of wages directly into their bank accounts. How Does Direct Deposit Work in QuickBooks Payroll?Direct deposit in QuickBooks Payroll simplifies the payroll process by electronically depositing employees’ paychecks directly into their designated bank accounts. Here’s how it works:Employee Setup: Employers can easily set up direct deposit for employees within QuickBooks Payroll by entering their banking information, including bank name, routing number, and account number.Payroll Processing: When processing payroll, employers can select the direct deposit option for each employee who has opted for electronic payment. QuickBooks Payroll calculates the amount to be deposited based on the employee’s salary or wages, deductions, and any other applicable payments.Funds Transfer: On the designated payday, QuickBooks Payroll initiates the transfer of funds from the employer’s bank account to the employees’ bank accounts. This process is typically completed within a few business days, depending on the banking institution and payment processing times.Pay Stub Generation: QuickBooks Payroll automatically generates and distributes electronic pay stubs to employees, detailing their earnings, deductions, taxes withheld, and net pay. Employees can access their pay stubs securely online through the QuickBooks Payroll portal.Benefits of Using Direct Deposit with QuickBooks Payroll: Implementing direct deposit with QuickBooks Payroll offers several benefits for businesses and employees alike:Time and Cost Savings: Direct deposit eliminates the need for manual paycheck preparation, printing, and distribution, saving time and reducing administrative costs associated with paper-based payroll processing.Convenience and Security: Employees enjoy the convenience of having their pay deposited directly into their bank accounts, eliminating the need to visit a bank to deposit or cash physical paychecks. Direct deposit also enhances security by reducing the risk of lost or stolen checks.Accuracy and Compliance: QuickBooks Payroll ensures accurate and compliant payroll processing, including timely tax withholding and reporting. Direct deposit reduces the likelihood of errors associated with manual data entry and calculation, helping businesses maintain payroll accuracy and regulatory compliance.Employee Satisfaction: Offering direct deposit as a payment option can enhance employee satisfaction and retention by providing a convenient and reliable method of receiving wages.Conclusion:Direct deposit is a valuable feature offered by QuickBooks Payroll, enabling businesses to streamline payroll processing and provide employees with a convenient and secure payment method. By leveraging direct deposit functionality, businesses can save time, reduce costs, ensure payroll accuracy, and enhance employee satisfaction. If you’re considering implementing direct deposit for your business, QuickBooks Payroll offers a user-friendly solution that simplifies the process and maximizes efficiency. Read More
solving linear systems of equations
i want to solve the following linear systems:
a)
2y+3x-7z=6
3z+5x-y=10
-4x+y+z=4
b)
2y+3x-7z=6
3z+5x-y=10
-4y-6x+14z=-12
i wrote the following code:
clc
clear
A=[3 2 -7; 5 -1 3; -4 1 1]
B=[6;10;4]
%Ax=B, therefore x=B/A
x=B./A
x=linsolve(A,B)
C=[3 2 -7;5 -1 3;-6 -4 14]
D=[6;10;-12]
%if Cx=D, therefore x=D/C
x=D./C
x=linsolve(C,D)
and it works for the first but not the second, this comes up in the command window anyone know why?
Warning: Matrix is singular to working precision.
> In q8_2 (line 15)
x =
NaN
NaN
NaNi want to solve the following linear systems:
a)
2y+3x-7z=6
3z+5x-y=10
-4x+y+z=4
b)
2y+3x-7z=6
3z+5x-y=10
-4y-6x+14z=-12
i wrote the following code:
clc
clear
A=[3 2 -7; 5 -1 3; -4 1 1]
B=[6;10;4]
%Ax=B, therefore x=B/A
x=B./A
x=linsolve(A,B)
C=[3 2 -7;5 -1 3;-6 -4 14]
D=[6;10;-12]
%if Cx=D, therefore x=D/C
x=D./C
x=linsolve(C,D)
and it works for the first but not the second, this comes up in the command window anyone know why?
Warning: Matrix is singular to working precision.
> In q8_2 (line 15)
x =
NaN
NaN
NaN i want to solve the following linear systems:
a)
2y+3x-7z=6
3z+5x-y=10
-4x+y+z=4
b)
2y+3x-7z=6
3z+5x-y=10
-4y-6x+14z=-12
i wrote the following code:
clc
clear
A=[3 2 -7; 5 -1 3; -4 1 1]
B=[6;10;4]
%Ax=B, therefore x=B/A
x=B./A
x=linsolve(A,B)
C=[3 2 -7;5 -1 3;-6 -4 14]
D=[6;10;-12]
%if Cx=D, therefore x=D/C
x=D./C
x=linsolve(C,D)
and it works for the first but not the second, this comes up in the command window anyone know why?
Warning: Matrix is singular to working precision.
> In q8_2 (line 15)
x =
NaN
NaN
NaN linear systems MATLAB Answers — New Questions
Why can’t polyshape.union() consolidate neighboring polygons?
I have a polyshape vector pv consisting of 4 adjacent triangles,
load tstcase_pv
plot(pv)
Why is it that when the polyshape vector elements are ordered one way, the union() operation successfully consolidates them, whereas in the reverse order, it does not?
pv1=pv([4,1,2,3]); plot(union(pv1))
pv2=pv([3,2,1,4]); plot(union(pv2))I have a polyshape vector pv consisting of 4 adjacent triangles,
load tstcase_pv
plot(pv)
Why is it that when the polyshape vector elements are ordered one way, the union() operation successfully consolidates them, whereas in the reverse order, it does not?
pv1=pv([4,1,2,3]); plot(union(pv1))
pv2=pv([3,2,1,4]); plot(union(pv2)) I have a polyshape vector pv consisting of 4 adjacent triangles,
load tstcase_pv
plot(pv)
Why is it that when the polyshape vector elements are ordered one way, the union() operation successfully consolidates them, whereas in the reverse order, it does not?
pv1=pv([4,1,2,3]); plot(union(pv1))
pv2=pv([3,2,1,4]); plot(union(pv2)) polyshape, union, numerical stability MATLAB Answers — New Questions
Input folders or files contain non-standard file extensions.
Post Content Post Content input folders or files contain non-standard file e, use fileextensions name-value pair to include the MATLAB Answers — New Questions


