

Category: News
Virtual Network Flow Logs Recipes
You might have heard about the General Availability of Virtual Network Flow Logs in Azure, and even read the announcement blog post. When writing that post with Harsha CS I had the chance to play a bit with VNet Flow Logs and Traffic Analytics, and I would like to share some of the learnings.
What the heck am I talking about? Let me bring you up to speed very quickly (attention, oversimplification ahead!): NSG Flow Logs is a technology that logs every packet going through an NSG: in and out, allowed and dropped. The main issue of NSG Flow Logs is, well, that you need an NSG, and some resources in Azure do not support them. For example, Azure Firewall, VPN gateways or ExpressRoute gateways. Enter VNet Flow Logs, which you can enable in a whole VNet or subnet, regardless of whether there are NSGs or not.
What is Traffic Analytics, I hear you say? VNet Flow Logs are stored in Azure Blob Storage. Optionally, you can enable Traffic Analytics, which will do two things: it will enrich the flow logs with additional information, and will send everything to a Log Analytics Workspace for easy querying. This “enrich and forward to Log Analytics” operation will happen in intervals, either every 10 minutes or every hour.
VNet Flow Logs give you much more, such as for example whether traffic is vnet-encrypted or not, whether traffic is dropped by AVNM security admin rules, and some more stuff, but you will find all that in the docs so I am not going to repeat it here.
Table structure: NTAIpDetails
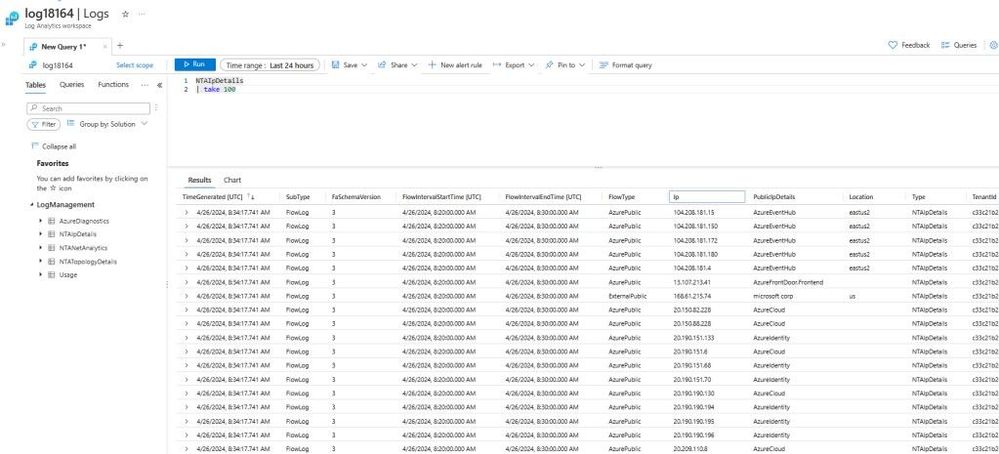
This table will contain some enrichment data about public IP addresses, including whether they belong to Azure services and their region, and geolocation information for other public IPs. Here you can see a sample of what that table looks like:
For example, looking at the NTAIpDetails table you could extract information about what communications are there in place. The query is very simple (NTAIpDetails | distinct FlowType, PublicIpDetails, Location), and it gives you a glimpse of what you can do, especially when joining this table to NTANetAnalytics (see the scenarios further down for examples on how to join this table):
NTAIpDetails
| distinct FlowType, PublicIpDetails, Location
Table structure: NTATopologyDetails
This table contains information about different elements of your topology, including VNets, subnets, route tables, routes, NSGs, Application Gateways and much more. Here you cans see what it looks like:
For example, with a simple query you can get the routes in the route tables configured in a given resource group:
NTATopologyDetails
| where TimeGenerated > ago(600d)
| where AzureResourceType == “Route”
| extend name_a = split(Name, “/”)
| extend ResourceGroup = tostring(name_a[0]), RouteTableName = tostring(name_a[1]), RouteName = tostring(name_a[2])
| where ResourceGroup == “flowlogs”
| distinct ResourceGroup, RouteTableName, RouteName, NextHopType,NextHopIp
Yeah, there are many other ways of getting topology information in Azure, such as with Azure Resource Graph, but having this in a table is pretty handy to do join queries.
Table structure: NTANetAnalytics
Alright, now we are coming to more interesting things: this table is the one containing the flows we are looking for. Records in this table will contain the usual attributes you would expect such as source and destination IP, protocol, and destination port. Additionally, data will be enriched with information such as:
Source and destination VM
Source and destination NIC
Source and destination subnet
Source and destination load balancer
Flow encryption (yes/no)
Whether the flow is going over ExpressRoute
And many more
Further below you can read some scenarios with detailed queries that will show you some examples of ways you can extract information from VNet Flow Logs and Traffic Analytics. Of course, these are just some of the scenarios that came to mind on my topology, the idea is that you can get inspiration from these queries to support your individual use case.
Scenario 1: traffic to/from a virtual machine
For example, imagine you want to see with which IP addresses a given virtual machine has been talking to in the last few days:
NTANetAnalytics
| where TimeGenerated > ago(60d)
| where SrcIp == “10.1.1.8” and strlen(DestIp)>0
| summarize TotalBytes=sum(BytesDestToSrc+BytesSrcToDest) by SrcIp, DestIp
What if we want to enrich this information with the NTAIpDetails table to get the geolocation of the public IP addresses? Let’s have a look:
NTANetAnalytics
| where TimeGenerated > ago(60d)
| where SrcIp == “10.1.1.8” and strlen(DestIp)>0
| join kind = leftouter (NTAIpDetails) on $left.DestIp == $right.Ip
| summarize TotalBytes=sum(BytesDestToSrc+BytesSrcToDest) by SrcIp, DestIp, PublicIpDetails, Location
Mmmh, that packet host inc. looks suspicious, so now you might be interested in getting a time distribution on the protocols that have been going on there. Nothing easier! We can see here that there have been two big data transfers of around 1GB in two different days, the last one on 23rd April.
NTANetAnalytics
| where TimeGenerated > ago(60d)
| where SrcIp == “10.1.1.8” and DestIp == “136.144.58.113”
| join kind = leftouter (NTAIpDetails) on $left.DestIp == $right.Ip
| extend App = strcat(L4Protocol,tostring(DestPort))
| summarize TotalBytes=sum(BytesDestToSrc+BytesSrcToDest) by App, bin(TimeGenerated, 1d)
| render columnchart
Mmmmh, somebody exfiltrating data?
Scenario 2: load balancer traffic distribution
You want to look into the traffic distribution of a given application front-ended by a load balancer? Two of the enrichment fields in the NTANetAnalytics table are SrcLoadBalancer and DestLoadBalancer, that we can leverage for this purpose. We will look at the source IP first, meaning traffic going from the VM to the load balancer:
NTANetAnalytics
| where SubType == ‘FlowLog’ and TimeGenerated > ago(60d)
| where SrcLoadBalancer contains ‘web’ or DestLoadBalancer contains ‘web’
| summarize TotalBytes = sum(BytesSrcToDest + BytesDestToSrc) by tostring(SrcIp)
| render piechart
Interesting, it looks like 10.1.1.70 is not getting too much traffic? Let’s look here to the time distribution as well, maybe that machine hasn’t been there for a long time:
NTANetAnalytics
| where SubType == ‘FlowLog’ and TimeGenerated > ago(60d)
| where SrcLoadBalancer contains ‘web’ or DestLoadBalancer contains ‘web’
| summarize TotalBytes = sum(BytesSrcToDest + BytesDestToSrc) by tostring(SrcIp), bin(TimeGenerated, 1d)
| render barchart
We can have a look at the Destination IP as well, which will show an interesting picture:
NTANetAnalytics
| where SubType == ‘FlowLog’ and TimeGenerated > ago(60d)
| where SrcLoadBalancer contains ‘web’ or DestLoadBalancer contains ‘web’
| summarize TotalBytes = sum(BytesSrcToDest + BytesDestToSrc) by tostring(DestIp), bin(TimeGenerated, 1d)
| render barchart
Wow, it looks like we need to have a look at these VMs, something seems not to be right with our load distribution!
Scenario 3: Traffic between IP ranges
Traffic Analytics will enrich the information with information such as source and destination subnets:
NTANetAnalytics
| where SubType == ‘FlowLog’ and FaSchemaVersion == ‘3’ and TimeGenerated > ago(60d)
| where isnotempty(SrcSubnet) and isnotempty(DestSubnet)
| summarize TotalBytes=sum(BytesSrcToDest + BytesDestToSrc) by SrcSubnet, DestSubnet,L4Protocol,DestPort
However, sometimes you want to do a different data aggregation, for example if you would like to see traffic between on-premises and Azure. In this case you can define the aggregation prefixes yourself and use the handy KQL function ipv4_is_in_range:
let prefix1=”10.1.1.0/27″;
let prefix2=”10.1.1.64/27″;
NTANetAnalytics
| where SubType == ‘FlowLog’ and FaSchemaVersion == ‘3’ and TimeGenerated > ago(30d)
| extend SrcIpIsInPrefix1 = ipv4_is_in_range(SrcIp, prefix1), SrcIpIsInPrefix2 = ipv4_is_in_range(SrcIp, prefix2)
| extend DestIpIsInPrefix1 = ipv4_is_in_range(DestIp, prefix1), DestIpIsInPrefix2 = ipv4_is_in_range(DestIp, prefix2)
| where (SrcIpIsInPrefix1 and DestIpIsInPrefix2) or (SrcIpIsInPrefix2 and DestIpIsInPrefix1)
| summarize TotalBytes=sum(BytesSrcToDest + BytesDestToSrc) by SrcIp, DestIp,L4Protocol,DestPort,L7Protocol
You want this information but distributed across time, to have a look at traffic evolution? You got it. We can create a new field to aggregate the information about source, destination and protocol, and represent to a stacked chart:
let prefix1=”10.1.1.0/27″;
let prefix2=”10.1.1.64/27″;
NTANetAnalytics
| where SubType == ‘FlowLog’ and FaSchemaVersion == ‘3’ and TimeGenerated > ago(30d)
| extend SrcIpIsInPrefix1 = ipv4_is_in_range(SrcIp, prefix1), SrcIpIsInPrefix2 = ipv4_is_in_range(SrcIp, prefix2)
| extend DestIpIsInPrefix1 = ipv4_is_in_range(DestIp, prefix1), DestIpIsInPrefix2 = ipv4_is_in_range(DestIp, prefix2)
| where (SrcIpIsInPrefix1 and DestIpIsInPrefix2) or (SrcIpIsInPrefix2 and DestIpIsInPrefix1)
//| summarize TotalBytes=sum(BytesSrcToDest + BytesDestToSrc) by SrcIp, DestIp,L4Protocol,DestPort,L7Protocol
| extend FlowDescription = strcat(SrcIp, “-“, DestIp, “-“, L4Protocol, tostring(DestPort))
| summarize TotalBytes=sum(BytesSrcToDest + BytesDestToSrc) by FlowDescription, bin(TimeGenerated, 1d)
| render columnchart
Interesting, a lot of traffic on port 80, maybe somebody should look at migrating to HTTPS?
Scenario 4: ExpressRoute traffic
You know that VNet Flow Logs are not tied to NSGs as we saw in the previous scenario about Azure Firewall. Guess what, this applies as well to VPN and ExpressRoute gateways. More concretely, with ExpressRoute we can even leverage the fields SrcExpressRouteCircuit and DestExpressRouteCircuit:
NTANetAnalytics
| where SubType == ‘FlowLog’ and TimeGenerated > ago(60d)
| where isnotnull(SrcExpressRouteCircuit) or isnotnull(DestExpressRouteCircuit)
| extend TargetResourceName = tostring(split(TargetResourceId, “/”)[2])
| summarize TotalBytes=sum(BytesSrcToDest + BytesDestToSrc) by TargetResourceName, bin(TimeGenerated, 1d)
| render columnchart
We can use the previous recipe for prefix aggregation to show traffic from onprem to Azure and Azure to onprem:
let prefix1=”10.4.0.0/16″;
let prefix2=”10.1.0.0/16″;
NTANetAnalytics
| where SubType == ‘FlowLog’ and FaSchemaVersion == ‘3’ and FlowStartTime > ago(24h)
| extend SrcIpIsInPrefix1 = ipv4_is_in_range(SrcIp, prefix1), SrcIpIsInPrefix2 = ipv4_is_in_range(SrcIp, prefix2)
| extend DestIpIsInPrefix1 = ipv4_is_in_range(DestIp, prefix1), DestIpIsInPrefix2 = ipv4_is_in_range(DestIp, prefix2)
| where (SrcIpIsInPrefix1 and DestIpIsInPrefix2) or (SrcIpIsInPrefix2 and DestIpIsInPrefix1)
| extend Direction = iff((SrcIpIsInPrefix1 and DestIpIsInPrefix2), “Onprem2Azure”, “Azure2Onprem”)
| summarize TotalBytesSrcToDest=sum(BytesSrcToDest), TotalBytesDestTosrc=sum(BytesDestToSrc) by Direction
| render columnchart
Wrapping up
These were only some examples of how you can slice and dice the data in VNet Flow Logs, please do not hesitate to let me know in the comments about other cool KQL queries you are using!
Microsoft Tech Community – Latest Blogs –Read More
Why my image cannot dramical crop?
Hello. I want to ask. I want to crop my image data with specific area with a specific part of an image. And I want to use auto dynamic cropping method in matlab. I’m using ultrasound data. Why my crop image does not appear on the result? Here’s my codes and I attach with my image:
clc; % Clear the command window.
close all; % Close all figures (except those of imtool.)
clear; % Erase all existing variables. Or clearvars if you want.
workspace; % Make sure the workspace panel is showing.
format long g;
format compact;
fontSize = 20;
mypath = ‘/home/motmot/Documents/test/’;
dinfo = dir(fullfile(mypath,’*.jpg’));
filenames = fullfile({dinfo.folder}, {dinfo.name});
nfiles = length(filenames);
for K = 1 : nfiles
thisfile = filenames{K};
[folder, basename, ext] = fileparts(thisfile);
outfile = fullfile(folder, basename + "_crop" + ext);
I = imread(thisfile);
% Get the dimensions of the image. numberOfColorChannels should be = 3.
[rows, columns, numberOfColorChannels] = size(I);
% Display the original color image.
subplot(2, 3, 1);
imshow(I);
axis on;
hp = impixelinfo(); % Show x,y and RGB as you mouse around.
title(‘Original Color Image’, ‘FontSize’, fontSize, ‘Interpreter’, ‘None’);
% Take the red channel.
grayImage = I(:, :, 1);
% Erase the first 110 columns to get rid of the holes.
verticalProfile = mean(grayImage, 2);
for col = 1 : 110
grayImage(:, col) = verticalProfile;
end
% Run a texture filter on it.
stdImage = stdfilt(grayImage);
% Display the image.
subplot(2, 3, 2);
imshow(stdImage, []);
axis on;
title(‘Filtered Image’, ‘FontSize’, fontSize, ‘Interpreter’, ‘None’);
% Enlarge figure
set(gcf, ‘Units’, ‘Normalized’, ‘Outerposition’, [0.05, 0.1, .9, .80]);
% Let’s compute and display the histogram.
subplot(2, 3, 3);
histogram(stdImage, 500); % 500 bins.
grid on;
title(‘Histogram of Filtered image’, ‘FontSize’, fontSize, ‘Interpreter’, ‘None’);
xlabel(‘Gray Level’, ‘FontSize’, fontSize);
ylabel(‘Pixel Count’, ‘FontSize’, fontSize);
% Threshold the image.
binaryImage = stdImage > 5;
% Display the image.
subplot(2, 3, 4);
imshow(binaryImage);
axis on;
title(‘Binary Image’, ‘FontSize’, fontSize, ‘Interpreter’, ‘None’);
% % Get areas of blobs
% labeledImage = bwlabel(binaryImage);
% props = regionprops(labeledImage, ‘Area’);
% allAreas = sort([props.Area])
% subplot(2, 3, 5);
% histogram(allAreas); % Show histogram of blob areas.
% title(‘Blob Areas’, ‘FontSize’, fontSize, ‘Interpreter’, ‘None’);
% Get rid of small blobs.
binaryImage = bwareafilt(binaryImage, [70, inf]); % Keep only if 70 pixels or larger.
% Display the image.
subplot(2, 3, 5);
imshow(binaryImage);
axis on;
title(‘Cleaned Binary Image’, ‘FontSize’, fontSize, ‘Interpreter’, ‘None’);
% Find the bounding box.
[blobRows, blobColumns] = find(binaryImage);
row1 = min(blobRows);
row2 = max(blobRows);
col1 = min(blobColumns);
col2 = max(blobColumns);
% Crop it.
croppedImage = rgbImage(row1:row2, col1:col2, :);
% Display the cropped, enhanced color image.
subplot(2, 3, 6);
imshow(croppedImage);
axis on;
title(‘Cropped Color Image’, ‘FontSize’, fontSize, ‘Interpreter’, ‘None’);
imwrite(croppedImage, outfile)
endHello. I want to ask. I want to crop my image data with specific area with a specific part of an image. And I want to use auto dynamic cropping method in matlab. I’m using ultrasound data. Why my crop image does not appear on the result? Here’s my codes and I attach with my image:
clc; % Clear the command window.
close all; % Close all figures (except those of imtool.)
clear; % Erase all existing variables. Or clearvars if you want.
workspace; % Make sure the workspace panel is showing.
format long g;
format compact;
fontSize = 20;
mypath = ‘/home/motmot/Documents/test/’;
dinfo = dir(fullfile(mypath,’*.jpg’));
filenames = fullfile({dinfo.folder}, {dinfo.name});
nfiles = length(filenames);
for K = 1 : nfiles
thisfile = filenames{K};
[folder, basename, ext] = fileparts(thisfile);
outfile = fullfile(folder, basename + "_crop" + ext);
I = imread(thisfile);
% Get the dimensions of the image. numberOfColorChannels should be = 3.
[rows, columns, numberOfColorChannels] = size(I);
% Display the original color image.
subplot(2, 3, 1);
imshow(I);
axis on;
hp = impixelinfo(); % Show x,y and RGB as you mouse around.
title(‘Original Color Image’, ‘FontSize’, fontSize, ‘Interpreter’, ‘None’);
% Take the red channel.
grayImage = I(:, :, 1);
% Erase the first 110 columns to get rid of the holes.
verticalProfile = mean(grayImage, 2);
for col = 1 : 110
grayImage(:, col) = verticalProfile;
end
% Run a texture filter on it.
stdImage = stdfilt(grayImage);
% Display the image.
subplot(2, 3, 2);
imshow(stdImage, []);
axis on;
title(‘Filtered Image’, ‘FontSize’, fontSize, ‘Interpreter’, ‘None’);
% Enlarge figure
set(gcf, ‘Units’, ‘Normalized’, ‘Outerposition’, [0.05, 0.1, .9, .80]);
% Let’s compute and display the histogram.
subplot(2, 3, 3);
histogram(stdImage, 500); % 500 bins.
grid on;
title(‘Histogram of Filtered image’, ‘FontSize’, fontSize, ‘Interpreter’, ‘None’);
xlabel(‘Gray Level’, ‘FontSize’, fontSize);
ylabel(‘Pixel Count’, ‘FontSize’, fontSize);
% Threshold the image.
binaryImage = stdImage > 5;
% Display the image.
subplot(2, 3, 4);
imshow(binaryImage);
axis on;
title(‘Binary Image’, ‘FontSize’, fontSize, ‘Interpreter’, ‘None’);
% % Get areas of blobs
% labeledImage = bwlabel(binaryImage);
% props = regionprops(labeledImage, ‘Area’);
% allAreas = sort([props.Area])
% subplot(2, 3, 5);
% histogram(allAreas); % Show histogram of blob areas.
% title(‘Blob Areas’, ‘FontSize’, fontSize, ‘Interpreter’, ‘None’);
% Get rid of small blobs.
binaryImage = bwareafilt(binaryImage, [70, inf]); % Keep only if 70 pixels or larger.
% Display the image.
subplot(2, 3, 5);
imshow(binaryImage);
axis on;
title(‘Cleaned Binary Image’, ‘FontSize’, fontSize, ‘Interpreter’, ‘None’);
% Find the bounding box.
[blobRows, blobColumns] = find(binaryImage);
row1 = min(blobRows);
row2 = max(blobRows);
col1 = min(blobColumns);
col2 = max(blobColumns);
% Crop it.
croppedImage = rgbImage(row1:row2, col1:col2, :);
% Display the cropped, enhanced color image.
subplot(2, 3, 6);
imshow(croppedImage);
axis on;
title(‘Cropped Color Image’, ‘FontSize’, fontSize, ‘Interpreter’, ‘None’);
imwrite(croppedImage, outfile)
end Hello. I want to ask. I want to crop my image data with specific area with a specific part of an image. And I want to use auto dynamic cropping method in matlab. I’m using ultrasound data. Why my crop image does not appear on the result? Here’s my codes and I attach with my image:
clc; % Clear the command window.
close all; % Close all figures (except those of imtool.)
clear; % Erase all existing variables. Or clearvars if you want.
workspace; % Make sure the workspace panel is showing.
format long g;
format compact;
fontSize = 20;
mypath = ‘/home/motmot/Documents/test/’;
dinfo = dir(fullfile(mypath,’*.jpg’));
filenames = fullfile({dinfo.folder}, {dinfo.name});
nfiles = length(filenames);
for K = 1 : nfiles
thisfile = filenames{K};
[folder, basename, ext] = fileparts(thisfile);
outfile = fullfile(folder, basename + "_crop" + ext);
I = imread(thisfile);
% Get the dimensions of the image. numberOfColorChannels should be = 3.
[rows, columns, numberOfColorChannels] = size(I);
% Display the original color image.
subplot(2, 3, 1);
imshow(I);
axis on;
hp = impixelinfo(); % Show x,y and RGB as you mouse around.
title(‘Original Color Image’, ‘FontSize’, fontSize, ‘Interpreter’, ‘None’);
% Take the red channel.
grayImage = I(:, :, 1);
% Erase the first 110 columns to get rid of the holes.
verticalProfile = mean(grayImage, 2);
for col = 1 : 110
grayImage(:, col) = verticalProfile;
end
% Run a texture filter on it.
stdImage = stdfilt(grayImage);
% Display the image.
subplot(2, 3, 2);
imshow(stdImage, []);
axis on;
title(‘Filtered Image’, ‘FontSize’, fontSize, ‘Interpreter’, ‘None’);
% Enlarge figure
set(gcf, ‘Units’, ‘Normalized’, ‘Outerposition’, [0.05, 0.1, .9, .80]);
% Let’s compute and display the histogram.
subplot(2, 3, 3);
histogram(stdImage, 500); % 500 bins.
grid on;
title(‘Histogram of Filtered image’, ‘FontSize’, fontSize, ‘Interpreter’, ‘None’);
xlabel(‘Gray Level’, ‘FontSize’, fontSize);
ylabel(‘Pixel Count’, ‘FontSize’, fontSize);
% Threshold the image.
binaryImage = stdImage > 5;
% Display the image.
subplot(2, 3, 4);
imshow(binaryImage);
axis on;
title(‘Binary Image’, ‘FontSize’, fontSize, ‘Interpreter’, ‘None’);
% % Get areas of blobs
% labeledImage = bwlabel(binaryImage);
% props = regionprops(labeledImage, ‘Area’);
% allAreas = sort([props.Area])
% subplot(2, 3, 5);
% histogram(allAreas); % Show histogram of blob areas.
% title(‘Blob Areas’, ‘FontSize’, fontSize, ‘Interpreter’, ‘None’);
% Get rid of small blobs.
binaryImage = bwareafilt(binaryImage, [70, inf]); % Keep only if 70 pixels or larger.
% Display the image.
subplot(2, 3, 5);
imshow(binaryImage);
axis on;
title(‘Cleaned Binary Image’, ‘FontSize’, fontSize, ‘Interpreter’, ‘None’);
% Find the bounding box.
[blobRows, blobColumns] = find(binaryImage);
row1 = min(blobRows);
row2 = max(blobRows);
col1 = min(blobColumns);
col2 = max(blobColumns);
% Crop it.
croppedImage = rgbImage(row1:row2, col1:col2, :);
% Display the cropped, enhanced color image.
subplot(2, 3, 6);
imshow(croppedImage);
axis on;
title(‘Cropped Color Image’, ‘FontSize’, fontSize, ‘Interpreter’, ‘None’);
imwrite(croppedImage, outfile)
end crop, dynamic MATLAB Answers — New Questions
Help, I need to know how to build a dataset. I have 7 txt file of bearing raw vibration generated. If can I need step by step. Already three days search.
Here attached with all raw vibration data mentioned above.Here attached with all raw vibration data mentioned above. Here attached with all raw vibration data mentioned above. dataset, data MATLAB Answers — New Questions
obtain the Impulse response from a frequency response
Hi everybody,
I need some help to get me started on this one:
I have a transfer function (a frequency response) that is generated by two datasets.
I need to convert this frequency response (FR) to the time domain (I guess by using the ifft function in Matlab) in order to obtain the impulse response (IR) and see how long it is in seconds.
What confuses me is if an impulse (IR) has N samples then the fft would have N/2+1 samples (please correct me if I am wrong). The rest of the samples in the FR are disregarded as they are symmetrical.
Now, if I have the FR I could go back to IR by ifft. But that would give me only N/2+1 samples. I need N for the impulse response. How do I deal with this?
Moreover, how can I determine the sampling frequency (fs) of my FR in order to calculate the duration of the IR in seconds?
My FR expands from 20 to 10000 Hz with a step of 20 Hz. Is it in this case that fs=20?
thank you for your patienceHi everybody,
I need some help to get me started on this one:
I have a transfer function (a frequency response) that is generated by two datasets.
I need to convert this frequency response (FR) to the time domain (I guess by using the ifft function in Matlab) in order to obtain the impulse response (IR) and see how long it is in seconds.
What confuses me is if an impulse (IR) has N samples then the fft would have N/2+1 samples (please correct me if I am wrong). The rest of the samples in the FR are disregarded as they are symmetrical.
Now, if I have the FR I could go back to IR by ifft. But that would give me only N/2+1 samples. I need N for the impulse response. How do I deal with this?
Moreover, how can I determine the sampling frequency (fs) of my FR in order to calculate the duration of the IR in seconds?
My FR expands from 20 to 10000 Hz with a step of 20 Hz. Is it in this case that fs=20?
thank you for your patience Hi everybody,
I need some help to get me started on this one:
I have a transfer function (a frequency response) that is generated by two datasets.
I need to convert this frequency response (FR) to the time domain (I guess by using the ifft function in Matlab) in order to obtain the impulse response (IR) and see how long it is in seconds.
What confuses me is if an impulse (IR) has N samples then the fft would have N/2+1 samples (please correct me if I am wrong). The rest of the samples in the FR are disregarded as they are symmetrical.
Now, if I have the FR I could go back to IR by ifft. But that would give me only N/2+1 samples. I need N for the impulse response. How do I deal with this?
Moreover, how can I determine the sampling frequency (fs) of my FR in order to calculate the duration of the IR in seconds?
My FR expands from 20 to 10000 Hz with a step of 20 Hz. Is it in this case that fs=20?
thank you for your patience impulse response MATLAB Answers — New Questions
Calculating sin and cos functions
Hello, i calculated the value of sin(45) in Matlab, the result was sin(45)=0.8509 and for cosin i got cos(45)= 0.5253. From general mathematics we know that sin(45)=cos(45) then why Matlab is giving different results??Hello, i calculated the value of sin(45) in Matlab, the result was sin(45)=0.8509 and for cosin i got cos(45)= 0.5253. From general mathematics we know that sin(45)=cos(45) then why Matlab is giving different results?? Hello, i calculated the value of sin(45) in Matlab, the result was sin(45)=0.8509 and for cosin i got cos(45)= 0.5253. From general mathematics we know that sin(45)=cos(45) then why Matlab is giving different results?? sine and cosine functions MATLAB Answers — New Questions
Create multi slopes from a profile
Hello there,
Is there a possible way to create some slopes within a profile? My case: I have a profile containing some group of values separated by nans. My intention is how to create slopes for each group. So, since there are some groups in the profile, there will be some slopes which corresponds to each group.
Please find attached mat file for the data.
CheersHello there,
Is there a possible way to create some slopes within a profile? My case: I have a profile containing some group of values separated by nans. My intention is how to create slopes for each group. So, since there are some groups in the profile, there will be some slopes which corresponds to each group.
Please find attached mat file for the data.
Cheers Hello there,
Is there a possible way to create some slopes within a profile? My case: I have a profile containing some group of values separated by nans. My intention is how to create slopes for each group. So, since there are some groups in the profile, there will be some slopes which corresponds to each group.
Please find attached mat file for the data.
Cheers slope, profiles, nan, multi slopes MATLAB Answers — New Questions
Rank value matrix from 3d Matrix
I have a 3d matrix of average global temperatures (0.5 degree lat/long) for 42 years (42×720×1440). For a given year (say year 42) I want to create a new matrix (720 × 1440) that ranks each lat/long pair based on the other 41 years. So if a lat/long pair is warmest, it will have a rank value of 1. If it’s coolest, it will have a rank value of 42. The resulting matrix will be 720 x 1440 matrix of values ranked from 1 to 42 based on the original matrix. Is there a simple way to take a given year from the original matrix to do this without looping?I have a 3d matrix of average global temperatures (0.5 degree lat/long) for 42 years (42×720×1440). For a given year (say year 42) I want to create a new matrix (720 × 1440) that ranks each lat/long pair based on the other 41 years. So if a lat/long pair is warmest, it will have a rank value of 1. If it’s coolest, it will have a rank value of 42. The resulting matrix will be 720 x 1440 matrix of values ranked from 1 to 42 based on the original matrix. Is there a simple way to take a given year from the original matrix to do this without looping? I have a 3d matrix of average global temperatures (0.5 degree lat/long) for 42 years (42×720×1440). For a given year (say year 42) I want to create a new matrix (720 × 1440) that ranks each lat/long pair based on the other 41 years. So if a lat/long pair is warmest, it will have a rank value of 1. If it’s coolest, it will have a rank value of 42. The resulting matrix will be 720 x 1440 matrix of values ranked from 1 to 42 based on the original matrix. Is there a simple way to take a given year from the original matrix to do this without looping? matrix, rank MATLAB Answers — New Questions
![Call [1-833-460-2030] to Download QuickBooks Tool Hub 2024](https://techcommunity.microsoft.com/t5/image/serverpage/image-id/578651iF4C79F6B4B086548/image-size/large?v=v2&px=999)
Call [1-833-460-2030] to Download QuickBooks Tool Hub 2024
Are you looking to enhance your QuickBooks experience and streamline your accounting processes? Look no further than the QuickBooks Tool Hub 2024. As one of the most powerful utilities offered by Intuit, the QuickBooks Tool Hub is designed to help users resolve common issues, optimize performance, and simplify troubleshooting tasks.
What is QuickBooks Tool Hub 2024?
The QuickBooks Tool Hub 2024 is an all-in-one solution that consolidates various tools and utilities to assist QuickBooks users in managing their software effectively. Whether you’re encountering errors, facing performance issues, or seeking guidance on specific tasks, the Tool Hub provides a centralized platform to address your needs swiftly and efficiently.
Key Features and Benefits:
Unified Interface: The Tool Hub offers a user-friendly interface that brings together a diverse range of tools and resources, eliminating the need to navigate through multiple menus and interfaces.
Diagnostic Tools: Diagnose and troubleshoot common QuickBooks errors and issues with ease using diagnostic tools such as QuickBooks File Doctor, QuickBooks Refresher, and QuickBooks Install Diagnostic Tool.
Repair Tools: Resolve software-related issues and restore functionality with built-in repair tools that can fix common installation problems, network issues, and data file corruption.
File Management: Manage and organize your QuickBooks company files effortlessly, with tools to create backups, restore data, and condense large files for optimal performance.
Update and Installation Assistance: Stay up-to-date with the latest QuickBooks releases and ensure smooth installations with tools that facilitate software updates and installations.
Technical Support Resources: Access a wealth of technical support resources, including FAQs, articles, and tutorials, to empower users with the knowledge and guidance needed to navigate QuickBooks effectively.
How to Download and Install QuickBooks Tool Hub 2024:
Downloading and installing the QuickBooks Tool Hub is a straightforward process:
Visit the official QuickBooks website or Intuit’s support portal to locate the QuickBooks Tool Hub download page.
Select the appropriate version of the Tool Hub for your operating system (Windows or Mac) and download the installation file to your computer.
Once the download is complete, double-click the installation file to launch the setup wizard.
Follow the on-screen instructions to complete the installation process. The Tool Hub will be installed on your computer, ready for immediate use.
Upon installation, launch the QuickBooks Tool Hub and explore its various tools and features to optimize your QuickBooks experience.
Conclusion:
In today’s fast-paced business environment, efficiency and productivity are paramount. The QuickBooks Tool Hub 2024 empowers users to overcome challenges, streamline workflows, and maximize the capabilities of their QuickBooks software. Whether you’re a small business owner, an accountant, or a financial professional, the Tool Hub serves as a valuable companion in your journey towards financial success. Download the QuickBooks Tool Hub 2024 today and unlock the full potential of your QuickBooks software.
Are you looking to enhance your QuickBooks experience and streamline your accounting processes? Look no further than the QuickBooks Tool Hub 2024. As one of the most powerful utilities offered by Intuit, the QuickBooks Tool Hub is designed to help users resolve common issues, optimize performance, and simplify troubleshooting tasks. What is QuickBooks Tool Hub 2024?The QuickBooks Tool Hub 2024 is an all-in-one solution that consolidates various tools and utilities to assist QuickBooks users in managing their software effectively. Whether you’re encountering errors, facing performance issues, or seeking guidance on specific tasks, the Tool Hub provides a centralized platform to address your needs swiftly and efficiently.Key Features and Benefits:Unified Interface: The Tool Hub offers a user-friendly interface that brings together a diverse range of tools and resources, eliminating the need to navigate through multiple menus and interfaces.Diagnostic Tools: Diagnose and troubleshoot common QuickBooks errors and issues with ease using diagnostic tools such as QuickBooks File Doctor, QuickBooks Refresher, and QuickBooks Install Diagnostic Tool.Repair Tools: Resolve software-related issues and restore functionality with built-in repair tools that can fix common installation problems, network issues, and data file corruption.File Management: Manage and organize your QuickBooks company files effortlessly, with tools to create backups, restore data, and condense large files for optimal performance.Update and Installation Assistance: Stay up-to-date with the latest QuickBooks releases and ensure smooth installations with tools that facilitate software updates and installations.Technical Support Resources: Access a wealth of technical support resources, including FAQs, articles, and tutorials, to empower users with the knowledge and guidance needed to navigate QuickBooks effectively.How to Download and Install QuickBooks Tool Hub 2024:Downloading and installing the QuickBooks Tool Hub is a straightforward process:Visit the official QuickBooks website or Intuit’s support portal to locate the QuickBooks Tool Hub download page.Select the appropriate version of the Tool Hub for your operating system (Windows or Mac) and download the installation file to your computer.Once the download is complete, double-click the installation file to launch the setup wizard.Follow the on-screen instructions to complete the installation process. The Tool Hub will be installed on your computer, ready for immediate use.Upon installation, launch the QuickBooks Tool Hub and explore its various tools and features to optimize your QuickBooks experience.Conclusion:In today’s fast-paced business environment, efficiency and productivity are paramount. The QuickBooks Tool Hub 2024 empowers users to overcome challenges, streamline workflows, and maximize the capabilities of their QuickBooks software. Whether you’re a small business owner, an accountant, or a financial professional, the Tool Hub serves as a valuable companion in your journey towards financial success. Download the QuickBooks Tool Hub 2024 today and unlock the full potential of your QuickBooks software. Read More
Outlook stopped downloading POP messages after update
Microsoft® Outlook® 2019 MSO (Version 2403 Build 16.0.17425.20176) 32-bit
My desktop outlook has changed and no longer download emails from non Microsoft POP accounts. This started on 7/5/2024. I have several POP accounts from different providers and they are all showing mail in their providers sites so the issue is with Outlook.
I also noticed in the outlook search bar “0w” in html brackets has appeared so I suspect it is another poor update.
I have two options. Fix it by the end of the week or abandon outlook altogether.
Any ideas?
thanks
jc
Microsoft® Outlook® 2019 MSO (Version 2403 Build 16.0.17425.20176) 32-bit My desktop outlook has changed and no longer download emails from non Microsoft POP accounts. This started on 7/5/2024. I have several POP accounts from different providers and they are all showing mail in their providers sites so the issue is with Outlook.I also noticed in the outlook search bar “0w” in html brackets has appeared so I suspect it is another poor update.I have two options. Fix it by the end of the week or abandon outlook altogether.Any ideas? thanks jc Read More
How to repair the drive from a drive failure in Windows 10 Storage Spaces
I have 4X 1TB drives configured as RAID 1. I assumed that meant that a copy of the data was also stored on the other drives since only 2TB of the 4TB is available. I found the failing drive and replaced it.I’m unable to remove the drive from the pool even though it’s physically uninstalled. All 4 HD’s (3 original, one new) show up as OK in Storage Spaces. I don’t see the pool in Explorer.
What’s the point of RAID if all your data is lost every time there’s a failure. The is the 2nd time I’ve had a SS failure. First time I just said good bye to all the data, reformatted everything and started over.
I have 4X 1TB drives configured as RAID 1. I assumed that meant that a copy of the data was also stored on the other drives since only 2TB of the 4TB is available. I found the failing drive and replaced it.I’m unable to remove the drive from the pool even though it’s physically uninstalled. All 4 HD’s (3 original, one new) show up as OK in Storage Spaces. I don’t see the pool in Explorer. What’s the point of RAID if all your data is lost every time there’s a failure. The is the 2nd time I’ve had a SS failure. First time I just said good bye to all the data, reformatted everything and started over. Read More
Dial +1-833-460-2030 to Download QuickBooks Tool Hub 2024
In the ever-evolving landscape of financial management software, QuickBooks stands out as a trusted ally for businesses of all sizes. Its intuitive interface and robust features streamline bookkeeping tasks, allowing entrepreneurs to focus on what truly matters: growing their ventures. To further enhance the user experience and address common issues efficiently, Intuit introduces QuickBooks Tool Hub 2024.
What is QuickBooks Tool Hub?
QuickBooks Tool Hub is a comprehensive solution designed to troubleshoot various QuickBooks errors and issues. It consolidates several diagnostic tools and utilities into a single, easy-to-use application, empowering users to resolve problems swiftly and effectively. Whether you’re encountering installation errors, company file issues, or connectivity problems, QuickBooks Tool Hub provides the necessary resources to diagnose and fix them promptly.
Key Features of QuickBooks Tool Hub 2024
1. Centralized Dashboard
QuickBooks Tool Hub offers a centralized dashboard where users can access all diagnostic tools and resources conveniently. With a user-friendly interface, navigating through the application is effortless, even for those with limited technical expertise.
2. Diagnostic Tools
From QuickBooks File Doctor to QuickBooks Install Diagnostic Tool, QuickBooks Tool Hub includes a range of diagnostic utilities tailored to address specific issues. Whether it’s repairing damaged company files or troubleshooting network connectivity, these tools simplify the troubleshooting process and minimize downtime.
3. Quick Solutions
Time is of the essence in business, and QuickBooks Tool Hub recognizes that. It provides quick solutions to common problems, allowing users to resolve issues with minimal disruption to their workflow. With just a few clicks, users can tackle issues head-on and get back to managing their finances seamlessly.
4. Seamless Integration
QuickBooks Tool Hub seamlessly integrates with existing QuickBooks applications, ensuring compatibility and ease of use. Whether you’re using QuickBooks Desktop or QuickBooks Online, QuickBooks Tool Hub complements your existing toolkit, enhancing its capabilities and addressing potential pain points.
How to Download QuickBooks Tool Hub 2024
Downloading QuickBooks Tool Hub 2024 is a straightforward process:
Visit the official Intuit website or the QuickBooks support page.Navigate to the Downloads section and locate QuickBooks Tool Hub 2024.Click on the download link and follow the on-screen instructions to complete the installation process.Once installed, launch QuickBooks Tool Hub and explore its features and capabilities.
Conclusion
In an era where efficiency and reliability are paramount, QuickBooks Tool Hub 2024 emerges as a valuable asset for businesses seeking seamless financial management solutions. By providing a comprehensive toolkit for diagnosing and resolving QuickBooks issues, it empowers users to overcome challenges quickly and stay focused on their entrepreneurial endeavors. With QuickBooks Tool Hub 2024 at your disposal, navigating the complexities of financial management becomes a breeze, enabling you to unlock your full potential and achieve success with confidence.
In the ever-evolving landscape of financial management software, QuickBooks stands out as a trusted ally for businesses of all sizes. Its intuitive interface and robust features streamline bookkeeping tasks, allowing entrepreneurs to focus on what truly matters: growing their ventures. To further enhance the user experience and address common issues efficiently, Intuit introduces QuickBooks Tool Hub 2024. What is QuickBooks Tool Hub?QuickBooks Tool Hub is a comprehensive solution designed to troubleshoot various QuickBooks errors and issues. It consolidates several diagnostic tools and utilities into a single, easy-to-use application, empowering users to resolve problems swiftly and effectively. Whether you’re encountering installation errors, company file issues, or connectivity problems, QuickBooks Tool Hub provides the necessary resources to diagnose and fix them promptly.Key Features of QuickBooks Tool Hub 20241. Centralized DashboardQuickBooks Tool Hub offers a centralized dashboard where users can access all diagnostic tools and resources conveniently. With a user-friendly interface, navigating through the application is effortless, even for those with limited technical expertise.2. Diagnostic ToolsFrom QuickBooks File Doctor to QuickBooks Install Diagnostic Tool, QuickBooks Tool Hub includes a range of diagnostic utilities tailored to address specific issues. Whether it’s repairing damaged company files or troubleshooting network connectivity, these tools simplify the troubleshooting process and minimize downtime.3. Quick SolutionsTime is of the essence in business, and QuickBooks Tool Hub recognizes that. It provides quick solutions to common problems, allowing users to resolve issues with minimal disruption to their workflow. With just a few clicks, users can tackle issues head-on and get back to managing their finances seamlessly.4. Seamless IntegrationQuickBooks Tool Hub seamlessly integrates with existing QuickBooks applications, ensuring compatibility and ease of use. Whether you’re using QuickBooks Desktop or QuickBooks Online, QuickBooks Tool Hub complements your existing toolkit, enhancing its capabilities and addressing potential pain points.How to Download QuickBooks Tool Hub 2024Downloading QuickBooks Tool Hub 2024 is a straightforward process:Visit the official Intuit website or the QuickBooks support page.Navigate to the Downloads section and locate QuickBooks Tool Hub 2024.Click on the download link and follow the on-screen instructions to complete the installation process.Once installed, launch QuickBooks Tool Hub and explore its features and capabilities.ConclusionIn an era where efficiency and reliability are paramount, QuickBooks Tool Hub 2024 emerges as a valuable asset for businesses seeking seamless financial management solutions. By providing a comprehensive toolkit for diagnosing and resolving QuickBooks issues, it empowers users to overcome challenges quickly and stay focused on their entrepreneurial endeavors. With QuickBooks Tool Hub 2024 at your disposal, navigating the complexities of financial management becomes a breeze, enabling you to unlock your full potential and achieve success with confidence. Read More
Why is there no location/office attribute in an AAD device properties?
Hey all,
we are using intune for some time now, and right now we think about optimizing how to put the location/office information to an Azure only device, because we want to use dynamic groups and group devices to an office/location. And Im kinda curious what you guys use for that, since there is no location/office attribute on an AAD/entra device (which I dont understand…)
So are you using device categories for that, or do you work with hundreds of different group tags? Or do you name every device different and use location shortcuts in the name?
Right now we dont have an inventory system or ticket system so im stuck with the intune / azure native options.
Would like to hear how you approach this, thank you
Hey all, we are using intune for some time now, and right now we think about optimizing how to put the location/office information to an Azure only device, because we want to use dynamic groups and group devices to an office/location. And Im kinda curious what you guys use for that, since there is no location/office attribute on an AAD/entra device (which I dont understand…)So are you using device categories for that, or do you work with hundreds of different group tags? Or do you name every device different and use location shortcuts in the name? Right now we dont have an inventory system or ticket system so im stuck with the intune / azure native options. Would like to hear how you approach this, thank you Read More
Why Windows 11 keeps booting into recovery mode when there’s an update?
Every time my Windows 11 needs an update, it fails and I have to go through recovery and repair. I’ve got plenty of space and I’ve already fixed it once before, but whenever there’s an update, it just goes back to square one. The last recovery worked fine, but now it’s acting up again. Any ideas how to fix this?
Every time my Windows 11 needs an update, it fails and I have to go through recovery and repair. I’ve got plenty of space and I’ve already fixed it once before, but whenever there’s an update, it just goes back to square one. The last recovery worked fine, but now it’s acting up again. Any ideas how to fix this? Read More

Automatic Memory Fit for Java Apps in Azure Container Apps
Introduction
Containerization has become the prevailing choice for hosting and managing Java applications, due to its unmatched portability, consistency, and scalability benefits. However, by default, when running a Java app inside containers, the JVM assumes that the OS memory is shared among multiple applications, so it conservatively claims memory for the Java application.
With Azure Container Apps, we can optimize memory allocation by simply dedicating more memory to the Java app, since only one Java application can run inside a container. This feature is called automatic memory fit, which is enabled by default when you deploy from Java source code or artifact.
In this blog we’ll cover the following:
Highlight Java memory management terms and concepts
Discuss how automatic memory fit works
Provide a benchmark comparison from before and after with the Java app memory fit
Java memory regions and JVM default settings
Heap memory
The Java heap is the working memory for dynamically allocating and managing objects during the running of an application. By default, when running an app in a container, the JVM reserves only a small portion of OS memory for the heap. This results in both low utilization of resources and low application performance because the JVM is busy with frequent garbage collection events.
Non-heap memory
Non-heap memory refers to memory that the JVM allocates for purposes other than running user apps. Non-heap memory consists of memory in the metaspace, code cache, direct memory, and stack memory.
Metaspace
Metaspace is a non-heap memory region for class metadata, constant pool information, and method bytecode. Unlike heap memory, it has no limit by default and can grow dynamically, which means if you don’t reserve enough memory for metaspace, it competes with other regions while running in an environment that has limited resources.
Code cache
As the Java application runs, the code (or more precisely, the bytecode) is interpreted or compiled to native code based on the compiler’s optimization level. A CPU can directly execute the cached native code, so it doesn’t need to interpret or compile again. By default, this space has a soft limit of 240 MB.
Thread stack
Stack memory is allocated during thread execution for short-lived values and references to the object in the heap. For each thread, this space is 1 MB in size by default, and is collected after the thread ends.
Direct memory
Direct buffer memory is allocated outside the Java heap. It represents the operating system’s native memory used by the JVM process. Direct buffers are used by Java I/O frameworks, such as Netty, for processing the data from network or disk I/O. By default, Java has 10 MB for this space.
Automatic memory fitting
Automatic memory fitting tries to make the best use of the container memory available for Java applications and enhances their performance by minimizing garbage collection. Here are the principles we apply to accomplish these objectives:
Within the container, reserve as much memory as possible for the JVM.
Within the JVM, reserve enough memory for non-heap regions, and give the rest to the heap.
We use the following methods to determine the amount of memory to allocate for the non-heap memory:
Memory Region
JVM Flag
Value
Metaspace
-XX:MaxMetaspaceSize
(JVM class count + application class count + agent class count + adjustment count(by default 0))
* class load factor * average class file size + Overhead
CodeCache
-XX:ReservedCodeCacheSize
240M
Direct Memory
-XX:MaxDirectMemorySize
10M
Stack
-Xss
1M * Thread Count (by default 250)
Because non-heap memory = Metaspace + CodeCache + Direct Memory + Stack size x Thread Count, this leaves the remaining memory for user apps (heap memory).
Heap memory = container memory limit – non-heap memory – headroom
You can change the size of headroom, which is 0 by default, to save more memory for the system when needed. Set BPL_JVM_HEAD_ROOM in an environment variable to define headroom as a percentage of total memory space.
To observe how automatic memory fit works, open the log stream from Azure Container Apps and look at the application startup part.
Benchmark comparison
To check the results of memory fitting, we performed load tests on the Spring petclinic project. We have changed petclinic so that it sends back random values and adds them to petclinic data. This lets us create unique values and trigger garbage collection.
The baseline image we used for comparison is a container app with 1 CPU and 2GB memory. It was built with Maven and a handwritten Dockerfile without any JVM memory options specified.
FROM mcr.microsoft.com/openjdk/jdk:17-ubuntu
WORKDIR /app
COPY target/spring-petclinic-*.jar spring-petclinic.jar
ENTRYPOINT [“java”, “-jar”, “/app/spring-petclinic.jar”]
The test subject consists of an app also with 1 CPU and 2GB memory. We deployed it to Azure Container Apps from Jar without any JVM memory options specified.
Results
In short, we saw 2.4x lower GC, 18% faster response time and 30% higher throughput when compared with and without automatic memory fit. Here are some detailed performance metrics.
Working set memory
GC count
Response time and throughput
For enabling/disabling and changing runtime settings, refer to automatic memory fitting in documentation.
To report a problem, ask a question, or share your feedback, please open an issue on Azure Container Apps GitHub.
Microsoft Tech Community – Latest Blogs –Read More
How To Fix QuickBooks Payroll Direct Deposit Not Working After Windows Update
Troubleshooting Solutions: QuickBooks Payroll Direct Deposit Not Working
QB users encountering QuickBooks Payroll Direct Deposit Not Working issues post-Windows update may find resolution through several troubleshooting steps:
Check QuickBooks Version Compatibility: Ensure QuickBooks and its payroll service are compatible with the updated Windows version. QuickBooks regularly releases updates to maintain compatibility with Windows updates. Navigate to the QuickBooks support website to download the latest version if necessary.
Verify Direct Deposit Settings: Review direct deposit settings within QuickBooks Payroll to confirm accuracy. Ensure that bank account information, employee details, and payroll schedules are correct. Any discrepancies can lead to direct deposit failures.
Review Windows Update Impact: Examine the recent Windows update’s impact on system settings and configurations. Changes in firewall settings, security protocols, or system permissions might affect QuickBooks’ ability to process direct deposits. Revert any relevant changes made during the update process if deemed necessary.
Update QuickBooks Payroll Tax Table: Refresh QuickBooks Payroll tax tables to align with the latest payroll regulations and tax rates. Outdated tax tables could disrupt direct deposit processing, leading to errors or failures. Access the ‘Employees’ menu in QuickBooks, select ‘Get Payroll Updates,’ and follow the prompts to update tax tables.
Run QuickBooks Diagnostic Tool: Utilize QuickBooks Diagnostic Tool to identify and resolve potential software issues. The tool scans QuickBooks files and configurations for errors, providing recommendations for rectification. Download and run the tool from the QuickBooks support website, following on-screen instructions.
Disable Third-Party Security Software: Temporarily disable third-party antivirus or security software to rule out conflicts with QuickBooks. Sometimes, security programs may inadvertently block QuickBooks processes, including direct deposit transactions. Re-enable security software after troubleshooting to maintain system protection.
Restart QuickBooks Database Server Manager: Restart the QuickBooks Database Server Manager to refresh connections and configurations. Access the ‘Services’ application through the Windows Start menu, locate ‘QuickBooksDBXX’ (XX denotes version), right-click, and select ‘Restart.’ Verify if direct deposit functionality is restored post-restart.
Reauthorize Direct Deposit Authorization: Reauthorize direct deposit authorization with the bank to ensure seamless transactions. Contact the bank associated with the QuickBooks direct deposit account and verify authorization status. Update any necessary permissions or reestablish connections as needed.
Perform System Restore: Consider performing a system restore to revert Windows settings to a previous state before the update. System restore can undo recent changes that may have contributed to QuickBooks Payroll direct deposit issues. Access ‘System Restore’ through the Control Panel and follow on-screen instructions.
Contact QuickBooks Support: If troubleshooting steps fail to resolve the issue, contact QuickBooks support for further assistance. QuickBooks representatives can provide personalized guidance and technical support tailored to specific user scenarios. Be prepared to provide detailed information about the issue and steps taken for efficient resolution.
By implementing these troubleshooting solutions, users can address QuickBooks Payroll Direct Deposit Not Working issues following a Windows update, ensuring seamless payroll processing and employee payments.
Troubleshooting Solutions: QuickBooks Payroll Direct Deposit Not Working QB users encountering QuickBooks Payroll Direct Deposit Not Working issues post-Windows update may find resolution through several troubleshooting steps: Check QuickBooks Version Compatibility: Ensure QuickBooks and its payroll service are compatible with the updated Windows version. QuickBooks regularly releases updates to maintain compatibility with Windows updates. Navigate to the QuickBooks support website to download the latest version if necessary.Verify Direct Deposit Settings: Review direct deposit settings within QuickBooks Payroll to confirm accuracy. Ensure that bank account information, employee details, and payroll schedules are correct. Any discrepancies can lead to direct deposit failures.Review Windows Update Impact: Examine the recent Windows update’s impact on system settings and configurations. Changes in firewall settings, security protocols, or system permissions might affect QuickBooks’ ability to process direct deposits. Revert any relevant changes made during the update process if deemed necessary.Update QuickBooks Payroll Tax Table: Refresh QuickBooks Payroll tax tables to align with the latest payroll regulations and tax rates. Outdated tax tables could disrupt direct deposit processing, leading to errors or failures. Access the ‘Employees’ menu in QuickBooks, select ‘Get Payroll Updates,’ and follow the prompts to update tax tables.Run QuickBooks Diagnostic Tool: Utilize QuickBooks Diagnostic Tool to identify and resolve potential software issues. The tool scans QuickBooks files and configurations for errors, providing recommendations for rectification. Download and run the tool from the QuickBooks support website, following on-screen instructions.Disable Third-Party Security Software: Temporarily disable third-party antivirus or security software to rule out conflicts with QuickBooks. Sometimes, security programs may inadvertently block QuickBooks processes, including direct deposit transactions. Re-enable security software after troubleshooting to maintain system protection.Restart QuickBooks Database Server Manager: Restart the QuickBooks Database Server Manager to refresh connections and configurations. Access the ‘Services’ application through the Windows Start menu, locate ‘QuickBooksDBXX’ (XX denotes version), right-click, and select ‘Restart.’ Verify if direct deposit functionality is restored post-restart.Reauthorize Direct Deposit Authorization: Reauthorize direct deposit authorization with the bank to ensure seamless transactions. Contact the bank associated with the QuickBooks direct deposit account and verify authorization status. Update any necessary permissions or reestablish connections as needed.Perform System Restore: Consider performing a system restore to revert Windows settings to a previous state before the update. System restore can undo recent changes that may have contributed to QuickBooks Payroll direct deposit issues. Access ‘System Restore’ through the Control Panel and follow on-screen instructions.Contact QuickBooks Support: If troubleshooting steps fail to resolve the issue, contact QuickBooks support for further assistance. QuickBooks representatives can provide personalized guidance and technical support tailored to specific user scenarios. Be prepared to provide detailed information about the issue and steps taken for efficient resolution.By implementing these troubleshooting solutions, users can address QuickBooks Payroll Direct Deposit Not Working issues following a Windows update, ensuring seamless payroll processing and employee payments. Read More
MS Defender on Alma Linux 9 is not reporting back details to the portal dashboard
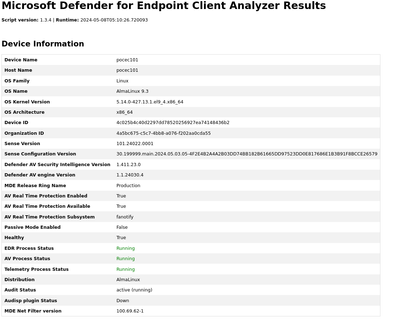
MS Defender is working fine on Ubuntu; It appears to be running find on AlmaLinux 9.3 but the dashboard doesn’t have any details besides the OS version. The connectivity test results appear to be fine. test results say
Audisp plugin Status Down
and mdatp log view has the output:
[1129][140239028782656][2024-05-07 04:55:59.718079 UTC][error]: [{user}]: Couldn’t connect to kernel extension, Make sure kernel extension is allowed
The release notes in Feb 2024 indicate some issue with the dashboard for Alma and Rocky, but I can’t tell if that has been remediated with the newer version or not.
MS Defender is working fine on Ubuntu; It appears to be running find on AlmaLinux 9.3 but the dashboard doesn’t have any details besides the OS version. The connectivity test results appear to be fine. test results say Audisp plugin Status Down and mdatp log view has the output:[1129][140239028782656][2024-05-07 04:55:59.718079 UTC][error]: [{user}]: Couldn’t connect to kernel extension, Make sure kernel extension is allowed The release notes in Feb 2024 indicate some issue with the dashboard for Alma and Rocky, but I can’t tell if that has been remediated with the newer version or not. Read More
How to highlight app icon when open a deep link to Teams app static tab by adaptive card
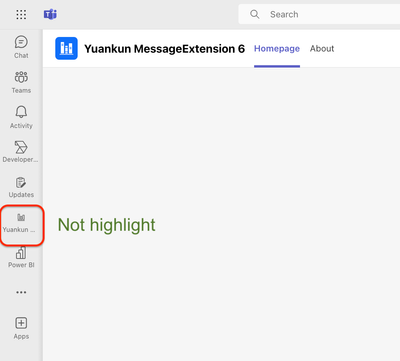
Using the adaptive card to open a deep link to Teams app static tab by following https://learn.microsoft.com/en-us/microsoftteams/platform/concepts/build-and-test/deep-links-execution-handling?tabs=teamsjs-v2#adaptive-card,
Open Teams app tab successfully, but the app icon on the left sidebar is not highlighted.
The deep link is like:
But I found other Teams app like PowerBI, can highlight the app icon by open deeplick of adaptive card, how to do it?
Using the adaptive card to open a deep link to Teams app static tab by following https://learn.microsoft.com/en-us/microsoftteams/platform/concepts/build-and-test/deep-links-execution-handling?tabs=teamsjs-v2#adaptive-card, Open Teams app tab successfully, but the app icon on the left sidebar is not highlighted.The deep link is like: https://teams.microsoft.com/l/entity/${appid}/${entityId}?webUrl=${contentUrl}&context=${context} But I found other Teams app like PowerBI, can highlight the app icon by open deeplick of adaptive card, how to do it? Read More
Super Low FPS on My Laptop After factory reset
I used to get 120 fps on my games, and especially modded Minecraft, and recently I reset my pc and when I went back to play my games the fps wouldn’t go above 20 fps, I remember when i first got the pc I had an online friend to help me with changing some settings, but I’m no longer in contact with them and I don’t know what to do, any help is appreciated
I used to get 120 fps on my games, and especially modded Minecraft, and recently I reset my pc and when I went back to play my games the fps wouldn’t go above 20 fps, I remember when i first got the pc I had an online friend to help me with changing some settings, but I’m no longer in contact with them and I don’t know what to do, any help is appreciated Read More

Why QuickBooks Not Letting Me Update Payroll Window 10?
Troubleshooting Solutions: QuickBooks Not Letting Me Update Payroll
QB users facing challenges QuickBooks Not Letting Me Update Payroll on Windows 10 may find resolution through the following troubleshooting steps:
Check Internet Connectivity: Ensure stable internet connectivity to facilitate the update process. Unstable or slow internet connections can impede QuickBooks’ ability to download and install updates. Switch to a reliable network or troubleshoot internet issues before proceeding with the update.
Verify QuickBooks Version: Confirm that the installed QuickBooks version is compatible with Windows 10. Outdated QuickBooks versions may lack support for Windows 10 updates, resulting in compatibility issues. Upgrade to the latest QuickBooks version compatible with Windows 10 to resolve potential update restrictions.
Run QuickBooks as Administrator: Execute QuickBooks with administrative privileges to bypass potential permission restrictions hindering the update process. Right-click the QuickBooks shortcut or executable file, select ‘Run as administrator,’ and proceed with updating payroll. Elevated privileges can override certain limitations imposed by Windows 10.
Disable User Account Control (UAC): Temporarily disable User Account Control (UAC) settings to prevent interference with QuickBooks update procedures. Access ‘Control Panel’ > ‘User Accounts’ > ‘Change User Account Control settings,’ and adjust the slider to ‘Never Notify.’ Restart the system and attempt updating QuickBooks Payroll again.
Clear QuickBooks Cache: Clear QuickBooks cache to eliminate potential data conflicts obstructing the update process. Navigate to the ‘Edit’ menu within QuickBooks, select ‘Preferences,’ followed by ‘Desktop View,’ and click ‘Clear Cache.’ Restart QuickBooks and retry updating payroll to observe if the issue persists.
Install Windows Updates: Install pending Windows updates to address underlying system vulnerabilities or compatibility issues impacting QuickBooks functionality. Access ‘Settings’ > ‘Update & Security’ > ‘Windows Update’ and install available updates. Reboot the system after installing updates and attempt updating QuickBooks Payroll anew.
Update QuickBooks Desktop: Ensure QuickBooks Desktop software is up-to-date to leverage the latest features and bug fixes. Access the ‘Help’ menu within QuickBooks, select ‘Update QuickBooks Desktop,’ and follow on-screen instructions to download and install updates. Updated software versions may resolve update-related issues on Windows 10.
Repair QuickBooks Installation: Initiate a repair of the QuickBooks installation to rectify corrupted program files or configurations hindering the update process. Access ‘Control Panel’ > ‘Programs’ > ‘Programs and Features,’ locate QuickBooks in the list, and select ‘Repair.’ Follow prompts to complete the repair process and retry updating payroll.
Check Firewall and Antivirus Settings: Review firewall and antivirus settings to ensure QuickBooks update processes are not being blocked. Add QuickBooks executable files to the firewall or antivirus whitelist to exempt them from security scans or network restrictions. Disable firewall or antivirus temporarily during the update process, if necessary.
Contact QuickBooks Support: If troubleshooting efforts yield no resolution, contact QuickBooks support for personalized assistance. QuickBooks specialists can diagnose the issue and provide tailored solutions to address update restrictions on Windows 10 systems. Be prepared to provide detailed information about the encountered error messages or symptoms for efficient troubleshooting.
Implementing these troubleshooting solutions can help users overcome QuickBooks Not Letting Me Update Payroll on Windows 10, facilitating seamless payroll management and software maintenance.
Troubleshooting Solutions: QuickBooks Not Letting Me Update Payroll QB users facing challenges QuickBooks Not Letting Me Update Payroll on Windows 10 may find resolution through the following troubleshooting steps: Check Internet Connectivity: Ensure stable internet connectivity to facilitate the update process. Unstable or slow internet connections can impede QuickBooks’ ability to download and install updates. Switch to a reliable network or troubleshoot internet issues before proceeding with the update.Verify QuickBooks Version: Confirm that the installed QuickBooks version is compatible with Windows 10. Outdated QuickBooks versions may lack support for Windows 10 updates, resulting in compatibility issues. Upgrade to the latest QuickBooks version compatible with Windows 10 to resolve potential update restrictions.Run QuickBooks as Administrator: Execute QuickBooks with administrative privileges to bypass potential permission restrictions hindering the update process. Right-click the QuickBooks shortcut or executable file, select ‘Run as administrator,’ and proceed with updating payroll. Elevated privileges can override certain limitations imposed by Windows 10.Disable User Account Control (UAC): Temporarily disable User Account Control (UAC) settings to prevent interference with QuickBooks update procedures. Access ‘Control Panel’ > ‘User Accounts’ > ‘Change User Account Control settings,’ and adjust the slider to ‘Never Notify.’ Restart the system and attempt updating QuickBooks Payroll again.Clear QuickBooks Cache: Clear QuickBooks cache to eliminate potential data conflicts obstructing the update process. Navigate to the ‘Edit’ menu within QuickBooks, select ‘Preferences,’ followed by ‘Desktop View,’ and click ‘Clear Cache.’ Restart QuickBooks and retry updating payroll to observe if the issue persists.Install Windows Updates: Install pending Windows updates to address underlying system vulnerabilities or compatibility issues impacting QuickBooks functionality. Access ‘Settings’ > ‘Update & Security’ > ‘Windows Update’ and install available updates. Reboot the system after installing updates and attempt updating QuickBooks Payroll anew.Update QuickBooks Desktop: Ensure QuickBooks Desktop software is up-to-date to leverage the latest features and bug fixes. Access the ‘Help’ menu within QuickBooks, select ‘Update QuickBooks Desktop,’ and follow on-screen instructions to download and install updates. Updated software versions may resolve update-related issues on Windows 10.Repair QuickBooks Installation: Initiate a repair of the QuickBooks installation to rectify corrupted program files or configurations hindering the update process. Access ‘Control Panel’ > ‘Programs’ > ‘Programs and Features,’ locate QuickBooks in the list, and select ‘Repair.’ Follow prompts to complete the repair process and retry updating payroll.Check Firewall and Antivirus Settings: Review firewall and antivirus settings to ensure QuickBooks update processes are not being blocked. Add QuickBooks executable files to the firewall or antivirus whitelist to exempt them from security scans or network restrictions. Disable firewall or antivirus temporarily during the update process, if necessary.Contact QuickBooks Support: If troubleshooting efforts yield no resolution, contact QuickBooks support for personalized assistance. QuickBooks specialists can diagnose the issue and provide tailored solutions to address update restrictions on Windows 10 systems. Be prepared to provide detailed information about the encountered error messages or symptoms for efficient troubleshooting.Implementing these troubleshooting solutions can help users overcome QuickBooks Not Letting Me Update Payroll on Windows 10, facilitating seamless payroll management and software maintenance. Read More


