

Category: News
If Else problem Valid_date code.
Write a function called valid_date that takes three positive integer scalar inputs year, month, day. If these three represent a valid date, return a logical true, otherwise false. The name of the output argument is valid. If any of the inputs is not a positive integer scalar, return false as well. Note that every year that is exactly divisible by 4 is a leap year, except for years that are exactly divisible by 100. However, years that are exactly divisible by 400 are also leap years. For example, the year 1900 was not leap year, but the year 2000 was. Note that your solution must not contain any of the date related built-in MATLAB functions.
So ive seen other peoples code and ive been trying to get it on my own but to no luck fails all test but non-scalar and random non-leap years
function [valid] = valid_date(year, month, day);
leap_year = false;
valid = true;
if nargin ~= 3
valid = false;
else
end
if isscalar(year) && isscalar(month) && isscalar(day)
%%if isinteger(year) && isinteger(month) && isinteger(day)
if (year>=0) && (13>month>0) && (32>day>0)
%%fix(year), fix(month), fix(day)
if month == 2 && day == 29
leap_year = true;
elseif rem(year,400) == 0
leap_year = true;
elseif rem(year,4) == 0 && rem(year,100) ~= 0
leap_year = true;
else
leap_year = false;
end
if month ~= 1 || month ~= 3 || month ~= 5 || month ~= 7 || month ~= 9 month ~= 12 && day == 31
valid = false;
elseif month == 2 && day > 29
valid = false;
end
else
valid = false;
end
else
valid = false;
endWrite a function called valid_date that takes three positive integer scalar inputs year, month, day. If these three represent a valid date, return a logical true, otherwise false. The name of the output argument is valid. If any of the inputs is not a positive integer scalar, return false as well. Note that every year that is exactly divisible by 4 is a leap year, except for years that are exactly divisible by 100. However, years that are exactly divisible by 400 are also leap years. For example, the year 1900 was not leap year, but the year 2000 was. Note that your solution must not contain any of the date related built-in MATLAB functions.
So ive seen other peoples code and ive been trying to get it on my own but to no luck fails all test but non-scalar and random non-leap years
function [valid] = valid_date(year, month, day);
leap_year = false;
valid = true;
if nargin ~= 3
valid = false;
else
end
if isscalar(year) && isscalar(month) && isscalar(day)
%%if isinteger(year) && isinteger(month) && isinteger(day)
if (year>=0) && (13>month>0) && (32>day>0)
%%fix(year), fix(month), fix(day)
if month == 2 && day == 29
leap_year = true;
elseif rem(year,400) == 0
leap_year = true;
elseif rem(year,4) == 0 && rem(year,100) ~= 0
leap_year = true;
else
leap_year = false;
end
if month ~= 1 || month ~= 3 || month ~= 5 || month ~= 7 || month ~= 9 month ~= 12 && day == 31
valid = false;
elseif month == 2 && day > 29
valid = false;
end
else
valid = false;
end
else
valid = false;
end Write a function called valid_date that takes three positive integer scalar inputs year, month, day. If these three represent a valid date, return a logical true, otherwise false. The name of the output argument is valid. If any of the inputs is not a positive integer scalar, return false as well. Note that every year that is exactly divisible by 4 is a leap year, except for years that are exactly divisible by 100. However, years that are exactly divisible by 400 are also leap years. For example, the year 1900 was not leap year, but the year 2000 was. Note that your solution must not contain any of the date related built-in MATLAB functions.
So ive seen other peoples code and ive been trying to get it on my own but to no luck fails all test but non-scalar and random non-leap years
function [valid] = valid_date(year, month, day);
leap_year = false;
valid = true;
if nargin ~= 3
valid = false;
else
end
if isscalar(year) && isscalar(month) && isscalar(day)
%%if isinteger(year) && isinteger(month) && isinteger(day)
if (year>=0) && (13>month>0) && (32>day>0)
%%fix(year), fix(month), fix(day)
if month == 2 && day == 29
leap_year = true;
elseif rem(year,400) == 0
leap_year = true;
elseif rem(year,4) == 0 && rem(year,100) ~= 0
leap_year = true;
else
leap_year = false;
end
if month ~= 1 || month ~= 3 || month ~= 5 || month ~= 7 || month ~= 9 month ~= 12 && day == 31
valid = false;
elseif month == 2 && day > 29
valid = false;
end
else
valid = false;
end
else
valid = false;
end if statement MATLAB Answers — New Questions
Sharepoint document conversion
So, our client wants to use Sharepoint to organize and store their files in a centralized location. This wouldn’t be incredibly difficult but they also want every file to be converted to a .pdf. This means any .doc, .docx, .txt. and even .xlsx files.
We were looking at a tool inside of Sharepoint called PowerAutomate and I was wondering if anyone found success using that app to convert files — or if anyone has a better suggestion on how to accomplish this.
Thanks so much in advance!
So, our client wants to use Sharepoint to organize and store their files in a centralized location. This wouldn’t be incredibly difficult but they also want every file to be converted to a .pdf. This means any .doc, .docx, .txt. and even .xlsx files.We were looking at a tool inside of Sharepoint called PowerAutomate and I was wondering if anyone found success using that app to convert files — or if anyone has a better suggestion on how to accomplish this.Thanks so much in advance! Read More
Excell Color Formula Help
Hello!
I am trying to add some color-based formatting to an excel sheet. The goal is to have all dates be yellow until 7 days after the date I have inputted. Then I would like them to turn green.
I am running into some problems as some of the dates being inputted are for the future and I cannot seem to find a good excel formula or formatting solution to fix this!
Appreciate any help as I am new to excel!
Thanks!
Hello! I am trying to add some color-based formatting to an excel sheet. The goal is to have all dates be yellow until 7 days after the date I have inputted. Then I would like them to turn green. I am running into some problems as some of the dates being inputted are for the future and I cannot seem to find a good excel formula or formatting solution to fix this!Appreciate any help as I am new to excel! Thanks! Read More

New banner with Canary
Hello
Recently with Canary, I have a banner that appeared with the indication “you’ll need to add a Microsoft API key to your app, website or server“
When I click on the “Learn more…. “button to find out more, I get an error message on the new page => permanently-removed.invalid’s server IP address could not be found..
It’s what ??
Thanks
Hello Recently with Canary, I have a banner that appeared with the indication “you’ll need to add a Microsoft API key to your app, website or server” When I click on the “Learn more…. “button to find out more, I get an error message on the new page => permanently-removed.invalid’s server IP address could not be found.. It’s what ?? Thanks Read More
Announcing AzAPI Dynamic Properties
It’s been almost two years since the announcement of AzAPI, and the provider has eclipsed 20M+ downloads thanks to all of you. We’re excited to share today that we’ve released v1.13 of AzAPI, which comes with support for dynamic pr While this is not a major release, the features here are significant in impact and thus we want to explain what v1.13 enables, as we believe you’ll find it useful.
Our Motivation
Previously, AzAPI resource definitions required JSON encoding and decoding. We know this experience was not perfect; plan outputs were not clear, HCL concepts were not supported, and JSON just didn’t feel like Terraform. So we sought out to improve the experience through conversations with you, the community.
In our research, we wanted to ensure a quality authoring experience that didn’t compromise on our promises of AzAPI: consistent resource definitions available from day 0. The top points of concern that we wanted to address were the JSON, clear terraform plan outputs, and exploring simplification of resource definitions.
These goals were part of our larger overarching goal, to make AzAPI a reliable first-class experience like AzureRM, and coexist alongside it as the recommended Terraform provider for latest and greatest functionality.
What are dynamic properties?
Simply put, dynamic properties enable the AzAPI provider to take a block of HCL instead of requiring JSON. For the below example of AzAPI code, we can see the difference between the first code sample of dynamic properties and second code sample of the old JSONEncode blocks.
resource “azapi_resource” “automationAccount” {
type = “Microsoft.Automation/automationAccounts@2023-11-01”
parent_id = azapi_resource.resourceGroup.id
name = “example-automation-account”
location = “westeurope”
body = {
properties = {
encryption = {
keySource = “Microsoft.Automation”
}
publicNetworkAccess = true
sku = {
name = “Basic”
}
}
}
response_export_values = [“properties”]
}
resource “azapi_resource” “automationAccount” {
type = “Microsoft.Automation/automationAccounts@2023-11-01”
parent_id = azapi_resource.resourceGroup.id
name = “example-automation-account”
location = “westeurope”
body = jsonencode({
properties = {
encryption = {
keySource = “Microsoft.Automation”
}
publicNetworkAccess = true
sku = {
name = “Basic”
}
}
})
}
As you can see, very little has changed for the actual resource definition; the only change with this automation account is the lack of the jsonencode() function and the response_export_values property. Similarly, for the resulting outputs:
output “o1” {
value = azapi_resource.automationAccount.output.properties.automationHybridServiceUrl
}
output “o1” {
value = jsondecode(azapi_resource.automationAccount.output).properties.automationHybridServiceUrl
}
Despite the minute change in resource definition, the impact is significant, as we will see through a variety of scenarios.
Scenarios
azapi_update_resource with Dynamic Properties
You can validate resource updates by comparing outputs from dynamic properties:
resource “azapi_update_resource” “automationAccount” {
type = “Microsoft.Automation/automationAccounts@2023-11-01”
resource_id = azapi_resource.automationAccount.id
body = {
properties = {
publicNetworkAccess = true
}
}
response_export_values = [“properties.publicNetworkAccess”]
}
output “o1” {
value = azapi_update_resource.automationAccount.output
}
Note that this will give a block output still as shown below; you can specify output.properties.publicNetworkAccess to just see the Boolean value here.
o1 = {
“properties” = {
“publicNetworkAccess” = true
}
}
azapi_resource_action and Dynamic Properties
Resource actions can also display outputs using dynamic properties.
data “azapi_resource_action” “listKeys” {
type = “Microsoft.Automation/automationAccounts@2021-06-22”
resource_id = azapi_resource.automationAccount.id
action = “listKeys”
response_export_values = [“*”]
}
resource “azapi_resource_action” “regenerateKey” {
type = “Microsoft.Automation/automationAccounts@2021-06-22”
resource_id = azapi_resource.automationAccount.id
action = “agentRegistrationInformation/regenerateKey”
body = {
keyName = “primary”
}
depends_on = [
data.azapi_resource_action.listKeys
]
response_export_values = [“*”]
}
output “o1” {
value = data.azapi_resource_action.listKeys.output.keys[0].Value
}
output “o2” {
value = azapi_resource_action.regenerateKey.output.endpoint
}
Managing Secrets with Dynamic Properties
You can now see accurate terraform plan outputs when you have sensitive property fields. Before, if a single property within your resource definition was marked sensitive, the entirety of the body would be marked sensitive. The below example (with some code removed for clarity) demonstrates this issue:
resource “azapi_resource” “test” {
type = “Microsoft.AppPlatform/Spring/storages@2024-01-01-preview”
name = “example-storage”
parent_id = azurerm_spring_cloud_service.test.id
body = jsonencode({
properties = {
accountKey = azurerm_storage_account.test.primary_access_key
accountName = azurerm_storage_account.test.name
storageType = “StorageAccount”
}
})
}
The storage account key with JSON encode would produce the following output: Terraform will perform the following actions:
# azapi_resource.test will be created
+ resource “azapi_resource” “test” {
+ body = (sensitive value)
+ id = (known after apply)
+ ignore_casing = false
+ ignore_missing_property = true
+ name = “example-storage”
+ output = (known after apply)
+ parent_id = “/subscriptions/0000/resourceGroups/example-rg/providers/Microsoft.AppPlatform/spring/example-service”
+ removing_special_chars = false
+ schema_validation_enabled = true
+ type = “Microsoft.AppPlatform/Spring/storages@2024-01-01-preview”
}
Plan: 1 to add, 0 to change, 0 to destroy.
Whereas, replacing the storage here with the dynamic properties configuration:
resource “azapi_resource” “test” {
type = “Microsoft.AppPlatform/Spring/storages@2024-01-01-preview”
name = “example-storage”
parent_id = azurerm_spring_cloud_service.test.id
body = {
properties = {
accountKey = azurerm_storage_account.test.primary_access_key
accountName = azurerm_storage_account.test.name
storageType = “StorageAccount”
}
}
}
Would yield the following output:
Terraform will perform the following actions:
# azapi_resource.test will be created
+ resource “azapi_resource” “test” {
+ body = {
+ properties = {
+ accountKey = (sensitive value)
+ accountName = “examplestorageaccount”
+ storageType = “StorageAccount”
}
}
+ id = (known after apply)
+ ignore_casing = false
+ ignore_missing_property = true
+ name = “example-storage”
+ output = (known after apply)
+ parent_id = “/subscriptions/0000/resourceGroups/example-rg/providers/Microsoft.AppPlatform/spring/example-service”
+ removing_special_chars = false
+ schema_validation_enabled = true
+ type = “Microsoft.AppPlatform/Spring/storages@2024-01-01-preview”
}
Plan: 1 to add, 0 to change, 0 to destroy.
Dynamic Blocks and HCL Functions
Before dynamic properties, none of the native functionality that was available with HCL could be utilized with the JSON blocks of the AzAPI provider. Dynamic properties can define and return HCL, enabling Terraform HCL functions, like for each loops and lifecycle.ignore_changes. For example, the following is a for_each loop for creating subnets in a VNet:
locals {
subnets = [
{
name = “subnet1”
addressPrefix = “10.0.1.0/24”
},
{
name = “subnet2”
addressPrefix = “10.0.2.0/24”
}
]
}
resource “azapi_resource” “virtualNetwork” {
type = “Microsoft.Network/virtualNetworks@2021-02-01”
parent_id = azapi_resource.resourceGroup.id
name = “example-vnet”
location = “westeurope”
body = {
properties = {
addressSpace = {
addressPrefixes = [
“10.0.0.0/16”,
]
}
dhcpOptions = {
dnsServers = [
]
}
subnets = [
for subnet in local.subnets : {
name = subnet.name
properties = {
addressPrefix = subnet.addressPrefix
}
}
]
}
}
This is an example for lifecycle_ignore_changes:
resource “azapi_resource” “automationAccount” {
type = “Microsoft.Automation/automationAccounts@2023-11-01”
parent_id = azapi_resource.resourceGroup.id
name = “example-account”
location = azapi_resource.resourceGroup.location
body = {
properties = {
encryption = {
keySource = “Microsoft.Automation”
}
publicNetworkAccess = true
sku = {
name = “Free” // Config: “Free”; Remote: “Basic”
}
}
}
lifecycle { // Terraform feature
ignore_changes = [
body.properties.sku.name
]
}
}
Looking Ahead
We’re continuing to actively invest in AzAPI as part of trying to deliver on creating a first-class Terraform experience. Look forward to more exciting features and releases as we continue to improve AzAPI with your feedback and help! Maybe 2.0 is on the horizon…
How to Upgrade
Without any breaking changes
To avoid any breaking changes with this release as it is technically a minor one, your code should all work simply through terraform init-upgrade. If this is not the case, please open an issue against the provider on its GitHub page.
We would not recommend using v1.13.0, as the release came with inadvertent breaking changes. Please move to v1.13.1 of the provider.
With the latest functionality
The upgrade to the latest functionality is mostly straightforward. First, run terraform init -upgrade and you’ll automatically get the latest version of AzAPI. Remove the jsonencode() and/or jsondecode() from your code. If you have any data sources in your configuration, you’ll need to enable the flag enable_hcl_output_for_data_source to true for the provider:
provider “azapi” {
enable_hcl_output_for_data_source = true
}
This flag is set to false by default to ensure no breaking changes for customers’ existing environments.
Note: In previous versions of AzAPI, your terraform state stored the body of the resource as a JSON string. Now, the body will properly store each property as its corresponding HCL type (i.e. object or string). However, this will only convert properly if you run terraform apply after upgrading to v1.13.1 of the provider.
Conclusion
Make sure to download the latest version of the provider and give it a try! We are excited for you to try this new functionality as we believe that it addresses some of the main concerns that customers shared with us about their challenges with adopting the AzAPI provider. Thank you to all who have given us feedback on the provider, and we look forward to continuing to improve the experience of AzAPI for you.
Microsoft Tech Community – Latest Blogs –Read More
Increased security and resiliency of Canonical workloads on Azure – General Availability
Azure’s collaboration with Canonical is redefining the industry benchmark for safely patching Linux distributions in the cloud. This partnership underscores Azure’s commitment to customer security since Ubuntu images are a significant presence on Azure. The snapshot capability allows for uniform updates across VM fleets, making Azure the first cloud provider to offer such a homogeneous update experience across regions.
Scalable reliability through Auto Patching
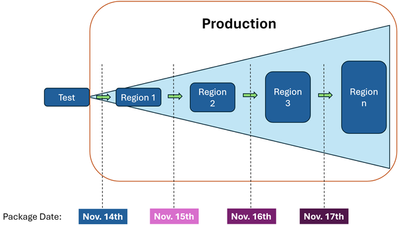
No action is required for customers that have enabled Auto Patching through Azure Guest Patching Service (AzGPS). The platform will install a package that is snapped to a point-in-time by default. In the event a snapshot-based update cannot be installed the platform will install the latest update to ensure the VM is secured. Customers can view the published-date information related to the update in Azure Resource Graph and the Instance View of the VM. The figure below highlights the difference between the current orchestration process and the expected reliability with snapshots.
Azure orchestration without snapshots
Today, each region gets the latest package as updates are applied across regions.
Scalable Reliability with Canonical Snapshots
Azure Guest Patching Service will now apply the same package update from a specific date to all regions due to the integration with Canonical’s snapshot service.
Enabling the snapshot capability on Azure Guest Patching Service
Azure Guest Patching Service: Enable Auto Guest Patching either through PowerShell or CLI for your existing VMs or select “Azure Orchestration” during new VM creation in the Azure portal. There is no action required for customers that have already enabled Auto Guest Patching on their VM and VM Scale Sets. This capability is currently available for Single Instance VMs and VM Scale Set Flexible Orchestration.
Summary
Customers of Azure Guest Patching will receive snapshot-based updates for a single point-in-time across their Canonical workloads by following safe deployment principles, by default. This is a game changer for Azure customers, since the platform can orchestrate updates and keep the updates in sync across regions. Azure is simplifying the way customers keep their assets secure, allowing homogeneity across customers’ fleet, and reducing the impact newer updates may have on customer workloads.
Microsoft Tech Community – Latest Blogs –Read More
Missing users tab in 365 admin center
Hello all,
I am having an issue where I need to retrieve files from a former employee’s OneDrive within the 365 admin center, when I login to the left there is no users>active users tab available; is this feature not available or does it need to be added to my profile?
Thank you
Hello all, I am having an issue where I need to retrieve files from a former employee’s OneDrive within the 365 admin center, when I login to the left there is no users>active users tab available; is this feature not available or does it need to be added to my profile? Thank you Read More

Need help with HTML/CSS for PnP Search Results Web Part
I have a PnP Search Results Web Part and I’m trying to change the style so that it looks like the news web part with the tile or list layout.
This is what I have so far by using the Card layout:
I removed a few fields so that only the news title shows:
Is it possible to adjust the HTML/CSS of the results so that it has one of the layouts below. If so, can someone please share the code?
Tile layout:
List layout:
I have a PnP Search Results Web Part and I’m trying to change the style so that it looks like the news web part with the tile or list layout. This is what I have so far by using the Card layout: I removed a few fields so that only the news title shows: Is it possible to adjust the HTML/CSS of the results so that it has one of the layouts below. If so, can someone please share the code? Tile layout: List layout: Read More

Call Now 800-845-9666 When QuickBooks Payroll Tax Table Update
QuickBooks is a powerful accounting software used by businesses worldwide for its comprehensive payroll management features. One crucial aspect of managing payroll is ensuring that tax calculations are accurate and up to date. The QuickBooks Payroll Tax Table plays a vital role in this process, as it contains the necessary information for calculating taxes withheld from employee paychecks. However, there are instances when users may encounter issues with the tax table, necessitating an update. In this article, we’ll delve into what the QuickBooks Payroll Tax Table is, reasons why it may need updating, and solutions to address related issues effectively.
What is the QuickBooks Payroll Tax Table?
The QuickBooks Payroll Tax Table is a built-in feature that contains all the necessary tax information, including federal and state tax rates, tax brackets, and withholding tables. This table is used by QuickBooks to calculate payroll taxes accurately based on employee wages and other relevant factors. It ensures compliance with tax regulations and helps businesses avoid penalties for incorrect tax calculations.
Reasons for Updating the Payroll Tax Table:
Legislative Changes: Tax laws and regulations are subject to frequent updates and changes at the federal, state, and local levels. These changes may include adjustments to tax rates, tax brackets, deduction limits, and other tax-related parameters. To ensure accurate tax calculations and compliance with the latest regulations, QuickBooks periodically releases updates to the payroll tax table.
Yearly Updates: Payroll tax tables may also need to be updated annually to reflect changes in tax rates and other parameters for the upcoming tax year. These updates typically occur at the beginning of each calendar year and are essential for accurately processing payroll and tax filings for the new year.
Correction of Errors: In some cases, QuickBooks users may encounter errors or discrepancies in tax calculations due to outdated or incorrect tax table information. Updating the payroll tax table can help rectify such errors and ensure accurate tax withholding and reporting.
Solutions for Updating the Payroll Tax Table:
Automatic Updates: QuickBooks offers automatic updates for the payroll tax table, ensuring that users receive the latest tax information without manual intervention. To enable automatic updates, users can navigate to the “Preferences” menu within QuickBooks, select “Payroll & Employees,” and check the box for automatic updates. This allows QuickBooks to download and install tax table updates automatically as they become available.
Manual Updates: If automatic updates are disabled or if users prefer to update the tax table manually, they can do so by accessing the “Employees” menu, selecting “Get Payroll Updates,” and then choosing “Download Entire Update.” QuickBooks will then download the latest payroll tax table update from Intuit’s servers and apply it to the software.
Verification of Update: After updating the payroll tax table, it’s essential to verify that the update was successful and that the tax calculations are accurate. Users can do this by running a payroll simulation or generating payroll reports to ensure that the withholding amounts match the updated tax rates and parameters.
Troubleshooting: In case of any issues or errors encountered during the update process, users can troubleshoot by checking their internet connection, ensuring that QuickBooks is up to date, and verifying that the correct payroll subscription is active. If the issue persists, contacting QuickBooks support or consulting with a certified payroll professional may be necessary.
Conclusion:
Keeping the QuickBooks Payroll Tax Table up to date is essential for accurate payroll processing and compliance with tax regulations. By understanding the reasons for updating the tax table and implementing the appropriate solutions, businesses can ensure smooth payroll operations and avoid potential tax-related issues. Whether through automatic or manual updates, staying informed and proactive about tax table updates is key to maintaining payroll accuracy and regulatory compliance in QuickBooks.
QuickBooks is a powerful accounting software used by businesses worldwide for its comprehensive payroll management features. One crucial aspect of managing payroll is ensuring that tax calculations are accurate and up to date. The QuickBooks Payroll Tax Table plays a vital role in this process, as it contains the necessary information for calculating taxes withheld from employee paychecks. However, there are instances when users may encounter issues with the tax table, necessitating an update. In this article, we’ll delve into what the QuickBooks Payroll Tax Table is, reasons why it may need updating, and solutions to address related issues effectively. What is the QuickBooks Payroll Tax Table? The QuickBooks Payroll Tax Table is a built-in feature that contains all the necessary tax information, including federal and state tax rates, tax brackets, and withholding tables. This table is used by QuickBooks to calculate payroll taxes accurately based on employee wages and other relevant factors. It ensures compliance with tax regulations and helps businesses avoid penalties for incorrect tax calculations. Reasons for Updating the Payroll Tax Table: Legislative Changes: Tax laws and regulations are subject to frequent updates and changes at the federal, state, and local levels. These changes may include adjustments to tax rates, tax brackets, deduction limits, and other tax-related parameters. To ensure accurate tax calculations and compliance with the latest regulations, QuickBooks periodically releases updates to the payroll tax table.Yearly Updates: Payroll tax tables may also need to be updated annually to reflect changes in tax rates and other parameters for the upcoming tax year. These updates typically occur at the beginning of each calendar year and are essential for accurately processing payroll and tax filings for the new year.Correction of Errors: In some cases, QuickBooks users may encounter errors or discrepancies in tax calculations due to outdated or incorrect tax table information. Updating the payroll tax table can help rectify such errors and ensure accurate tax withholding and reporting. Solutions for Updating the Payroll Tax Table: Automatic Updates: QuickBooks offers automatic updates for the payroll tax table, ensuring that users receive the latest tax information without manual intervention. To enable automatic updates, users can navigate to the “Preferences” menu within QuickBooks, select “Payroll & Employees,” and check the box for automatic updates. This allows QuickBooks to download and install tax table updates automatically as they become available.Manual Updates: If automatic updates are disabled or if users prefer to update the tax table manually, they can do so by accessing the “Employees” menu, selecting “Get Payroll Updates,” and then choosing “Download Entire Update.” QuickBooks will then download the latest payroll tax table update from Intuit’s servers and apply it to the software.Verification of Update: After updating the payroll tax table, it’s essential to verify that the update was successful and that the tax calculations are accurate. Users can do this by running a payroll simulation or generating payroll reports to ensure that the withholding amounts match the updated tax rates and parameters.Troubleshooting: In case of any issues or errors encountered during the update process, users can troubleshoot by checking their internet connection, ensuring that QuickBooks is up to date, and verifying that the correct payroll subscription is active. If the issue persists, contacting QuickBooks support or consulting with a certified payroll professional may be necessary.Conclusion: Keeping the QuickBooks Payroll Tax Table up to date is essential for accurate payroll processing and compliance with tax regulations. By understanding the reasons for updating the tax table and implementing the appropriate solutions, businesses can ensure smooth payroll operations and avoid potential tax-related issues. Whether through automatic or manual updates, staying informed and proactive about tax table updates is key to maintaining payroll accuracy and regulatory compliance in QuickBooks. Read More

How to dynamically calculate row total?
I organized my data in power query and used power pivot to create a pivot table off that data model. I have the years 2019-2023 as columns in this current dataset. However, sometimes when I refresh, a 2024 column will be added. How do I create a new measure column that will take the sum of columns 2019:2023 as well as 2019:2024 without me having to manually edit the formula to include the new column?
Additionally, I have metrics that I will be conditionally formatting this table on. For example, I will want all values less than 100,000 filled green. How do I make this dynamic so that it works with the occasional inclusion of another column (2024)? I’ve tried but when I select 2019:2023 as my value range, it hard codes the formula and does not apply to the new column.
I organized my data in power query and used power pivot to create a pivot table off that data model. I have the years 2019-2023 as columns in this current dataset. However, sometimes when I refresh, a 2024 column will be added. How do I create a new measure column that will take the sum of columns 2019:2023 as well as 2019:2024 without me having to manually edit the formula to include the new column? Additionally, I have metrics that I will be conditionally formatting this table on. For example, I will want all values less than 100,000 filled green. How do I make this dynamic so that it works with the occasional inclusion of another column (2024)? I’ve tried but when I select 2019:2023 as my value range, it hard codes the formula and does not apply to the new column. Read More
Voice Profile Storage and Export Options
I’m starting to use the speaker attribution feature in Teams Rooms. Now that were have Copilot and Intelligent Meeting Recap I need this in place for Teams Rooms. Once I register my voice and face in the new Teams Client, where is this data stored? and how do I delete these voice and face profiles for users?
This link states “Your IT admin can export your audio data at any time.” but I see no real instructions on how to do this.
I’m starting to use the speaker attribution feature in Teams Rooms. Now that were have Copilot and Intelligent Meeting Recap I need this in place for Teams Rooms. Once I register my voice and face in the new Teams Client, where is this data stored? and how do I delete these voice and face profiles for users?This link states “Your IT admin can export your audio data at any time.” but I see no real instructions on how to do this.Tenant Administration control for voice recognition (voice profile) in Teams Rooms – Microsoft Teams | Microsoft Learn Read More
Microsoft Authenticator Circle
I upgraded my iPhone and the accounts on Authenticator did not show back up in the app. The data was not backed up. As such the Authenticator is requiring the Authenticator to Authenticate and I do not have the accounts set up to do so. As such I can not get into my Admin. to fix the problem or use any of the Office 365 products.
How do I access my Admin. account with out using Authenticator? Help!
Thank you,
Bill Moersch
President, CommUNITY Service Team
I upgraded my iPhone and the accounts on Authenticator did not show back up in the app. The data was not backed up. As such the Authenticator is requiring the Authenticator to Authenticate and I do not have the accounts set up to do so. As such I can not get into my Admin. to fix the problem or use any of the Office 365 products. How do I access my Admin. account with out using Authenticator? Help! Thank you, Bill MoerschPresident, CommUNITY Service Teamwww.communityserviceteam.com Read More

Sharepoint online home page is slow to load.
Hello, I am new to sharepoint online development and I am trying to debug an existing webpart created by another developer. It is pretty slow and sometimes it doesn’t load on the apge and I need to fix that. It is the news webpart. When I run diagnostics I see the following
The webpart I am working with is the Spark News Feed, any ideas on how to debug it to figure out why it is slow and how to make it faster? Thank you
Hello, I am new to sharepoint online development and I am trying to debug an existing webpart created by another developer. It is pretty slow and sometimes it doesn’t load on the apge and I need to fix that. It is the news webpart. When I run diagnostics I see the followingThe webpart I am working with is the Spark News Feed, any ideas on how to debug it to figure out why it is slow and how to make it faster? Thank you Read More

Creating A Survey in Forms – HLS Copilot Snacks
One of the challenges that managers face in the remote work environment is how to monitor and support their teams’ work-life balance and well-being. Copilot for Microsoft 365 can help managers create surveys in Microsoft Forms to collect feedback from their employees on how they are coping with the workload, stress, and productivity. Copilot can also suggest best practices and tips on how to design effective surveys, analyze the results, and follow up with actions. Watch this video to learn how to use Copilot to create a survey in Form and get insights into your team’s well-being and performance.
In this Copilot Snack I will demonstrate how to create a survey using Copilot for Microsoft 365 within Microsoft 365 Forms.
*Note: The prompt used is a modification of one created by my colleague Chad Stout. A big shout out to him for first showing me this!
To see all HLS Copilot Snacks video click here.
Resources:
HLS Copilot Snacks (microsoft.com)
Microsoft Copilot for Microsoft 365 documentation | Microsoft Learn
Copilot Lab (cloud.microsoft)
Copilot in Excel help & learning (cloud.microsoft)
Prompt used:
I’d like to create a survey for a group of Pharmaceutical Researchers to better understand their day-to-day experience researching the development of new vaccines, communicating with colleagues, finding the appropriate information for their research, and completing their professional training and education. I’d also like to understand how they are feeling about the demands on their time in a professional sense, how is this affecting time outside of the workplace, and how they think their time could be better allocated to improve research leading to vaccine development, improve educational and training opportunities, remove stress in the workplace and at home.
To see all HLS Copilot Snacks video click here.
Thanks for visiting – Michael Gannotti LinkedIn
Microsoft Tech Community – Latest Blogs –Read More
Windows Server 2022 IIS web site TLS 1.3 does not work with client certificate authentication
On Windows Server 2022, in IIS Web Site SSL binding, there is TLS 1.3 option enabled by default. However, if the web application uses client certificate authentication. SSL handshake will not work and so the web app is not reachable.
Client certificate authentication is a very old technology and it is at the Stage of Post-Negotiation of SSL handshake, such Post-Negotiation is restricted by TLS 1.3 RFC.
It is recommended to use TLS 1.3 with different Morden authentication methods. If you need to keep client authentication, then disabling TLS 1.3 and HTTP/2 in the IIS site SSL bindings will make client certificate authentication work.
If you want to keep TLS 1.3 and client certificate authentication, the workaround is to enable “Negotiate Client Certificate” property on http.sys, we can do it via netsh command, or change the registry key value for “Negotiate Client Certificate” directly. For example, if your IIS web site SSL binding is at 0.0.0.0:443 (IP:Port), then the following registry key set the “Negotiate Client Certificate” to true at Http.Sys layer.
HKEY_LOCAL_MACHINESYSTEMControlSet001ServicesHTTPParametersSslBindingInfo.0.0.0:443
Type: DWORD, Name: DefaultFlags, Value:2.
However, please note, setting client cert negotiation flag enables negotiation of the client cert during the initial handshake and the specifics of that handshake should be part of the TLS 1.3 specification. So the enabling “client cert negotiate” at HTTP.Sys is not something that not complaint with TLS 1.3 RFC. You will take this as your own risk to do so.
If the web site SSL binding has SNI enabled or SSL certificate is in a IIS cert center store, the registry key above is different and such enabling “Negotiate Client Certificate” may not work.
Microsoft Tech Community – Latest Blogs –Read More

Monthly news – May 2024
Microsoft Defender for Cloud
Monthly news
May 2024 Edition
This is our monthly “What’s new” blog post, summarizing product updates and various new assets we released over the past month. In this edition, we are looking at all the goodness from April 2024.
Legend:
Product videos
Webcasts (recordings)
Docs on Microsoft
Blogs on Microsoft
GitHub
External content
Product improvements
Announcements
Microsoft Defender for Cloud
We’ve released a new default experience for MDC in the Azure portal! Now, recommendations are sorted by risk to help prioritize the more critical security risks against the medium and low ones. Click here to read more?
Announcing General Availability for Defender for Containers in AWS and GCP!
Defender for Containers’ runtime threat detection and agentless discovery features now cover AWS and GCP. With that, new container vulnerability assessments (public preview) are available for Azure, AWS and GCP, specifically reporting on container images for registry and container workloads for runtime. Learn more about Defender for Containers support matrix here.
In April, our team published the following blog posts we would like to share:
Introducing our CNAPP mastery e-book!
Operationalizing Attack Path Insight
eBPF-Powered Threat Protection using Inspektor Gadget
Microsoft Defender for Cloud Adds Full Coverage for Azure Open-Source Relational Databases
How to better manage cost of API calls Defender for Cloud makes to AWS
Unleashing the Power of Microsoft Defender for Cloud – Unique Capabilities for Robust Protection
Defender for Cloud CxE team has worked on updating the MDC Lab on GitHub! Now, updated with Data aware security posture module, check out the Defender for Cloud Lab now!
Discover how other organizations successfully use Microsoft Defender for Cloud to protect their cloud workloads. This month we are featuring Newington College – an educational institute in Australia – that uses Microsoft security solutions, including Defender for Cloud, to secure their environment.
Watch new episodes of the Defender for Cloud in the Field show to learn about the vulnerability management and navigating the Microsoft CNAPP solution.
Join our experts in the upcoming webinars to learn what we are doing to secure your workloads running in Azure and other clouds.
We greatly value your input on the types of content that enhance your understanding of our security products. Your insights are crucial in guiding the development of our future public content. We aim to deliver material that not only educates but also resonates with your daily security challenges. Whether it’s through in-depth live webinars, real-world case studies, comprehensive best practice guides through blogs, or the latest product updates, we want to ensure our content meets your needs. Please submit your feedback on which of these formats do you find most beneficial, and are there any specific topics you’re interested in https://aka.ms/PublicContentFeedback
Note: If you want to stay current with Defender for Cloud and receive updates in your inbox, please consider subscribing to our monthly newsletter: https://aka.ms/MDCNewsSubscribe
Microsoft Tech Community – Latest Blogs –Read More

Azure VMware Solution now available in Italy North, Switzerland North and UAE North
Azure VMware Solution has recently expanded availability to
Italy North, Switzerland North and UAE North
We are pleased to announce we recently expanded to three more regions: Italy North, Switzerland North and UAE North. Now in 32 Azure regions, Azure VMware Solution empowers you to seamlessly extend or migrate existing VMware workloads to Azure without the cost, effort or risk of re-architecting applications or retooling operations.
Azure VMware Solution supports:
Rapid cloud migration of VMware-based workloads to Azure without refactoring.
Datacenter exit while maintaining operational consistency for the VMware environment.
Business continuity and disaster recovery for on-premises VMware environments.
Attach Azure services and innovate applications at your own pace.
Includes the VMware technology stack and lets you leverage existing Microsoft licenses for Windows Server and SQL Server.
For updates on current and upcoming region availability, visit the product by region page here.
Streamline migration with new offers and licensing benefits, including a 20% discount.
We recently introduced the VMware Rapid Migration Plan, where Microsoft provides a comprehensive set of licensing benefits and programs to give you price protection and savings as you migrate to Azure VMware Solution. Azure VMware Solution is a great first step to the cloud for VMware customers, and this plan can help you get there. Learn More
Microsoft Tech Community – Latest Blogs –Read More
WinGet: Enabling experimental features in production
Explore a new way to access experimental features in WinGet.
The Windows Package Manager (WinGet) is a command-line tool that allows you to install and manage applications on Windows. WinGet has been in development since 2020 and has been releasing new features and improvements regularly. However, to date, the use of experimental features has only been available in preview releases of WinGet, accessible via the WinGet repository on GitHub. With preview builds, the WinGet team has been able test new and experimental features before releasing them to the production build, which is the stable and official version of WinGet. Anyone who wanted to try out the latest and greatest features of WinGet, therefore, had to install the preview release.
That’s about to change with WinGet 1.9, scheduled to ship in October 2024. In this release, the WinGet team will be enabling the use of experimental features in production builds. This means that you will no longer have to switch between the two different builds of WinGet to access all the experimental features. However, this does not mean that the experimental features of WinGet will be enabled by default. Some features will still be in development or testing, in which case you will have to opt-in to enable them. This ensures that you can choose which features you want to use and which ones you want to avoid, depending on their preferences and needs.
How to enable and disable experimental features in WinGet
Enabling and disabling experimental features in WinGet is very easy and straightforward. Use the WinGet settings command to open the settings file of WinGet, which is in JSON format. In this file, you can add a section called Experimental Features, and include a list of experimental features you want enabled in WinGet. For example, if you want to enable the experimental feature called configureSelfElevate, which allows WinGet CLI to request elevation when running a WinGet Configure command and elevation is required, you would have to set the value of configureSelfElevate to true in the settings file. After saving the file, you will have access to the enabled experimental features.
For a complete list of experimental features, see WinGet CLI settings on GitHub.
You will be able to enable and disable experimental features in WinGet at any time as long as you have permission to edit the settings file. Please be aware that experimental features are not guaranteed to work as expected, and you may encounter bugs, errors, or unexpected behaviors when using them. We recommend that you read the descriptions of each feature carefully before enabling it as some features may have dependencies or requirements that need to be met before using them.
How to block the use of experimental features in WinGet
Some enterprises may not want to use or allow the use of experimental features in WinGet, either for security, stability, or compatibility reasons. If that is the case, you can block the use of experimental features in WinGet by disabling the Enable App Installer Experimental Features Group Policy Object (GPO), which will prevent the enabling of experimental features in WinGet. Anyone who tries to enable experimental features in WinGet after the WinGet GPO has been applied will receive an error message saying that the feature is blocked by policy.
If you want to block the use of experimental features in WinGet, you should enable the WinGet GPO before the WinGet 1.9 release, as experimental features will be enabled by default after this release. If you enable the WinGet GPO after the release, you will not need to disable any experimental features that were already enabled in WinGet before applying the policy. The policy will disable any experimental features that had been previously enabled.
Get more out of WinGet
The WinGet 1.9 release will bring a major change to the way you can access and use experimental features in WinGet. By offering experimental features in the production release of WinGet, our goal is to simplify the installation and update process of WinGet and give you more control and flexibility over the features you want to use. Users of WinGet will be able to enable and disable experimental features in WinGet using the settings file while IT pros can block the use of experimental features in WinGet using the GPO. Please make sure that both IT and users are aware of the risks and benefits of using experimental features.
For more information and updates on new and experimental features, be sure to check the WinGet documentation and the GitHub repository. Also, we’d love for you to provide feedback and report issues to the WinGet team to help improve the quality and functionality of WinGet.
Continue the conversation. Find best practices. Bookmark the Windows Tech Community, then follow us @MSWindowsITPro on X/Twitter. Looking for support? Visit Windows on Microsoft Q&A.
Microsoft Tech Community – Latest Blogs –Read More
MATLAB coder-Check for Run-Time Issues,the output of test file is totally wrong compared with the original MATLAB code output
Use MATLAB coder to convert MATLAB code into C code suitable for Xilinx ARM development. However, when the conversion process proceeded to the MEX function check step, I found that the output of the test file using MEX was inconsistent with the output of the MATLAB code running directly. Here are the results running directly in MATLAB:
As the official tutorial shows, I split the code that needs to be translated into a data file (.mat), a separately encapsulated function file (.m), and a script that calls this function file (.m). The check was then performed in MATLAB coder, but the results were inconsistent
Here is the code in the test file to load the data and call the function. I can’t figure out why the results of the test file were incorrect when all the checks passed. Perhaps the converted code itself is not equivalent?
Note: The drawing of the final result is directly related to RY_final, and the built-in functions used by the converted function such as eig, sort, etc. should also support the conversion (otherwise it will not pass the check).
clear all
load(‘Data_02.mat’);
%%%%%%%%%%%%%%%%%%%%%%%%%%%%%%%%%%%%%%%%%%%%%%%%%%%%%%%%%%%%%%%%%%%%%%%%%%%%%%%%%%%%%%%%%%%%%%
%R:core algorithm
%%%%%%%%%%%%%%%%%%%%%%%%%%%%%%%%%%%%%%%%%%%%%%%%%%%%%%%%%%%%%%%%%%%%%%%%%%%%%%%%%%%%%%%%%%%%%%
[RNb_cub ,RYNb_cub, RY_final] = …
CoreFunc(PSub_mat, SDoa, var_n, M, N, J, K, Bin, Sample_vec, Time, Array, c, f_vec, EigVecNL_0);
……some compute and Plot the resultUse MATLAB coder to convert MATLAB code into C code suitable for Xilinx ARM development. However, when the conversion process proceeded to the MEX function check step, I found that the output of the test file using MEX was inconsistent with the output of the MATLAB code running directly. Here are the results running directly in MATLAB:
As the official tutorial shows, I split the code that needs to be translated into a data file (.mat), a separately encapsulated function file (.m), and a script that calls this function file (.m). The check was then performed in MATLAB coder, but the results were inconsistent
Here is the code in the test file to load the data and call the function. I can’t figure out why the results of the test file were incorrect when all the checks passed. Perhaps the converted code itself is not equivalent?
Note: The drawing of the final result is directly related to RY_final, and the built-in functions used by the converted function such as eig, sort, etc. should also support the conversion (otherwise it will not pass the check).
clear all
load(‘Data_02.mat’);
%%%%%%%%%%%%%%%%%%%%%%%%%%%%%%%%%%%%%%%%%%%%%%%%%%%%%%%%%%%%%%%%%%%%%%%%%%%%%%%%%%%%%%%%%%%%%%
%R:core algorithm
%%%%%%%%%%%%%%%%%%%%%%%%%%%%%%%%%%%%%%%%%%%%%%%%%%%%%%%%%%%%%%%%%%%%%%%%%%%%%%%%%%%%%%%%%%%%%%
[RNb_cub ,RYNb_cub, RY_final] = …
CoreFunc(PSub_mat, SDoa, var_n, M, N, J, K, Bin, Sample_vec, Time, Array, c, f_vec, EigVecNL_0);
……some compute and Plot the result Use MATLAB coder to convert MATLAB code into C code suitable for Xilinx ARM development. However, when the conversion process proceeded to the MEX function check step, I found that the output of the test file using MEX was inconsistent with the output of the MATLAB code running directly. Here are the results running directly in MATLAB:
As the official tutorial shows, I split the code that needs to be translated into a data file (.mat), a separately encapsulated function file (.m), and a script that calls this function file (.m). The check was then performed in MATLAB coder, but the results were inconsistent
Here is the code in the test file to load the data and call the function. I can’t figure out why the results of the test file were incorrect when all the checks passed. Perhaps the converted code itself is not equivalent?
Note: The drawing of the final result is directly related to RY_final, and the built-in functions used by the converted function such as eig, sort, etc. should also support the conversion (otherwise it will not pass the check).
clear all
load(‘Data_02.mat’);
%%%%%%%%%%%%%%%%%%%%%%%%%%%%%%%%%%%%%%%%%%%%%%%%%%%%%%%%%%%%%%%%%%%%%%%%%%%%%%%%%%%%%%%%%%%%%%
%R:core algorithm
%%%%%%%%%%%%%%%%%%%%%%%%%%%%%%%%%%%%%%%%%%%%%%%%%%%%%%%%%%%%%%%%%%%%%%%%%%%%%%%%%%%%%%%%%%%%%%
[RNb_cub ,RYNb_cub, RY_final] = …
CoreFunc(PSub_mat, SDoa, var_n, M, N, J, K, Bin, Sample_vec, Time, Array, c, f_vec, EigVecNL_0);
……some compute and Plot the result code generation, c convert MATLAB Answers — New Questions
Create “n” non-lineal equations in a loop and solved by Fsolve
Hi, guys…. I’ve been trying to create euqaitons to solve a non-lineal system in a loop. But, the number of functions to be created depends on the user (2<n<24)…. Turbine seal gas leak though labyrinth.
For example, when n=5 the loop should create 5 functions with 5 unknown variables (x1, x2, x3, x4, x5) and then, the system is solved by fsolve.
Here is my script:
All below variables are known:
n=;
pi=;
p0=;
pn=;
Ag=;
k1=;
k2=;
k3=;
k4=;
The equations:
—————————————————-
F(1)= (k1/p0^2)*(x(n)*(1/(pi*Ag))*(pi+2-5*((p0/x(i))^k4-1)+2*((p0/x(1))^k4-1)^2))^2-(x(i)/p0)^k2+(x(i)/p0)^k3];%…………. 1st equation
F(n)= [k1/(x(n-1))^2)*(x(n)*(1/(pi*Ag))*(pi+2-5*((x(n-1)/pn)^k4-1)+2*((x(n-)/pn)^k4-1)^2))^2-(pn/x(n-1))^k2+(pn/x(n-1))^k3]; %…………. “n” equation
%…………. for remained equations
For i=2:n-1
F(i) = (k1/(x(i))^2)*(x(n)*(1/(pi*Ag))*(pi+2-*((x(i)/x(i+1))^k4-1)+2*((x(i)/x(i+1))^k4-1)^2))^2- (x(i+1)/x(i))^k2+(x(i+1)/x(i))^k3;
End
————–
factor=(p0-pn)/n;
for i=1:(n-1)
x0(i)=p0-factor*i;
end
x0(n)=0;
——————-
options=optimoptions(‘fsolve’,’Display’,’iter’);
[x11,fval]=fsolve(F,x0,options)
Any help will be appreciated guys
Thanks in advance.Hi, guys…. I’ve been trying to create euqaitons to solve a non-lineal system in a loop. But, the number of functions to be created depends on the user (2<n<24)…. Turbine seal gas leak though labyrinth.
For example, when n=5 the loop should create 5 functions with 5 unknown variables (x1, x2, x3, x4, x5) and then, the system is solved by fsolve.
Here is my script:
All below variables are known:
n=;
pi=;
p0=;
pn=;
Ag=;
k1=;
k2=;
k3=;
k4=;
The equations:
—————————————————-
F(1)= (k1/p0^2)*(x(n)*(1/(pi*Ag))*(pi+2-5*((p0/x(i))^k4-1)+2*((p0/x(1))^k4-1)^2))^2-(x(i)/p0)^k2+(x(i)/p0)^k3];%…………. 1st equation
F(n)= [k1/(x(n-1))^2)*(x(n)*(1/(pi*Ag))*(pi+2-5*((x(n-1)/pn)^k4-1)+2*((x(n-)/pn)^k4-1)^2))^2-(pn/x(n-1))^k2+(pn/x(n-1))^k3]; %…………. “n” equation
%…………. for remained equations
For i=2:n-1
F(i) = (k1/(x(i))^2)*(x(n)*(1/(pi*Ag))*(pi+2-*((x(i)/x(i+1))^k4-1)+2*((x(i)/x(i+1))^k4-1)^2))^2- (x(i+1)/x(i))^k2+(x(i+1)/x(i))^k3;
End
————–
factor=(p0-pn)/n;
for i=1:(n-1)
x0(i)=p0-factor*i;
end
x0(n)=0;
——————-
options=optimoptions(‘fsolve’,’Display’,’iter’);
[x11,fval]=fsolve(F,x0,options)
Any help will be appreciated guys
Thanks in advance. Hi, guys…. I’ve been trying to create euqaitons to solve a non-lineal system in a loop. But, the number of functions to be created depends on the user (2<n<24)…. Turbine seal gas leak though labyrinth.
For example, when n=5 the loop should create 5 functions with 5 unknown variables (x1, x2, x3, x4, x5) and then, the system is solved by fsolve.
Here is my script:
All below variables are known:
n=;
pi=;
p0=;
pn=;
Ag=;
k1=;
k2=;
k3=;
k4=;
The equations:
—————————————————-
F(1)= (k1/p0^2)*(x(n)*(1/(pi*Ag))*(pi+2-5*((p0/x(i))^k4-1)+2*((p0/x(1))^k4-1)^2))^2-(x(i)/p0)^k2+(x(i)/p0)^k3];%…………. 1st equation
F(n)= [k1/(x(n-1))^2)*(x(n)*(1/(pi*Ag))*(pi+2-5*((x(n-1)/pn)^k4-1)+2*((x(n-)/pn)^k4-1)^2))^2-(pn/x(n-1))^k2+(pn/x(n-1))^k3]; %…………. “n” equation
%…………. for remained equations
For i=2:n-1
F(i) = (k1/(x(i))^2)*(x(n)*(1/(pi*Ag))*(pi+2-*((x(i)/x(i+1))^k4-1)+2*((x(i)/x(i+1))^k4-1)^2))^2- (x(i+1)/x(i))^k2+(x(i+1)/x(i))^k3;
End
————–
factor=(p0-pn)/n;
for i=1:(n-1)
x0(i)=p0-factor*i;
end
x0(n)=0;
——————-
options=optimoptions(‘fsolve’,’Display’,’iter’);
[x11,fval]=fsolve(F,x0,options)
Any help will be appreciated guys
Thanks in advance. fsolve, loop, nonlinear, functions MATLAB Answers — New Questions


