

Category: News
OKR model configuration missing in Viva Goals Admin Center
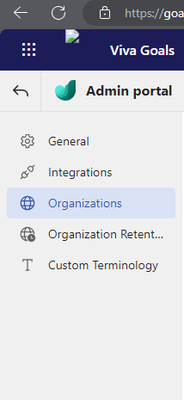
We miss in our Viva Goals Admin Portal the section “OKR Model Configuration”, as it is written under bullet point 2 in https://learn.microsoft.com/en-us/viva/goals/configure-okr-model
How to configure your OKR rules
On the left panel in Viva Goals, select Admin.In the Admin Dashboard section, select the OKR Model Configuration tab.Define your objectives and key results (OKRs) and initiatives as described in the following sections.
I have a Viva Goals license assigned, as well as I have the Viva Goals Administrator Role and I am Owner of the Organization.
We miss in our Viva Goals Admin Portal the section “OKR Model Configuration”, as it is written under bullet point 2 in https://learn.microsoft.com/en-us/viva/goals/configure-okr-modelHow to configure your OKR rulesOn the left panel in Viva Goals, select Admin.In the Admin Dashboard section, select the OKR Model Configuration tab.Define your objectives and key results (OKRs) and initiatives as described in the following sections. I have a Viva Goals license assigned, as well as I have the Viva Goals Administrator Role and I am Owner of the Organization. Read More
Question
Hello
How do you empty cells based on a particular value entered in another cell?
Example if cell A1 = NA
Cells A2:D6 are emptied?
Thanks
Thierry
HelloHow do you empty cells based on a particular value entered in another cell?Example if cell A1 = NACells A2:D6 are emptied?ThanksThierry Read More
UDF and SP what is difference
Hi SQLGurus, might someone explain me with simple words
I created on SQL UDF – quite complex – containing 3-level CTE inside – but single query (RETURNS TABLE AS RETURN(….)
and I created exact same as SP
comparision (I executed together both – select * from UDF and EXEC SP with same parameters goves me that SP runs 5 time quicker than UDF
What is tehnical difference of them and is there some way (SCHEMABINDING or Execute as or something else) to speed up the UDF
Create UDF with EXEC SP inside I’ve not yet tested 🙂
any comment are welcome
Henn Sarv
Hi SQLGurus, might someone explain me with simple wordsI created on SQL UDF – quite complex – containing 3-level CTE inside – but single query (RETURNS TABLE AS RETURN(….)and I created exact same as SPcomparision (I executed together both – select * from UDF and EXEC SP with same parameters goves me that SP runs 5 time quicker than UDFWhat is tehnical difference of them and is there some way (SCHEMABINDING or Execute as or something else) to speed up the UDFCreate UDF with EXEC SP inside I’ve not yet tested :)any comment are welcomeHenn Sarv Read More
Issue with Leaving Comments in Microsoft Planner
Hi everyone
I have been encountering an issue with Microsoft Planner within Microsoft Teams. Whenever I try to add comments to tasks, I receive an error message stating that the delivery has failed because the recipient’s email provider has rejected it. This prevents me from leaving comments in Planner.
Error Details:
– Error message: “Delivery has failed to these recipients or groups: Your message wasn’t delivered because the recipient’s email provider rejected it.”
– In addition to this email delivery error, I am unable to leave comments in Planner.
I need assistance to determine why these errors are occurring and how I can resolve this issue so that I can effectively use the commenting functionality in Planner.
Thank you in advance for your help!
Best
Milan
Hi everyoneI have been encountering an issue with Microsoft Planner within Microsoft Teams. Whenever I try to add comments to tasks, I receive an error message stating that the delivery has failed because the recipient’s email provider has rejected it. This prevents me from leaving comments in Planner.Error Details:- Error message: “Delivery has failed to these recipients or groups: Your message wasn’t delivered because the recipient’s email provider rejected it.”- In addition to this email delivery error, I am unable to leave comments in Planner.I need assistance to determine why these errors are occurring and how I can resolve this issue so that I can effectively use the commenting functionality in Planner.Thank you in advance for your help!BestMilan Read More
Office365 Outlook Auto-Complete not working
Application: MS Office 365 Apps for Enterprise
OS: Windows 10 Enterprise v 22H2
PROBLEM: Auto-Complete not working for user
WHAT I TRIED THAT HAS NOT WORKED:
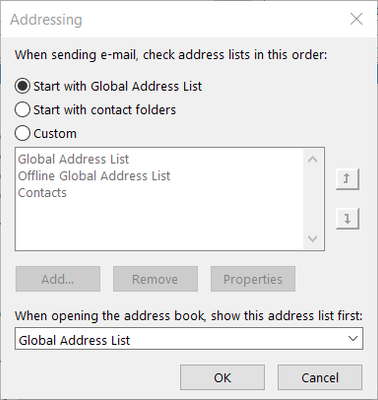
1. Went to Address Book. Chose Tools > Options.
2. Selected “Start with Global Address List” at the top. Selected Global Address List under “When opening the address book… at the bottom.
3. Deleted contents of C:Temp and C:UsersUserIDAppDataLocalTemp.
4. Went to %LOCALAPPDATA%MicrosoftOutlook and renamed RoamCache to OldRoamCache.
5. Went to File > Options > Mail and emptied the auto-complete list.
6. Ran scanpst.exe and found no problems.
7. Booted in Safe Mode and tested.
8. Had user email someone to get the name into the Auto-Complete list.
9. Had user try emailing that same person again by typing in the name. It still does not auto complete.
10. Rebooted and tried steps 8 and 9 again. No luck.
Any help is appreciated. Thank you for your time.
Application: MS Office 365 Apps for EnterpriseOS: Windows 10 Enterprise v 22H2PROBLEM: Auto-Complete not working for userWHAT I TRIED THAT HAS NOT WORKED:1. Went to Address Book. Chose Tools > Options.2. Selected “Start with Global Address List” at the top. Selected Global Address List under “When opening the address book… at the bottom.3. Deleted contents of C:Temp and C:UsersUserIDAppDataLocalTemp.4. Went to %LOCALAPPDATA%MicrosoftOutlook and renamed RoamCache to OldRoamCache.5. Went to File > Options > Mail and emptied the auto-complete list.6. Ran scanpst.exe and found no problems.7. Booted in Safe Mode and tested.8. Had user email someone to get the name into the Auto-Complete list.9. Had user try emailing that same person again by typing in the name. It still does not auto complete.10. Rebooted and tried steps 8 and 9 again. No luck.Any help is appreciated. Thank you for your time. Read More
Maximiza la Productividad de tu Equipo con Copilot en Planner: La Nueva Función que Está Transforman
¡Noticias emocionantes! ¡Copilot en Planner (vista previa) ahora disponible para usuarios con licencia Project Plan 3 o Project Plan 5 en Microsoft Teams!
Estoy emocionado de anunciar que ahora que el nuevo Microsoft Planner se está implementando completamente en Microsoft Teams, ¡Copilot en Planner (vista previa) también está haciendo su debut! Disponible para usuarios con una licencia Project Plan 3 o Project Plan 5, Copilot en Planner aprovecha el poder de la inteligencia artificial generativa para agilizar la planificación, gestión y ejecución de tus trabajos.
Con Copilot en Planner a tu disposición, experimentarás un nuevo nivel de productividad y colaboración. Desde proporcionar sugerencias inteligentes hasta automatizar tareas repetitivas, Copilot asegura que tú y tu equipo estén informados y concentrados mientras trabajan hacia sus objetivos.
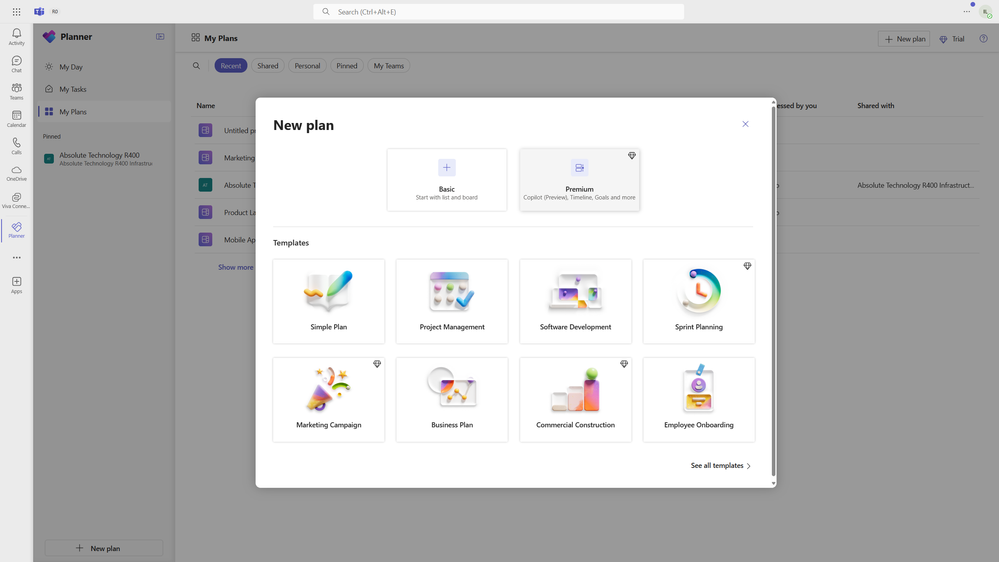
Copilot en Planner
Copilot en el nuevo Planner es una función revolucionaria que integra inteligencia artificial para ofrecer asistencia en la planificación, gestión y seguimiento de proyectos. Utilizando tecnología de vanguardia, Copilot proporciona sugerencias inteligentes y automatiza tareas repetitivas para optimizar el flujo de trabajo del equipo. Desde la asignación de tareas hasta la priorización de actividades y el seguimiento del progreso, en el nuevo Planner simplifica la gestión de proyectos y mejora la productividad del equipo. Con esta herramienta poderosa, los equipos pueden trabajar de manera más eficiente y colaborativa, logrando sus objetivos con mayor rapidez y precisión.
La ejecución efectiva es clave para lograr realmente tus objetivos planificados. Con Copilot como tu asistente digital, puedes agilizar este proceso y mantenerte en el camino correcto. Copilot puede ayudarte a identificar qué trabajar a continuación o desglosar un elemento de trabajo grande en pasos concretos. Toma dirección de los usuarios, buscando aprobación y retroalimentación para gestionar cómo las personas y la inteligencia artificial trabajan juntas para alcanzar objetivos. Cuando llegue el momento de abordar un problema, ampliar el alcance o hacer otros cambios en el plan, Copilot puede ayudar a rastrear un nuevo objetivo, identificar qué tareas están atrasadas o qué miembros del equipo tienen la carga de trabajo más alta.
Experimenta las capacidades de Copilot en el nuevo Planner
Con Copilot, puedes:
Generar y añadir tareas, objetivos y grupos: Olvídate de la tediosa tarea de crear listas de tareas. Copilot puede generar y añadir elementos de forma automática, basándose en tus indicaciones.Crear planes completos: ¿Necesitas un plan detallado para tu próximo proyecto? Simplemente pídele a Copilot que lo genere por ti, y comenzará a trabajar en el desglose del proyecto.Agilizar la ejecución del proyecto: Una vez que tengas tu plan en marcha, Copilot puede ayudarte a mantener el rumbo correcto. Te sugiere qué hacer a continuación y te ayuda a desglosar tareas complejas en pasos más manejables.Gestionar cambios en el plan: ¿Surge un imprevisto? No hay problema. Copilot puede ayudarte a adaptarte a los cambios, identificando nuevas metas, tareas atrasadas o posibles problemas de carga de trabajo en tu equipo.
¡Gracias a todos por tomarse el tiempo de leer mi publicación sobre la implementación de Copilot en Planner! Si encontraste útiles las ideas compartidas, te invito a que le des un “Me gusta” y a que compartas tus pensamientos en los comentarios.
La incorporación de Copilot en Planner puede ser un gran paso hacia la mejora de nuestra productividad y colaboración en equipo. ¡Vamos juntos a aprovechar al máximo esta herramienta y a llevar nuestros proyectos al siguiente nivel!
Espero con ansias ver cómo Copilot en Planner transforma nuestra forma de trabajar! ¡Nos vemos en el siguiente post.
¡Noticias emocionantes! ¡Copilot en Planner (vista previa) ahora disponible para usuarios con licencia Project Plan 3 o Project Plan 5 en Microsoft Teams! Estoy emocionado de anunciar que ahora que el nuevo Microsoft Planner se está implementando completamente en Microsoft Teams, ¡Copilot en Planner (vista previa) también está haciendo su debut! Disponible para usuarios con una licencia Project Plan 3 o Project Plan 5, Copilot en Planner aprovecha el poder de la inteligencia artificial generativa para agilizar la planificación, gestión y ejecución de tus trabajos. Con Copilot en Planner a tu disposición, experimentarás un nuevo nivel de productividad y colaboración. Desde proporcionar sugerencias inteligentes hasta automatizar tareas repetitivas, Copilot asegura que tú y tu equipo estén informados y concentrados mientras trabajan hacia sus objetivos. Copilot en Planner Copilot en el nuevo Planner es una función revolucionaria que integra inteligencia artificial para ofrecer asistencia en la planificación, gestión y seguimiento de proyectos. Utilizando tecnología de vanguardia, Copilot proporciona sugerencias inteligentes y automatiza tareas repetitivas para optimizar el flujo de trabajo del equipo. Desde la asignación de tareas hasta la priorización de actividades y el seguimiento del progreso, en el nuevo Planner simplifica la gestión de proyectos y mejora la productividad del equipo. Con esta herramienta poderosa, los equipos pueden trabajar de manera más eficiente y colaborativa, logrando sus objetivos con mayor rapidez y precisión. La ejecución efectiva es clave para lograr realmente tus objetivos planificados. Con Copilot como tu asistente digital, puedes agilizar este proceso y mantenerte en el camino correcto. Copilot puede ayudarte a identificar qué trabajar a continuación o desglosar un elemento de trabajo grande en pasos concretos. Toma dirección de los usuarios, buscando aprobación y retroalimentación para gestionar cómo las personas y la inteligencia artificial trabajan juntas para alcanzar objetivos. Cuando llegue el momento de abordar un problema, ampliar el alcance o hacer otros cambios en el plan, Copilot puede ayudar a rastrear un nuevo objetivo, identificar qué tareas están atrasadas o qué miembros del equipo tienen la carga de trabajo más alta. Experimenta las capacidades de Copilot en el nuevo Planner Con Copilot, puedes:Generar y añadir tareas, objetivos y grupos: Olvídate de la tediosa tarea de crear listas de tareas. Copilot puede generar y añadir elementos de forma automática, basándose en tus indicaciones.Crear planes completos: ¿Necesitas un plan detallado para tu próximo proyecto? Simplemente pídele a Copilot que lo genere por ti, y comenzará a trabajar en el desglose del proyecto.Agilizar la ejecución del proyecto: Una vez que tengas tu plan en marcha, Copilot puede ayudarte a mantener el rumbo correcto. Te sugiere qué hacer a continuación y te ayuda a desglosar tareas complejas en pasos más manejables.Gestionar cambios en el plan: ¿Surge un imprevisto? No hay problema. Copilot puede ayudarte a adaptarte a los cambios, identificando nuevas metas, tareas atrasadas o posibles problemas de carga de trabajo en tu equipo.¡Gracias a todos por tomarse el tiempo de leer mi publicación sobre la implementación de Copilot en Planner! Si encontraste útiles las ideas compartidas, te invito a que le des un “Me gusta” y a que compartas tus pensamientos en los comentarios. La incorporación de Copilot en Planner puede ser un gran paso hacia la mejora de nuestra productividad y colaboración en equipo. ¡Vamos juntos a aprovechar al máximo esta herramienta y a llevar nuestros proyectos al siguiente nivel! Espero con ansias ver cómo Copilot en Planner transforma nuestra forma de trabajar! ¡Nos vemos en el siguiente post. Read More
simple way to create a supplies ordered / inventory SS that is broken down into mini categories
I need to track everything our company purchases in a lot of various categories such as Safety Gear and Supplies (PPE, Apparel, Vehicle Parts and Vehicle Maintenance supplies, Tools, Apparel and promo items, Misc small items, Office supplies, Office tech equipment, Shop tools, Shop Equipment, tools, chemical products, hoses, jetters, nozzles, cameras etc, Job site equipment and supplies (totes, tools, sorbents, etc)
I need to make a inventory count sheet that has the items we purchase and links of where we purchase them for easy reordering and include the previous order dates and quantity’s so when we do the next count, we have a running list of what we should have in stock and used and use a blank sheet of the categories when we do the counts.
I was thinking of Breaking it down into Categories, with subcategories or possibly making a table for each various item and then have a master full list that can be printed and wrote on for inventory counts.
I just tried adding a dropdown list in to see if that’s the best way but don’t want to make it more complex than needed and im horrible at setting the structure up.
what is my best solution and how do i set it up?
I need to track everything our company purchases in a lot of various categories such as Safety Gear and Supplies (PPE, Apparel, Vehicle Parts and Vehicle Maintenance supplies, Tools, Apparel and promo items, Misc small items, Office supplies, Office tech equipment, Shop tools, Shop Equipment, tools, chemical products, hoses, jetters, nozzles, cameras etc, Job site equipment and supplies (totes, tools, sorbents, etc)I need to make a inventory count sheet that has the items we purchase and links of where we purchase them for easy reordering and include the previous order dates and quantity’s so when we do the next count, we have a running list of what we should have in stock and used and use a blank sheet of the categories when we do the counts. I was thinking of Breaking it down into Categories, with subcategories or possibly making a table for each various item and then have a master full list that can be printed and wrote on for inventory counts. I just tried adding a dropdown list in to see if that’s the best way but don’t want to make it more complex than needed and im horrible at setting the structure up. what is my best solution and how do i set it up? Read More
Office Scripts triggered on sheet activation – to Refresh all data connections
Hi,
I have recorded the below office script that refreshes all data connections. I want this script to run when a sheet named “Delivery date” is activated (i.e. when the user swaps from another sheet to this sheet)
It would appear that this is possible, as I found the below help article but I can’t get it to work…
Hi,I have recorded the below office script that refreshes all data connections. I want this script to run when a sheet named “Delivery date” is activated (i.e. when the user swaps from another sheet to this sheet) It would appear that this is possible, as I found the below help article but I can’t get it to work…https://learn.microsoft.com/en-us/javascript/api/excel/excel.worksheet?view=excel-js-preview#excel-excel-worksheet-onactivated-member function main(workbook: ExcelScript.Workbook) { // Refresh all data connections workbook.refreshAllDataConnections();} Thank for your helpMike Read More
Find next meeting date for a specific meeting subject
Hi, I’m trying to build a spreadsheet to pull together which will include flagging the next meeting date for a specific meetings.
I’ve exported my calendar from outlook to an excel sheet ‘calendar’ which contains dates for multiple reoccurring meetings exported from Outlook, for example (UK date format):
meeting 101/04/2024meeting 101/05/2024meeting 101/06/2024meeting 201/04/2024meeting 201/05/2024meeting 201/06/2024meeting 301/04/2024meeting 301/05/2024meeting 301/06/2024
I want to have a cell in a separate sheet which will look at the next upcoming date for a specified meeting subject, how can I achieve this please?
And as a progression would there be any way to look this up directly in my Outlook calendar which would save me regularly exporting my calendar to the sheet in Excel?
Any help would be appreciated, thanks
Hi, I’m trying to build a spreadsheet to pull together which will include flagging the next meeting date for a specific meetings. I’ve exported my calendar from outlook to an excel sheet ‘calendar’ which contains dates for multiple reoccurring meetings exported from Outlook, for example (UK date format): meeting 101/04/2024meeting 101/05/2024meeting 101/06/2024meeting 201/04/2024meeting 201/05/2024meeting 201/06/2024meeting 301/04/2024meeting 301/05/2024meeting 301/06/2024 I want to have a cell in a separate sheet which will look at the next upcoming date for a specified meeting subject, how can I achieve this please? And as a progression would there be any way to look this up directly in my Outlook calendar which would save me regularly exporting my calendar to the sheet in Excel? Any help would be appreciated, thanks Read More
How to Deploy MySql server without .SQL file?
I currently have a MySQL server deployed on a Linux operating system. I am considering migrating this MySQL server to a Windows operating system. Although I do not possess a .SQL file typically used for importing databases, I do have the MySQL directory folder available.
Would it be feasible to deploy the MySQL database utilizing this root folder directory?
I currently have a MySQL server deployed on a Linux operating system. I am considering migrating this MySQL server to a Windows operating system. Although I do not possess a .SQL file typically used for importing databases, I do have the MySQL directory folder available. Would it be feasible to deploy the MySQL database utilizing this root folder directory? Read More
RUNTIME ERROR 13
I am getting runtime ERROR 13, whenever I try to delete a row in my excel spreadsheet. The code where the error appears I can’t figure out where it is going wrong. Could someone help me to debug this problem?
Thanks much.
I am getting runtime ERROR 13, whenever I try to delete a row in my excel spreadsheet. The code where the error appears I can’t figure out where it is going wrong. Could someone help me to debug this problem? Thanks much. Read More

Why Am I Getting An Error Message When Trying To Open My QuickBooks File?
Troubleshooting Solutions: Error Message When Trying To Open My QuickBooks File
Encountering an Error Message When Trying To Open My QuickBooks File can disrupt your workflow, especially when you need immediate access to your financial data. Several factors could contribute to this issue, ranging from file corruption to software conflicts. Here are some troubleshooting solutions to help you resolve the problem:
1. Verify File Location and Permissions: Start by ensuring that the QuickBooks file is stored in the correct location and that you have the necessary permissions to access it. Check if the file is located on a network drive or a local disk. If it’s on a network drive, verify that you have the appropriate network permissions.
2. Use QuickBooks File Doctor: Intuit offers a tool called QuickBooks File Doctor, designed to diagnose and repair common QuickBooks file issues. Download and run the tool, then follow the on-screen instructions to scan your company file for errors and repair any issues it detects.
3. Update QuickBooks to the Latest Version: Outdated software can sometimes lead to compatibility issues and errors. Ensure that you’re using the latest version of QuickBooks by checking for updates. Navigate to the Help menu within QuickBooks and select “Update QuickBooks Desktop” to download and install any available updates.
4. Disable Antivirus and Firewall Temporarily: Sometimes, antivirus software or firewall settings can interfere with QuickBooks operations, leading to error messages. Temporarily disable your antivirus software and firewall, then try opening the QuickBooks file again to see if the issue persists. Remember to re-enable them once you’ve finished troubleshooting.
5. Open QuickBooks Sample Company File: To determine if the problem lies with the specific company file or with QuickBooks itself, try opening a sample company file provided by QuickBooks. If you can open the sample file without encountering any errors, it suggests that the issue may be related to your company file specifically.
6. Check for File Corruption: File corruption can prevent QuickBooks from opening your company file properly. QuickBooks has a built-in utility called “Rebuild Data” that can help resolve minor data corruption issues. To use this feature, go to the File menu, select “Utilities,” and then choose “Rebuild Data.” Follow the prompts to rebuild your company file.
7. Restore from Backup: If you have a recent backup of your QuickBooks company file, consider restoring it to see if the error persists. This can help bypass any issues with the current file. Be sure to regularly backup your QuickBooks data to prevent data loss in the future.
8. Check Disk Space and System Resources: Insufficient disk space or system resources can also cause errors when opening QuickBooks files. Ensure that you have enough free disk space and that your system meets the minimum requirements for running QuickBooks.
9. Run QuickBooks in Compatibility Mode: If you’re using an older version of QuickBooks on a newer operating system, try running QuickBooks in compatibility mode. Right-click on the QuickBooks shortcut or executable file, select “Properties,” navigate to the Compatibility tab, and check the box for “Run this program in compatibility mode for.” Choose an appropriate operating system from the dropdown menu and click “Apply” to save the changes.
By following these troubleshooting solutions, you can hopefully resolve the Error Message When Trying To Open My QuickBooks File and regain access to your financial data. If the issue persists, consider reaching out to QuickBooks support for further assistance.
Troubleshooting Solutions: Error Message When Trying To Open My QuickBooks File Encountering an Error Message When Trying To Open My QuickBooks File can disrupt your workflow, especially when you need immediate access to your financial data. Several factors could contribute to this issue, ranging from file corruption to software conflicts. Here are some troubleshooting solutions to help you resolve the problem: 1. Verify File Location and Permissions: Start by ensuring that the QuickBooks file is stored in the correct location and that you have the necessary permissions to access it. Check if the file is located on a network drive or a local disk. If it’s on a network drive, verify that you have the appropriate network permissions.2. Use QuickBooks File Doctor: Intuit offers a tool called QuickBooks File Doctor, designed to diagnose and repair common QuickBooks file issues. Download and run the tool, then follow the on-screen instructions to scan your company file for errors and repair any issues it detects.3. Update QuickBooks to the Latest Version: Outdated software can sometimes lead to compatibility issues and errors. Ensure that you’re using the latest version of QuickBooks by checking for updates. Navigate to the Help menu within QuickBooks and select “Update QuickBooks Desktop” to download and install any available updates.4. Disable Antivirus and Firewall Temporarily: Sometimes, antivirus software or firewall settings can interfere with QuickBooks operations, leading to error messages. Temporarily disable your antivirus software and firewall, then try opening the QuickBooks file again to see if the issue persists. Remember to re-enable them once you’ve finished troubleshooting.5. Open QuickBooks Sample Company File: To determine if the problem lies with the specific company file or with QuickBooks itself, try opening a sample company file provided by QuickBooks. If you can open the sample file without encountering any errors, it suggests that the issue may be related to your company file specifically.6. Check for File Corruption: File corruption can prevent QuickBooks from opening your company file properly. QuickBooks has a built-in utility called “Rebuild Data” that can help resolve minor data corruption issues. To use this feature, go to the File menu, select “Utilities,” and then choose “Rebuild Data.” Follow the prompts to rebuild your company file.7. Restore from Backup: If you have a recent backup of your QuickBooks company file, consider restoring it to see if the error persists. This can help bypass any issues with the current file. Be sure to regularly backup your QuickBooks data to prevent data loss in the future.8. Check Disk Space and System Resources: Insufficient disk space or system resources can also cause errors when opening QuickBooks files. Ensure that you have enough free disk space and that your system meets the minimum requirements for running QuickBooks.9. Run QuickBooks in Compatibility Mode: If you’re using an older version of QuickBooks on a newer operating system, try running QuickBooks in compatibility mode. Right-click on the QuickBooks shortcut or executable file, select “Properties,” navigate to the Compatibility tab, and check the box for “Run this program in compatibility mode for.” Choose an appropriate operating system from the dropdown menu and click “Apply” to save the changes. By following these troubleshooting solutions, you can hopefully resolve the Error Message When Trying To Open My QuickBooks File and regain access to your financial data. If the issue persists, consider reaching out to QuickBooks support for further assistance. Read More
SharePoint Online List Column Validation on Multiple Fields Not Working
I’m trying to enforce validation in an out of the box SharePoint list. When a value is selected in a choice column eg. Column A = 1, I want six other columns to become required. The column types are as follows:
Column B: Yes/No Column C: Choice Column D: Single line of text Column E: Single line of text Column F: Single line of text Column G: Single line of text
Validation syntax: =IF([Column A]=”1″,AND(NOT(ISBLANK([Column B])),NOT(ISBLANK([Column C])),NOT(ISBLANK([Column D])),NOT(ISBLANK([Column E])),NOT(ISBLANK([Column F])),NOT(ISBLANK([Column G]))),TRUE)
Issue 1: It doesn’t work on Yes/No type of column (Column B) i.e. I can submit the form by leaving it blank, but if I change it to Single line of text it works.
Issue 2: It allows me to submit the form If I select a value in Column C and leave everything else blank.
Issue 3: When I remove Column C from the syntax I can submit the form by leaving all required fields empty.
For issue 1: Tried changing column type to text, it worked but tried on another Yes/No type column, it didn’t work. tried on a different list in a different site collection. For issue 2 and 3:
Tried a different list in a different site collection.Tried removing the choice type column and all validation stopped working.Tried with just one or two columns, worked fine.
I’m trying to enforce validation in an out of the box SharePoint list. When a value is selected in a choice column eg. Column A = 1, I want six other columns to become required. The column types are as follows:Column B: Yes/No Column C: Choice Column D: Single line of text Column E: Single line of text Column F: Single line of text Column G: Single line of textValidation syntax: =IF([Column A]=”1″,AND(NOT(ISBLANK([Column B])),NOT(ISBLANK([Column C])),NOT(ISBLANK([Column D])),NOT(ISBLANK([Column E])),NOT(ISBLANK([Column F])),NOT(ISBLANK([Column G]))),TRUE) Issue 1: It doesn’t work on Yes/No type of column (Column B) i.e. I can submit the form by leaving it blank, but if I change it to Single line of text it works. Issue 2: It allows me to submit the form If I select a value in Column C and leave everything else blank. Issue 3: When I remove Column C from the syntax I can submit the form by leaving all required fields empty. For issue 1: Tried changing column type to text, it worked but tried on another Yes/No type column, it didn’t work. tried on a different list in a different site collection. For issue 2 and 3:Tried a different list in a different site collection.Tried removing the choice type column and all validation stopped working.Tried with just one or two columns, worked fine. Read More

How to send Direct Deposit paychecks in QuickBooks Desktop Payroll?
Troubleshooting Solutions: Direct Deposit paychecks in QuickBooks Desktop Payroll
Verify Direct Deposit Setup: Ensure that your Direct Deposit setup in QuickBooks Desktop Payroll is accurate. Double-check bank account information, employee Direct Deposit authorizations, and paycheck details. Go to the Employees menu, then select Send Payroll Data. Review the Direct Deposit Summary to confirm setup correctness.Check Paycheck Status: Review the status of each paycheck to determine if it was successfully transmitted for Direct Deposit. Navigate to the Employees menu, then select Send Payroll Data. Check the transmission status for each paycheck. If any paycheck shows a transmission error, resolve the error before attempting to resend.Confirm Employee Information: Verify that employee bank account details and Direct Deposit authorizations are correct. Go to the Employees menu, then select Employee Center. Choose the affected employee and review their information. Update any incorrect details and ensure the Direct Deposit authorization is active.Review Payroll Processing Schedule: Ensure that your payroll processing schedule allows sufficient time for Direct Deposit transactions to be processed. Review the cutoff times provided by your bank for submitting payroll. Adjust your payroll processing schedule accordingly to ensure timely submission.Check Bank Account Balance: Ensure that your company’s bank account has sufficient funds to cover Direct Deposit transactions. Insufficient funds can result in failed Direct Deposit transactions and delays in paycheck processing. Monitor your bank account balance and replenish funds as needed before processing payroll.Monitor Bank Notifications: Keep an eye on any notifications or alerts from your bank regarding Direct Deposit transactions. Banks may send notifications for failed transactions or other issues related to Direct Deposit processing. Address any issues promptly to avoid delays in employee paycheck deposits.Resend Paychecks if Necessary: If a paycheck fails to deposit into an employee’s account, attempt to resend the paycheck. Go to the Employees menu, then select Send Payroll Data. Choose Resend Direct Deposit Paychecks and follow the prompts to resend the affected paychecks. Monitor the transmission status to ensure successful processing.Contact Bank for Assistance: If Direct Deposit issues persist, contact your bank for assistance. Banks can provide insights into any issues with Direct Deposit transactions, such as failed deposits or processing delays. Verify that your bank has the correct information for processing Direct Deposit transactions and address any issues identified.Review Direct Deposit Service Agreement: Review the terms and conditions of your Direct Deposit service agreement with your bank. Ensure compliance with all requirements and guidelines outlined in the agreement. Address any discrepancies or issues that may impact Direct Deposit processing.Contact QuickBooks Support: If troubleshooting steps fail to resolve the Direct Deposit issue, contact QuickBooks Desktop Payroll support for assistance. Provide detailed information about the problem, including steps taken to troubleshoot. QuickBooks support representatives can offer further guidance and troubleshooting steps tailored to your specific issue.
By following these troubleshooting solutions, you can effectively address Direct Deposit paycheck issues in QuickBooks Desktop Payroll and ensure timely and accurate paycheck deposits for your employees.
Troubleshooting Solutions: Direct Deposit paychecks in QuickBooks Desktop Payroll Verify Direct Deposit Setup: Ensure that your Direct Deposit setup in QuickBooks Desktop Payroll is accurate. Double-check bank account information, employee Direct Deposit authorizations, and paycheck details. Go to the Employees menu, then select Send Payroll Data. Review the Direct Deposit Summary to confirm setup correctness.Check Paycheck Status: Review the status of each paycheck to determine if it was successfully transmitted for Direct Deposit. Navigate to the Employees menu, then select Send Payroll Data. Check the transmission status for each paycheck. If any paycheck shows a transmission error, resolve the error before attempting to resend.Confirm Employee Information: Verify that employee bank account details and Direct Deposit authorizations are correct. Go to the Employees menu, then select Employee Center. Choose the affected employee and review their information. Update any incorrect details and ensure the Direct Deposit authorization is active.Review Payroll Processing Schedule: Ensure that your payroll processing schedule allows sufficient time for Direct Deposit transactions to be processed. Review the cutoff times provided by your bank for submitting payroll. Adjust your payroll processing schedule accordingly to ensure timely submission.Check Bank Account Balance: Ensure that your company’s bank account has sufficient funds to cover Direct Deposit transactions. Insufficient funds can result in failed Direct Deposit transactions and delays in paycheck processing. Monitor your bank account balance and replenish funds as needed before processing payroll.Monitor Bank Notifications: Keep an eye on any notifications or alerts from your bank regarding Direct Deposit transactions. Banks may send notifications for failed transactions or other issues related to Direct Deposit processing. Address any issues promptly to avoid delays in employee paycheck deposits.Resend Paychecks if Necessary: If a paycheck fails to deposit into an employee’s account, attempt to resend the paycheck. Go to the Employees menu, then select Send Payroll Data. Choose Resend Direct Deposit Paychecks and follow the prompts to resend the affected paychecks. Monitor the transmission status to ensure successful processing.Contact Bank for Assistance: If Direct Deposit issues persist, contact your bank for assistance. Banks can provide insights into any issues with Direct Deposit transactions, such as failed deposits or processing delays. Verify that your bank has the correct information for processing Direct Deposit transactions and address any issues identified.Review Direct Deposit Service Agreement: Review the terms and conditions of your Direct Deposit service agreement with your bank. Ensure compliance with all requirements and guidelines outlined in the agreement. Address any discrepancies or issues that may impact Direct Deposit processing.Contact QuickBooks Support: If troubleshooting steps fail to resolve the Direct Deposit issue, contact QuickBooks Desktop Payroll support for assistance. Provide detailed information about the problem, including steps taken to troubleshoot. QuickBooks support representatives can offer further guidance and troubleshooting steps tailored to your specific issue.By following these troubleshooting solutions, you can effectively address Direct Deposit paycheck issues in QuickBooks Desktop Payroll and ensure timely and accurate paycheck deposits for your employees. Read More
How to use Bookings to allow external users to pick a webinar to attend
I’m working on moving a company from Zoom to MS Teams. One feature of Zoom they use is the ability to provide external uses the ability to pick from a list of scheduled webinars to join. See attached for an example of what I need to replicate. I tried creating a shared Booking page to do this, but can’t quite get what I want. Is that possible with Bookings and if so, could you please help me by listing the steps? Thank you in advance!
I’m working on moving a company from Zoom to MS Teams. One feature of Zoom they use is the ability to provide external uses the ability to pick from a list of scheduled webinars to join. See attached for an example of what I need to replicate. I tried creating a shared Booking page to do this, but can’t quite get what I want. Is that possible with Bookings and if so, could you please help me by listing the steps? Thank you in advance! Read More

How to Set up your company Payroll for Direct Deposit in QuickBooks?
Troubleshooting Solutions: Set up your company payroll for direct deposit in QuickBooks
Setting up direct deposit for your company’s payroll in QuickBooks is essential for streamlining your payroll process. If you’re encountering issues during the setup, here are some troubleshooting solutions to help you resolve them:
Verify Bank Account Information: Before setting up direct deposit, ensure that you have accurate bank account information entered into QuickBooks. Double-check the routing number and account number to prevent any errors.Check for Compliance: Ensure that your company is compliant with all federal and state regulations regarding direct deposit. Some states have specific requirements or restrictions for direct deposit, so it’s crucial to review these guidelines before proceeding.Review QuickBooks Subscription: Direct deposit functionality may vary depending on your QuickBooks subscription. Make sure that your subscription plan includes direct deposit services. If not, you may need to upgrade your plan or purchase the direct deposit feature separately.Internet Connection: A stable internet connection is necessary for setting up direct deposit in QuickBooks. Ensure that you have a reliable internet connection to avoid any disruptions during the setup process.Update QuickBooks Software: Ensure that you are using the latest version of QuickBooks software. Outdated software may lack necessary updates or bug fixes required for smooth direct deposit setup.Check Bank’s Direct Deposit Requirements: Different banks may have specific requirements for setting up direct deposit. Contact your bank to verify any additional steps or documentation needed to enable direct deposit for your company’s payroll.Employee Information Accuracy: Verify that all employee information, including bank account details and personal information, is accurate and up-to-date in QuickBooks. Incorrect information can lead to direct deposit errors or failures.Review Direct Deposit Limits: Some banks impose limits on the amount of money that can be sent via direct deposit. Ensure that your payroll amounts do not exceed these limits to prevent any issues with processing direct deposits.Check for QuickBooks Updates: Regularly check for updates within QuickBooks to ensure that you have the latest features and fixes. Updates may include improvements to the direct deposit setup process.Test Direct Deposit: Before processing payroll, perform a test direct deposit for a small amount to ensure that everything is set up correctly. This allows you to identify and resolve any issues before processing larger payroll amounts.Contact QuickBooks Support: If you’re still experiencing difficulties setting up direct deposit, don’t hesitate to contact QuickBooks customer support for assistance. They can provide personalized guidance and troubleshooting steps based on your specific issue.
By following these troubleshooting solutions, you can effectively address any issues you encounter while setting up direct deposit for your company’s payroll in QuickBooks, ensuring a smooth and efficient payroll process for your business.
Troubleshooting Solutions: Set up your company payroll for direct deposit in QuickBooks Setting up direct deposit for your company’s payroll in QuickBooks is essential for streamlining your payroll process. If you’re encountering issues during the setup, here are some troubleshooting solutions to help you resolve them: Verify Bank Account Information: Before setting up direct deposit, ensure that you have accurate bank account information entered into QuickBooks. Double-check the routing number and account number to prevent any errors.Check for Compliance: Ensure that your company is compliant with all federal and state regulations regarding direct deposit. Some states have specific requirements or restrictions for direct deposit, so it’s crucial to review these guidelines before proceeding.Review QuickBooks Subscription: Direct deposit functionality may vary depending on your QuickBooks subscription. Make sure that your subscription plan includes direct deposit services. If not, you may need to upgrade your plan or purchase the direct deposit feature separately.Internet Connection: A stable internet connection is necessary for setting up direct deposit in QuickBooks. Ensure that you have a reliable internet connection to avoid any disruptions during the setup process.Update QuickBooks Software: Ensure that you are using the latest version of QuickBooks software. Outdated software may lack necessary updates or bug fixes required for smooth direct deposit setup.Check Bank’s Direct Deposit Requirements: Different banks may have specific requirements for setting up direct deposit. Contact your bank to verify any additional steps or documentation needed to enable direct deposit for your company’s payroll.Employee Information Accuracy: Verify that all employee information, including bank account details and personal information, is accurate and up-to-date in QuickBooks. Incorrect information can lead to direct deposit errors or failures.Review Direct Deposit Limits: Some banks impose limits on the amount of money that can be sent via direct deposit. Ensure that your payroll amounts do not exceed these limits to prevent any issues with processing direct deposits.Check for QuickBooks Updates: Regularly check for updates within QuickBooks to ensure that you have the latest features and fixes. Updates may include improvements to the direct deposit setup process.Test Direct Deposit: Before processing payroll, perform a test direct deposit for a small amount to ensure that everything is set up correctly. This allows you to identify and resolve any issues before processing larger payroll amounts.Contact QuickBooks Support: If you’re still experiencing difficulties setting up direct deposit, don’t hesitate to contact QuickBooks customer support for assistance. They can provide personalized guidance and troubleshooting steps based on your specific issue.By following these troubleshooting solutions, you can effectively address any issues you encounter while setting up direct deposit for your company’s payroll in QuickBooks, ensuring a smooth and efficient payroll process for your business. Read More
MFA denied; duplicate authentication attempt
We see a lot of entries in the Entra ID Sign in logs with “MFA denied; duplicate authentication attempt”. Most of the time a lot of them are registered in a short amount of time
Users are not (yet) complaining. May be users don’t even see something wrong.
Anyone who knows what this means? (MFA denied; duplicate authentication attempt)
kind regards
Jurgen
We see a lot of entries in the Entra ID Sign in logs with “MFA denied; duplicate authentication attempt”. Most of the time a lot of them are registered in a short amount of time Users are not (yet) complaining. May be users don’t even see something wrong.Anyone who knows what this means? (MFA denied; duplicate authentication attempt)kind regardsJurgen Read More
Bletchley Park AI User Group 29 May
The Post Microsoft Build One
Date And Time: Wednesday 29 May, 17:45-20:00
Venue: South Central Institute of Technology, Bletchley Park, Milton Keynes, MK3 6DN
Event Overview:
Join us to explore Artificial Intelligence (AI) and how it is changing work in every industry.
You can join Microsoft Build online (or in Seattle) from 21-23 May. Then join us for a roundup of our favourite things.
We are group of international technology speakers bringing the brightest and best minds in technology to the home of the codebreakers
We aim to demystify the rapidly changing AI environment, delve into its practical applications and deepen your understanding.
Designed for tech professionals, leaders, and knowledge workers, this seminar will navigate the opportunities for transformation using AI.
Purpose:
Enhance AI literacy among participants from public and private sectors
Help you navigate the “watch back sessions” and key news from Microsoft Build
Provide practical insights into AI’s role in revolutionising business operations and educational practices
Explore ethical considerations and responsible AI implementation
Foster problem-solving capabilities using AI in unique industry contexts
Lay the groundwork for continuous AI learning and adaptation
The Post Microsoft Build One
Date And Time: Wednesday 29 May, 17:45-20:00Venue: South Central Institute of Technology, Bletchley Park, Milton Keynes, MK3 6DN
Event Overview:Join us to explore Artificial Intelligence (AI) and how it is changing work in every industry.You can join Microsoft Build online (or in Seattle) from 21-23 May. Then join us for a roundup of our favourite things.
We are group of international technology speakers bringing the brightest and best minds in technology to the home of the codebreakers
We aim to demystify the rapidly changing AI environment, delve into its practical applications and deepen your understanding.
Designed for tech professionals, leaders, and knowledge workers, this seminar will navigate the opportunities for transformation using AI.
Purpose:
Enhance AI literacy among participants from public and private sectors
Help you navigate the “watch back sessions” and key news from Microsoft Build
Provide practical insights into AI’s role in revolutionising business operations and educational practices
Explore ethical considerations and responsible AI implementation
Foster problem-solving capabilities using AI in unique industry contexts
Lay the groundwork for continuous AI learning and adaptation Read More
Bletchley Park AI User Group 18 June – The Turing One
Join us to explore Artificial Intelligence (AI) and how it is changing work in the tech industry.
This event, hosted by Bletchley Park AI Microsoft User Group, a group of international technology speakers bringing the brightest and best minds in technology to the birthplace of AI.
We aim to demystify AI and delve into its practical applications and deepen your understanding. Designed for tech professionals, leaders, and knowledge workers, this seminar will navigate the opportunities for transformation using AI.
Purpose:
Enhance AI literacy among participants from public and private sectors
Provide practical insights into AI’s role in revolutionising business operations and educational practices
Explore ethical considerations and responsible AI implementation
Foster problem-solving capabilities using AI in unique industry contexts
Lay the groundwork for continuous AI learning and adaptation
Agenda:
William Dorrington – Tech Intensity & Organisational Enablement
Adam Jackson – Alan Turing and his legacy – Pride month special
Leon Gordon – AI news and views
Final speaker TBA
Join us to explore Artificial Intelligence (AI) and how it is changing work in the tech industry.This event, hosted by Bletchley Park AI Microsoft User Group, a group of international technology speakers bringing the brightest and best minds in technology to the birthplace of AI.We aim to demystify AI and delve into its practical applications and deepen your understanding. Designed for tech professionals, leaders, and knowledge workers, this seminar will navigate the opportunities for transformation using AI.Purpose:
Enhance AI literacy among participants from public and private sectors
Provide practical insights into AI’s role in revolutionising business operations and educational practices
Explore ethical considerations and responsible AI implementation
Foster problem-solving capabilities using AI in unique industry contexts
Lay the groundwork for continuous AI learning and adaptation
Agenda:William Dorrington – Tech Intensity & Organisational EnablementAdam Jackson – Alan Turing and his legacy – Pride month specialLeon Gordon – AI news and viewsFinal speaker TBA Read More
Conditional Colour Formatting. with multiple values.
Hello.
I’m new here and a pretty basic user of excel. I work in print and use Excel to make Datamerge (DM) files in Adobe InDesign. This is a multiple party process and we’ve had a couple of issues so I’m looking to add a redundancy to make for less issues.
We have a product that changes it’s DM layout depending on which location it’s going to. I have two template sheets that we use and I’m looking to set it up so that a cell changes colour to Red if it’s the wrong location listed.
I.E. I’m using the sheet layout for Locations A-C but I accidentally put in Location D into the sheet I want location D to turn Red and Locations A-C to turn Green. The location Names don’t ever change but I have some 100+ Locations that I need to set it up for.
I’ve gotten it to work for Location D using the conditional Formatting rules with
=Sheet1!$C$2=Sheet 2!$A$2:$A$33 but if I insert Location E it just turns back to white.
Sorry if this is rambling.
Also sorry if the answer is obvious I tried to make it work with Google but couldn’t get it so I turn to th
Hello.I’m new here and a pretty basic user of excel. I work in print and use Excel to make Datamerge (DM) files in Adobe InDesign. This is a multiple party process and we’ve had a couple of issues so I’m looking to add a redundancy to make for less issues. We have a product that changes it’s DM layout depending on which location it’s going to. I have two template sheets that we use and I’m looking to set it up so that a cell changes colour to Red if it’s the wrong location listed. I.E. I’m using the sheet layout for Locations A-C but I accidentally put in Location D into the sheet I want location D to turn Red and Locations A-C to turn Green. The location Names don’t ever change but I have some 100+ Locations that I need to set it up for.I’ve gotten it to work for Location D using the conditional Formatting rules with =Sheet1!$C$2=Sheet 2!$A$2:$A$33 but if I insert Location E it just turns back to white.Sorry if this is rambling. Also sorry if the answer is obvious I tried to make it work with Google but couldn’t get it so I turn to th Read More


