

Month: January 2024
Lesson Learned #464: Utilizing SMO’s Scripting Option in Azure SQL Database.
Today, I encountered a unique service request from a customer inquiring about alternative methods to script out a table and all its dependencies in Azure SQL Database. Traditionally, several approaches are employed, such as utilizing stored procedures like sp_help, sp_depends, or functions like object_definitionor SSMS GUI. These methods, while useful, but, I would like to share other options using SQL Server Management Objects (SMO).
Script:
# Define connection details
$serverName = “servername.database.windows.net”
$databaseName = “DBName”
$tableName = “Table1”
$schemaName = “dbo” # Update if using a different schema
$userId = “UserName”
$password = “Pwd!”
# Create a Server object
$serverConnection = New-Object Microsoft.SqlServer.Management.Common.ServerConnection($serverName, $userId, $password)
$server = New-Object Microsoft.SqlServer.Management.Smo.Server($serverConnection)
# Access the database
$database = $server.Databases.Item($databaseName)
# Access the specific table
$table = $database.Tables.Item($tableName, $schemaName)
# Configure scripting options
$scripter = New-Object Microsoft.SqlServer.Management.Smo.Scripter($server)
$scripter.Options.ScriptSchema = $true
$scripter.Options.Indexes = $true
$scripter.Options.Triggers = $true
$scripter.Options.ScriptDrops = $false
$scripter.Options.WithDependencies = $false
# Script the table
$scripter.Script($table) | ForEach-Object { Write-Output $_ }
Running this small PowerShell Script we are going to have the structure of the table including triggers and Indexes.
Example:
SET ANSI_NULLS ON
SET QUOTED_IDENTIFIER ON
CREATE TABLE [dbo].[PerformanceVarcharNVarchar](
[Id] [int] NOT NULL,
[TextToSearch] [varchar](200) COLLATE SQL_Latin1_General_CP1_CI_AS NOT NULL,
CONSTRAINT [PK_PerformanceVarcharNVarchar] PRIMARY KEY CLUSTERED
(
[Id] ASC
)WITH (STATISTICS_NORECOMPUTE = OFF, IGNORE_DUP_KEY = OFF)
)
SET ANSI_PADDING ON
CREATE NONCLUSTERED INDEX [PerformanceVarcharNVarchar1] ON [dbo].[PerformanceVarcharNVarchar]
(
[TextToSearch] ASC
)WITH (STATISTICS_NORECOMPUTE = OFF, DROP_EXISTING = OFF, ONLINE = OFF)
Microsoft Tech Community – Latest Blogs –Read More

Azure DevOps Pipelines: Discovering the Ideal Service Connection Strategy
About
This post is part of an overall series on Azure DevOps YAML Pipelines. The series will cover any and all topics that fall into the scope of Azure DevOps Pipelines. I encourage you to check it out if you are new to this space.
Introduction
When an organization is trying to configure their Azure DevOps (ADO) environment to deploy into Azure, they are immediately met with the dilemma on how their DevOps instance will execute the deployment against their Azure Environment. This article will go over the various configurations, decisions, and pros and cons that should be evaluated when deciding how your DevOps environment will deploy code into Azure.
This article will not talk about the nitty gritty details on how to configure the connection. This is covered in MS documentation. Nor will we discuss which type of authentication should be created. There are additional resources that will cover this. This article instead will focus on questions such as “How many Service Connections should I have?”, “What access should my Service Connection have?”, “Which pipelines can access my Service Connection?”, etc…
Deployment Scope
This question on how to architect our Service Connections, the means by which Azure DevOps communicates to Azure, will be the main focal point of this piece. Deployment Scope, for the purposes of this article, will refer to what Azure Environment and resources our Azure DevOps Service Connection can interact with.
This answer will vary depending on your organization’s security posture, scale, and maturity. The most secure will be the smallest deployment scope and will then entail the most amount of overhead, while on the flip side the least secure will have the largest deployment scope and least amount of overhead associated with it. We will cover three scenarios and the associated pros and cons: One Service Connection to Rule Them All, a Service Connection per Resource Group, as well as a Service Connection Per Environment.
As for what access the identity from ADO should have in Azure I typically recommend starting with Contributor as this will provide the ability to create Azure resources and interact with the Azure Management Plane. If your organization in leveraging Infrastructure as Code (IaC) I would also recommend leveraging User Access Administrator, to provision Role Based Access Controls and allow Azure to Azure resource communication leveraging Managed Identities. This is effectively the same permission combo as Owner; however, if you are familiar with Azure recommended practices, Owner permission assignment is not recommended in the majority of cases.
One Service Connection to Rule Them All
This scenario is pretty self-explanatory. A team would have a single Service Connection which all their pipeline would leverage across all environments. This scenario could be scoped a little more specific where a specific application will have one Service Connection that is responsible for deploying across all environments.
Pros
The pro to this approach is pretty simple. We are only concerned about one Service Connection for our application(s). This means we have to manage and provision access to one identity behind the scenes in Entra ID. Additionally, if your organization is leveraging a Service Principle and password to authenticate to Azure these credentials will expire and need to be rotated. Since there is one Service Connection for all deployments, we will only need to maintain the connection to one Service Principal. This negates the potential risk your production deployment is delayed due to credentials expiring. This overall would be considered a small concern, unless it is realized while in the middle of a production outage/hot fix.
Cons
As mentioned earlier this would be the least secure approach. By enabling one Service Connection access to everything we are effectively given every deployment regardless of the deployment scope. This also means from a deployment/audit log that all activity will report back to one identity which can make troubleshooting and tracking harder.
We also introduce the unintended risk of a deployment designed to go a development environment inadvertently going to production. Defining the Service Connection is one criteria to separate Azure Deployments across environments. This is a rather large concern as someone can easily unknowingly forget to update the service connection and deploy code in the wrong location.
Service Connection Per Resource Group
The opposite of a one Service Connection to Rule Them All would be a Service Connection Pre Resource Group. This structure would have the finest grain access control where each individual Resource Group would have a Service Connection tied to it’s deployment.
Pros
This approach is the most secure. It is the most restrictive model that is easily available when creating the Service Connection. By creating a Service Connection per Resource Group we are limiting what specific deployments can interact with. This would eliminate the risk of Team A’s deployments touching Team B’s resources since the deployment scope of the Service Connection would be limited to the resources contained in Team A’s Resource Group. This can be a rather significant gain; however, I will point out that a proper CI/CD flow should mitigate this risk.
Additionally, from a logging and auditing perspective there would be clear transparency on what deployment updated what resources. Since each deployment pipeline’s permissions are scoped to that pipeline, we can quickly trace back any changes that were made back to the orchestrating pipeline.
Cons
By the nature of this approach there will be exponentially more Service Connections to manage. If wanting to use this approach I would highly encourage using the Workload Identity Federation when setting up your connections. This will help alleviate the password expiration of your Service Connections.
If you aren’t using Workload Identity Federation this could lead to the team having to constantly watch for and update passwords since a large organization could easily have 100 Resource Groups which means typically 100 pipelines and that could be across three environments. Thus, we are talking about managing and organizing around 300 Service Connections. Not a simple task.
Another significant drawback to this approach occurs when you are deploying Infrastructure as Code or having to update resources that live outside of the designated Resource Group. Since the Service Connection can only interact with the resources in its designated Resource Group it will not be able to provision any additional RBAC access required to resources that live outside of the Resource Group. Again, the scope of this effort in the example above could mean tracking access for 300 Service Connections.
Some common scenarios for this would be activities such as being able to setup up access to retrieve secrets from a shared Key Vault, add a Managed Identity access to a share data source, and pushing images to a shared container registry. To accommodate for this one would have to manually add the extra permissions. This then will have an impact as this access provisioning would not be defined via IaC and runs the risk of being unaccounted for in an organization Azure deployment.
A Service Connection Per Environment
This configuration is a bit of a goldilocks between the two extremes. In this scenario our Service Connection will have access to all resource groups in a specific Azure Subscription/Environment. The Service Connection would be reused across a team(s) to handle Azure Deployments to a specified subscription.
Pros
This architecture will lead to higher developer enablement as developers would be able to, via Azure DevOps Deployments, make any and all changes required for their applications and/or infrastructure. Additionally, by having different Service Connections we create the need to have the Service Connection updated when moving across environments. This is a significant win as it will satisfy any audit/security requirements that environments are separated by access.
This approach limits the activity of the Service Connection’s role assignment to just one per environment as opposed to having to continuously create/update Service Connection role assignments each time a new pipeline is created. This is sizable as it will negate the overhead involved with maintaining these.
Cons
Structuring your Service Connection this way will violate the least privilege access principle. This principle is defined as:
“The information security principle of least privilege asserts that users and applications should be granted access only to the data and operations they require to perform their jobs.”
Since the deployment pipeline will have access greater than what is needed to do its specific job (i.e. access to update resources outside the scope of the defined deployment) this architecture will violate this principle. As such this approach is not the most secure. In some organizations that strictly adhere to the concept of least privilege this could be significant and a deal breaker.
Auditing your Azure Environment will also not be as granular/transparent as it would be under the Service Connection Per Resource Group model since the same Service Connection would be reused across the environment.
Conclusion
These three approaches are all options when looking to configure your Service Connections from Azure DevOps into Azure. Each approach will have its one set of pros and cons your organization should evaluate when making a decision. It is important to understand there isn’t one universal answer for everyone.
If interested in learning more on Azure DevOps YAML Pipelines I’d encourage you to check out additional posts on this topic.
Microsoft Tech Community – Latest Blogs –Read More
SharePoint Roadmap Pitstop: December 2023
Ho ho ho, Merry SharePoint! We ho ho hope you found time away from screens and unwound with fun, family, and friends. December 2023 brought a lot to review AND a lot to look forward. So, without delay, in this here beginning of 2024… let, us, go!
We’ll focus on everything that landed this past month: SharePoint eSignature, Stream: Add a survey, poll/quiz/link/text, Viva Engage: Community creation API, OneDrive app for Teams, OneDrive: Open in app, Microsoft 365 Backup (Public Preview), Microsoft Loop moves to loop.cloud.microsoft, and notification of the Delve Web retirement on Dec. 16, 2024.
We take a glance back and highlight the top 5 SharePoint tech items of 2023, peek ahead at 5 anticipated features slated for CY24-Q1 and shine a light on a few related items and the always-fun teasers. AND we’ve a special bonus, festive song within the companion podcast episode – titled, “It’s beginning to look a lot like SharePoint” – queried at number one on the Power BI charts :).
Details and screenshots below, including the full audible companion: The Intrazone Roadmap Pitstop: Month 2023 podcast episode – all to help answer, “What’s rolling out now for SharePoint and related technologies into Microsoft 365?”
All features listed below began rolling out to Targeted Release customers in Microsoft 365 as of December 2023 (possibly early January 2024).
Inform and engage with dynamic employee experiences
Build your intelligent intranet on SharePoint in Microsoft 365 and get the benefits of investing in business outcomes – reducing IT and development costs, increasing business speed and agility, and up-leveling the dynamic, personalized, and welcoming nature of your intranet.
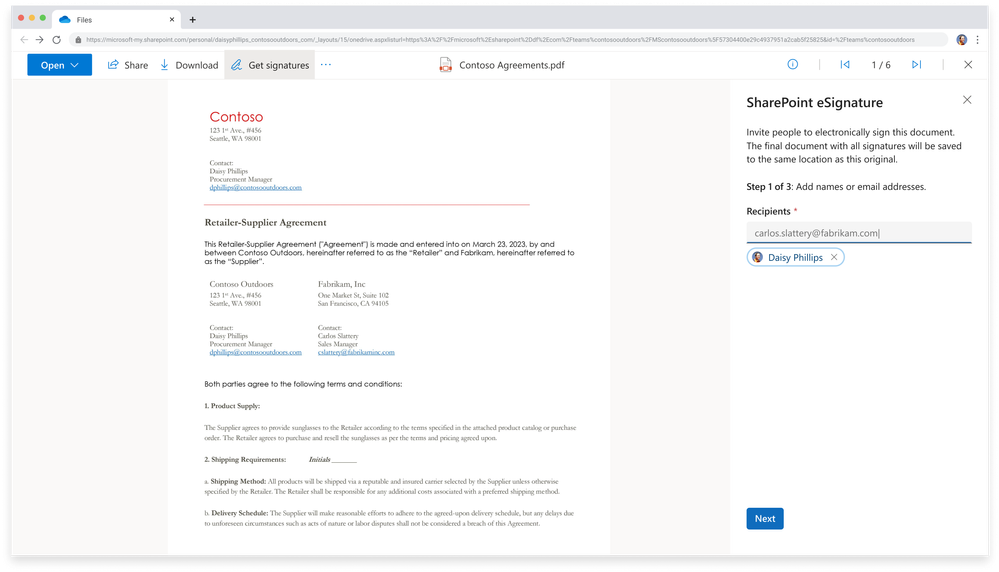
Microsoft SharePoint eSignature
Might I get your John Hancock, please. Microsoft’s native eSignature service allows you to request simple electronic signatures from internal and external recipients for a PDF document in SharePoint. Recipients sign the documents without the document leaving the trusted boundaries of Microsoft.
From a SharePoint document library, open the document for which you want to start the eSignature process. In the document viewer, select More options (…), and then select Get signatures (pictured below). Once sent, the status of the request is set to In progress and recipients are able to add their signatures. An email notification is sent to the creator and the recipients.
On the SharePoint eSignature panel, add up to 10 internal or external recipients you want to sign the document, and then select Next.
The SharePoint eSignature service is set up in the Microsoft 365 admin center. SharePoint eSignature uses simple electronic signatures. Before you begin, determine whether this feature is appropriate for your needs and then read the Microsoft SharePoint eSignature terms of service. This is a PAY-As-You-GO service with a charge per request. In order to setup SharePoint eSignature, please read the admin support documentation: Set up SharePoint eSignature
Additional information
Help and support
Roadmap ID 168828
Stream: Add a survey, poll, or quiz to a video at specific times
Make your video interactive and more engaging by adding a survey, quiz, or poll using Microsoft Forms. You can add forms anywhere in the video timeline. Great for training scenarios or anytime you want get info and insights from your viewers in the flow of viewing.
A survey automatically overlays over the Stream video during playback, here showing the Microsoft Form that pops up inline.
Interactivity can be added, edited, and previewed in Stream Web App in Edit mode by users with editing permissions. You then go to Microsoft Forms to view responses and share a summary link with answers and scores in Microsoft Forms. Viewers can use video timeline markers to navigate in and out of interactive content.
Roadmap ID 180796
Stream: Add a hyperlink or text callout to a video at specific times
Another way to Make your video interactive and engaging is by adding annotations that can include hyperlinks and text. This could be a call out to highlight important moments or share links to related documents and other additional resources. You can add text and links anywhere in the video timeline to help guide your viewers to the right information.
Creating Callout text for a Stream video in Microsoft 365 – noting an in-point and an out-point for when the text/link appears over the video while playing.
And again, Viewers can use video timeline markers to navigate interactive content.
Roadmap ID 180795
Viva Engage Community creation API | Available within Microsoft Graph Beta
Many of our customers have requested this capability in the past to programmatically create communities instead of creation via Engage UI. We invite you to try this beta endpoint and provide us with feedback. Some things to note about the API:
It is Microsoft 365 Groups unified.
It supports app-delegated (user auth) and app-only access.
It is limited to networks in Native mode only – legacy and external Yammer networks will not be able to use this API for community creation.
Community creation for an existing Microsoft 365 group is out of scope.
Roadmap ID: 178311.
Learn more.
Top 5 tech from SharePoint and related tech shipped in 2023
It was a Banner year. Some Marvel enthusiasts might even say it was a Bruce Banner year. And to not make you angry, I shall not delay… Two of the biggest releases were undoubtably Copilot for Microsoft 365 AND New Teams… we count and credit those behemoths for sure, but not have them count against the SharePoint top five of 2023.
So, counting down, here are the top 5 SharePoint and related tech features and updates from 2023:
#5: OneDrive: Simplified sharing
#4: Stream Playlists (powered by Microsoft Lists)
#3: New Stream (on SharePoint) web part
#2: Loop components in Teams channels
#1: SharePoint news to email
Three bonuses | One for each core Microsoft 365 persona:
BONUS for everyone: Microsoft Feed
BONUS one for admins: SharePoint Advanced Management (SAM)
BONUS for devs: Advances in Microsoft Graph connectors
OK, “The sun’s getting’ real low,” time to deescalate and keep things moving into our teamwork section…
Teamwork updates across SharePoint team sites, OneDrive, and Microsoft Teams
Microsoft 365 is designed to be a universal toolkit for teamwork – to give you the right tools for the right task, along with common services to help you seamlessly work across applications. SharePoint is the intelligent content service that powers teamwork – to better collaborate on proposals, projects, and campaigns throughout your organization – with integration across Microsoft Teams, OneDrive, Yammer, Stream, Planner and much more.
OneDrive app for Microsoft Teams
By now, you may have seen or used our new OneDrive experience on the web. And if so, you know how it makes finding and organizing what’s important to you, incredibly easy – no matter where your content is stored or how it’s shared with you.
Now Microsoft Teams is giving you access to that same OneDrive experience, with all the new enhancements, directly from within Teams. The new OneDrive app for Teams is now rolling out to customers worldwide and will replace the generic Files app in Teams; this is the Files app you’ve seen on the left-hand rail of Microsoft Teams – now it’s simply branded “OneDrive” (as it should be)
Highlights of the value of access full OneDrive from within Microsoft Teams.
This new experience means you’ll have a consistent and familiar file management experience across both Teams and OneDrive Web. To learn more about the OneDrive app experience for Teams, please check out the Microsoft Teams post: Effective file management with the next generation of OneDrive app for Microsoft Teams
OneDrive: Open in app
Fewer clicks, tighter integration, less content leaving your tenant trust boundaries. In the same way that you can open a Word, PowerPoint, or Excel file in their respective desktop apps, you can now open any file in its desktop app directly from OneDrive, edit it, and the changes will sync to OneDrive. From OneDrive’s My Files or SharePoint’s Documents, users can now select Open in app to open a file in its native app.
Open any file from OneDrive for Web in its native desktop app.
Note: this feature is powered by OneDrive’s Sync – it requires having OneDrive.exe installed on the user’s machine. In case it’s not running, ‘Open in app’ will start the OneDrive executable.
Roadmap ID 124813
Learn more.
Microsoft 365 Backup (Public Preview)
Microsoft 365 Backup Service is a product offering spanning across the OneDrive, SharePoint, and Exchange Online services. This service provides customers with a consistent, cross product solution, to recover their Microsoft 365 data from cataclysmic events such as: at scale ransomware attacks, or malicious/accidental data deletion/corruption by end users.
Microsoft 365 Backup architecture | Data never leaves the Microsoft 365 data trust boundary or the geographic locations of your current data residency. The backups are immutable unless expressly deleted by the Backup tool admin via product offboarding. OneDrive, SharePoint, and Exchange have multiple physically redundant copies of your data to protect against physical disasters.
Microsoft 365 Backup Service is available on a pay-as-you-go basis and can be enabled through the Microsoft 365 admin center. Global admins can backup and restore content across the defined services (SPO/ODB/EXO). To protect content for any defined service, they need to create a backup policy for that service and add the relevant sites/accounts/mailboxes that they want to protect to that policy. SharePoint admins can backup and restore content for both SharePoint and OneDrive but not Exchange. Similarly, Exchange admins can backup and restore content only for Exchange but not SharePoint and OneDrive; per boundaries and delegation of each admin role.
Roadmap ID 188799
Learn more.
Related technology
SharePoint Embedded (Public Preview)
At its core, Microsoft 365 offers industrial strength capacity and management for your critical enterprise content in the apps you use every day. And much of that is based on the foundational content management capabilities of SharePoint. Imagine if you didn’t have to build a robust content store for your line of business application…
We’re pleased to have announced that SharePoint Embedded, a new way to build custom content apps for enterprises and ISVs, and it’s now in public preview. SharePoint Embedded offers a headless, API-only pattern to build content apps that integrate management capabilities like collaboration, security, and compliance into any app by storing content inside an enterprise’s existing Microsoft 365 tenant.
Slide as presented during Jeff Teper’s opening keynote (November 28, 2023), to highlight how SharePoint Embedded is designed, “Build rich applications that go beyond Microsoft 365 with fully managed and controlled content inside your org trust boundary.”
SharePoint Embedded is available now for public preview, with general availability planned for mid-2024. It’s available under pay-as-you-go consumption terms, meaning you pay for the storage you use and the volume of API calls and data transfers – without the need for additional user licenses.
Learn more. (See additional pricing and availability details)
Microsoft Loop app transitioning to the cloud.microsoft domain
The Microsoft Loop app will soon, if not already, become available at the *.cloud.microsoft domain, accessible at https://loop.cloud.microsoft. Note: MC699714 · Published Dec 19, 2023
loop.cloud.microsoft is the new URL/domain for Microsoft Loop in Microsoft 365, updating loop.microsoft.com.
The cloud.microsoft domain was provisioned in early 2023 to provide a unified, trusted, and dedicated DNS domain space to host Microsoft’s first-party authenticated SaaS products and experiences. The cloud.microsoft domain has been a part of standard Microsoft network guidance on domains and service endpoints since April 2023. If you are currently following this guidance, this change should not impact users in your organization using the above applications under the new domain.
Users will be redirected from https://loop.microsoft.com to https://loop.cloud.microsoft automatically. No specific user action is required. Admins should ensure that connections to *.cloud.microsoft are not blocked from their clients and enterprise networks. This should require no action if standard Microsoft network guidance on domains and service endpoints is being followed.
The legacy SharePoint Invitation Manager is being retired
This platform is currently used only when Document Libraries are shared externally or when an external user is shared with a custom role. These flows will now use Entra B2B Invitation Manager instead. This means that these flows will now also respect any policies or settings in the Entra B2B admin center.
Microsoft will retire Delve Web on December 16, 2024
[Original, official message center post, MC698136, published Dec 14, 2023]
Originally announced by Satya Nadella at the Convergence Conference on March 16, 2015, then “Office Delve” was described as “an experience within Office 365 that surfaces relevant content and insights tailored to each person. It is powered by the Office Graph, an intelligent fabric that applies machine learning to map the connections between people, content and interactions that occur across Office 365.” Plus, a small bit of trivia: The original codename for Delve was “Project Oslo” – Oslo being the hometown of the Fast product team – our original engineering team behind Delve, now driving Microsoft Search and people experiences across Microsoft 365.
Screenshot of Delve overview slide, as presented at Microsoft Ignite | May 4 – 8, 2015 | Chicago, IL.
We’ve always considered Delve as the first Microsoft app to tap into and realize the value of what we now call Microsoft Graph. And today, nearly every Microsoft 365 app and service is tuned and tied to Microsoft Graph; we learned a lot through Delve; much of what you use today was informed by it.
Screenshot of Office Graph (now Microsoft Graph) visual overview slide, as presented at Microsoft Ignite | May 4 – 8, 2015 | Chicago, IL.
We will be retiring Delve on December 16th, 2024. Most of the features and value offered by Delve today are already available and improved in other experiences in Microsoft 365. The main one being Profile Cards in Microsoft 365.
Here is a list of features offered in Delve and the experiences we recommend using instead:
Delve Home – discover relevant documents recommended on Office.com, in Office apps and in Profile Cards. [“For you” recommendation in OneDrive and Using search efficiently for organizational content]
Delve Profile – view profile data in the Profile Cards cross M365, through people in search on Office.com and search in SharePoint. [Profile cards in Microsoft 365]
Edit profile – a new edit profile experience tightly coupled with Profile Cards are being developed and will be released in second half of 2024. It is also possible for users to edit their profile data in the SharePoint profile edit experience (editprofile.aspx).
Organizational view – exists in the Profile Card and as a dedicated experience in Org Explorer [Org Explorer (requires Viva license)]
Favorites – favorites on Office.com and OneDrive is not connected to Delve and is a good option for users with similar functionality and improved availability. [Favorites in OneDrive]
Note: Boards found in Delve Web will not be replaced.
January 2024 teasers + 5 roadmap item highlights coming CY24-Q1
Now, to kick off our teasers section this month, I wanted to look-look ahead-ahead, first beyond next month, to highlight 5 interesting, anticipated features live on the public roadmap — projected to begin roll out in CY24-Q1 that’s Jan-Mar 2024. We’ll then narrow in on two teasers for January 2024.
5 interesting features live on the public roadmap, aka, long-term teasers projected to begin roll out in CY24-Q1:
Collaborate on SharePoint pages and news with co-authoring [Roadmap ID: 124853]
Microsoft Viva: Viva Amplify – Publish to Viva Engage [Roadmap ID: 185105]
Microsoft Teams: Ability for meeting participants to edit their display name [Roadmap ID: 122934]
Microsoft Graph: SharePoint Pages API (Preview) [Roadmap ID: 101166]
Microsoft Viva: Viva Goals in People Profile Cards [Roadmap ID: 117453]
BONUS long-term teaser: Microsoft Teams: Loop components in Teams chat for GCC [Roadmap ID: 93163]; coming ~ CY24-Q2
Review these and more on the public Microsoft 365 roadmap – anytime you like.
January 2024 teasers
Teaser #1: Community Campaigns in Viva Engage [Roadmap ID: N/A]
Teaser #2: Microsoft Teams: Discover Feed in Channels [Roadmap ID: 187084]
… shhh, tell everyone about everything that’s public.
Upcoming events and helpful, ongoing change management resources
Upcoming events
Microsoft Fabric Community Conference | March 26-28, 2024 in Las Vegas, NV
AIIM | April 3-5, 2024 in San Antonio, TX
North American Cloud & Collaboration Summit (NACS) | April 9-11, 2024 in Dallas, TX
Microosft 365 Conference | April 28 – May 4, 2024 in Orlando, FL
SharePoint Intranet Festival (Online)
European Collaboration Summit | May 14-16, 2024 in Weisbaden, Germany
365 EduCon – Seattle | June 3-7, 2024 in Seattle, WA
Ongoing resources:
“Stay on top of Office 365 changes“
“Message center in Office 365“
Install the Office 365 admin app; view Message Center posts and stay current with push notifications.
Microsoft 365 public roadmap + pre-filtered URL for SharePoint, OneDrive, Yammer and Stream roadmap items.
SharePoint Facebook | Twitter | SharePoint Community Blog | Feedback
Follow me to catch news and interesting SharePoint things: @mkashman; warning, occasional bad puns may fly in a tweet or two here and there.
Thanks for tuning in and/or reading this episode/blog of the Intrazone Roadmap Pitstop – December 2023. We are open to your feedback in comments below to hear how both the Roadmap Pitstop podcast episodes and blogs can be improved over time.
Engage with us. Ask those questions that haunt you. Push us where you want and need to get the best information and insights. We are here to put both our and your best change management foot forward.
Stay safe out there on the road’map ahead. And thanks for listening and reading.
Thanks for your time,
Mark Kashman – senior product manager (SharePoint/Lists) | Microsoft)
The Intrazone Roadmap Pitstop – December 2023 graphic showing some of the highlighted release features.
FYI | “It’s beginning to look a lot like SharePoint” lyrics
[Original “It’s beginning to look a lot like Christmas” song written by Meredith Willson. | Parody lyrics written and sung by Mark Kashman (lightly out of tune; right on time; embedded within the above podcast episode, “SharePoint Roadmap pitstop: December 2023”) ]
It’s beginning to look a lot like SharePoint
Everywhere you scroll
Create a site with ease
Design it as you please
Web parts make each page whole.
It’s beginning to look a lot like SharePoint
Powering the M365 apps you adore…
Oh the common collab you’ll see
Across the pages, sites, files, videos, lists, loops, whiteboards, and more… will be
In your common content store.
It’s beginning to look a lot like SharePoint
No matter where you post
A Stream video on each page
One from your CEO in Viva Engage
It’s a wonderful employee experience host.
Yes, it’s beginning to look a lot like SharePoint
The grandest of all content stores
And the prettiest home site you’ll see
Is Viva Connections under the tree
Your New Teams front door.
Sure it’s SharePoint… belov’ed SharePoint… once… more….
Microsoft Tech Community – Latest Blogs –Read More

Contributor Stories: Kristina Devochko
If you’ve ever engaged with the content on the Microsoft Learn platform, it’s highly likely that the material you utilized was written or co-authored by dedicated contributors. These contributors, often volunteers, generously offer their time and expertise to fill knowledge gaps within our portfolio and ensure the content remains up to date.
In this interview series, we aim to acquaint ourselves with some of these valuable contributors. Through these conversations, we seek to understand their motivations for sharing their knowledge and gain insights into their experiences.
Congratulations and welcome to this month’s recognized contributor, Kristina Devochko – cloud guru, tech contributor, content creator, blogger, speaker, and mentor. Kristina resides in Norway and is currently employed at Amesto Fortytwo as a principal cloud engineer. She’s the owner of the kristhecodingunicorn.com tech blog, a CNCF ambassador, Microsoft Azure MVP, CNCF TAG Environmental Sustainability tech lead, Kubernetes Unpacked podcast co-host, and co-organizer of multiple meetup groups. Throughout her career, Kristina has primarily focused on all things cloud native, Kubernetes, cloud security, and green tech. She believes in helping to make the world a better place, is passionate about volunteering with non-profit organizations, and frequently provides guidance to tech communities on building sustainable, secure, and cloud native systems.
Recently, Kristina also added “Microsoft Learn contributor” to her list of accomplishments. Her article, How to manage cost and optimize resources in AKS with Kubecost, was not only her first Microsoft Learn contribution, it was also the first article published on the new Microsoft Learn Community Content site.
Meet Kristina
Kristina Devochko, Principal Cloud Engineer, Amesto Fortytwo
Megan: Welcome Kristina! So lovely to meet you! To start us off, can you share a bit about your experience and background?
Kristina: Hi Megan! Absolutely, I’m happy to. I’ve been in the tech industry for almost eight years now, but tech wasn’t something I’d been planning to do since I was born or even right out of school! I was actually studying economics when a female friend who was already studying computer science inspired me to switch and test it out for myself. It was one of the best choices I ever made and from that point on, I never looked back! I’ve been in many roles so far in my tech career – from full stack developer to database administrator to software architect – and for the last four to five years I’ve been primarily focusing on all things cloud native, platform development, and Azure. Currently, I’m a principal cloud engineer at Amesto Fortytwo. I started sharing my knowledge with various tech communities back in 2021 and am forever grateful (and shocked) with how many wonderful experiences and opportunities I’ve had since then!
Megan: Fascinating that you started in economics but ended up in computer science – all thanks to your friend! And the knowledge sharing you began in 2021 also sounds fascinating. What prompted you to start sharing your knowledge with others and what motivates you to continue?
Kristina: Well, I was basically challenged – asked if I would consider sharing my knowledge! Back in 2021 I was contacted on LinkedIn by a Microsoft Norway employee who challenged me to start contributing to the technical community as a whole by sharing my knowledge and experiences in the form of publishing blog posts, speaking at events, and mentoring, etc. Before I was asked, this wasn’t something I’d ever thought of doing, because I thought I wasn’t that big of an expert to have anything valuable to share with the tech community. But I was wrong, and I’m so happy he helped me realize that! Lots of great things have happened to me since I started contributing to the global technical community that might not have happened if I wasn’t encouraged and supported along the way!
I love sharing my knowledge and love the tech communities! Among other things, they’re amazing, supportive, inclusive, and welcoming, and it’s why I started contributing and continue to contribute three years later! Once you become a part of the global tech community, you stay there forever. At least, that’s how I feel. We help each other grow, we share feedback and knowledge with each other, we support each other, and encourage each other in the community. It energizes me and makes me want to do more. In addition, getting feedback that something I wrote or spoke about was useful and helped others is incredibly gratifying to me as a content creator. It’s the best motivator to keep me helping the tech community. Recently, I also published my first article on the Microsoft Learn platform. It was another fantastic experience, and I’m looking forward to contributing to Microsoft Learn again very soon!
Megan: Yes! Congratulations on your very first Microsoft Learn article, Kristina! It’s great! I read it earlier today when I was preparing for our interview. I’d love to know what led you to start contributing to Microsoft Learn.
Kristina: I’ve used Microsoft Learn many times as a consumer – both for my personal competence development and also for organizing Cloud Skills Challenges activities at work in collaboration with Microsoft. Earlier this year Microsoft contacted me and asked if I was interested in joining the new Microsoft Learn Community Content site, as well as helping with the site launch and being an early contributor to it. Since I’d already gained so much value from this platform as a user, I knew it would be a great opportunity to contribute back to Microsoft Learn and to the entire community that uses it. So, I went for it – and I’m happy to say that it was a truly giving and enjoyable experience! I had room to be heard and share my suggestions and ideas of how this new site could be structured to bring the most value to the community. I was also able to recommend how to motivate more authors to join the new Community Content site and publish their own articles there. Speaking of which, not only was my article my first official Microsoft Learn contribution, it was also the first article published on this new site – an interesting fact I’m very pleased about and find to be quite a fun achievement!
Megan: I’m glad you got that little nudge to join our new Microsoft Learn Community Content site and to contribute to it – sounds like it was a great experience for you. You’ve mentioned that good things have happened since you started sharing your knowledge with the general tech communities in 2021. Can you elaborate on that?
Kristina: Sure! Sharing and contributing was a new experience for me. To ensure that my blog posts, articles, and speaking engagements, etc. were the same high-quality content the tech communities expect, I devoted a lot of time and effort to researching when I began contributing. I learned a lot from the research and tight collaboration with my resources. And it was all worth it because since I started contributing to the various tech communities three years ago, I’m now a:
Microsoft Azure MVP
CNCF ambassador
Kubernetes Unpacked podcast co-host
CNCF Technical Advisory Group Environmental Sustainability (TAG ENV) tech lead
founder of Green Software Foundation Oslo meetup group
co-organizer of two meetup groups: Norwegian .NET User Group Oslo and Cloud Native and Kubernetes Oslo
co-organizer of the Kubernetes and Cloud Native Community Days (KCD) Oslo 2024 conference
tech speaker (some highlights were speaking at NDC Oslo and KubeCon + CloudNativeCon EU 2023 and being the only guest speaker at the Microsoft Build Norway event a few months ago)
program committee member for KubeCon + CloudNativeCon North America and upcoming KubeCon + CloudNativeCon Europe that will take place in Paris in March 2024
delegate at Cloud Field Day 18, an event that was held this past October for independent thought leaders in enterprise cloud to discuss pressing issues and technology advancements with key companies in the space
mentor
Megan: Kristina! WOW! You weren’t kidding when you said a lot’s happened to you as a result of your contributions within the various tech communities. Congratulations! Can you share any learnings or advice for folks who want to start contributing to the Microsoft Learn platform?
Kristina: Yes, great question, Megan. The most important advice I can give is just to start. I know very well how one can feel as an impostor sometimes or start comparing oneself with others and end up underestimating oneself, losing confidence, and not contributing. Ask yourself:
Do I like sharing knowledge and helping others?
Does it sound fun and interesting for me to try out?
Have I ever gained value from someone else’s contribution?
If the answer to one or more of these questions is “Yes”, then you should definitely start contributing! You never know who your content can help! Also, when you’re just starting out, don’t hesitate to seek help, ask for feedback from the Microsoft Learn community, and/or ask for a second pair of eyes to look at your content and give feedback. And if you’re nervous to ask about it in public, find a contributor who you feel comfortable and confident with, and ask him/her privately. A lot of people are happy to help out, including myself!
Megan: Awesome insight and advice, thanks! One final question for you. One purpose of this interview is to get to know a little about the person behind the contributions. What do you like to do in your spare time? Do you have any hobbies?
Kristina: I spend a significant part of my free time on tech and community-related activities. But apart from that, I love reading, not only tech-related literature but also fantasy (I’m a Potterhead, a Harry Potter universe fan) and adventure genres. I also love hiking, drawing, cross stitching, and photography. And I have two cats, Penelope and Sofie, that I absolutely love spending time with, cuddling, and playing with.
Penelope Sofie
Megan: Yes! Ditto for me on the hiking, photography, and cats. Well, it was wonderful meeting you today, Kristina, and getting to know you on a professional and personal level. Before we wrap up, is there anything else you’d like to share about your contributing experience?
Kristina: Thanks, Megan. It was nice to meet you, as well. I just want to reiterate that contributing to the new Microsoft Learn Community Content site has been such a fun, educational, amazing, and gratifying experience for me. I’m looking forward to seeing and reading articles from more Microsoft contributors in the coming months, as well as creating and publishing more articles myself!
Megan: A great final thought for our readers today. Thanks again, Kristina, and I can’t wait to read your future contributions. Take care!
Keep up with Kristina:
Personal website: https://kristhecodingunicorn.com
LinkedIn: https://linkedin.com/in/krisde
Twitter: https://twitter.com/kristhecodingu1
Credly: https://credly.com/users/kristina-devochko/badges
BioDrop: https://biodrop.io/guidemetothemoon
To learn more about:
contributing to Microsoft Learn, visit Microsoft Learn Contributor Home.
joining the new Community Content site on Microsoft Learn, visit Microsoft Learn Community Content.
Microsoft Tech Community – Latest Blogs –Read More

Addressing Data Exfiltration: Token Theft Talk
Let’s continue our discussion on preventing data exfiltration. In previous blogs, we shared Microsoft’s approach to securing authentication sessions with Continuous Access Evaluation (CAE) and discussed securing cross-tenant access with Tenant Restrictions v2. Today our topic is stolen authentication artifacts.
Stolen authentication artifacts – tokens and cookies – can be used to impersonate the victim and gain access to everything the victim had access to. Up until a few years ago, token theft was a rare attack and was most often exercised by corporate Red Teams. Why? Because it’s simpler to steal a password than a cookie. However, with multifactor authentication (MFA) becoming prevalent, we’re seeing real-life attacks involving artifact theft and replay.
Before diving into details, it’s important to note that Microsoft recommends that the first line of defense against token theft is protecting your devices by deploying endpoint protections, device management, MFA (and moving towards phishing-resistant credentials), and antimalware, as described in Token tactics: How to prevent, detect, and respond to cloud token theft | Microsoft Security Blog.
Now, let’s discuss types of authentication artifacts and what techniques are recommended for each type to minimize the impact of theft. All authentication artifacts can be roughly divided into two buckets:
Renewable artifacts, also known as sign-in session artifacts, maintain single sign-on (SSO) and app state between the client and Entra ID.
Non-renewable artifacts, also known as apps session artifacts, grant data access to client applications.
It may be obvious that the first priority would be protecting the most powerful device SSO artifacts – Primary Refresh Tokens (PRT). The good news is that PRTs on all operating system platforms have been hardened against theft from day one. The level of protection depends on operated system capabilities, with Windows offering the strongest protection. PRT protection is not controllable by policy and is always on.
Offering similar protection for all artifacts is on our roadmap, but delivering these capabilities is going to be a multi-year journey. If you want to learn more about various challenges of building comprehensive protection against token theft, watch this RSA presentation. In the meantime, you can reduce token theft by carefully orchestrating Entra ID security products.
Addressing token theft of sign-in session artifacts
Conditional Access: Token protection policy offers cryptographic protection against replay of stolen tokens. This feature leverages and builds on top of already existing cryptographic protections of PRTs. When token protection policy is on, use of unprotected sign-in sessions is blocked. In combination with PRT protection always being on, it extends cryptographic protection to all renewable artifacts. Token protection is in public preview for Office and Outlook on Windows. Start in report-only mode first to evaluate the impact for your organization.
Apps that are not yet in scope of token protection can be protected by enabling compliant network check for Entra Global Secure Access. This policy will ensure that authentication artifacts always come from your organization’s network. It means that stolen tokens can only be replayed from your organization’s network, thus significantly reducing blast radius of the attack.
Addressing token theft of app session artifacts
Depending on your network configuration, you might be able block usage of stolen access tokens and workload cookies outside of your corporate network by using Conditional Access: Block access by location and strictly enforce location policies for continuous access evaluation (CAE). This new CAE enforcement mode blocks access from outside allowed IP ranges, thus blocking any usage of stolen tokens from outside your network and significantly reducing blast radius of the attack. To take advantage of this capability, your users must access both Entra ID and workloads from enumerable IP addresses. CAE strictly enforce locations policy can be enforced for corpnet users accessing data via Entra Global Secure Access (GSA) because Entra GSA is able to pass along IP address of user’s device. When configuring Named Locations in Conditional Access (CA), make sure to include range of IP addresses from which your users access both Entra ID and workloads (e.g. SharePoint Online).
Detecting token theft
To detect stolen artifacts, you can enable risk detections with Microsoft Entra ID Protection to elevate user risk when token theft is suspected. Anomalous token, token issuer anomaly, and adversary in the middle detections can be indicative of token theft. Each detection is calculated offline, whereas anomalous token can also be calculated in real-time at sign-in to catch the threat and flag the sign in as compromised. To take full advantage of these detections, we recommend configuring Risk-based Conditional Access (RBCA) to ensure your users have the proper policy controls applied when token theft is suspected. When RBCA policies are applied against token theft detections, it forces the user to complete multifactor authentication and reset their password, and when applicable, require an admin to revoke user tokens.
Continuous Access Evaluation works together with RBCA to block resource access with tainted artifacts. When user risk increases, CAE issues signals to all CAE-capable workloads to enforce RBCA policy immediately.
Pictures speak a thousand words – this infographic illustrates how different technologies work together to address token theft.
As token theft attacks are becoming more prevalent Microsoft constantly improves defenses against such attacks. Stay tuned for new updates in this area soon.
Anna Barhudarian
Principal Product Manager, Identity Division
Learn more about Microsoft Entra:
Related Articles:
Apply Zero Trust Principles to Authentication Session Management with Continuous Access Evaluation
How Tenant Restrictions v2 Can be Used to Prevent Data Exfiltration
See recent Microsoft Entra blogs
Dive into Microsoft Entra technical documentation
Join the conversation on the Microsoft Entra discussion space and Twitter
Learn more about Microsoft Security
Microsoft Tech Community – Latest Blogs –Read More
Native support for Socket.IO on Azure, scalability issue no more
This article talks about a popular open-source library called “Socket.IO”. It’s often used to build real-time web applications, like multi-player games and co-editing, co-creation applications.
It explores the relationship between WebSocket API, Socket.IO library and an Azure service.
WebSocket API – provides the transport-level plumbing of bi-directional communication between clients and server.
Socket.IO library – builds on top of WebSocket API and provides application-level features that are common when developing real-time web apps.
Azure Web PubSub for Socket.IO – a feature from an Azure service that provides the infrastructure for massive scalability of Socket.IO apps.
What is WebSocket API?
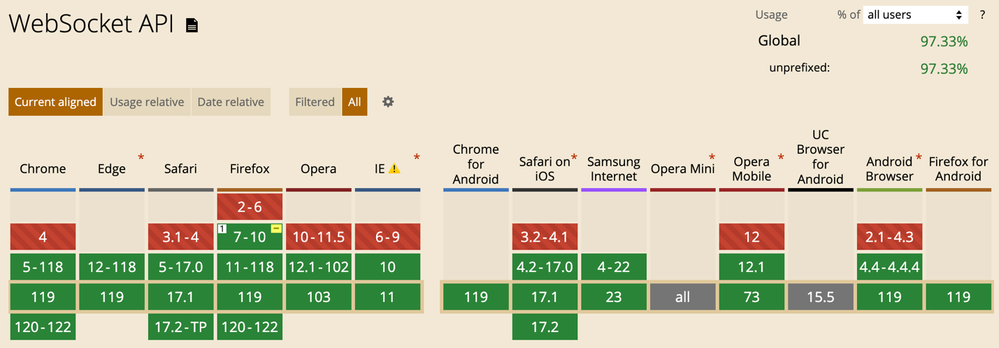
WebSocket API allows web apps to establish a persistent, bi-directional communication channel between the server and client. Compared with polling techniques based on HTTP, WebSocket consumes less resources and offers lower latency. When we conducted performance test between using HTTP polling-based technique and using WebSocket, we saw a 10x reduction of memory reusage.
Screenshot take from caniuse.com/?search=websocket
WebSocket is a perfect fit for building real-time web experiences. It’s why it was introduced in the first place. But the API only concerns itself with establishing the communication channel, in other words, it’s an API that works at the transport level. Application developers much prefer working at a higher level, a level that brings them closer to the application they are building.
The application-level questions developers grapple with are of these sorts:
How do I send a notification to every online user when the database is updated?
How do I notify the only the users who are interested in a certain company stock?
How do I make sure the moves made by one game player are delivered to other players quickly?
What is Socket.IO library?
Socket.IO is a popular open-source library for building real-time web experiences. When we conducted a user study earlier this year, we were pleasantly surprised to learn that developers use Socket.IO for all kinds of applications, from the typical chat rooms and multi-player games to as far afield as controlling IoT devices and real-time monitoring for fraud detections.
While developers don’t necessarily need to use Socket.IO library to build real-time web experiences as these days browsers have solid support for WebSocket API, they continue to choose Socket.IO for several reasons.
Developers choose Socket.IO for productivity gains
The gain in productivity is why developers choose Socket.IO. Socket.IO removes the need to focus on transport level concerns. It offers higher-level APIs to manage client connections as a group. We can easily add a client to a group and send messages to all the clients in that group.
// Sends a message to all the clients in the room ‘room-101’. The event name is “greeting” and the message content is “Hello. Hola! 你好. “);
io.to(“room-101”).emit(“greeting”, “Hello. Hola! 你好. “);
Group membership is highly dynamic in nature. We can add and remove a client from a group as we see fit. As needs arise, we may have many groups, and a client can be in multiple groups.
// Adds a single client to “room-101”
io.in(theSocketId).socketsJoin(“room-101”);
Besides these high-level APIs, Socket.IO handles reconnect when connection drops which is common due to the nature of network connectivity.
Easy-to-learn and easy-to-use APIs
Another selling point is the design of the APIs. Server-side APIs mirror the client-side APIs so once developers become comfortable with one side of the APIs, they can easily transfer the knowledge to the other side. And it conforms to the event-based nature of the browser. Developers can define event handlers to whatever event names they define. It’s been shared with us by numerous Socket.IO users that APIs are intuitive and easy to use.
// Client defines an event handler to handle an event named “greeting”
socket.io.on(“greeting”, () => {
// …
});
To learn more about Socket.IO, visit its documentation site.
Using a high-level library like Socket.IO is not without challenges. Azure solves the scalability challenge.
It’s hard to find faults in Socket.IO as a library that abstracts away the common tasks of building real-time web experiences. Developers can hit the ground running without a problem. That’s until real users start using the applications. For one, meeting the challenge of thousands+ online users can be a pain and an unfamiliar territory for developers. It’s entirely doable and there are guides on the internet, just that it’s difficult to set up. When we are on a deadline to ship features reliably, the lines of code needed to build the infrastructure eat away the already tight time budget.
When we surveyed Socket.IO users, scaling out Socket.IO servers came up the top of the challenges. Scaling out refers to the practice of setting up more than one Socket.IO server and instrumenting a mechanism to coordinate messaging between Socket.IO servers. Plain as it sounds, the devils are in the implementation details.
This is an area Azure can add much value. We asked ourselves “how to make scalability a non-issue for developers” and “how to provide the simplest developer interface” to developers familiar with Socket.IO library?
With the input from the Socket.IO community (over 200 responses), we brought native support for Socket.IO on Azure. This means developers can continue using the Socket.IO APIs they know and love and let Azure handle scalability. You can follow the quickstarts to see how easy it is port a locally running Socket.IO app to Azure. Once it’s running on Azure, it’s ready to handle up to 100,000 concurrent connections with on single Azure resource.
Resources and references
WebSocket API
Socket.IO library documentation
Web PubSub for Socket.IO documentation
Microsoft Tech Community – Latest Blogs –Read More
Uncover the Future: Microsoft Autonomous AI Agents analyzing SAP Data Insights
As a professional in SAP, Data and AI, intimately involved with the latest developments in Microsoft Research, our focus has been keenly set on the advancements in Generative AI (GenAI) and Large Language Models (LLMs) such as GPT, Claude, Palm, and Llama. These groundbreaking technologies represent more than mere progress in natural language processing; They embody a paradigm shift in our approach to language generation and comprehension, propelled by the most recent achievements in artificial intelligence. This evolution signifies a transformative step in our interaction with digital language. In the expanding landscape of AI, we distinguish between two types of digital assistants to get: Copilots and AI Agents, each playing a unique role in how we harness AI.
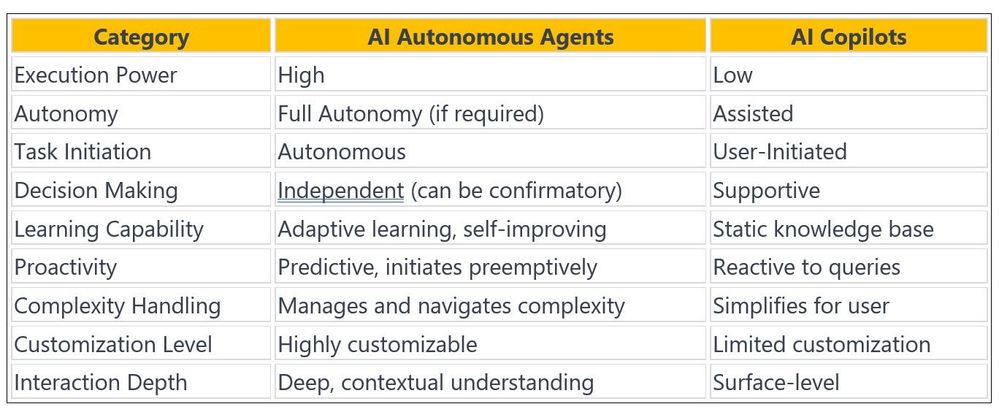
To start with, let’s understand the distinction between “AI Copilot” and “AI Autonomous Agents”, before we explore the Microsoft Groundbreaking AI Frameworks that support SAP ERP, BW Applications like SAP ECC, SAP BW, SAP S/4HANA & Microsoft Dynamics 365.
AI Copilots: Your Helper
Copilots are like navigators, offering real-time support to enhance user decision-making and productivity without overstepping into the realm of action. They’re silent whisperers of data, providing insights and answers upon request, perfect for scenarios where autonomy isn’t necessary or desired. To put it simply, Copilots are software add-ons that offer instant assistance to users of application functions. GitHub Copilot and Microsoft 365 Copilots are some examples. Let’s envision an intelligent SAP Copilot in an SAP S/4HANA or ECC system might show important inventory data to help with procurement decisions without ordering anything itself, provide comprehensive views to assist business users making a smart call without navigating through different SAP screens to get the numbers. Similarly, Microsoft’s Power BI Copilot draws upon data from the SAP ERP system to deliver predictive analytics and trends, equipping business decision makers with the information they need to make smart, proactive decisions while preserving the human touch in final strategic determinations.
AI Autonomous Agents: Your Doer
In the field of AI, Agents are autonomous doers/workers, capable of independently carrying out tasks that align with predefined goals and parameters. They’re the behind-the-scenes workhorses, streamlining workflows by taking on tasks such as auto-generating reports or proactively managing calendars based on learned user preferences. In the domain of Microsoft Dynamics, an AI Agent might not only flag a high-priority customer interaction but also draft a follow-up email, pending the user’s final approval. Additionally, it can retrieve multiple SAP business tables for immediate analysis and create a dynamic report for business decision makers to examine. In the world of smart enterprises, the distinction between Copilots and Agents is based on how they assist business and technical users. Copilots, like helpers within your software, might do things like giving you a summary of your meeting in Microsoft 365. They’re there to guide you, not to take over. Think of them as helpful chatbot in your program. However, AI Agents are different because they do things on their own, like making decisions and completing tasks with just a little bit of help from us.
In conclusion, enterprises running SAP on Azure can greatly benefit from the tailored support of AI Copilots and AI Agents. These advanced AI assistants play a crucial role in guiding enterprises through key decisions and strategies. Moreover, these Agents and Copilots have different ways of working because of the type of model engineering that is involved in answering a given prompt. Agents and Copilots differ in the training data that they use to model the LLM. Copilots usually have data from a specific domain that is relevant to the user. So, when GitHub Copilot makes a suggestion, it does so based on its knowledge of repositories. AI Agents usually have a wider range of resources that they use to form their conclusions and suggestions.
Let’s dive deeper and explore how we can harness the power of two Microsoft’s sophisticated AI frameworks to create autonomous AI agents specifically designed for analyzing complex data on SAP S/4HANA and ECC platforms in real-time scenario with practical examples. To provide some background, Microsoft research team recently released two innovative AI papers related to these sophisticated AI frameworks that have generated considerable buzz in the tech community, showcasing the commitment to pushing the boundaries of AI technology –
1. TaskWeaver: A Code-First Agent Framework, two sophisticated frameworks that are redefining the capabilities of AI in diverse scenarios and
2. AutoGen blogpost: Enabling Next-Gen LLM Applications via Multi-Agent Conversation.
TaskWeaver: Empowering LLMs with Enhanced Capabilities
As we know, Large Language Models (LLMs) have demonstrated remarkable skills in natural language understanding and generation, leading to their use in applications such as chatbots and virtual assistants. However, current LLM frameworks have limitations in dealing with domain-specific data analytics tasks with rich data structures. Furthermore, they have difficulty with flexibility to satisfy diverse user demands. To tackle these challenges, TaskWeaver is introduced as a code-first framework for building LLM-powered autonomous agents. It translates user requests into executable code and treats user-defined plugins as callable functions. TaskWeaver supports rich data structures, flexible plugin usage, dynamic plugin selection, and harnesses LLM coding capabilities for complex logic. It also incorporates domain-specific knowledge through examples and ensures the secure execution of generated code. TaskWeaver offers a strong and flexible framework for creating smart conversational agents that can handle complex tasks and adapt to domain-specific situations. TaskWeaver’s capacity to handle domain-specific data analytics tasks, default plugins and its support for rich data structures make it a distinguished framework in the field of AI. Its customizable plugins enable developers to adjust the framework to their specific needs, providing a level of refinement and efficiency that distinguishes it from other AI frameworks. By leveraging the power of LLMs and enabling developers to adapt the framework to different industries, TaskWeaver is ready to lead the way in transforming how we exploit the potential of AI, we’ll explore with an example in a moment.
Framework Components
TaskWeaver consists of several key components that work in tandem to provide a seamless workflow:
Planner Agent: Acts as the master strategist, orchestrating the workflow by creating a comprehensive list of tasks based on user requests.
Code Generator: Translates the Planner Agent’s instructions into Python code, leveraging TaskWeaver’s plugins to perform specific functions.
Code Interpreter/Executor: Executes the generated code and reports results back to the user.
This workflow demonstrates TaskWeaver’s efficiency in using AI to handle tasks from planning to execution, transforming complex requests into actionable insights.
TaskWeaver Features and Capabilities –
TaskWeaver stands out with its advanced capabilities that cater to a wide range of applications:
Integration with Large Language Models: TaskWeaver is compatible with LLMs, which are the backbone of the framework, enabling the creation of autonomous agents that can navigate through intricate logic and specialized knowledge domains.
Customizable Plugins: Users can create custom Python function-based plugins to execute domain-specific tasks, interact with external data sources, or perform specialized analytics.
Secure Execution: Microsoft ensures the secure execution of code within TaskWeaver, allowing developers to focus on their work without concern for security vulnerabilities.
User-Friendly Interface: Designed to prevent developers from getting bogged down in complicated processes, TaskWeaver offers a smooth user experience.
TaskWeaver’s ability to integrate with large language models (LLMs) and its customizable plugins sets it apart from other AI frameworks. By leveraging the power of LLMs and allowing developers to tailor the framework to their specific needs, TaskWeaver offers a level of sophistication and efficiency that is unmatched in the field.
As AI continues to advance, TaskWeaver is well-positioned to lead the way in reshaping how we harness the potential of AI in various industries.
Microsoft TaskWeaver is a framework that lets developers build and manage tasks across different platforms and applications. Frameworks such as Langchain, Semantic Kernel, Transformers Agent, Agents, AutoGen and JARVIS, which use LLMs for task-oriented conversations, are crucial in this transformation. They allow easy, natural language interactions with AI systems, making complex data analytics and domain-specific tasks more available. However, the real challenge and opportunity are in improving these frameworks to overcome current limitations, especially in specialized areas like SAP and data analytics. This involves adding domain-specific knowledge into GenAI models, improving their ability to process and analyze industry-specific data and workflows. There are many examples of how TaskWeaver can handle different tasks effectively. For example, developers can build smart agents that communicate with users fluently and helpfully, improving user satisfaction through clever conversation. TaskWeaver’s skill to understand user needs, control plugins, and run code safely makes it a very useful tool for various applications, from financial prediction to data exploration.
How to connect TaskWeaver with SAP S/4HANA for Data Insights?
To demonstrate the TaskWeaver approach, and to learn more about how TaskWeaver works in this situation, let’s examine the specific requirements for using it with SAP S/4HANA workload on Azure and HANA DB plugin creation for data analysis and insights. This example presents common actions in a data analysis task, which include getting data, analyzing the data, and displaying the results. By reviewing the steps in this use case, we can identify the main requirements that this example demands:
Rationale and Prerequisites for TaskWeaver, SAP S/4HANA and HANA DB Plugin:
Using Custom HANA Plugins: TaskWeaver should support custom plugins for doing things like getting data from SAP S/4HANA product and sales or custom tables, using specific SAP data extraction algorithms, and making the connection plugin with the ‘hdbcli’ python package deployment.
Handling Complex Data Structures: It must handle complex data formats, like pandas DataFrame, for advanced data processing and facilitate easy data transfer between plugins.
Stateful Execution: TaskWeaver should maintain state across conversations, processing user inputs and executing tasks in an iterative manner throughout the session.
Data Schema Inspection and Action: Prior to executing tasks, TaskWeaver needs to inspect the data schema in the database and use this information for actions before analyzing the SAP product and sales data.
Natural Language Responses: The system should provide user-friendly responses in natural language, summarizing execution results, such as the amount of sales order per product details.
Dynamic Code Generation: TaskWeaver must generate code on-the-fly to meet ad-hoc user requests, including tasks not covered by existing plugins, like visualizing SAP data related to Sales and product tables.
Incorporating Domain Knowledge: The framework should integrate domain-specific knowledge to enhance LLM’s planning and tool usage, ensuring accurate and reliable results in complex domains.
Persisting Results: It should offer a mechanism to save outcomes, such as DataFrames or images, to persistent storage, with options for business users to download these artifacts.
Installation and Setup
Getting started with TaskWeaver AI Agent and SAP HANA DB Plugin setup, it involves cloning the repository from GitHub and setting up a virtual environment to ensure smooth operation. AI Developers can then install the necessary requirements and begin leveraging TaskWeaver’s advanced AI functionalities.
1. Assuming SAP S/4HANA or SAP Suite on HANA(SoH) is operational.
2. Follow below link for step-by-step instructions to set up TaskWeaver on your local environment for testing.
TaskWeaver-SAP-AI-AGENT· amitlals/TaskWeaver-SAP-AI-AGENT
Example prompt –>
=========================================================
_____ _ _ __
|_ _|_ _ ___| | _ | | / /__ ____ __ _____ _____
| |/ _` / __| |/ /| | /| / / _ / __ `/ | / / _ / ___/
| | (_| __ < | |/ |/ / __/ /_/ /| |/ / __/ /
|_|__,_|___/_|_|__/|__/___/__,_/ |___/___/_/
=========================================================
TaskWeaver: I am TaskWeaver, an AI assistant. To get started, could you please enter your request?
Human: ___Fetch Product HT-1001 and related sales orders, and visualize in pie chart
Conclusion –
2024: A Year of New Opportunities and AI Agents.
It’s 2024, and the AI field is buzzing with excitement, particularly about autonomous AI Agent technology and its advancement as AI Agents as a Service (AIAaaS). Following the success of LLM apps in 2022 & 2023, AI Agents are poised to take over this year. Right now, many of these agents are still like new gadgets – fun for experimentation but not yet widely adopted in everyday life. However, the foundation is being laid, and we’re about to see these AI agents evolve from novelty concepts to practical, real-world solutions.
AI agents have the power to shape our future in amazing ways. The speed of technological progress is remarkable, and the possibilities for AI agents to change the way we work and live are huge. They can make our tasks easier, boost creativity, and improve efficiency, all with little effort. This change will surely reshape the business world, giving us a chance to grow with these innovative technologies. As we move towards this AI-led future, it will be an exciting adventure full of new findings and inventions.
For any feedback or issues related to this blog, please feel free to reach out to Amit Lal
Report Issues or Feedback: Have you encountered any problems?
Click to join the Discussion: Want to participate in discussions about this repo?
Reference –
AutoGen Official Blog: AutoGen: Enabling next-generation large language model applications – Microsoft Research
TaskWeaver Official Blog: TaskWeaver | TaskWeaver (microsoft.github.io)
GitHub
AutoGen: microsoft/autogen
TaskWeaver: microsoft/TaskWeaver
Papers:
Autogen: https://arxiv.org/pdf/2308.08155.pdf
TaskWeaver: https://arxiv.org/pdf/2311.17541.pdf
—
….Up next: Explore the synergy of AutoGen Framework with SAP platforms in our upcoming post. Stay tuned for more!
—
–Amit Lal
Disclaimer: The announcement of the Microsoft AI Framework is intended for informational purposes only. Microsoft reserves the right to make adjustments or changes to the product, its features, availability, and pricing at any time without prior notice. This blog does not constitute a legally binding offer or guarantee of specific functionalities or performance characteristics. Please refer to the official product documentation and agreements for detailed information about the product and its use. Microsoft is deeply committed to the responsible use of AI technologies. It is recommended to review and comply with all applicable laws, regulations, and organizational policies to ensure the responsible and ethical use of AI.
Microsoft Tech Community – Latest Blogs –Read More

Running AutoDock HPC application on Azure Machine Learning platform
Azure Machine Learning is a service that enables you to create, train, deploy, and manage machine learning models and experiments. You can also use it to run HPC applications, such as simulations, rendering, or data analysis.
Autodock is a powerful tool for molecular simulation, essential for researchers who work with large-scale computational tasks in HPC environments. It is especially useful for drug design and biomolecular interaction studies.
Figure 1. The image illustrates the results of flexible docking (green) superimposed on the crystal structures of (a) indinavir, (b) atorvastatin, (c) imatinib, and (d) oseltamivir bound to their respective targets. (source: AutoDock Vina (scripps.edu))
This article will guide you through the process of running Autodock Vina docking simulation scripts on the Azure Machine Learning platform. You will also learn how to provision Azure NetApp Files (ANF) volumes for the Machine Learning notebooks, which can provide persistent storage for most HPC applications.
The steps are:
Prepare your Azure Machine Learning environment
Create ANF volume
Install Autodock Vina on the ANF volume
Create a compute cluster to run your job
Create your Autodock Vina docking script
Create your command job to run the docking script on the compute cluster
At the end, we will conclude this tutorial and highlight the benefits of using AML environment for HPC applications. We will also explore some customization options based on various needs and factors.
Let’s begin!
Prepare your Azure Machine Learning environment
Follow Quickstart: Get started with Azure Machine Learning to create an Azure Machine Learning workplace, sign in to studio and create a new notebook.
Set your kernel and create handle to workplace. You’ll create ml_client for a handle to the workspace. Enter your Subscription ID, Resource Group name and Workspace name and run in your notebook.
from azure.ai.ml import MLClient
from azure.identity import DefaultAzureCredential
# authenticate
credential = DefaultAzureCredential()
# Get a handle to the workspace
ml_client = MLClient(
credential=credential,
subscription_id=”<SUBSCRIPTION_ID>”,
resource_group_name=”<RESOURCE_GROUP>”,
workspace_name=”<AML_WORKSPACE_NAME>”,
)
Create ANF volume
Follow Create an NFS volume for Azure NetApp Files with Service Level “Standard” and NFSv3 protocol to create a 4TiB size volume.
To ensure accessibility from Azure Machine Learning compute to the ANF volume, we will place both the Azure Machine Learning compute resources and the Azure NetApp Files subnets within the same VNET.
Figure 2. Ensure Azure Machine Learning compute resources and Azure NetApp Files subnets are within the same VNET.
2. Open terminal of your notebook. Follow Mount NFS volumes for virtual machines | Microsoft Learn to test if you can mount the ANF volume from the Compute node successfully.
Figure 3. Test if you can mount the ANF volume successfully from the Compute node.
Install Autodock Vina on the ANF volume
Follow Installation — Autodock Vina 1.2.0 documentation (Autodock-vina.readthedocs.io) to install Autodock Vina. We will download the executable for the latest release (1.2.5):
$ cd anfvol
$ wget https://github.com/ccsb-scripps/AutoDock-Vina/releases/download/v1.2.5/vina_1.2.5_linux_x86_64
$ chmod +x vina_1.2.5_linux_x86_64
Create a compute cluster to run your job
from azure.ai.ml.entities import AmlCompute, NetworkSettings
# Name assigned to the compute cluster
cpu_compute_target = “cpu-dockingcluster”
try:
# let’s see if the compute target already exists
cpu_cluster = ml_client.compute.get(cpu_compute_target)
print(
f”You already have a cluster named {cpu_compute_target}, we’ll reuse it as is.”
)
except Exception:
print(“Creating a new cpu compute target…”)
# Let’s create the Azure Machine Learning compute object with the intended parameters
# if you run into an out of quota error, change the size to a comparable VM that is available.
# Learn more on https://azure.microsoft.com/en-us/pricing/details/machine-learning/.
network_settings = NetworkSettings(vnet_name=”/subscriptions/<SUBSCRIPTION_ID>/resourceGroups/<RESOURCE_GROUP>/providers/Microsoft.Network/virtualNetworks/<VNET_NAME>”,
subnet=”/subscriptions/<SUBSCRIPTION_ID>/resourceGroups/<RESOURCE_GROUP>/providers/Microsoft.Network/virtualNetworks/<VNET_NAME>/subnets/<SUBNET_NAME>”)
cpu_cluster = AmlCompute(
name=cpu_compute_target,
# Azure Machine Learning Compute is the on-demand VM service
type=”amlcompute”,
# VM Family
size=”STANDARD_HB120RS_V3″,
# Minimum running nodes when there is no job running
min_instances=0,
# Nodes in cluster
max_instances=4,
# How many seconds will the node running after the job termination
idle_time_before_scale_down=180,
# Dedicated or LowPriority. The latter is cheaper but there is a chance of job termination
tier=”Dedicated”,
network_settings=network_settings
)
print(
f”AMLCompute with name {cpu_cluster.name} will be created, with compute size {cpu_cluster.size}”
)
# Now, we pass the object to MLClient’s create_or_update method
cpu_cluster = ml_client.compute.begin_create_or_update(cpu_cluster)
Create your Autodock Vina docking script (basicdocking.sh)
In this example, we will dock the approved anticancer drug imatinib (Gleevec; PDB entry 1iep) in the structure of c-Abl using AutoDock Vina. The target for this protocol is the kinase domain of the proto-oncogene tyrosine protein kinase c-Abl. The protein is an important target for cancer chemotherapy—in particular, the treatment of chronic myelogenous leukemia. We set exhaustiveness value to 32 in order to get a more consistent docking result.
import os
train_src_dir = “./src”
os.makedirs(train_src_dir, exist_ok=True)
%%writefile {train_src_dir}/basicdocking.sh
#!/bin/bash
git clone https://github.com/ccsb-scripps/AutoDock-Vina.git;
cd AutoDock-Vina/example/basic_docking/solution ;
~/anfvol/vina_1.2.5_linux_x86_64 –receptor 1iep_receptor.pdbqt –ligand 1iep_ligand.pdbqt –config 1iep_receptor_vina_box.txt –exhaustiveness=32 –out 1iep_ligand_vina_out.pdbqt
This script will run AutoDock Vina to perform molecular docking and generate a PDBQT file named 1iep_ligand_ad4_out.pdbqt. This file will include all the poses that the script discovered. The script will also display docking information on the terminal window.
Create your command job to run the docking script on the compute cluster
from azure.ai.ml import command, MpiDistribution, Input
registered_model_name = “autodock_basicdocking”
job = command(
code=”./src/”, # location of source code
command=”apt-get -y install nfs-common;
mkdir ~/anfvol;
mount -t nfs -o rw,hard,rsize=262144,wsize=262144,vers=3,tcp 10.30.1.4:/anfvol ~/anfvol;
cp basicdocking.sh ~/anfvol/;
~/anfvol/basicdocking.sh;”,
environment=”aml-vina@latest”,
instance_count=2,
# distribution=MpiDistribution(process_count_per_instance=2),
compute=”cpu-dockingcluster”
if (cpu_cluster)
else None, # No compute needs to be passed to use serverless
display_name=”autodock_basicdocking”,
)
Submit your job
ml_client.create_or_update(job)
The file 1iep_ligand_ad4_out.pdbqt or the terminal window will display results similar to the ones below after the job has run successfully. The predicted free energy of binding is approximately -13.22 kcal/mol, as shown.
Scoring function : vina
Rigid receptor: 1iep_receptor.pdbqt
Ligand: 1iep_ligand.pdbqt
Grid center: X 15.19 Y 53.903 Z 16.917
Grid size : X 20 Y 20 Z 20
Grid space : 0.375
Exhaustiveness: 32
CPU: 32
Verbosity: 1
Computing Vina grid … done.
Performing docking (random seed: -835730415) …
0% 10 20 30 40 50 60 70 80 90 100%
|—-|—-|—-|—-|—-|—-|—-|—-|—-|—-|
***************************************************
mode | affinity | dist from best mode
| (kcal/mol) | rmsd l.b.| rmsd u.b.
—–+————+———-+———-
1 -13.22 0 0
2 -11.37 1.553 1.987
3 -11.19 2.983 12.44
4 -11.04 3.899 12.3
5 -10.61 2.54 12.63
6 -9.859 1.836 13.68
7 -9.639 2.919 12.58
8 -9.5 2.422 13.49
9 -9.427 1.625 2.682
Summary and discussion
As illustrated in this article, you can use the Azure Machine Learning studio, a web interface that provides a user-friendly and collaborative environment for building and managing your machine learning and HPC projects. You can also use the Azure Machine Learning SDKs and CLI to programmatically interact with the platform and automate your tasks.
You can utilize the scalability and flexibility of Azure to run your HPC applications on demand, without investing in costly and complex on-premises infrastructure. You can pick from various VM sizes and configurations that fit your needs, including the latest NVIDIA and AMD GPUs with high-bandwidth InfiniBand interconnect.
Azure Machine Learning pricing is transparent and easier for customers to estimate cost. The pricing is based on the amount of compute used, and there are no additional charges for using Azure Machine Learning. You can pay for compute capacity by the second, with no long-term commitments or upfront payments. You can also save money across select compute services globally by committing to spend a fixed hourly amount for 1 or 3 years, unlocking lower prices until you reach your hourly commitment. Azure also provides a pricing calculator that allows you to estimate the cost of using Azure Machine Learning running your HPC applications.
Storage options. In our example, we have implemented Azure NetApp Files (ANF) as the persistent storage solution. Azure offers a range of alternative storage options tailored to specific performance requirements such as IOPS, throughput, and cost considerations. Including Azure Managed Lustre Storage, Azure Files, and Azure Blob, each serving distinct needs based on your application’s demands and budget constraints.
Please note that Azure Machine Learning is not inherently designed for running HPC applications. Therefore, you may have to modify or rewrite some parts of your code during the migration process. For example, you may need to create a parallel pipeline or manually handle the logic for distributing the workload among nodes.
Microsoft Tech Community – Latest Blogs –Read More
Lesson Learned #464: Utilizing SMO’s Scripting Option in Azure SQL Database.
Today, I encountered a unique service request from a customer inquiring about alternative methods to script out a table and all its dependencies in Azure SQL Database. Traditionally, several approaches are employed, such as utilizing stored procedures like sp_help, sp_depends, or functions like object_definitionor SSMS GUI. These methods, while useful, but, I would like to share other options using SQL Server Management Objects (SMO).
Script:
# Define connection details
$serverName = “servername.database.windows.net”
$databaseName = “DBName”
$tableName = “Table1”
$schemaName = “dbo” # Update if using a different schema
$userId = “UserName”
$password = “Pwd!”
# Create a Server object
$serverConnection = New-Object Microsoft.SqlServer.Management.Common.ServerConnection($serverName, $userId, $password)
$server = New-Object Microsoft.SqlServer.Management.Smo.Server($serverConnection)
# Access the database
$database = $server.Databases.Item($databaseName)
# Access the specific table
$table = $database.Tables.Item($tableName, $schemaName)
# Configure scripting options
$scripter = New-Object Microsoft.SqlServer.Management.Smo.Scripter($server)
$scripter.Options.ScriptSchema = $true
$scripter.Options.Indexes = $true
$scripter.Options.Triggers = $true
$scripter.Options.ScriptDrops = $false
$scripter.Options.WithDependencies = $false
# Script the table
$scripter.Script($table) | ForEach-Object { Write-Output $_ }
Running this small PowerShell Script we are going to have the structure of the table including triggers and Indexes.
Example:
SET ANSI_NULLS ON
SET QUOTED_IDENTIFIER ON
CREATE TABLE [dbo].[PerformanceVarcharNVarchar](
[Id] [int] NOT NULL,
[TextToSearch] [varchar](200) COLLATE SQL_Latin1_General_CP1_CI_AS NOT NULL,
CONSTRAINT [PK_PerformanceVarcharNVarchar] PRIMARY KEY CLUSTERED
(
[Id] ASC
)WITH (STATISTICS_NORECOMPUTE = OFF, IGNORE_DUP_KEY = OFF)
)
SET ANSI_PADDING ON
CREATE NONCLUSTERED INDEX [PerformanceVarcharNVarchar1] ON [dbo].[PerformanceVarcharNVarchar]
(
[TextToSearch] ASC
)WITH (STATISTICS_NORECOMPUTE = OFF, DROP_EXISTING = OFF, ONLINE = OFF)
Microsoft Tech Community – Latest Blogs –Read More
RESOLVED: HDC Web Dashboard Outage
Updated 12/29/2023
Thank you for your patience. The issue has been resolved and service restored.
***
We are aware of an issue with the hardware dashboard and are working to remediate. As this issue occurred during our scheduled US Winter Holiday timeframe release moratorium, we are targeting restoration of service early in January. In the meantime, the API interface should still be available to you.
Please check the Hardware Dev Center Community Hub for updates.
Microsoft Tech Community – Latest Blogs –Read More
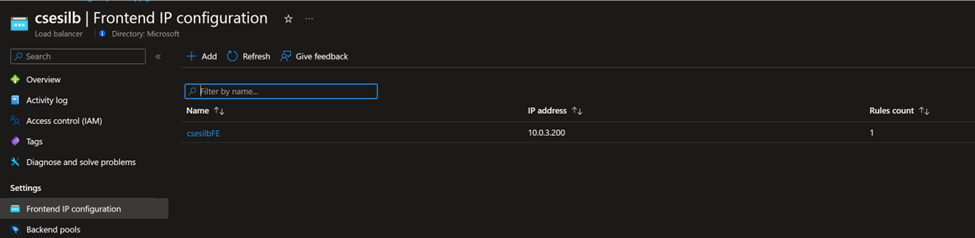
How to allow traffic from Internet to a Cloud Service Extended Support with Internal Load Balancer
The previous article explained how user could configure and limit the access to Cloud Service Extended Support (CSES) only from specific Virtual Network(s) by using internal Load Balancer feature. But for some scenarios, user does not really want to fully block the traffic from public Internet, but just wants to make the CSES safer. In this scenario, adding an Azure Application Gateway in front of CSES will be a good idea. It can provide following benefits:
From public Internet, the traffic is only able to reach CSES through Application Gateway
From Virtual Network, the traffic is not blocked by this design
User can add additional feature such as Web Application Firewall to make the traffic safer
Generally speaking, Azure Application Gateway is an OSI layer 7 service. It can be used for load balancing, WAF and some other purposes. For more details about this service, please check here.
Pre-requirement:
You need to follow this document at first and have a running CSES with internal Load Balancer. The following screenshots are from my environment (Frontend IP using 10.0.3.200, a private IP address, proving it’s an internal Load Balancer):
CSES Internal LB frontend IP
CSES Internal LB backend pool
CSES Internal LB health probe
CSES Internal LB load balancing rule
The traffic design
CSES with internal LB + App Gateway traffic flow
As above diagram, the part inside of yellow dash is in Virtual Network. The outside part of yellow dash is the public Internet. As the CSES is using Internal Load Balancer only, the traffic through public Load Balancer is blocked. In this scenario, in order to be able to visit the site hosted in CSES, we need to use another service as a jump box to forward the traffic to CSES. In this article, we will use Application Gateway.
The traffic flow will be:
Public Internet -> public IP address of Application Gateway -> Application Gateway -> private IP address of CSES -> Internal Load Balancer -> CSES instance
Configuration guideline
P.S. In order to make the whole process easier to follow, only the basic function of forwarding traffic is realized in this article. If any additional feature is needed, such as HTTPS traffic or WAF configuration, please kindly create a support ticket to Application Gateway team for further assistance.
Application Gateway side configuration:
Frontend Public IP address: (172.191.12.201 in this sample)
Application Gateway frontend IP
Backend pool setting: (Name can be configured as you want. Key point is to use the private, frontend IP address of the Internal Load Balancer)
Application Gateway backend pool
Backend setting: Setting about how the traffic will be forwarded. In this sample, the easiest simple HTTP traffic with port 80 is used (if CSES project is listening on other port like 700, then here it should be configured as 700). If any additional feature is needed such as HTTPS, custom health probe or path override, please kindly create support ticket to Application Gateway team for further assistance.
Application Gateway backend setting
Listener setting: This is about which port of Application Gateway will be used by public Internet to send traffic to CSES. Like here the port 8080 is configured, so when user in public Internet sends traffic to this CSES, he needs to send the traffic to Application Gateway, port 8080. Of course original port 80 can still be used, here using 8080 is to prove that this port can be different from the CSES listening port.
Application Gateway listener
Rule setting: Combine all the above settings together.
Application Gateway rule 1
Application Gateway rule 2
Test result:
The website hosted in the CSES with Internal Load Balancer is successfully returned back to user in public Internet by visiting Application Gateway IP address (172.191.12.201) plus specific port number (8080).
Test result
Additional tips:
Someone may find that in this article, two different load balancing services are used at same time: Load Balancer and Application Gateway. In fact, this point may cause small impact on the performance of network level traffic, but it can help much if we consider about the auto-scaling scenario of CSES.
If we only use the Application Gateway in our system, this means the Application Gateway needs to add the private IP addresses of each CSES instance into the backend pool. If our CSES is scaled out (increasing the number of instances), the new instances will use new private IP addresses and those new instances must be added into Application Gateway backend pool manually. This is inconvenient for user.
Microsoft Tech Community – Latest Blogs –Read More
Utilize legacy Web Service code in Logic App Standard
This article shows how to automatically create local function app classes that can be called by logic app .
We’ll also talk about the use of T4 for code generation and provide a practical example with a sample web service.
Understanding WorkflowActionTrigger
WorkflowActionTrigger is a type of function app triggers that can be invoked by logic app which called Local Function App
Image
For more information, visit .NET Framework Custom Code for Azure Logic Apps (Standard) Reaches General Availability (microsoft.com).
Integrating Web Services into .NET
Integrating web services into a .NET project can be done using tools like ServiceUtil and wsdl.exe.
In my POC I will talk only about ServiceUtil which it will create reference.cs class and it is available in visual studio 2022
For detailed information on wsdl.exe, visit WSDL and Service Contracts.
For detailed information on ServiceUtil (Svcutil.exe), visit ServiceModel Metadata Utility Tool (Svcutil.exe).
https://learn.microsoft.com/en-us/dotnet/core/additional-tools/wcf-web-service-reference-guide
Generating C# Code with T4 Templates
T4 (Text Template Transformation Toolkit) is a powerful tool for generating C# code. It can be run using TextTransform.exe. Here’s how to do it:
The template that I have created WSProxyGenerator.tt will open the Function App DLL using Reflection then scan it for all interfaces with attribute named ServiceContractAttribute
{
private readonly ILogger<AddAsyncLogicAppProxy> logger;
public AddAsyncLogicAppProxy(ILoggerFactory loggerFactory)
{
logger = loggerFactory.CreateLogger<AddAsyncLogicAppProxy>();
}
[FunctionName(“AddAsyncLogicAppProxy”)]
public Task<Int32> Run([WorkflowActionTrigger] string endpointAddress, Int32 a, Int32 b)
{
var _binding = new BasicHttpsBinding();
var _address = new EndpointAddress(endpointAddress);
using (var proxy = new CalculatorWebServiceSoapClient(_binding, _address))
{
var result = proxy.AddAsync(a, b);
return result;
}
}
}
Running the Sample
Since the template expect the Dll to be exist then fist you need to build your Function App first to generate the Dll.
You need to locate the file TextTransform.exe which exists.
C:Program FilesMicrosoft Visual Studio2022EnterpriseCommon7IDETextTransform.exe
Modify the T4 file and change Dll path inside the template then save it.
string dllPath = “……fa.dll”;
Then run the below command to generate the c# file that contains all classes.
TextTransform.exe” “path_toWSProxyGenerator.tt”
All steps :
#first Build to get the Dll
dotnet build FunctionApp.csproj
#generate the proxy class CS file
TextTransform.exe” “path_toWSProxyGenerator.tt”
#Build to get the Dll again to get the proxy generated
dotnet build FunctionApp.csproj
To verify that everything worked as expected.
Make sure that you have the function.json in the lib folder in logic app.
then Open logic app designer and make sure that you can see the new Functions.
To demonstrate the concepts, we will use a sample web service. The logic app will call the following web service: Calc.asmx.
from http://ecs.syr.edu/faculty/fawcett/Handouts/cse775/code/calcWebService/Calc.asmx
To access the complete repository with all the necessary files and detailed instructions, visit the GitHub repository:
logic-app-workspace-with-web-service-client-generator
Microsoft Tech Community – Latest Blogs –Read More

New on Microsoft AppSource – December 8-14, 2023
We continue to expand the Microsoft AppSource ecosystem. For this volume, 115 new offers successfully met the onboarding criteria and went live. See details of the new offers below:
Akamai Segmentation: This product from Akamai Technologies simplifies and accelerates segmentation projects, providing affordable and context-rich visibility into traffic across cloud, PaaS, on-prem, and hybrid environments. It offers a single infrastructure-agnostic tool to manage policies across all environments, attaches policies to workloads, and provides an overlay segmentation solution that reduces friction and decreases convergence time.
Drill Down Combo Bar PRO (Pin): From ZoomCharts, Drill Down Combo Bar PRO (Pin) is a customizable chart used by 80% of Fortune 200 companies. It offers multiple chart types, stacking and clustering options, on-chart interactions, and full customization. Popular use cases include sales and marketing, human resources, accounting and finance, and manufacturing. The visual is mobile-friendly and comes with 30 days of free access to paid features.
Drill Down Timeline PRO (Pin): This customizable visual from ZoomCharts allows for time-based data visualization and drill-down to specific periods. The visual is suitable for various industries, including banking, sales, IT, logistics, and manufacturing. It offers in-app purchases and comes with 30 days free access to paid features. ZoomCharts visuals are mobile-friendly and offer interactive drilldowns, smooth animations, and rich customization options.
Drill Down Waterfall PRO (Pin): This customizable chart from ZoomCharts, known for its smooth animations, offers intuitive and interactive drilldowns, zooming, and rich customization options for creating reports that empower business users. Popular use cases include accounting, inventory management, human resources, and sales/marketing. The visual is mobile-friendly and comes with 30 days free access to paid features.
GDPR Registry: A data registry is essential for companies to keep track of personal data and potential breaches. From PD-Consult, GDPR Registry keeps track of all the personal data a company gathers. It contains information on what, where, why, and how long data is kept. In case of a data leak, the breach registry is also included.
HumanSoft – HR Solution Built on Power Platform: HumanSoft from Genbil Software is comprehensive HCM software for medium to large organizations. It integrates with Microsoft Teams and covers the entire employee lifecycle from hiring to retiring, including core HR functions, self-service portal, recruitment, onboarding/offboarding, learning and development, performance and recognition, talent and succession management, and reporting and analytics.
Kollective EdgeCache: Kollective’s EdgeCache is a video-caching platform that streamlines bandwidth requests, groups streaming traffic to a central point, and limits concurrent connections to supercharge network efficiencies. It requires no additional hardware and can handle requests behind a firewall, enable backhaul network setups, and simplify tunneled remote worker scenarios.
Go further with workshops, proofs of concept, and implementations
Contract Management System: 4-Week Implementation: From LTIMindtree, the Contract Manager app automates creation, review, approval, and signing. It eliminates manual activities, enhances collaboration, increases efficiency, and provides an audit trail. The implementation process includes discovery, assessment, design, and MVP. The deliverables include a technical design document, architecture diagram, recommendations, and app inventory.
Copilot Discovery Assessment: This MindWorks discovery assessment prepares customers for Microsoft Copilot adoption. It helps identify business scenarios, optimize workplace technology, and leverage AI. It includes the Envision Workshop, which showcases Copilot use cases and designs custom use cases for corporations. Also included is the Advisory, which helps build AI and Copilot strategy, calculate ROI, and develop an implementation road map.
Crafting Your Vision with the AI and Copilot Blueprint: 10-Week Program: From Changing Social, this program offers AI-powered training and readiness services to help organizations fully utilize Microsoft 365. The service includes a comprehensive introduction to AI, deep dives into Copilot’s functionalities, and training on apps and permissions. The program also includes stakeholder mapping, pilot deployment, and executive coaching.
Customer Portal: 4-Month Implementation: From Spyglass MTG, this implementation helps organizations create customer collaboration portals using Microsoft Power Pages. The process involves reviewing current engagement methods, identifying gaps, designing and implementing the portal, and providing post-implementation support. The result is a fully functional portal that enhances customer engagement and communication strategies.
Deployment Advisor: 1-Week Implementation: This tool from LTIMindtree compares Microsoft Dynamics 365 CRM solutions and counts components in both environments, helping end users understand differences between solutions. It saves time during development and deployment, improves solution quality, and predicts and prevents issues that could impact revenue. Ideal for comparing instances and ensuring they’re in sync.
Dynamics 365 Business Central QuickStart Basic: Prysma offers implementation services for Microsoft Dynamics 365 Business Central, including financial management, sales, inventory, and purchasing. The team provides consultation, training, data migration, and support. The client is responsible for data extraction and validation, and for designating a key user. Joint tasks include defining analytical dimensions and configuration.
Dynamics 365 Business Central Workshop: From Covenant Technology Partners, this workshop identifies a company’s needs in Microsoft Dynamics 365 Business Central through staff interviews and process analysis. It evaluates current accounting software, maps current and future processes, conducts gap analysis, and creates a road map for implementing solutions. The workshop can be conducted in two four-hour sessions or multiple days.
Enhance Identity Security with Entra ID P2: 6-Week Implementation/Proof of Concept: This service from Bulletproof provides Microsoft 365 customers with best practice implementations and understanding of Entra ID P2, which offers a comprehensive solution with features such as multi-factor authentication, conditional access policies, identity protection, privileged identity management, and password-less authentication.
Expense720 Onboarding: Expense720 is a simple-to-use app that digitizes invoice- and expense-handling processes, helping to avoid common problems such as time-consuming tasks, slow approvals, compliance challenges, security concerns, and inefficiencies. On720.com offers onboarding services to ensure successful implementation and setup, with consultancy available for more advanced use cases.
FSM Mobility: 8-Week Consultation and Implementation Workshop: FSM Mobility Application streamlines field technicians’ work order journey with immediate data sync across devices. LTIMindtree offers a free workshop to assess field service productivity and create a modernization road map. The Field Service Mobile Application complements the Field Service Module and can be customized as per business requirements.
HCLTech’s PDOC Digital Workplace Migration and Modernization Services: HCLTech offers services for Microsoft 365, covering modernization assessment, migration services, Windows 11 transformation, Azure Virtual Desktop migration and implementation, virtual workplace, and workplace automation solutions. Its services enable enterprises to enhance productivity, collaboration, security, and user experience.
Incident Response Retainer: Sentinel Technologies offers incident response services for Microsoft 365, providing remote and on-site support, tried and tested tools, full-scope forensics analysis, and technical expertise beyond cyber security. Sentinel’s around-the-clock rapid response helps minimize business impacts and restore normal service. Insurance and third-party friendly. It has proactive services, discounted rates, contracted service levels, and flexible use provisions.
MDS AI + Copilot Technical Advisory Workshop: 3-Day Engagement: This Maureen Data Systems workshop includes three defined milestones to help customers assess different Copilot solutions and align their enterprise productivity with their business objectives. At the end of the workshop, customers will have identified specific enterprise AI objectives and received guidance from experienced IT professionals.
MDS Microsoft 365 Copilot Extensibility Workshop: 3-Day Engagement: This Maureen Data Systems workshop covers three defined milestones and includes sharing Microsoft Azure concepts and delivering a detailed road map. Outcomes include a Copilot customization and connection strategy, evaluation of content and data operations, technical insight, and responsible AI practices.
Microsoft 365 Compliance Consulting: Fujitsu offers specialized consulting services for achieving data security and compliance for Microsoft Azure and 365. Fujitsu, a global system integrator with extensive experience in compliance consulting for Azure and Microsoft 365, identifies personal data, assesses existing privacy practices, and provides recommendations for improvement.
Microsoft 365 Copilot Immersive Workshop: 2-Day Workshop: This service from Noventiq helps organizations explore the possibilities of AI with Microsoft Copilot and create an implementation and adoption plan tailored to their needs. The workshop showcases Copilot capabilities within Microsoft 365 and aims to accelerate AI and Copilot journeys, empower users, increase user satisfaction and engagement, and drive innovation and transformation.
Microsoft 365 Copilot Optimization: Alfa Connections offers a workshop to help customers migrate data to Microsoft 365 Copilot effectively and securely. The workshop provides reports and suggestions on data challenges, governance, security, and adoption. The engagement includes identifying high-value scenarios, showcasing intelligence, and developing an implementation plan.
Microsoft 365 Copilot Readiness: Alfa Connections offers a workshop to help customers migrate data to Microsoft 365 Copilot effectively and securely. The workshop provides reports and suggestions on data challenges, governance, security, and adoption. The engagement includes identifying high-value scenarios, showcasing intelligence, and developing an implementation plan.
Microsoft 365 Copilot Readiness Workshop: Advaiya Solutions’ Microsoft 365 Copilot workshop offers insights into its capabilities, live demos of common tasks, and strategies for harnessing its power. Professionals across various industries can attend to gain insights into the potential impact of Copilot on productivity, efficiency, and the overall digital experience.
Microsoft 365 Copilot Workshop: This Trans4mation IT workshop targets business decision makers, IT professionals, and adoption managers. It offers insights into AI integration and practical applications tailored to participants’ needs. The workshop covers Microsoft 365 Copilot, with inspiring presentations on AI possibilities and strategic planning for implementation. Participants gain practical skills and strategies for effective AI integration.
Microsoft 365 Information Protection: 1-Day Workshop: Grant Thornton offers a workshop that provides strategic and technical advice on Microsoft 365 implementation, including discovery and classification of data, labeling strategy, metrics development, system integration, and data governance. The workshop helps establish goals, identify solutions, develop a roadmap, enhance security posture, and determine metrics for program accomplishments and risks.
Microsoft Dynamics 365 Sales Copilot Training: 3-Hour Session: Advaiya Solutions’ Microsoft Dynamics 365 Sales Copilot Training helps sellers and administrators maximize seller-customer engagement through an intelligent assistant. The three-hour session covers using Copilot with CRM, Teams, and Outlook, and attendees will gain proficiency in Copilot and effective prompts. Customizations and configurations can also be added.
Securing On-Prem AD with Defender for Identity: 3-Week Implementation/Proof of Concept: This service from Bulletproof helps detect advanced attacks in hybrid environments by monitoring user behavior and activities with learning-based analytics. It protects user identities and credentials stored in Active Directory and provides clear incident information on a simple timeline for fast triage.
SVA Workshop: Microsoft and Data Protection: Available only in German, this workshop from SVA discusses the challenges of protecting IT systems from unwanted disruptions and attacks, particularly in the context of cloud computing. It explores the legal and regulatory frameworks necessary for efficient use of cloud services, with a focus on Microsoft’s approach to data privacy and security in the German and European markets.
Contact our partners
Aptean Profiles for Food and Beverage
BE-terna Connector App Commerce Interface to Fashion
Business Central Upgrade: 2-Hour Assessment
CAAPS (Complete Automated Accounts Payable Solution)
CloudMonitor Enterprise FinOps
Cyber Security and Digital Infrastructure
Data Integrator for Power Automate SFTP
Decisio Cloud for Water (C4W) – Leakage and Demand Management
Epiq Microsoft 365 Copilot Optimization with Microsoft Purview
ERP Link for Solidworks, Autodesk, Siemens, PTC, EPLAN
GO Portal for tegossuite – ECM Adapter
H&G Microsoft 365 Control: 2-Hour Assessment
Information Management: 3- to 4-Week Assessment
Integrated Supply Chain Management for the Automotive Industry
iStratgo HR, Performance and Talent Management Software
John Deere Financial Dealer Integration
Kalpataru Field Sales Force Application
Kortext Arcturus Transactable Offer
Lighthouse Microsoft Data Security Check: 4-Week Assessment
Microsoft Entra: IAM Review and Assessment
Migr8 for Dynamics 365 Customer Service
Migr8 for Dynamics 365 Field Service
Migr8 for Dynamics 365 Project Operations
Migration Assistance for Business Central: 3-Week Assessment
Monitoring Service for Microsoft Azure Virtual Desktops
Point-to-Point (P2P) Migration and App Modernization: 4-Week Assessment
Power BI Governance Plan: 3-Week Assessment
Power Platform: 2-Week Discovery and Assessment
PowerBPM Enterprise Process Management System
PowerEIP Enterprise Information Portal
Self Service Portal – Alna HR Office WTA Advanced
SharePoint Migration Services: 4-Week Assessment Followed by Estimated Duration of Implementation
SIEVERS Connector to SharePoint
Success Insurance Reporting and Intermediary System (IRIS)
This content was generated by Microsoft Azure OpenAI and then revised by human editors.
Microsoft Tech Community – Latest Blogs –Read More
Migrating a Full Stack MySQL Web App from Google Cloud to Microsoft Azure: Step-by-Step Guide
Introduction
Migrating a full-stack application can be an intricate job, even if you are using the same technologies on different clouds. Some things need to be done in order to have a fully functional application. If both platforms support the programming language and version, then that’s one thing to put aside and start working on figuring out how to connect the database. Databases differ in the language they speak. You can use a universal dialect like SQLAlchemy that facilitates communication with multiple databases like MySQL. The last problem is to provide the application with the credentials it needs in a way it understands to establish a connection. Once you are done and the database is up and running. Here, comes the part where you look for a tool to import your data. Luckily, mysql CLI provides a command that you can use to import your data.
In this blog, you will go through a step-by-step guide, from preparing your Full-stack web application to be deployed to Azure and exporting your data from Google Cloud SQL to deploying your application to Azure App Service, migrating your MySQL database to Azure Databases for MySQL and connecting it to your application.
We have got you covered whether you already have a full-stack application working on Google or looking to bring your first full-stack application to the Internet. You’ll learn everything you need to do to deploy your website to Microsoft Azure.
What will you learn?
In this blog, you’ll learn to:
Export a database from Google Cloud SQL to Cloud Storage and save it locally.
Create an Azure Web App to host your application and a MySQL database to store your data.
Fork a GitHub repository and configure continuous deployment from GitHub to Azure App service.
Modify the application environment variables to bind the app with the database.
Import data to MySQL database using mysql CLI inside Azure App service SSH session.
What is the main objective?
Migrating a Full stack application from Google Cloud to Microsoft Azure including a Python web app and MySQL database.
Prerequisites
An Azure subscription.
If you don’t already have one, you can sign up for an Azure free account.
For students, you can use the free Azure for Students offer which doesn’t require a credit card only your school email.
Web Application Source Code from GitHub.
Summary of the steps:
Step 1: Export your Data from Google Cloud SQL.
Step 2: Create an Azure Web App and a MySQL Database.
Step 3: Fork the Code and Configure Azure App Service Deployment.
Step 4: Configure Azure App Service with your Relational Database.
Step 5: Import your Data into Azure MySQL using Azure App Service.
Step 1: Export your Data from Google Cloud SQL
Google Cloud SQL provides you with the ability to export your database as a SQL dump file which can be used to recreate the whole database with all its tables and data anywhere you want.
In this step, you export your data from Cloud SQL to have a potable and reusable copy from your entire database.
Complete the following steps to export your data from Cloud SQL in Google Cloud:
1. Visit the Google Cloud Platform console.cloud.google.com in your browser and sign in.
2. Type cloud sql in the search bar at the top of the console page and select SQL from the options that appear.
3. Select the Instance ID of the Cloud SQL instances that you want to export.
4. Select Export from the top navigation menu to export your database.
5. Perform the following tasks to export data to Cloud Storage:
What
Value
File format
Select SQL.
Data to export
Select the name of the database that has your tables and data.
Destination
Select Browse to choose a cloud storage bucket. Currently, the only supported destination is Google Cloud Storage
6. Select the + icon to create a new bucket.
7. Enter a globally unique name for your bucket followed by selecting CREATE. Leave all the other options to the default values as you will delete this bucket later.
8. Select CONFIRM to proceed with the creation process. This prompt asks if you want to make the bucket open for public access or private, private will work for you.
9. Select the SELECT button to select the newly created bucket to save your data inside.
10. Select EXPORT to confirm your selection and initiate the data export process.
11. Select the name of the file from the notification pane at the bottom right of the screen to redirect you to the storage bucket that has the exported file.
12. Select the DOWNLOAD button to download the data locally to your device.
13. Select DELETE to delete the bucket after the download finishes as you no longer need it.
Congratulations! You successfully exported your database from Google Cloud SQL. The application source code is available on GitHub so, there is no need to do anything from the Application side. In the next step, you’ll create an Azure Web App and a MySQL database.
Step 2: Create an Azure Web App and a MySQL Database
Azure App Service is an HTTP-based service for hosting web applications, REST APIs, and mobile back ends. You can develop in your favorite language, be it .NET, .NET Core, Java, Node.js, PHP, and Python. Applications run and scale with ease on both Windows and Linux-based environments.
In this step, you create an Azure App service to host your Python application and a MySQL database to store the migrated data.
Complete the following steps to create an Azure Web App and a MySQL database in the Azure portal:
1. Visit the Azure portal https://portal.azure.com in your browser and sign in.
2. Type app services in the search bar at the top of the portal page and select App Service from the options that appear.
3. Select Create from the navigation menu followed by selecting Web App + Database.
4. Perform the following tasks:
In the Project Details section,
What
Value
Subscription
Select your preferred subscription.
Resource group
Select the Create new under (New) Resource group to create a new resource group to store your resources. Enter a unique name for the resource group followed by selecting OK.
Region
Select a region close to you for best response times.
In the Web App Details section,
What
Value
Name
Enter a unique name for your applications. This is the same subdomain for your deployed website.
Runtime stack
Select Python 3.8.
In the Database, Azure Cache for Redis, and Hosting sections,
What
Value
Engine
Select MySQL – Flexible Server.
Server name
Enter a unique name for your server. This is the place that will host your different database instances
Database name
Enter a unique name for your database. This is the instance that will store your tables and data
Add Azure Cache for Redis?
Select No. Azure Cache for Redis is a high-performance caching service that provides in-memory data store for faster retrieval of data but will incur more charges to your account.
Hosting Plan
Select Basic. You can scale it up later the difference between the two plans is their different capabilities and the cost per service you are receiving.
5. Select Review + create.
6. Save the Database details in a safe place as you need them to connect to your database. This is the only time that you have access to the database password.
7. Select Create to initiate the deployment process.
8. After the deployment finishes, select Go to resource to inspect your created resource. Here, you can manage your resource and find important information like the Deployment center and configuration settings for your website.
Congratulations! You successfully created a web application and a database with a single button this enables you to deploy your code and migrate your data later to them as the website and database are initially empty. In the next step, you will get the website code and deploy it to Azure App service.
Step 3: Fork the Code and Configure Azure App Service Deployment
The sample code you are using is an Artists Booking Venues Web Application powered by Python (Flask) and MySQL Database.
In this step, you’ll:
Fork a GitHub repository on GitHub.
Configure continuous deployment from the Deployment center on Microsoft Azure.
1. Visit the following GitHub repository john0isaac/flask-webapp-mysql-db . (github.com) in your browser and sign in.
2. Select Fork to create a copy from the source code to your own GitHub account.
3. Navigate back to your newly created deployment on Microsoft Azure. Select Deployment Center.
4. To link your GitHub repository with the Web App, Perform the following tasks:
What
Value
Source
Select GitHub.
Signed in as
Select your preferred Account.
Organization
Select your Organization. This is your GitHub username if you haven’t forked the repository to an organization.
Repository
Select the name of the forked repository flask-webapp-mysql-db.
Branch
Select main.
5. Select Save to confirm your selections.
6. Wait for the deployment to finish. You can view the GitHub Actions deployment logs by selecting the Build/Deploy Logs.
7. Once the deployment is successful, select the website URL from the deploy job to view the live website.
Congratulations! You successfully deployed a website to Azure App Service and as you can see the website works as expected.
But if you try to navigate to any page that needs to make a call to the database you get the following error.
Let’s go ahead and solve this error by configuring the database.
Step 4: Configure Azure App Service with your Relational Database
This web application uses SQLAlchemy ORM (Object Relational Mapping) capabilities to map Python classes defined in models.py to database tables.
It also handles the initialization of a connection to the database and uses the create_all() function to initiate the table creation process.
But how do you trigger this function to make all of that happen?
If you navigate to the beginning of the app.py you will find that in order for the application to call the setup_db() function it needs an environment variable called DEPLOYMENT_LOCATION.
You may wonder, why are we using this? The answer is quite simple, different deployment locations require different database configurations.
Feel free to check out the difference in the environment folder.
Let’s go ahead and define this environment variable to start the database creation process.
1. Navigate back to your web app on Azure and select Configuration from the left side panel under the Settings label.
2. From the Configuration window, select + New application setting to add a new environment variable.
3. Add the following name and value in the input text fields followed by selecting Ok.
Name
Value
DEPLOYMENT_LOCATION
azure
4. Confirm that DEPLOYMENT_LOCATION is in the list of Application settings then, select Save followed by selecting Continue.
5. Wait a couple of seconds then, refresh the website to see the update.
Congratulations! It works but wait a minute… Where is the data? Everything is blank!
You haven’t imported the database yet but now the website is connected to the database and the tables have been created, which means that you can insert new data from the website, update, and delete it but you don’t have access to the old data yet. In the next step, you will work on importing your data using the SSH feature from Azure App service.
Step 5: Import your Data into Azure MySQL using Azure App Service
This application and database are deployed to a virtual network so, you can’t access them unless you use a virtual machine deployed to the same virtual network and that’s why you are going to make use of the SSH feature in your web app to access the database through the web app and import your data.
Let’s go ahead and SSH into the website.
1. Navigate back to your web app and select SSH from the left side panel under the Developer Tools label.
2. Select Go -> to open the SSH session in a new window.
Inside the ssh session, perform the following tasks:
3. Execute this command to update the installed packages.
apt-get update
4. Execute this command to install mysql as it doesn’t come preinstalled. If prompted Do you want to continue? type y and press Enter.
apt-get install default-mysql-server
5. Execute this command to import your .SQL file data to the MySQL database. The file referred to in this command was uploaded with the website data from GitHub.
mysql –host=$AZURE_MYSQL_HOST –user=$AZURE_MYSQL_USER –password=$AZURE_MYSQL_PASSWORD $AZURE_MYSQL_NAME<‘Cloud_SQL_Export_2023-10-15 (22_09_32).sql’ –ssl
Note that I had to clean up the exported SQL from Google Cloud a little bit but I didn’t add anything to it I just removed the unnecessary to avoid errors in the ssh session.
6. Navigate back to the website, refresh any page and you’ll find all the data there.
Congratulations!!! you have come a long way taking the data and web application from Google Cloud to Microsoft Azure through all the steps in this blog.
Clean Up
You can now safely delete the Google Cloud SQL database and disable your App Engine or even delete the whole project.
Once you finish experimenting on Microsoft Azure you might want to delete the resources to not consume any more money from your subscription.
You can delete the resource group and it will delete everything inside it or delete the resources one by one that’s totally up to you.
Conclusion
Congratulations, you have learned and applied all the concepts behind taking an existing Python web application and a MySQL database and migrating them to Microsoft Azure.
This gives you the ability to build your own web applications on Azure and explore other databases like Azure Cosmos DB or Azure Databases for PostgreSQL as you will find that at the end you just need a connection string to connect with a different database and a dialect to translate your code to a language that the database understands. You have also learned that you can deploy your website to Microsoft Azure by selecting your website’s programming language, no extra configuration is needed or creation of any file.
Next steps
Documentation
Subscriptions, licenses, accounts, and tenants for Microsoft’s cloud offerings
Manage Azure resource groups by using the Azure portal
App Service overview
Azure Database for MySQL
Quickstart: Deploy a Python (Django or Flask) web app to Azure App service
Configure CI/CD with GitHub Actions – Azure App Service
Configure apps – Azure App Service
Encrypted connectivity using TLS/SSL – Azure Database for MySQL – Flexible Server
SSH access for Linux and Windows containers – Azure App Service
Training Content
Deploy a website to Azure with Azure App Service learning path – Training | Microsoft Learn
Build real world applications with Python – Training | Microsoft Learn
Develop applications with Azure Database for MySQL – Flexible Server
Found this useful? Share it with others and follow me to get updates on:
Twitter (twitter.com/john00isaac)
LinkedIn (linkedin.com/in/john0isaac)
Feel free to share your comments and/or inquiries in the comment section below.
See you in future demos!
Microsoft Tech Community – Latest Blogs –Read More
New on Azure Marketplace: December 8-14, 2023
We continue to expand the Azure Marketplace ecosystem. For this volume, 164 new offers successfully met the onboarding criteria and went live. See details of the new offers below:
Get it now in our marketplace
Akamai Segmentation: Akamai Segmentation simplifies and accelerates segmentation projects, providing affordable and context-rich visibility into traffic across cloud, PaaS, on-prem, and hybrid environments. The infrastructure-agnostic tool manages policies, attaches policies to workloads, and provides an overlay segmentation solution that reduces friction and decreases convergence time.
Atlassian Migration Suite: Solidify’s Atlassian migration suite helps users easily migrate Jira issues, test data, and Confluence pages to Microsoft Azure DevOps. The migrator PRO tool allows for the migration of all issues, including attachments and comments, while maintaining issue hierarchy and links.
HumanSoft – HR Solution Built on Power Platform: HumanSoft is comprehensive HCM software for large or medium-sized organizations. It integrates with Microsoft Teams and covers the employee lifecycle from hiring to retirement. HumanSoft has a self-service portal, reporting and analytics, recruitment and onboarding/offboarding features, learning and development elements, and more.
Insight for Web Server (IWS): Insight for Web Server is a security solution that acts as a reverse proxy response scanner for HTTP/HTTPS endpoints, protecting against various types of information leakage and malicious attacks. It complements existing security systems by extending the protection profile to include protection against outgoing information leakage.
Jira Migrator Pro: This tool from Solidify streamlines the migration process from Jira to Microsoft Azure DevOps. It ensures comprehensive migration of all issues, attachments, comments, issue hierarchy, and links. The PRO version offers advantages such as custom mapping for objects and arrays, user mapping automation, and priority support. It also allows for easy configuration and workflow insights.
Kollective EdgeCache: EdgeCache is a video caching platform that streamlines bandwidth requests, groups streaming traffic to a central point, and limits concurrent connections to supercharge network efficiencies. It requires no additional hardware, and it can handle requests behind a firewall, enable backhaul network setups, and simplify tunneled remote worker scenarios.
RidgeBot: RidgeBot enables enterprises, governments, web app teams, and others to affordably and efficiently test their systems. The system automates the penetration testing process and emulates adversary attacks to validate an organization’s cybersecurity posture. RidgeBot provides a clearer picture of security gaps, which lets security experts devote more energy to research.
Go further with workshops, proofs of concept, and implementations
AI Leadership/Learn GPT: 2-Day Workshop: ACP’s workshop offers two phases of keynote speeches, knowledge transfer, and interactive elements. It aims to provide solutions to technical challenges and potential in your existing specialist areas, with a focus on the use of Microsoft Azure OpenAI Service for generative AI. The workshop also covers cost estimates, content transfer, and workflow creation.
AI Use Case Workshop (Generative AI/Microsoft 365 Copilot): This workshop from KPCS identifies opportunities for implementing generative AI in businesses. The solution proposal involves using AI services such as Microsoft 365 Copilot for enhancing productivity, Azure Cognitive Services for building intelligent apps, and other Microsoft AI services that align with business requirements.
Azure Cost Optimization: Intellias will identify areas of overspending and potential cost-saving opportunities for cloud-based systems. Intellias will assess Azure deployments, implement Azure Monitor and Azure Advisor, and prepare an optimization proposal based on cost-benefit analysis. You can expect reduced cloud computing platform bills, improved profitability and observability, optimized resource utilization, and enhanced performance.
Azure Networking: NW Computing will implement two Meraki vMX virtual appliances to extend your SD-WAN to Microsoft Azure in availability zones for redundancy and high availability. Azure Functions will be set up for automatic failover and updating of user-defined routes. Best-practice Azure security and management will be implemented.
Azure Virtual Desktop Basic Implementation: Chalkline will set up and manage Azure Virtual Desktop so your business can access desktops and applications from anywhere, with robust security and cost-efficient infrastructure. Start with a discovery call to ask questions and learn about Chalkline’s approach toward providing fully managed solutions.
Azure Virtual Desktop Proof of Concept: Chalkline will set up and manage Azure Virtual Desktop so your business can access desktops and applications from anywhere, with robust security and cost-efficient infrastructure. This proof of concept includes a discovery call, migration and modernization, a testing session, a review session, and a Q&A.
Azure Virtual Desktop Workshop for SMB: Chalkline will set up and manage Azure Virtual Desktop so your business can access desktops and applications from anywhere, with robust security and cost-efficient infrastructure. This workshop covers Azure Virtual Desktop basics, exploring benefits, security, cost optimization, customization, and migration.
BI4ALL Databricks Lakehouse Test Automation: 8-Day Implementation: This test framework from BI4ALL is designed for Microsoft Azure Databricks and detects errors and anomalies. The framework promotes transparency in data quality processes, fostering a culture of continuous improvement. It empowers data professionals to fortify the foundation of their analytical solutions and enhances the quality and reliability of data-driven endeavors.
CAF Workshop: The Microsoft Cloud Adoption Framework provides a set of practices and recommended steps to successfully adopt the cloud. Sii will use CAF to guide your business through strategy, planning, readiness, adoption, and secure governance and management. Topics include defining motivations, creating a cloud adoption plan, migrating to Microsoft Azure, and implementing best practices for security and compliance.
Cloud-Native AI-Infused Application Design: 2-Day Workshop: Reply offers AI-integrated applications for businesses to redesign customer experience, enable intelligent manufacturing processes, and improve knowledge management. Reply uses OpenAI services on Microsoft Azure and provides support from vision to product-ready implementation. This workshop will involve developing a common vision, analyzing use cases, and creating a detailed road map.
Community Training – Platform Support: Wipfli offers a platform for organizations to provide digital skills training across large regions. Wipfli contributes ongoing support for adoption and customer success, which includes answering functionality questions, coordinating with a Microsoft support team, and offering technology guidance.
Customer Service Gen AI Bot – 4 Week Implementation: Generative AI has revolutionized customer service by providing swift, accurate responses to inquiries, streamlining communication, and freeing up human agents for more complex tasks. Decision Inc. will implement a Customer Service Automation Bot for improved customer experiences, increased efficiency, and strengthened relationships.
Data Foundation Advisory Services: SoftwareOne offers enterprises a suite of services to establish, standardize, and optimize data infrastructure. This engagement includes envisioning, discovery, and adoption of required changes based on priorities from the discovery phase. Workshops and knowledge transfer sessions will be included.
Data Governance with Purview: Inetum offers a complete data governance solution based on Microsoft Purview. Its consultancy teams help organizations build data trust through collaborative data quality, offering consulting, coaching, data architecture, and deployment services. The approach combines tools to design and deploy governance with the efficiency provided by Microsoft Purview, saving time and improving business efficiency.
Demand Forecasting Accelerator: 8-Week Proof of Concept: LTIMindtree’s Demand Forecasting Accelerator uses machine learning models to predict future demand at a distributor SKU level, enabling better product planning and coordination in the supply chain. The solution identifies the best machine learning model for different product categories and logs different metrics for better tracking.
Demand Forecasting: 10-Week Implementation: Tiger’s forecasting solution on Microsoft Azure improves forecast accuracy, reduces inventory stockouts, controls sourcing and manufacturing, and facilitates labor planning. The solution can be scaled across categories and markets quickly and seamlessly. Key deliverables include harmonized data, finalized modeling dataset, and model documentation.
Gen AI ISO27001 Policy Bot: 4 Week Implementation: The ISO 27001 Policy Bot from Decision Inc. streamlines access to information, enhances productivity, and promotes a self-service culture. It ensures compliance and aligns employees with organizational goals, while also facilitating continuous learning.
Gen AI-Powered Strategy and Lateral Thinking Workshop: Brainstorm, a tool from Slalom, combines Microsoft Azure OpenAI and Slalom’s facilitation frameworks to generate 40 percent more ideas during client workshops. Kick-start innovation conversations and enable teams to continue ideating after this workshop session from Slalom, maintaining access to all ideas using Azure data storage solutions.
HCLTech’s PDOC Application Migration and Modernization Services: HCLTech helps enterprises move and update their legacy applications to modern cloud-native platforms and architectures. This service covers the entire lifecycle of cloud transformation, from assessment to optimization, and includes cloud re-platforming, re-architecting, re-engineering, and DevOps services.
HCLTech’s PDOC Data Modernization and Migration Services: HCLTech offers data modernization and migration services to help enterprises improve and maximize their data assets. This comprehensive approach covers the entire data lifecycle, from discovery to governance, and includes prebuilt tools and a flexible, scalable solution.
IBM Consulting Global Hybrid Retail (HC4R) – Store: IBM Hybrid Cloud for Retail is an integrated suite of assets that helps retailers create a unified store operating platform. It features AI-driven workflows, modern user experiences, and next-gen performance insights. The modular solution works alongside existing technology to deliver seamless omnichannel experiences, empowering associates and optimizing operations.
Infinity LAMPS: 4-Week Implementation: LAMPS is a platform for automating the migration of SAP workloads to Microsoft Azure. LTIMindtree’s deployment process involves setting up a secure Azure subscription, identifying use cases, creating process flow models, building workflows, and conducting end-user testing. Deliverables include deployment, automation of three workflows, validation, and a road map for automation.
LTIMindtree Assessment and Proof of Concept for Azure VMware Solution: LTIMindtree offers end-to-end migration solutions for on-premises infrastructure to Microsoft Azure using Microsoft Azure VMWare Solution. This offer includes assessment, design, migration, validation, management, and operation of client infrastructure.
LTIMindtree KenAI: 6-Week Proof of Concept: LTIMindtree KenAI is an integrated automation framework that helps accelerate MLOps on Microsoft Azure. It standardizes and streamlines the AI/ML journey by leveraging built-in components to operationalize models with speed and scalability. KenAI provides observability across models, insights around drift management, ground truth evaluation, and model explanations.
LTIMindtree REDAR Consulting: LTIMindtree REDAR is an AI-driven solution suite that helps manage product portfolios in e-commerce marketplaces. It provides actionable recommendations on pricing, new product opportunities, and promotional strategies. The suite is powered by Microsoft Azure and offers smarter and faster insights to decode market demand for a sustainable product portfolio.
Money in Motion: 6-Week Proof of Concept: Money in Motion, an AI/ML-driven data monetization solution using Microsoft Azure, helps banks tap into the immense value inherent in their payment transactions data, grow their customer base, and deepen product penetration. The solution from LTIMindtree also offers low-cost and sustainable funds, data-driven insights, and hyper-personalized recommendations.
Proof of Concept SAP on Azure Migration: Vnomic automates and engineers SAP landscape deployment and management on Microsoft Azure, reducing costs and time to value from months to hours. It meets SAP and Azure best practices, improves IT staff productivity, and accelerates cloud migration projects. The solution also optimizes infrastructure utilization.
SUSE Rancher Enterprise Kubernetes Management Platform: 3-Week Implementation: SUSE Rancher is an open-source enterprise computing platform for running Kubernetes clusters on-premises, in the cloud, and at the edge. This offer from Frontier Digital lets organizations operate Kubernetes with a NeuVector zero-trust container security platform for safeguarding cloud-native applications.
SUSE Rancher Enterprise Kubernetes Management Platform: 1-Week Proof of Concept: SUSE Rancher is an open-source enterprise computing platform for running Kubernetes clusters on-premises, in the cloud, and at the edge. Frontier Digital offers a code-first proof of concept that includes a NeuVector zero-trust container security platform.
Contact our partners
Airsonic on Windows Server 2016 Datacenter
Airsonic on Windows Server 2019 Datacenter
Airsonic on Windows Server 2022 Datacenter: Azure Edition
Airsonic on Windows Server 2022 Datacenter
Azure Foundations: 6-Week Assessment
Azure Rapid Assessment: 3-Week Assessment
Azure Security: 3-Week Assessment
Bright Data Web Scraping and Proxy Solutions
CIS Hardened Images on AlmaLinux
CIS Hardened Images on CentOS Linux
CIS Hardened Images on Microsoft Windows 11 Enterprise
CIS Hardened Images on Microsoft Windows Server 2016
CIS Hardened Images on Rocky Linux
CIS Hardened Images on Ubuntu Linux Server LTS
Cloud Custodian – Azure Platform Management
Cybersecurity and Digital Infrastructure
Data Analytics: 3-Day Assessment
Data Science and AI Innovation
Datadog Cluster Extension for Azure Kubernetes Service
Decisio Cloud for Water (C4W) Leakage and Demand Management
Device Data Management: 4-Week Assessment
Drupal 10.0.9 With Support on Ubuntu 20.04
Dynamics 365 Copilot: 4-Week Assessment
Firebird 3 on Windows Server 2016 Datacenter
Firebird 3 on Windows Server 2019 Datacenter
Firebird 3 on Windows Server 2022 Datacenter
Firebird 3 on Windows Server 2022 Datacenter: Azure Edition
Firebird 4 on Windows Server 2016 Datacenter
Firebird 4 on Windows Server 2019 Datacenter
Firebird 4 on Windows Server 2022 Datacenter
Firebird 4 on Windows Server 2022 Datacenter: Azure Edition
GitLab Server on Debian 10 Minimal
GitLab Server on Debian 11 Minimal
GitLab Server on Ubuntu 18.04 Minimal
GitLab Server on Ubuntu 22.04 Minimal
GLPI 10.0.10 with Support on Ubuntu 20.04
Grafana 10.1.2 with Support on Ubuntu 20.04
Healthcare Data Analytics Platform
Informatica’s (IDMC) Data Platform in 30 Days
Infrastructure Discovery and Assessment
Integrated Supply Chain Management for the Automotive Industry
IoT Data Validator: 4-Week Assessment
Kalpataru Field Sales Force Application
Klefki Digital ID and Credentials Platform
LimeSurvey on Windows Server 2022 Powered by Globalsolutions
Mantis Bug Tracker on Windows Server 2016 Datacenter
Mantis Bug Tracker on Windows Server 2019 Datacenter
Mantis Bug Tracker on Windows Server 2022 Datacenter
Mantis Bug Tracker on Windows Server 2022 Datacenter: Azure Edition
Metabase 0.40.3 with Support on Ubuntu 20.04
Migr8 for Dynamics 365 Customer Service
Migr8 for Dynamics 365 Field Service
Migr8 for Dynamics 365 and Power Apps
Migr8 for Dynamics 365 Project Operations
Monitoring Service for Microsoft Azure Virtual Desktop
Neo4j Server on CentOS Stream 9
NGINX 1.18.0 with Support on Ubuntu 20.04
Octopus Deploy Self-Hosted Solution
osTicket 1.17.2 with Support on Ubuntu 20.04
PowerBPM Enterprise Process Management System
PowerEIP Enterprise Information Portal
Prometheus on Windows Server 2016 Datacenter
Prometheus on Windows Server 2019 Datacenter
Prometheus on Windows Server 2022 Datacenter
Prometheus on Windows Server 2022 Datacenter: Azure Edition
Responder MDR for Microsoft Defender for Endpoint
Ridge Security RidgeBot for Microsoft Sentinel
RustDesk on Windows Server 2016 Datacenter
RustDesk on Windows Server 2019 Datacenter
RustDesk on Windows Server 2022 Datacenter: Azure Edition
RustDesk on Windows Server 2022 Datacenter
SQL Server 2022 on Ubuntu 22.04
Valence Security for Microsoft Sentinel
Wi-Fi Data Logger for Temperature Monitoring
This content was generated by Microsoft Azure OpenAI and then revised by human editors.
Microsoft Tech Community – Latest Blogs –Read More
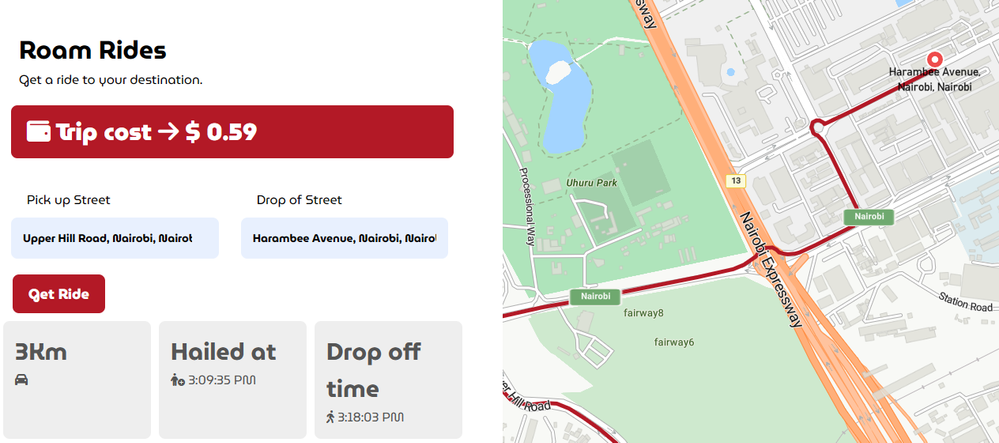
How to use Azure Maps to Build a Taxi Hailing Web App
How to use Azure Maps to Build a Taxi Hailing Web App
Learn how simple it is to set up an Azure Maps Resource account and quickly create applications that have beautiful maps that can be used in a range of solutions. In this tutorial we are going to create a simple and fast taxi hailing Web application with only HTML, CSS and Vanilla JavaScript.
The Taxi Hailing Web Application
Roam Rides is a fictional company that wants to extend their static web application to have capability to offer route calculation and generate a price for a trip that must be made in that calculated route. In this tutorial we are going to add basic map functionalities and features using a CDN link that loads the Azure Maps SDK into our project.
What you will need
An active Azure subscription, get Azure for Student for free or get started with Azure for 12 months free.
VS Code
Basic knowledge in JavaScript (not a must)
Create an Azure Maps Account
Head over to Azure portal.
In the search box, type in Azure Maps then select Azure Maps Accounts as show in the picture below.
Select + Create and in the Create an Azure Maps Account resource page create a new resource group or use a preferred resource group, enter name of the Azure Maps Resource you want to create, for example I will name the resource Roam, the name should be unique.
Click Review + Create.
After the deployment is done select Go to resource and on the left panel select Authentication and copy the Primary Key.
Build the Taxi Hailing Website and Add Azure Maps Map Control
This section introduces you to Azure Maps Map Control and gives you guidance on how you can directly use Azure Maps SDK CDN to start practicing and build an applications with Azure Maps in a fast, clean and easy way, just to get your feet wet. To show you this, we are going to build a taxi hailing app. To get all the code we are going to use for this tutorial, feel free to fork the repository azureMaps-roamrides from GitHub.
Create an index.html, index.css, map.js and index.js file.
In the index.html file add the following html code.
The html head code
<!DOCTYPE html>
<html>
<head>
<title>Roam Rides</title>
<meta charset=”utf-8″>
<meta name=”viewport” content=”width=device-width, initial-scale=1, shrink-to-fit=no”>
<!– Add references to the Azure Maps Map control JavaScript and CSS files. –>
<link rel=”stylesheet” href=”https://atlas.microsoft.com/sdk/javascript/mapcontrol/3/atlas.min.css” type=”text/css”>
<script src=”https://atlas.microsoft.com/sdk/javascript/mapcontrol/3/atlas.min.js”></script>
<!– Add a reference to the Azure Maps Services Module JavaScript file. –>
<script src=”https://atlas.microsoft.com/sdk/javascript/service/2/atlas-service.min.js”></script>
<script src=”map.js”></script>
<link rel=”preconnect” href=”https://fonts.googleapis.com”>
<link rel=”preconnect” href=”https://fonts.gstatic.com” crossorigin>
<link href=”https://fonts.googleapis.com/css2?family=Montserrat:ital,wght@0,100;0,200;0,300;0,400;0,500;0,600;0,700;0,800;0,900;1,100;1,200;1,300;1,400;1,500;1,600;1,700;1,800;1,900&family=MuseoModerno:ital,wght@0,100;0,200;0,300;0,400;0,500;0,600;0,700;0,800;0,900;1,100;1,200;1,300;1,400;1,500;1,600;1,700;1,800;1,900&family=Open+Sans:ital,wght@0,300;0,400;0,500;0,600;0,700;0,800;1,300;1,400;1,500;1,600;1,700;1,800&display=swap” rel=”stylesheet”>
<link rel=”stylesheet” href=”index.css”>
<link rel=”stylesheet” href=”https://cdnjs.cloudflare.com/ajax/libs/font-awesome/6.5.1/css/all.min.css”>
</head>
Notice the SDK files we have just imported into the project:
<!– Add references to the Azure Maps Map control JavaScript and CSS files. –>
<link rel=”stylesheet” href=”https://atlas.microsoft.com/sdk/javascript/mapcontrol/3/atlas.min.css” type=”text/css”>
<script src=”https://atlas.microsoft.com/sdk/javascript/mapcontrol/3/atlas.min.js”></script>
<!– Add a reference to the Azure Maps Services Module JavaScript file. –>
<script src=”https://atlas.microsoft.com/sdk/javascript/service/2/atlas-service.min.js”></script>
We first of all add references to the css style sheet of the map, which is a CDN link. We then add a global version of the Web SDK which is also served as a CDN.
We then add a reference for map.js as <script src=”map.js”></script>, in order for it to be loaded first.
Add the rest of the html code shown below.<body>
<div class=”main-container”>
<div class=”input-container”>
<div class=”heading”>
<h1>Roam Rides</h1>
<p>Get a ride to your destination.</p>
</div>
<div class=”ad-label” id=”ad-label-box”>
<p> <i class=”fa fa-car-side”></i> let’s go</p>
</div>
<div class=”inputs-box”>
<div class=”top-form-section”>
<div class=”input-section”>
<label for=”start”>Pick up Street</label>
<br>
<input list=”start-locations-list” type=”text” name=”start” id=”start-location” placeholder=”e.g. Harambee Avenue”>
<datalist id=”start-locations-list”>
</datalist>
</div>
<div class=”input-section”>
<label for=”start”>Drop of Street</label>
<br>
<input list=”end-locations-list” type=”text” name=”end” id=”end-location” placeholder=”e.g. Upper Hill Nairobi”>
<datalist id=”end-locations-list”>
</datalist>
</div>
</div>
<div class=”buttons-container”>
<button onclick=”GetMap()”>Get Ride</button>
</div>
</div>
<div class=”result-container” id=”res-container”>
</div>
</div>
<div id=”myMap”></div>
</div>
<script src=”index.js”></script>
</body>
</html>
Next let’s add some code to map.js.
The following code creates a GetMap() function that will create a map object.
let map, datasource, client;
function GetMap(){
//Instantiate a map object
var map = new atlas.Map(‘myMap’, {
// Replace <Your Azure Maps Key> with your Azure Maps subscription key. https://aka.ms/am-primaryKey
authOptions: {
authType: ‘subscriptionKey’,
subscriptionKey: ‘<key in your primary subscription key here’
}
});
}
We then add this section to the function, this part of the code will create a data source and add map layers only when all resources are ready and have been all loaded.
//Wait until the map resources are ready.
map.events.add(‘ready’, function() {
//Create a data source and add it to the map.
datasource = new atlas.source.DataSource();
map.sources.add(datasource);
//Add a layer for rendering the route lines and have it render under the map labels.
map.layers.add(new atlas.layer.LineLayer(datasource, null, {
strokeColor: ‘#b31926’,
strokeWidth: 5,
lineJoin: ’round’,
lineCap: ’round’
}), ‘labels’);
//Add a layer for rendering point data.
map.layers.add(new atlas.layer.SymbolLayer(datasource, null, {
iconOptions: {
image: [‘get’, ‘icon’],
allowOverlap: true
},
textOptions: {
textField: [‘get’, ‘title’],
offset: [0, 1.2]
},
filter: [‘any’, [‘==’, [‘geometry-type’], ‘Point’], [‘==’, [‘geometry-type’], ‘MultiPoint’]] //Only render Point or MultiPoints in this layer.
}));
In this other section, still under the GetMap() function, we are going to pick out the latitude and longitude from the input boxes that we have in the html document. The split method in JavaScript will be used to derive the coordinates from the input boxes. We can finally calculate the route and find necessary information.
//Create the GeoJSON objects which represent the start and end points of the route.
//starting coordinates
let start_lat=parseFloat(startLocation.value.split(‘:’)[1].split(‘,’)[0])
let start_long=parseFloat(startLocation.value.split(‘:’)[1].split(‘,’)[1])
var startPoint = new atlas.data.Feature(new atlas.data.Point([start_long,start_lat]), {
title: `${startLocation.value.split(‘:’)[0]}`,
icon: “pin-red”
});
//destination coordinates
let end_lat=parseFloat(endLocation.value.split(‘:’)[1].split(‘,’)[0])
let end_long=parseFloat(endLocation.value.split(‘:’)[1].split(‘,’)[1])
var endPoint = new atlas.data.Feature(new atlas.data.Point([end_long,end_lat]), {
title: `${endLocation.value.split(‘:’)[0]}`,
icon: “pin-round-red”
});
//Use MapControlCredential to share authentication between a map control and the service module.
var pipeline = atlas.service.MapsURL.newPipeline(new atlas.service.MapControlCredential(map));
//Construct the RouteURL object
var routeURL = new atlas.service.RouteURL(pipeline);
//Start and end point input to the routeURL
var coordinates= [[startPoint.geometry.coordinates[0], startPoint.geometry.coordinates[1]], [endPoint.geometry.coordinates[0], endPoint.geometry.coordinates[1]]];
//Make a search route request
routeURL.calculateRouteDirections(atlas.service.Aborter.timeout(10000), coordinates).then((directions) => {
//Get data features from response
var data = directions.geojson.getFeatures();
datasource.add(data);
});
});
Lastly, we add to the GetMap() function the following code. This code will create date formatter for your local region to display information on the pick up and drop off time. Finally it then appends the data and information of that route requested. How it does this? We use fetch API to get response from the Azure server that will serve us with the route calculation result. You can use Postman to test for some of these endpoints that have been shared in the code.
//create time formatter
// Create a formatter with options for 12-hour clock system
const formatter = new Intl.DateTimeFormat(‘en-US’, {
hour: ‘numeric’,
minute: ‘numeric’,
second: ‘numeric’,
hour12: true
});
//route calculation result container & pricing container
const res_routBox=document.getElementById(‘res-container’)
const pricing_container = document.getElementById(‘ad-label-box’)
//get route calculation details
fetch(`https://atlas.microsoft.com/route/directions/json?subscription-key=<subscription_key>&api-version=1.0&query=${startLocation.value.split(‘:’)[1]}:${endLocation.value.split(‘:’)[1]}`)
.then(response => response.json())
.then(route =>{
if((parseFloat(route.routes[0].summary.travelTimeInSeconds)/60).toFixed(0)>=60){
route.routes[0].summary.travelTimeInSeconds = `${(parseFloat(route.routes[0].summary.travelTimeInSeconds)/3600).toFixed(0)} Hrs`
}else{
route.routes[0].summary.travelTimeInSeconds = `${parseFloat((route.routes[0].summary.travelTimeInSeconds)/60).toFixed(0)} mins`
}
if((parseFloat(route.routes[0].summary.trafficDelayInSeconds)/60).toFixed(0)>=60){
route.routes[0].summary.trafficDelayInSeconds = `${(parseFloat(route.routes[0].summary.trafficDelayInSeconds)/3600).toFixed(0)} Hrs`
}else{
route.routes[0].summary.trafficDelayInSeconds = `${parseFloat((route.routes[0].summary.trafficDelayInSeconds)/60).toFixed(0)} mins`
}
res_routBox.innerHTML=
<div class=”result-card”>
<h1>${(parseFloat(route.routes[0].summary.lengthInMeters)/1000).toFixed(0)}Km</h1>
<p><i class=”fa fa-car”></i></p>
</div>
<div class=”result-card”>
<h1>Hailed at</h1>
<p><i class=”fa fa-person-circle-plus”></i> ${formatter.format(new Date(route.routes[0].summary.departureTime))}</p>
</div>
<div class=”result-card”>
<h1>Drop off time</h1>
<p><i class=”fa fa-person-walking”></i> ${formatter.format(new Date(route.routes[0].summary.arrivalTime))}</p>
</div>
<div class=”result-card”>
<h1>Duration</h1>
<p><i class=”fa fa-stopwatch”></i> ${ route.routes[0].summary.travelTimeInSeconds}</p>
</div>
<div class=”result-card”>
<h1>Traffic time</h1>
<p><i class=”fa-regular fa-clock”></i> ${(parseFloat(route.routes[0].summary.trafficDelayInSeconds)/60).toFixed(0)}min</p>
</div>
// $0.1885/km, & $0.028/min – theses are my pricing table values
pricing_container.innerHTML = `<p> <i class=”fa fa-wallet”></i> Trip cost <i class=”fa fa-arrow-right”></i> $ ${(((parseFloat(route.routes[0].summary.lengthInMeters)/1000)*0.1885)+((parseFloat(parseInt(route.routes[0].summary.trafficDelayInSeconds)/60))*0.028)).toFixed(2)}</p>`
})
Now add the CSS code found in the repository to the index.css file you created.
To add functionality to the app, also add the JavaScript code found in the repository to your index.js file.
The following JavaScript code utilizes fetch api to suggest locations while typing into the text boxes. The getLocations() function does the job of getting this locations through the help of fetch api, that utilizes the end point specified above that returns a number of results as a response. The getLocations() function then appends these results to the data list specified as <option/> elements.
Now our last step is to open the index.html page and see if the web app works. If it works, it supposed to look like the one shown in the screenshot below.
Type in a pick up street and a drop street and observe let’s go label change to pricing.
There we have it. You have successfully helped Roam Rides to achieve their goal. Congratulations on implementing Azure Apps on a web application.
Learn More Here
How to use Azure Maps with Node.js npm Package
Create an Android App with Azure Maps
Microsoft Tech Community – Latest Blogs –Read More

Recap: September 2023 Ambassador Projects Demo Day
On December 14, 2023, The Ambassador Projects Demo Day was held at. The event brought together rising developers from all over the world to collaborate and create innovative solutions to real-world problems.
We would like to extend our sincerest thanks to the Gold Leads Amtaulla Bohara, Anushka Bhatnagar, Arpita Das, Hadil BenAmor, John Aziz, Mudasir Murtaza, Muhammad Samiullah, and Rohit Yadav for their hard work and dedication in putting together such an amazing event and leading this past cycle of the projects program. Without their tireless efforts, this event would not have been possible.
The winning team was Digital Digesters. Their project, YouTube Summarizer, was chosen as the winner because of its innovative approach to solving a real-world problem. YouTube Summarizer is an AI tool to transcribe YouTube videos. The judges were impressed with the team’s ability to work together and create a solution that was both practical and innovative. Congratulations to DANTON KIPKURUI, Ian Peter, Madhav Gaur, SHREYANSHI RATHI.
Other teams that participated in the Ambassadors Projects demo day included Onboarding Software, Catalyst, Data Sensei, and Inclusi-AI Vitality. Each team worked tirelessly to create innovative solutions to real-world problems. Although they did not win, their projects were impressive and showed great promise.
Onboarding software: – Build a healthy eco-community by integrating recruiting software that will aid in maintaining a diverse workforce and equip recruiters with the ability to hire talent from all over the world.
Data Sensei: – DataSensei-DBInsights is a dedicated project aimed at empowering individuals and businesses with the knowledge and skills essential for proficient database management and administration. In a world where data is a valuable asset, our mission is to provide clear and comprehensive guidance on database technologies, best practices, and real-world applications.
Team Catalyst: AI Chat Bot for The Microsoft Learn Student Ambassadors program. Powered by Chat GPT-4, Amy is not just any bot; she’s been meticulously trained with Student Ambassador Handbook. Whether you’re a new ambassador or a seasoned member, Amy is here to provide precise and insightful answers to all your MLSA (Microsoft Learn Student Ambassadors) Program-related queries.
Team Inclusi-AI-Vitality: A comprehensive mental well-being app powered by Flask, Next.js, OpenAI API, and Azure services. This project aims to provide users with a personalized mental well-being app that offers a range of features to support their emotional well-being. The app utilizes Flask as a backend framework, Next.js for a dynamic frontend, OpenAI API for natural language processing and conversational AI, and Azure services for cloud hosting and scalability.
Overall, this cycle of Ambassador Projects was a huge success. The event brought together some of the brightest minds in the industry and showcased some truly innovative solutions to real-world problems. We look forward to seeing what the future holds for these talented developers.
Microsoft Tech Community – Latest Blogs –Read More
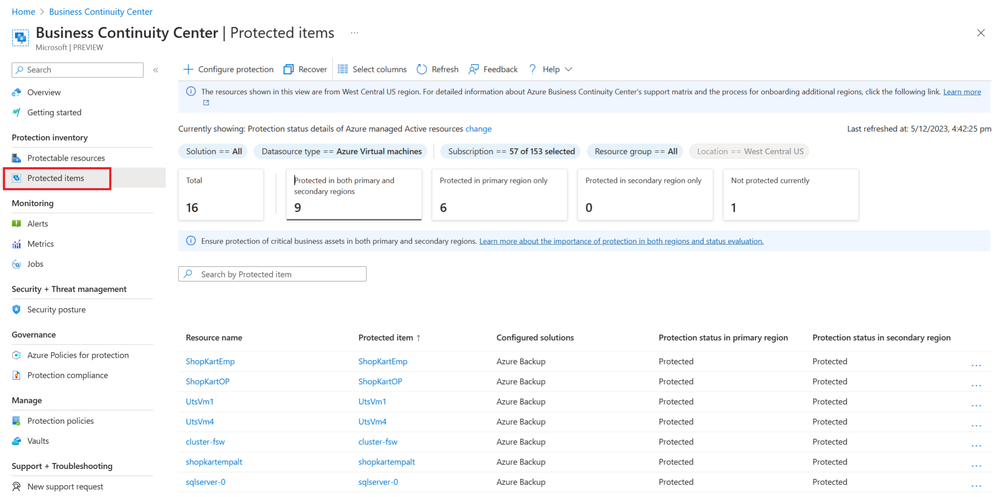
Business Continuity with ABCC: Part 3: understand your protected items inventory
Hello everyone! This is Daya Patil back with the next part of our series on business continuity with ABCC. In our last session, we delved into using ABCC to understand the protectable resources inventory. Today, we’re going deeper into exploring the inventory of protected items within ABCC.
Tailwind Traders case study
Tailwind trader has also recently configured Azure Site Recovery solution to protect their 40 VMware virtual machines to Azure. In this segment, we’ll explore how John, Tailwind’s BCDR admin, can achieve his upcoming objectives:
View protected items
Explore best practices for protection
Execute actions on protected items.
View protected items (protection status)
John heads to the Protected Items view in ABCC. Alternatively, he can access this view by clicking on the “Protection Status” tile located on the ABCC overview page. John is happy to see centralized & at scale view for overseeing their protection landscape, offering a unified perspective across various solutions. He sees a list of all the protected items across the supported solution across the subscription, resource groups, location, type, and so on, along with their protection status.
Within the protected items view, John can find the protection details for each resource using the following information:
Summary cards displays count of total protected items and based on various states of protection. based on applied filters at the top of view. This summary changes based on applied filters at the top of view. These cards are clickable to help you further filter and view protected items with specific states.
Protected status details view shows protection status for each protected item in primary region and secondary regions.
Resource name: This displays the name of the underlying resource that is protected with a clickable value that directs to the resource blade for the specific resource.
Protected item: Shows the name of the protected item.
Configured solutions: Shows the names of solutions used for protecting the resource.
Protection status: Protected items should be recoverable in both the primary and secondary regions. Protection status in the primary region refers to the protection status in the region in which datasource is hosted, and protection status in secondary region refers to the protection status in paired or target region in which datasource can be recovered in case the primary region is not accessible.
The protection status values can be: Pending protection (protection is triggered and is in-progress), Protection disabled (protection has been disabled, for example, protection is in soft-deleted state like in the case of Azure Backup) or Protection paused (protection is stopped; however, the protection data will be retained as per solution provider), or Protected. When the datasource is protected by multiple solutions (that is, Configured solutions >= 2), the Protection Status for an item is computed in the following order:
When one or more solutions indicate that the protection status is disabled, then the protected item status is shown as Protection disabled.
When one or more solutions indicate that the protection status is paused, then the protected item status is shown as Protection paused.
When one or more solutions indicate that the protection status is pending, then the protected item status is shown as Pending protection.
When all the configured solutions indicate that the protection status is protected, then the protected item status is shown as Protected.
If there’s no protection for a datasource in primary or secondary region, then the protected item status for that region is shown as Not protected.
For example, if a resource is protected by both Azure Backup (with status Protection paused) and Azure Site Recovery (with status Protected), then the protection status for the region displays Protection paused.
John finds all his 5 Azure Virtual machines protected with Azure Backup in primary region. John is curious about the protection status details in both the primary and secondary regions. He’s uncertain if simply enabling backup for his resources is sufficient for adequate protection. Surprisingly, he discovers a best practice guideline that addresses all his uncertainties and doubts.
He comprehends the significance of securing resources in both primary and secondary regions and acknowledges their direct impact on RPO (Recovery Point Objective) and RTO (Recovery Time Objective), as given below:
Protect your data and applications
To determine how often to back up data and where to store backups, you consider the cost of downtime and impact of access loss to data and applications for any duration, as well as the cost of replacing or recreating the lost data. To determine the backup frequency and availability decisions, determine recovery time objectives (RTOs) and recovery point objectives (RPOs) for each data source and application to guide frequency.
Recovery Point Objective (RPO): The amount of data the organization can afford to lose. This helps to determine how frequently you must back up your data to avoid losing more.
Recovery Time Objective (RTO): The maximum amount of time the business can afford to be without access to the data or application i.e., being offline or how quickly you must recover the data and application. This helps in developing your recovery strategy.
RTOs and RPOs might vary depending on the business and the individual applications data. Mission-critical applications mostly require microscopic RTOs and RPOs since, downtime could cost millions per minute.
A datasource is an Azure resource or an item hosted in Azure resource (e.g. SQL database in Azure VM, SAP Hana database in Azure Virtual Machine, and etc.). A datasource belonging to a critical business application should be recoverable in both primary and secondary region in case of any malicious attack or operational disruptions.
Primary region: Region in which datasource is hosted.
Secondary region: Paired or target region in which datasource can be recovered in case primary region is not accessible.
Customize the view
John notices similar couple of other options on the page to customize view like:
Filters: John utilizes filters to tailor the displayed information to your specific requirements. Available filters include – solution, datasource type, subscription, resource group, location etc.
Scope: John also notices the new scope feature in ABCC that enhances visibility into protection landscape across various platforms such as Azure and Hybrid environments. Clicking on “Currently showing: Azure managed Active resources change” he discovers a range of available options, including:
Resources managed by: Azure, non-Azure
Resource status: Active, deprovisioned resources
Protected item details –
Protection status details: This category pertains to protection status of protected item in primary and secondary regions.
Retention details: Under this category, you will find comprehensive information about the retention of protected items. It delves into the specifics of how long data is retained.
Search: John could also search by specific item name to get information specific to it.
Select columns: Use Select columns from the menu available at the top of the views to add or remove columns.
John is excited to discover that ABCC extends beyond Azure resources, providing protection data for non-Azure / hybrid resources as well. This revelation significantly eases his task of managing these resources, eliminating the need for separate management tools. With enthusiasm, John narrows down the scope to non-Azure resources and witnesses VMware virtual machines successfully replicating to Azure through Azure Site Recovery.
View protected items (retention details)
John aims to ensure that the retention of the protection data is configured as per the organization rules based on the compliance standards that they follow. Seeking to understand the configured retention on each item, he identifies an option within the scope to obtain comprehensive retention information for all items at once. Opting for the retention details view from the scope, he can now efficiently review this data without delving into each individual policy used for protection configuration.
He chooses the retention details view from scope, and on select, the view loads the retention information for protected items. The Protected items retention table shows the retention details for each protected item in the primary and secondary regions.
Resource name: This displays the name of the underlying resource that is protected with a clickable value that directs to the resource blade for the specific resource.
Protected item: Shows the name of the protected item.
Configured solutions: Shows the names of solutions used for protecting the resource.
Retention in primary region – Shows the retention configured for an item’s protection data in primary region
Retention in secondary region – Shows the retention configured for an item’s protection data in secondary region.
View protected item details
John wants to explore further details for protection by each solution used to protect the resource. He clicks the item name or can select the more icon … > View details action menu to navigate and view further details for an item.
On the item details view, John gets to see more information for item, coming from provider as is like protection state, latest recovery point in both regions etc.
The view also allows John to add more columns using the “select columns” along with the option to change the default view using the scope picker from Currently showing: Protection status details, select Change.
To change the scope for item details view from the scope-picker, select the required options:
Protection status – protection status of the protected item in primary and secondary regions
Retention details – retention details for protected items
Security posture details – security details for protected items
Alert details – alerts fired details for protected items
Perform actions
John is delighted to find all protection-related information consolidated in one location, along with the flexibility to switch between options seamlessly. As he explores further, he discovers the array of core actions available within the protected items view, allowing him to execute various operations:
The menu available at the top of the view for actions like configure protection, recover, and so on. Using this option allows you to select multiple data sources.
The menu on individual items in Protected items view. This option allows you to perform actions for the single resource.
When Solutions filter is set to ALL, common actions across the solutions are available on the item like
Enhance protection – Allows you to protect the items with the other solutions than the ones that are already used to protect the item.
Recover – Allows you to perform the available recovery actions for the solutions with which the item is protected, that is, configured solutions.
View details – Allows you to view more information for the protected item.
Choose a specific solution in the filter and notice solution specific actions command bar (appears over the protected items table and on the Protected item) by selecting the more icon … corresponding to the specific item.
Learn about the view
Like other view, John sees the presence of built-in assistance within ABCC under the “Help” menu. Upon clicking, he discovers that it covers:
Business Continuity Center: Offers a concise brief of ABCC, detailing its various views and the objectives of each view.
the current view: Provides comprehensive information about the current view, offering insights into its components such as filters, tiles, scope, columns, values, and more.
John is excited to discover direct guidance on utilizing ABCC within the portal, removing the necessity of constantly referring to documentation for minor queries.
Completing his exploration of protection inventory, John leverages the protectable and protected items view in ABCC. In the next article, we’ll delve into John’s journey of comprehending the security coverage for the protected items utilizing ABCC.
Stay tuned………………
Microsoft Tech Community – Latest Blogs –Read More

Become a Microsoft Unified SOC Platform Ninja
(Last updated January 2024)
** The integration of Microsoft Sentinel into the Defender portal is currently in private preview, with the eventual goal of a fully integrated and aligned user experience. The early preview, specific feature information mentioned here is under development and therefore subject to change. Our recommendation is to regularly check for new developments and improvements. **
Getting started with XDR+SIEM Unified Experience? Watch the Ignite video:
Unifying XDR + SIEM: A new era in SecOps
What is happening to Microsoft Sentinel and Defender XDR?
We are bringing together these products to deliver the most optimized and unified security operations platform. This experience will combine the full power of Microsoft Sentinel with Microsoft Defender XDR into a single portal enhanced with more comprehensive features, AI, automation, guided experiences, and curated threat intelligence. Customers will enjoy a fully integrated toolset to protect, detect, investigate, and respond to threats across every layer of digital estate.
Microsoft has been on a mission to empower security operations teams by unifying the many tools essential for protecting a digital estate and delivering them into an effective solution driven by AI and automation.
Today, we help SOC teams build a powerful defense using the most comprehensive XDR platform on the market, Microsoft Defender XDR, by delivering unified visibility, investigation, response across endpoints, hybrid identities, emails, collaboration tools, cloud apps, and data.
We also help provide unparalleled visibility into the overall threat landscape with our cloud native SIEM solution, Microsoft Sentinel, to extend coverage to every edge and layer of the digital environment.
These experiences are natively integrated with bidirectional solutions, giving security operations teams an easy way to benefit from the comprehensiveness and flexibility of the SIEM and the threat driven approach of the XDR.
Microsoft is ready to continue this journey to delivering the most comprehensive offering for security operations, and by bringing together mature, market leading SIEM and XDR customers can stay safer, more easily than ever before.
Before continuing with the Ninja Training, we recommend reviewing the Unified SOC Platform FAQ
Watch the video on Microsoft Defender XDR, Security Copilot & Microsoft Sentinel now in one portal (youtube.com)
Already did the Unified SOC Platform Ninja Training? check what’s new.
Table of Contents
XDR+SIEM Overview
Module 1. Unified security operations platform benefits
Module 2. Getting started with Unified SOC Platform
Module 3. Common Use Cases and Scenarios
Operating with XDR+SIEM Unified Experience
Module 1. Connecting to Microsoft Defender XDR
Module 2. Unified Incidents
Module 3. Automation
Module 4. Advanced Hunting
Module 5. SOC optimization
Module 6. More learning and support options
XDR+SIEM Overview
Watch the Ignite 2023 session “What’s new in SIEM and XDR: Attack disruption and SOC empowerment”
Module 1. Unified security operations platform benefits
A unified security operations platform will empower you and your organization to:
• Drive analyst efficiency by unifying the SIEM and XDR experiences.
• Reduce context switching with the merger of duplicate features.
• Quicker time to value with less integration work and more out of the box value.
• Automatically detect and disrupt attacks proactively over expanded estate of Microsoft and non-Microsoft products, starting with SAP, backed my Microsoft security research and insights.
• Get the most out of tools with guided optimizations and better manage the SOC while managing costs.
• Use Microsoft Security Copilot in context. Leverage generative AI with in-product experiences that surface skills relevant to the tasks at hand. Watch the MDTI: Now Anyone Can Tap Into Game-Changing Threat Intelligence session from Ignite 2023.
• Benefit from a breadth of coverage with the most expansive XDR on the market and a SIEM that spans multi-cloud, business applications, IoT, OT and multi-platform.
Module 2. Getting started with Unified SOC Platform
The Microsoft Defender portal supports a single Microsoft Entra tenant and the connection to one workspace at a time. In the context of this article, a workspace is a Log Analytics workspace with Microsoft Sentinel enabled.
To onboard and use Microsoft Sentinel in the Microsoft Defender portal, you must have the following resources and access:
A Microsoft Entra tenant that’s allow-listed by Microsoft to connect a workspace through the Defender portal
A Log Analytics workspace that has Microsoft Sentinel enabled
The data connector for Microsoft Defender XDR (formerly named Microsoft Defender XDR) enabled in Microsoft Sentinel for incidents and alerts
Microsoft Defender XDR onboarded to the Microsoft Entra tenant
An Azure account with the appropriate roles to onboard and use Microsoft Sentinel in the Defender portal.
Read more about the onboarding process and requisites in our documentation
Module 3. Common use cases and scenarios
One-click connect of Microsoft Defender XDR incidents, including all alerts and entities from Microsoft Defender XDR components, into Microsoft Sentinel.
Bi-directional sync between Sentinel and Microsoft Defender XDR incidents on status, owner, and closing reason.
Application of Microsoft Defender XDR alert grouping and enrichment capabilities in Microsoft Sentinel, thus reducing time to resolve.
In-context deep link between a Microsoft Sentinel incident and its parallel Microsoft Defender XDR incident, to facilitate investigations across both portals.
Operating with XDR+SIEM Unified Experience
Module 1. Connecting to Microsoft Defender XDR
Install the Microsoft Defender XDR solution for Microsoft Sentinel and enable the Microsoft Defender XDR data connector to collect incidents and alerts. Microsoft Defender XDR incidents appear in the Microsoft Sentinel incidents queue, with Microsoft Defender XDR in the Product name field, shortly after they are generated in Microsoft Defender XDR.
It can take up to 10 minutes from the time an incident is generated in Microsoft Defender XDR to the time it appears in Microsoft Sentinel.
Alerts and incidents from Microsoft Defender XDR (those items which populate the SecurityAlert and SecurityIncident tables) are ingested into and synchronized with Microsoft Sentinel at no charge. For all other data types from individual Defender components (such as DeviceInfo, DeviceFileEvents, EmailEvents, and so on), ingestion will be charged.
Once the Microsoft Defender XDR integration is connected, the connectors for all the integrated components and services (Defender for Endpoint, Defender for Identity, Defender for Office 365, Defender for Cloud Apps, Microsoft Entra ID Protection) will be automatically connected in the background if they weren’t already. If any component licenses were purchased after Microsoft Defender XDR was connected, the alerts and incidents from the new product will still flow to
Microsoft Sentinel with no additional configuration or charge.
Watch this short overview of Microsoft Sentinel integration with Microsoft Defender XDR video (5 minutes).
Here’s how it works.
Get a deeper understanding of Connecting to Microsoft Defender XDR
Module 2. Unified incidents
• For successful onboarding and integration, the M365D connector needs to be enabled. The separate Defender connectors will be disabled to avoid alert duplication. This means that your Microsoft Security Services based detection rules will be replaced by the M365D connector incidents creation rule. This can potentially impact any incident filtering or automation based on incident titles. To preserve filtering capabilities please use alert tuning or automation rules.
• Because the unified portal will provide correlations across all signals – which is the strength of our combined SIEM + XDR solution – alerts from a Sentinel incident with a custom incident title might be merged into a new incident with a new title to group all related alerts. An example is a multi-stage attack which contains all alerts related to the attacker’s lateral movement. This behavior impacts any automation against the custom incident title as a condition and visual triaging of the incident queue. Our proposed mitigation is to leverage tags which will be merged into the new incident to support automation and visual triaging of the incident queue.
• Incidents programmatically created in Microsoft Sentinel through the API, playbook, or manually from the incident creation interface are not synchronized to the unified portal. However, these incidents are still supported in the Microsoft Sentinel portal and the API.
• A Sentinel alert can no longer be removed from the Sentinel incident.
• Creating new incident comments within the new portal is supported but editing existing ones created at incident generation time is not.
• The ProviderName in the SecurityIncident table will be changed to Microsoft XDR for all incidents, including those created by Microsoft Sentinel analytic rules. This may affect automation rules (more information in the Automation section of this document) or queries which are leveraged from within Workbooks as an example.
• Tasks manually added, or created by automation rules or playbooks, will not be reflected in the unified portal.
• The option to set the grouping definition in analytic rules to reopen closed incidents in case of a new alert being added to the incident (documented here) will not be supported in the first release of this integration. Incidents that were closed will not re-open as is the case with M365 Defender correlations.
Module 3. Automation
• Triggering a Logic App playbook from an incident or an entity will become available at the end of this year (2023).
• Automation rules with a condition based on the ProviderName field (e.g., Incident provider equals Microsoft Sentinel) will continue to run, even after the incident provider name has changed to Microsoft XDR. The system, however, will ignore the
incident provider condition. This means that the automation rule with only the incident provider condition will run on ALL incidents, rather than only on Microsoft Sentinel or M365D incidents. The Incident provider condition will also not be available in the Unified Portal UI.
• Automation rules with a condition updated by will be changed to include more details (e.g., who/what updated the incident). Instead of reflecting M365 Defender as the update source (which is the case today), we will provide the name of the user or service
who performed the change. Values can include a username, alert grouping, AIR (automated investigation and response), application or others.
• It can take up to 10 minutes from alert creation to running an automation rule. This is because incidents are created first in the unified portal and then forwarded to Microsoft Sentinel. We are continuously working on eliminating this delay.
Module 4. Advanced Hunting
The Microsoft Defender XDR connector also lets you stream advanced hunting events – a type of raw event data – from Microsoft Defender XDR and its component services into Microsoft Sentinel. You can now (as of April 2022) collect advanced hunting events from all Microsoft Defender XDR components, and stream them straight into purpose-built tables in your Microsoft Sentinel workspace.
• Microsoft Defender XDR tables can be queried with a maximum lookback period of 30 days. To support longer retention periods, the recommendation is to ingest the required tables into the Sentinel workspace.
o Queries can be executed from the Unified Portal to cover Sentinel data but not from the Sentinel side to access XDR data unless raw data ingestion into Sentinel has been configured.
• Saved queries and functions from Sentinel cannot be edited. They can only be viewed and used.
• The IdentityInfo table from Sentinel is not available, as the IdentityInfo remains as is in Defender XDR. Sentinel features like analytics rules that query this table won’t be impacted as they are querying the Log Analytics workspace directly.
• The Sentinel SecurityAlert table is replaced by AlertInfo and AlertEvidence tables, which both contain all the alert data. While SecurityAlert is not available in the schema tab, you can still use it in queries using the advanced hunting editor. This provision is made to not break existing queries from Sentinel that use this table.
• Guided hunting mode is supported by Microsoft Defender XDR data only.
• Custom detections, links to incidents, and take actions capabilities are supported for Defender XDR data only.
• Right-clicking query results is not yet supported for columns in the JSON array format or lists.
• Bookmarks are not supported in the advanced hunting experience.
Get a deeper understanding of advanced hunting in this document.
Watch our video introductory on Unified Advanced Hunting
Quick overview & a short tutorial that will get you started fast on Defender XDR Advanced Hunting
Watch the Microsoft Sentinel Incident Investigation Experience webinar
Learn how to Hunt for threats with Microsoft Sentinel
Use Hunts to conduct end-to-end proactive threat hunting in Microsoft Sentinel
Module 5. SOC optimization
Tailored recommendations. The new SOC optimization feature will be available for Microsoft Sentinel customers in private preview, both in the unified SOC platform and in the Azure portal. New data ingestion analysis will provide recommendations to help manage costs, ensure value on all data ingested and better protect companies against threats. Tailored suggestions will be available to customers for things like recommended data log tiers, adding relevant content on top of data or ingesting new sources to protect against relevant threats.
Module 6. More learning and support options
Learn more:
1. Unified platform documentation: aka.ms/unifiedsiemxdrdocs
2. SIEM and XDR Solutions | Microsoft Security
3. Microsoft Sentinel: https://aka.ms/microsoftsentinel
4. Blogs: Microsoft Sentinel Blog – Microsoft Tech Community
5. Microsoft Sentinel solution for SAP: Microsoft Sentinel solution for SAP® applications – SAP Monitoring | Microsoft Azure
7. Microsoft Sentinel documentation | Microsoft Learn
9. Security Operations Platform FAQ
Microsoft Tech Community – Latest Blogs –Read More


