

Category: Microsoft
Category Archives: Microsoft
Updating Microsoft Secure Boot keys
Microsoft, in collaboration with our ecosystem partners, is preparing to roll out replacement certificates that’ll set new Unified Extensible Firmware Interface (UEFI) Certificate Authorities (CAs) trust anchors in Secure Boot for the future. Look out for Secure Boot database updates rolling out in phases to add trust for the new database (DB) and Key Exchange Key (KEK) certificates. This new DB update is available as an optional servicing update for all Secure Boot enabled devices from February 13, 2024.
What is Secure Boot?
Secure Boot is a security feature in the UEFI that helps ensure that only trusted software runs during the system’s boot sequence. It works by verifying the digital signature of any software against a set of trusted digital keys stored in the UEFI. As an industry standard, UEFI’s Secure Boot defines how platform firmware manages certificates, authenticates firmware, and how the operating system (OS) interfaces with this process. For more details on UEFI and Secure Boot, please refer to this article.
Secure Boot was first introduced to Windows systems with the Windows 8 release to protect against the emerging pre-boot malware (bootkit) threat at that time. Since then, Secure Boot has continued to be a part of Microsoft’s Trusted Boot security architecture. Secure Boot authenticates modules such as UEFI firmware drivers, bootloaders, applications, and option ROMs (Read-Only Memory), which are firmware run by the PC BIOS during platform initialization, before they are all executed. As the final step of the Secure Boot process, the firmware verifies the Windows boot loader is trusted by Secure Boot and then passes control to the boot loader which in turn verifies, loads into memory, and launches Windows. This process coupled with the UEFI firmware signing process helps to ensure that only verified code executes before Windows, preventing attackers from utilizing the boot path as an attack vector. To learn more about how Secure Boot fits in with the overall Windows chip-t-cloud security, please refer to the Windows Security Book RWMyFE.
Trust and authenticity in Secure Boot are built using the Public-Key Infrastructure (PKI). This establishes a certificate management system which utilizes CAs to store digital certificates. These CAs, consisting of Original Equipment Manufacturer (OEM) or their delegates and Microsoft, generate key pairs that form the root of trust of a system.
Secure Boot “root of trust”: Setting trust anchors for the future
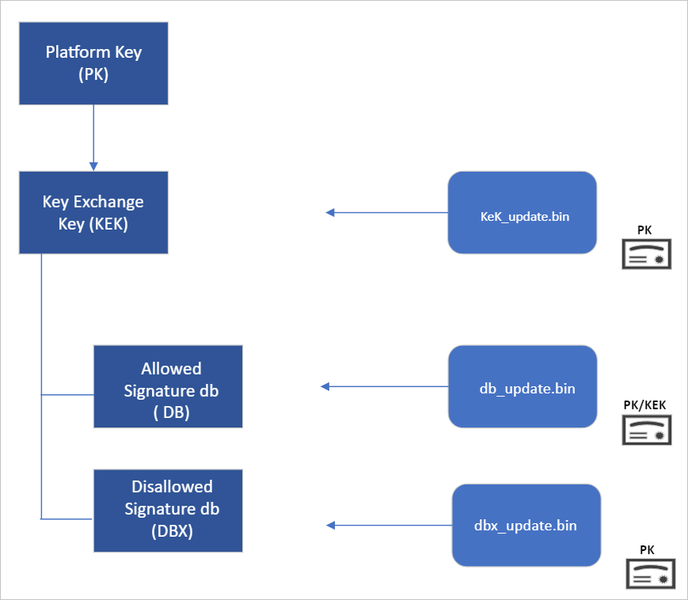
Secure Boot’s root of trust utilizes a hierarchical system, where the Platform Key (PK) is typically managed by the OEM and used to sign updates to the KEK database. The KEK in turn signs updates to both the Allowed Signature DB and the Forbidden Signature Database (DBX).
The Secure Boot Allowed Signature DB and the DBX are integral to the functionality of Secure Boot. Bootloader modules’ signing authority must be allowlisted by the Secure Boot DB, while the DBX is used for revoking previously trusted boot components. Updates to the DB and DBX must be signed by a KEK in the Secure Boot KEK database.
The configuration of Secure Boot DB and KEK for Windows devices has remained the same since Windows 8. Microsoft requires every OEM to include the same three certificates managed by Microsoft for Windows and in support of the third-party hardware and OS ecosystem. These include the Microsoft Corporation KEK CA 2011 stored in the KEK database, and two certificates stored in the DB called the Microsoft Windows Production PCA 2011, which signs the Windows bootloader, and the Microsoft UEFI CA 2011 (or third-party UEFI CA), which signs third-party OS and hardware driver components.
All three of these Microsoft certificates expire in 2026. So, in collaboration with our ecosystem partners, Microsoft is preparing to roll out replacement certificates that will set new UEFI CA trust anchors for the future. Microsoft will be rolling out Secure Boot database updates in phases to add trust for the new DB and KEK certificates. The first DB update will add the Microsoft Windows UEFI CA 2023 to the system DB. The new Microsoft Windows UEFI CA 2023 will be used to sign Windows boot components prior to the expiration of the Windows Production CA 2011. This DB update will be optional for the February 2024 servicing and preview updates, and can be manually applied to devices. Microsoft will slowly roll out this DB update as we validate devices and firmware compatibility globally. The full DB update’s controlled-rollout process to all Windows customers will begin during the 2024 April servicing and preview updates, ahead of the certificate expiration in 2026. Meanwhile, efforts to update the Microsoft UEFI CA 2011 (aka third-party UEFI CA) and Microsoft Corporation KEK CA 2011 will begin late 2024, and will follow a similar controlled rollout process as this DB update.
While Microsoft has frequently performed DBX updates globally since the inception of Secure Boot, this will be the first DB update performed on such a large scale. We’re actively collaborating with our OEM partners to identify and address bugs in firmware implementation that could result in unbootable systems or render a device unreceptive to the DB update. To ensure a successful rollout, devices with identified issues will be suspended from receiving the update until a fix is released.
Microsoft is taking a very deliberate and cautious approach to rolling out this update. With this DB update, Microsoft will sustain its ability to service all Windows devices’ boot components.
Guidance to manually apply DB update
The DB update is available on February 13, 2024, along with manual steps to allow customers to test for firmware compatibility, especially for organizations with fleets of devices. If you would like to manually apply the DB update to validate that your system is compatible, please read the following instructions. These actions should be completed with non-critical hardware representing devices in your environment.
Pre-requisite checks
Before attempting the DB update, please ensure to perform the necessary pre-requisite checks:
If you intend to manually apply this update to a large group of devices, we advise that you begin by rolling out to individual devices with the same firmware and specifications first to minimize the risks in the case of firmware bugs in your devices.
Please verify that your UEFI firmware version is the most recent available version by your firmware vendor or OEM.
For data backup steps, please refer to this guide.
If you use BitLocker or if your enterprise has deployed BitLocker on your machine, ensure to backup BitLocker Keys:
See this portal to ensure your BitLocker keys are backed up before your next reboot for your selfhost device. In the unlikely event that device becomes inoperable after receiving the update, the hard drive can still be unlocked.
If the keys are backed up, the UI should resemble the following:
If the keys are not backed up, please open Windows Search to search for “Manage BitLocker” and select Back up your recovery key followed by Save to your Azure AD or MSA account.
For users that use a local account instead of an Azure Active Directory (AAD) or Microsoft account (MSA), you can print your recovery password, save to a file, and store it in a secure location.
Formal DB update steps
Apply the February 2024 (or later) security update.
Open a PowerShell console and ensure that PowerShell is running as an administrator before running the following commands:
Set the registry key to Set-ItemProperty -Path “HKLM:SYSTEMCurrentControlSetControlSecureBoot” -Name “AvailableUpdates” -Value 0x40
Run the following scheduled task as Start-ScheduledTask -TaskName “MicrosoftWindowsPISecure-Boot-Update”
Reboot the machine twice after running these commands to confirm that the machine is booting with the updated DB.
To verify that the Secure Boot DB update was successful, open a PowerShell console and ensure that PowerShell is running as an administrator before running the following command: [System.Text.Encoding]::ASCII.GetString((Get-SecureBootUEFI db).bytes) -match ‘Windows UEFI CA 2023’
If the command returns “True”, the update was successful. In the case of errors while applying the DB update, please refer to the article, KB5016061: Addressing vulnerable and revoked Boot Managers.
Continue the conversation. Find best practices. Bookmark the Windows Tech Community, then follow us @MSWindowsITPro on X/Twitter. Looking for support? Visit Windows on Microsoft Q&A.
Microsoft Tech Community – Latest Blogs –Read More

Released: 2024 H1 Cumulative Update for Exchange Server
Today we are announcing the availability of the 2024 H1 Cumulative Update (CU) for Exchange Server 2019 (aka CU14). CU14 includes fixes for customer reported issues, a security change, and all previously released Security Updates (SUs).
A full list of fixes is contained in the KB article for CU14, but we also want to highlight a few changes in this CU.
Extended Protection enabled by default
As announced in August 2023, by default, starting with CU14, Setup enables the Windows Extended Protection (EP) feature on the Exchange server being installed. This will happen when running the GUI version of Setup and when running the command line version of Setup without using either the /DoNotEnableEP or /DoNotEnableEPFEEWS setup switch to opt out. Please see the EP setup documentation for more information.
While Setup enables EP by default, it does not validate that your organization is ready for or able to use EP. To validate that your organization is ready, please review the following before running Setup:
Exchange Server Health Checker script
Prerequisites for enabling Extended Protection on Exchange server
If your servers are not ready for using EP (for example, they use SSL offloading or there are mismatches between client and server TLS configuration), and you do not opt out of EP enablement during Setup, it is possible that some functionality may break after installing CU14. If that happens, you must either make the configuration changes to fulfill the prerequisites for EP (recommended), or use the EP script to disable EP on this server after Setup has completed (and in the future, use the Setup switch to opt-out of EP on all servers that do not yet meet EP prerequisites).
That said, we originally released Exchange Server EP support in August 2022. If you haven’t enabled EP yet, it is time to take this step and further secure your Exchange server environment. Additional information can be found in the documentation.
To help you decide how to proceed, we are providing the following decision flow:
.NET Framework 4.8.1 support on Windows Server 2022
CU14 also introduces support for .NET Framework 4.8.1, which is only for Windows Server 2022 (and it cannot be installed on older versions). The Exchange Server supportability matrix has been updated to reflect this change.
TLS 1.3 support moved to CU15
We previously announced plans to support TLS 1.3 when running on Windows Server 2022 in CU14. We’re still testing and validating TLS 1.3 with Exchange Server and do not want to delay the release of CU14. Support for TLS 1.3 will be released in CU15 later this year.
CVE-2024-21410 information
To address CVE-2024-21410 (also released today) – please allow CU14 Setup to enable Extended Protection (EP) on your Exchange 2019 servers. On all other versions of Exchange that support it, enabling EP addresses this CVE. Please see Configure Windows Extended Protection in Exchange Server.
If you have servers that currently do not meet the prerequisites for EP, please see the following table:
Scenario that does not support EP
Action to take
SSL Offloading for Outlook Anywhere
SSL Offloading for Outlook Anywhere must be disabled. If Extended Protection is enabled via Exchange Server CU14, the installer will take care of disabling SSL Offloading for Outlook Anywhere.
SSL Offloading on Load Balancer
SSL Offloading is not supported. Use SSL bridging instead with the same SSL certificate as on Exchange Server IIS front end.
Public folders hosted on Exchange Server 2013, 2016 CU22 (or older) or 2019 CU11 (or older)
Move all Public folders to currently supported versions, decommission Exchange Server 2013 which is out of support. Check this table for your Public Folder scenario.
Modern Hybrid agent is used to publish Exchange Server to the internet in hybrid scenario
Identify the Exchange Servers which are published via Modern Hybrid agent, by following the steps outlined in this section of documentation.
On these servers, run Exchange Server CU14 setup in unattended mode and use the /DoNotEnableEPFEEWS switch to not enable Extended Protection on the EWS front end virtual directory.
Please note that CVE 2024-21410 also applies to Exchange Server 2016. For Exchange 2016 servers, follow Configure Windows Extended Protection in Exchange Server if Extended Protection is not already enabled in your organization.
Release details
The KB article that describes the fixes in this release and product downloads is:
Exchange Server 2019 Cumulative Update 14 (KB5035606), VLSC Download, Download
After installing a CU, always check for and install any available SUs. The Exchange Server Health Checker will also tell you if any additional steps are needed.
Support status
With the release of Exchange Server 2019 CU14, CU12 is no longer supported and will not receive any future SUs. Please update your servers to the latest CU to continue receiving SUs. As of this writing, the support status of different Exchange versions is as follows:
Exchange Server
Support status
Action to take
Exchange 2019 CU13 or CU14
Supported
Update to latest SU
Exchange 2019 CU 12 (and earlier)
Unsupported (no future SUs)
Update to latest CU and latest SU
Exchange 2016 CU23
Supported
Update to latest SU
Exchange 2016 CU22 (and earlier)
Unsupported (no future SUs)
Update to CU23 and latest SU
Exchange Server 2019 is now in Extended Support, and as previously announced, we plan to release one more CU for Exchange Server 2019 (2024 H2 CU, aka CU15).
Additional information
Microsoft recommends that all customers test the deployment of an update in a lab environment to determine the proper installation process for their production environment.
You can find information on preparing Active Directory here. All Exchange-made schema changes are tracked here.
For installation best practices, see Upgrade Exchange to the latest Cumulative Update. See also the Exchange Update Wizard for detailed installation steps.
If you plan to install the update in unattended mode from PowerShell or a command prompt, make sure you specify either the full path to Setup.exe, or use a “.” in front of the command when running Setup directly from the folder containing the CU. If you do not do either of these, Setup may indicate that it completed successfully when it did not. Read more here.
Customers in Exchange hybrid deployments and those using Exchange Online Archiving with an on-premises Exchange deployment are required to deploy the latest CU for product support.
For the latest information on Exchange Server announcements please see What’s New in Exchange Server and the Exchange Server Release Notes.
Documentation may not be fully available at the time this post is published.
The Exchange Server team
Microsoft Tech Community – Latest Blogs –Read More

Announcing general availability of FSLogix 2210 hotfix 3!
We are pleased to announce the general availability of FSLogix 2210 hotfix 3 (2.9.8784.63912).
Important News!
We recognize many customers are under pressure to deploy new Teams in anticipation of the upcoming June 30, 2024 deprecation of classic Teams. We have released this version “out of band” of our expected integration in the Azure marketplace images in order to expedite the adoption process. This version will be pre-installed in the Azure marketplace images on March 12th, 2024.
What’s new in FSLogix 2210 hotfix 3?
This hotfix release specifically enables compatibility and support for the new version of Microsoft Teams which became generally available on December 5th, 2023. Following our preview release of hotfix 3, we found some minor changes needed for the behavior when using profiles and ODFC or ODFC only. We have an outstanding bug for Windows Server 2019, and it continues to be one of our top priorities.
Most notable changes in hotfix 3 are in how we register the new Teams AppX package (by family name) and persisting the user data located in: %LocalAppData%PackagesMSTeams_8wekyb3d8bbweLocalCache.
A handful of customers have seen unexpected reboots due a bugcheck (various stop codes) due to redirects getting cleaned up for active sessions. This was also included in the hotfix 3 release.
Documentation updates:
Known Issue | New Teams for virtual desktops on Windows Server 2019
Known Issue | Enabled by default policies in the ADMX template can’t be disabled using Group Policy
Troubleshooting | When using or switching to new Teams for VDI, users report the application is missing or has long load times
Microsoft Tech Community – Latest Blogs –Read More
Azure SQL Managed Instance – Log Space Growth Alert using Azure Runbook/PowerShell
Introduction
There are scenarios wherein customer want to monitor their transaction log space usage. Currently there are options available to monitor Azure SQL Managed Instance metrics like CPU, RAM, IOPS etc. using Azure Monitor, but there is no inbuilt alert to monitor the transaction log space usage.
This blog will guide to setup Azure Runbook and schedule the execution of DMVs to monitor their transaction log space usage and take appropriate actions.
Overview
Microsoft Azure SQL Managed Instance enables a subset of dynamic management views (DMVs) to diagnose performance problems, which might be caused by blocked or long-running queries, resource bottlenecks, poor query plans, and so on.
Using DMV’s we can also find the log growth – Find the usage in percentage and compare it to a threshold value and create an alert.
In Azure SQL Managed Instance, querying a dynamic management view requires VIEW SERVER STATE permissions.
GRANT VIEW SERVER STATE TO database_user;
Monitor log space use by using sys.dm_db_log_space_usage. This DMV returns information about the amount of log space currently used and indicates when the transaction log needs truncation.
For information about the current log file size, its maximum size, and the auto grow option for the file, you can also use the size, max_size, and growth columns for that log file in sys.database_files.
Solution
Below PowerShell script can be used inside an Azure Runbook and alerts can be created to notify the user about the log space used to take necessary actions.
# Ensures you do not inherit an AzContext in your runbook
Disable-AzContextAutosave -Scope Process
$Threshold = 70 # Change this to your desired threshold percentage
try
{
“Logging in to Azure…”
Connect-AzAccount -Identity
}
catch {
Write-Error -Message $_.Exception
throw $_.Exception
}
$ServerName = “tcp:xxx.xx.xxx.database.windows.net,3342”
$databaseName = “AdventureWorks2017”
$Cred = Get-AutomationPSCredential -Name “xxxx”
$Query=”USE [AdventureWorks2017];”
$Query= $Query+ ” “
$Query= $Query+ “SELECT ROUND(used_log_space_in_percent,0) as used_log_space_in_percent FROM sys.dm_db_log_space_usage;”
$Output = Invoke-SqlCmd -ServerInstance $ServerName -Database $databaseName -Username $Cred.UserName -Password $Cred.GetNetworkCredential().Password -Query $Query
#$LogspaceUsedPercentage = $Output.used_log_space_in_percent
#$LogspaceUsedPercentage
if($Output. used_log_space_in_percent -ge $Threshold)
{
# Raise an alert
$alertMessage = “Log space usage on database $databaseName is above the threshold. Current usage: $Output.used_log_space_in_percent%.”
Write-Output “Alert: $alertMessage”
# You can send an alert using Send-Alert cmdlet or any other desired method
# Send-Alert -Message $alertMessage -Severity “High” Via EMAIL – Can call logicApp to send email, run DBCC CMDs etc.
} else {
Write-Output “Log space usage is within acceptable limits.”
}
There are different alert options which you can use to send alert in case log space exceeds its limit as below.
Alert Options
Send email using logic apps or SMTP – https://learn.microsoft.com/en-us/azure/connectors/connectors-create-api-smtp
Azure functions – https://learn.microsoft.com/en-us/samples/azure-samples/e2e-dotnetcore-function-sendemail/azure-net-core-function-to-send-email-through-smtp-for-office-365/
Run dbcc command to shrink log growth – https://learn.microsoft.com/en-us/azure/azure-sql/managed-instance/file-space-manage?view=azuresql-mi#ShrinkSize
Feedback and suggestions
If you have feedback or suggestions for improving this data migration asset, please contact the Data SQL Ninja Engineering Team (datasqlninja@microsoft.com). Thanks for your support!
Note: For additional information about migrating various source databases to Azure, see the Azure Database Migration Guide
Microsoft Tech Community – Latest Blogs –Read More
Azure Database for MySQL – Single Server retirement – Key updates and migration tooling available
Azure Database for MySQL – Single Server is scheduled for retirement by September 16, 2024.
As part of this retirement, we stopped support for creating new Single Server instances via the Azure portal as of January 16, 2023, and beginning March 19, 2024, we’ll no longer support creating new Single Server instances via the Azure CLI. Should you still need to create Single Server instances to meet your business continuity needs, please raise an Azure support ticket. Note that you’ll still be able to create read replicas and perform restores (PITR and geo-restore) for your existing Single Server instance until the sunset date, September 16, 2024.
If you currently have an Azure Database for MySQL – Single Server production server, we’re pleased to let you know that you can migrate your Azure Database for MySQL – Single Server instance to the Azure Database for MySQL – Flexible Server service free of charge by using one of the following migration tooling options.
Azure Database for MySQL Import CLI
You can leverage the Azure Database for MySQL Import CLI (General Availability) to migrate your Azure Database for MySQL – Single Server instances to Flexible Server using snapshot backup and restore technology with a single CLI command. Based on user inputs, this functionality will provision your target Flexible Server instance, take a backup of the source server, and then restore it to the target. It copies the following properties and files from the Single Server instance to the Flexible Server instance:
Data files
Server parameters
Compatible firewall rules
Server properties such as tier, version, SKU name, storage size, location, geo-redundant backups settings, public access settings, tags, auto grow settings and backup-retention days settings
Admin username and password
In-place auto-migration
In-place auto-migration (General Availability) from Azure Database for MySQL – Single Server to Flexible Server is an in-place upgrade during a planned maintenance window for select Single Server database workloads. If you have a Single Server workload based on the Basic or General Purpose SKU with <= 20 GiB of used storage and without complex features (CMK, AAD, Read Replica, Private Link) enabled, you can now nominate yourself for auto-migration by submitting your server details using this form.
Azure Database Migration Service (DMS)
Azure Database Migration Service (DMS) (General Availability) is a fully managed service designed to enable seamless online and offline migration from Azure Database for MySQL – Single Server to Flexible Server. DMS supports cross-region, cross-version, cross-resource group, and cross-subscription migrations.
Conclusion
Take advantage of one of these options to migrate your Single Server instances to Flexible Server at no cost!
For more questions on Azure Database for MySQL Single Server retirement, see our Frequently Asked Questions.
Microsoft Tech Community – Latest Blogs –Read More

Ensuring Edge ML Models Provide Value by Observing Data Drift.
In this blog post, guest blogger Martin Bald, Senior Manager Developer Community from one of our startup partners Wallaroo.AI will go through model observability which will check for data drift of our in-store models. The conditions that existed when a model was created, trained and tested can change over time, due to various factors. Retail consumer behavior can change due to supply chain shortages or other price-affecting events, leading to changes in their spending patterns. A new highway, or a highway closure, can affect traffic patterns. Societal adjustments to the COVID-19 pandemic changed a lot of things.
Introduction
In the previous blog posts in this series we deployed our model to production on an edge device at our retail store location for product monitoring. Then we ran some validation checks on the model with challenger models to discover which performed better. We are not quite ready to sit back and put our feet up yet. In order to keep our models operational, we must continue to monitor the behavior and performance of the model to ensure that the model provides value to the business.
What is Data Drift?
In machine learning, you use data and known answers to train a model to make predictions for new previously unseen data. You do this with the assumption that the future unseen data will be similar to the data used during training: the future will look somewhat like the past.
This isn’t completely true, of course, and a good model should be robust to some amount of change in the environment; however, if the environment changes too much, your models may no longer be making the correct decisions. This situation is known as concept drift; too much drift can obsolete your models, requiring periodic retraining.
Concept drift generally manifests as data drift: the distribution of values that you observe in your input data (and in the model predictions) will change over time from the distributions of those values at the time you trained the model. Too much data drift, if it persists, can be a sign that it’s time to retrain your model.
The challenges that come with model monitoring and observability for edge device deployments can manifest themselves in a number of ways such as remote devices with limited processing resources, low/intermittent connectivity, low latency connections, limited or intermittent power supply to name a few. A comprehensive edge AI solution requires the capability to inference and process output at the edge while providing data scientists the power to centrally monitor, and take prompt, timely action on models in production without incurring high costs and latency delays of sending large amounts of data to and from the edge locations.
Establishing good model monitoring and observability habits in your MLOps lifecycle is crucial as data drift monitoring ensures model robustness, business continuity, and alignment with changing data dynamics.
Monitoring for Data Drift
For the rest of this blog post we will see what model observability for edge devices looks like in action.
The first steps are to load the necessary Python libraries and connect to our production instance.
import wallaroo
from wallaroo.object import EntityNotFoundError
from wallaroo.framework import Framework
from IPython.display import display
from IPython.display import Image
import pandas as pd
import json
import datetime
import time
import cv2
import matplotlib.pyplot as plt
import string
import random
import pyarrow as pa
import sys
import asyncio
import utils
pd.set_option(‘display.max_colwidth’, None)
Next we will authenticate and connect to our Wallaroo cluster and workspace.
wl = wallaroo.Client()
workspace = utils.getWorkspace(wl, “cv-retail-edge”)
_ = wl.set_current_workspace(workspace)
For this CV retail example, we want to track the average confidence of object predictions and get alerted if we see a drop in confidence. To accomplish this, we’ll add a simple Python step that computes the average confidence to our pipeline:
input_schema = pa.schema([
pa.field(‘tensor’, pa.list_(
pa.list_(
pa.list_(
pa.float32(), # images are normalized
list_size=640
),
list_size=480
),
list_size=3
)),
])
output_schema = pa.schema([
pa.field(‘boxes’, pa.list_(pa.list_(pa.float32(), list_size=4))),
pa.field(‘classes’, pa.list_(pa.int64())),
pa.field(‘confidences’, pa.list_(pa.float32())),
pa.field(‘avg_px_intensity’, pa.list_(pa.float32())),
pa.field(‘avg_confidence’, pa.list_(pa.float32())),
])
model_name = “resnet-with-intensity”
model = wl.upload_model(model_name, “models/model-with-pixel-intensity.zip”, framework=Framework.CUSTOM,
input_schema=input_schema, output_schema=output_schema)
This will take a few mins and give us the following output.
Waiting for model loading – this will take up to 10 mins.
Model is pending loading to a container runtime..
Model is attempting loading to a container runtime…………..successful
Ready
Next we will set up the hardware environment as we have seen in the previous blogs.
deployment_config = wallaroo.DeploymentConfigBuilder()
.replica_count(1)
.cpus(1)
.memory(“2Gi”)
.sidekick_cpus(model, 1)
.sidekick_memory(model, ‘6Gi’)
.build()
Then we will deploy the model.
pipeline_name = ‘retail-inv-tracker-edge-obs’
pipeline = wl.build_pipeline(pipeline_name)
.add_model_step(model)
.deploy(deployment_config = deployment_config)
This will take a few seconds and give us the following output telling us the deployment was successful.
Waiting for deployment – this will take up to 45s ………………… ok
We have data that describes the expected data, and assume we have training data that describes the expected behavior of the model in a baseline.csv file that we will upload & use that for baseline. We will upload this data to create a baseline distribution that we will use to compare the model behavior to this baseline
pipeline = wl.list_pipelines()[0]
assay_name = “average confidence drift detection v2”
step_name = “resnet-with-intensity”
assay_builder = wl.build_assay(assay_name, pipeline, step_name, iopath=”output avg_confidence 0″, baseline_data=”baseline.csv”)
We will click on the output URL and select Yes to authenticate to the instance.
Please log into the following URL in a web browser:
https://keycloak.demo3.pov.wallaroo.io/auth/realms/master/device?user_code=UDZF-HTWP
Login successful!
Monitor for Drift and see Alerts
One good example of drift detection at the edge is to monitor cameras for focus. Here we show how to set up an assay that will try to do exactly that.
We can assess our model for two variables that we think will help us detect loss of camera focus.
Pixel Intensity – This computes the average pixel value, and drift can be because of subject matter change as well as physical damage to sensors or other input distortion
Average Confidence – This takes the average confidence of the model’s predictions and I’ll get alerted if there is a change in the model’s confidence, this could be due to subject matter drift or other causes
assay_builder = assay_builder.add_run_until(assay_end)
# View 1 minute intervals
assay_builder.window_builder().add_width(minutes=3).add_interval(minutes=3)
assay_config = assay_builder.build()
assay_results = assay_config.interactive_run()
print(f”Generated {len(assay_results)} analyses”)
assay_results.chart_scores()
This will produce the output graph showing abrupt drift.
Fig 1.
We can also represent this in table format.
display(assay_results.to_dataframe().loc[:, [“score”, “start”, “alert_threshold”, “status”]])
Fig 2.
We can see the drift in the last 2 entries consistent with the graph visualization.
assay_builder.upload()
Output
1
Conclusion
We have seen in the above example that in addition to setting up assays on a model’s prediction, you can also set up assays on key inputs to the model as well, to more directly measure for concept drift. In either case, data scientists have a way to easily monitor the behavior of their models in production, so that they can intervene and adjust to a changing environment and help ensure model robustness, business continuity, and alignment with changing data dynamics.
The next blog post in this series will address a very common set of challenges that AI teams face with production ML workloads and how to solve them through Model Workload Orchestration so we can easily define, automate, and scale recurring production ML workloads that ingest data from predefined data sources, run inferencing, and deposit the results to a predefined location.
If you want to try the steps in this blog post series you can access the tutorials at this link and use the free inference servers available on the Azure Marketplace. Or you can download a free Wallaroo.AI Community Edition you can use with GitHub Codespaces.
Wallaroo.AI is a unified production ML platform built for Data Scientists and ML Engineers for easily deploying, observing, and optimizing machine learning in production at scale – in any cloud, on-prem, or at the edge.
Microsoft Tech Community – Latest Blogs –Read More
Leveraging Redis Insights for Azure Cache for Redis
The blog talks about how to leverage Redis Insights GUI tool while working with Azure Cache for Redis. We will look at some of the option what will help us with some high-level connectivity troubleshooting and insights to our data present inside the cache.
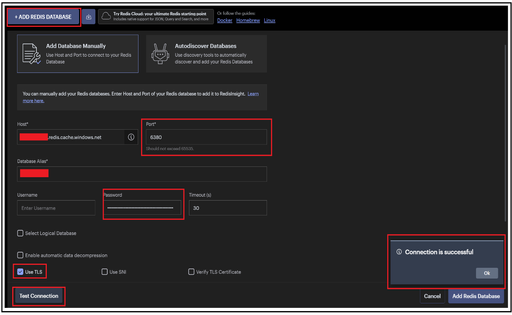
To start with, we can leverage this for testing the connectivity to our Redis cache instance. After clicking on Add Redis Database button, we can fill in the other fields ahead:
Host: Complete FQDN or the completed Redis cache Endpoint
For Basic, Standard & Premium Tier – <Cachename>.redis.windows.net
For Enterprise Tier – <Cachename>.<regionname>.redisenterprise.cache.azure.net
Port: 6380 or 6379 (depending on whether we are testing for SSL or non-SSL port respectively) / 10000 for Enterprise Tier
Database Alias: Cache name
Password: Access Key for your cache
Use TLS: Option to be checked for testing with 6380 port and also Enterprise Tier cache.
Post that, we can click on Test Connection button which will help us doing a high-level check whether the cache endpoint is reachable or not.
SSL Port:
Non-SSL Port:
Enterprise Cache:
Once the test connection is successful, you can click on Add Redis Database to start exploring the insights of your cache instance.
Note: All the above demo has been done without any kind of firewall, private endpoints or VNET restrictions. In case you are having VNET or private endpoints configured, then you have test it from a VM which is part of the VNET configured.
On clicking My Redis Database option, it will list down all the databases you have connected too from the Redis Insights along with some high-level details such as modules if any for the enterprise tier or OSS Cluster as connection type if clustering policy selected was OSS. If Enterprise, it shows as Standalone only.
For this Demo, we took an empty cache and the below snippet demonstrate on how your can-do simple Set operations or add a key to your cache instance. We can add a new key by providing the key type such as Set, String, List, Hast etc, Key name, TTL etc.
We have added 3 keys initially and it will start reflecting in the left-hand window section as depicted below:
Similarly, we added the keys further and all of them started listing. Selecting any of the keys shall provide insights to that particular key on the right sight window such as value, TTL , key size etc.
You can also use this to do any kind of pattern match as well. E.g. In the below snippet, we tried listing all the keys that start key name as testkey.
There is a Bulk Actions button available as well which has mainly 2 option available:
Perform bulk deletion.
Execute multiple set of Redis commands in a sequential format which can be uploaded as a plain text file.
Moving ahead, there is an Analysis Tool option which can be leveraged to gain insight to the data summary residing in our cache. There is a New Report button which will generate a report providing various kind of insights on data residing in the cache. Below are some of the highlights:
It provides a high-level summary key based on type.
It gives you a view of how much data in under No Expiry (no TTL set) and is expected to get freed in expected time (based on TTL set). In the below example, it points around ~450 bytes of memory to get freed in less than an hour while there is approx. ~1200 bytes of data which don’t have any kind of TTL set and will not expire.
It further provides high level details of top keys based on TTL or Key size which can be used to identify larger size keys.
There is also a Workbench option that provides a command line option like Redis CLI, using which we can execute commands. In the below example, we have used it to do PING-PONG test, set up the keys and other operations too.
Disclaimer: Please note that tool is supported by REDIS and not Azure cache for Redis so we don’t control the behavior or features for the tool.
Hope that helps!
Microsoft Tech Community – Latest Blogs –Read More

Accelerating OpenFOAM Integration with Azure CycleCloud
OpenFOAM, which stands for Open Field Operation and Manipulation, is a free, open-source software framework primarily used for computational fluid dynamics (CFD) simulations. It provides a wide range of numerical methods and solvers to simulate fluid flow, heat transfer, chemical reactions, and other related phenomena.
Developed by the OpenFOAM Foundation, OpenFOAM is written in C++ and includes a comprehensive set of libraries and tools for simulating complex fluid flows in various engineering and scientific applications. It supports various mesh types, including structured, unstructured, and Cartesian meshes, and offers parallel computing capabilities to leverage multicore processors and high-performance computing clusters.
OpenFOAM is widely used in automotive, aerospace, energy, and environmental engineering industries for tasks like aerodynamics analysis, combustion modelling, multiphase flow simulations, and more. Its open-source nature allows users to customize and extend its functionality according to their specific needs, making it a popular choice for academic research and industrial applications.
Azure CycleCloud offers effective and efficient solutions for running OpenFOAM simulations, whether for individuals or organizations. In this particular scenario, we’ll explore a Slurm-based high-performance computing (HPC) setup utilizing HBv4 virtual machines and Ubuntu 22.04.
The following table shows the components used in the demonstration.
CycleCloud
Slurm
23.02.6-1
OS
microsoft-dsvm:ubuntu-hpc:2204:latest
OpenFOAM
MPI
Open MPI 4.1.5rc2 (Nvidia HPC-X v2.16)
Compute VM SKU
Standard_HB176-96rs_v4 (96 AMD EPYC™ 9V33X (“Genoa-X”) CPU cores with AMD’s 3D V-Cache, clock frequencies up to 3.7 GHz, 768 GB of RAM, 2.3 GB L3 cache, 400 Gb/s NDR InfiniBand
Scheduler VM SKU
Standard_D4ads_v5
CycleCloud Configuration
To create a Slurm Cluster, you must first ensure that CycleCloud is configured and running. Then, using the CycleCloud GUI, follow the instructions in the Create an HPC cluster from built-in templates guide to create a basic Slurm Cluster.
During the cluster creation process, most parameters can be left at their default values. However, there are a few that need to be updated based on your specific requirements. Under the “Required Settings” section of the Slurm Cluster creation screen, select the appropriate VM SKU for computation. For this demo, we are using Standard_D4ads_v5 for the scheduler and Standard_HB176-96rs_v4 as the HPC VM Type for compute. Additionally, set the Max HPC Cores to 192, as we will be running a 2 Node (2 x 96) MPI job with Infiniband in this test. If you are using more VMs, update the Max HPC cores accordingly.
In the “Advanced Settings” under “Slurm Settings” select 23.02.6-1 and in the “Software”, section select Ubuntu 22.04 LTS for all Machines.
We’ll utilize CycleCloud’s Cloud-Init feature to automate the installation of required dependencies for setting up OpenFOAM on Ubuntu 22.04. This script streamlines the installation process, guaranteeing that all necessary dependencies are installed accurately.
#cloud-config
runcmd:
– wget https://raw.githubusercontent.com/vinil-v/of2312-build-repo/main/install_deps_of2312.sh
– bash install_deps_of2312.sh
Save all the configurations and start the cluster.
Download and Compile OpenFOAM v2312 on Ubuntu 22.04
Engineers frequently prefer compiled versions of OpenFOAM over pre-compiled ones due to various benefits. These include the ability to optimize performance, access cutting-edge features, customize functionality, manage dependencies, optimize for HPC environments, and support educational and research endeavours. By compiling OpenFOAM from source, engineers can personalize the software to suit their precise requirements, leading to superior simulation outcomes. This customization ultimately drives advancements in computational fluid dynamics, facilitating groundbreaking discoveries in fluid dynamics and engineering applications.
To commence building OpenFOAM-v2312, access the Scheduler VM and clone the of2312-build-repo with the command:
git clone https://github.com/vinil-v/of2312-build-repo.git
This step is crucial for accessing the necessary files and initiating the building process.
You will find 4 scripts under of2312-build-repo
vinil@ofcls-prod-scheduler:~$ cd of2312-build-repo/
vinil@ofcls-prod-scheduler:~/of2312-build-repo$ ls -l
total 20
-rw-rw-r– 1 vinil vinil 65 Feb 12 15:47 README.md
-rw-rw-r– 1 vinil vinil 2427 Feb 12 15:47 build_of2312-job.sh
-rw-rw-r– 1 vinil vinil 1444 Feb 12 15:47 download_of2312.sh
-rw-rw-r– 1 vinil vinil 1746 Feb 12 15:47 install_deps_of2312.sh
-rw-rw-r– 1 vinil vinil 2755 Feb 12 15:47 motorbike_sim_job_of2312.sh
download_of2312.sh: This script is responsible for downloading OpenFOAM-v2312 and extracting its contents. It automates the process of acquiring the necessary files, ensuring that they are readily available for the subsequent steps in the installation or compilation process.
build_of2312-job.sh: This script facilitates the compilation of OpenFOAM-v2312 through a Slurm job. It sets up the necessary environment and configurations required for the compilation process, ensuring that it can be executed efficiently within a distributed computing environment managed by Slurm.
motorbike_sim_job_of2312.sh: This script serves as a test job for running an OpenFOAM simulation using OpenFOAM-v2312. It provides a sample scenario or simulation setup, such as simulating a motorbike, to demonstrate the functionality and capabilities of the OpenFOAM software. This allows users to verify that the installation and compilation of OpenFOAM-v2312 was successful and that the software is functioning as expected for running simulations.
install_deps_of2312.sh: Installs dependencies required for OpenFOAM-v2312 installation. This is used via cloud-init in cyclecloud.
Run the download_of2312.sh file to download and extract the OpenFOAM-v2312 version.
vinil@ofcls-prod-scheduler:~/of2312-build-repo$ bash download_of2312.sh
Downloading OpenFOAM v2312…
Downloading ThirdParty package…
Extracting OpenFOAM v2312…
Extracting ThirdParty package…
Download and extraction completed.
The OpenFOAM compilation process on a 4-core node takes more than 5 hours, which is considerably long. Therefore, I’ve chosen not to run the compilation on a Scheduler node due to its limited resources and long compilation time. To speed up the compilation process, I’ve opted to run it as a Slurm job instead. Slurm will allocate a Standard_HB176-96rs_v4 node with 96 cores for this purpose. With this setup, the compilation job is completed in less than 20 minutes, significantly reducing the overall turnaround time and improving productivity. You could check the OpenFOAMv2312-Build-Job_<ID>.out file to check the progress of the compilation process.
Submit the build_of2312-job.sh using sbatch command to start the compilation process.
vinil@ofcls-prod-scheduler:~/of2312-build-repo$ sbatch build_of2312-job.sh
Submitted batch job 2
vinil@ofcls-prod-scheduler:~/of2312-build-repo$ squeue
JOBID PARTITION NAME USER ST TIME NODES NODELIST(REASON)
2 hpc OpenFOAM vinil CF 0:04 1 ofcls-prod-hpc-1
Here is the Compilation slurm job script for the reference:
#!/bin/bash
# SLURM Directives
#SBATCH –job-name=OpenFOAMv2312-Build-Job
#SBATCH –ntasks=96
#SBATCH –output=%x_%j.out
#SBATCH –partition=hpc
# Load MPI and Prepare Software
module purge
module load mpi/hpcx
# Software Installation and Configuration
export INSTALL_DIR=”$HOME/OpenFOAM”
# Compiling OpenFOAM
# Load OpenFOAM environment
. “$INSTALL_DIR/OpenFOAM-v2312/etc/bashrc”
cd “$INSTALL_DIR/OpenFOAM-v2312/”
# Set the number of compilation processes
export WM_NCOMPPROCS=$SLURM_NTASKS
# Start compilation
echo “Starting the compilation job at $(date)”
./Allwmake -j -s -q -l
echo “Finishing the compilation job at $(date)”
# Post-compilation Check
foamInstallationTest
Check the OpenFOAMv2312-Build-Job_<ID>.out log file for the Compilation job for any error. At the end of the job, it checks for foamInstallationTest to verify the compilation job.
vinil@ofcls-prod-scheduler:~/of2312-build-repo$ tail -60 OpenFOAMv2312-Build-Job_2.out
Basic setup :
——————————————————————————-
OpenFOAM: OpenFOAM-v2312
ThirdParty: ThirdParty-v2312
Shell: bash
Host: ofcls-prod-hpc-1
OS: Linux version 5.15.0-1041-azure
——————————————————————————-
Main OpenFOAM env variables :
——————————————————————————-
Environment FileOrDirectory Valid Crit
——————————————————————————-
$WM_PROJECT_USER_DIR /shared/home/vinil/OpenFOAM/vinil-v2312 no no
$WM_THIRD_PARTY_DIR …/home/vinil/OpenFOAM/ThirdParty-v2312 yes maybe
$WM_PROJECT_SITE [env variable unset] no
——————————————————————————-
OpenFOAM env variables in PATH :
——————————————————————————-
Environment FileOrDirectory Valid Path Crit
——————————————————————————-
$WM_PROJECT_DIR …ed/home/vinil/OpenFOAM/OpenFOAM-v2312 yes yes yes
$FOAM_APPBIN …12/platforms/linux64GccDPInt32Opt/bin yes yes yes
$FOAM_SITE_APPBIN …12/platforms/linux64GccDPInt32Opt/bin no no
$FOAM_USER_APPBIN …12/platforms/linux64GccDPInt32Opt/bin no no
$WM_DIR …e/vinil/OpenFOAM/OpenFOAM-v2312/wmake yes yes often
——————————————————————————-
OpenFOAM env variables in LD_LIBRARY_PATH :
——————————————————————————-
Environment FileOrDirectory Valid Path Crit
——————————————————————————-
$FOAM_LIBBIN …12/platforms/linux64GccDPInt32Opt/lib yes yes yes
$FOAM_SITE_LIBBIN …12/platforms/linux64GccDPInt32Opt/lib no no
$FOAM_USER_LIBBIN …12/platforms/linux64GccDPInt32Opt/lib no no
$FOAM_EXT_LIBBIN …v2312/platforms/linux64GccDPInt32/lib yes yes maybe
$MPI_ARCH_PATH …-cuda12-gdrcopy2-nccl2.18-x86_64/ompi yes yes yes
——————————————————————————-
Software Components
——————————————————————————-
Software Version Location
——————————————————————————-
flex 2.6.4 /usr/bin/flex
make 4.3 /usr/bin/make
wmake 2312 /shared/home/vinil/OpenFOAM/OpenFOAM-v2312/wmake/wmake
gcc 11.4.0 /usr/bin/gcc
g++ 11.4.0 /usr/bin/g++
——————————————————————————-
icoFoam exists …OAM-v2312/platforms/linux64GccDPInt32Opt/bin/icoFoam
Summary
——————————————————————————-
Base configuration ok.
Critical systems ok.
Done
Submitting OpenFOAM Motorbike example job
This job serves as a test job for running an OpenFOAM simulation using OpenFOAM-v2312. It provides a sample scenario or simulation setup, such as simulating a motorbike, to demonstrate the functionality and capabilities of the OpenFOAM software. This allows users to verify that the installation and compilation of OpenFOAM-v2312 was successful and that the software is functioning as expected for running simulations.
Submit the motorbike_sim_job_of2312.sh using sbatch to run the job in 2 x Standard_HB176-96rs_v4 with 192 CPUs.
Job submission script:
#!/bin/bash
# SLURM Directives
#SBATCH –job-name=OpenFOAM-MotorBike-Sim
#SBATCH –ntasks=192
#SBATCH –output=%x_%j.out
#SBATCH –partition=hpc
# Load MPI and OpenFOAM Environment
module purge
module load mpi/hpcx
export INSTALL_DIR=”$HOME/OpenFOAM”
. “$INSTALL_DIR/OpenFOAM-v2312/etc/bashrc”
# Nodefile Generation
scontrol show hostname “$SLURM_JOB_NODELIST” | sort -u > “$HOME/nodefile-$SLURM_JOB_ID”
# Case Setup
mkdir “$HOME/run”
cp -r “$FOAM_TUTORIALS/incompressible/simpleFoam/motorBike” “$HOME/run”
cd “$HOME/run/motorBike”
# Parameter Setup and Simulation Run for 192 CPUs
cp “system/decomposeParDict.6” “system/decomposeParDict.$SLURM_NTASKS”
sed -i “s/numberOfSubdomains.*/numberOfSubdomains $SLURM_NTASKS;/” “system/decomposeParDict.$SLURM_NTASKS”
sed -i “s/ n (3 2 1)/ n (48 4 1);/” “system/decomposeParDict.$SLURM_NTASKS”
sed -i “s/(20 8 8)/(100 40 40)/” “system/blockMeshDict”
sed -i “s#system/decomposeParDict.6#system/decomposeParDict.$SLURM_NTASKS#” “Allrun”
mpiopts=”$mpiopts -np $SLURM_NTASKS –hostfile $HOME/nodefile-$SLURM_JOB_ID”
./Allrun
Submit the job and check the output file for details.
vinil@ofcls-prod-scheduler:~/of2312-build-repo$ sbatch motorbike_sim_job_of2312.sh
Submitted batch job 3
vinil@ofcls-prod-scheduler:~/of2312-build-repo$ cat OpenFOAM-MotorBike-Sim_3.out
Loading mpi/hpcx
Loading requirement:
/opt/hpcx-v2.16-gcc-mlnx_ofed-ubuntu22.04-cuda12-gdrcopy2-nccl2.18-x86_64/modulefiles/hpcx
Running surfaceFeatureExtract on /shared/home/vinil/run/motorBike
Running blockMesh on /shared/home/vinil/run/motorBike
Running decomposePar on /shared/home/vinil/run/motorBike
Running snappyHexMesh (192 processes) on /shared/home/vinil/run/motorBike
Running topoSet (192 processes) on /shared/home/vinil/run/motorBike
Restore 0/ from 0.orig/ [processor directories]
Running patchSummary (192 processes) on /shared/home/vinil/run/motorBike
Running potentialFoam (192 processes) on /shared/home/vinil/run/motorBike
Running checkMesh (192 processes) on /shared/home/vinil/run/motorBike
Running simpleFoam (192 processes) on /shared/home/vinil/run/motorBike
vinil@ofcls-prod-scheduler:~/of2312-build-repo$
You can locate more detailed log files for each process OpenFOAM run within the case directory.
vinil@ofcls-prod-scheduler:~/of2312-build-repo$ ls -l $HOME/run/motorBike/log.*
-rw-rw-r– 1 vinil vinil 2407 Feb 12 17:42 /shared/home/vinil/run/motorBike/log.blockMesh
-rw-rw-r– 1 vinil vinil 10549 Feb 12 17:44 /shared/home/vinil/run/motorBike/log.checkMesh
-rw-rw-r– 1 vinil vinil 95795 Feb 12 17:42 /shared/home/vinil/run/motorBike/log.decomposePar
-rw-rw-r– 1 vinil vinil 2578 Feb 12 17:44 /shared/home/vinil/run/motorBike/log.patchSummary
-rw-rw-r– 1 vinil vinil 3021 Feb 12 17:44 /shared/home/vinil/run/motorBike/log.potentialFoam
-rw-rw-r– 1 vinil vinil 1572 Feb 12 17:47 /shared/home/vinil/run/motorBike/log.reconstructPar
-rw-rw-r– 1 vinil vinil 52984 Feb 12 17:46 /shared/home/vinil/run/motorBike/log.reconstructParMesh
-rw-rw-r– 1 vinil vinil 777220 Feb 12 17:46 /shared/home/vinil/run/motorBike/log.simpleFoam
-rw-rw-r– 1 vinil vinil 276955 Feb 12 17:44 /shared/home/vinil/run/motorBike/log.snappyHexMesh
-rw-rw-r– 1 vinil vinil 4156 Feb 12 17:42 /shared/home/vinil/run/motorBike/log.surfaceFeatureExtract
-rw-rw-r– 1 vinil vinil 1801 Feb 12 17:44 /shared/home/vinil/run/motorBike/log.topoSet
vinil@ofcls-prod-scheduler:~/of2312-build-repo$
In conclusion, this blog has explored the seamless integration of OpenFOAM into high-performance computing environments facilitated by Azure CycleCloud. By configuring a Slurm-based HPC setup with HBv4 virtual machines and Ubuntu 22.04, engineers can optimize performance effectively. The post also delved into the crucial aspect of reducing OpenFOAM’s compilation time and provided a comprehensive walkthrough for the compilation and execution process. Leveraging the parallel computing capabilities of MPI, along with Azure CycleCloud’s scalable infrastructure, engineers can achieve remarkable simulation results. This demonstration underscores the immense potential of integrating OpenFOAM into HPC environments, heralding new horizons in fluid dynamics research and engineering applications.
References:
OpenFOAM Documentation
Azure CycleCloud Documentation
Create an HPC cluster from built-in templates
Azure HBv4 Series Virtual machine
Nvidia HPCX 2.16.2 toolkit
Azure Ubuntu-based HPC and AI Image
Microsoft Tech Community – Latest Blogs –Read More
Building an Azure Static Web Apps site using WordPress on App Service as a headless CMS
Azure Static Web Apps is the ideal service to host static content sites on Azure. Many static sites are built using content from content management systems (CMS) into static assets and then deployed to Azure Static Web Apps. In this article, we take a look at using WordPress on App Service as a headless CMS for a static site hosted on Azure Static Web Apps.
Evolution of traditional CMS’s to headless CMS’s
A content website generally involves 2 artifacts: the website code itself, and the articles that make up the website content. To build such websites, content management systems (CMS) are ideal tools to provide purpose-built editing experiences for content editors.
Traditional CMS’s such as WordPress provide both the ability to edit content and the website code itself. They provide a what-you-see-is-what-you-get (WYSIWYG) editor to design the website itself, multiple pre-built themes and plugins that allow you to design how the final website will look, in addition to a rich editing interface to write and review content.
Over time however, headless CMS’s have increased in popularity, decoupling the content management experience from the website building experience. For instance, headless CMS’s such as Contentful and Strapi focus solely on the content editing experience, and provide APIs and configurations for frontend web developers to use to include the content in their custom-built frontends.
Pro’s & Con’s of Headless CMS’s
Headless CMS’s provide a similar content editing experience as traditional CMS’s, but leave the website design and hosting as the development team’s responsibility. This provides a decoupled architecture, allowing greater flexibility with how the content is used and accessed, whether that be from various devices, sites or channels. This also provides more flexibility with hosting architectures. This additional flexibility does mean additional development, and this tradeoff must be considered.
In contrast, traditional CMS’ monolithic structure enable rapid development with their WYSIWYG website editors and themes, a simpler deployment, but may be more limited in terms of flexibility, configuration, and hosting depending on your requirements.
As always, the tradeoffs of each will help you decide which is most appropriate for your scenario. Luckily, today, many traditional CMS’s can also be used as a headless CMS, such that you can start by using the rapid development enabled by a traditional CMS, and migrate to a headless mode with a custom frontend when your requirements grow beyond what a WYSIWYG editor can offer.
Using Azure WordPress on App Service as a headless CMS
Many teams today use Azure’s WordPress on App Service as a traditional CMS. It’s also possible to use WordPress on App Service as a headless CMS, thereby decoupling the content layer (the written articles, pages) from the presentation layer (the actual website, HTML/CSS/JS, etc.) of the content website. This can be a convenient option in the case where a team wants to have more flexibility regarding the presentation layer and write their custom frontend for their content website.
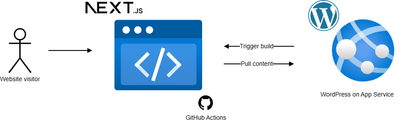
In this article, I’ll detail how a WordPress on App Service instance can be configured as a headless CMS and show how it can be used as a content source for a sample frontend website, in this case, built with NextJS and hosted on Azure Static Web Apps.
Here are the steps required to use WordPress on App Service as a headless CMS for a Static Web Apps-hosted site:
Create a WordPress on App Service instance
Create a Static Web Apps instance with a sample NextJS project and consume the content provided by the headless CMS
Configure the WordPress on App Service to trigger new builds of your Static Web App
Let’s jump into it!
Step 1: Create a WordPress on App Service instance (if it does not exist yet)
This guide was written to enable anyone to create such an architecture. If you already have a WordPress on App Service instance, you may skip this step.
We’ll start by creating our WordPress on App Service instance, which will provide our content in the form of blog articles, posts, and pages.
To create a WordPress on App Service instance, navigate to the Azure Portal and search for ‘WordPress on App Service’. This will show up in the Azure Marketplace as a Microsoft service.
Once the WordPress on Azure instance is created, we can access our site by clicking on the “Browse” button, or the default domain. In my case, that’s demo-headless-wordpress-for-swa.azurewebsites.net. This takes us to the sample template that has been pre-deployed to our WordPress instance when we created the WordPress on App Service resource.
We can now access the WordPress Admin Dashboard by appending /wp-admin/ to our URL and providing our login credentials. The WordPress Admin Dashboard will provide the content editing interface that a headless CMS provides. From this dashboard, we can create new posts, and add media. When WordPress is used as a traditional CMS, the dashboard also enables editing the website, but we won’t be using this functionality as the website will be built in a separate frontend code project.
Now that we have created our WordPress instance, we have a place where we can edit posts and the media of our website. This will be our headless content management system.
By default, the WordPress instance provides API access to all the content contained within our WordPress instance. This API access will enable us to pull the data from WordPress into our static website project. For instance, we can access all posts at the https://demo-headless-wordpress-for-swa.azurewebsites.net/wp-json/wp/v2/posts URL, and we can access specific posts with the https://demo-headless-wordpress-for-swa.azurewebsites.net/wp-json/wp/v2/posts/1 URL. In addition, we can access our images and media via the https://demo-headless-wordpress-for-swa.azurewebsites.net/wp-json/wp/v2/media URL. For full reference on the available API endpoints, refer to the WordPress developer documentation on REST APIs.
Step 2: Update your frontend web app to pull content from the WordPress CMS
Now is the fun part: the main objective in decoupling the presentation layer from our WordPress instance is to have full flexibility to build and host the website using the technology of our choice. In this case, I’ll demonstrate how we can build a sample frontend web app that pulls content from the WordPress instance to demonstrate how to use the WordPress REST API. This will be just a simple example of what can be done using WordPress as a headless CMS, but the potential to develop a tailored solution goes well beyond this.
For this sample frontend web app, we’ll be building a static site using Next.js, a frontend JavaScript framework. In this project, we’ll be pulling the written content from the WordPress instance via the REST API, treating the WordPress instance as a headless CMS. Note that while we’re demonstrating Next.js, this could be achieved with any other frontend framework or static site generator. Our Next.js content website will be decoupled and hosted separately from our WordPress instance, in this case, hosted on Azure Static Web Apps.
To make it easier to follow along, we’ve published a template of the Next.js application that we built for this article which can be accessed here: thomasgauvin/swa-with-headless-wordpress: Sample Static Web Apps site with headless WordPress on App Service (github.com). Types are omitted from the below code snippets for simplicity, though they are present in the template.
Since this article focuses on the integration with WordPress, the styling is omitted from this tutorial. All styling can be accessed in the Next.js template GitHub repository.
Step 2.1: Create a new Next.js project
To create a new Next.js project, we’ll run the following command in a terminal:
npx create-next-app@latest
After this, we can open our project with a code editor (such as VSCode) and start consuming the REST APIs made available by our WordPress content. To run the development server, we can run the following command:
npm run dev
We’ll now add the code to pull the content from the WordPress instance. Before we start, we’ll add the URL of your WordPress site as an environment variable. We’ll create a .env in the root of our project, and add the following line. With this, we’ll be able to easily access our WordPress URL throughout our project.
WORDPRESS_URL = “<ENTER YOUR WORDPRESS URL HERE>”
For this sample, we’ll commit the .env file into our repository as it does not represent a secret. However, if you use your .env file to store secrets, set your environment variables securely within your GitHub Actions/build configurations instead of relying on the .env file.
Step 2.2: List all posts in the homepage
We’ll first start by listing all posts in the homepage of our website. In the /app/page.tsx file, we’ll add the following fetch call to get the posts from our WordPress instance in our Home component, and then render them in the page.
import Link from ‘next/link’;
export default async function Home() {
const wordpressUrl = process.env.WORDPRESS_URL;
const response = await fetch(`${wordpressUrl}/wp-json/wp/v2/posts?_embed`);
const posts: any = await response.json();
return (
<main className=”w-full max-w-4xl m-auto”>
{posts.map((post: any) => (
<Link href={`/post/${post.slug}`} key={post.slug}>
<div>
slug: {post.slug}
title: {post.title.rendered}
excerpt: {post.excerpt.rendered}
imageUrl: {post._embedded ? post._embedded[‘wp:featuredmedia’] ? post._embedded[‘wp:featuredmedia’][0].source_url : ” : ”}
</div>
<br />
</Link>
))}
</main>
)
}
We can then add some styling to show a card of the post, which can be clicked to access the full post.
Since this article focuses on the integration with WordPress, the styling is omitted from this tutorial. All styling can be accessed in the Next.js template GitHub repository.
Step 2.3: Create a page for individual posts
Now, we’ll create a new file /app/post/[slug]/page.tsx which will contain a component for pages of individual posts. In this file, we’ll access the slug of the WordPress post from the URL parameters, fetch the post from the WordPress REST API, and then display it.
Note: Next.js uses a file-system based router, such that the actual file path represents the routing of our site. In this case, the /app/post/[slug]/page.tsx file will represent the /post/some-sample-slug page, where some-sample-slug will be accessible as a page parameter in our Next.js component.
const wordpressUrl = process.env.WORDPRESS_URL;
export default async function BlogPage({ params }: { params: { slug: string } }) {
const response = await fetch(`${wordpressUrl}/wp-json/wp/v2/posts/?slug=${params.slug}&_embed`);
const post: any = (await response.json())[0];
return (
<div>
title: {post.title.rendered}
<br />
content: {post.content.rendered}
</div>
);
};
Adding a bit of styling , we can now display the full contents, the authors, any attached images and more.
We can also replicate steps 2.2 and 2.3 for WordPress pages and other elements of our WordPress site we want to surface in our custom site. In the template repository that accompanies this blog, we’ve added more styling to the site and surfaced the pages of our WordPress site, to obtain the following:
Step 2.4: (Next.js-specific) Configure static output for Next.js
Since we’re using Next.js with static output to get optimal performance for our content site, we can configure a static export of our site by editing next.config.js as such:
const nextConfig = {
output: ‘export’,
…
}
module.exports = nextConfig
For the static site export, we’ll need to indicate each of the potential paths of our site at build time. We can do so by using the generateStaticParams function to return an array of all possible paths for our post pages. This function will then be called by the Next.js build action, which will use these paths in order to pre-generate the static HTML for each of these pages. Add the following code to the /app/post/[slug]/page.tsx file.
export async function generateStaticParams(){
const response = await fetch(`${wordpressUrl}/wp-json/wp/v2/posts?_fields[]=slug`);
const posts = await response.json();
const paths = posts.map(post => ({
slug: post.slug
}));
return paths;
}
We will do the same for the /app/page/[slug]/page.tsx file.
Now, when running npm run build, we’ll get an out folder with the static files that make up our website.
Step 2.5: (Next.js-specific) Configure images for Next.js
If you use images in your Next.js project, you will need to specify the remotePatterns needed to allow Next.js to access the images from your WordPress instance. Also, if you plan to use the Next Image feature, you will need to specify that images are unoptimized or use a custom handler. Here’s what our next configuration will look like:
const nextConfig = {
output: ‘export’,
images: {
unoptimized: true,
remotePatterns: [
{
protocol: ‘https’,
hostname: <ENTER HOSTNAME FOR YOUR WORDPRESS CMS SITE>,
port: ”,
},
{
protocol: ‘https’,
hostname: ‘secure.gravatar.com’,
port: ”,
}
]
}
}
module.exports = nextConfig
Step 3: Deploy your frontend web app to Azure Static Web Apps
Step 3.1: Create a GitHub repository for your project
Now, we’ll create a GitHub repository for our Next.js project. This will make it convenient for deploying to Static Web Apps and allow us to leverage GitHub Actions to have new builds & deployments of the website when WordPress content changes. For instance, for this project, I’ve created this sample repository:
Step 3.2: Create a Static Web Apps resource for this repository
With this repository, we can create a Static Web Apps resource from the Azure Portal or by following another method mentioned in the Azure Static Web Apps documentation. For our build details, we’ll specify that this is a Next.js project.
Step 3.3: (Next.js-specific) Configure the Next.js project and GitHub Actions workflow for the Static Web Apps deploy action
With Next.js 14, NodeJS 18 is required to build the project. To specify the Node version needed for the build action configured for Static Web Apps, we can add the following engines specification to the package.json file of our Next.js project:
{
…
“engines”: {
“node”: “>=18.17.0”
}
…
}
Since we are exporting our Next.js project to a static site, we’ll configure our GitHub Actions to indicate this in the Build and Deploy step for Static Web Apps. We’ll add the environment variable IS_STATIC_EXPORT: true, and output_location: “out” to the build and deploy job as such:
[…]
jobs:
build_and_deploy_job:
if: github.event_name == ‘push’ || (github.event_name == ‘pull_request’ && github.event.action != ‘closed’) || github.event_name == ‘workflow_dispatch’
runs-on: ubuntu-latest
name: Build and Deploy Job
steps:
– uses: actions/checkout@v3
with:
submodules: true
lfs: false
– name: Build And Deploy
id: builddeploy
uses: Azure/static-web-apps-deploy@v1
with:
azure_static_web_apps_api_token: ${{ secrets.AZURE_STATIC_WEB_APPS_API_TOKEN_PURPLE_WATER_0F95B5510 }}
repo_token: ${{ secrets.GITHUB_TOKEN }} # Used for Github integrations (i.e. PR comments)
action: “upload”
###### Repository/Build Configurations – These values can be configured to match your app requirements. ######
# For more information regarding Static Web App workflow configurations, please visit: https://aka.ms/swaworkflowconfig
app_location: “/” # App source code path
api_location: “” # Api source code path – optional
output_location: “out” # Built app content directory – optional
###### End of Repository/Build Configurations ######
env: # Add environment variables here
IS_STATIC_EXPORT: true
[…]
We now have a deployed Next.js project on Azure Static Web Apps, that is fetching its content at build time from our WordPress on App Service instance. Excellent!
Step 4: Configure your WordPress instance and GitHub Actions to trigger new builds for WordPress changes
Our last step will be to configure our WordPress instance to trigger new builds & deployments of our Next.js project when changes on our WordPress CMS require these. For instance, we want to ensure that when a content writer publishes edits to a post of new posts, our GitHub Actions is retriggered to build and deploy our Next.js project to the Static Web Apps resource.
To do so, we can make use of a WordPress plugin that allows us to use the GitHub API in order to trigger new workflow runs for our GitHub Actions.
Step 4.1: Add & configure a plugin to your WordPress instance that will trigger new GitHub Actions upon edits
While you can use any plugin that allows you to trigger new GitHub Actions builds, we’ve written a custom WordPress plugin that requires minimal setup and will trigger new builds on edits to published or new posts or pages for the sake of this tutorial. For this tutorial, you can download the custom plugin as a zip file from thomasgauvin/trigger-github-action-plugin-for-wordpress: This WordPress plugin can trigger a GitHub Action job when a post or page is created or updated. If you want further productionize and customize the behavior of this plugin, you can do so by making edits to the source code of this plugin.
In our WordPress admin dashboard, we can now upload the zip file of this plugin.
After installation, we can activate the plugin and configure it. To configure this project, we’ll need to indicate the GitHub repository URL of the project containing GitHub Actions we want to trigger on new changes. Moreover, we’ll need to provide a GitHub Personal Access Token that has access to trigger GitHub Actions runs for our repository.
At this point, if you`ve configured your Trigger GitHub Action plugin correctly, you’ll receive a success message indicating that your GitHub Personal Access Token and repository are valid. Manually triggering the workflow, you’ll see an error message indicating that we must allow workflow dispatch for our repository. We’ll do that in the next step.
Step 4.2: Configure your Static Web Apps GitHub Actions workflow to accept manual deployments
Our GitHub Actions workflow for Azure Static Web Apps deployment is currently only configured to execute on pushes or pull requests to specific branches. In the /.github/workflows/<default-SWA-domain-hash>.yml, we’ll edit the `on` section to indicate that our workflow should be triggered on `workflow_dispatch:`. We’ll also edit the build_and_deploy_job to run if the github.event_name is equal to ‘workflow_dispatch’.
name: Azure Static Web Apps CI/CD
on:
push:
branches:
– main
pull_request:
types: [opened, synchronize, reopened, closed]
branches:
– main
workflow_dispatch:
jobs:
build_and_deploy_job:
if: github.event_name == ‘push’ || (github.event_name == ‘pull_request’ && github.event.action != ‘closed’) || github.event_name == ‘workflow_dispatch’
runs-on: ubuntu-latest
name: Build and Deploy Job
steps:
– uses: actions/checkout@v3
with:
submodules: true
lfs: false
– name: Build And Deploy
id: builddeploy
uses: Azure/static-web-apps-deploy@v1
…
Once we’ve made these changes, we’ll once again commit & push to our repository. To validate these edits are correctly working, we can validate once again by clicking on the Manual trigger button and noticing that the message indicates our workflow trigger successfully.
Now, when we make creates or edits to published posts or pages, the Trigger GitHub Action plugin will activate and trigger the GitHub Action workflow to build and deploy a new version of our Next.js static site to our Azure Static Web Apps resource. During the build process, the Next.js site will use the newly updated posts or pages such that these changes will be made visible when the deployment finishes.
Conclusion
In this article, we demonstrated how to use WordPress as a headless CMS for an Azure Static Web Apps-hosted site. We first created a WordPress on App Service instance to be used as a headless CMS, and investigated how we can use the APIs of our WordPress instance to access the content. We also created a custom frontend site with Next.js to demonstrate how to use the content from the WordPress instance to create our site. We also installed a custom WordPress plugin to automatically trigger new builds and deployments of the Next.js site whenever the WordPress content is updated. By using WordPress as a headless CMS, we can take advantage of its rich editor experience for content teams, while having full flexibility over the frontend code and the presentation layer.
Get started with WordPress on App Service and Azure Static Web Apps for free
Check out the quickstart for WordPress on App Service and Azure Static Web Apps and get started with their Free Tiers
Check out the template repository of a Next.js starter site using WordPress as a headless CMS
Microsoft Tech Community – Latest Blogs –Read More
Azure Database for MySQL – Single Server retirement – Key updates and migration tooling available
Azure Database for MySQL – Single Server is scheduled for retirement by September 16, 2024.
As part of this retirement, we stopped support for creating new Single Server instances via the Azure portal as of January 16, 2023, and beginning March 19, 2024, we’ll no longer support creating new Single Server instances via the Azure CLI. Should you still need to create Single Server instances to meet your business continuity needs, please raise an Azure support ticket. Note that you’ll still be able to create read replicas and perform restores (PITR and geo-restore) for your existing Single Server instance until the sunset date, September 16, 2024.
If you currently have an Azure Database for MySQL – Single Server production server, we’re pleased to let you know that you can migrate your Azure Database for MySQL – Single Server instance to the Azure Database for MySQL – Flexible Server service free of charge by using one of the following migration tooling options.
Azure Database for MySQL Import CLI
You can leverage the Azure Database for MySQL Import CLI (General Availability) to migrate your Azure Database for MySQL – Single Server instances to Flexible Server using snapshot backup and restore technology with a single CLI command. Based on user inputs, this functionality will provision your target Flexible Server instance, take a backup of the source server, and then restore it to the target. It copies the following properties and files from the Single Server instance to the Flexible Server instance:
Data files
Server parameters
Compatible firewall rules
Server properties such as tier, version, SKU name, storage size, location, geo-redundant backups settings, public access settings, tags, auto grow settings and backup-retention days settings
Admin username and password
In-place auto-migration
In-place auto-migration (General Availability) from Azure Database for MySQL – Single Server to Flexible Server is an in-place upgrade during a planned maintenance window for select Single Server database workloads. If you have a Single Server workload based on the Basic or General Purpose SKU with <= 20 GiB of used storage and without complex features (CMK, AAD, Read Replica, Private Link) enabled, you can now nominate yourself for auto-migration by submitting your server details using this form.
Azure Database Migration Service (DMS)
Azure Database Migration Service (DMS) (General Availability) is a fully managed service designed to enable seamless online and offline migration from Azure Database for MySQL – Single Server to Flexible Server. DMS supports cross-region, cross-version, cross-resource group, and cross-subscription migrations.
Conclusion
Take advantage of one of these options to migrate your Single Server instances to Flexible Server at no cost!
For more questions on Azure Database for MySQL Single Server retirement, see our Frequently Asked Questions.
Microsoft Tech Community – Latest Blogs –Read More


