

Category: Microsoft
Category Archives: Microsoft
Azure Database for MySQL – Single Server retirement – Key updates and migration tooling available
Azure Database for MySQL – Single Server is scheduled for retirement by September 16, 2024.
As part of this retirement, we stopped support for creating new Single Server instances via the Azure portal as of January 16, 2023, and beginning March 19, 2024, we’ll no longer support creating new Single Server instances via the Azure CLI. Should you still need to create Single Server instances to meet your business continuity needs, please raise an Azure support ticket. Note that you’ll still be able to create read replicas and perform restores (PITR and geo-restore) for your existing Single Server instance until the sunset date, September 16, 2024.
If you currently have an Azure Database for MySQL – Single Server production server, we’re pleased to let you know that you can migrate your Azure Database for MySQL – Single Server instance to the Azure Database for MySQL – Flexible Server service free of charge by using one of the following migration tooling options.
Azure Database for MySQL Import CLI
You can leverage the Azure Database for MySQL Import CLI (General Availability) to migrate your Azure Database for MySQL – Single Server instances to Flexible Server using snapshot backup and restore technology with a single CLI command. Based on user inputs, this functionality will provision your target Flexible Server instance, take a backup of the source server, and then restore it to the target. It copies the following properties and files from the Single Server instance to the Flexible Server instance:
Data files
Server parameters
Compatible firewall rules
Server properties such as tier, version, SKU name, storage size, location, geo-redundant backups settings, public access settings, tags, auto grow settings and backup-retention days settings
Admin username and password
In-place auto-migration
In-place auto-migration (General Availability) from Azure Database for MySQL – Single Server to Flexible Server is an in-place upgrade during a planned maintenance window for select Single Server database workloads. If you have a Single Server workload based on the Basic or General Purpose SKU with <= 20 GiB of used storage and without complex features (CMK, AAD, Read Replica, Private Link) enabled, you can now nominate yourself for auto-migration by submitting your server details using this form.
Azure Database Migration Service (DMS)
Azure Database Migration Service (DMS) (General Availability) is a fully managed service designed to enable seamless online and offline migration from Azure Database for MySQL – Single Server to Flexible Server. DMS supports cross-region, cross-version, cross-resource group, and cross-subscription migrations.
Conclusion
Take advantage of one of these options to migrate your Single Server instances to Flexible Server at no cost!
For more questions on Azure Database for MySQL Single Server retirement, see our Frequently Asked Questions.
Microsoft Tech Community – Latest Blogs –Read More
Simplifying Azure Kubernetes Service Authentication Part 2
Welcome to the second installment of our multipart series on simplifying Azure Kubernetes Service (AKS) authentication. In this article, we delve deeper into the intricacies of AKS setup, focusing on critical aspects such as deploying demo applications, configuring Cert Manager for TLS certificates (enabling HTTPS), establishing a static IP address, creating a DNS label, and initiating the groundwork for robust authentication. First part here Part 1
Let’s dive in!
Deploy two demo applications
In the previous post we set up our AKS cluster and configured NGINX. Now we will deploy two sample applications and deploy them. You can follow the official documentation here Create an unmanaged ingress controller.
First create the following two YAML files that define our two applications:
aks-helloworld-one.yaml
apiVersion: apps/v1
kind: Deployment
metadata:
name: aks-helloworld-one
spec:
replicas: 1
selector:
matchLabels:
app: aks-helloworld-one
template:
metadata:
labels:
app: aks-helloworld-one
spec:
containers:
– name: aks-helloworld-one
image: mcr.microsoft.com/azuredocs/aks-helloworld:v1
ports:
– containerPort: 80
env:
– name: TITLE
value: “Welcome to Azure Kubernetes Service (AKS)”
—
apiVersion: v1
kind: Service
metadata:
name: aks-helloworld-one
spec:
type: ClusterIP
ports:
– port: 80
selector:
app: aks-helloworld-one
aks-helloworld-two.yaml
apiVersion: apps/v1
kind: Deployment
metadata:
name: aks-helloworld-two
spec:
replicas: 1
selector:
matchLabels:
app: aks-helloworld-two
template:
metadata:
labels:
app: aks-helloworld-two
spec:
containers:
– name: aks-helloworld-two
image: mcr.microsoft.com/azuredocs/aks-helloworld:v1
ports:
– containerPort: 80
env:
– name: TITLE
value: “AKS Ingress Demo”
—
apiVersion: v1
kind: Service
metadata:
name: aks-helloworld-two
spec:
type: ClusterIP
ports:
– port: 80
selector:
app: aks-helloworld-two
Then run the following commands to deploy the applications:
kubectl apply -f aks-helloworld-one.yaml –namespace ingress-basic
kubectl apply -f aks-helloworld-two.yaml –namespace ingress-basic
Now lets check the pods, service, and deployment:
List the pods and verify the STATUS is Running for both applications
kubectl get pods -n ingress-basic
List the service and notice the CLUSTER-IP assigned to each service
kubectl get service -n ingress-basic
List the deployment and notice the READY state
kubectl get deployment -n ingress-basic
Create an ingress route
We will proceed to create a Kubernetes Ingress resource YAML file, enabling us to efficiently route traffic to each of our deployed applications. As a reminder, our ingress controller has been configured to utilize NGINX, as discussed in our previous post. Consequently, we will leverage the NGINX configuration to effectively manage traffic for the following services:
EXTERNAL_IP/hello-world-one to aks-helloworld-one
EXTERNAL_IP/hello-world-two to aks-helloworld-two,
EXTERNAL_IP/static to aks-helloworld-one
First create the following YAML file:
apiVersion: networking.k8s.io/v1
kind: Ingress
metadata:
name: hello-world-ingress
annotations:
nginx.ingress.kubernetes.io/ssl-redirect: “false”
nginx.ingress.kubernetes.io/use-regex: “true”
nginx.ingress.kubernetes.io/rewrite-target: /$2
spec:
ingressClassName: nginx
rules:
– http:
paths:
– path: /hello-world-one(/|$)(.*)
pathType: Prefix
backend:
service:
name: aks-helloworld-one
port:
number: 80
– path: /hello-world-two(/|$)(.*)
pathType: Prefix
backend:
service:
name: aks-helloworld-two
port:
number: 80
– path: /(.*)
pathType: Prefix
backend:
service:
name: aks-helloworld-one
port:
number: 80
—
apiVersion: networking.k8s.io/v1
kind: Ingress
metadata:
name: hello-world-ingress-static
annotations:
nginx.ingress.kubernetes.io/ssl-redirect: “false”
nginx.ingress.kubernetes.io/rewrite-target: /static/$2
spec:
ingressClassName: nginx
rules:
– http:
paths:
– path: /static(/|$)(.*)
pathType: Prefix
backend:
service:
name: aks-helloworld-one
port:
number: 80
Then create the resource with the following command:
kubectl apply -f hello-world-ingress.yaml –namespace ingress-basic
You will need your public IP obtained from the last post. Now visit the deployed application in the web browser by navigating to:
PUBLICIP/hello-world-two or PUBLICIP/hello-world-one
Upload cert manager images to your ACR
We will proceed to configure images for the certificate manager by deploying the necessary images to our Azure Container Registry (ACR) instance. Before executing the following command, ensure that you include the -TargetTag <your tag name> flag. Although the Microsoft documentation for using Transport Layer Security (TLS) with an ingress controller on AKS does not explicitly require this flag, it is advisable to include it. Doing so allows you to specify the ACR repository names, such as jetstack/cert-manager-cainjector, jetstack/cert-manager-controller, and jetstack/cert-manager-webhook. For detailed steps, you can refer to the official documentation here Use TLS with an ingress controller on Azure Kubernetes Service (AKS)
Enter the following commands in PowerShell to upload the cert manager images to your ACR:
$RegistryName = “<REGISTRY_NAME>”
$ResourceGroup = (Get-AzContainerRegistry | Where-Object {$_.name -eq $RegistryName} ).ResourceGroupName
$CertManagerRegistry = “quay.io”
$CertManagerTag = “v1.8.0”
$CertManagerImageController = “jetstack/cert-manager-controller”
$CertManagerImageWebhook = “jetstack/cert-manager-webhook”
$CertManagerImageCaInjector = “jetstack/cert-manager-cainjector”
Import-AzContainerRegistryImage -ResourceGroupName $ResourceGroup -RegistryName $RegistryName -SourceRegistryUri $CertManagerRegistry -SourceImage “${CertManagerImageController}:${CertManagerTag}” -TargetTag “${CertManagerImageController}:${CertManagerTag}”
Import-AzContainerRegistryImage -ResourceGroupName $ResourceGroup -RegistryName $RegistryName -SourceRegistryUri $CertManagerRegistry -SourceImage “${CertManagerImageWebhook}:${CertManagerTag}” -TargetTag “${CertManagerImageWebhook}:${CertManagerTag}”
Import-AzContainerRegistryImage -ResourceGroupName $ResourceGroup -RegistryName $RegistryName -SourceRegistryUri $CertManagerRegistry -SourceImage “${CertManagerImageCaInjector}:${CertManagerTag}” -TargetTag “${CertManagerImageCaInjector}:${CertManagerTag}”
Create a static IP address
In the context of configuring the NGINX ingress controller, it is prudent to address the necessity of a static IP address for proper routing functionality. Based on my observations during the NGINX setup process outlined in the previous documentation, it appears that a static IP address may already be assigned. Consequently, there might be no immediate requirement to allocate a new static IP address. However, to ensure unequivocal utilization of a static IP address, it is advisable to consider assigning a fresh one to the load balancer exposed by NGINX. While this additional step does not inherently pose any harm, it remains a discretionary measure. Depending on the specific deployment scenario, it may or may not be essential.
First get the resource group name of your AKS cluster:
(Get-AzAksCluster -ResourceGroupName $ResourceGroup -Name myAKSCluster).NodeResourceGroup
The run the following command to create a static IP address:
(New-AzPublicIpAddress -ResourceGroupName MC_myResourceGroup_myAKSCluster_eastus -Name myAKSPublicIP -Sku Standard -AllocationMethod Static -Location eastus).IpAddress
You should get an IP address. Keep a note of this IP.
Set the DNS label, static IP, and health probe using Helm
Create a DNS label name that will be used to generate a FQDN for navigating to your applications. This can be any name, but it must be unique. Additionally, add the static IP address obtained from above and set the health monitoring request path. Run the following command to configure the NGINX ingress controller:
$DnsLabel = “<DNS_LABEL>”
$Namespace = “ingress-basic”
$StaticIP = “<STATIC_IP>”
helm upgrade ingress-nginx ingress-nginx/ingress-nginx `
–namespace $Namespace `
–set controller.service.annotations.”service.beta.kubernetes.io/azure-dns-label-name”=$DnsLabel `
–set controller.service.loadBalancerIP=$StaticIP `
–set controller.service.annotations.”service.beta.kubernetes.io/azure-load-balancer-health-probe-request-path”=/healthz
This marks the conclusion of the second installment in our series. In the upcoming segment, we will delve further into the setup process. Specifically, we’ll configure the certificate manager, update our ingress routes, establish passwords and secrets for authentication, and prepare for the configuration of our OAuth2 proxy. Stay tuned for the next part, where we continue our journey toward a robust and secure system.
Microsoft Tech Community – Latest Blogs –Read More
Intune moving to support Android 10 and later for user-based management methods in October 2024
We’ve heard your feedback asking to understand the plan for Intune’s support for Android operating system (OS) versions.
In October 2024 (after Google’s expected release of Android 15), Intune will revise its operating system support statement to move to supporting only Android 10 and later for user-based management methods, which include:
Android Enterprise personally owned with a work profile.
Android Enterprise corporate owned work profile.
Android Enterprise fully managed.
Android Open Source Project (AOSP) user-based.
Android Device administrator.
App protection policies.
App configuration policies for managed apps.
The following aren’t impacted by this change:
Android Enterprise dedicated devices: Will continue to be supported on Android 8 or later.
AOSP user-less: Will continue to be supported on Android 8 or later.
Microsoft Teams certified Android devices: Will be supported on versions listed in Microsoft Teams certified Android device documentation.
Microsoft Teams certified Android devices
Teams Rooms certified systems and peripherals
We plan to gradually move to only supporting the four most recent Android versions for our user-based management methods to keep enrolled devices secure. As Google continues to release new Android versions annually, we’ll stop supporting one or two older versions every October until we support only the four most recent versions. After that, we’ll end support for one version annually in October to maintain our support statement for the four latest versions.
Impact of ending support
For user-based management methods (as listed above), Android devices running Android 9 or earlier will no longer be supported. For devices on unsupported Android OS versions:
Intune technical support will no longer be provided.
Intune will no longer be making changes to address bugs or issues.
New and existing features are not guaranteed to work.
While Intune won’t prevent enrollment or management of devices on unsupported Android OS versions, functionality isn’t guaranteed, and use isn’t recommended.
How can you prepare?
Use Intune reporting to identify which devices or users might be affected:
For devices with mobile device management (MDM), go to Devices > All devices and filter by OS.
For devices with app protection policies, go to Apps > Monitor > App Protection status and use the Platform and Platform version columns to filter.
For devices with app configuration policies, go to Apps > Monitor > App Configuration status and use the Platform and Platform version columns to filter.
Warn users that they should update their Android version:
For devices with MDM, utilize a device compliance policy for Android Enterprise, Android AOSP, or Android device administrator and set the action for noncompliance to send an email or push notification to users before marking them noncompliant.
For devices with app protection policies, create an app protection policy and configure conditional launch with a min OS version requirement that warns users.
Block devices from accessing corporate resources until they update their Android version:
For devices with MDM, you can use either or both of these methods:
Set enrollment restrictions to prevent enrollment on devices running older versions.
Utilize a device compliance policy to make devices noncompliant if they are running older versions.
For devices with app protection policies, create an app protection policy and configure conditional launch with a min OS version requirement that blocks users from app access.
For more information, see Manage operating system versions with Intune. If you have any questions, leave a comment below or reach out to us on X @IntuneSuppTeam.
Microsoft Tech Community – Latest Blogs –Read More
Join Teams for work or school meetings with personal account
We are improving the ways to join Teams meetings and have started to roll out an improvement enabling you to join a Teams meeting organized by a work or school user with your signed-in personal account. Read more on the Teams Insider blog and join Teams Insider to try this in Teams free on Windows 11 today!
Join Teams for work or school meeting with your personal account – Teams Insider
Microsoft Tech Community – Latest Blogs –Read More

Contributor Stories: Carlos Solís Salazar
If you’ve ever engaged with the content on the Microsoft Learn platform, it’s highly likely that the material you utilized was written or co-authored by dedicated contributors. These contributors, often volunteers, generously offer their time and expertise to fill knowledge gaps within our content portfolio by suggesting valuable updates to our material, sharing their knowledge within the Microsoft community, and/or answering questions on the Q&A area of the Microsoft Learn platform!
In this interview series, we aim to acquaint ourselves with some of these valuable contributors. Through these conversations, we seek to understand their motivations for sharing their knowledge on Microsoft Learn and gain insights into their experiences.
Today, we’re pleased to introduce one of our top Microsoft Community Champions contributors, Carlos Solís Salazar. Carlos is a dedicated IT professional currently serving as the DOJO Cloud Leader within the Communidad DOJO sub-community and a Presales Engineer at Business IT. With a specialization in Microsoft Azure and a keen focus on information security, Carlos brings a wealth of experience in spearheading digital transformation initiatives and fortifying technological infrastructures across diverse organizations. Renowned for his innovative mindset and effective problem-solving, Carlos has made a significant impact on the cloud computing community as an Ambassador and Leader of DOJO Cloud, organizing and coordinating educational events. Additionally, his commitment to education is evident through his role as a lecturer at Colegio Universitario Francisco de Miranda, emphasizing skill development in IT security.
Carlos was nominated for this month’s Contributor Spotlight Series because of his long-standing contributions to our Microsoft Learn platform! He’s helped answer over 300+ questions on Microsoft Learn Q&A and is a recognized champion of the Microsoft Community Champions program. Carlos holds key certifications, including Microsoft Certified: Azure Solutions Architect Expert, Microsoft Certified: DevOps Engineer, and Microsoft Certified: Azure Security Engineer Associate, underscoring his dedication to continuous learning and professional excellence. Aside from his Microsoft contributions and certifications, he’s also a regular contributor in various forums like Stack Overflow.
Meet Carlos:
Sumit: Hello Carlos! It’s great to meet you and spend some time with you today. Please tell us about yourself and your experience.
Carlos: Hey there, Sumit. Nice to meet you, as well. I’m an IT pro with a strong focus on Microsoft Azure and info security. I’m all about digital transformation and beefing up tech infrastructures. Day-to-day, I’m knee-deep in crafting cool solutions with Microsoft Azure and Microsoft 365 to make businesses smoother and safer.
Outside the office grind, I’m super active in the DOJO community, especially around cloud computing. As a DOJO Cloud Leader, I get to organize workshops and talks, creating a space for people to learn and connect over cloud tech. I even spearheaded Microsoft Cloud Day Panama this September, and we’re planning to make it an annual thing!
I also love hitting the stage at conferences to chat about IT trends and my experiences. It’s a great way to spread knowledge and sharpen my public speaking skills. Some events I’ve attended include DOJO Conf 2023, Bsides Panama 2023, Amalia Conf 2022, and morterueloCON 2021.
In short, my world’s a blend of tech know-how, community vibes, and an endless journey of learning and growing – for me and everyone I meet.
Sumit: That’s so exciting. Love the community work that you’ve been doing. As a community leader, what inspired you to start contributing to Microsoft Learn Q&A, and what motivates you to keep contributing?
Carlos: Jumping into the IT world, especially Microsoft Azure, was driven by my love for tech innovation and wanting to make a real difference. I’ve always been intrigued by how tech can revolutionize organizations and enhance daily life. This curiosity pulled me deeper into cloud computing and security, which I think are super crucial today. Stumbling across champions program, I was inspired by the desire to belong to a community of professionals who share the same goal which is to help others solve their problems in the use of azure technologies.
What keeps me contributing to the Q&A site? It‘s seeing the real-world impact of my contributions. When I share what I know, I see others grow, adapt, and solve their own tech challenges. Plus, the feedback and stories from the community are super valuable—they keep me on my toes, always learning and improving.
Another big push is how fast technology evolves. Staying on top of the latest trends is a challenge, but it’s thrilling, and I enjoy sharing it with others so they can also stay up to date! I’m stoked about being part of this ongoing tech evolution and helping shape how it positively transforms our lives and society.
Sumit: Have your contributions to Microsoft Learn Q&A helped you advance your learning journey and/or career path?
Carlos: Oh, absolutely! Diving into the Microsoft Learn Q&A platform really turbocharged my career and skill set. It’s been awesome for showing off my knack for tackling Microsoft Azure challenges. And dealing with real-world scenarios on the Q&A platform has sharpened my problem-solving skills. I get to look at these problems with a ‘let’s-fix-this’ attitude. Every time I bump into a new question or issue there, it’s not just about using what I already know. It’s also a chance to dig into fresh areas and technologies in the Azure world, which keeps me right at the cutting edge of what’s happening in the industry.
Plus, explaining solutions on the Q&A platform has really upped my communication game. There’s a big difference between solving a problem versus explaining it in a way that’s clear and helpful to others. That ability to communicate well has been a game-changer in my professional life, especially when I’m working with teams or pitching ideas to bigwigs.
Sumit: That’s amazing – really appreciate the growth mindset with which you operate. What about our Champions program, Carlos? I’d love to know how your partnership with the Microsoft Community Champions program has been?
Carlos: Being part of Microsoft Community Champions? It’s been amazing! The vibe here is all about teamwork and support, from both Microsoft folks and fellow champs. They’ve really helped me up my game, especially in understanding and tackling Azure challenges. What’s cool is that this program isn’t just about tech skills. It’s also boosted my communication and problem-solving abilities big time, thanks to all the great feedback and shared knowledge from the community.
And the perks? They’re like the cherry on top! They’ve got some neat incentives that make being active in the program super rewarding. Won’t give away the surprises, but they definitely make you feel appreciated. I recommend everyone to join the Microsoft Community Champions program.
In short, this partnership with Microsoft has been a total win. It’s been fun, enlightening, and really pushed my professional growth, connecting me more with the Azure world.
Sumit: Glad to hear that. Community work is an integral part of our culture and having said that, is there any advice you would like to give to your fellow peers who are interested in contributing to open-source content?
Carlos: For anyone thinking about diving into open-source content, I say, yes – jump right in! Getting involved in open-source is a game-changer. It’s great for personal growth and getting noticed professionally because when you contribute, you’re not just visible to that project’s community, but also to others in similar fields and folks interested in your work.
And here’s the cool part: you don’t need to be a pro to make a real difference. Just by jumping in, sharing ideas, and doing what you can, you start building a reputation as a knowledgeable and dedicated contributor. And that can happen even if you’re still learning.
Plus, open-source is all about teamwork with a diverse bunch of people from all sorts of backgrounds. It’s an awesome way to expand your network and polish those team skills, which are super important in any job.
So, my advice? Go for it! It’s a rewarding journey that opens up loads of opportunities.
Sumit: Thank you, Carlos – both for your insight and motivation! We’d also like to understand the person behind all this great work. Do you mind sharing something about yourself outside of work?
Carlos: When I’m off the clock, I really focus on staying healthy and connecting with my family and friends. It’s all about finding that sweet spot between work and personal life, you know?
I used to be big on running, but these days, I’m more into chill walks. They’re awesome for getting some fresh air, clearing my head, and keeping fit. Plus, it’s a great way to just slow down and enjoy the moment. Meditation’s another big thing for me. It’s been a game-changer for my mental health, keeping me cantered and sharp, both in my personal life and at work.
And I love to read! Lately, I’ve been diving into Stoicism. It’s fascinating stuff – talks a lot about resilience, virtue, and just living a good life. It’s not just brain food; it’s really helped me grow as a person. So yeah, my downtime’s all about doing things that bring me joy and balance. Keeps me energized for everything else!
Sumit: Same goes for me as well. I love taking my amazing peaceful walks with my dog! It’s so rejuvenating. Thank you for sharing a part of your life with us. It was wonderful getting to know you. Before we wrap up, how would you summarize your experience being a Community Champion and a selfless leader who helps the tech ecosystem in various ways?
Carlos: Looking back on my contributions, what really stands out is the importance of sharing knowledge, keeping an active online profile, and building a solid professional brand. It’s about more than just you – it’s how you fit into and enrich the community, whether it’s with DOJO or Microsoft Learn.
Sharing isn’t just passing on info; it’s about creating a learning environment where everyone benefits. Engaging on platforms like Microsoft Learn is awesome for this – you’re both teaching and learning, and that’s a win-win. Having a strong online presence has been key for me. It’s not just about visibility; it’s about connecting, staying updated, and really seeing your impact. These platforms are more than Q&A sites – they’re where professional relationships and reputations are built.
And it’s not just about what you gain. Being part of a community means contributing to something bigger, and there’s a huge sense of fulfillment in that. It’s all about giving back and watching the community grow. I would suggest everyone to join the program and help the community grow.
Sumit: Thank you, Carlos, for your time and for all the hard work you’ve dedicated to helping the tech community. It was really nice to meet you.
Keep up with Carlos:
Personal blog: https://www.soysoliscarlos.com/
LinkedIn: https://www.linkedin.com/in/soysoliscarlos/
Twitter: https://twitter.com/soysoliscarlos
Credly: https://www.credly.com/users/soysoliscarlos/badges
To learn more about:
Contributing to Microsoft Learn, visit Microsoft Learn Contributor Home.
Contribute to the Microsoft Learn Q&A by joining the Microsoft Community Champions program using nomination form.
Microsoft Tech Community – Latest Blogs –Read More
Introducing the new Microsoft Copilot experience in Teams
Starting today, Copilot for Microsoft 365 users will begin to see a new Copilot experience in Microsoft Teams. Here’s what you need to know.
What’s the new Copilot experience in Teams?
The new Copilot experience is an improved version of the Copilot app in Teams that you may have used before (formerly known as Microsoft 365 Chat). It offers the same functionality and content access as the current app, but with additional benefits, including:
Better prompts, including details specific to you like the people you work with, your meetings, and your files.
Ability to see your Copilot chat history
Access to a library of prompts via Copilot Lab
An image of the Microsoft Copilot app in Teams, responding to a question based on the user’s Graph data
How is it different from the current experience in Teams?
It’s better than the current Microsoft 365 Chat in Teams. The new Copilot in Teams is easier to find, to use, and has better functionality for a better experience.
This will give you the same Copilot experience in Teams as you get from microsoft365.com, Bing, and copilot.microsoft.com.
What’s the difference between the Copilot app in the Teams app store and the Copilot pinned above chats?
They’re the same, and it’s up to you how you’d like to use Copilot.
The new Copilot app experience is an improved version of the previous M365 Chat app. If you still have Microsoft 365 Chat (or M365 Chat), this is the older version and we recommend unpinning.
When will this be available?
The new pinned Copilot app in Teams is rolling out now.
Where can I find it and how do I get started?
If you have a Copilot for Microsoft 365, the new app will be automatically pinned above your chats. Just open Teams, select “chats” and you’ll see Copilot. Open Copilot and start catching up, creating, and asking! Learn more.
Microsoft Tech Community – Latest Blogs –Read More
SQL Server – Minimum downtime schema updates
Introduction and Motivation
Many customers want to deploy application and database schema updates to a production environment with zero or minimal downtime. The SQL Server dev team has done a lot of work to reduce or eliminate locking during schema updates (i.e. add a column), but there are still situations where such schema changes can have a direct and negative impact on production workloads.
One model that has emerged to facilitate minimal downtime deployments is the Blue/Green model. This technique was described in Continuous Delivery by Jez Humble and David Farley and Martin Fowler’s Blue Green Deployment model. The basic concept is that you have two parallel systems; the blue system is the current production, while the green system is kept up to date with the DML changes on the blue. By making this green update process asynchronous, blocking schema changes can be made on green and then the data changes to the blue database can be caught up afterward.
For application servers, you can either have a parallel set of blue and green servers, unless you can simultaneously deploy green application updates to blue servers. The challenge is how to seamlessly migrate users from the blue to the green version of the application, since in most cases, the application maintains some kind of state. Obviously, there may be timing issues and conflicting write scenarios, but this is outside of the scope of this blog. In this blog we will focus on the database tier.
Michael J Swart, describes a blue/green type deployment, but his company does not actually use separate blue and green databases, but instead use an “aqua” database with versioned SQL objects. Martin Fowler suggested potentially making the database read-only during the transition, but that would be very difficult to achieve, so instead Michael’s company decided to combine multiple versions into a single database. This technique requires very careful planning of schema changes and may even preclude certain types of changes.
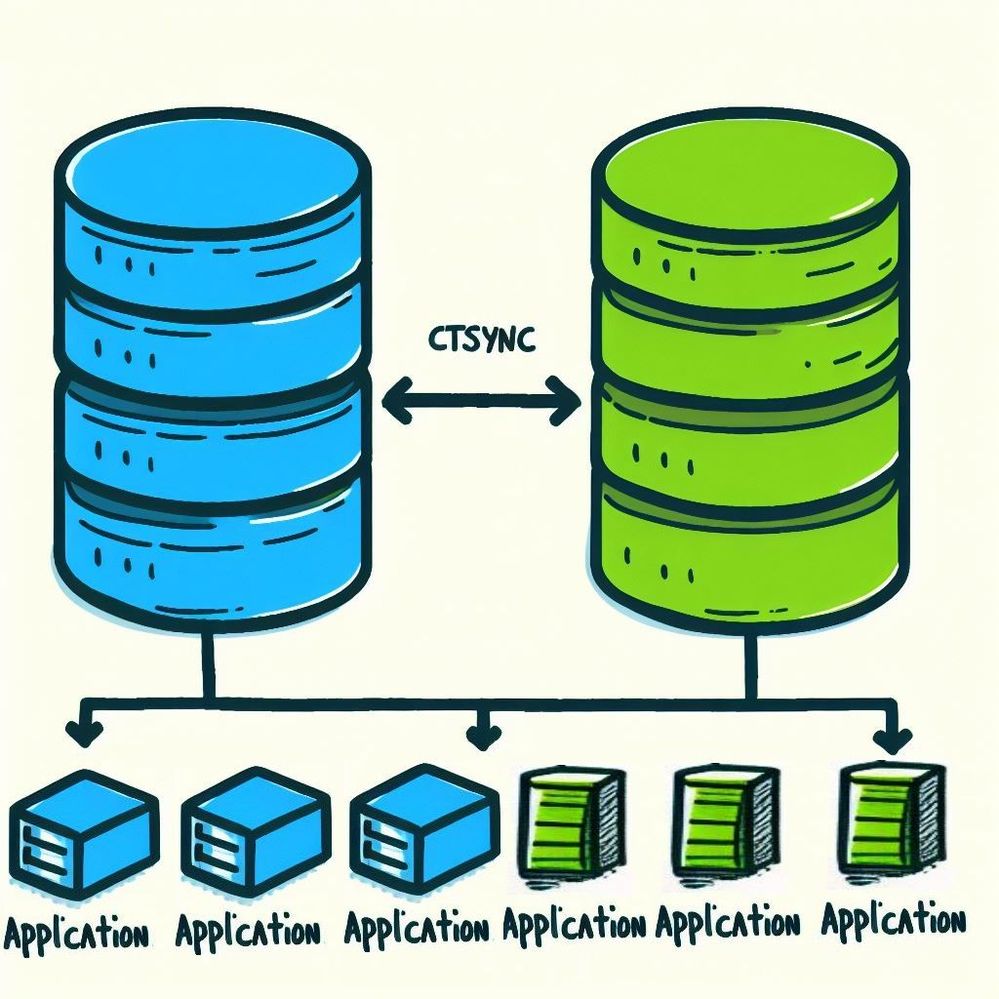
In this blog we want to explore the ability to do a full blue/green set of databases and how we can enable change propagation from blue to green databases using an asynchronous update method with minimal performance impact on the blue server.
One option worth exploring that may offer an alternative to handling change data and schema changes is a combination of Azure Data Factory (ADF) – Native Change Data Capture (CDC) and ADF Data Flow – Schema Drift features.
In developing this Proof of Concept (POC) application, we considered using Availability Groups (AGs), Replication, Change Data Capture (CDC) and Change Tracking (CT). The synchronous nature of AGs and the fact that the secondary (green) is read only disqualifies using them in this application. Replication and CDC both turn on verbose logging and require a logreader etc. therefore we decided that CT was the lighter weight solution that we would focus on.
The key requirement of the POC was to allow green schema changes without breaking the data change synchronization from blue. Not only do we need to be able to handle any schema differences between tables in blue and green, but we need to be able to pause the update activity during impactful schema changes.
During a review of the initial solution, it became clear that there was a requirement of additional column mapping capabilities from blue to green, i.e. the ability to replace a column with a primary key from a lookup table using the original column value, the ability to rename columns, change column types and split columns between two tables.
The result of our POC work is a .NET 7 C# console application that uses an application configuration file and an optional Excel file to drive the synchronization and mapping process from Blue to Green. Although .Net 7 is cross platform, the OLEDB driver used to read Excel is Windows only.
Once the switch over from Blue to Green happens, the intent behind this design is to start the process again by using a backup of the new Blue database, restore it over the old Blue database making it the new Green database. This would likely be easier than trying to synchronize schema by applying all of the change scripts applied to the Green and then synchronizing the data.
Application Installation
There is no installation required, just unzip the application into a folder. The installation includes an application configuration (app.config) file and optional Excel file. The app.config includes blue (source) and green (target) connection strings, the last synchronization version starting point, optional Excel input and several other parameters:
The input Excel file allows five mapping operations from blue to green (operation input column):
N = Name change.
V = Write CT current Version into a new column.
T = Type change.
S = Split column.
L = Replace column with Lookup.
The input spreadsheet has the following columns:
The application assumes that Change Tracking has been turned on and at least one table has been enabled for change tracking (see script in Appendix A). At the app.config configurable wait interval, the application checks if there have been any data changes made in the blue environment and if so, it will bulk insert the changes into a staging table in the green database, from where it will apply the changes to the green table(s). In this way, synchronization between Azure SQL DB databases is also supported.
Tables are processed in dependency order, so if there are foreign key (FK) constraints defined, the “dimension” table insert, and update operations will be processed first and then the referenced “fact” tables will be processed. For dimension tables with references, the row deletes from those tables will be deferred until after the dependent fact tables are processed, to avoid FK delete conflicts.
To avoid processing changes more than once, when starting a synchronization, the application gets the current change tracking version and only processes changes between the previous sync and this version. This avoids the need to use read only snapshot isolation (RCSI) during change processing. There is also some additional processing done on the green database, to avoid duplicate inserts and updates of non-existing records, to ensure the set operations succeed and are not rolled back.
To run the application, make the appropriate changes to the app.config file, the optional Excel file and run the application. While the application is running the following single key commands are available:
X – Exit
E – Reload Excel Mapping File
T – Shows Statistics at a Table level – i.e. DML operations per table.
S – Shows Total Statistics – i.e. Total DML operations.
P – Pause synchronization
R – Resume synchronization
The application creates an XEvent listener on the green database to monitor schema changes to tables. When a change tracked table is modified the application automatically reloads the metadata for the green table and re-evaluates the column mappings. To prevent application failures, you should pause synchronization during green schema modifications.
Every time there is a synchronization, a console message is written that includes the starting and ending version and the number of inserts, updates, and deletes. The number of deletes has two numbers, the total deletes, and the number of deferred deletes (in brackets).
The total operations are displayed when the applications exits but are also available during application execution using the T command for totals by table or the S command for overall totals.
The sample application can be downloaded here: CTSync application.
Note: The sample application is a Proof of Concept to explore the feasibility of the technique proposed. It comes with no warrantees or support, therefore use it at your own risk. There are additional details in the User’s Guide included in the package. For information related to support for this tool, please refer the license agreement that is included in the download.
Feedback and suggestions
If you have feedback or suggestions for improving this team asset, please contact the Azure Databases SQL Customer Success Engineering Team. Thank you for your support!
Microsoft Tech Community – Latest Blogs –Read More

Converting an AWS Lambda Function in Go into an Azure Function using LLMs
Converting an AWS Lambda into an Azure Function using LLMs in Go
Disclaimer: This article is an experimental implementation about applying LLMs to convert AWS Lambda functions into Azure Functions. It is not intended as a defined guide for the process and does not guarantee successful conversion. The outcome depends on the specific code you intend to convert and the LLM that you are using.
What would it take to convert a Lambda Function into an Azure Function?
How does a Lambda look like?
import (
“context”
“fmt”
“github.com/aws/aws-lambda-go/lambda”
)
type MyEvent struct {
Name string `json:”name”`
}
type MyResponse struct {
Message string `json:”message”`
}
func HandleRequest(ctx context.Context, event *MyEvent) (*MyResponse, error) {
if event == nil {
return nil, fmt.Errorf(“received nil event”)
}
message := fmt.Sprintf(“Hello %s!”, event.Name)
return &MyResponse{Message: message}, nil
}
func main() {
lambda.Start(HandleRequest)
}
func () error
func (TIn) error
func () (TOut, error)
func (context.Context) error
func (context.Context, TIn) error
func (context.Context) (TOut, error)
func (context.Context, TIn) (TOut, error)
What should be the result?
import (
“fmt”
“net/http”
“github.com/gin-gonic/gin”
)
type MyEvent struct {
Name string `json:”name”`
}
type MyResponse struct {
Message string `json:”message”`
}
func HandleRequest(ctx *gin.Context) {
if ctx.Request.Body == nil {
errorMsg := “received nil event”
ctx.JSON(http.StatusBadRequest, gin.H{“error”: errorMsg})
return
}
var event MyEvent
err := ctx.ShouldBindJSON(&event)
if err != nil {
errorMsg := fmt.Sprintf(“error on reading request body: %vn”, err.Error())
ctx.JSON(http.StatusBadRequest, gin.H{“error”: errorMsg})
return
}
message := fmt.Sprintf(“Hello %s!”, event.Name)
ctx.JSON(http.StatusOK, &MyResponse{Message: message})
}
func main() {
r := gin.Default()
r.Handle(http.MethodPost, “/HandleRequest”, HandleRequest)
r.Run()
}
The attempts
Chain-of-Thought (CoT) Prompt
Few shots using an example selector
Fine tuning
The solution
Language agent tree search
Simple prompt
You will be given a lambda function code. Rewrite the code without using lambda code and using a GinGonic server instead.
import (
“fmt”
“net/http”
“github.com/gin-gonic/gin”
)
type MyEvent struct {
Name string `json:”name”`
}
type MyResponse struct {
Message string `json:”message”`
}
func HandleRequest(c *gin.Context) {
var event MyEvent
if err := c.ShouldBindJSON(&event); err != nil {
c.JSON(http.StatusBadRequest, gin.H{“error”: err.Error()})
return
}
message := fmt.Sprintf(“Hello %s!”, event.Name)
c.JSON(http.StatusOK, MyResponse{Message: message})
}
func main() {
router := gin.Default()
router.POST(“/handle-request”, HandleRequest)
router.Run() // By default, it listens on :8080
}
and intuitive unit tests for functions. You will be given a Go AWS Lambda function, that
is being converted to a GinGonic http server. Your job is to generate a comprehensive set
of tests to ensure its functionality remains consistent. The tests should cover all major
functionality of the function, including error handling, input validation, and expected output.
Here is the Go code for the AWS Lambda function:
{{lambdaCode}}
Here is the Go code for the GinGonic http server:
{{azureCode}}
import (
“bytes”
“net/http”
“net/http/httptest”
“testing”
“github.com/gin-gonic/gin”
“github.com/stretchr/testify/assert”
)
func setupRouter() *gin.Engine {
gin.SetMode(gin.TestMode)
r := gin.Default()
r.POST(“/event”, HandleRequest)
return r
}
func TestHandleRequest_Successful(t *testing.T) {
router := setupRouter()
w := httptest.NewRecorder()
body := bytes.NewBufferString(`{“name”:”John Doe”}`)
req, _ := http.NewRequest(“POST”, “/event”, body)
req.Header.Set(“Content-Type”, “application/json”)
router.ServeHTTP(w, req)
assert.Equal(t, http.StatusOK, w.Code)
assert.JSONEq(t, `{“message”:”Hello John Doe!”}`, w.Body.String())
}
func TestHandleRequest_BadRequest(t *testing.T) {
router := setupRouter()
w := httptest.NewRecorder()
body := bytes.NewBufferString(`{“nom”:”John Doe”}`) // Incorrect JSON field name
req, _ := http.NewRequest(“POST”, “/event”, body)
req.Header.Set(“Content-Type”, “application/json”)
router.ServeHTTP(w, req)
assert.Equal(t, http.StatusBadRequest, w.Code)
}
func TestHandleRequest_EmptyBody(t *testing.T) {
router := setupRouter()
w := httptest.NewRecorder()
body := bytes.NewBufferString(`{}`) // Empty JSON body
req, _ := http.NewRequest(“POST”, “/event”, body)
req.Header.Set(“Content-Type”, “application/json”)
router.ServeHTTP(w, req)
assert.Equal(t, http.StatusOK, w.Code)
assert.JSONEq(t, `{“message”:”Hello !”}`, w.Body.String()) // Expect default behavior for empty name
}
import (
“net/http”
“net/http/httptest”
“strings”
“testing”
“github.com/gin-gonic/gin”
“github.com/stretchr/testify/assert”
)
func TestHandleRequest(t *testing.T) {
type args struct {
request *http.Request
}
tests := []struct {
name string
request func() *http.Request
expectedCode int
expectedBody string
}{
{
name: “success”,
request: func() *http.Request {
req := `{“name”:”Ana”}`
return httptest.NewRequest(http.MethodPost, “/handle”, strings.NewReader(req))
},
expectedCode: http.StatusOK,
expectedBody: `{“message”:”Hello Ana!”}`,
},
}
for _, tt := range tests {
t.Run(tt.name, func(t *testing.T) {
router := gin.Default()
router.POST(“/handle”, HandleRequest)
w := httptest.NewRecorder()
httpHandler := router
httpHandler.ServeHTTP(w, tt.request())
assert.Equal(t, tt.expectedCode, w.Code)
assert.Equal(t, tt.expectedBody, w.Body.String())
})
}
}
Feedback: |
TestsPassed: … <The code for the test I manually added>
TestsFailed: … <The code for the auto-generated one>
ErrorTrace:
C:/Users/XXXXX/AppData/Local/Temp/go-lats/lats_test.go:44
Error: Not equal:
expected: 400
actual : 200
Test: TestHandleRequest_BadRequest
Score: 0.75
series of unit tests. Your goal is to write a few sentences to explain why your
implementation is wrong as indicated by the tests. You will need this as a hint when you
try again later. Only provide the few sentence description in your answer, not the
implementation.
{{examples}}
[function impl]:
{{azure_code}}
[unit test results]:
{{feedback}}
[self-reflection]:”
request (such as wrong field names), the error should be reported with a status code of
`http.StatusBadRequest`. However, the failing unit test `TestHandleRequest_BadRequest`
suggests that this behavior is not occurring as expected. The test sends a JSON body with
an incorrect field name (`”nom”` instead of `”name”`) and expects a
`http.StatusBadRequest` status code due to binding failure, but the test reports receiving
a `http.StatusOK` status code instead. This indicates that the `ShouldBindJSON` method
might not be detecting the discrepancy between the expected and received JSON fields or
the error handling logic after the `ShouldBindJSON` call is not functioning correctly.
You are an AI Go assistant. You will be given your past function implementation, a
series of unit tests, and a hint to change the implementation appropriately. Write your
full implementation, Rewrite the code without using lambda code and using a GinGonic
server instead. Do not by any chance use lambda code.
Use a Go code block to write your response. For example:
“`go
func main() {
fmt.Println(“Hello, World!”)
}
{{examples}}
[user message]:
{{lambda_code}}
[assistant message]:
{{azure_code}}
[user message]:
[unit test results from previous impl]:
{{feedback}}
[assistant message]:
[reflection on previous impl]:
{{self-reflection}}
[user message]:
Try to convert this code again:
{{lambda_code}}
import (
“fmt”
“net/http”
“github.com/gin-gonic/gin”
)
type MyEvent struct {
Name string `json:”name”`
}
type MyResponse struct {
Message string `json:”message”`
}
// HandleRequest processes the event and returns a response
func HandleRequest(c *gin.Context) {
var event MyEvent
// Bind the JSON to the struct; if nil or incorrect, return an error.
if err := c.ShouldBindJSON(&event); err != nil {
c.JSON(http.StatusBadRequest, gin.H{“error”: err.Error()})
return
}
// Check if the event is nil or the name is an empty string
if event.Name == “” {
// Respond with an error message if Name is empty
c.JSON(http.StatusBadRequest, gin.H{“error”: “name field is required”})
return
}
// Constructing the message
message := fmt.Sprintf(“Hello %s!”, event.Name)
response := MyResponse{Message: message}
// Sending back the response as JSON
c.JSON(http.StatusOK, response)
}
func main() {
// Set up Gin router
r := gin.Default()
// Define POST route
r.POST(“/event”, HandleRequest)
// Run the Gin server on a specified port
r.Run(“:8080”)
}
Microsoft Tech Community – Latest Blogs –Read More
Join Teams for work or school meetings with personal account
We are improving the ways to join Teams meetings and have started to roll out an improvement enabling you to join a Teams meeting organized by a work or school user with your signed-in personal account. Read more on the Teams Insider blog and join Teams Insider to try this in Teams free on Windows 11 today!
Join Teams for work or school meeting with your personal account – Teams Insider
Microsoft Tech Community – Latest Blogs –Read More


