

Category: Microsoft
Category Archives: Microsoft
Auto Rollout of Conditional Access Policies in Microsoft Entra ID
The linked blog post was originally published on the Microsoft Security Blog on November 6th, 2023. We are sharing it again on the SMB Tech Community blog channel to ensure that all of our partners, who manage customer tenants and their conditional access policies, are informed about the upcoming policy changes.
Microsoft announced the automatic rollout of Conditional Access polices in Entra ID back in November 2023.
This feature automatically creates new Conditional Access policies in report-only mode for eligible customers of Microsoft Entra ID P1/P2 (M365 E3/M365 E5/M365 Business Premium). Between November 9th, 2023, and December 31st, 2023, policies were created in all eligible tenants. Customers will have at least 90 days to review the policy’s impact, manage exclusions, turn the policy on, or turn it off if necessary.
This 90-day period is ending soon, and enforcement will begin on a rolling basis in February and March 2024.
Recommended actions
To avoid any potential disruption to users’ access and to ensure these policies meet your organization’s needs, take the following actions within 90 days of their creation, before they’re moved to the On state:
Read the original blog announcement By Alex Weinert, Vice President, Identity Security
Review the effects and benefits of the new policies. If you don’t want us to enable them automatically, set them to Off. Or, you may set them to On at any time.
Customize these policies according to your specific needs, such as excluding emergency access accounts. If you require more extensive customizations, you can clone a policy and then make as many changes as you want.
Verify that all users covered by these policies have enabled and registered at least one multifactor authentication method. If necessary, run a registration campaign to set up the Authenticator app.
Microsoft Tech Community – Latest Blogs –Read More
Azure Arc-Enabled Kubernetes now available on Azure Marketplace!
Earlier this year, Kubernetes Apps in the Azure Marketplace became Generally Available on Azure Kubernetes Service (AKS). With Kubernetes Apps, teams can extend the capabilities of their deployments with a vibrant ecosystem of tested and transactable third-party solutions from industry-leading partners and popular open-source offerings. Now we’re excited to announce that we are expanding the range of offers to include Arc-Enabled Kubernetes. Azure Arc-Enabled Kubernetes allows you to connect, manage, and operate Kubernetes clusters and applications running anywhere using Azure Arc. With this offer expansion, Kubernetes apps on Marketplace can be deployed to Azure Arc-enabled Kubernetes connected clusters.
An Azure Arc-enabled Kubernetes connected cluster is a Kubernetes cluster that is hosted on an on-premises, hybrid, or multi-cloud environment and connected to Azure Arc. This type of cluster allows customers to manage their on-premises and cloud-based resources from a single unified platform. It also provides a secure, reliable, and cost-effective way to manage and deploy applications across multiple environments. The Azure Arc-enabled connected cluster is designed to simplify the deployment and management of hybrid cloud architecture. With the GA release of Azure Arc-Enabled Kubernetes connected cluster-based apps on Azure Marketplace, we have pre-defined billing meters available. Pre-defined meters allow customers to easily monitor and track their usage of Azure Arc-enabled connected clusters and applications. With usage based pre-and take action to optimize their cost savings. Get started today with Azure Arc-Enabled Kubernetes on Azure Marketplace!
For more information please visit:
Partners:
Overview of Azure Arc-enabled Kubernetes – Azure Arc | Microsoft Learn
Plan an Azure Container offer – Marketplace publisher | Microsoft Learn
Create an Azure Container offer on Azure Marketplace – Marketplace publisher | Microsoft Learn
Customers:
Deploy an Azure Kubernetes application programmatically by using Azure CLI – Azure Kubernetes Service | Microsoft Learn
Deploy a Kubernetes application from Azure Marketplace – Azure Kubernetes Service | Microsoft Learn
Samples:
This sample shows how ISV can prepare a Kubernetes application that can be installed on Azure Arc-enabled Kubernetes clusters.
This sample shows how ISV can prepare a Kubernetes application that can be installed on Azure Kubernetes Service (AKS) clusters or Azure Arc-enabled Kubernetes clusters.
Microsoft Tech Community – Latest Blogs –Read More
Important Announcement: Deprecation of Search-AdminAuditLog and New-AdminAuditLogSearch cmdlets
Dear customers,
We are writing to inform you about an upcoming change that will affect the way you access and manage your Exchange Online audit logs. Starting from April 30, 2024, we will be deprecating the following four cmdlets in the Exchange Online V3 module:
Search-AdminAuditLog
Search-MailboxAuditLog
New-AdminAuditLogSearch
New-MailboxAuditLogSearch
These cmdlets will no longer be available for use after this date, and you will need to switch to a Search-UnifiedAuditLog cmdlet or Microsoft Purview portal to access your audit logs.
Why are we deprecating these cmdlets?
We are working towards streamlining the audit log search experience of our customers by deprecating four older cmdlets in favor of a single, more powerful cmdlet: Search-UnifiedAuditLog. This cmdlet has been in use for a long time and offers several advantages, including:
Support for a wider variety of record types.
More filtering options to refine your search.
A range of output formats to suit your needs.
To make things simpler and more efficient, it’s recommended to use Search-UnifiedAuditLog from now on. You can learn more about this cmdlet and its usage here: Search-UnifiedAuditLog (ExchangePowerShell) | Microsoft Learn
What do you need to do if you are using the deprecated cmdlets?
If you are currently using any or all the above-mentioned cmdlets, you will need to take the following actions before April 30, 2024:
For Search-AdminAuditLog, you will need to replace it with Search-UnifiedAuditLog in your scripts or commands. To get the same results as Search-AdminAuditLog, you will need to set the RecordType parameter to ExchangeAdmin. For example, if you want to search for all Exchange admin actions in the last 30 days, you can use the following command:
Search-UnifiedAuditLog -RecordType ExchangeAdmin -StartDate (Get-Date).AddDays(-30) -EndDate (Get-Date)
For Search-MailboxAuditLog, you may also replace it with Search-UnifiedAuditLog. You can use the Exchange Online PowerShell V2 module to query the unified audit log for Exchange-related events. The cmdlet allows you to filter the results by record type, date range, user, and operation. For example, if you want to search for all Exchange mailbox actions in the last 30 days, you can use the following command:
Search-UnifiedAuditLog -RecordType ExchangeItem -StartDate (Get-Date).AddDays(-30) -EndDate (Get-Date)
You can also export the results to a CSV file for further analysis. To use the cmdlet, you need to have the View-Only Audit Logs or Audit Logs role assigned. You can learn more about the cmdlet here: Search-UnifiedAuditLog.
For New-MailboxAuditLogSearch and New-AdminAuditLogSearch you will need to use the Microsoft Purview portal to download your audit log report. The portal allows you to specify the criteria for your audit log search, such as date range, record type, user, and action. You can also choose to receive the report by email or download it directly from the portal. You can access the portal here: Microsoft Purview
We are also working on a new Audit Search API using Microsoft Graph which is expected to become available in Public Preview by February 2024. This will allow our customers to programmatically access the new async Audit Search experience, which also provides improved reliability and search completeness.
Note on default enablement of Auditing based on SKU:
To use the Search-UnifiedAuditLog command, auditing needs to be enabled for your tenant. Auditing is by default only enabled for the following SKUs:
A1/A3/A5/Edu
O365E1/E3/E5
Defender
If you are using any different SKU, you will need to enable the Auditing manually by following the steps as mentioned here: https://learn.microsoft.com/en-us/purview/audit-log-enable-disable. Please note To ensure you have access to the last 90 days of logs once the cmdlets are deprecated, it’s crucial to enable auditing before January 31st. If you enable auditing after this date, you’ll only have access to logs from the day you activate it and onwards.
We are here to help
We understand that this change may cause some inconvenience or disruption to your workflows, and we apologize for any inconvenience this may cause. We are committed to providing you with the best tools and services to manage your Exchange Online environment, and we appreciate your understanding and cooperation.
If you have any questions or feedback about this change, please feel free to contact us through our support channels or post a comment on this blog post. We are always happy to hear from you and assist you in any way we can.
Sincerely,
The Exchange Online Team
Microsoft Tech Community – Latest Blogs –Read More

Monitoring ExpressRoute: A Workbook Solution
Summary:
This workbook addresses a common challenge faced by organizations using Azure ExpressRoute to connect their on-premises networks to Azure cloud services. The challenge is to effectively visualize the health and availability of ExpressRoute components. To address this, we have developed a solution using Azure Monitor Workbooks. Our solution is an interactive workbook that provides comprehensive monitoring and troubleshooting for ExpressRoute, including the monitoring of break-glass metrics.
________________________________________________________________________________________________________________________________________________________
Introduction: Azure ExpressRoute Monitoring.
Azure ExpressRoute is a service that enables organizations to create private connections between their on-premises networks and Azure cloud services. ExpressRoute provides faster speeds, lower latencies, higher reliability, and more security than public internet connections. However, ExpressRoute also requires careful monitoring and optimization to ensure optimal performance and availability. Organizations need to track metrics such as ExpressRoute Circuit Status, BGP availability, total throughput, Primary and Secondary Connection traffic, packet drops, Gateway utilization and throughput, and Azure Firewall SNAT and throughput. They also need to troubleshoot issues such as circuit failures, gateway failures, routing errors, bandwidth bottlenecks, firewall misconfigurations, and more.
Problem: Disparate Monitoring of Azure ExpressRoute.
While there are currently tools such as network insights, which highlight resource health and detailed metrics for resources, such as ExpressRoute, the problem is that these existing tools for ExpressRoute monitoring and troubleshooting are not sufficient for a comprehensive view of the health of ExpressRoute components, they can also sometimes not be as user-friendly. For example, Azure Portal provides some basic metrics and alerts for ExpressRoute circuits and gateways, but they are not customizable or interactive. Azure Monitor provides more granular metrics and logs for ExpressRoute resources, but they are scattered across different sources and require complex queries to analyze. Azure Network Watcher provides some diagnostic tools for ExpressRoute connectivity issues, but they are not integrated with other monitoring data or visualizations.
Figure 1: network insights
______________________________________________________________________________________________________
Solution:
The solution is a workbook that we created using Azure Monitor Workbooks. A workbook is a type of dashboard that allows users to combine text, metrics, logs, queries, parameters, charts, tables, and other visualizations in a single view. The workbook that we developed is specifically designed for ExpressRoute monitoring and troubleshooting. It allows users to dynamically choose their ExpressRoute circuit and gateway from a drop-down list and see relevant metrics and logs in an interactive dashboard. The dashboard includes sections for:
– ExpressRoute Circuit Status: This section shows the status of the selected circuit (Enabled or Disabled) and the status of its primary and secondary connections (Active or Inactive). It also shows the BGP availability of the circuit (the percentage of time that BGP sessions are established between the circuit and Azure).
Figure 2: ExpressRoute Circuit Status
– BGP Availability: This section shows the percentage of time that the BGP sessions between the customer edge router and the Microsoft edge router are established and stable. BGP availability of an ExpressRoute depends on factors such as the physical connectivity, the routing configuration, and the network performance of the service provider and the customer.
100% means BGP is being handled properly on both connections of the ExpressRoute Circuit. If you are only using one of the redundant connections or have one of the peers is down during maintenance, 50% is expected.
Figure 3: BGP Availability for ExpressRoute Circuit
– Total Throughput: This section shows the total inbound and outbound throughput of the selected circuit in Mbps over a specified time range. The chart will burst as needed from Mbps to Gbps as it needs to scale.
Figure 4: Total Throughput of ExpressRoute Circuit
– Primary and Secondary Connection Traffic: This section shows the inbound and outbound traffic of the primary and secondary connections of the selected circuit in Mbps over a specified time range. If one connection is being exceeded and not load balancing to the other connection, there could be a configuration issue that should be investigated.
Figure 5: Primary and Secondary Connection Traffic for the ExpressRoute Circuit
– Packet Drops: This section shows the dropped bits/second for ingress and egress traffic through the circuit. This provides an easy way to monitor performance issues that may occur if you regularly need or exceed your circuit bandwidth.
Figure 6: Packet Drops for ExpressRoute Circuit
– Gateway Utilization and Throughput: This section shows the utilization (the percentage of allocated bandwidth used) and throughput (the actual bandwidth used) of the selected gateway in Mbps over a specified time range. It also shows the average latency of the gateway in ms over the same time range.
Figure 7: Gateway Utilization and Throughput
– Route Advertisements: ExpressRoute supports up to 4000 IPv4 prefixes and 100 IPv6 prefixes advertised to Microsoft through the Azure private peering. This limit can be increased up to 10,000 IPv4 prefixes if the ExpressRoute premium add-on is enabled. ExpressRoute accept up to 200 prefixes per BGP session for Azure public and Microsoft peering.
NOTE: BGP limits should be closely monitored because several of these limits are considered “Break-Glass” limits. For example, if you exceed 1000 address spaces being announced to on-prem via BGP, you will stop advertising BGP from that gateway due to an in-line resource limit. This number CANNOT be increased. To reduce the number of routes being advertised, consider using Route Summarization if possible.
Figure 8: Route Advertisements
– Azure Firewall SNAT and Throughput: This section shows the SNAT (Source Network Address Translation) sessions (the number of connections from on-premises sources to Azure destinations) and throughput (the inbound and outbound traffic) of the selected firewall in Mbps over a specified time range.Figure 9: SNAT and Throughput Metrics__________________________________________________________________________________________________________________________________
Conclusion:
This whitepaper has presented a problem faced by many organizations that use Azure ExpressRoute to connect their on-premises networks to Azure cloud services. The problem is how to monitor and optimize the performance and availability of their ExpressRoute circuits and gateways. The white paper has also introduced a solution that we developed using Azure Monitor Workbooks. The solution is a workbook that provides a comprehensive and interactive dashboard for ExpressRoute monitoring and troubleshooting. The white paper has explained how the workbook works, what benefits it offers, and how to use it.
Begin Monitoring ExpressRoute:
ExpressRoute Alerts:
ExpressRoute Circuits | Azure Monitor Baseline Alerts
ExpressRoute Gateways | Azure Monitor Baseline Alerts
ExpressRoute Ports | Azure Monitor Baseline Alerts
ExpressRoute Workbook Template:
Microsoft Tech Community – Latest Blogs –Read More
WMI command line (WMIC) utility deprecation: Next steps
Starting January 29, 2024, you’ll find Windows Management Instrumentation Command line (WMIC) feature “disabled by default” on the insider build of Windows 11. If your application is dependent on WMIC, please migrate away from it using this post as a guide. Let’s catch up on the latest and learn how you can use PowerShell and programmatic ways to query WMIC today.
What is WMI command line (WMIC)?
The WMI command line (WMIC) utility provides a command-line interface for Windows Management Instrumentation (WMI). It’s compatible with existing shells and utility commands.
Note: For more information and guidelines on how to use WMIC, see Using Windows Management Instrumentation command line and WMIC—take command-line control over WMI. Look for information on aliases, verbs, switches, and commands.
WMIC deprecation history
Deprecation is a term used here at Microsoft to describe the stage of the product lifecycle when a feature or functionality is no longer in active development and may be removed in future releases of a product or online service. Usually, it’s replaced by something better, more advanced, or more functional. The feature or capability will typically continue to work and is fully supported until it’s officially removed. The deprecation notification can span a few months or years. After removal, the feature or capability will no longer work.
The Windows Management Instrumentation Command line (WMIC) was deprecated in 2016.
Note: If needed, revisit the first two announcements in Features Removed or Deprecated in Windows Server 2012 and Deprecated features in the Windows client.
Since then, WMIC was converted into a Feature on Demand (FoD) as part of Windows 11, version 22H2. FoDs are Windows features that can be added at any time. And up until now, WMIC FoD has been “enabled by default” on Windows 11, version 22H2 and later versions. That’s changing in the coming year: in the next OS release of Windows 11, the WMIC FoD will be “disabled by default.” If you’re on the insider build, you’ll start seeing the change after January 29, 2024.
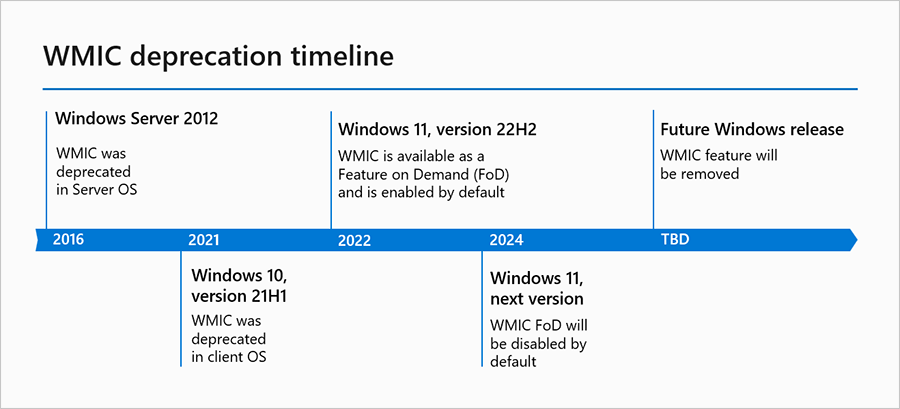
WMIC deprecation timeline
The timeline graphic showing past and future dates of WMIC deprecation.
Why was WMIC deprecated?
The WMIC tool is superseded by Windows PowerShell for WMI. We’ve been heavily investing in PowerShell in the past few years. The new tools provide a more efficient way of querying WMI. Removing a deprecated component helps reduce complexity while keeping you secure and productive. It will be removed from Windows in a future release.
What should I do if my app has a dependency on WMIC?
Please use WMIC workarounds such as PowerShell or programmatically query WMI.
PowerShell support
By default, PowerShell includes cmdlets for working with other technologies such as Windows Management Instrumentation (WMI). There are several native WMI cmdlets that exist in PowerShell without having to install any additional software or modules. Here’s an example of how you can replace a familiar WMIC query with a WMI PowerShell cmdlet.
WMIC
PowerShell
Wmic /namespace:\>namespace< PATH >Class< Get >Attribute1, Attribute2, … Attribute n<
Get-CIMInstance -namespace ‘ >namespace< ‘ -query ‘select * from >Class<‘ | ft >Attribute1, Attribute2, … Attribute n<
Alternatively, run the PowerShell command directly from the command prompt (given the setup has PowerShell capabilities):
C:WindowsSystem32> powershell -c “Get_CIMInstance -query ‘select * from <Class>’ | ft <Attribute1, Attribute 2, … Attribute n>”
Please look at Working with WMI – PowerShell for more information and examples.
Programmatic ways of using WMI
Apart from PowerShell and other tools like wbemtool.exe, you can use COM APIs to interact with WMI. Specifically, you can write scripts and programs in supported languages like C++, .Net, VBScript, etc.
Please refer to the following documentation for more guidance and examples:
Using WMI – Win32 apps
Creating WMI Clients – Win32 apps
Creating a WMI Application or Script – Win32 apps
Creating a WMI Application Using C++ – Win32 apps
WMI C++ Application Examples – Win32 apps
Are you ready for the next step in WMIC deprecation this year? For now, you’ll continue to receive WMIC inbox as-is in all the versions prior to Windows 11, version 22H2. As we evaluate the usage of WMIC, we’re also planning to remove it in a future Windows release.
Continue the conversation. Find best practices. Bookmark the Windows Tech Community, then follow us @MSWindowsITPro on X/Twitter. Looking for support? Visit Windows on Microsoft Q&A.
Microsoft Tech Community – Latest Blogs –Read More
Welcome to Windows Insider flighting on Windows Server
If you’re a Windows Server insider, you’re no stranger to preview builds. And if not, it’s never been a better time to start!
However, up until now, you had to download each new build manually and either perform a clean installation or do in-place upgrade by running Setup from the media. This is a familiar task, and it sure became easier and more reliable over years. But it’s time consuming and might be boresome—especially if you do it often. (By the way: thank you for testing those upgrades, this is a very important feature and reliability of it is paramount to us.)
But it’s not the only way anymore!
Those options are still available (and will remain available of course.) However, there’s one more option now, and we’re pretty excited about it. We hope you will be, too!
Enter “flighting”
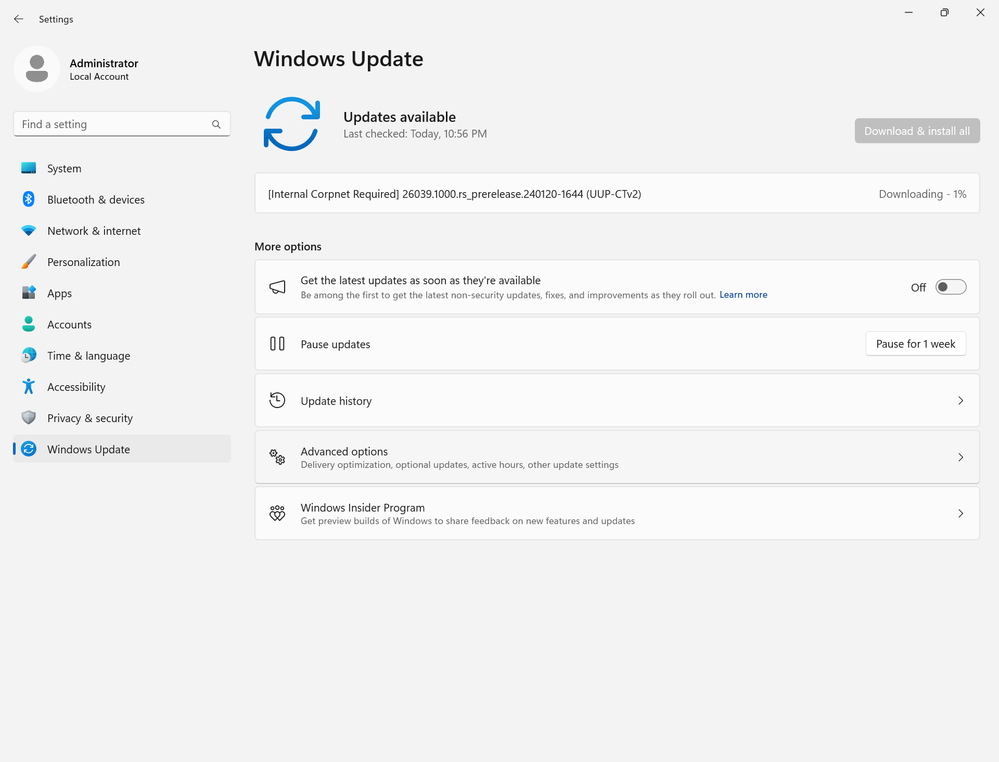
If you have a recent Windows Server insider build installed, you can now go to Windows Update in Settings app, and check for updates. This will bring you a newer build, as a Feature update (also known as “in place OS upgrade”.) The flight actually starts later today, to hold tight.
That’s it! The process is incredibly simple and has proven well for thousands of Windows 10 and Windows 11 insiders across the years.
For example, this way you can seamlessly upgrade from build 26010 (published on December 8th last year) to build 26040 which we’ve just published.
From now on, we plan to publish each new build to Windows Update (aka “flighting”) at the same time we publish the familiar ISO to our Windows Server insider community. It’s your choice to upgrade using Setup as before, or to use Windows Update for the same.
What does not change
The frequency on which new builds are published. We still plan to publish a new build for Windows Server insiders approximately every two weeks, although there can be delays or skipped weeks for various reasons.
You still need to check for updates manually. On Windows Server, the administrator is always in control, and the updates won’t be automatically installed. (Unless you enable automatic updates yourself.)
Nothing is changing for production servers running released OS versions, such as Windows Server 2022 or Windows Server 2019. This feature is only available in preview builds. In other words, you need to manually download and install a preview build to get started.
Flighting (OS upgrade via Windows Update) is currently available via Settings app. As such, it’s currently only for Windows Server with Desktop Experience.
Looking forward
With that said, this a new functionality for us, so there may be rough edges. Please share your thoughts with us and feedback on what worked well and what did not. We plan to expand this functionality over time, e.g., by adding more channels—just like flighting on Windows 11. If there’s a particular feature you’re looking for, don’t hesitate to drop us a line in the comments. And as Windows Server development is getting up to speed, stay tuned for more news!
Microsoft Tech Community – Latest Blogs –Read More
Important Announcement: Deprecation of Search-AdminAuditLog and New-AdminAuditLogSearch cmdlets
Dear customers,
We are writing to inform you about an upcoming change that will affect the way you access and manage your Exchange Online audit logs. Starting from April 30, 2024, we will be deprecating the following four cmdlets in the Exchange Online V3 module:
Search-AdminAuditLog
Search-MailboxAuditLog
New-AdminAuditLogSearch
New-MailboxAuditLogSearch
These cmdlets will no longer be available for use after this date, and you will need to switch to a Search-UnifiedAuditLog cmdlet or Microsoft Purview portal to access your audit logs.
Why are we deprecating these cmdlets?
We are working towards streamlining the audit log search experience of our customers by deprecating four older cmdlets in favor of a single, more powerful cmdlet: Search-UnifiedAuditLog. This cmdlet has been in use for a long time and offers several advantages, including:
Support for a wider variety of record types.
More filtering options to refine your search.
A range of output formats to suit your needs.
To make things simpler and more efficient, it’s recommended to use Search-UnifiedAuditLog from now on. You can learn more about this cmdlet and its usage here: Search-UnifiedAuditLog (ExchangePowerShell) | Microsoft Learn
What do you need to do if you are using the deprecated cmdlets?
If you are currently using any or all the above-mentioned cmdlets, you will need to take the following actions before April 30, 2024:
For Search-AdminAuditLog, you will need to replace it with Search-UnifiedAuditLog in your scripts or commands. To get the same results as Search-AdminAuditLog, you will need to set the RecordType parameter to ExchangeAdmin. For example, if you want to search for all Exchange admin actions in the last 30 days, you can use the following command:
Search-UnifiedAuditLog -RecordType ExchangeAdmin -StartDate (Get-Date).AddDays(-30) -EndDate (Get-Date)
For Search-MailboxAuditLog, you may also replace it with Search-UnifiedAuditLog. You can use the Exchange Online PowerShell V2 module to query the unified audit log for Exchange-related events. The cmdlet allows you to filter the results by record type, date range, user, and operation. For example, if you want to search for all Exchange mailbox actions in the last 30 days, you can use the following command:
Search-UnifiedAuditLog -RecordType ExchangeItem -StartDate (Get-Date).AddDays(-30) -EndDate (Get-Date)
You can also export the results to a CSV file for further analysis. To use the cmdlet, you need to have the View-Only Audit Logs or Audit Logs role assigned. You can learn more about the cmdlet here: Search-UnifiedAuditLog.
For New-MailboxAuditLogSearch and New-AdminAuditLogSearch you will need to use the Microsoft Purview portal to download your audit log report. The portal allows you to specify the criteria for your audit log search, such as date range, record type, user, and action. You can also choose to receive the report by email or download it directly from the portal. You can access the portal here: Microsoft Purview
We are also working on a new Audit Search API using Microsoft Graph which is expected to become available in Public Preview by February 2024. This will allow our customers to programmatically access the new async Audit Search experience, which also provides improved reliability and search completeness.
Note on default enablement of Auditing based on SKU:
To use the Search-UnifiedAuditLog command, auditing needs to be enabled for your tenant. Auditing is by default only enabled for the following SKUs:
A1/A3/A5/Edu
O365E1/E3/E5
Defender
If you are using any different SKU, you will need to enable the Auditing manually by following the steps as mentioned here: https://learn.microsoft.com/en-us/purview/audit-log-enable-disable. Please note To ensure you have access to the last 90 days of logs once the cmdlets are deprecated, it’s crucial to enable auditing before January 31st. If you enable auditing after this date, you’ll only have access to logs from the day you activate it and onwards.
We are here to help
We understand that this change may cause some inconvenience or disruption to your workflows, and we apologize for any inconvenience this may cause. We are committed to providing you with the best tools and services to manage your Exchange Online environment, and we appreciate your understanding and cooperation.
If you have any questions or feedback about this change, please feel free to contact us through our support channels or post a comment on this blog post. We are always happy to hear from you and assist you in any way we can.
Sincerely,
The Exchange Online Team
Microsoft Tech Community – Latest Blogs –Read More
Late January 2024 Viva Glint newsletter
Welcome to our late January 2024 edition of our Viva Glint newsletter. Our communications are full of information that help you get the most from your Viva Glint programs. You can always access the current edition and past editions of the monthly Viva Glint news update on our blog page.
Our next features release date
Viva Glint’s next features release is scheduled for February 10, 2024. Your dashboard will provide date and timing details two or three days before the release.
In your Viva Glint programs
Viva Glint admins can consent to use of external benchmarks, allowing Microsoft to use their survey data to refresh external benchmark suites. Consent is required to use external benchmarks in the platform. Once consent is given, a Viva Glint admin can select one or more external benchmarks for managers to use when viewing reports. Learn more about opting into using external benchmarks.
Need to delete a Distribution List? You can! Admins can delete a list from the Distribution Lists page, accessible from their admin dashboard. Names of any program using that list will display and you’ll need to remove the list from the target audience of those programs before the list can be deleted. Distribution List deletions are permanent, but the data of the members in the list is not deleted. Read about Distribution Lists.
Admins can also delete custom content resources that have been added to their Action Plans. As with Distribution Lists, a window displays any dependencies on the content, advising that any resource linked to this custom resource will have a broken link and also that all actions plans containing this resource will be deleted. Read about customizing action plans.
News from Viva People Science
The Microsoft Viva People Science team hosts events and authors blogs on current tips and trends to empower you to improve your business. Check out our most recent content:
Think like a People Scientist webinars premiere in February and were created based on customer feedback. These monthly webinars will deep-dive into topics you may encounter on your Viva Glint journey:
Think like a People Scientist: Understanding and interpreting your survey data
Think like a People Scientist: Telling a compelling story with your data
Think like a People Scientist: Influencing action without authority
Think like a People Scientist: Designing a survey that meets your organization’s needs
Look forward to an upcoming series on AI! We’re eager to provide you with the knowledge and resources to feel ready and excited for AI. We’ll cover topics such as AI and the employee experience, how to use AI in everyday work, and how to get your organization and employees AI-ready. Watch for our event listings in this monthly newsletter and on the Viva Glint Community.
Connect and learn with Microsoft and Viva Glint
Join us on February 6th for our first Viva Glint: Ask the Experts session! This inaugural session is geared toward new Viva Glint customers who are in the process of deploying their first programs. You must be registered to attend Ask the Experts. Bring your questions! Use this registration link.
We have platform trainings for Viva Glint admins and managers on Microsoft Learn! Use step-by-step guides to understand our dashboards, reports, and how to have quality team conversations.
For those in the NYC area, join us at Microsoft Discovery Day on January 29th. During this free half-day event, you will learn how AI-enabled technology helps you empower your workforce for innovation. Learn more here.
How are we doing?
Please share your feedback! Share with your Customer Experience Program Manager (CxPM) if you have one, or by emailing us here.
Also, if you do not want to receive these emails in the future, please let us know and you will be removed from the distribution list. Conversely, if there are people on your teams that should be receiving this monthly update, send us those emails and we’ll be sure they are added.
Viva Glint is committed to consistently improving the customer experience. The cloud-based platform maintains an agile production cycle with fixes, enhancements, and new features. Planned program release dates are provided with the best intentions of releasing on these dates, but dates may change due to unforeseen circumstances. Schedule updates will be provided as appropriate.
Microsoft Tech Community – Latest Blogs –Read More

Tech Mahindra and Microsoft enhance patient experiences with intelligent communication capabilities
In my first post after the holiday break, I am excited to announce a collaboration between Tech Mahindra and Microsoft to help enterprises realize the power of intelligent communication solutions.
Tech Mahindra offers innovative and customer-centric digital experiences, enabling enterprises, associates, and society to rise for a more equal world, future readiness, and value creation. It is a USD 6.5+ billion organization with 150,000+ professionals across 100 countries helping over 1250 global customers, including many Fortune 500 companies.
This collaboration will bring the strength of both Tech Mahindra and Azure Communication Services to deliver intelligent communication solutions to the Healthcare and Life Sciences industry. With over 400 customers and relationships with 200 health systems across 30 countries, Tech Mahindra has a global reach and a deep understanding of the unique challenges in the Healthcare and Life Sciences industry. Their commitment to innovation is evident in their 15+ global patents, which demonstrate their ability to develop cutting-edge solutions. With more than 30 healthcare and life sciences industry solutions, Tech Mahindra has a broad range of expertise that enables them to deliver customized solutions that address the specific needs of each customer.
“We at Tech Mahindra, are excited to collaborate with Azure Communication Services to empower enterprise communications capabilities of our Healthcare and Life Sciences customers. Azure Communication Services offers a cloud-based platform to facilitate video calling, voice and text messages. Customers are really looking forward to enhancing patient experience and overall productivity. With our deep domain expertise and Azure Communication Services, we are helping customers reimagine and create transformative communication solutions.” – Mahesh Rajamani, Chief Executive Officer – The HCI Group, Head of Tech Mahindra Healthcare & Life Sciences.
Through the value derived from intelligent communication capabilities, Tech Mahindra and Microsoft will help healthcare providers streamline communication between care teams, patients, and their families, enabling improved patient outcomes, increased patient satisfaction, and better overall healthcare management. With Azure Communication Services, this includes capabilities such as secure messaging, video conferencing, and voice calling, all of which can be directly built into existing healthcare systems.
“We’re thrilled to partner with Microsoft to bring Azure Communication Services to the forefront of healthcare communication! This collaboration empowers Tech Mahindra to deliver a game-changing experience for patients and providers. By combining Tech Mahindra’s healthcare expertise with the scalability, security, and patient-centric design of Azure Communication Services, we’re transforming the way healthcare connects and thrives toward a more connected and efficient healthcare ecosystem.” – Amit Kaistha, Global Head – Microsoft Business.
Tech Mahindra’s Azure Center of Excellence (CoE) is a testament to their longstanding partnership with Microsoft, which spans over 18 years. With over 2500 full-time employees dedicated to the CoE, Tech Mahindra has built an impressive team of experts who are well-versed in the latest Azure technologies and solutions. In addition, the CoE boasts over 1000 accredited associates, who have undergone rigorous training and certification to ensure they have the skills and knowledge needed to deliver world-class solutions to their clients.
“In Healthcare, communication with patients is very critical and care providers are really looking to enhance this experience. The use of cutting-edge technologies is a must for exceptional customer experience and Azure Communication Services offers a competent cloud-based platform to achieve this. Tech Mahindra has been at the forefront of driving innovation and delivering exceptional solutions and we are excited to partner with Microsoft to bring Azure Communication Services to our healthcare customers.” – Dinesh Kumar, Vice President – Growth Office (Healthcare and Life Sciences), Tech Mahindra.
Welcome Tech Mahindra to our Global System Integrator community of experts on all things Azure Communication Services alongside TCS, Capgemini, HCLTech and Wipro. We are thrilled to work with you!
Contact your Microsoft representative to learn about how Tech Mahindra and Azure Communication Services can help you communicate, serve, and engage with your customers and patients.
Learn more about Azure Communication Services
Learn more about Tech Mahindra
Microsoft Tech Community – Latest Blogs –Read More
Enhancing Cybersecurity: Geomatch Custom Rules in Azure WAF
Web application firewalls (WAFs) are essential tools for cyber security professionals who want to protect their web applications from malicious attacks. WAFs can filter, monitor, and block web traffic based on predefined as well as custom rules. Custom rules allow you to create your own unique rule that is evaluated for each request that passes through the WAF. These rules hold higher priority than rules in the managed rulesets and will be processed first. One of the most powerful features of Azure Web Application Firewall is the ability to create geomatch custom rules, which allow you to match web requests based on the geographic location of the source IP address. You may want to block requests from certain countries or regions that are known to be sources of malicious activity, or you may want to allow requests from specific locations that are part of your business operations. Geomatch custom rules can also help you comply with data sovereignty and privacy regulations, by restricting access to your web applications based on the location of the data subjects.
In this blog post, we will introduce you to the geomatch custom rules feature of Azure Web Application Firewall and show you how to create and manage them using the Azure portal, Bicep and PowerShell.
Geomatch Custom Rule Patterns
Geomatch custom rules can help you achieve various security objectives, such as blocking requests from high-risk regions and allowing requests from trusted locations. Geomatch custom rules can also be very useful for mitigating distributed denial-of-service (DDoS) attacks, which aim to overwhelm your web application with a large volume of requests from multiple sources. By using geomatch custom rules, you can quickly identify and block the regions that are generating the most DDoS traffic, while allowing legitimate users to access your web application. In this blog, we’ll cover different custom rule patterns that you can use to tune your Azure WAF using geomatch custom rules.
Scenario: Block traffic from all countries except “x”
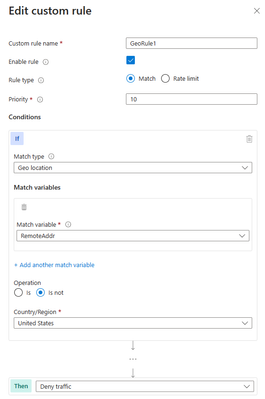
One of the common scenarios where geomatch custom rules can be very helpful is when you want to block traffic from all countries except a specific one. For example, if your web application is only intended for users in the United States, you can create a geomatch custom rule that blocks all requests that do not originate from the US. This way, you can reduce the attack surface of your web application and prevent unauthorized access from other regions. This specific technique uses a negating condition for this traffic pattern to work. To create a geomatch custom rule that blocks traffic from all countries except the US, check out the Portal, Bicep, and PowerShell examples below:
Portal example – Application Gateway:
Portal example – Front Door:
*Note: You’ll notice on the Azure Front Door WAF, we are using SocketAddr as the Match variable and not RemoteAddr. The RemoteAddr variable is the original client IP that’s usually sent via the X-Forwarded-For request header. The SocketAddr variable is the source IP address the WAF sees.
Bicep example – Application Gateway:
properties: {
customRules: [
{
name: ‘GeoRule1’
priority: 10
ruleType: ‘MatchRule’
action: ‘Block’
matchConditions: [
{
matchVariables: [
{
variableName: ‘RemoteAddr’
}
]
operator: ‘GeoMatch’
negationConditon: true
matchValues: [
‘US’
]
transforms: []
}
]
state: ‘Enabled’
}
Bicep example – FrontDoor:
properties: {
customRules: {
rules: [
{
name: ‘GeoRule1’
enabledState: ‘Enabled’
priority: 10
ruleType: ‘MatchRule’
matchConditions: [
{
matchVariable: ‘SocketAddr’
operator: ‘GeoMatch’
negateCondition: true
matchValue: [
‘US’
]
transforms: []
}
]
action: ‘Block’
}
PowerShell example – Application Gateway:
$RGname = “rg-waf “
$policyName = “waf-pol”
$variable = New-AzApplicationGatewayFirewallMatchVariable -VariableName RemoteAddr
$condition = New-AzApplicationGatewayFirewallCondition -MatchVariable $variable -Operator GeoMatch -MatchValue “US” -NegationCondition $true
$rule = New-AzApplicationGatewayFirewallCustomRule -Name GeoRule1 -Priority 10 -RuleType MatchRule -MatchCondition $condition -Action Block
$policy = Get-AzApplicationGatewayFirewallPolicy -Name $policyName -ResourceGroupName $RGname
$policy.CustomRules.Add($rule)
Set-AzApplicationGatewayFirewallPolicy -InputObject $policy
PowerShell example – FrontDoor:
$RGname = “rg-waf”
$policyName = “wafafdpol”
$matchCondition = New-AzFrontDoorWafMatchConditionObject -MatchVariable SocketAddr -OperatorProperty GeoMatch -MatchValue “US” -NegateCondition $true
$customRuleObject = New-AzFrontDoorWafCustomRuleObject -Name “GeoRule1” -RuleType MatchRule -MatchCondition $matchCondition -Action Block -Priority 10
$afdWAFPolicy= Get-AzFrontDoorWafPolicy -Name $policyName -ResourceGroupName $RGname
Update-AzFrontDoorWafPolicy -InputObject $afdWAFPolicy -Customrule $customRuleObject
Scenario: Block traffic from all countries except “x” and “y” that target the URI “foo” or “bar”
Another scenario where geomatch custom rules can be useful is when you want to block traffic from all countries except two or more specific ones, that target an explicit URI. For example, if your web application has specific URI paths that are only intended for users in the US and Canada, you can create a geomatch custom rule that blocks all requests that do not originate from either of these countries. With this pattern, request payloads from the US and Canada are still processed through the managed rulesets, catching any unwanted malicious attacks while still blocking requests from all other countries. This way, you can ensure that only your target audience can access your web application and avoid unwanted traffic from other regions. Furthermore, to reduce potential false positives, you can include the country code “ZZ” in the list to capture IP addresses that aren’t yet mapped to a country in Azure’s dataset. This specific technique also uses a negate condition for the Geo location type and a non-negate condition for our URI match. To create a geomatch custom rule that blocks traffic from all countries except the US and Canada to a specified URI, check out the Portal, Bicep, and PowerShell examples below:
Portal example – Application Gateway:
Portal example – Front Door:
Bicep example – Application Gateway:
properties: {
customRules: [
{
name: ‘GeoRule2’
priority: 11
ruleType: ‘MatchRule’
action: ‘Block’
matchConditions: [
{
matchVariables: [
{
variableName: ‘RemoteAddr’
}
]
operator: ‘GeoMatch’
negationConditon: true
matchValues: [
‘US’
‘CA’
]
transforms: []
}
{
matchVariables: [
{
variableName: ‘RequestUri’
}
]
operator: ‘Contains’
negationConditon: false
matchValues: [
‘/foo’
‘/bar’
]
transforms: []
}
]
state: ‘Enabled’
}
Bicep example – FrontDoor:
properties: {
customRules: {
rules: [
{
name: ‘GeoRule2’
enabledState: ‘Enabled’
priority: 11
ruleType: ‘MatchRule’
matchConditions: [
{
matchVariable: ‘SocketAddr’
operator: ‘GeoMatch’
negateCondition: true
matchValue: [
‘US’
‘CA’
]
transforms: []
}
{
matchVariable: ‘RequestUri’
operator: ‘Contains’
negateCondition: false
matchValue: [
‘/foo’
‘/bar’
]
transforms: []
}
]
action: ‘Block’
}
PowerShell example – Application Gateway:
$RGname = “rg-waf “
$policyName = “waf-pol”
$variable1a = New-AzApplicationGatewayFirewallMatchVariable -VariableName RemoteAddr
$condition1a = New-AzApplicationGatewayFirewallCondition -MatchVariable $variable1a -Operator GeoMatch -MatchValue @(“US”, “CA”) -NegationCondition $true
$variable1b = New-AzApplicationGatewayFirewallMatchVariable -VariableName RequestUri
$condition1b = New-AzApplicationGatewayFirewallCondition -MatchVariable $variable1b -Operator Contains -MatchValue @(“/foo”, “/bar”) -NegationCondition $false
$rule1 = New-AzApplicationGatewayFirewallCustomRule -Name GeoRule2 -Priority 11 -RuleType MatchRule -MatchCondition $condition1a, $condition1b -Action Block
$policy = Get-AzApplicationGatewayFirewallPolicy -Name $policyName -ResourceGroupName $RGname
$policy.CustomRules.Add($rule1)
Set-AzApplicationGatewayFirewallPolicy -InputObject $policy
PowerShell example – FrontDoor:
$RGname = “rg-waf”
$policyName = “wafafdpol”
$matchCondition1a = New-AzFrontDoorWafMatchConditionObject -MatchVariable SocketAddr -OperatorProperty GeoMatch -MatchValue @(“US”, “CA”) -NegateCondition $true
$matchCondition1b = New-AzFrontDoorWafMatchConditionObject -MatchVariable RequestUri -OperatorProperty Contains -MatchValue @(“/foo”, “/bar”) -NegateCondition $false
$customRuleObject1 = New-AzFrontDoorWafCustomRuleObject -Name “GeoRule2” -RuleType MatchRule -MatchCondition $matchCondition1a, $matchCondition1b -Action Block -Priority 11
$afdWAFPolicy= Get-AzFrontDoorWafPolicy -Name $policyName -ResourceGroupName $RGname
Update-AzFrontDoorWafPolicy -InputObject $afdWAFPolicy -Customrule $customRuleObject1
Scenario: Block traffic specifically from country “x”
A similar scenario where geomatch custom rules can be helpful is when you want to block traffic from a specific country or multiple countries. For example, if your web application is facing a lot of malicious requests from country X, you can create a geomatch custom rule that blocks all requests that originate from that country. This way, you can protect your web application from potential attacks and reduce the load on your resources. You can use this pattern to block multiple countries that you have validated as malicious or hostile. This specific technique uses a match condition for this traffic pattern to work. To create a geomatch custom rule that blocks traffic from country X, check out the Portal, Bicep, and PowerShell examples below:
Portal example – Application Gateway:
Portal example – Front Door:
Bicep example – Application Gateway:
properties: {
customRules: [
{
name: ‘GeoRule3’
priority: 12
ruleType: ‘MatchRule’
action: ‘Block’
matchConditions: [
{
matchVariables: [
{
variableName: ‘RemoteAddr’
}
]
operator: ‘GeoMatch’
negationConditon: false
matchValues: [
‘US’
]
transforms: []
}
]
state: ‘Enabled’
}
Bicep example – FrontDoor:
properties: {
customRules: {
rules: [
{
name: ‘GeoRule3’
enabledState: ‘Enabled’
priority: 12
ruleType: ‘MatchRule’
matchConditions: [
{
matchVariable: ‘SocketAddr’
operator: ‘GeoMatch’
negateCondition: false
matchValue: [
‘US’
]
transforms: []
}
]
action: ‘Block’
}
PowerShell example – Application Gateway:
$RGname = “rg-waf “
$policyName = “waf-pol”
$variable2 = New-AzApplicationGatewayFirewallMatchVariable -VariableName RemoteAddr
$condition2 = New-AzApplicationGatewayFirewallCondition -MatchVariable $variable2 -Operator GeoMatch -MatchValue “US” -NegationCondition $false
$rule2 = New-AzApplicationGatewayFirewallCustomRule -Name GeoRule3 -Priority 12 -RuleType MatchRule -MatchCondition $condition2 -Action Block
$policy = Get-AzApplicationGatewayFirewallPolicy -Name $policyName -ResourceGroupName $RGname
$policy.CustomRules.Add($rule2)
Set-AzApplicationGatewayFirewallPolicy -InputObject $policy
PowerShell example – FrontDoor:
$RGname = “rg-waf”
$policyName = “wafafdpol”
$matchCondition2 = New-AzFrontDoorWafMatchConditionObject -MatchVariable SocketAddr -OperatorProperty GeoMatch -MatchValue “US” -NegateCondition $false
$customRuleObject2 = New-AzFrontDoorWafCustomRuleObject -Name “GeoRule3” -RuleType MatchRule -MatchCondition $matchCondition2 -Action Block -Priority 12
$afdWAFPolicy= Get-AzFrontDoorWafPolicy -Name $policyName -ResourceGroupName $RGname
Update-AzFrontDoorWafPolicy -InputObject $afdWAFPolicy -Customrule $customRuleObject2
Geomatch custom rules and Priority
When using geomatch custom rules, it’s important to use the priority parameter wisely to avoid unnecessary processing or conflicts. The Azure WAF will determine the order that it evaluates the rules by using the priority parameter. This parameter is a numerical value that ranges from 1 to 100, with lower values indicating higher priority. The priority must be unique across all custom rules. You should assign higher priority to the rules that are more critical or specific for your web application security, and lower priority to the rules that are less essential or general. This way, you can ensure that WAF applies the most appropriate actions to your web traffic. Given our examples above, the scenario where we’ve identified an explicit URI path is the most specific and should have a higher priority rule than other types of patterns. This allows us to protect a critical path on the application with the highest priority while allowing more generic traffic to be evaluated across the other custom rules or managed rulesets.
Geomatch Custom Rule Anti-Patterns
On the other hand, there are some anti-patterns that you should avoid when using geomatch custom rules. These are scenarios where you set the custom rule action to allow instead of block. This can have unintended consequences, such as allowing a lot of traffic to bypass the WAF and potentially exposing your web application to other threats. Instead of using an allow action, you should use a block action with a negate condition, as shown in the previous patterns. This way, you can ensure that only traffic from the countries that you want is allowed, and all other traffic is blocked by the WAF.
Scenario: Allow traffic from country “x”
The first anti-pattern that you should be aware of is setting the geomatch custom rule to allow traffic from a specific country. For example, suppose you want to allow traffic from the United States because you have a large customer base there. You might think that creating a custom rule with the action “allow” and the value “United States” would achieve this. However, this is not the case. What this rule does is to allow all traffic that originates from the United States, regardless of whether it has a malicious payload or not, as the allow action bypasses further rule processing of the managed rulesets. Additionally, traffic from all other countries will still be allowed to be processed by the WAF, consuming resources. This exposes your web application to malicious requests from the United States that would otherwise be blocked by the WAF.
Portal example – Application Gateway:
Portal example – Front Door
Bicep example – Application Gateway:
properties: {
customRules: [
{
name: ‘GeoRule4’
priority: 20
ruleType: ‘MatchRule’
action: ‘Allow’
matchConditions: [
{
matchVariables: [
{
variableName: ‘RemoteAddr’
}
]
operator: ‘GeoMatch’
negationConditon: false
matchValues: [
‘US’
]
transforms: []
}
]
state: ‘Enabled’
}
Bicep example – FrontDoor:
properties: {
customRules: {
rules: [
{
name: ‘GeoRule4’
enabledState: ‘Enabled’
priority: 20
ruleType: ‘MatchRule’
matchConditions: [
{
matchVariable: ‘SocketAddr’
operator: ‘GeoMatch’
negateCondition: false
matchValue: [
‘US’
]
transforms: []
}
]
action: ‘Allow’
}
PowerShell example – Application Gateway:
$RGname = “rg-waf”
$policyName = “waf-pol”
$variable3 = New-AzApplicationGatewayFirewallMatchVariable -VariableName RemoteAddr
$condition3 = New-AzApplicationGatewayFirewallCondition -MatchVariable $variable3 -Operator GeoMatch -MatchValue “US” -NegationCondition $false
$rule3 = New-AzApplicationGatewayFirewallCustomRule -Name GeoRule4 -Priority 20 -RuleType MatchRule -MatchCondition $condition3 -Action Allow
$policy = Get-AzApplicationGatewayFirewallPolicy -Name $policyName -ResourceGroupName $RGname
$policy.CustomRules.Add($rule3)
Set-AzApplicationGatewayFirewallPolicy -InputObject $policy
PowerShell example – FrontDoor:
$RGname = “rg-waf”
$policyName = “wafafdpol”
$matchCondition3 = New-AzFrontDoorWafMatchConditionObject -MatchVariable SocketAddr -OperatorProperty GeoMatch -MatchValue “US” -NegateCondition $false
$customRuleObject3 = New-AzFrontDoorWafCustomRuleObject -Name “GeoRule4” -RuleType MatchRule -MatchCondition $matchCondition3 -Action Allow -Priority 20
$afdWAFPolicy= Get-AzFrontDoorWafPolicy -Name $policyName -ResourceGroupName $RGname
Update-AzFrontDoorWafPolicy -InputObject $afdWAFPolicy -Customrule $customRuleObject3
Scenario: Allow traffic from all counties except “x”
Another anti-pattern that you should avoid when using geomatch custom rules is to set the rule action to allow and specify a list of countries to exclude. For example, you might want to allow traffic from all countries except the United State, where the US is a country that you suspect of malicious activity. However, this approach can also have unintended consequences, such as allowing traffic from countries that you have not verified or validated as safe or legitimate or allowing traffic from countries that have low or no security standards, exposing your web application to potential vulnerabilities or attacks. As mentioned in the previous scenario, using the allow action for all countries except the US, indicates to the WAF to stop processing the request payloads against the managed rulesets. All rule evaluation will cease once the custom rule with allow is processed, thus exposing the application to unwanted malicious attacks.
Therefore, it is better to use a more restrictive and specific rule action, such as block, and specify a list of countries to allow with a negate condition. This way, you can ensure that only traffic from trusted and verified sources can access your web application, while blocking any suspicious or unwanted traffic.
Portal example – Application Gateway:
Portal example – Front Door:
Bicep example – Application Gateway:
properties: {
customRules: [
{
name: ‘GeoRule5’
priority: 21
ruleType: ‘MatchRule’
action: ‘Allow’
matchConditions: [
{
matchVariables: [
{
variableName: ‘RemoteAddr’
}
]
operator: ‘GeoMatch’
negationConditon: true
matchValues: [
‘US’
]
transforms: []
}
]
state: ‘Enabled’
}
Bicep example – FrontDoor:
properties: {
customRules: {
rules: [
{
name: ‘GeoRule5’
enabledState: ‘Enabled’
priority: 21
ruleType: ‘MatchRule’
matchConditions: [
{
matchVariable: ‘SocketAddr’
operator: ‘GeoMatch’
negateCondition: true
matchValue: [
‘US’
]
transforms: []
}
]
action: ‘Allow’
}
PowerShell example – Application Gateway:
$RGname = “rg-waf”
$policyName = “waf-pol”
$variable4 = New-AzApplicationGatewayFirewallMatchVariable -VariableName RemoteAddr
$condition4 = New-AzApplicationGatewayFirewallCondition -MatchVariable $variable4 -Operator GeoMatch -MatchValue “US” -NegationCondition $true
$rule4 = New-AzApplicationGatewayFirewallCustomRule -Name GeoRule5 -Priority 21 -RuleType MatchRule -MatchCondition $condition4 -Action Allow
$policy = Get-AzApplicationGatewayFirewallPolicy -Name $policyName -ResourceGroupName $RGname
$policy.CustomRules.Add($rule4)
Set-AzApplicationGatewayFirewallPolicy -InputObject $policy
PowerShell example – FrontDoor:
$RGname = “rg-waf”
$policyName = “wafafdpol”
$matchCondition4 = New-AzFrontDoorWafMatchConditionObject -MatchVariable SocketAddr -OperatorProperty GeoMatch -MatchValue “US” -NegateCondition $true
$customRuleObject4 = New-AzFrontDoorWafCustomRuleObject -Name “GeoRule5” -RuleType MatchRule -MatchCondition $matchCondition4 -Action Allow -Priority 10
$afdWAFPolicy= Get-AzFrontDoorWafPolicy -Name $policyName -ResourceGroupName $RGname
Update-AzFrontDoorWafPolicy -InputObject $afdWAFPolicy -Customrule $customRuleObject4
Conclusion
The Azure Web Application Firewall is a powerful tool for protecting your web applications from common threats and attacks and by using geomatch custom rules, you can fine-tune your security controls based on the geographic location of the requests. The patterns outlined help to maintain the effectiveness and performance of the Azure WAF when utilizing geomatch custom rules. You should always test your rules before applying them to production and monitor their performance and impact regularly. By following these best practices, you can leverage the power of geomatch custom rules to enhance your web application security.
Resources
Azure Web Application Firewall (WAF) v2 custom rules on Application Gateway | Microsoft Learn
Azure Web Application Firewall (WAF) Geomatch custom rules | Microsoft Learn
What is Azure Web Application Firewall on Azure Front Door? | Microsoft Learn
Web application firewall custom rule for Azure Front Door | Microsoft Learn
Geo-filtering on a domain for Azure Front Door | Microsoft Learn
Configure v2 custom rules using PowerShell – Azure Web Application Firewall | Microsoft Learn
Create and use v2 custom rules – Azure Web Application Firewall | Microsoft Learn
Configure an IP restriction WAF rule for Azure Front Door | Microsoft Learn
Microsoft Tech Community – Latest Blogs –Read More
Build your Web Apps faster with the Azure Cache for Redis: Quick Start Template
Are you a developer looking to quickly and securely spin up a Webapp with a database and cache? Look no further than the Azure Cache for Redis Quick Start Template, now available in the Azure Marketplace. This template allows developers to work across various databases and languages of their choice, making it easier than ever to get started.
The Quick Start Template is compatible with several popular programming languages, including **Java, .NET, Python, Go, PHP, and Node.js**. It also works with a variety of data services, such as **Azure SQL, Azure PostgreSQL, Azure MySQL, and Azure Cosmos DB for MongoDB**.
Azure Cache for Redis is a 1st party service that fully manages caching solutions based on open-source Redis, an in-memory data store that is commonly used for caching, message brokering, session management, and real-time data processing. The Quick Start Template lets you quickly and securely deploy an Azure Cache for Redis instance and connect it with your Webapp.
But that’s not all – the Azure Cache for Redis also offers several advanced features, such as data persistence, clustering, load balancing, and geo-replication, which make it easy to scale and deploy Redis-based solutions across multiple regions and data centers. Azure Cache for Redis can be used effectively with other Azure services, such as Azure App Service, Azure Kubernetes Service, Azure Functions, and Azure Logic Apps, enabling developers to easily incorporate caching into their applications without having to manage infrastructure or worry about scalability and availability.
And if you’re interested in learning more about the Azure Cache for Redis Quick Start Template, be sure to check out the upcoming Open at Microsoft episode that is all about this quick start template. The episode is hosted by Ricky Diep, Product Marketing Manager, and Catherine Wang, Senior Product Manager, and it’s a great opportunity to see the template in action and learn from the experts. In the episode, there will be a demo showcasing how Catherine quickly spun up a python web app using Azure Cache for Redis with PostgreSQL that is used for restaurant reviews.
In addition to its ease of use and advanced features, the Azure Cache for Redis Quick Start Template has several practical use cases that can enhance the performance and functionality of your web applications. For example:
Session Store: Storing user session data in Azure Cache for Redis can enhance web application performance by reducing the database server load, particularly beneficial for high-traffic or complex session data.
Message Broker: Azure Cache for Redis can also serve as a message queue broker for background processing tasks, allowing web applications to offload time-consuming tasks to background workers while maintaining reliability and scalability.
Distributed Caching: Implementing leaderboards, counters, or other real-time ranking systems can be achieved efficiently using Azure Cache for Redis, ensuring fast and accurate updates.
Content Cache: For web applications serving dynamic content, you can cache HTML fragments, page components, or entire rendered pages in Azure Cache for Redis. This approach can help offload the web server and reduce the generation time of dynamic content.
Cache-Aside is ideal for storing frequently accessed data like product catalogs, user profiles, or configuration settings. By caching this data in Azure Cache for Redis, you can reduce the latency associated with database queries. The Cache-Aside pattern is a smart caching strategy where the application itself is responsible for managing the cache. When a request for data arrives, the application first checks the cache. If the cache doesn’t contain the required data, the application retrieves the data from the primary data store, such as a database, and stores it in the cache for future use. This can improve performance and help maintain consistency between data held in the cache and data in the underlying data store.
So why wait? Head over to the Azure Marketplace and try out the Azure Cache for Redis Quick Start Template today!
TRY NOW
Resources
Learn More on Quick Deploy Template
Learn More on Azure Cache for Redis
Watch the Open at Microsoft Video
Microsoft Tech Community – Latest Blogs –Read More


