

Category: Microsoft
Category Archives: Microsoft
Announcing the availability of the new gMSA on AKS workshop
gMSA is the technology behind the support for Active Directory dependent applications to run on Kubernetes. Over time, we’ve been adding a lot of resources around it, such as PowerShell modules (to help with the configuration process), documentation, scripts, and more. The reason behind this is that on one side, gMSA is incredibly popular (of course, anyone trying to containerize a Windows app that relies on AD for authentication will use it), but also because it is somewhat complex to configure it. Setting up gMSA means you have to configure your Kubernetes cluster, the networking between the cluster and Domain Controller(s), the secret store (such as Azure Key Vault), the Domain Controller itself, and so on…
Because so many resources need to be configured, many customers have a hard time to see how gMSA actually works before doing it in production. Today, we’re glad to announce that you can now try gMSA on AKS with a guided workshop. This workshop still requires a subscription for you to use, but all the other configurations can be implemented by following the workshop’s instructions. We plan to upgrade this into a self-contained workshop in the future.
What is part of the workshop
This is an end-to-end workshop on which you can start with a net-new subscription (or an existing one, of course) and build everything from scratch. The workshop covers briefly what gMSA is and how it’s used.
The workshop has the following objectives:
Provide an overview of gMSA on AKS, necessary components, and how to set up an environment for a Windows app that requires Active Directory authentication.
Understand how the AksGMSA PowerShell module helps in the process of configuring gMSA on AKS.
Understand the flow of configuring gMSA on AKS and how the multiple resources interact with each other.
The workshop is divided into seven exercises:
Exercise 01 – Spinning up Azure environment
Here you will deploy the base services to get started. You will use a script to deploy the Resource Group, the Virtual Network and Subnet, the AKS cluster and the Windows node pool. The script will also deploy a VM to be used as domain controller.
Exercise 2 – Configure Active Directory
Here we will prepare the VM and the Active Directory domain to use gMSA. A script is provided to deploy AD into the VM.
Exercise 3 – Enable Azure Bastion to RDP into DC01 VM and take note of additional resources
To reduce costs, we will only use one VM in this workshop, so we will also use this VM (which is our Domain Controller) for other purposes – which is not recommended in production. To securely access the VM, we will enable Azure Bastion.
Exercise 4 – Configure the AksGMSA PowerShell module on the DC01 VM
This is where most of the gMSA configuration is passed to the AksGMSA PowerShell module on the DC01 VM. The provided script and module will set up gMSA on AKS later and in this exercise, we pass on the configuration we want to be used later.
Exercise 5 – Deploy gMSA on AKS and configure AD and Azure resources
This where the configuration for gMSA on AKS happens. Using the information provided before, we run the commands for the AksGMSA module and set up the gMSA on AKS, configure AD, create the Azure Key Vault, Managed Identity, and all other configurations.
Exercise 6 – Validate the deployment of gMSA on AKS
Once gMSA on AKS has been deployed and configured, you can use the AksGMSA module to validate the configuration and communication between the AKS cluster and the AD domain. This exercise uses the native commands on the module to validate everything is in place.
Exercise 7 – Deploy IIS with Windows authentication enabled
Validating that gMSA has been deployed correctly is not as cool as seeing an application working properly. In this exercise, we deployed a very simple, sample application to see the authentication actually happening. We deploy a Windows pod to the AKS cluster, with an IIS website setup to use Windows authentication and then open the website to see the authentication pop-up, provide the username and password, and see the website open.
At the end, there’s an exercise to clean up the environment and ensure you’re not being charged for this any further.
Hopefully this workshop provides a good overview of how gMSA on AKS works. Feel free to go wild and try different things, try your own app, your own set up. And let us know what you think and how we can improve not only the workshop itself but the whole gMSA on AKS experience.
Microsoft Tech Community – Latest Blogs –Read More
How to Convert Audio to .WAV for Speech Service Using MoviePy
Azure Speech Service offers robust speech recognition, translation, text-to-speech and many more capabilities, providing developers with powerful tools to integrate voice-based interactions into their applications.
However, to ensure seamless compatibility and optimal performance, Azure Speech Service requires audio files to adhere to specific standards regarding format, bitrate, sampling rate, and channel configuration. Let’s dive into how we can use Moviepy to convert your different audio files to Azure Speech Service Compatible.
Leveraging MoviePy for Audio Conversion
According to its documentation, MoviePy is a Python module for video editing, which can be used for basic operations (like cuts, concatenations, and title insertions), video compositing (a.k.a. non-linear editing), video processing, or to create advanced effects. It can read and write the most common video formats, including GIF.
MoviePy is a powerful Python module primarily designed for video editing but equally adept at manipulating audio. Let’s explore how MoviePy can help convert various audio formats to comply with Azure Speech Service requirements.
Understanding Azure Speech Service Audio Requirements
For the use case being discussed in this article, we would need to know the audio configurations. Azure Speech Service demands audio files in the WAV format with specific bitrate, sampling rate, and channel configurations. Here are the key criteria:
File Format: WAV (Microsoft PCM)
Bit Depth: 16-bit
Sampling Rate: 16 kHz or 8 kHz (some scenarios support 32 kHz or 48 kHz)
Channels: Mono or Stereo (Mono recommended for speech recognition)
Bitrate: 256 kbps (kilobits per second) for mono, 512 kbps for stereo
Codec: PCM (Pulse Code Modulation)
File Size: Generally, up to 4 GB for continuous recognition
Step-by-Step Guide
Now to convert your audio file in a different format to have these configurations, follow the steps below.
Step 1 – Install Moviepy
Begin by installing MoviePy using the command pip install moviepy in your terminal. This would install all the dependencies needed to run Moviepy in your Python environment along with Moviepy.
Step 2 – Import Required Functions
Import required attributes from MoviePy’s editor method, particularly AudioFileClip, which will help load and manipulate audio files. It has a method you can call to set the output file and format, bitrate and all configurations necessary.
from moviepy.editor import *
or
from moviepy.editor import AudioFileClip
Step 3 – Load the Audio File
Load your audio file using the AudioFileClip method. This method takes in the audio file path and loads up your audio file as a Moviepy AudioFileClip format that can be manipulated to the file format required for compatibility with Azure Speech Service API and/or SDK.
Assuming the file format is .ogg and the file is saved as audio.ogg, load the file as shown below. Ensure to use a relative path if the audio file is in a different directory from your Python script.
audioclip = AudioFileClip(“audio.ogg”)
Step 4 – Set Audio Configurations
Define the audio parameters necessary for compatibility as required for your solution.
audio_params = {
“codec”: “pcm_s16le”,
“fps”: 16000, # Set the desired sampling rate: 16000 Hz
# “fps”: 8000, # Alternatively, set the sampling rate to 8000 Hz
“nchannels”: 1, # Mono audio
“bitrate”: “16k” # Set the desired bitrate
}
Step 5 – Pass Configurations Parameters and Convert Audio
Define the file path for the output. Since we want to convert our audio file to .wav format, we would define a file with the extension .wav.
Pass the defined required audio parameters that you have defined to the write_audiofile method from AudioFileClip. This would convert the audio file to the extension you have defined in your output file path and also configure the audio to all the parameters you have set and passed into the method.
output_file = “audio.wav”
audioclip.write_audiofile(output_file, codec=audio_params[“codec”],fps=audio_params[“fps”],nbytes=2,bitrate=audio_params[“bitrate”])
Step 6 – Load Your New Audio File to Use with Azure Speech Service
Your new audio file should be located in the file path you have defined. If you followed the naming convention above, you would find your “audio.wav” file in the same directory as your python script/code. You can then load up this file with the Azure Speech Service SDK (for example) to create a simple transcription solution. A simple sample is found below:
After getting your Speech Service key and region from your Azure portal and saving them as environment variables, follow the code below to test run with your new audio file.
import os
import azure.cognitiveservices.speech as speechsdk
def recognize_from_file():
# This example requires environment variables named “SPEECH_KEY” and “SPEECH_REGION”
speech_config = speechsdk.SpeechConfig(subscription=os.environ.get(‘SPEECH_KEY’), region=os.environ.get(‘SPEECH_REGION’))
speech_config.speech_recognition_language=”en-US”
audio_config = speechsdk.audio.AudioConfig(filename=”audio.wav”)
speech_recognizer = speechsdk.SpeechRecognizer(speech_config=speech_config, audio_config=audio_config)
speech_recognition_result = speech_recognizer.recognize_once_async().get()
if speech_recognition_result.reason == speechsdk.ResultReason.RecognizedSpeech:
print(“Recognized: {}”.format(speech_recognition_result.text))
elif speech_recognition_result.reason == speechsdk.ResultReason.NoMatch:
print(“No speech could be recognized: {}”.format(speech_recognition_result.no_match_details))
elif speech_recognition_result.reason == speechsdk.ResultReason.Canceled:
cancellation_details = speech_recognition_result.cancellation_details
print(“Speech Recognition canceled: {}”.format(cancellation_details.reason))
if cancellation_details.reason == speechsdk.CancellationReason.Error:
print(“Error details: {}”.format(cancellation_details.error_details))
print(“Did you set the speech resource key and region values?”)
recognize_from_file()
This example uses the recognize_once_async operation to transcribe utterances of up to 30 seconds, or until silence is detected.
This sample code was taken from the Azure Speech Service Documentation. You can explore more on the Azure Speech Service through the documentation. You can also watch this tutorial on building transcription and translation services with the Azure Speech Service and Translator service from the video below.
<!–
%[https://youtu.be/ikNPMomeZKs?si=Bup8lJ5P-voImVqc]
–>
Conclusion
MoviePy simplifies the process of converting audio files to the precise format required by Azure Speech Service. By adhering to these guidelines and utilizing MoviePy’s flexibility, you can seamlessly prepare your audio data for optimal performance within Azure’s powerful Speech Service.
That’s it!!! We have successfully converted our audio to be compatible with Azure Speech Service.
Additional Resources
1. Recognize and convert speech to text using Python
2. Sign up for free Azure credits
3. Process and Translate Speech with Azure AI Speech Services
4. Get started with Azure Cognitive Services Speech
5. Translate speech with Azure AI Speech Service
Microsoft Tech Community – Latest Blogs –Read More
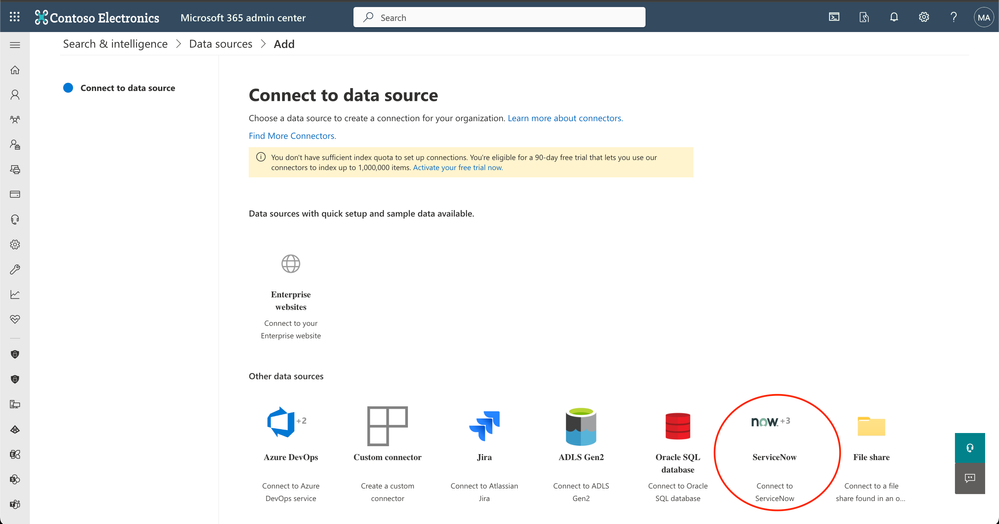
ServiceNow Tickets connector is generally available
We are excited to announce the launch of the Microsoft Graph connector for ServiceNow Tickets. Now you can index tickets from ServiceNow and end users can search for these tickets in Microsoft Search and Copilot.
Tickets is a system provided by ServiceNow for enterprises to manage and resolve IT issues efficiently. A ticket is a special document or record that captures details about incidents and requests. It is generated by employees or automated systems, which are then assigned to IT agents for resolution. For more details, check out this link.
How to configure the ServiceNow Tickets connector?
Navigate to the Connectors catalog page. Select ServiceNow and from the right panel, select ServiceNow Tickets. Follow the steps as mentioned in the ServiceNow Tickets Graph connector documentation.
Graph connectors catalog
ServiceNow Connectors
Key Features
1. Define users who can access tickets: The connector supports search permissions, ensuring that indexed tickets are only visible to users with appropriate access. You can select up to 25 properties to define who can access ServiceNow tickets in Microsoft Search & Copilot (Opened by, Assigned to, Resolved by, Last reopened by, and more)
Select permissions
2. Choose from multiple authentication methods: The connector supports multiple authentication methods, including Basic Authentication, ServiceNow OAuth, and Microsoft Entra ID OpenID Connect.
Authentication options
3. Select only the type of tickets you want to index: You can choose to index only incident tickets or change requests by selecting the appropriate table in ‘Select properties’ screen.
Select ticket types
We are sure you will find the ServiceNow Tickets Graph connector useful. We welcome your feedback and suggestions to improve it.
Get started
Refer to the ServiceNow Tickets documentation, to learn more about configuring the ServiceNow Tickets Graph connector.
Head to Search & Intelligence section in the M365 admin center to get started.
Also, check out documentation for Microsoft Graph connectors for ServiceNow Knowledge and Catalog.
ServiceNow Catalog Microsoft Graph connector | Microsoft Docs
ServiceNow Knowledge Microsoft Graph connector | Microsoft Docs
Microsoft Tech Community – Latest Blogs –Read More
How to Convert Audio to .WAV for Speech Service Using MoviePy
Azure Speech Service offers robust speech recognition, translation, text-to-speech and many more capabilities, providing developers with powerful tools to integrate voice-based interactions into their applications.
However, to ensure seamless compatibility and optimal performance, Azure Speech Service requires audio files to adhere to specific standards regarding format, bitrate, sampling rate, and channel configuration. Let’s dive into how we can use Moviepy to convert your different audio files to Azure Speech Service Compatible.
Leveraging MoviePy for Audio Conversion
According to its documentation, MoviePy is a Python module for video editing, which can be used for basic operations (like cuts, concatenations, and title insertions), video compositing (a.k.a. non-linear editing), video processing, or to create advanced effects. It can read and write the most common video formats, including GIF.
MoviePy is a powerful Python module primarily designed for video editing but equally adept at manipulating audio. Let’s explore how MoviePy can help convert various audio formats to comply with Azure Speech Service requirements.
Understanding Azure Speech Service Audio Requirements
For the use case being discussed in this article, we would need to know the audio configurations. Azure Speech Service demands audio files in the WAV format with specific bitrate, sampling rate, and channel configurations. Here are the key criteria:
File Format: WAV (Microsoft PCM)
Bit Depth: 16-bit
Sampling Rate: 16 kHz or 8 kHz (some scenarios support 32 kHz or 48 kHz)
Channels: Mono or Stereo (Mono recommended for speech recognition)
Bitrate: 256 kbps (kilobits per second) for mono, 512 kbps for stereo
Codec: PCM (Pulse Code Modulation)
File Size: Generally, up to 4 GB for continuous recognition
Step-by-Step Guide
Now to convert your audio file in a different format to have these configurations, follow the steps below.
Step 1 – Install Moviepy
Begin by installing MoviePy using the command pip install moviepy in your terminal. This would install all the dependencies needed to run Moviepy in your Python environment along with Moviepy.
Step 2 – Import Required Functions
Import required attributes from MoviePy’s editor method, particularly AudioFileClip, which will help load and manipulate audio files. It has a method you can call to set the output file and format, bitrate and all configurations necessary.
from moviepy.editor import *
or
from moviepy.editor import AudioFileClip
Step 3 – Load the Audio File
Load your audio file using the AudioFileClip method. This method takes in the audio file path and loads up your audio file as a Moviepy AudioFileClip format that can be manipulated to the file format required for compatibility with Azure Speech Service API and/or SDK.
Assuming the file format is .ogg and the file is saved as audio.ogg, load the file as shown below. Ensure to use a relative path if the audio file is in a different directory from your Python script.
audioclip = AudioFileClip(“audio.ogg”)
Step 4 – Set Audio Configurations
Define the audio parameters necessary for compatibility as required for your solution.
audio_params = {
“codec”: “pcm_s16le”,
“fps”: 16000, # Set the desired sampling rate: 16000 Hz
# “fps”: 8000, # Alternatively, set the sampling rate to 8000 Hz
“nchannels”: 1, # Mono audio
“bitrate”: “16k” # Set the desired bitrate
}
Step 5 – Pass Configurations Parameters and Convert Audio
Define the file path for the output. Since we want to convert our audio file to .wav format, we would define a file with the extension .wav.
Pass the defined required audio parameters that you have defined to the write_audiofile method from AudioFileClip. This would convert the audio file to the extension you have defined in your output file path and also configure the audio to all the parameters you have set and passed into the method.
output_file = “audio.wav”
audioclip.write_audiofile(output_file, codec=audio_params[“codec”],fps=audio_params[“fps”],nbytes=2,bitrate=audio_params[“bitrate”])
Step 6 – Load Your New Audio File to Use with Azure Speech Service
Your new audio file should be located in the file path you have defined. If you followed the naming convention above, you would find your “audio.wav” file in the same directory as your python script/code. You can then load up this file with the Azure Speech Service SDK (for example) to create a simple transcription solution. A simple sample is found below:
After getting your Speech Service key and region from your Azure portal and saving them as environment variables, follow the code below to test run with your new audio file.
import os
import azure.cognitiveservices.speech as speechsdk
def recognize_from_file():
# This example requires environment variables named “SPEECH_KEY” and “SPEECH_REGION”
speech_config = speechsdk.SpeechConfig(subscription=os.environ.get(‘SPEECH_KEY’), region=os.environ.get(‘SPEECH_REGION’))
speech_config.speech_recognition_language=”en-US”
audio_config = speechsdk.audio.AudioConfig(filename=”audio.wav”)
speech_recognizer = speechsdk.SpeechRecognizer(speech_config=speech_config, audio_config=audio_config)
speech_recognition_result = speech_recognizer.recognize_once_async().get()
if speech_recognition_result.reason == speechsdk.ResultReason.RecognizedSpeech:
print(“Recognized: {}”.format(speech_recognition_result.text))
elif speech_recognition_result.reason == speechsdk.ResultReason.NoMatch:
print(“No speech could be recognized: {}”.format(speech_recognition_result.no_match_details))
elif speech_recognition_result.reason == speechsdk.ResultReason.Canceled:
cancellation_details = speech_recognition_result.cancellation_details
print(“Speech Recognition canceled: {}”.format(cancellation_details.reason))
if cancellation_details.reason == speechsdk.CancellationReason.Error:
print(“Error details: {}”.format(cancellation_details.error_details))
print(“Did you set the speech resource key and region values?”)
recognize_from_file()
This example uses the recognize_once_async operation to transcribe utterances of up to 30 seconds, or until silence is detected.
This sample code was taken from the Azure Speech Service Documentation. You can explore more on the Azure Speech Service through the documentation. You can also watch this tutorial on building transcription and translation services with the Azure Speech Service and Translator service from the video below.
<!–
%[https://youtu.be/ikNPMomeZKs?si=Bup8lJ5P-voImVqc]
–>
Conclusion
MoviePy simplifies the process of converting audio files to the precise format required by Azure Speech Service. By adhering to these guidelines and utilizing MoviePy’s flexibility, you can seamlessly prepare your audio data for optimal performance within Azure’s powerful Speech Service.
That’s it!!! We have successfully converted our audio to be compatible with Azure Speech Service.
Additional Resources
1. Recognize and convert speech to text using Python
2. Sign up for free Azure credits
3. Process and Translate Speech with Azure AI Speech Services
4. Get started with Azure Cognitive Services Speech
5. Translate speech with Azure AI Speech Service
Microsoft Tech Community – Latest Blogs –Read More
Partner Blog | Copilot for Microsoft 365: expanded partner opportunity
Written by Nicole Dezen, Chief Partner Officer and Corporate Vice President, Global Partner Solutions
Within our expansive portfolio, AI intersects with virtually every product, industry, and solution area, and we anticipate that it will bring about a fundamental shift in every software category, unlocking a new era of productivity growth. Our commitment is to empower partners to harness the potential of this innovation for the benefit of customers worldwide, assisting them in navigating through this emerging technological landscape.
Since launching Copilot for Microsoft 365 for enterprise customers in November, partners have been supporting customers to define, activate, and deliver their AI strategy. Building on this momentum, we are taking the next step, expanding access to more customers, and creating more opportunities for the partners who serve those customers.
Today, we are announcing that as of January 16, 2024, Copilot for Microsoft 365 is generally available across all sales channels including Cloud Solution Provider (CSP) new commerce.
Continue reading here
Microsoft Tech Community – Latest Blogs –Read More

Upcoming January 2024 Microsoft 365 Champion Community Call
Happy 2024 and welcome back! Join our first call of the new year on January 23 to dive into Microsoft Teams Town Halls. We will be starting the call at 5 minutes past the hour for both of our sessions (at 8:05 AM and 5:05 PM PT), and it will still end at the top of the hour (9:00 AM and 6:00 PM PT, respectively).
If you have not yet joined our Champion community, sign up here to get access to the calendar invites, program assets, and previous call recordings.
Microsoft Tech Community – Latest Blogs –Read More

FHIRlink Power Platform Connector Public Preview Release
The healthcare industry is rapidly moving to adopt the emerging HL7 FHIR® standard. FHIR defines an extensible data model with standardized semantics and data exchange that enables interoperability and rapid exchange of data in applications.
Microsoft’s Health and Life Sciences team offers the Azure API for FHIR as part of Azure Health Data Services, which is a full implementation HL7 FHIR APIs. Power Platform also includes some FHIR inspired solutions with the Healthcare Data Model for Dataverse that allows customers and partners to build healthcare focused model driven apps on a FHIR standards based relational system.
FHIRlink Connector
Some teams require building Power Apps directly accessing FHIR services. For these cases, Microsoft’s is releasing the public preview of our FHIRlink Power Platform connector. FHIRlink is a first-party Power Platform connector developed by Microsoft’s Health and Life Sciences team that enables Power App developers to build low-code, no-code applications that interact directly with FHIR compliant REST APIs.
FHIRlink reduces complexity in authenticating to FHIR services, constructing FHIR based API calls, and working with resulting FHIR JSON data, all removing the need for custom, single-use integration solutions. Because developers can build their apps directly against the FHIR services, they remove the complexity and cost of mapping, transforming, and synchronizing data between systems.
Power Platform Connectors
Because FHIRlink is released as a Power Platform connector, developers see the benefits of first-party connectors such as ease of support by Microsoft. Other benefits customers see from the Power Platform connector infrastructure are governance through automated DLP polices, access control with Azure Active Directory, and monitoring from the Power Platform admin console.
Using the FHIRlink connector, developers can build Power Platform canvas apps, Power Automate flows, and Azure Logic Apps that connect directly to FHIR services and integrate with many available connectors. Each service offers a various tools for working with REST services and related JSON data. You may build simple, targeted apps that leverage only FHIRlink, connected apps using first-party connectors like Microsoft Office and Teams for communication and collaboration, or data centric apps connecting FHIR services to SQL Server databases.
Preview Features
FHIRlink’s preview version supports multiple authentication options for FHIR services for flexibility and enhanced security. The following services are available in the public preview release:
Azure API for FHIR – Microsoft’s FHIR services for management of clinical data hosted in Azure.
Google Cloud Healthcare API -FHIR services for management of clinical data.
More options will be available in later releases of the FHIRlink connector.
FHIRlink supports several operations on the FHIR service endpoint. Each operation includes parameters that align with the FHIR specification, such as filtering, sorting, or include statements. FHIRlink’s operations construct FHIR compliant REST calls, so one set of operations should work no matter the FHIR service. This means you can build a single Power App that works even if you change the connection reference to a different service.
Some key operation examples available for building Power Apps or Azure Logic Apps:
List Resources – retrieve a full list of available records for a particular FHIR resource type. For example, you may want to retrieve a list of Appointment records for a given Patient.
Get a Resource – Get a single record for a type of FHIR resource using the FHIR Id. This will return the full FHIR JSON.
Create a Resource – post a JSON payload to the FHIR service that represents a new FHIR record in the target service.
You can review the full list of available operations at the FHIRlink landing page.
We welcome your feedback for this preview release of the FHIRlink connector. Watch for upcoming posts over the next few months diving into some real examples on how to leverage FHIRlink to build healthcare applications on the Power Platform.
Microsoft Tech Community – Latest Blogs –Read More
Partner Blog | Copilot for Microsoft 365: expanded partner opportunity
Written by Nicole Dezen, Chief Partner Officer and Corporate Vice President, Global Partner Solutions
Within our expansive portfolio, AI intersects with virtually every product, industry, and solution area, and we anticipate that it will bring about a fundamental shift in every software category, unlocking a new era of productivity growth. Our commitment is to empower partners to harness the potential of this innovation for the benefit of customers worldwide, assisting them in navigating through this emerging technological landscape.
Since launching Copilot for Microsoft 365 for enterprise customers in November, partners have been supporting customers to define, activate, and deliver their AI strategy. Building on this momentum, we are taking the next step, expanding access to more customers, and creating more opportunities for the partners who serve those customers.
Today, we are announcing that as of January 16, 2024, Copilot for Microsoft 365 is generally available across all sales channels including Cloud Solution Provider (CSP) new commerce.
Continue reading here
Microsoft Tech Community – Latest Blogs –Read More


