

Category: Microsoft
Category Archives: Microsoft
Continued region expansion: Azure Data Factory is generally available in two more regions
Azure Data Factory is now available in two new regions:
Israel Central
Italy North
You can now provision Data Factory in the new regions in order to co-locate your Extract-Transform-Load logic with your data lake and compute.
See the full set of Azure Data Factory supported regions.
Microsoft Tech Community – Latest Blogs –Read More
Microsoft 365 Group Calendar Reminder
Hi,
My team recently created a Group calendar which we are using to establish visibility across the group for interlated meetings. I notice that when a meeting is created in this calendar, the Outlook does not send an upcoming appointment reminder as it does for my personal calendar. Can this be enabled?
Hi, My team recently created a Group calendar which we are using to establish visibility across the group for interlated meetings. I notice that when a meeting is created in this calendar, the Outlook does not send an upcoming appointment reminder as it does for my personal calendar. Can this be enabled? Read More

Updating column in SharePoint List row using forms submitted by different users
I’m a novice at PowerAutomate. I’ve built two Forms. First will go to a student. Student fills out information including a school official email address. Once submitted, one Flow will use the school official email address to send a form to the school official. A second flow will load information into a SharePoint List. Both forms (student and school official) ask for a student ID number.
When the school official submits their form I’d like to build a Flow that updates the row submitted via the student’s form with select information from the school official. Ideally, I’d be able to use the student ID (StarID) in the Flow to connect everything (ie if the StarID is the same please do this . . .). The only data that I want added to the student row is the recommendation (far right column of screenshot). School Officials will recommend “Yes” or “No.” All other data you can see in the screenshot is loaded in when the student submits their form. After the school official submits, the flow would look to see if there is a StarID in the list and only add the data from the recommendation. Any help would be more than appreciated.
I’m a novice at PowerAutomate. I’ve built two Forms. First will go to a student. Student fills out information including a school official email address. Once submitted, one Flow will use the school official email address to send a form to the school official. A second flow will load information into a SharePoint List. Both forms (student and school official) ask for a student ID number. When the school official submits their form I’d like to build a Flow that updates the row submitted via the student’s form with select information from the school official. Ideally, I’d be able to use the student ID (StarID) in the Flow to connect everything (ie if the StarID is the same please do this . . .). The only data that I want added to the student row is the recommendation (far right column of screenshot). School Officials will recommend “Yes” or “No.” All other data you can see in the screenshot is loaded in when the student submits their form. After the school official submits, the flow would look to see if there is a StarID in the list and only add the data from the recommendation. Any help would be more than appreciated. Read More
Announcing the availability of the new gMSA on AKS workshop
gMSA is the technology behind the support for Active Directory dependent applications to run on Kubernetes. Over time, we’ve been adding a lot of resources around it, such as PowerShell modules (to help with the configuration process), documentation, scripts, and more. The reason behind this is that on one side, gMSA is incredibly popular (of course, anyone trying to containerize a Windows app that relies on AD for authentication will use it), but also because it is somewhat complex to configure it. Setting up gMSA means you have to configure your Kubernetes cluster, the networking between the cluster and Domain Controller(s), the secret store (such as Azure Key Vault), the Domain Controller itself, and so on…
Because so many resources need to be configured, many customers have a hard time to see how gMSA actually works before doing it in production. Today, we’re glad to announce that you can now try gMSA on AKS with a guided workshop. This workshop still requires a subscription for you to use, but all the other configurations can be implemented by following the workshop’s instructions. We plan to upgrade this into a self-contained workshop in the future.
What is part of the workshop
This is an end-to-end workshop on which you can start with a net-new subscription (or an existing one, of course) and build everything from scratch. The workshop covers briefly what gMSA is and how it’s used.
The workshop has the following objectives:
Provide an overview of gMSA on AKS, necessary components, and how to set up an environment for a Windows app that requires Active Directory authentication.
Understand how the AksGMSA PowerShell module helps in the process of configuring gMSA on AKS.
Understand the flow of configuring gMSA on AKS and how the multiple resources interact with each other.
The workshop is divided into seven exercises:
Exercise 01 – Spinning up Azure environment
Here you will deploy the base services to get started. You will use a script to deploy the Resource Group, the Virtual Network and Subnet, the AKS cluster and the Windows node pool. The script will also deploy a VM to be used as domain controller.
Exercise 2 – Configure Active Directory
Here we will prepare the VM and the Active Directory domain to use gMSA. A script is provided to deploy AD into the VM.
Exercise 3 – Enable Azure Bastion to RDP into DC01 VM and take note of additional resources
To reduce costs, we will only use one VM in this workshop, so we will also use this VM (which is our Domain Controller) for other purposes – which is not recommended in production. To securely access the VM, we will enable Azure Bastion.
Exercise 4 – Configure the AksGMSA PowerShell module on the DC01 VM
This is where most of the gMSA configuration is passed to the AksGMSA PowerShell module on the DC01 VM. The provided script and module will set up gMSA on AKS later and in this exercise, we pass on the configuration we want to be used later.
Exercise 5 – Deploy gMSA on AKS and configure AD and Azure resources
This where the configuration for gMSA on AKS happens. Using the information provided before, we run the commands for the AksGMSA module and set up the gMSA on AKS, configure AD, create the Azure Key Vault, Managed Identity, and all other configurations.
Exercise 6 – Validate the deployment of gMSA on AKS
Once gMSA on AKS has been deployed and configured, you can use the AksGMSA module to validate the configuration and communication between the AKS cluster and the AD domain. This exercise uses the native commands on the module to validate everything is in place.
Exercise 7 – Deploy IIS with Windows authentication enabled
Validating that gMSA has been deployed correctly is not as cool as seeing an application working properly. In this exercise, we deployed a very simple, sample application to see the authentication actually happening. We deploy a Windows pod to the AKS cluster, with an IIS website setup to use Windows authentication and then open the website to see the authentication pop-up, provide the username and password, and see the website open.
At the end, there’s an exercise to clean up the environment and ensure you’re not being charged for this any further.
Hopefully this workshop provides a good overview of how gMSA on AKS works. Feel free to go wild and try different things, try your own app, your own set up. And let us know what you think and how we can improve not only the workshop itself but the whole gMSA on AKS experience.
Microsoft Tech Community – Latest Blogs –Read More
Unleash the full potential of User and Entity Behavior Analytics with our updated workbook
This blog post introduces a new and improved version of the User and Entity Behavior Analytics workbook. This workbook uses data from User and Entity Behavior Analytics (UEBA), a feature of Microsoft Sentinel that leverages machine learning and threat intelligence to detect anomalous and potentially malicious behavior of users and devices in your network (for more information see Identify advanced threats with UEBA).
UEBA is a powerful tool that can help you identify and respond to various types of cyberattacks, such as insider threats, brute-force attacks, DDoS attacks, and phishing campaigns. By using UEBA data in the workbook, you can gain deeper insights into the activities and patterns of your users and entities, and visualize the scope and impact of the threats you face.
The main updates you will find in this version:
Anomalies related to IPs and hosts, on top of accounts are now displayed.
A new section has been added for incidents involving entities with anomalies raised up to 3 days prior to the incident’s creation.
The workbook now relies on the Anomalies table, whereas the old version was looking at the BehaviorAnalytics table
Getting started
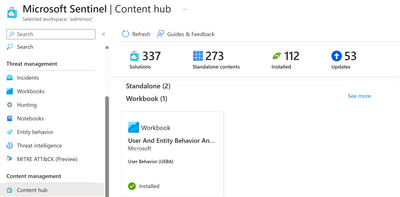
As always, you can find the latest version on the Content Hub:
Search for the ‘Microsoft Sentinel Optimization Workbook’ in the Content hub and install the solution.
After you install it (or update it), you can
Either select ‘Configuration’
or go to the Workbooks blade, and select View Template or save the workbook in case you want to make modifications.
Once you launch the workbook, we recommend selecting Show Help: Yes the first time so you can see explanations for each step:
Visualizing your workbook
At the top you will find the number of new or active incidents and alerts, as well as anomalies.
We have now added a section for Incidents with entities present in anomalies created up to 3 days before the incident was generated:
This can be helpful to prioritize incident investigation, as well as discover suspicious behaviors in the entities involved.
Finally, at the bottom you can see top Users, Ips and Hosts by anomalies. (Previously, this was only available for users).
We hope that this workbook helps your organization in your investigations.
This workbook has been updated by @NChristis (Senior Product Manager) and @madesous (Senior Product Manager).
Microsoft Tech Community – Latest Blogs –Read More

How to handle the 2025 change to Azure VM internet access, including Aviatrix, in Azure Marketplace
In this guest blog post, Bryan Woodworth, Director of Solution Strategy for Aviatrix, explains best practices for tackling the upcoming change to Azure VM internet access.
Microsoft Azure has recently announced that support for default access to the internet is ending for new virtual machines (VMs) after September 30, 2025. While this change will not affect existing VMs, any VM built after this date will need an explicit method to allow outbound or inbound internet access. Today, any VM in Azure can access the internet right out of the box using a feature called default source network address translation (SNAT).
Default SNAT happens to outbound internet connections from VMs when none of the preferred methods for source address translation are otherwise available. Here, Azure will automatically translate the private IP of the VM to a special public IP pulled from a reserved regional block. While convenient, this method has its downsides, such as implicit internet access, lack of control or visibility over the public IP, and difficulties performing advanced troubleshooting.
Fortunately, Azure provides other choices for allowing VMs to connect to public endpoints, such as instance-level public IPs, outbound rules, the Azure NAT Gateway, and vendor-based solutions, such as Distributed Cloud Firewall for Egress (DCF for Egress) from Aviatrix. The question is: With so many options, which is the right solution for you? The answer is that some choices are better than others, depending on what you want to accomplish. Let’s look at four of these options:
Instance-level public IPs
Instance-level public IPs (IL-PIPs) are special IP addresses in Azure that you assign to a single VM or, more correctly, to a single network interface controller (NIC) that then is assigned to a VM. They are special because they don’t reside within the private IP space of the virtual network (VNet) itself; they instead operate as a regional-level service for private-to-public address translation when a single VM needs to access another public endpoint. IL-PIPs remove a lot of the mystery of the default SNAT feature in Azure: they are purposeful, explicit, and stapled to their parent NIC.
IL-PIPs are best used on network virtual appliances (NVAs) within Azure, such as virtual firewalls and software-defined wide area network (SD-WAN) devices. They are a convenient and easy way for NVAs to provide egress security or hybrid connectivity on behalf of app-level VMs that need to connect to internet destinations. One care here is that unless scaled correctly, IL-PIPs on NVAs are prone to port exhaustion; this is a common scenario when NAT is involved.
IL-PIPs are not ideal for individual VMs that are running application or data workloads due to complexity, lack of security, and cost. It is far better to provide an internet egress de-militarized zone (DMZ) for these VMs to leverage, per the NVA model above, which is a best-practice architecture in Azure.
Outbound rules
Fortunately, Azure has several outbound solutions that specifically address this issue. Outbound rules, for example, operate in conjunction with an Azure public load balancer and offer a sophisticated set of parameters for adding additional outbound public IPs and port mappings to tackle almost any egress requirements. Outbound rules are ideal for VMs that are part of a backend pool and need easy and convenient outbound access through the same Azure public load balancer that services their inbound requests.
But not all VMs in Azure are behind a load balancer and not all customers want to configure every public load balancer with outbound rules, especially if they have a large number of public load balancers to deal with. Furthermore, outbound rules are not optimized for customers looking for a VNet-wide solution or quick “one click” deployment. For this reason, Azure offers customers what is sure to be its best solution for egress traffic, which is the Azure NAT Gateway.
Azure NAT Gateway
The Azure NAT Gateway has a lot to offer; it’s simple to configure and deploy, fully managed, and intelligently handles port allocation under the hood so that customers can quickly and easily scale their egress traffic requirements. Even better, it works with both standalone VMs as well as VMs behind load balancers, all without any complicated requirements. Simply deploy the Azure NAT Gateway, assign it one or more PIPs — classless inter-domain routing (CIDR) ranges are indeed supported — point it to the subnets you want to it serve, and you’re off to the races. Finally, Azure NAT Gateway is fully redundant and supports availability zones for high uptimes.
Aviatrix’s Distributed Cloud Firewall for Egress in Azure Marketplace
Even with all these great capabilities, some customers are looking to add additional functionality to their Internet egress strategy. This is where the Azure Marketplace comes in, and one of the most compelling offerings here is the Aviatrix Distributed Cloud Firewall (DCF). Aviatrix DCF features three upgradable tiers of capability, giving customers both choice and control over how they want to deploy and scale their internet egress solution in Azure.
Aviatrix DCF is a unique solution that distributes security across the entire cloud network, which alleviates bottlenecks, improves overall security, and reduces cloud costs. In addition to supporting full automation through Terraform and centralized management through Aviatrix CoPilot, Aviatrix DCF is supported in all Azure regions, including Azure Gov Cloud, as well as other major public clouds.
The Aviatrix DCF for Egress solution starts with the basic NAT tier. This tier provides customers with enterprise-grade dynamic NAT capabilities on a per-VNet basis. The basic NAT tier can be easily and quickly scaled to handle enormous amounts of traffic; it will automatically become the default internet gateway for its resident VNet through cloud-native orchestration.
For customers looking to add additional security, the basic NAT tier can be upgraded to the Aviatrix DCF for Egress tier, which adds support for transport layer security (TSL)/secure sockets layer (SSL) decryption, fully qualified domain name (FQDN) filtering, and intrusion detection. These additional capabilities are a game-changer for customers who need to ensure that all outbound traffic is both trusted and secure. Because public cloud introduces a rapidly changing “endless perimeter” for internet access across the entire network, this distributed approach ensures that all business-critical apps are protected without sacrificing application performance or disrupting your architecture.
In terms of billing, Aviatrix DCF for Egress does not meter on network data, only hourly consumption. This difference can quickly translate into big savings for customers, especially around security costs, which can rapidly spiral out of control in cloud. The billing plan for Aviatrix DCF for Egress ensures your monthly billing will be predictable, which makes your overall cloud expenses easier to control.
Finally, for customers looking for micro-segmentation and app-to-app (east/west) security in Azure, Aviatrix DCF for Egress can be upgraded to the full Aviatrix Distributed Cloud Firewall solution. This solution supports full-scale network security group (NSG) automation and dynamic policy enforcement based on object resource tags in addition to IP addresses. Aviatrix SmartGroups give customers intelligent, centralized policy control across the entire cloud network and even support hybrid policy enforcement over VPN and ExpressRoute.
While platform changes in networking behavior are not always welcome news, rest assured that Azure has a rich set of egress solutions to help you navigate the upcoming change with ease. Regardless of the solution you choose, the result will be an internet egress strategy that is more explicit, easier to see and control, and ultimately more secure. Together, Azure and Aviatrix can help you save money and improve security for outbound internet traffic with Aviatrix Distributed Cloud Firewall for Egress.
Please check out the Aviatrix Guide to Network Security in Azure. With it, you’ll learn how Aviatrix’s innovative network security solution enhances Azure’s native resources and services, optimizing performance and improving security.
Microsoft Tech Community – Latest Blogs –Read More
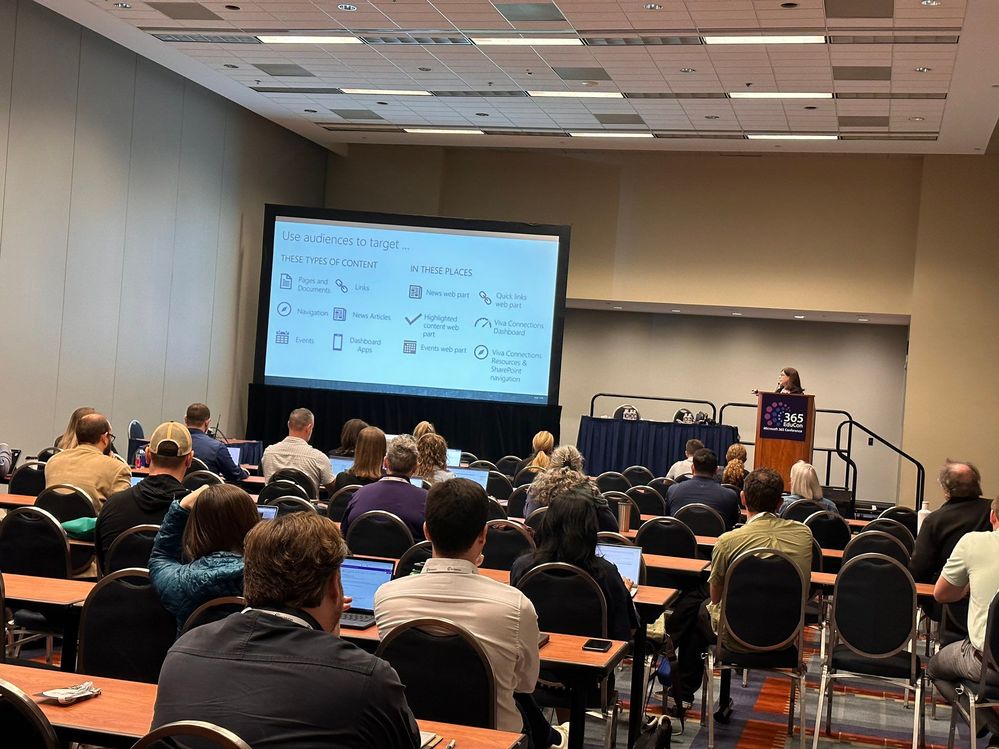
“WWSD: What would Sue do (for your intranet)” 🎙 – The Intrazone podcast
“As your organization evolves, you need intranets that make it easy to align experiences with the way you work and that can adapt to the inevitable changes in the way you work.” – Sue Hanley (from her ‘Planning your SharePoint hub sites’ documentation)
On this episode, we hear from Sue Hanley who expertly focuses on change — evolving and improving your intranet. Sue is an information architect, a Knowledge Management expert, and she doesn’t shy away from the word: Portals. Sue is steeped in all sorts of governance and collaboration consultation in the grandiose enterprise content services and app: SharePoint.
We grabbed time with Sue recently at 365 EduCon – Chicago (aka now “TechCon365”) – to see what she was up to and to ask her a few questions everyone would benefit from in hearing her answers – especially when it comes to establishing and revamping intranets. The goal is to discover how to make them better, how to make them work for you AND be worthy for people to go to and come back. Employees need to find things quickly and get things done – or your intranet doesn’t get a second visit.
Our full discussion is embedded below and now available through your favorite pod’player.
The Intrazone, episode 105:
Subscribe to The Intrazone podcast + show links and more below.
The Intrazone guest: Sue Hanley presenting her intranet expertise at a 365 EduCon event (2023).
Links to important on-demand recordings and articles mentioned in this episode:
Hosts, guests, and related products
Sue Hanley | LinkedIn | X | Website [guest]
Mark Kashman |@mkashman [co-host]
Chris McNulty |@cmcnulty2000 [co-host]
SharePoint | Facebook | @SharePoint | SharePoint community blog | Feedback
Articles and sites
Microsoft Docs – The home for Microsoft documentation for end users, developers, and IT professionals.
Microsoft Tech Community Home
Stay on top of Office 365 changes
Listen to other Microsoft podcasts
Upcoming Events
CollabDays – Bremen 2024 | Feb 9-10, 2024 near Hamburg in Germany
Teams Nation 2024 | Feb 21, 2024 9:00 – 19:30 CET
CollabDays – Calgary 2024 | Feb. 24, 2024
Microsoft Fabric Community Conference | March 26-28, 2024 in Las Vegas, NV
AIIM | April 3-5, 2024 in San Antonio, TX
North American Cloud & Collaboration Summit (NACS) | April 9-11, 2024 in Dallas, TX
Microosft 365 Conference | April 28 – May 4, 2024 in Orlando, FL
SharePoint Intranet Festival (Online)
European Collaboration Summit | May 14-16, 2024 in Weisbaden, Germany
TechCon365 – Seattle (formerly 365 EduCon) | June 3-7, 2024 in Seattle, WA
Subscribe today!
Thanks for listening! If you like what you hear, we’d love for you to Subscribe, Rate and Review on iTunes or wherever you get your podcasts.
Be sure to visit our show page to hear all episodes, access the show notes, and get bonus content. And stay connected to the SharePoint community blog and where we’ll share more information per episode, guest insights, and take any questions or suggestions from our listeners and SharePoint users (TheIntrazone@microsoft.com).
Get Intrazone anywhere and everywhere
Show page
Apple Podcasts
Google Play Music
Spotify
Pandora
Stitcher
Overcast
TuneIn
RadioPublic
iHeart
RSS
+ Listen to other Microsoft podcasts at aka.ms/microsoft/podcasts.
The Intrazone, a show about the Microsoft 365 intelligent intranet (aka.ms/TheIntrazone)
Microsoft Tech Community – Latest Blogs –Read More
Forms practice mode is here to enhance your learning process
Practice mode is now available in Forms. It’s tailored for EDU users, particularly students, offering a new way for students to review, test, and reinforce their knowledge. Follow me, let’s check out more details of practice mode. You can just try it from this template. (Note: Practice mode is only available for quizzes. )
Practice mode
Instant feedback after answering each question
In practice mode, questions will be shown one at a time. Students will receive immediate feedback after submitting each question, indicating whether their answer is right or wrong.
Instant feedback after answering each question
Try multiple times for the correct answer
Students can reconsider and try a question multiple times if they answer it incorrectly, facilitating immediate re-learning, and consequently strengthening their grasp of certain knowledge.
Try multiple times to get the correct answer
Encouragement and autonomy during practice
Students will receive an encouraging message after answering a question, whether their answer is correct or not, giving them a positive practice experience. And They have the freedom to learn at their own pace. If they answer a question incorrectly, they can choose to retry, view the correct answer, or skip this question.
Encouragement message and other options
Recap questions
After completing the practice, students can review all the questions along with the correct answers, offering a comprehensive overview to assess their overall performance.
Recap questions
Enter practice mode
Practice mode is only available for quizzes. You can turn it on from the “…” icon in the upper-right corner. Once you distribute the quiz recipients will automatically enter practice mode. Try out practice mode from this template now!
Enter practice mode
Microsoft Tech Community – Latest Blogs –Read More
Announcing the availability of the new gMSA on AKS workshop
gMSA is the technology behind the support for Active Directory dependent applications to run on Kubernetes. Over time, we’ve been adding a lot of resources around it, such as PowerShell modules (to help with the configuration process), documentation, scripts, and more. The reason behind this is that on one side, gMSA is incredibly popular (of course, anyone trying to containerize a Windows app that relies on AD for authentication will use it), but also because it is somewhat complex to configure it. Setting up gMSA means you have to configure your Kubernetes cluster, the networking between the cluster and Domain Controller(s), the secret store (such as Azure Key Vault), the Domain Controller itself, and so on…
Because so many resources need to be configured, many customers have a hard time to see how gMSA actually works before doing it in production. Today, we’re glad to announce that you can now try gMSA on AKS with a guided workshop. This workshop still requires a subscription for you to use, but all the other configurations can be implemented by following the workshop’s instructions. We plan to upgrade this into a self-contained workshop in the future.
What is part of the workshop
This is an end-to-end workshop on which you can start with a net-new subscription (or an existing one, of course) and build everything from scratch. The workshop covers briefly what gMSA is and how it’s used.
The workshop has the following objectives:
Provide an overview of gMSA on AKS, necessary components, and how to set up an environment for a Windows app that requires Active Directory authentication.
Understand how the AksGMSA PowerShell module helps in the process of configuring gMSA on AKS.
Understand the flow of configuring gMSA on AKS and how the multiple resources interact with each other.
The workshop is divided into seven exercises:
Exercise 01 – Spinning up Azure environment
Here you will deploy the base services to get started. You will use a script to deploy the Resource Group, the Virtual Network and Subnet, the AKS cluster and the Windows node pool. The script will also deploy a VM to be used as domain controller.
Exercise 2 – Configure Active Directory
Here we will prepare the VM and the Active Directory domain to use gMSA. A script is provided to deploy AD into the VM.
Exercise 3 – Enable Azure Bastion to RDP into DC01 VM and take note of additional resources
To reduce costs, we will only use one VM in this workshop, so we will also use this VM (which is our Domain Controller) for other purposes – which is not recommended in production. To securely access the VM, we will enable Azure Bastion.
Exercise 4 – Configure the AksGMSA PowerShell module on the DC01 VM
This is where most of the gMSA configuration is passed to the AksGMSA PowerShell module on the DC01 VM. The provided script and module will set up gMSA on AKS later and in this exercise, we pass on the configuration we want to be used later.
Exercise 5 – Deploy gMSA on AKS and configure AD and Azure resources
This where the configuration for gMSA on AKS happens. Using the information provided before, we run the commands for the AksGMSA module and set up the gMSA on AKS, configure AD, create the Azure Key Vault, Managed Identity, and all other configurations.
Exercise 6 – Validate the deployment of gMSA on AKS
Once gMSA on AKS has been deployed and configured, you can use the AksGMSA module to validate the configuration and communication between the AKS cluster and the AD domain. This exercise uses the native commands on the module to validate everything is in place.
Exercise 7 – Deploy IIS with Windows authentication enabled
Validating that gMSA has been deployed correctly is not as cool as seeing an application working properly. In this exercise, we deployed a very simple, sample application to see the authentication actually happening. We deploy a Windows pod to the AKS cluster, with an IIS website setup to use Windows authentication and then open the website to see the authentication pop-up, provide the username and password, and see the website open.
At the end, there’s an exercise to clean up the environment and ensure you’re not being charged for this any further.
Hopefully this workshop provides a good overview of how gMSA on AKS works. Feel free to go wild and try different things, try your own app, your own set up. And let us know what you think and how we can improve not only the workshop itself but the whole gMSA on AKS experience.
Microsoft Tech Community – Latest Blogs –Read More
How to Convert Audio to .WAV for Speech Service Using MoviePy
Azure Speech Service offers robust speech recognition, translation, text-to-speech and many more capabilities, providing developers with powerful tools to integrate voice-based interactions into their applications.
However, to ensure seamless compatibility and optimal performance, Azure Speech Service requires audio files to adhere to specific standards regarding format, bitrate, sampling rate, and channel configuration. Let’s dive into how we can use Moviepy to convert your different audio files to Azure Speech Service Compatible.
Leveraging MoviePy for Audio Conversion
According to its documentation, MoviePy is a Python module for video editing, which can be used for basic operations (like cuts, concatenations, and title insertions), video compositing (a.k.a. non-linear editing), video processing, or to create advanced effects. It can read and write the most common video formats, including GIF.
MoviePy is a powerful Python module primarily designed for video editing but equally adept at manipulating audio. Let’s explore how MoviePy can help convert various audio formats to comply with Azure Speech Service requirements.
Understanding Azure Speech Service Audio Requirements
For the use case being discussed in this article, we would need to know the audio configurations. Azure Speech Service demands audio files in the WAV format with specific bitrate, sampling rate, and channel configurations. Here are the key criteria:
File Format: WAV (Microsoft PCM)
Bit Depth: 16-bit
Sampling Rate: 16 kHz or 8 kHz (some scenarios support 32 kHz or 48 kHz)
Channels: Mono or Stereo (Mono recommended for speech recognition)
Bitrate: 256 kbps (kilobits per second) for mono, 512 kbps for stereo
Codec: PCM (Pulse Code Modulation)
File Size: Generally, up to 4 GB for continuous recognition
Step-by-Step Guide
Now to convert your audio file in a different format to have these configurations, follow the steps below.
Step 1 – Install Moviepy
Begin by installing MoviePy using the command pip install moviepy in your terminal. This would install all the dependencies needed to run Moviepy in your Python environment along with Moviepy.
Step 2 – Import Required Functions
Import required attributes from MoviePy’s editor method, particularly AudioFileClip, which will help load and manipulate audio files. It has a method you can call to set the output file and format, bitrate and all configurations necessary.
from moviepy.editor import *
or
from moviepy.editor import AudioFileClip
Step 3 – Load the Audio File
Load your audio file using the AudioFileClip method. This method takes in the audio file path and loads up your audio file as a Moviepy AudioFileClip format that can be manipulated to the file format required for compatibility with Azure Speech Service API and/or SDK.
Assuming the file format is .ogg and the file is saved as audio.ogg, load the file as shown below. Ensure to use a relative path if the audio file is in a different directory from your Python script.
audioclip = AudioFileClip(“audio.ogg”)
Step 4 – Set Audio Configurations
Define the audio parameters necessary for compatibility as required for your solution.
audio_params = {
“codec”: “pcm_s16le”,
“fps”: 16000, # Set the desired sampling rate: 16000 Hz
# “fps”: 8000, # Alternatively, set the sampling rate to 8000 Hz
“nchannels”: 1, # Mono audio
“bitrate”: “16k” # Set the desired bitrate
}
Step 5 – Pass Configurations Parameters and Convert Audio
Define the file path for the output. Since we want to convert our audio file to .wav format, we would define a file with the extension .wav.
Pass the defined required audio parameters that you have defined to the write_audiofile method from AudioFileClip. This would convert the audio file to the extension you have defined in your output file path and also configure the audio to all the parameters you have set and passed into the method.
output_file = “audio.wav”
audioclip.write_audiofile(output_file, codec=audio_params[“codec”],fps=audio_params[“fps”],nbytes=2,bitrate=audio_params[“bitrate”])
Step 6 – Load Your New Audio File to Use with Azure Speech Service
Your new audio file should be located in the file path you have defined. If you followed the naming convention above, you would find your “audio.wav” file in the same directory as your python script/code. You can then load up this file with the Azure Speech Service SDK (for example) to create a simple transcription solution. A simple sample is found below:
After getting your Speech Service key and region from your Azure portal and saving them as environment variables, follow the code below to test run with your new audio file.
import os
import azure.cognitiveservices.speech as speechsdk
def recognize_from_file():
# This example requires environment variables named “SPEECH_KEY” and “SPEECH_REGION”
speech_config = speechsdk.SpeechConfig(subscription=os.environ.get(‘SPEECH_KEY’), region=os.environ.get(‘SPEECH_REGION’))
speech_config.speech_recognition_language=”en-US”
audio_config = speechsdk.audio.AudioConfig(filename=”audio.wav”)
speech_recognizer = speechsdk.SpeechRecognizer(speech_config=speech_config, audio_config=audio_config)
speech_recognition_result = speech_recognizer.recognize_once_async().get()
if speech_recognition_result.reason == speechsdk.ResultReason.RecognizedSpeech:
print(“Recognized: {}”.format(speech_recognition_result.text))
elif speech_recognition_result.reason == speechsdk.ResultReason.NoMatch:
print(“No speech could be recognized: {}”.format(speech_recognition_result.no_match_details))
elif speech_recognition_result.reason == speechsdk.ResultReason.Canceled:
cancellation_details = speech_recognition_result.cancellation_details
print(“Speech Recognition canceled: {}”.format(cancellation_details.reason))
if cancellation_details.reason == speechsdk.CancellationReason.Error:
print(“Error details: {}”.format(cancellation_details.error_details))
print(“Did you set the speech resource key and region values?”)
recognize_from_file()
This example uses the recognize_once_async operation to transcribe utterances of up to 30 seconds, or until silence is detected.
This sample code was taken from the Azure Speech Service Documentation. You can explore more on the Azure Speech Service through the documentation. You can also watch this tutorial on building transcription and translation services with the Azure Speech Service and Translator service from the video below.
<!–
%[https://youtu.be/ikNPMomeZKs?si=Bup8lJ5P-voImVqc]
–>
Conclusion
MoviePy simplifies the process of converting audio files to the precise format required by Azure Speech Service. By adhering to these guidelines and utilizing MoviePy’s flexibility, you can seamlessly prepare your audio data for optimal performance within Azure’s powerful Speech Service.
That’s it!!! We have successfully converted our audio to be compatible with Azure Speech Service.
Additional Resources
1. Recognize and convert speech to text using Python
2. Sign up for free Azure credits
3. Process and Translate Speech with Azure AI Speech Services
4. Get started with Azure Cognitive Services Speech
5. Translate speech with Azure AI Speech Service
Microsoft Tech Community – Latest Blogs –Read More
ServiceNow Tickets connector is generally available
We are excited to announce the launch of the Microsoft Graph connector for ServiceNow Tickets. Now you can index tickets from ServiceNow and end users can search for these tickets in Microsoft Search and Copilot.
Tickets is a system provided by ServiceNow for enterprises to manage and resolve IT issues efficiently. A ticket is a special document or record that captures details about incidents and requests. It is generated by employees or automated systems, which are then assigned to IT agents for resolution. For more details, check out this link.
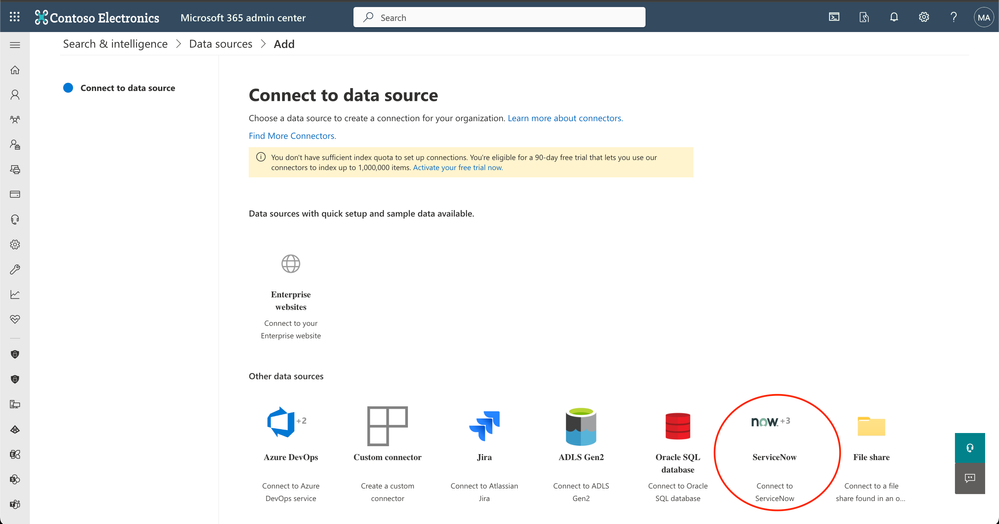
How to configure the ServiceNow Tickets connector?
Navigate to the Connectors catalog page. Select ServiceNow and from the right panel, select ServiceNow Tickets. Follow the steps as mentioned in the ServiceNow Tickets Graph connector documentation.
Graph connectors catalog
ServiceNow Connectors
Key Features
1. Define users who can access tickets: The connector supports search permissions, ensuring that indexed tickets are only visible to users with appropriate access. You can select up to 25 properties to define who can access ServiceNow tickets in Microsoft Search & Copilot (Opened by, Assigned to, Resolved by, Last reopened by, and more)
Select permissions
2. Choose from multiple authentication methods: The connector supports multiple authentication methods, including Basic Authentication, ServiceNow OAuth, and Microsoft Entra ID OpenID Connect.
Authentication options
3. Select only the type of tickets you want to index: You can choose to index only incident tickets or change requests by selecting the appropriate table in ‘Select properties’ screen.
Select ticket types
We are sure you will find the ServiceNow Tickets Graph connector useful. We welcome your feedback and suggestions to improve it.
Get started
Refer to the ServiceNow Tickets documentation, to learn more about configuring the ServiceNow Tickets Graph connector.
Head to Search & Intelligence section in the M365 admin center to get started.
Also, check out documentation for Microsoft Graph connectors for ServiceNow Knowledge and Catalog.
ServiceNow Catalog Microsoft Graph connector | Microsoft Docs
ServiceNow Knowledge Microsoft Graph connector | Microsoft Docs
Microsoft Tech Community – Latest Blogs –Read More
How to Convert Audio to .WAV for Speech Service Using MoviePy
Azure Speech Service offers robust speech recognition, translation, text-to-speech and many more capabilities, providing developers with powerful tools to integrate voice-based interactions into their applications.
However, to ensure seamless compatibility and optimal performance, Azure Speech Service requires audio files to adhere to specific standards regarding format, bitrate, sampling rate, and channel configuration. Let’s dive into how we can use Moviepy to convert your different audio files to Azure Speech Service Compatible.
Leveraging MoviePy for Audio Conversion
According to its documentation, MoviePy is a Python module for video editing, which can be used for basic operations (like cuts, concatenations, and title insertions), video compositing (a.k.a. non-linear editing), video processing, or to create advanced effects. It can read and write the most common video formats, including GIF.
MoviePy is a powerful Python module primarily designed for video editing but equally adept at manipulating audio. Let’s explore how MoviePy can help convert various audio formats to comply with Azure Speech Service requirements.
Understanding Azure Speech Service Audio Requirements
For the use case being discussed in this article, we would need to know the audio configurations. Azure Speech Service demands audio files in the WAV format with specific bitrate, sampling rate, and channel configurations. Here are the key criteria:
File Format: WAV (Microsoft PCM)
Bit Depth: 16-bit
Sampling Rate: 16 kHz or 8 kHz (some scenarios support 32 kHz or 48 kHz)
Channels: Mono or Stereo (Mono recommended for speech recognition)
Bitrate: 256 kbps (kilobits per second) for mono, 512 kbps for stereo
Codec: PCM (Pulse Code Modulation)
File Size: Generally, up to 4 GB for continuous recognition
Step-by-Step Guide
Now to convert your audio file in a different format to have these configurations, follow the steps below.
Step 1 – Install Moviepy
Begin by installing MoviePy using the command pip install moviepy in your terminal. This would install all the dependencies needed to run Moviepy in your Python environment along with Moviepy.
Step 2 – Import Required Functions
Import required attributes from MoviePy’s editor method, particularly AudioFileClip, which will help load and manipulate audio files. It has a method you can call to set the output file and format, bitrate and all configurations necessary.
from moviepy.editor import *
or
from moviepy.editor import AudioFileClip
Step 3 – Load the Audio File
Load your audio file using the AudioFileClip method. This method takes in the audio file path and loads up your audio file as a Moviepy AudioFileClip format that can be manipulated to the file format required for compatibility with Azure Speech Service API and/or SDK.
Assuming the file format is .ogg and the file is saved as audio.ogg, load the file as shown below. Ensure to use a relative path if the audio file is in a different directory from your Python script.
audioclip = AudioFileClip(“audio.ogg”)
Step 4 – Set Audio Configurations
Define the audio parameters necessary for compatibility as required for your solution.
audio_params = {
“codec”: “pcm_s16le”,
“fps”: 16000, # Set the desired sampling rate: 16000 Hz
# “fps”: 8000, # Alternatively, set the sampling rate to 8000 Hz
“nchannels”: 1, # Mono audio
“bitrate”: “16k” # Set the desired bitrate
}
Step 5 – Pass Configurations Parameters and Convert Audio
Define the file path for the output. Since we want to convert our audio file to .wav format, we would define a file with the extension .wav.
Pass the defined required audio parameters that you have defined to the write_audiofile method from AudioFileClip. This would convert the audio file to the extension you have defined in your output file path and also configure the audio to all the parameters you have set and passed into the method.
output_file = “audio.wav”
audioclip.write_audiofile(output_file, codec=audio_params[“codec”],fps=audio_params[“fps”],nbytes=2,bitrate=audio_params[“bitrate”])
Step 6 – Load Your New Audio File to Use with Azure Speech Service
Your new audio file should be located in the file path you have defined. If you followed the naming convention above, you would find your “audio.wav” file in the same directory as your python script/code. You can then load up this file with the Azure Speech Service SDK (for example) to create a simple transcription solution. A simple sample is found below:
After getting your Speech Service key and region from your Azure portal and saving them as environment variables, follow the code below to test run with your new audio file.
import os
import azure.cognitiveservices.speech as speechsdk
def recognize_from_file():
# This example requires environment variables named “SPEECH_KEY” and “SPEECH_REGION”
speech_config = speechsdk.SpeechConfig(subscription=os.environ.get(‘SPEECH_KEY’), region=os.environ.get(‘SPEECH_REGION’))
speech_config.speech_recognition_language=”en-US”
audio_config = speechsdk.audio.AudioConfig(filename=”audio.wav”)
speech_recognizer = speechsdk.SpeechRecognizer(speech_config=speech_config, audio_config=audio_config)
speech_recognition_result = speech_recognizer.recognize_once_async().get()
if speech_recognition_result.reason == speechsdk.ResultReason.RecognizedSpeech:
print(“Recognized: {}”.format(speech_recognition_result.text))
elif speech_recognition_result.reason == speechsdk.ResultReason.NoMatch:
print(“No speech could be recognized: {}”.format(speech_recognition_result.no_match_details))
elif speech_recognition_result.reason == speechsdk.ResultReason.Canceled:
cancellation_details = speech_recognition_result.cancellation_details
print(“Speech Recognition canceled: {}”.format(cancellation_details.reason))
if cancellation_details.reason == speechsdk.CancellationReason.Error:
print(“Error details: {}”.format(cancellation_details.error_details))
print(“Did you set the speech resource key and region values?”)
recognize_from_file()
This example uses the recognize_once_async operation to transcribe utterances of up to 30 seconds, or until silence is detected.
This sample code was taken from the Azure Speech Service Documentation. You can explore more on the Azure Speech Service through the documentation. You can also watch this tutorial on building transcription and translation services with the Azure Speech Service and Translator service from the video below.
<!–
%[https://youtu.be/ikNPMomeZKs?si=Bup8lJ5P-voImVqc]
–>
Conclusion
MoviePy simplifies the process of converting audio files to the precise format required by Azure Speech Service. By adhering to these guidelines and utilizing MoviePy’s flexibility, you can seamlessly prepare your audio data for optimal performance within Azure’s powerful Speech Service.
That’s it!!! We have successfully converted our audio to be compatible with Azure Speech Service.
Additional Resources
1. Recognize and convert speech to text using Python
2. Sign up for free Azure credits
3. Process and Translate Speech with Azure AI Speech Services
4. Get started with Azure Cognitive Services Speech
5. Translate speech with Azure AI Speech Service
Microsoft Tech Community – Latest Blogs –Read More
Partner Blog | Copilot for Microsoft 365: expanded partner opportunity
Written by Nicole Dezen, Chief Partner Officer and Corporate Vice President, Global Partner Solutions
Within our expansive portfolio, AI intersects with virtually every product, industry, and solution area, and we anticipate that it will bring about a fundamental shift in every software category, unlocking a new era of productivity growth. Our commitment is to empower partners to harness the potential of this innovation for the benefit of customers worldwide, assisting them in navigating through this emerging technological landscape.
Since launching Copilot for Microsoft 365 for enterprise customers in November, partners have been supporting customers to define, activate, and deliver their AI strategy. Building on this momentum, we are taking the next step, expanding access to more customers, and creating more opportunities for the partners who serve those customers.
Today, we are announcing that as of January 16, 2024, Copilot for Microsoft 365 is generally available across all sales channels including Cloud Solution Provider (CSP) new commerce.
Continue reading here
Microsoft Tech Community – Latest Blogs –Read More


