

Category: Microsoft
Category Archives: Microsoft
Introducing Viva Glint: Ask the Experts series
Viva Glint is now hosting a monthly session in which you will have an opportunity to interact live with Glint experts! Designed for new Viva Glint customers, each session will introduce you to a foundational topic and discuss best practices around Viva Glint implementation. During this session, the team will also be available to answer questions that you may have as you’re launching your first Viva Glint programs.
The first session is scheduled for February 6, 2024. Be sure to register for the date here. Sessions will be monthly and recordings will be posted to the Viva Glint: Ask the Experts site.
What topics are you most interested in learning about as you start your Viva Glint journey? Leave us a note in the comments below.
Microsoft Tech Community – Latest Blogs –Read More
Introducing Viva Glint Ask the Expert series
Viva Glint is now hosting a monthly session in which you will have an opportunity to interact live with Glint experts! Designed for new Viva Glint customers, each session will introduce you to a foundational topic and discuss best practices around Viva Glint implementation. During this session, the team will also be available to answer questions that you may have as you’re launching your first Viva Glint programs.
The first session is scheduled for February 6, 2024. Be sure to register for the date here. Sessions will be monthly and recordings will be posted to the Viva Glint: Ask the Experts site.
What topics are you most interested in learning about as you start your Viva Glint journey? Leave us a note in the comments below.
Microsoft Tech Community – Latest Blogs –Read More
Persisting Data Volumes With .NET Aspire
This post is written against the .NET Aspire Preview 2 release, so it may change when the final version is released.
Recently, I’ve been building an app using .NET Aspire which I’m using PostgreSQL as the database and Azure Storage Blobs and Queues in.
.NET Aspire is awesome for this, as you can setup a developer inner loop super simply with the components that ship, and the nice thing about this is that locally PostgreSQL is run in a Docker container and Azure Storage uses the Azurite storage emulator (which also happens to run in a container).
The problem with this is that when you restart your app, you lose all the data in the database and storage emulator, since they are started fresh each time.
Turns out, it’s a pretty easy fix – all that you need to do is mount a volume into the container where it would store it’s data.
Here’s the PostgreSQL example:
IResourceBuilder<PostgresContainerResource> postgresContainerDefinition = builder.AddPostgresContainer();
if (builder.Environment.IsDevelopment())
{
postgresContainerDefinition
// Mount the Postgres data directory into the container so that the database is persisted
.WithVolumeMount(“./data/postgres”, “/var/lib/postgresql/data”, VolumeMountType.Bind);
}
And here’s the Azure Storage example:
IResourceBuilder<AzureStorageResource> storage = builder.AddAzureStorage(“azure-storage”);
if (builder.Environment.IsDevelopment())
{
storage.UseEmulator()
.WithAnnotation(new VolumeMountAnnotation(“./data/azurite”, “/data”, VolumeMountType.Bind));
}
With this I’m mounting the ./data/<service name> folder from within the AppHost project into the respective data paths, but also wrapping them with a builder.Environment.IsDevelopment() check so that it only happens when running locally (since you don’t want to mount volumes in production – we’ll use the Azure services for that).
Note: The Azure Storage emulator doesn’t have a WithVolumeMount method, so we have to use the WithAnnotation method, which is what the WithVolumeMount method wraps anyway. Also, due to this pull request it’s likely there’ll be an easier way come Preview 3, where you provide the ./data/azurite path as part of the UseEmulator method.
Now when I restart my app, the data is persisted, meaning I don’t have to rebuild state each time. Just make sure you put those paths in the .gitignore file so that you don’t accidentally commit them to source control!
Microsoft Tech Community – Latest Blogs –Read More

AI & Cloud Learning Space, by Students, for Students
As we introduced in a previous article on this blog, the Korea MLSA AI & Cloud Learning Hands-on Camp, an event where Korean Microsoft Learn Student Ambassadors (MLSA) and Microsoft MVPs teach students how to utilize Microsoft AI and cloud technologies, was held in July 2023. Following that, the second event (MLSA와 함께하는 대학생 AI & Cloud 러닝 핸즈온 캠프) took place in November 2023, where six MLSAs were involved in organizing the event, and hands-on AI sessions were conducted for 60 student participants.
At the beginning of this event, Soyoung Lee, the Community Program Manager in Korea, introduced the Azure OpenAI Service and Microsoft’s startup support initiative, Microsoft for Startups Founders Hub. Demonstrations were conducted with MVPs and MLSAs who develop their own services or apps through these services. Subsequently, Jaeseok Lee, a Business Applications MVP, held a session about immediately applicable AI in business.
After that, MLSAs led three divided sections, where participants could join the section they were most interested in and deepen their understanding through sessions and hands-on activities. The three themes of these sections are introduced below.
Aaron Roh introduced how to create projects that can be operated in a serverless environment using Azure Functions and the GitHub API. Additionally, he covered how to implement automated deployment of Azure Functions via GitHub Actions.
Minjin Park introduced methods for generating images using Generative Adversarial Networks (GAN) based Bing Image Creator and Stable Diffusion. She also presented how to create and assess the reliability of image diagnostic models using Azure AI Custom Vision.
Minseok Song, who studies Industrial Engineering, explained Azure Cognitive Search and Azure OpenAI using both Semantic Kernel and LangChain, based on his contributed technical blog, Teach ChatGPT to Answer Questions Based on PDF content Using Azure AI Search and Azure OpenAI.
Students who learned about the latest AI and cloud technologies in this 8-hour event will continue to learn and enhance their skills in technologies that interest them, sparked by this opportunity. Some might participate in the MLSA program and become educators themselves, while others might join the Microsoft for Startups program and become future entrepreneurs who launch better services.
Students who wish to participate in an opportunity to organize, learn, and grow together are encouraged to search for and attend events of interest organized by MLSAs in the future.
https://mvp.microsoft.com/en-US/search?target=Event&timeline=UPCOMING&host=MLSA
Microsoft Tech Community – Latest Blogs –Read More
From Chaos to Clarity: Simplifying Your Networking with Azure Container Apps
In this blog post, I will share my experience as an Azure architect who has consulted with customers on how to design and implement networking in Azure Container Apps environment. Azure Container Apps is a service that enables you to run containerized applications at scale, with minimal overhead and operational complexity. You can focus on your application logic, while Azure Container Apps takes care of the infrastructure, scaling, availability, and security. If you are confused about which service to select between AKS (Azure Kubernetes Service) and Azure Container Apps, please refer to my previous blog, ACA vs AKS: Which Azure Service Is Better for Running Containers? for more insights.
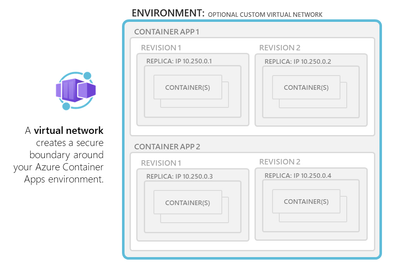
One of the key aspects of Azure Container Apps is the environment, which is a logical boundary that encapsulates one or more container apps or jobs. Each environment has its own virtual network (VNet) that provides network isolation and security. You can choose to use a generated VNet that is automatically created for you by Azure, or you can provide an existing VNet that you have already configured. Depending on your networking requirements, you can also decide whether your environment allows public ingress or ingress only from within your VNet.
In this post, I will cover the following topics:
– How to choose between external and internal environments
– How to configure custom VNet and subnet for your environment
– How to use network security groups (NSGs) and application gateway to control network access
– How to leverage DNS, ingress, WAF, and other features to optimize your network performance and security
Let’s get started!
Environment selection
———————
When you create an Azure Container App, you need to specify an environment, which is a logical grouping of one or more container apps or jobs that share a common virtual network (VNet). The environment defines the network boundary and isolation level for your applications.
You can choose between two types of environments: 1. Consumption only and 2. Workload profiles.
Consumption only environments are optimized for cost and scalability, and they support user defined routes (UDR) and egress through NAT Gateway. The minimum required subnet size for consumption only environments is /27. Consumption only environments are suitable for stateless applications that do not need to communicate with other resources in your VNet or use advanced networking features.
Workload profiles environments are optimized for performance and flexibility, and they support all the networking features that are available in Azure Container Apps, such as integration with Application Gateway, Network Security Groups, private endpoints, peering through a remote gateway, and custom egress. The minimum required subnet size for workload profiles environments is /23. Workload profiles environments are suitable for stateful applications that need to communicate with other resources in your VNet or use advanced networking features.
Accessibility levels
——————–
You can configure whether your container app allows public ingress or ingress only from within your VNet at the environment level. You can choose between two accessibility levels: external and internal.
External environments allow your container app to accept public requests over the internet. External environments are deployed with a virtual IP on an external, public facing IP address. You can use DNS names or custom domains to access your container app from outside your VNet.
Internal environments restrict your container app to accept requests only from within your VNet. Internal environments are deployed with a virtual IP mapped to an internal IP address. The internal endpoint is an Azure internal load balancer (ILB) and IP addresses are issued from the custom VNet’s list of private IP addresses. You can use DNS names or private DNS zones to access your container app from inside your VNet.
Very important to note that a managed public IP resource(created) handles outbound requests and management traffic, regardless if you have an external or internal environment.
User Defined Routes (UDR) and controlled egress through NAT Gateway are supported in the workload profiles environment. In the Consumption only environment, these features aren’t supported. You can create a UDR that routes all outbound traffic through the firewall.
Custom VNet configuration
————————-
By default, Azure Container Apps creates a VNet for your environment automatically, which is inaccessible to you as it is created in backend by Azure. However, if you want more control over your network configuration, you can provide an existing VNet when you create an environment. Once you create an environment with either a generated or existing VNet, the network type cannot be changed.
If you use your own VNet, you need to provide a subnet that is dedicated exclusively to the Container App environment you deploy. This subnet is not available to other services. Network addresses are assigned from a subnet range you define as the environment is created. You can define the subnet range used by the Container Apps environment.
When you use your own VNet, you can also leverage some of the Azure networking features that are not available with generated VNets, such as:
– Integration with Application Gateway: You can use Application Gateway as an ingress controller for your container apps, and benefit from its features such as SSL termination, URL-based routing, cookie-based session affinity, web application firewall (WAF), etc.
– Network Security Groups: You can use Network Security Groups (NSGs) to control the inbound and outbound traffic for your container apps at the subnet level. You can define rules to allow or deny traffic based on source and destination IP addresses, ports, protocols, etc.
– Communication with resources behind private endpoints: You can use private endpoints to securely connect your container apps to other Azure services such as Storage Accounts, Cosmos DB, etc., without exposing them to the internet.
– Peering through a remote gateway: You can use peering through a remote gateway to connect your container apps to other VNets or on-premises networks via VPN or ExpressRoute.
HTTP edge proxy behaviour
————————
Azure Container Apps uses Envoy as a network proxy for all HTTP requests. Envoy provides some capabilities such as:
– Scaling to zero: Envoy allows your container apps to scale to zero instances when there is no traffic, and scale up when there is demand. Envoy acts as a buffer between the clients and the container apps, and handles the cold start latency.
– HTTPS redirection: Envoy automatically redirects all HTTP requests to HTTPS, ensuring secure communication between the clients and the container apps.
– TLS termination: Envoy terminates the transport layer security (TLS) at the edge of the container app environment, and forwards the requests to the container apps over plain HTTP. This reduces the overhead of encryption and decryption for the container apps.
– Mutual TLS: Envoy supports mutual TLS (mTLS) when you use Dapr as a sidecar for your container apps. mTLS provides an additional layer of security by requiring both the client and the server to present valid certificates for authentication.
– Ingress controls: Envoy allows you to configure some ingress controls for your container apps, such as IP restrictions, CORS, WAF, etc.
Security
——–
Azure Container Apps provides several security features to protect your applications and data, such as:
– Encryption at rest: All data stored by Azure Container Apps is encrypted at rest using Microsoft-managed keys.
– Encryption in transit: All communication between Azure Container Apps and other Azure services is encrypted in transit using TLS.
– Private endpoints: You can use private endpoints to securely access Azure Container Apps from your VNet or on-premises network, without exposing it to the internet.
– Network security groups: You can use network security groups to control the inbound and outbound traffic for your container apps at the subnet level.
– Web application firewall: You can use web application firewall (WAF) to protect your container apps from common web attacks such as SQL injection, cross-site scripting, etc.
– DDOS protection: You can use Azure DDoS Protection for the Azure Container Apps Environment.
– Secure inbound connectivity: When publishing internet-facing services, use Azure Application Gateway (WAF_v2 SKU) or Azure Front Door (with Web Application Firewall) to secure inbound connectivity.
Summary
——-
In this blog post, I have explained some of the networking options and features that are available in Azure Container Apps, and how to use them effectively. Azure Container Apps provides a serverless and scalable way to run containerized applications, with different levels of network isolation and configuration. You can choose the environment type, accessibility level, and VNet configuration that best suits your application needs and requirements. You can also leverage Envoy as a network proxy to provide some capabilities such as scaling to zero, HTTPS redirection, TLS termination, mTLS, and ingress controls. Additionally, you can consider the security, and WAF aspects of Azure Container Apps to optimize your budget and protect your applications and data.
Microsoft Tech Community – Latest Blogs –Read More

O Hackathon de Chat Inteligente da Microsoft
Nos últimos seis meses, conhecemos centenas de desenvolvedores que estão usando Python para criar aplicativos de chat de IA para seus próprios domínios de conhecimento, usando o RAG (Retrieval Augmented Generation) para enviar pedaços de informação para um modelo de LLM junto com a pergunta do usuário.
Infográfico em Inglês demonstrando como funciona o RAG
Também ouvimos de muitos desenvolvedores que eles gostariam de aprender a criar seus próprios aplicativos de chat com RAG, mas não sabem por onde começar. Então, estamos organizando um hackathon virtual para ajudá-lo a aprender a construir seu próprio aplicativo de chat com RAG com Python!
Banner do Hackathon
De 29 de janeiro a 12 de fevereiro, realizaremos transmissões ao vivo em inglês e de 5 e 6 de Fevereiro em Português mostrando como construir em nosso repositório de exemplo de chat com RAG mais popular, enquanto também explicamos os principais conceitos subjacentes a todos os aplicativos de chat com RAG modernos. Os tópicos de transmissão ao vivo incluirão pesquisa vetorial, controle de acesso, GPT-4 com visão.
Fique ligado às suas sessões locais do Reactor.
Esperamos envolver desenvolvedores de todo o mundo, então também teremos transmissões ao vivo em espanhol, português e chinês. Haverá prêmios para os melhores aplicativos e até mesmo um prêmio para nosso membro mais útil da comunidade. Para isso, fique atento às suas sessões locais do Reactor!
Para saber mais, visite a página do Reactor para sintonizar seu evento local e visite a página AI Chat App Hack e siga as etapas para se registrar e conhecer a comunidade. Esperamos você lá!
Mais recursos de RAG para desenvolvedores Python
Se você estiver interessado em saber mais sobre os aplicativos RAG, mas não puder participar do hack, aqui estão alguns recursos para você começar:
• Tutorial: Introdução ao exemplo de bate-papo corporativo Python usando RAG
• Recursos de IA do Azure para desenvolvedores Python
• Usando o Llamaindex com a Pesquisa de IA do Azure
Microsoft Tech Community – Latest Blogs –Read More

Why are 273 queries needed to refresh one chart in Power BI ?
Why are 273 queries needed to refresh one chart?
Scenario
A customer approached me and complained that a page in a PBI report was taking a very long time to refresh. (> 100 seconds)
An investigation showed that one chart was sending 273 queries to the ADX cluster.
Was it a coincidence that the chart showed a distinct count of customers in each one of 273 points of sale?
Where are the tables in a star schema coming from?
You design your model as a star schema which is the recommended way even with big data.
The fact table is probably large, and you use direct query from ADX/RTA KQL database.
The question is what storage mode do you use for the dimensions?
The dimensions are usually not very large so technically you can import them.
They are usually not changing very frequently so you can use scheduled refresh.
To be able to update the dimensions at will, you may want to store them in some standard database like SQL server and not ingest them into ADX.
In all these cases in which the fact table is in DQ mode and the dimensions are in import mode or even DQ from a different source, you might encounter the situation described with a ton of queries for a single visual.
What exactly is the problem?
If you look at the attached example you’ll see one page using the Customers table in import mode and the other showing the same visuals where all tables are in DQ mode.
In each page , the upper chart shows a simple count of rows for each week and is fast in both pages.
The bottom chart uses measures and even a % measure that looks more complicated, but it can be calculated with a single query in both cases.
The middle visual shows the distinct count of customers for each week and this one behaves very differently when the date dimension is imported or in DQ.
The reason for this big difference is that in the import case an individual query is send to calculate the distinct count for every week, while in the direct case one query joining the two tables is calculating the results for all weeks.
The simple way to write such a query would be:
Execute in [Web] [Desktop] [cluster(‘help.kusto.windows.net’).database(‘ContosoSales’)]
SalesFact
| lookup kind=inner Dates on $left.DateKey==$right.Datekey
| where CalendarYear ==2008
| summarize Customers=dcount(CustomerKey) by CalendarWeek
| render columnchart
If you click on the Web link, it will take you to our Kusto Web Explorer and you can see that the query is blazing fast.
Power Bi generates a more complicated query but it is basically the same.
Takeaway
When your fact is in DQ mode, don’t use dimensions in import mode unless you are sure that all your measures are additive, and you don’t need to calculate distinct counts.
If the dimension is in ADX, the recommended storage mode is dual.
If the dimension table is stored in a database supported for ADX external tables define an external table in the ADX database and use it instead of importing int PBI.
When an external table is joined with another table, it will be read into memory once.
Microsoft Tech Community – Latest Blogs –Read More
Performing simple FILE Storage REST API operations using CURL
The blog aims to perform simple File storage REST API operations such as Create, Copy, Rename and Delete operations using CURL utility.
Let’s look at some of the CURL command syntax to perform REST API operations and will be making use of SAS as the auth scheme.
We need to take care of the pointers below while performing the operations via CURL:
Ensure the URL is formed correctly as per the operation you are trying to perform.
The mandatory header needs to be passed and can be done using “-H” parameter.
Ensure you are appending/removing extra ‘?’ to the SAS token in the URLs accordingly.
Http verb can be GET, PUT or DELETE as provided by the CURL specifications.
Note:
If you employ an authentication mechanism different from SAS, please ensure that you are including the required headers.
Create FileShare:
The create share operation creates a new Azure Files share under the specified account.
Create Share (FileREST API) – Azure Files | Microsoft Learn
Syntax:
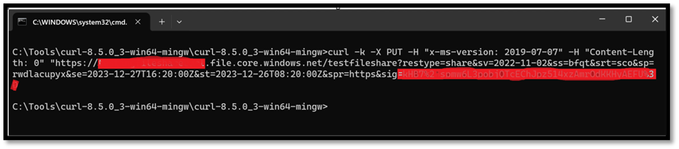
curl -X <HTTP Verb> -H “x-ms-version: 2019-07-07” -H “Content-Length: Content Length in Bytes” “https://StorageAccountName.file.core.windows.net/NameOfTheFileshare?restype=share&SAStoken”
In the below example screenshot, a PUT operation was performed on the storage account to create a File share name as testfileshare. File Share was created successfully.
Create directory:
The Create Directory operation creates a new directory under the specified share or parent directory.
Create Directory (FileREST API) – Azure Files | Microsoft Learn
Syntax :
curl -X <HTTP Verb> -H “x-ms-version: 2021-06-08” -H “x-ms-date: <Date and Time in GMT format>” -H “Content-Length: Content Length in Bytes” “https://StorageAccountName.file.core.windows.net/NameOfTheFileshare/DirectoryToBeCreated?restype=directory&SAStoken”
In the below example screenshot, a PUT operation was performed on the storage account to create a directory name as testdir1. Directory was created successfully.
Delete Directory:
The Delete Directory operation removes the specified empty directory. Note that the directory must be empty before it can be deleted.
Delete Directory (FileREST API) – Azure Files | Microsoft Learn
Syntax :
curl -i -X <HTTP Verb> -H “x-ms-version: 2019-12-12” “https://StorageAccountName.file.core.windows.net/NameOfTheFileshare/DirectoryToBeDeleted?restype=directory&SAStoken”
In the below example screenshot, we have deleted the directory named myfileshare inside a file share using HTTP verb as DELETE
Create file:
The Create File operation creates a new file or replaces a file. When you call Create File, you only initialize the file. To add content to a file, you call the Put Range operation.
Create File (FileREST API) – Azure Files | Microsoft Learn
Syntax :
curl -X <HTTP Verb> -H “x-ms-version: 2021-06-08” -H “x-ms-date: <Date and Time in GMT format>” -H “x-ms-type: file” -H “x-ms-content-length:50000” -H “Content-Length: Content Length in Bytes” “https://StorageAccountName.file.core.windows.net/NameOfTheFileshare/FileToBeCreatedWithFileExtension?SAStoken”
In the below example screenshot, we have created a file named filecreate1 inside a directory and File share.
Mandatory headers:
x-ms-content-length: size for the file, up to 4 tebibytes (TiB)
x-ms-type: file
x-ms-date: <Date and Time in GMT format>
x-ms-version: 2021-06-08
Put Range:
The Put Range operation writes a range of bytes to a file.
Put Range (FileREST API) – Azure Files | Microsoft Learn
Syntax :
curl -X <HTTP Verb> -H “x-ms-version: 2021-06-08” -H “x-ms-date: <Date and Time in GMT format>” -H “Content-Length: Content Length in Bytes” -H “x-ms-range: bytes=startByte-endByte” -H “x-ms-write: <update or Clear>” -d “Content of the blob” “https://StorageAccountName.file.core.windows.net/NameOfTheFileshare/NameOfTheDirectory/FileToBeUpdatedWithFileExtension?comp=range?SAStoken”
Mandatory headers:
In the below example screenshot, We are writing 9 bytes of data i.e. “abcdefghi” to an existing file.
Copy file:
The Copy File operation copies a blob or file to a destination file within the storage account.
Copy File (FileREST API) – Azure Files | Microsoft Learn
Syntax :
curl -X <HTTP Verb> -H “x-ms-version: 2021-06-08” -H “x-ms-date: <Date and Time in GMT format>” -H “Content-Length: Content Length in Bytes” -H “x-ms-copy-source: https://SourceStorageAccountName.file.core.windows.net/NameOfTheFileshare/NameOfTheDirectory/FileToBeCopiedWithFileExtension?SAStoken”
“https://StorageAccountName.file.core.windows.net/NameOfTheFileshare/NameOfTheDirectory/FileNameToBeCreatedWithFileExtension?SAStoken”
In the below example screenshot, we have copied the file named copyfile.txt from Source fileshare testfileshare to destination fileshare myfileshare1. You need to authorize the source file to successfully copy to destination.
Mandatory headers:
x-ms-date: <Date and Time in GMT format>
x-ms-version: 2021-06-08
x-ms-copy-source: https://SourceStorageAccountName.file.core.windows.net/NameOfTheFileshare/NameOfTheDirectory /FileToBeCopied.txt?SAStoken
Rename file:
The Rename File operation renames a file in a storage account.
Rename File (REST API) – Azure Storage | Microsoft Learn
Syntax URL:
curl -X <HTTP Verb> -H “x-ms-version: 2021-06-08” -H “x-ms-date: <Date and Time in GMT format>” -H “Content-Length: Content Length in Bytes” -H “x-ms-type: file” -H “x-ms-file-rename-source:
https://StorageAccountName.file.core.windows.net/NameOfTheFileshare/NameOfTheDirectory/ExistingFileWithFileExtension?SAS token” “https://StorageAccountName.file.core.windows.net/NameOfTheFileshare/NameOfTheDirectory/NewFileToBeRenamedWithFileExtension?comp=rename&SAStoken”
In the below example screenshot, we have renamed the file from filecreate2 to filecreate3.
Mandatory headers:
x-ms-date: <Date and Time in GMT format>
x-ms-version: 2021-06-08
x-ms-file-rename-source : https://StorageAccountName.file.core.windows.net/NameOfTheFileshare/NameOfTheDirectory/ExistingFile?SAS token
Note:
To bypass the SSL certification warnings, you have the option to use the “-k” flag, which permits insecure server connections when utilizing SSL. However, it is not recommended.
Conclusion:
If you find yourself needing to test a different API that hasn’t been covered in this discussion, you can effortlessly apply a comparable approach. Simply modify the essential header parameters according to the specifications of the particular API you are examining.
This adaptability empowers you to apply these testing methods across a diverse range of APIs, ensuring that you can effectively manage different endpoints by adjusting headers and configurations as necessary.
I trust that this information is beneficial for navigating through various APIs and tailoring your approach to meet their distinct requirements. Best of luck with your testing, exploration, and leveraging of APIs to advance your development initiatives!
If your curl command does not execute or return what you expected it to, We can run the command with the -v or –verbose option to get more information.
When verbose mode is enabled, curl gets more talkative and explains and shows a lot more of its doings.
Example screenshot,
I hope this explanation is helpful!
Reference Links:
Operations on the FileService resource – Azure Files | Microsoft Learn
Operations on the FileShare resource – Azure Files | Microsoft Learn
Operations on directories (FileREST API) – Azure Files | Microsoft Learn
Operations on files (FileREST API) – Azure Files | Microsoft Learn
Microsoft Tech Community – Latest Blogs –Read More
Introducing Forms data sync to Excel
The highly anticipated feature – Forms data sync to Excel is now available in Microsoft Forms. With just one click, you can now easily access all your form responses in Excel for the web and take advantage of Excel’s rich functions to analyze and visualize your data. With automatic syncing of new responses in real-time, you can keep working on your existing spreadsheet without missing a beat. No more juggling multiple copies of the same file, making it easier than ever to stay on top of important data. Ready to check out this feature? Let’s get started! You can also try out this feature from this template.
Open responses in Excel
Open any active form or quiz, go to the “Responses” page and click “Open results in Excel”. This will automatically create an Excel worksheet in your OneDrive and take you to Excel for the web, where you’ll see all your data in just a few seconds.
Open response in Excel
Deeper analysis in Excel
In Excel, you can manipulate the data the way you want and leverage various tools to do further analysis, like sorting, filtering, and inserting charts.
Manipulate data in Excel
New responses sync to Excel
New responses will automatically sync when you open your Excel file for the web, allowing you to seamlessly continue your existing work.
New response sync to Excel
Let’s review two real user cases to see how Excel data sync solved their problems to give you some inspiration on how to leverage this feature.
Business scenario
A company uses Excel to manually log every office facility request in a workbook that is shared among different departments for manual status updates and reporting. By using Forms data sync to Excel, they can instead distribute one office facility form through Microsoft Forms and share the Excel workbook of responses. Each department can then review newly synced requests and update the request status they are responsible for accordingly.
Education scenario
Middle school teachers utilize online quizzes for in-class testing. After class, they consolidate various classes’ quiz results into an Excel file for deeper analysis, aiming to identify students’ weaknesses and provide targeted support.
With Forms, multiple classes can use one quiz, and the results will be synced to a single worksheet, eliminating the need for teachers to manually combine quiz results from different classes. The teacher can add a question for class identification and use the filter in Excel to easily distinguish one class from another.
Please note that Forms data sync to Excel is currently only available in Excel for the Web. While you can still view your data with the desktop and mobile apps, new responses will not be automatically synced unless you are using Excel for the Web.
Microsoft Tech Community – Latest Blogs –Read More
Collect Event Ids using Azure Monitor Agent
Introduction
Hello everyone, I am Bindusar (CSA) working with Intune. I have received multiple requests from customers asking to collect specific event IDs from internet-based client machines with either Microsoft Entra ID or Hybrid Joined and upload to Log Analytics Workspace for further use cases. There are several options available like:
Running a local script on client machines and collecting logs. Then using “Send-OMSAPIIngestionFile” to upload required information to Log Analytics Workspace.
The biggest challenge with this API is to allow client machines to authenticate directly in Log Analytics Workspace. If needed, Brad Watts already published a techcommunity blog here.
Extending OMS with SCCM Information – Microsoft Community Hub
Using Log analytics agent. However, it is designed to collect event logs from Azure Virtual Machines.
Use of Monitoring Agent to collect certain types of events like Warning, Errors, Information etc and upload to Log Analytics Workspace. However, in monitoring agent, it was difficult to customize it to collect only certain event IDs. Also, it will be deprecated soon.
Log Analytics agent overview – Azure Monitor | Microsoft Learn
In this blog, I am trying to extend this solution to Azure Monitor Agent instead. Let’s try to take a scenario where I am trying to collect Security Event ID 4624 and upload it to Event Table of Log Analytics Workspace.
Event ID 4624 is generated when a logon session is created. It is one of the most important security events to monitor, as it can provide information about successful and failed logon attempts, account lockouts, privilege escalation, and more. Monitoring event ID 4624 can help you detect and respond to potential security incidents, such as unauthorized access, brute force attacks, or lateral movement.
In following steps, we will collect event ID 4624 from Windows client machines using Azure Monitor Agent and store this information in Log Analytics workspace. Azure Monitor Agent is a service that collects data from various sources and sends it to Azure Monitor, where you can analyse and visualize it. Log Analytics workspace is a container that stores data collected by Azure Monitor Agent and other sources. You can use Log Analytics workspace to query, alert, and report on the data.
Prerequisites
Before you start, you will need the following:
A Windows client that you want to monitor. Machine should be Hybrid or Entra ID joined.
An Azure subscription.
An Azure Log Analytics workspace.
An Azure Monitor Agent.
Steps
To collect event ID 4624 using Azure Monitor Agent, follow these steps:
If you already have a Log Analytics workspace where you want to collect the events, you can move to step #2 where we need to create a DCR. A table named “Events” (not custom) will be used to collect all the events specified.
1. Steps to create Log Analytics Workspace
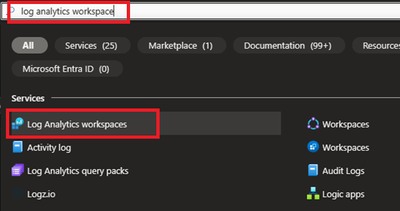
1.1 Login to Azure portal and search for Log analytics Workspace
1.2 Select and Create after providing all required information.
2. Creating a Data Collection Rule (DCR)
Detailed information about data collection rule can be found at following. However, for the granularity of this blog, we will extract the required information to achieve our requirements.
Data collection rules in Azure Monitor – Azure Monitor | Microsoft Learn
2.1 Permissions
“Monitoring Contributor” on Subscription, Resource Group and DCR is required.
Reference: Create and edit data collection rules (DCRs) in Azure Monitor – Azure Monitor | Microsoft Learn
2.2 Steps to create DCR.
For PowerShell lovers, following steps can be referred.
Create and edit data collection rules (DCRs) in Azure Monitor – Azure Monitor | Microsoft Learn
Login to Azure portal and navigate to Monitor.
Locate Data collection Rules on Left Blade.
Create a New Data Collection Rule and Provide required details. Here we are demonstrating Platform Type Windows
Resources option talks about downloading an Azure Monitor Agent which we need to install on client machines. Please select link to “Download the client installer” and save it for future steps.
Under Collect and deliver, collect talks about “what” needs to be collected and deliver talks about “where” collected data will be saved. Click on Add data source and select Windows Event Logs for this scenario.
In this scenario, we are planning to collect Event ID 4624 from Security Logs. By default, under Basic, we do not have such option and thus we will be using Custom.
Customer uses XPath format. XPath entries are written in the form LogName!XPathQuery. For example, in our case, we want to return only events from the Security event log with an event ID of 4624. The XPathQuery for these events would be *[System[EventID=4624]]. Because you want to retrieve the events from the Security event log, the XPath is Security!*[System[EventID=4624]]. To get more information about how to consume event logs, please refer to following doc.
Consuming Events (Windows Event Log) – Win32 apps | Microsoft Learn
Next is to select the Destination where logs will be stored. Here we are selecting the Log analytics workspace which we created in steps 1.2.
Once done, Review and Create the rule.
2.3 Creating Monitoring Object and Associating it with DCR.
You need to create a ‘Monitored Object’ (MO) that creates a representation for the Microsoft Entra tenant within Azure Resource Manager (ARM). This ARM entity is what Data Collection Rules are then associated with. This Monitored Object needs to be created only once for any number of machines in a single Microsoft Entra tenant. Currently this association is only limited to the Microsoft Entra tenant scope, which means configuration applied to the Microsoft Entra tenant will be applied to all devices that are part of the tenant and running the agent installed via the client installer.
Here, we are using a PowerShell script to create and map Monitoring Object to DCR.
Reference: Set up the Azure Monitor agent on Windows client devices – Azure Monitor | Microsoft Learn
Following things to keep in mind:
The Data Collection rules can only target the Microsoft Entra tenant scope. That is, all DCRs associated to the tenant (via Monitored Object) will apply to all Windows client machines within that tenant with the agent installed using this client installer. Granular targeting using DCRs is not supported for Windows client devices yet.
The agent installed using the Windows client installer is designed for Windows desktops or workstations that are always connected. While the agent can be installed via this method on client machines, it is not optimized for battery consumption and network limitations.
Action should be performed by Tenant Admin as one-time activity. Steps mentioned below gives the Microsoft Entra admin ‘owner’ permissions at the root scope.
<#
Disclaimer
The sample scripts are not supported under any Microsoft standard support program or service. The sample scripts are provided AS IS without warranty of any kind. Microsoft further disclaims all implied warranties including, without limitation, any implied warranties of merchantability or of fitness for a particular purpose. The entire risk arising out of the use or performance of the sample scripts and documentation remains with you. In no event shall Microsoft, its authors, or anyone else involved in the creation, production, or delivery of the scripts be liable for any damages whatsoever (including, without limitation, damages for loss of business profits, business interruption, loss of business information, or other pecuniary loss) arising out of the use of or inability to use the sample scripts or documentation, even if Microsoft has been advised of the possibility of such damages.
#>
#Make sure execution policy is allowing to run the script.
Set-ExecutionPolicy unrestricted
#Define the following information
$TenantID = “< >” #Your Tenant ID
$SubscriptionID = “< >” #Your Subscription ID where Log analytics workspace was created.
$ResourceGroup = “Custom_Inventory” #Your resroucegroup name where Log analytics workspace was created.
$Location = “eastus” #Use your own location. “location” property value under the “body” section should be the Azure region where the Monitor object would be stored. It should be the “same region” where you created the Data Collection Rule. This is the location of the region from where agent communications would happen.
$associationName = “EventTOTest1_Agent” #You can define your custom associationname, must change the association name to a unique name, if you want to associate multiple DCR to monitored object.
$DCRName = “Test1_Agent” #Your Data collection rule name.
#Just to ensure that we have all modules required.
If(Get-module az -eq $null)
{
Install-Module az
Install-Module Az.Resources
Import-Module az.accounts
}
#Connecting to Azure Tenant using Global Admin ID
Connect-AzAccount -Tenant $TenantID
#Select the subscription
Select-AzSubscription -SubscriptionId $SubscriptionID
#Grant Access to User at root scope “/”
$user = Get-AzADUser -UserPrincipalName (Get-AzContext).Account
New-AzRoleAssignment -Scope ‘/’ -RoleDefinitionName ‘Owner’ -ObjectId $user.Id
#Create Auth Token
$auth = Get-AzAccessToken
$AuthenticationHeader = @{
“Content-Type” = “application/json”
“Authorization” = “Bearer ” + $auth.Token
}
#1. Assign ‘Monitored Object Contributor’ Role to the operator.
$newguid = (New-Guid).Guid
$UserObjectID = $user.Id
$body = @”
{
“properties”: {
“roleDefinitionId”:”/providers/Microsoft.Authorization/roleDefinitions/56be40e24db14ccf93c37e44c597135b”,
“principalId”: `”$UserObjectID`”
}
}
“@
$requestURL = “https://management.azure.com/providers/microsoft.insights/providers/microsoft.authorization/roleassignments/$newguid`?api-version=2020-10-01-preview”
Invoke-RestMethod -Uri $requestURL -Headers $AuthenticationHeader -Method PUT -Body $body
##########################
#2. Create Monitored Object
$requestURL = “https://management.azure.com/providers/Microsoft.Insights/monitoredObjects/$TenantID`?api-version=2021-09-01-preview”
$body = @”
{
“properties”:{
“location”:`”$Location`”
}
}
“@
$Respond = Invoke-RestMethod -Uri $requestURL -Headers $AuthenticationHeader -Method PUT -Body $body -Verbose
$RespondID = $Respond.id
##########################
#3. Associate DCR to Monitored Object
#See reference documentation https://learn.microsoft.com/en-us/rest/api/monitor/data-collection-rule-associations/create?tabs=HTTP
$requestURL = “https://management.azure.com$RespondId/providers/microsoft.insights/datacollectionruleassociations/$associationName`?api-version=2021-09-01-preview”
$body = @”
{
“properties”: {
“dataCollectionRuleId”: “/subscriptions/$SubscriptionID/resourceGroups/$ResourceGroup/providers/Microsoft.Insights/dataCollectionRules/$DCRName”
}
}
“@
Invoke-RestMethod -Uri $requestURL -Headers $AuthenticationHeader -Method PUT -Body $body
#IN case you want to create more than DCR, use following in comments.
<#
#(Optional example). Associate another DCR to Monitored Object
#See reference documentation https://learn.microsoft.com/en-us/rest/api/monitor/data-collection-rule-associations/create?tabs=HTTP
$associationName = “assoc02” #You must change the association name to a unique name, if you want to associate multiple DCR to monitored object
$DCRName = “dcr-PAW-WindowsClientOS” #Your Data collection rule name
$requestURL = “https://management.azure.com$RespondId/providers/microsoft.insights/datacollectionruleassociations/$associationName`?api-version=2021-09-01-preview”
$body = @”
{
“properties”: {
“dataCollectionRuleId”: “/subscriptions/$SubscriptionID/resourceGroups/$ResourceGroup/providers/Microsoft.Insights/dataCollectionRules/$DCRName”
}
}
“@
Invoke-RestMethod -Uri $requestURL -Headers $AuthenticationHeader -Method PUT -Body $body
#>
#Following step is to query the created objects.
#4. (Optional) Get all the associatation.
$requestURL = “https://management.azure.com$RespondId/providers/microsoft.insights/datacollectionruleassociations?api-version=2021-09-01-preview”
(Invoke-RestMethod -Uri $requestURL -Headers $AuthenticationHeader -Method get).value
3. Client-side activity
3.1 Prerequisites:
Reference: Set up the Azure Monitor agent on Windows client devices – Azure Monitor | Microsoft Learn
The machine must be running Windows client OS version 10 RS4 or higher.
To download the installer, the machine should have C++ Redistributable version 2015) or higher
The machine must be domain joined to a Microsoft Entra tenant (AADj or Hybrid AADj machines), which enables the agent to fetch Microsoft Entra device tokens used to authenticate and fetch data collection rules from Azure.
The device must have access to the following HTTPS endpoints:
global.handler.control.monitor.azure.com
<virtual-machine-region-name>.handler.control.monitor.azure.com (example: westus.handler.control.azure.com)
<log-analytics-workspace-id>.ods.opinsights.azure.com (example: 12345a01-b1cd-1234-e1f2-1234567g8h99.ods.opinsights.azure.com) (If using private links on the agent, you must also add the data collection endpoints)
3.2 Installing the Azure Monitoring Agent Manually
Use the Windows MSI installer for the agent which we downloaded in step 1.3 while creating the DCR.
Navigate to downloaded file and run that as administrator. Follow the steps like configuring proxy etc as per your need and finish the setup.
Following screenshots can be referred to install manually on selected client machines to test.
This needs Admin permissions on local machine.
Verify successful installation:
Open Services and confirm ‘Azure Monitor Agent’ is listed and shows as Running.
Open Control Panel -> Programs and Features OR Settings -> Apps -> Apps & Features and ensure you see ‘Azure Monitor Agent’ listed.
3.3 Installation of Azure Monitor Agent using Intune.
Login to Intune Portal and navigate to Apps.
Click on +Add to create a new app. Select Line-of-business app.
Locate the Agent file which was downloaded in section 2.2 during DCR creation.
Provide the required details like scope tags and groups to deploy.
Assign and Create.
Ensure that machines are already installed with C++ Redistributable version 2015) or higher. If not, please create another package as dependent of this application. If you do not do that, Azure Monitoring Agent will be stuck in Install Pending State.
4. Verification of configuration.
Its time to validate the configuration and data collected.
4.1 Ensure that the Monitoring Object is mapped with data collection rule.
To do this, navigate to Azure Portal > Monitor > Data collection rule > Resources. A new custom monitored object should be created.
4.2 Ensure that Azure Monitor Agents are Connected.
To do this, navigate to Azure Portal > Log Analytics Workspaces > Your workspace which was created at the beginning > Agents > Focus on Windows Computers Connected Via Azure Monitor Windows Agents on Left Side.
4.3 Ensure that the client machines can send required data.
To check this, navigate to Azure Portal > Log Analytics workspaces > Your workspace which was created at the beginning > Tables. Events table must be created.
4.4 Ensure that required data is captured.
To access the event logs captured, navigate to Azure Portal > Log Analytics workspaces > Your workspace which was created at the beginning > Logs and run KQL query.
“Event
| where EventID == 4624”
Conclusion
Collecting event IDs, like Event ID 4624 from Windows clients is a useful way to track user logon activities and identify any suspicious or unauthorized actions. By using Azure Monitor Agent and Log Analytics workspace, you can easily configure, collect, store, and analyse this data in a scalable and easy way. You can also leverage the powerful features of the Log Analytics query language (KQL) and portal to create custom queries, filters, charts, and dashboards to visualize and monitor the logon events. You can further refer this data in PowerBI reports as well.
We would like to thank you for reading this article and hope you found it useful and informative.
If you want to learn more about Azure Monitor and Log Analytics, you can visit our official documentation page and follow our blog for the latest updates and news.
Microsoft Tech Community – Latest Blogs –Read More

The AI Study Guide: Azure’s top free resources for learning generative AI in 2024
Hi! It’s me, Natalie, you’re Azure AI learning guru. Want to learn something about Azure AI? We’ve got something for that!
Welcome to the January edition of the Azure AI Study Guide. Every month I’ll bring you the best and newest tools when it comes to skilling up on Azure AI. This month, we’re all about Generative AI. Whether you are already building and training models or trying out a few AI tools for the first time, these free resources are for you.
First, the fundamentals:
Fundamentals of generative AI: By the time you’re done with this 40-minute course you’ll understand how large language models (LLMs) form the foundation of generative AI, what the term “copilot” means, and how to improve AI responses with prompt engineering.
Fundamentals of Azure OpenAI Service: Learn to build enterprise-grade solutions for text summarization, code suggestions, and image generation using OpenAI tools such as ChatGPT and DALL-E, paired with Azure OpenAI Service.
Fundamentals of responsible generative AI: Check out this course to explore a set of responsible AI guidelines for generative AI, as defined by experts at Microsoft. It should take about 50 minutes to finish.
Generative AI for beginners: This 12-lesson comprehensive course covers generative AI principles and application development so you can get an understanding of what it would take to build a generative AI startup with Microsoft Cloud Advocates on GitHub.
AI in a minute video series: Demystify generative AI terminology and technology through these bite-sized videos. Subscribe to our Microsoft Cloud YouTube channel to keep up with a growing list of vitally important developments as this series grows.
Next, start building solutions with generative AI:
Get started with Azure OpenAI Service: Get the full Azure OpenAI Studio experience and bring generative AI models to life on the Azure platform. Learn the skills to develop powerful AI solutions—supporting workloads across vision, speech, language, decision, search, and more.
Build natural language solutions with Azure OpenAI Service: Learn to integrate Azure OpenAI Service into your applications using Python and C# SDKs and REST APIs. This 1-hour module provides step-by-step guidance on building natural language solutions with generative AI.
Apply prompt engineering with Azure OpenAI Service: Learn effective prompt engineering techniques to maximize the utilization of Azure OpenAI models in this comprehensive module.
Generate code with Azure OpenAI Service: Generative AI can whip up all kinds of content, including code across multiple languages. In this module you’ll learn to use Azure OpenAI to generate code and assist in diverse development tasks.
Generative images with Azure OpenAI Service: With the power of the DALL-E image generation model, Azure OpenAI can produce any kind of graphic you want based on your plain-language descriptions. Completing this module will allow you to use DALL-E to generate illustrations, photorealistic images, marketing collateral, unique logos, and much more.
Use your data with Azure OpenAI Service: Maximize the potential of Azure OpenAI by integrating your own data sources. In this 30-minute module, discover how to seamlessly add your data to Azure OpenAI, allowing supported AI chat models to provide responses based on both your data and its pretrained knowledge.
Fundamentals of responsible AI: Despite its powerful capabilities, generative AI poses certain risks. Navigate the guidelines for responsible generative AI built on Microsoft’s responsible AI standard that accounts for considerations related to generative AI models in this module.
Finally, get guided hands-on experience:
Microsoft Azure Virtual Training Day: Generative AI Fundamentals: Attend this free online training to gain foundational insights into language models and generative AI applications. Discover how Azure OpenAI Service helps you deliver results using text, code, image generation, natural language summarization, and semantic search.
Microsoft Azure Virtual Training Day: Building Generative Apps with Azure OpenAI Service: Join us to learn how to work with powerful large language models, including GPT. You’ll gain deeper insight into the benefits of natural language processing and discover how to provision Azure OpenAI, deploy models, and effectively use language models in generative AI applications.
Last week we also kicked off the Generative AI with Azure OpenAI Cloud Skills Challenge, part interactive learning sprint, part good-natured competition between you and thousands of your peers around the globe. Advance your technical skills through task-based achievements and prepare for Microsoft role-based certifications. In about 18 hours, you’ll learn how to train models to generate original content based on natural language input.
For these and more AI training content, visit our AI learning hub.
Microsoft Tech Community – Latest Blogs –Read More
Persisting Data Volumes With .NET Aspire
This post is written against the .NET Aspire Preview 2 release, so it may change when the final version is released.
Recently, I’ve been building an app using .NET Aspire which I’m using PostgreSQL as the database and Azure Storage Blobs and Queues in.
.NET Aspire is awesome for this, as you can setup a developer inner loop super simply with the components that ship, and the nice thing about this is that locally PostgreSQL is run in a Docker container and Azure Storage uses the Azurite storage emulator (which also happens to run in a container).
The problem with this is that when you restart your app, you lose all the data in the database and storage emulator, since they are started fresh each time.
Turns out, it’s a pretty easy fix – all that you need to do is mount a volume into the container where it would store it’s data.
Here’s the PostgreSQL example:
IResourceBuilder<PostgresContainerResource> postgresContainerDefinition = builder.AddPostgresContainer();
if (builder.Environment.IsDevelopment())
{
postgresContainerDefinition
// Mount the Postgres data directory into the container so that the database is persisted
.WithVolumeMount(“./data/postgres”, “/var/lib/postgresql/data”, VolumeMountType.Bind);
}
And here’s the Azure Storage example:
IResourceBuilder<AzureStorageResource> storage = builder.AddAzureStorage(“azure-storage”);
if (builder.Environment.IsDevelopment())
{
storage.UseEmulator()
.WithAnnotation(new VolumeMountAnnotation(“./data/azurite”, “/data”, VolumeMountType.Bind));
}
With this I’m mounting the ./data/<service name> folder from within the AppHost project into the respective data paths, but also wrapping them with a builder.Environment.IsDevelopment() check so that it only happens when running locally (since you don’t want to mount volumes in production – we’ll use the Azure services for that).
Note: The Azure Storage emulator doesn’t have a WithVolumeMount method, so we have to use the WithAnnotation method, which is what the WithVolumeMount method wraps anyway. Also, due to this pull request it’s likely there’ll be an easier way come Preview 3, where you provide the ./data/azurite path as part of the UseEmulator method.
Now when I restart my app, the data is persisted, meaning I don’t have to rebuild state each time. Just make sure you put those paths in the .gitignore file so that you don’t accidentally commit them to source control!
Microsoft Tech Community – Latest Blogs –Read More


