

Category: Microsoft
Category Archives: Microsoft

Announcing HCIBox support for Azure Stack HCI 23H2
Microsoft Tech Community – Latest Blogs –Read More

Skill up on Modern Work: What you may have missed in 2023…
Note from the editor: This blog is guest-authored by Jeremy Chapman, former IT professional and long-time technical expert on the Microsoft 365 product team.
2023 will go down as the year the world was broadly introduced to generative AI. Experiences from OpenAI’s ChatGPT and Microsoft Copilot were significant in both technology and even non-technology conversations. Beyond the user experiences, many of the core concepts were more deeply explained, including how generative AI can offer more personalized responses by incorporating your files and data as part of the orchestration process to respond to your prompts.
Before I go any deeper into the mechanics of generative AI and retrieval augmented generation, since this is about Modern Work skilling overall, let me start by sharing a few highlights spanning Microsoft 365, Windows, and others that you may have missed. The good news is that you can get to everything right now on demand and for free. These resources span online and in-person events, videos, documentation, and structured learning, so whatever modality you prefer, we’ve got your covered!
Here are 7 recommended resources
Microsoft Technical Takeoff with deep Windows, Windows 365, and Microsoft Intune went live in November and hosted more than 30 deeper-dive 300-level sessions, which didn’t make it into the agenda of Microsoft Ignite.
Microsoft Ignite’s Modern Work track included 37 technical sessions spanning Microsoft 365, Teams, Copilot and more – with exclusive and deep dive updates across products and services – so you can find information on your specific areas of focus and interest.
Microsoft Mechanics went deep across 10 Modern Work topics since June, not just for Microsoft Copilot, but also announcements like the new Windows App, Microsoft Loop general availability, and more.
New Copilot for Microsoft 365 Learning Paths, starting with basic concepts and going all the way to what you and your organization can do to prepare for generative AI
Microsoft Copilot end user skilling site with even more of the basics covered for how to work with Copilot, tips for authoring prompts, demonstrations and more.
If instructor-led training is your preference, there are 7 unique Virtual Training Days that have been running for months and you can now sign up for future deliveries.
My final recommendation is to use Microsoft Copilot to find and summarize the skilling content you want – and because it’s grounded using current web content, those recommendations will always be up to date.
Sharing one of my 2023 skilling journeys: Learning the core mechanics of generative AI apps and orchestration
So now, let me get back to the topic of how generative AI experiences can safely work with your data to create more personalized responses. You may know me from Microsoft Mechanics, where we dig into trending technical topics at Microsoft and as the name suggests, explain the mechanics behind them. And because we cover topics on Mechanics from several areas across Microsoft, including Azure AI, developer tools, and data security, as well as Modern Work, I have a unique cross-product perspective. This extends to generative AI solutions with retrieval-augmented generation, and how their underlying orchestration patterns work. I’d like to share some highlights from my own personal skilling journey to demystify a few of the core concepts. And to be clear, you will likely need a basic understanding of generative AI concepts, to follow everything I’ll write and show below.
The mechanics of copilot-style apps
First, you may have seen this architecture representing Copilot for Microsoft 365, either in product documentation or a Microsoft Ignite session that I helped present in November:
Copilot for Microsoft 365 architecture
If you follow the lines and numbered steps in the diagram, it walks through the mechanics of what happens behind the scenes when you submit a prompt. I won’t describe every step in the architecture, but there are a few concepts in there that I learned a bit more deeply about while building recent shows like our deep dive on building custom apps using Azure AI Studio, along with the many topics before that in our broader generative AI video playlist. And unless you are a developer, there’s a good chance that you might have missed these details, so let me break down at a very high level a few of the shared core concepts you’d use to build your own copilot-style app. I’ll use the Azure AI Studio as visual representations for a few of the steps that I initially had not fully understood.
Pre-processing. This refers to a broader set of steps occurring immediately after you submit a prompt. In Azure AI Studio, as well as most common generative AI architectures, one of the first concepts used for pre-processing is called a System Message, but it’s sometimes also referred to as a “System Prompt” or “Meta Prompt” as highlighted below. These are appended to all user prompts behind the scenes to provide additional context for how a large language model should respond. The example is simple system message, and you will see these used to ensure for example that responses are friendly, helpful, voiced in a certain tone, factual, and cite information sources used for a response.
Grounding with data. This refers to data that can later be presented to a large language model along with your prompt and system message to help generate an informed response. This process uses information that the large language model did not have access to as part of its training set. Any data used for retrieval is limited to what the user has permission to access.
Below, the integrated data is represented in my example by a dataset of owner manuals for outdoor products from a fictitious online retailer. In Copilot for Microsoft 365, this would include the Microsoft Graph and the information it can programmatically access in places like SharePoint, OneDrive, email, calendar, and others. This can also include any information you have extended your organization’s instance of the Microsoft Graph with using Graph connectors or plugins to connect programmatically and in real-time via APIs to read information external to Microsoft 365. Information on the web can also optionally be used to retrieve up-to-date public information as part of the grounding process.
These retrieval steps can optionally use semantic search – or what’s often referred to as vector search – in addition to keyword search. Semantic search retrieves similar information based on the derived intent of the user prompt, without matching keywords, keyword synonyms, or keyword misspellings. An example of semantic search would be if you described “the app with numbers, tables, and formulas” in a prompt; semantic search could derive that you are referring to Microsoft Excel, even though neither “Microsoft” or “Excel” were used to describe it as keywords. To find out more about how semantic search works with keyword search and the benefits of combining the two concepts, I’d encourage you to watch this show about vector and keyword search on Mechanics.
Orchestration. All of the steps shown in the architecture diagram are referring to orchestration, or the things that happen between submitting your prompt and receiving the response. There is a lot that goes on there. In the Azure AI Studio, the orchestration used is called a prompt flow. This does everything described in the high-level steps 1-6 in the architecture diagram above. And using Azure AI Studio and prompt flows, can get a little higher fidelity on what can happen, such as determining and extracting intent, formatting the retrieved information so that it can be efficiently presented to the large language model, and later formatting the reply so that it matches the interface and expectation of the user in your app.
Responsible AI. Responsible AI is often abbreviated as RAI, like in the architecture diagram above, but what does it mean programmatically? Microsoft has an entire site devoted to describing what responsible AI means. Azure AI Studio also has the concept of Content Safety using content filters for both user inputs and response outputs (model completions) using a few high-level categories. These are only a few components used as part of orchestration and inferencing with generative AI, and you can get an idea of the types of things that are filtered.
Post-processing. Again, the post processing comprises a larger number of steps, including formatting the output of a response for a particular app or interface. This is also where data security and compliance controls can come into play, as described in the architecture diagram. For example, the response here can include data labels of referenced content for confidentiality or automatically apply sensitivity labels of generated content if sensitive information was retrieved to generate the response.
Then, once all of these and other steps are completed, the orchestration returns its informed response back to the user in the app they are using with generative AI.
Hopefully, this helps demystify a few of the core concepts for these types of apps. This is by no means an exhaustive description of every step in the process (or for that matter, everything I’ve learned in 2023 :)). For me, with a background in deployment and process automation, these steps were very helpful in my personal skilling journey to understand how everything works, and even helped me to build a few simple copilot style apps using the Azure AI Studio.
Of course, there is a lot more that you can explore. I’d recommend starting with a few of the items listed in the beginning. If you’re looking for something not on my list, that’s where Microsoft Copilot can help. Just remember to be specific with your prompt for best results.
Thanks for reading this far and best wishes for 2024!
Microsoft Tech Community – Latest Blogs –Read More

Network provider connectivity attribution in the Microsoft 365 admin center
When you think of Microsoft 365 services and network recommendations from Microsoft, the first thing that comes to mind is Microsoft’s network connectivity principles. These principles are the guidelines to follow when it comes to designing enterprise network connectivity for accessing Microsoft 365.
The Health | Network Connectivity page in the Microsoft 365 admin center is where you can view network connectivity assessment results for your users, which is represented as an aggregate at your tenant level and location level. “Location level” refers to your Office locations that are automatically discovered or defined by you.
You can find complete product documentation at https://aka.ms/networkproviders, but we wanted to share some details on how the new experience works.
In Health | Network Connectivity, you can find network insights to help you improve your assessment results, by understanding factors in your enterprise network design that don’t align with the network connectivity principles.
For example: Backhauled network egress has been detected at Location X and we recommend using a closer egress point.
Network provider devices are affecting your network, we detected proxy servers or firewalls between your users’ devices and Microsoft 365 endpoints.
The common feedback we heard was to improve the quality of actionable information provided through these network insights: “Don’t just tell me I am backhauling network traffic, tell me what I need to do to rectify the situation.”
Here are other examples where actionable information is missing today:
“How are the network devices affecting my network and what are the steps I can take to prevent it?”
“Are there better network connectivity providers that I can explore for my users network connectivity?”
We listened and have been working hard to improve your admin experience with Health | Network Connectivity, today we are thrilled to announce that the following features are generally available for all tenants in the Microsoft 365 admin center:
Network Providers in use for your tenant users, shown at the tenant level and location level.
Network connectivity Performance and Availability assessment results for your network providers.
Network Provider details impacting performance assessment results.
The Network Provider Index chart shows top performing network providers at a given location (for the USA only, coming soon for rest of the world).
These features have been in limited public preview since June 2023. We have more than 170 enterprise customers enrolled in the public preview and provide direct feedback to improve product quality. Go to Health | Network Connectivity today to experience the new features. You can sign up for the preview of upcoming features at https://aka.ms/networkpreview.
How can I access the new features?
The new features are under Health | Network Connectivity in Microsoft 365 admin center. To access them you must be assigned the Network Administrator or Global Administrator role. You can view the Network Traffic tab, which shows you your network providers at the tenant level. You can also view the table of network providers by location on the Locations tab.
How can I view network providers in use for my users at my tenant level?
You can view this in the Overview tab of Network Connectivity, where there is a widget that shows the top five network providers in use for your tenant users.
Widget for Top five network providers for the tenant
You can also see this on the Network Traffic tab, which contains all the information about network providers used by your users.
Network traffic tab in network connectivity page
What do you mean by Overlay and ISP?
We classify network providers as ISP, Overlay, Corporate, or Satellite. This identifies the type of solution or service offered by the network provider. For example, a VPN solution or cloud proxy service is classified as Overlay, and an Internet link is classified as ISP or Satellite depending on the delivery of the service (terrestrial or satellite). Some organizations have their own ASN or network infrastructure and this is classified as Corporate.
How can I view network providers in use for my users at my Office location level?
When you go to the Locations tab, you should see the list of Office locations that were automatically discovered or added by an admin. If you do not see any discovered or added locations, jump to the next question.
In the list of locations, you should see a Network Providers column that shows you the network providers used at each location.
List of office locations along with network providers in Locations tab
Click on a Location, and then scroll to the end on the Summary tab to see the list of network providers in use at that location.
List of network providers used at a specific location
How can I filter my list of locations for a particular network provider?
In the Network Traffic tab where you see the list of providers at the tenant level, you can click on any network provider and a flyout panel appears with an option to View Locations that you can click to view the list of automatically filtered locations for this provider.
Flyout panel for network provider along with the view locations link
When you click on View Locations, you will be taken to a filtered list of locations for the provider.
List of locations automatically filtered for a network provider
Why do I not see the View Locations option in the flyout panel?
View Locations is not shown when we can’t identify the office locations where the network provider is used. This could be because you do not have any or some of your office locations have not been discovered or added.
Why do I not see any locations discovered or added in the locations tab?
We depend on location information from Windows Location Services (WLS) to discover your location, it’s possible that WLS is not enabled on your user’s devices, or you chose to not share the location information with Microsoft in the Settings for Network Connectivity in Microsoft 365 admin center.
Some admins define their locations manually using the Add Location option in Locations tab, or the Manage multiple locations option, to import their locations using a csv or tsv file or the building data file exported from Call Quality Dashboard.
If you have not shared location information with us or defined locations manually, you will not see any locations for your tenant. Go to the next question to sign up for an alternative option to automatically discover your locations without sharing your location information.
How can I get my Locations discovered automatically without sharing my location information or using WLS?
If you prefer not to share location information with us or do not have the information required to define locations manually, you can use a new option we are introducing to discover your locations based on the network telemetry. In the network telemetry we have information like your LAN Subnet ID, Egress IP address that enables us to show all your locations from where your users are connecting to Microsoft 365. You can sign up for the public preview at https://aka.ms/networkpreview to explore this new option and provide us feedback.
When defining locations manually, can I use supernets instead of specific LAN subnets?
Yes, we now support supernets when you add locations using LAN subnets. For example, You added a location using /20 LAN subnet, we received a LAN subnet attribute containing /24 (if part of the supernet you defined uses /20 and there is no other specific match for the /24 subnet) in the network assessment, we will map this network assessment to the location based on the /20 supernet definition.
I have too many locations, how can I manage the view to prioritize?
You can filter the list of locations using location type (automatically discovered vs admin added), work type (onsite or remote). You can also select multiple locations and hide them by using the Hide option.
Can I edit the location by adding more details?
Yes, you can edit the location by selecting it and using the Edit option. In fact, this is a great way to build on the automatically discovered locations by adding LAN subnets or egress IP’s or both to make the location view more accurate or scoped to your needs.
If my network provider’s performance is low, where can I view details that will help improve performance?
From the list of locations, you can click on a location to go to its Summary tab. If you scroll down to the end of the Summary tab you will see the list of network providers used at this location.
List of network providers used at a specific location
From this list of providers, you can click on a specific provider to view the Summary and Details for that provider. For example, I can click Fabrikam to view the flyout with summary and details for Fabrikam.
Summary for network provider Fabrikam
In the Details tab there is information that typically affects provider performance. For example, we detect network provider device interference between your users and Microsoft 365.
Here are the types of device interference we can detect.
SSL break and inspect test: This detects a private or unknown certificate presented by a network device to your users for data path connections to Microsoft 365, a private certificate is typically used when the network device intends to perform break and inspect operation at the SSL or TLS layer for those connections. We may not be able to show you the detected certificate issuer names due to privacy reasons.
Incorrect destination IP address detected: This indicates that the destination endpoint representing Microsoft 365 endpoints have incorrect or unfamiliar IP addresses assigned to them. Typically, this means there is an intermediate network device acting as a proxy and we will show you the incorrect or unfamiliar IP address detected.
VPN or tunneling detected: This indicates that the network taken to connect to Microsoft 365 endpoints involves a VPN or traffic tunnelling. A VPN or traffic tunnelling may cause backhaul of network traffic and lead to network performance issues that impacts user experience.
If no device interference is detected, the implementation is considered to be aligned with our network connectivity principles.
Interference details like SSL break and inspect, Incorrect destination IP address and VPN tunneling detected for a network provider
NPI
The Network Provider Index (NPI) chart is a monthly index that can be viewed by office location. It lists network providers with the highest performance used by Microsoft 365 customers in the same country/region and state as your office. We include availability and performance information attributed to these providers. This index also shows a target baseline that shows the best performance observed in the same country/region and state.
Network provider index chart for a location
How can I use the NPI chart?
You can use the NPI chart to find top performing network providers and view their performance assessment at a given location, such as your office location or any other location from where users connect to Microsoft 365. Note that the index is provided at the State level and not City level.
You can also use the NPI chart to determine the best performance observed at a particular location. This is referred to as the Target baseline. For example, sometimes the best performance assessment observed 80 points out of 100, this means you are unlikely to find a network provider who can deliver better performance at this location.
— The Microsoft 365 Network Engineering team
Microsoft Tech Community – Latest Blogs –Read More
Introducing More Granular Certificate-Based Authentication Configuration in Conditional Access
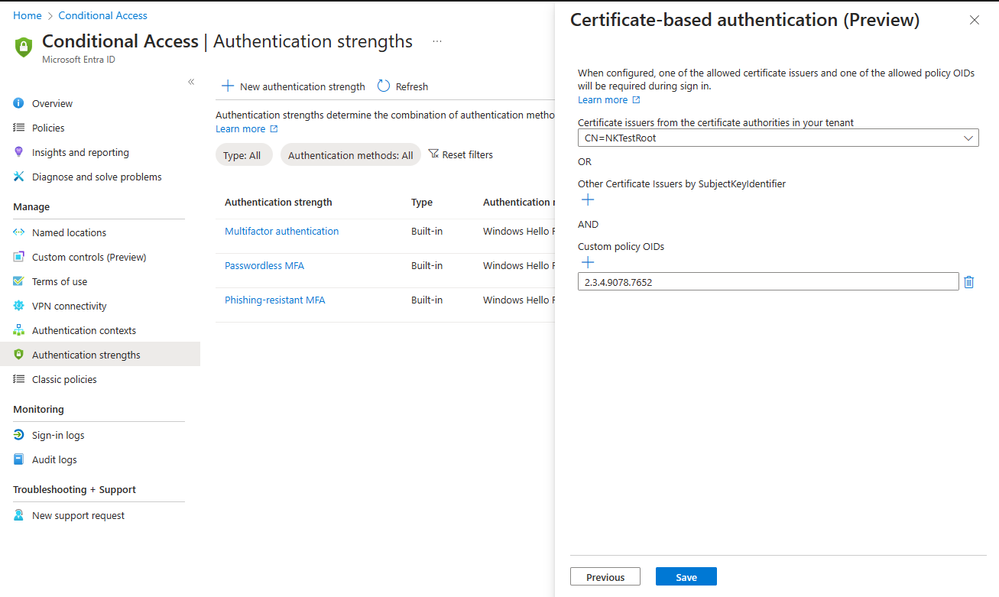
I’m thrilled to announce the public preview of advanced certificate-based authentication (CBA) options in Conditional Access, which provides the ability to allow access to specific resources based on the certificate Issuer or Policy Object Identifiers (OIDs) properties.
Our customers, particularly those in highly regulated industries and government, have expressed the need for more flexibility in their CBA configurations. Using the same certificate for all Entra ID federated applications is not always sufficient. Some resources may require access with a certificate issued by specific issuers, while other resources require access based on a specific policy OIDs.
For instance, a company like Contoso may issue three different types of multifactor certificates via Smart Cards to employees, each distinguished by properties such as Policy OID or issuer. These certificates may correspond to different levels of security clearance, such as Confidential, Secret, or Top Secret. Contoso needs to ensure that only users with the appropriate multifactor certificate can access data of the corresponding classification.
Figure 1: Authentication strength – advanced CBA options
With the authentication strength capability in Conditional Access, customers can now create a custom authentication strength policy, with advanced CBA options to allow access based on certificate issuer or policy OIDs. For external users whose multifactor authentication (MFA) is trusted from partners’ Entra ID tenant, access can also be restricted based on these properties.
This adds flexibility to CBA, in addition to the recent updates we shared in December. We remain committed to enhancing phishing-resistant authentication to all our customers and helping US Gov customers meet Executive Order 14028 on Improving the Nation’s Cybersecurity.
To learn more about this new capability check authentication strength advanced options.
Thanks, and let us know what you think!
Alex Weinert
Learn more about Microsoft Entra:
See recent Microsoft Entra blogs
Dive into Microsoft Entra technical documentation
Learn more at Azure Active Directory (Azure AD) rename to Microsoft Entra ID
Join the conversation on the Microsoft Entra discussion space and Twitter
Learn more about Microsoft Security
Microsoft Tech Community – Latest Blogs –Read More
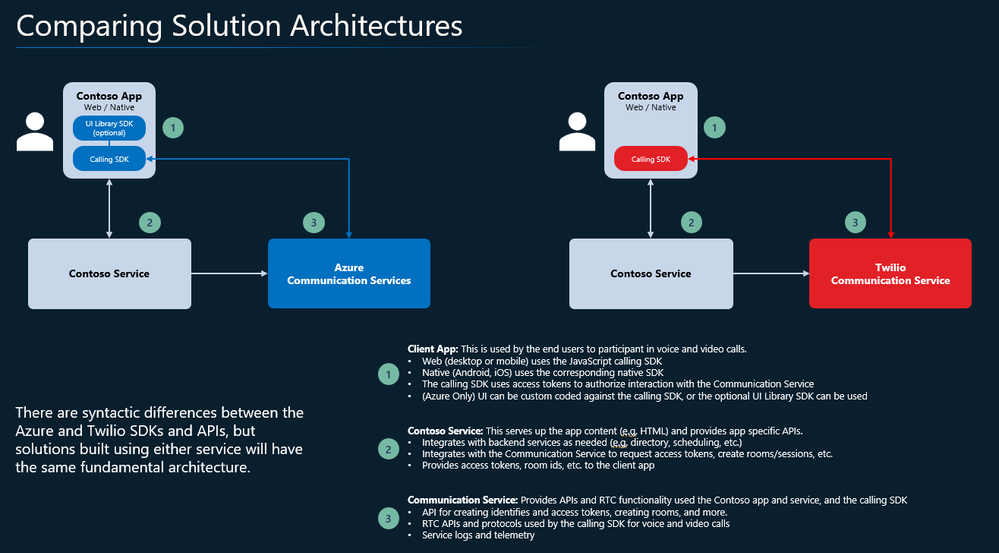
Transitioning Smoothly from Twilio to Azure Communication Services
Twilio recently announced that their Programmable Video API will be deprecated effective December 5, 2024. Azure Communication Services offers real-time video calling solutions for developers looking to migrate from Twilio’s Video API. Below is a migration guide to add video to a Web (JavaScript) calling app.
Further details can be found in our Twilio to Azure Communication Services migration. documentation.
Azure Communication Services Video Calling
Azure Communication Services offers multichannel communication APIs for adding voice, video, chat, text messaging/SMS, email, and more to all your applications and is used by Microsoft Teams, LinkedIn, Dynamics, and many other customers whose stories can be found here.
Azure Communication Services Video Calling features and integrated services:
Calling client SDK, which can be embedded in websites and native applications
Call Automation APIs, which allow services to manage and access calls
Rooms APIs which adds common communication semantics to a voice or video call, such as roles and permissions for virtual appointments
Phone Numbers and Direct routing, allowing you to acquire phone numbers directly from Azure or to bring your own.
SDKs enabling you to reach users where they are: desktop & mobile web browsers, iOS, Android, and Windows native apps
Interoperability with Teams. This is especially useful for business-to-consumer communication scenarios like virtual appointments, because many organizations already use Teams for employee communication.
Open-source production-ready UI components to drop into your application
High definition, efficient, and reliable video, with a variety of quality and diagnostic tools that simplify operations and troubleshooting
Data Channel APIs providing high performance, low-latency access to Azure’s global network.
Migration guide for a browser video calling app
In this section we’ve provided architectural information for developers migrating a JavaScript browser video calling application. A step-by-step guide with code snippets and additional detail and guidance for other platforms is available in our migration documentation.
These are the key steps for migrating an application:
Installation and Project Setup: Get started with Azure Communication Services with ease.
Creating Access Tokens: Understand the token generation process for secure authentication.
Client Authentication: Ensure secure and authorized access for clients.
Initiating and Ending Calls: Gain insights into starting and concluding video calls.
Server-side Code for Local Deployment and Cleanup: Ensure your server-side code is primed for local deployment and testing.
For more details, check out the step-by-step guide in our Twilio to ACS migration documentation.
Microsoft Tech Community – Latest Blogs –Read More
What’s New in Microsoft EDU webinar – February 2024
Join us on Tuesday, February 6th, 2024 for our latest “What’s New in Microsoft EDU” webinar! This webinar will also be recapping the big announcements we made at the Bett conference in London in late January. These 30 minute webinars are put on by the Microsoft Education Product Management group and happen once per month, this month both 8:00am Pacific Time and 4:00pm Pacific time to cover as many global time zones as possible around the world. And don’t worry – we’ll be recording these and posting on our Microsoft Education YouTube channel in the new “What’s New in Microsoft EDU” playlist, so you’ll always to able to watch later or share with others!
Here is our February 2024 webinar agenda:
What’s New in AI
What’s new in Microsoft Teams for EDU
What’s new in Microsoft 365 EDU
AMA – Ask Microsoft EDU Anything (Q&A)
How to sign up
OPTION 1: February 6th, Tuesday @ 8:00am Pacific Tim Register here
OPTION 2: February 6th, Tuesday @ 4:00pm Pacific Time: Register here
Send us your questions ahead of time by adding yours into this form: WNIEDUWebinarFeb24QnA
This is what the webinar portal will look like when you register:
Microsoft Tech Community – Latest Blogs –Read More
Scvmm iscsi dell storage
Hello all,
I have one unity xt 380 that i want to connect to scvmm. The unity has iscsi interfaces 192.168.x.x and management at different subnet.
I cannot connect to the iscsi through smi-s from scvmm. Can you please help.
Hello all,I have one unity xt 380 that i want to connect to scvmm. The unity has iscsi interfaces 192.168.x.x and management at different subnet. I cannot connect to the iscsi through smi-s from scvmm. Can you please help. Read More

issue with comments – the group isn’t set up to receive messages
There is an issue for all of our M365 users with using Tasks by Planner and To Do in Teams. We use M365 with Exchange Online and Teams licenses.
We create tasks in Teams. Each task has a comment box where text can be entered. When a comment is created, the user receives an e-mail with the error message:
the group isn’t set up to receive messages from user’s email address
It looks like an authorization problem, because comments fail for each user, even the creator of the task. On the other hand the app Planner shows a hint that a new user interface for Planner will be available shortly.
Any help is appreciated.
There is an issue for all of our M365 users with using Tasks by Planner and To Do in Teams. We use M365 with Exchange Online and Teams licenses.We create tasks in Teams. Each task has a comment box where text can be entered. When a comment is created, the user receives an e-mail with the error message:the group isn’t set up to receive messages from user’s email addressIt looks like an authorization problem, because comments fail for each user, even the creator of the task. On the other hand the app Planner shows a hint that a new user interface for Planner will be available shortly.Any help is appreciated. Read More
A Guide to Optimizing Performance and Saving Cost of your Machine Learning (ML) Service – Part 2
Return to Part 1: Introduction to ML Service
In this section, we will explore some of the options and best practices for deploying your ML model service on Azure, especially using Azure Machine Learning.
We will cover how to choose the appropriate Azure SKU for your ML service, as well as some of the settings and limits of Azure ML that you should be aware of.
Azure VM SKUs
After optimizing the model and framework utilization, it’s essential to save costs by selecting the best VM SKU. Selecting the correct VM can help enhance performance and latency. However, we must be clear that the end goal is to reduce the cost of inference, not to get the best latency. For example, if SKU A setup can run 20% faster than SKU B but is 40% more expensive, SKU A may not be the best option.
Understand VM Configurations
First, we must understand the VM description. You must pay close attention to the following fields:
CPU type; some VMs support several CPU types. They can have many instructions, some of which can aid machine learning execution. As an example:
AVX-512, which is designed to boost vector processing performance in Skylake and Cascade Lake Intel CPUs. Broadwell CPUs, Haswell processors, and AMD processors do not support AVX-512.
There is no hyperthreading on the HC-series, NDv2-series, HBv3-series, and so on. This might be handy if you have a high context transition rate in the OS or a high L3-cache miss rate.
High frequency chipsets on FX-series(4.0GHz), HBv3-series(3.675GHz), etc.
Memory size; if you have a large model or several models, pay close attention to this field.
Disk:
The default OS disk size is 40GB. All models and code will be stored on this drive via AzureML.
SSD is desirable if you have code and want to write files regularly (not recommended).
Network bandwidth: If the model request and/or response payload is substantial, you must pay close attention to network bandwidth. Different VM SKUs may have varying network bandwidth constraints. It should be noted that AzureML has its own limitations for Managed Endpoints. (Manage resources and quotas – Azure Machine Learning | Microsoft Learn)
GPU: The N*-series are all GPU SKUs. They are using the most recent NVIDIA driver and CUDA version. Although all GPUs can handle inference workloads, some of them may not be cost-effective. Some GPUs, such as the T4 (NCasT4_v3-series), are tuned for inference execution using a specific machine learning framework (TensorRT).
Understanding VM Availability and Pricing
The price of different SKUs varies. Please refer to the Virtual Machine series | Microsoft Azure for the most up-to-date VM SKU list, available regions, and pricing. Some SKUs may be available in certain regions but not others.
If the client of a model service is a web service hosted in Azure, we preferably want the model service and the client service in the same region to minimize network latency. If cross-region access can’t be avoided, you can find more details about network latency between Azure regions here.
In order to decide which SKU is the best fit, there are various profiling tools you could leverage. More on this in the later parts of this series.
Additionally, here are the SKU supported by Managed Online Endpoints ref. Managed online endpoints VM SKU list – Azure Machine Learning | Microsoft Learn
AzureML Settings and Limits
The AzureML settings and limits related to model service throughput and latency fall into two categories: network stack settings and container settings.
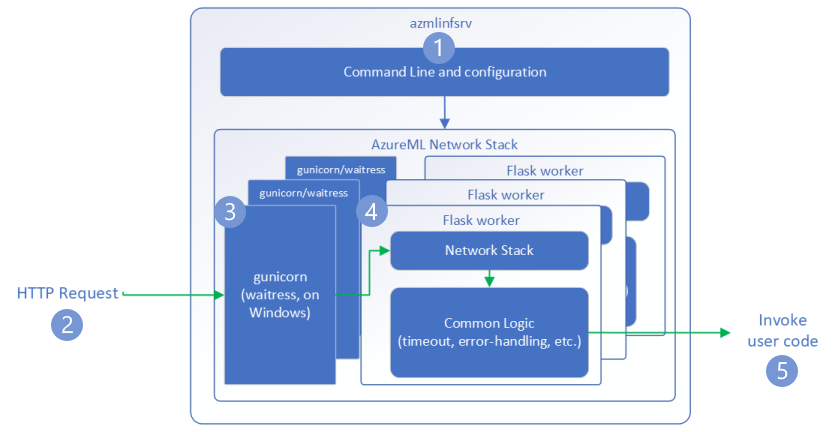
Network Stack
Here is how the AzureML network stack request flow looks like:
Azure Machine Learning inference HTTP server – Azure Machine Learning | Microsoft Learn
These limits are either hardcoded or related to your deployment, such as the number of cores. Refer here for the resource limits Manage resources and quotas – Azure Machine Learning | Microsoft Learn
There is one deployment configuration you need to pay attention to:
max_concurrent_requests_per_instance
If you are using AzureML container image or AzureML pre-built inference image, this number needs to be set the same as WORKER_COUNT (discussed below). If you are using an image built by yourself, then you need to set it to an appropriate number.
This setting defines the concurrent level at load balance time. Usually, the higher this number, the higher the throughput. However, if this number is set higher than what the model and machine learning framework can handle, it will cause requests to wait in the queue, eventually leading to longer end-to-end latency.
If the request per second is greater than (max_concurrent_requests_per_instance * number_of_instance), the client side will receive an HTTP status code 429.
For default value for request settings, refer here CLI (v2) managed online deployment YAML schema – Azure Machine Learning | Microsoft Learn
Container
Bring your own container
If you are using a Docker image built by yourself, please make sure it can accept environment variables to tune the setup. Then during deployment, make sure the environment variables are set properly.
Here is an example:
Assume “mymodelserver” can read an environment variable “MY_THREAD_COUNT” at runtime. Here is an example of your Dockerfile:
FROM <base image>
…
ENV MY_THREAD_COUNT
…
ENTRYPOINT [“mymodelserver”, “param1”, “param2”]
At deployment time, you can set the “MY_THREAD_COUNT” to a proper number to decide different parallelism level on different SKU.
AzureML container
If you are using the AzureML container image or AzureML prebuilt inference image, then WORKER_COUNT is one of the most important environment variables you need to set properly.
In AzureML provided images, the Python HTTP server can have multiple worker processes to serve concurrent HTTP requests. Each of the worker processes will load a model instance and process requests separately. WORKER_COUNT is an integer to define how many worker processes and default value is one (1). This means if you do not set this environment variable to a proper number, even if you choose a SKU that has multiple CPU cores, the container will still only process one request at a time!
How to determine WORKER_COUNT?
This value is determined using an iterative process. You can use the following process to determine the value of WORKER_COUNT
Determine number of cores that can be used in the selected SKU.
For example: F32s v2 SKU, there are 32 cores that can be utilized by the model.
For each worker, determine the number of CPU cores the model execution actually needs.
You can get the number by running profiling against single worker with different machine learning framework and library setup.
Note: Do not over optimize for latency. As long as it can meet the requirement, you can start with the result.
Then, WORKER_COUNT = floor(result_1 / result_2). Make sure you slightly reserve some cores and memory for system components on the same VM.
Return to Part 1: Introduction to ML Service
Microsoft Tech Community – Latest Blogs –Read More

Optimizing ML Models in Production in The Cloud or At the Edge Using A/B Testing
In this second blog post in our series, guest blogger Martin Bald, Senior Manager, Developer Community from one of our startup partners Wallaroo.AI will dive into the production ML model validation method of A/B testing.
Introduction
Testing and experimentation are a critical part of the ML lifecycle. This is because the ability to quickly experiment and test new models in the real world helps data scientists to continually learn, innovate, and improve AI-driven decision processes.
In the first blog post in this series, we stepped through deploying a packaged ML model to an edge device in a retail CV use case example. However, in the MLOps lifecycle just deploying the model in production is not enough. In many situations, it’s important to vet a model’s performance in the real world before fully activating it. Real world vetting can surface issues that may not have arisen during the development stage, when models are only checked using hold-out data.
A/B Testing
An A/B test, also called a controlled experiment or a randomized control trial, is a statistical method of determining which of a set of variants is the best. A/B tests allow organizations and policy-makers to make smarter, data-driven decisions that are less dependent on guesswork.
In the simplest version of an A/B test, subjects are randomly assigned to either the control group (group A) or the treatment group (group B). Subjects in the treatment group receive the treatment (such as a new medicine, a special offer, or a new web page design) while the control group proceeds as normal without the treatment. Data is then collected on the outcomes and used to study the effects of the treatment.
In data science, A/B tests are often used to choose between two or more candidate models in production, by measuring which model performs best in the real world. In this formulation, the control is often an existing model that is currently in production, sometimes called the champion. The treatment is a new model being considered to replace the old one. This new model is sometimes called the challenger. In our discussion, we’ll use the terms champion and challenger, rather than control and treatment.
Keep in mind that in machine learning, the terms experiments and trials also often refer to the process of finding a training configuration that works best for the problem at hand (this is sometimes called hyperparameter optimization). In this post, we will use the term experiment to refer to the use of A/B tests to compare the performance of different models in production.
How to Design an A/B Test
A/B tests are a useful way to rely less on opinions and intuition and to be more data-driven in decision making, but there are a few principles to keep in mind. The experimenter has to decide on a number of things.
First, decide what you are trying to measure. We’ll call this the Overall Evaluation Criterion or OEC. This may be different and more business-focused than the loss function used while training the models, but it must be something you can measure. Common examples are revenue, click-thru rate, conversion rate, or process completion rate.
Second, decide how much better is “better”. You might want to just say “Success is when the challenger is better than the champion,” but that’s actually not a testable question, at least not in the statistical sense. You have to decide how much better the challenger has to be.
Some Practical Considerations for Setting Up an A/B Test
Splitting your subjects: When splitting your subjects up randomly between models, make sure the process is truly random, and think through any interference between the two groups. Do they communicate or influence each other in some way? Does the randomization method cause an unintended bias? Any bias in group assignments can invalidate the results. Also, make sure the assignment is consistent so that each subject always gets the same treatment. For example, a specific customer should not get different prices every time they reload the pricing page.
Don’t Peek!: Due to human nature, it’s difficult not to peek at the results early and draw conclusions or stop the experiment before the minimum sample size is reached. Resist the temptation. Sometimes the “wrong” model can get lucky for a while. You want to run a test long enough to be confident that the behavior you see is really representative and not just a weird fluke.
Let’s go through an A/B test in action. If Shadow Deployment is your preference you can skip to the blog post on Shadow Deployment. We will set up the test for a 50/50 split of the data between the champion and the challenger models.
Our first step is to create and upload our challenger model:
# Get the most recent version of a model.
# Assumes that the most recent version is the first in the list of versions.
# wl.get_current_workspace().models() returns a list of models in the current workspace
def get_model(mname, modellist=wl.get_current_workspace().models()):
model = [m.versions()[0] for m in modellist if m.name() == mname]
if len(model) <= 0:
raise KeyError(f”model {mname} not found in this workspace”)
return model[0]
# get a pipeline by name in the workspace
def get_pipeline(pname, plist = wl.get_current_workspace().pipelines()):
pipeline = [p for p in plist if p.name() == pname]
if len(pipeline) <= 0:
raise KeyError(f”pipeline {pname} not found in this workspace”)
return pipeline[0]
Next we will retrieve the models and pipelines
pipeline = get_pipeline(‘tutorialpipeline-jch’)
challenger_model = wl.upload_model(‘challenger-model’, ‘./models/rf_model.onnx’, framework=Framework.ONNX)
Then creating an A/B test deployment would look something like this:
# retrieve handles to the most recent versions
# of the champion and challenger models
control_model = get_model(‘tutorial-model’)
challenger_model = get_model(‘challenger-model’)
Second step is to retrieve the pipeline created in the previous Notebook, then redeploy it with the A/B testing split step as seen in the code below.
# get an existing single-step pipeline and undeploy it
pipeline = get_pipeline(“pipeline”)
pipeline.undeploy()
# clear the pipeline and add a random split
pipeline.clear()
pipeline.add_random_split([(2, champion), (1, challenger)])
pipeline.deploy()
In our example, a pipeline will be built with a 2:1 weighted ratio between the champion and a single challenger model. The random split will randomly send inference data to one model based on the weighted ratio. As more inferences are performed, the ratio between the champion and challengers will align more and more to the ratio specified.
We can see from the code below that our test is set for a 2:1 random split of the data between the Champion and a single Challenger model.
Note: You can also add more than one Challenger model if you need to as seen in the below example which will distribute data in the ratio 2:1:1 (or half to the champion, a quarter each to the challengers) to the champion and challenger models, respectively.
pipeline.add_random_split([ (2, champion), (1, challenger01), (1, challenger02) ])
pipeline.clear()
pipeline.add_random_split([(2, control_model), (1, challenger_model)])
pipeline.deploy()
The pipeline steps are displayed with the Pipeline steps() method. This is used to verify the current deployed steps in the pipeline.
pipeline.steps()
[Output]
[{‘RandomSplit’: {‘hash_key’: None, ‘weights’: [{‘model’: {‘name’: ‘tutorial-model’, ‘version’: ’44f9e250-7636-4800-be08-da624b51d057′, ‘sha’: ‘ed6065a79d841f7e96307bb20d5ef22840f15da0b587efb51425c7ad60589d6a’}, ‘weight’: 2}, {‘model’: {‘name’: ‘challenger-model’, ‘version’: ‘bd69c37d-8e8d-4cfa-8cf7-6f47a411c893’, ‘sha’: ‘e22a0831aafd9917f3cc87a15ed267797f80e2afa12ad7d8810ca58f173b8cc6’}, ‘weight’: 1}]}}]
Now we are ready to send some queries to our A/B test deployment. The first step is to test our setup by sending a single datum to the A/B test pipeline we created.
df_from_csv = pd.read_csv(‘./data/test_data.csv’)
singleton = get_singleton(df_from_csv, 0)
display(singleton)
single_result = pipeline.infer(singleton)
display(single_result)
display(get_names(single_result))
[Output]
Fig 1.
The second step is to send a large number of queries (at least 100) one at a time to the pipeline.
results = []
# get a list of result frames
for i in range(20):
query = get_singleton(df_from_csv, i)
results.append(pipeline.infer(query))
# make one data frame of all results
allresults = pd.concat(results, ignore_index=True)
# add a column to indicate which model made the inference
allresults[‘modelname’] = get_names(allresults)
# get the counts of how many inferences were made by each model
allresults.modelname.value_counts()
[Output]
tutorial-model 14
challenger-model 6
Name: modelname, dtype: int64
Conclusion
In this blog we have seen a post-production ML model validation method in action for A/B testing. With testing and experimentation being a critical part of the ML lifecycle, we have the ability to quickly experiment and test new models in production and make fast informed decisions to replace the production champion model on the fly when a new model shows better performance without halting production. This helps data scientists to continually learn, innovate, and improve AI-driven decision processes.
The next blog post in this series will cover the Shadow Deployment method for model validation for edge or multi-cloud production deployments.
If you want to try the steps in these blog posts, you can access the tutorials at this link and use the free inference servers available on the Azure Marketplace. Or you can download a free Wallaroo.AI Community Edition you can use with GitHub Codespaces.
Microsoft Tech Community – Latest Blogs –Read More

Configuration Manager technical preview version 2401
Automated diagnostic Dashboard for Software Update Issues
A new dashboard is added to the console under monitoring workspace which shows the diagnosis of the software update issues in your environment. You can fix software update issues based on CM troubleshooting documentation.
Introducing Centralized Search box: Effortlessly Find What You Need in the Console!
Users can now use the global search box in CM console which streamlines the search experience and centralizes access to information. This enhances the overall usability, productivity and effectiveness of CM. Users no longer need to navigate through multiple nodes or sections/ folders to find information they require, saving valuable time and effort.
Microsoft Azure Active Directory rebranded to Microsoft Entra ID
Starting Configuration Manager version 2403, Microsoft Azure Active Directory is renamed to Microsoft Entra ID within Configuration Manager.
Enhancement in Deploying Software Packages with Dynamic Variables
With the introduction of retry count in UI administrators while deploying the “Install Software Package” via Dynamic variable with “Continue on error” unchecked to clients, won’t be notified with task sequence failures even if package versions on the distribution point are updated.
Enabling Auto-Image Patching for CMG Virtual Machine Scale Set
With this version of CM Configuration Manager Cloud Management Gateway (CMG) Virtual Machine Scale introduces enabling of Auto-Image Patching for seamless and automated updates to ensure your environment stays current and secure with this efficient solution.
Window 11 Readiness dashboard to support Windows 23H2
With this version of Configuration Manager, the Windows 11 readiness dashboard will show charts for Windows 23H2.
HTTPS or Enhanced HTTP should be enabled for client communication from this version of Configuration Manager
HTTP-only communication is deprecated, and support is removed from this version of Configuration Manager. Please enable HTTPS or Enhanced HTTP for client communication.
Upgrade to CM 2403 is blocked if CMG V1 is running as a cloud service (classic)
The option to upgrade Configuration Manager 2403 is blocked if you’re running cloud management gateway V1 (CMG) as a cloud service (classic).All CMG deployments should use a virtual machine scale set.
Windows Server 2012/2012 R2 operating system site system roles aren’t supported from this version of Configuration Manager
Starting 2403, Windows Server 2012/2012 R2 operating system site system roles aren’t supported in any CB releases.
Improvements to Bitlocker
This release includes the following improvements to Bitlocker:
Based on your feedback, this feature ensures proper verification of key escrow and prevents message drops. We now validate whether the key is successfully escrowed to the database, and only on successful escrow we add the key protector.
This feature prevents a potential data loss scenario where BitLocker is protecting the volumes with keys that are never backed up to the database, in any failures to escrow happens.
Update 2401 for Technical Preview Branch is available in the Microsoft Configuration Manager Technical Preview console. For new installations, the 2401 baseline version of Microsoft Configuration Manager Technical Preview Branch is available on the link: CM2401TP-Baseline or from Eval center
Technical Preview Branch releases give you an opportunity to try out new Configuration Manager features in a test environment before they are made generally available.
We would love to hear your thoughts about the latest Technical Preview! Send us feedback directly from the console.
Thanks,
The Configuration Manager team
Configuration Manager Resources:
Documentation for Configuration Manager Technical Previews
Try the Configuration Manager Technical Preview Branch
Documentation for Configuration Manager
Microsoft Tech Community – Latest Blogs –Read More
Announcing the general availability of NFS Azure file share snapshots
Azure Files is offered as a fully managed file share service in Azure cloud. Azure file shares can be mounted via SMB (Server Message Block) and NFS (Network file System) protocols on clients running either on-premises or in the cloud.
We first made snapshot support available for SMB Azure file shares, and since then we’ve seen many of our customers and partners reaping the benefits of having point-in-time copies of their production data. In late 2023, we announced the Public preview of snapshot support for NFS Azure file shares. With this blog, I’m excited to announce General availability (GA) of snapshot support for NFS Azure file shares.
File share backups are critical to every organization’s data protection strategy. Even though snapshots aren’t considered backups in the traditional sense, they’re generally seen as a complementary approach in mitigating data protection challenges. Customers rely on technologies like snapshots and replication to deliver on lower recovery point objective (RPO) and recovery time objective (RTO) SLAs compared to traditional backup technologies. In this blog, I’ll talk about how NFS Azure file share snapshots can complement your existing backups and strengthen your overall data protection solution.
When to use?
Prevent accidental data loss
Data loss via accidental deletions or by malicious admins is a common scenario that customers must protect against. Having point-in-time snapshots will allow users to recover lost data at a file-level granularity. Because snapshots are read-only, the data within the share is immutable by design.
Protect against upgrade failures
Imagine running a production upgrade, and due to some issue or bug, it fails. Having snapshots in such scenarios will enable customers to roll back production to a previous point in time without impacting business.
Fast and frequent copies of production data at a lower RPO and lower cost
Unlike traditional backups, snapshots don’t create a full copy of data. Only changes made to the file share are stored in the snapshot. If nothing changes after you create the snapshot, the size of the snapshot remains zero. This makes snapshots space and cost efficient. It also minimizes the time required to create the snapshot. Customers can create a snapshot of the share instantaneously and frequently to improve RPO.
Customers can also restore snapshot data to an alternate location to create a copy of production datasets for various scenarios such as test and development, reporting, and risk analytics without impacting production performance.
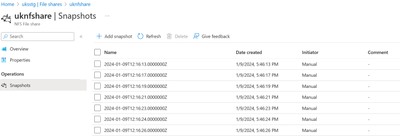
How to get started?
NFS Azure file share snapshots can be created, managed, and deleted via the Azure portal, Azure PowerShell, Azure CLI, and REST API.
Sample scripts to automate the creation and deletion of snapshots are available here.
Azure Files GitHub samples repository
The REST API interface enables third-party applications to integrate with file share snapshots to build seamless and automated management workflows.
Restoring from a snapshot is a simple two-step process.
Mount the snapshot on the NFS client.
Copy the content from the snapshot using native file system copy tools to the desired destination.
To learn more, please refer to Overview of share snapshots for Azure Files | Microsoft Learn.
Microsoft Tech Community – Latest Blogs –Read More

MVPs Collaborate for Enhanced Power Platform Experience
The 2023 edition of the Power Platform French Summit was held at the Microsoft France Conference Center in Paris in December 2023. The two-day hybrid event featured the Business Day on the first day and the Technical Day on the second day, hosting 65 sessions with over 100 speakers. Like the previous event we featured in this blog, it proved to be a valuable opportunity for many attendees to enhance their learning about the Power Platform. Since they hosted the first event in 2020, their four events have attracted over 6,000 participants from 22 countries so far.
The conference was orchestrated mainly by a team of local French Microsoft MVPs, significantly contributing to its success. Notably, French Business Applications MVPs Aurélien Clere, David Vachala, Allan de Castro, Théophile Chin-Nin, Loic Cimon, Jeff Angama, Data Platform MVP Tristan Malherbe, M365 MVP Patrick Guimonet, and international MVPs including Business Applications MVP Raphael Pothin (Canada), Chloé Moreau (Switzerland), played major roles.
According to Aurélien, attendees were keen on learning about the latest updates and new features of the Power Platform. They also showed significant interest in Microsoft AI, including the Microsoft Copilot Studio. Furthermore, the event served as an occasion to revisit crucial announcements made at the Microsoft Ignite 2023 in November 2023.
Aurélien highlighted why guests enjoyed the summit, explaining that “the main reasons why people love this event is from the customer experiences they learned in the Business Day, and sessions in French;)”.
For this event, Aurélien focused on increasing the number of attendees visiting the venue. His efforts paid off, with the number of onsite participants doubling from 200 last year to 400 this year. However, Aurélien emphasizes the importance of reaching a broader audience as well as physical attendance, expressing a commitment to exploring better ways to deliver information in various formats. He remarked, “we launched this event during the pandemic and now run it in a hybrid format. It’s always a challenge to find the right balance to be the best event in France for the Power Platform with all kinds of attendees. More than 1,000 people are still watching the event virtually!”
Aurélien also shared his growth mindset as a community leader who is dedicated to hosting better events based on the participants’ perspectives. He said, “we also try to fulfill all kinds of feedback we received in the past four editions. We always learn year after year in the community!”
Finally, he concluded with words of appreciation for his community peers who worked together for the event, highlighting the collaborative spirit that underpins these gatherings. “A huge thanks for all MVPs, community members including all moderators, and three associations (Biz Apps French Community, aMS Community, and Club Power BI France) that help us organizing this event. It’s always a pleasure to gather all kinds of different background profile such as BizApps, Modern Workplace, and Data Platform into one major global event in France. Also, Microsoft France is always a large support locally and that is a much-appreciated help.”
A highlight video of the event, After Movie – #PPFS2023, was released on their YouTube channel, Power Platform French Summit. It features sessions at the venue, moments of interaction among participants, and comments from the organizing team. We encourage you to watch this video to get a comprehensive view of the entire event and experience its atmosphere and the engagements it fostered.
Session videos are also available – check the playlist PPFS2023 – YouTube and watch the sessions to learn more from Power Platform French Summit 2023.
Microsoft Tech Community – Latest Blogs –Read More

Harness the Power of the Migration Service in Azure Database for PostgreSQL
The migration service in Azure Database for PostgreSQL simplifies the process of moving your PostgreSQL databases to Azure, offering both offline and online migration options from an on-premises servers, AWS RDS for PostgreSQL, Azure Virtual Machines (VMs), and Azure Database for PostgreSQL – Single Server. The migration service is designed to help you move to Azure Database for PostgreSQL – Flexible Server with ease and confidence.
Advantages of Azure Database for PostgreSQL – Flexible Server
By migrating to Azure Database for PostgreSQL – Flexible Server, you can take advantage of:
Cost-Effective Scaling and Performance: Azure Database for PostgreSQL – flexible server offers built-in high availability with no additional cost, and the ability to scale compute and storage resources independently, allowing for more precise control over performance and cost management.
Improved Control and Customization: Users gain more control over the database server’s maintenance windows and can choose when to apply patches, ensuring minimal disruption to their applications.
Enhanced Security Features: With Azure Database for PostgreSQL – flexible server, users benefit from Azure’s advanced security features, including the ability to restrict network access using firewalls and VNet integration. Data is protected with encryption at rest and in transit, and users can leverage Azure Active Directory (Azure AD) for authentication, enhancing overall security posture.
Simplified Management and Migration: Simplifies the management of PostgreSQL databases with features like automatic backups, point-in-time restore, and migration services.
Global Availability and Reliability: Azure Database for PostgreSQL – flexible server is available in multiple regions worldwide, ensuring that users can deploy their databases close to their users to reduce latency. The built-in high availability with zone-redundant deployment options ensures that databases remain operational even in the event of zone failures, providing enterprise-level reliability.
Vector Search + Azure AI Extension: With the integration of Vector Search and Azure AI extension for PostgreSQL, users can perform advanced search operations and leverage AI-driven insights directly within the database, further enhancing query capabilities and application intelligence.
Migration Options with the Migration Service in Azure Database for PostgreSQL
The service caters to various migration needs, accommodating different source environments. Below is a table summarizing the migration support provided by the service:
Source Environment
Offline Migration
Online Migration
Azure Database for PostgreSQL – Single Server
Supported
Supported
AWS RDS for PostgreSQL
Supported
Planned within next 6 months.
On-Premises
Supported
Azure VM
Supported
Key Benefits of Using the Migration Service in Azure Database for PostgreSQL
When it comes to migrating your PostgreSQL databases to the cloud, Azure offers a robust and user-friendly solution with the migration Service in Azure Database for PostgreSQL. This service is designed to streamline the migration process, offering a range of benefits that cater to the needs of businesses looking to leverage the advantages of a managed cloud database environment.
Managed Migration Service
The migration Service in Azure Database for PostgreSQL is a fully managed service, meaning that we handle the complexities of the migration process.
Support for Schema and Data Migrations
The migration service isn’t limited to just data migrations; it also supports schema migrations. This comprehensive approach ensures that both the structure and the content of your databases are accurately migrated in the target environment, maintaining the integrity and functionality of your applications.
No Complex Setup
One of the most significant advantages of using this migration service is the elimination of complex setup procedures.
Simple Portal-Based/CLI Migration Experience
Whether you prefer a graphical interface or command-line tools, the migration service offers a simple portal-based experience for those who prefer a visual approach, as well as a command-line interface (CLI) for those who are more comfortable with scripting and automation.
No Size Limitations
Unlike Azure DMS (classic), which can migrate only up to 1TB of data, the migration service in Azure Database for PostgreSQL can handle databases of any size. This means that whether you’re dealing with a small database or a large-scale enterprise database, the migration service is equipped to manage the migration without issue.
Overcoming Azure DMS (classic) limitations
The new migration service overcomes many of the limitations of Azure DMS (classic) for PostgreSQL migrations, as documented in the Azure DMS (classic) PostgreSQL known issues. By addressing these challenges, the service provides a smoother and more reliable migration experience.
To ensure an optimal migration experience with enhanced capabilities, we highly recommend utilizing our newly introduced migration service for Azure Database for PostgreSQL. This service is designed to offer superior performance, greater flexibility, and support for larger databases compared to Azure DMS (classic).
Overview of the Migration Process
Before initiating the migration, it’s crucial to perform pre-requisites and run pre-migration validations, to ensure a smooth migration between source and target.
Step 1: Prepare for Your Migration
Provision your target Azure Database for PostgreSQL – Flexible Server instance.
Set up the necessary network and security configurations to ensure connectivity between the source and target servers.
For detailed guidance on network configuration during database migration to Azure, refer to the documentation on Network configurations and Connectivity.
Step 2: Pre-Migration Validations
Check the compatibility of your PostgreSQL version with Azure Database for PostgreSQL – Flexible Server.
Identify any unsupported features or extensions.
Verify that the target Azure Database for PostgreSQL can establish a connection to the source database.
For an overview of pre-migration validation steps to ensure a smooth transition to Azure Database for PostgreSQL, visit the documentation on Pre-Migration Validation.
Step 3: Launch Your Migration
In the Azure portal, find your Azure Database for PostgreSQL – flexible server instance and start the migration process using the migration service.
Input the required details for your source, target database, including connection strings and access credentials.
Step 4: Monitor and Validate the Migration
Keep track of the migration’s progress via the Azure portal/CLI.
Post-migration, verify that all data has been successfully migrated and is intact on the target server.
Step 5: Finalize Your Migration
Update your application’s connection strings to point to the new Azure Database for PostgreSQL – Flexible Server.
Conduct comprehensive testing to confirm that your applications are fully operational with the new target database server i.e. Azure Database for PostgreSQL – Flexible server.
Conclusion
The migration Service in Azure Database for PostgreSQL is transforming the way businesses migrate their databases to the cloud. With its migration options and the robust capabilities of Azure Database for PostgreSQL – Flexible Server, you can elevate your database management, ensuring scalability, availability, and security. Embrace this service to streamline your migration journey and unlock the full potential of your data in the cloud.
Next Steps
To learn more about the migration service in Azure Database for PostgreSQL, go to Overview of the Migration service in Azure Database for PostgreSQL.
For a comprehensive guide on using migration Service in Azure Database for PostgreSQL to migrate your PostgreSQL databases to Azure Database for PostgreSQL via the Azure portal and CLI, refer to the official Azure documentation: Migrate PostgreSQL to Azure Database for PostgreSQL
We’re always eager to hear customer feedback, so please reach out to us at Ask Azure DB for PostgreSQL.
Microsoft Tech Community – Latest Blogs –Read More

AzCopy support for Entra ID authentication
AzCopy support for Entra ID authentication using Azure CLI or PowerShell authentication tokens
Using AzCopy version 10.22.0 or newer you can reuse your existing Entra ID authentication tokens from Azure PowerShell and Azure CLI for authentication for blob transfers to and from your storage accounts. This will reduce the number of times you have to enter your credentials when using Azure PowerShell and Azure CLI in the same session as you login to either Azure PowerShell or Azure CLI once and you do not need to enter a separate set of credentials in AzCopy. By the end of this article, you will be able to authenticate AzCopy actions seamlessly on Linux or Windows by reusing an existing OAuth token.
Environment variables
To enable this new feature, you must set the AZCOPY_AUTO_LOGIN_TYPE environment variable to the appropriate value. Besides the existing authentication methods – using a Service Principal or Managed Service Identity – two new options are now available. AZCLI for Azure CLI and PSCRED for Azure PowerShell. If you want to learn more on AzCopy supported environment variables you can easily get overview using the following command: azcopy env
To change the login type to either reusing OAuth tokens from Azure CLI or Azure PowerShell use one of the following commands for each operating system:
Linux and macOS environment variables
export AZCOPY_AUTO_LOGIN_TYPE=AZCLI
export AZCOPY_AUTO_LOGIN_TYPE=PSCRED
Windows environment variables
$Env:AZCOPY_AUTO_LOGIN_TYPE=”AZCLI”
$Env:AZCOPY_AUTO_LOGIN_TYPE=”PSCRED”
Scenarios
The prerequisite for all samples is that you own an active Azure Subscription and already deployed a storage account with a container. Write Permissions on the data plane needs be granted for your Entra ID account (see Assign an Azure role for access to blob data).
Note: If you don’t own an Azure Subscription you can create your Azure Free Account today. If you are facing troubles creating a storage account or granting the needed permissions you can read the Optional section at the end of this article.
Please make sure you have the newest version (>=10.22.0) of the AzCopy installed on your local machine. You can download it manually or use the provided CLI command for each scenario either using Linux or Windows.
Flow diagram
The following diagram shows the flow diagram of each scenario in detail.
Scenario 1: Using Linux on Windows Subsystem for Linux (WSL)
Using WSL and Ubuntu 22.04 LTS you can download the newest version of AzCopy using the following bash one-liner.
wget -cq https://aka.ms/downloadazcopy-v10-linux -O – | tar xz –strip-components=1
Optional: Verify your login type (AZCOPY_AUTO_LOGIN_TYPE) is set to use the Azure CLI
./azcopy env
INFO: Name: AZCOPY_AUTO_LOGIN_TYPE
Current Value: AZCLI
Now we can try to upload a file, in this case the AzCopy binary itself, to the storage account. Please replace “<storage-account>” and “<container>” with their respective values.
./azcopy copy azcopy https://<storage-account>.blob.core.windows.net/<container>/azcopy
NOTE: This command will fail if you don’t have Contributor or at least a sufficient RBAC role for write access on the storage account. Please make sure you are already authenticated using “az login“ and the container you try to upload to exists.
Scenario 2: Using Windows 11
Using Windows 11 you can download the newest version of AzCopy using the following PowerShell commands.
Invoke-WebRequest -Uri ‘https://aka.ms/downloadazcopy-v10-windows’ -OutFile ‘azcopyv10.zip’
Expand-archive -Path ‘.azcopyv10.zip’ -Destinationpath ‘.’
$AzCopy = (Get-ChildItem -path ‘.’ -Recurse -File -Filter ‘azcopy.exe’).FullName
Optional: Verify your login type (AZCOPY_AUTO_LOGIN_TYPE) is set to use Azure PowerShell
& $AzCopy env
INFO: Name: AZCOPY_AUTO_LOGIN_TYPE
Current Value: PSCRED
Now we can try to upload a file, in this case the AzCopy binary itself, to the storage account. Please replace “<storage-account>” and “<container>” with their respective values.
& $AzCopy copy $AzCopy https://<storage-account>.blob.core.windows.net/<container>/azcopy.exe
NOTE: This command will fail if you don’t have Contributor or at least a sufficient RBAC role for write access on the storage account. Please make sure you are already authenticated using “Connect-AzAccount“ and the container you try to upload to exists.
Optional: How to create a demo storage account
To create and configure a storage account on Azure you can use the following Azure CLI commands. There are a couple of other options available outlined in the official documentation.
First of all, we need to create a resource group. You can change the variables for the name or location to fit your needs. For the sake of the sample, it’s fine to start with the following command and options:
az group create –name MyResourceGroup –location westus
Next, create a storage account and a container using the resource group you just created. As a storage account name is globally unique you must change the name “<storage-account>” in the following command. Also change the name of the “<container>” variable.
az storage account create –name <storage-account> –resource-group MyResourceGroup –location westus –sku Standard_LRS
az storage container create -n <container> –account-name <storage-account>
Last we need to grant our Entry ID account write permission on the storage accounts data plane, replacing “<email>”, “<subscription>”, “<resource-group>”, “<storage-account>” and “<container>” with their respective values.
az role assignment create
–role “Storage Blob Data Contributor”
–assignee <email>
–scope “/subscriptions/<subscription>/resourceGroups/<resource-group>/providers/Microsoft.Storage/storageAccounts/<storage-account>/blobServices/default/containers/<container>”
References
Create Your Azure Free Account Today | Microsoft Azure
Download AzCopy v10 | Microsoft Learn
Sign into Azure from Azure PowerShell | Microsoft Learn
Sign in with Azure CLI — Login and Authentication | Microsoft Learn
Authorize access to blobs & files with AzCopy & Microsoft Entra ID | Microsoft Learn
Create a storage account – Azure Storage | Microsoft Learn
Microsoft Tech Community – Latest Blogs –Read More
New Viva Connections Desktop experience is now available worldwide
We are excited to announce general availability of the refreshed Viva Connections desktop experience which offers a more intuitive layout and introduces several requested new features including branding capabilities, sending announcements, a revamped Resources section, and support for different card sizes.
Here are the updates that we expect our new layout will offer:
Announcements – Important time sensitive information surfaced on desktop, mobile and tablet
Hero section – This new section focuses on org news
Dashboard layout – The Dashboard section is evolving to be more fluid with inline expansion
Resources – Introduces a new section for company curated links different from global navigation. The new section allows for more flexibility to have a unique list with visuals like icons.
Viva Suite links relocated – Viva suite links have been moved to the bottom of the experience and will offer links that the user is licensed for with a description next to each explaining what each is.
Full page feed – Full page feed treatment now exists with its own pivot shown at the top of the page.
With this update, the main changes are visible in the desktop experiences, but some of the branding assets are also visible across the different devices. We will be rolling out further updates also to the mobile and tablet experiences within spring 2024.
How will this affect your organization?
Feed will now be in the viewport of your Connections page. Your communication team can share important organizational news with employees which would surface in the hero section on top of the page.
Updated resources experience will replace the current global navigation. You will be able to manage a list of company links with support to add icons and images, along with URLs, that showcase your company’s brand and vision. In addition, a user managed section for employees to manage their own links is planned to be released in the second phase of this update.
Users will be notified of new announcements through the Viva Connections app through the Viva Connections app on desktop, mobile and tablet.
With the provided changes, you can have more powerful branding capabilities which will enable you to adjust the experience based on your company objectives.
Here’s a video where Nancy Handa, Leslie Thomas & Vesa Juvonen from Microsoft are covering the key changes with live demos.
Resources
Here are the key resources to get started with the Viva Connections and the new capabilities.
Microsoft Viva Connections – Product overview
Overview of Viva Connections – Microsoft Learn documentation
Using announcements in Viva Connections – Microsoft Learn documentation
Introduction to Viva Connections Announcements – YouTube video
What’s new with Viva Connections: Resources update! – Announcement blog post
Overview of Viva Connections extensibility – Build custom experiences for the Viva Connections and integrate it with your Microsoft Teams and SharePoint solutions
Viva Connections partner apps in the Microsoft store / AppSource – available to be installed to your dashboard
Frequently asked questions
Q: Is this experience fully available for Viva Connections worldwide?
A: Yes, with certain exceptions. News and header section updates are enabled now worldwide with the normal production tenants and the Change the Look feature is now gradually getting rolled out to normal production tenants as well.
Q: Will you release matching updates as this for the mobile experience?
A: Yes. We will provide separate updates around the mobile experiences as the rollout new features there. You can already now see some branding changes based on the dashboard configuration, but there will be further updates and improvements in mobile soon.
Q: I could not find the Change the Look feature from my tenant? Is this already fully available?
A: This feature is currently being rolled out worldwide as this blog post is published. If the feature is missing currently from your tenant, it will be available there soon.
Q: That’s pretty cool – what are the extensibility options of this UX?
A: We do cover those in the associated video, but in short you can change the Viva Connections logo, header picture, theme and provide custom Viva Connections cards in the dashboard section based on your business requirements.
Q: Any other new features which are coming out for the Viva Connections?
A: This is continuously evolving area as we keep on rolling out new features and improvements. In the video we talked about the future mobile updates to align on the desktop experiences. We also are rolling out more options to control which news are surfaced on the hero top section. Resources section will also start supporting audiences soon, which will enable more personalized experiences. On the dashboard side, we are looking into supporting new card types and to provide more configuration options. We will keep on sharing updates as things are ready to be used. There will be a plenty of new great features within spring 2024.
Q: I’d like to surface relevant business data and actions from my business apps to the Viva Connections users, can this be done?
A: Yes. You can use SharePoint Framework to build extensibility for your Viva Connections deployment and expose the relevant business data and actions for your users across the different Viva Connection experiences.
Let us know what you think. Your feedback is more than welcome 🧡
Microsoft Tech Community – Latest Blogs –Read More

More vCore options for SQL MI Business Critical for better price/performance and flexibility
Recently, we announced a number of Azure SQL Managed Instance improvements in Business Critical tier. In this article, we would like to highlight the more granular selection of the number of vCores for both premium-series and premium-series memory optimized hardware generations.
What is a vCore?
A vCore represents a unit of database compute resources. It is a logical CPU that provides processing power to handle your workloads and queries.
The number of vCores in Azure SQL Managed Instance determines the amount of compute resources allocated to your database instance. This directly impacts the performance and scalability of the instance; more vCores provide higher processing power, which can help in handling larger workloads and improving query performance.
What is new?
Customers used to have 10 choices for the number of vCores for SQL MI: 4, 8, 16, 24, 32, 40, 64, 80 vCores and newly offered 96 and 128 vCores.
We introduced 6 additional vCore click stops in Azure SQL MI Business Critical: 6, 10, 12, 20, 48 and 56 vCores. Going forward, customers have 16 choices for the number of vCores for both premium-series and premium-series memory optimized SQL MI Business Critical: 4, 6, 8, 10, 12, 16, 20, 24, 32, 40, 48, 56, 64, 80, 96 and 128 vCores.
These new options allow customers to scale their workloads more granularly, enabling them to optimize their costs through more measured increases of CPU vCores or allowing consolidation to take place without paying for the extra cores.
Now you do not have to double your 8-vCore SQL Managed instance to get more CPU power, you may simply resize it to 10 or 12 vCores and thereby save 75 or 50% of what you would spend previously by going straight to 16-vCore instance. A similar story applies to the other new options.
Furthermore, you can now consolidate several of your existing SQL Managed instances into one SQL MI more efficiently for the same cost and easier management. For example, you can consolidate two instances, one of 16 vCores and one of 32 vCores, right into one Managed instance of 48 vCores with no additional cost (instead of buying surplus of 16 vCores by landing them onto one 64-vCore instance).
Last example, but not least, is that you may resize your managed instance if you indicate that you do not use as many vCores as you had to buy due to more restrictive resource limitations. Decreasing your managed instance size, you may significantly decrease your total costs.
Why is more granular selection of number of vCores important?
Cost benefits and improved price/performance: Users can optimize costs by choosing the exact amount of CPU resources needed for their workload. This flexibility ensures that users are not overpaying for resources they do not require and helps avoid under-provisioning of resources due to prohibitive costs, which could lead to performance issues.
Enhanced performance efficiency, easy scalability, and optimized resource usage: Offering a range of CPU vCore options allows users to select the configuration that best aligns with the performance needs of their specific workload. Users can adjust the number of CPU vCores as their workload grows or changes, ensuring that the SQL Managed Instance can adapt to evolving business needs. This fine-grained control allows for a more customized and optimized infrastructure configuration, enhancing the overall efficiency of SQL Managed Instances.
How to monitor vCore usage on SQL Managed Instance?
There are many ways to monitor the vCore usage of your instance, here are a few:
In SQL Server Management Studio (SSMS):
Go to Object Explorer; right-click on your instance; expand Reports; expand Standard Reports; select Performance Dashboard:
Using Azure portal:
Using a script:
select top 1000 avg_cpu_percent, start_time, end_time from sys.server_resource_stats order by start_time desc
If you decide to scale your managed instance, you can do so from Azure portal, PowerShell, Azure CLI or ARM templates. You can also utilize ‘online scaling’ with minimal downtime. See Scale resources – Azure SQL Database & Azure SQL Managed Instance | Microsoft Learn.
Summary
More granular control of vCores in Azure SQL Managed Instance Business Critical offers more flexibility, brings the opportunity for cost savings and improves your price/performance. If you’re still new to Azure SQL Managed Instance, now is a great time to get started and take Azure SQL Managed Instance for a spin!
Next steps:
Get started with SQL Managed Instance with our Quick Start reference guide.
Learn more about the latest innovation in Azure SQL Managed Instance.
Microsoft Tech Community – Latest Blogs –Read More


