

Category: Microsoft
Category Archives: Microsoft
Learn from Microsoft: Best practices for engaging employees with AMAs and live events
At the beginning of each fiscal year, Rajesh Jha, Executive Vice President of Experiences + Devices at Microsoft, hosts a kick-off event for his organization of more than 40,000 employees. During the event he is eager to get his employees excited about what is to come, listen to, and engage with colleagues through their questions. This year was more engaging than ever as they adopted new technology to achieve their goals: Ask Me Anything (AMA) events and live events in Viva Engage.
“Colleagues have been clear and consistent in their desire to hear directly from our leaders on the topics that matter most to them. Viva Engage Ask Me Anything events have given us a powerful tool to answer the questions that are truly top of mind for them in a transparent way that encourages constructive dialogue across different levels of the organization. Viva Engage also gives us, as corporate communications professionals, the right tools and settings to enable the right style of event from smaller team events through to scaling AMAs to tens of thousands of employees. Feedback has been positive from our leader (Rajesh), the leadership team, our event team and, most importantly, our colleagues; so much so that we are increasing the cadence of our AMAs to every other month.”
– Alexander Bradley, Director of Communications
AMAs and live events
An AMA is an event during which leaders and employees connect to ask and answer questions. It’s a two-way engagement—leaders create the space for conversation, and employees drive the agenda through their questions. AMA events are available as a part of the Viva Suite or Communications and Communities plan. AMAs can be customized with options including moderation, upvoting, and anonymous submission. Previously where you could only submit questions via forms or email, now you can generate engagement before the event with features like upvoting. Upvoting helps to signal moderators and communicators what’s important and top of mind for employees. Participation can be controlled and limited to a specific set of people, or open for anyone in the organization to participate.
Events bring people together to spark dialogue and engagement. They’re an opportunity for leaders to create clarity and spark energy—to inform and inspire employees, and to listen and respond to employees. Events can be in person, but hybrid events with live and on-demand video have become standard, particularly to engage a large, distributed workforce. Live events can be hosted in Viva Engage, where conversations in an event become part of the community’s ongoing discussion.
Rajesh and his team put these two capabilities together in what has proven an excellent, repeatable model. They created the AMA before the event to gather questions and feedback from employees and then proceeded to leverage the ‘upvoting’ from colleagues to inform which topics/questions they took live during the event. They streamed the event live on Viva Engage in their private community, enabling robust conversation alongside the live video, and incorporate a few live questions, apart from the AMA, demonstrating agility in the moment and responsiveness to colleagues’ ‘in the moment’ questions. They then brought the recording and key content back to Viva Engage to share broadly with people who could not attend the live event, hosting the video on Stream and launching via a Viva Engage Storyline announcement from Rajesh; something that previously would have happened over email, limiting the potential for ongoing dialogue.
In this article, we share the best practices that Rajesh and his team learned before, during, and after the event—the ingredients that made it a success. Many of the learnings and best practices mentioned below can be found in the AMA playbook.
Peering into our crystal ball, we can share that we are working to deeply integrate the capabilities Rajesh and his team leveraged into a seamless, end-to-end events experience. We’ll have much more to share in 2024 but, for now, you can have confidence that following these best practices today will set you up for even more success in the coming months.
Before the event
Like any event, success requires planning and preparation. Rajesh’s team determined that the event would be a public AMA event, promoted to the employees of his Experiences + Devices (E+D) organization, but discoverable by anyone in the organization. They also decided that the event would consist of approximately 25% prepared content, in which Rajesh would share vision and top-of-mind, and 75% Q&A.
1-2 weeks before the event
Before the event, Rajesh and his communications team prepared the content and videos for the vision and updates portion. From the E+D community in Viva Engage, they scheduled the live event for the interactive, video portion of the event. Learn more about live events.
To gather questions before the event they leveraged the new ask-me-anything (AMA) feature in Engage. They scheduled the AMA for the same timeframe as the live event, but published the AMA so that it was “live” for several weeks leading up to the event. This gave employees time to submit questions before the live event, upvote questions they found interesting, and react or comment on questions from coworkers. Learn more about AMAs.
To encourage attendance and engagement, the team promoted the event in relevant Engage communities, on Rajesh’s storyline, and via Outlook. We’ve included sample communications at the end of this article. Communications emphasized the importance of upvoting and mentioned that Rajesh would address the most upvoted questions live during the event.
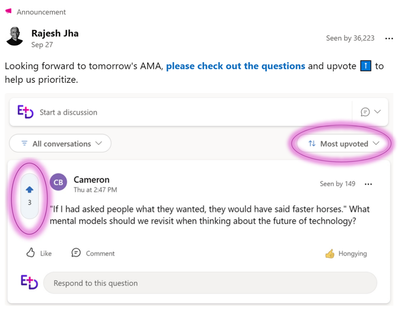
Rajesh announced the event and encouraged employees to upvote colleagues’ questions and submit their own.
For a more recent event, Rajesh’s team shared an announcement from his storyline using a visually-compelling image that takes advantage of new layouts for media that feature a video or image above the text of the post.
At a more recent event, Rajesh used the new layout for images in posts in his announcement. He encouraged employees to submit questions and upvote colleagues’ questions.
To create a space where employees felt comfortable expressing their concerns and questions, the team enabled the option for anonymous submission. They found—as we see across customers—that enabling anonymous questions increased both the quantity and quality of input form employees. The team also enabled moderation, so that organizers could vet questions before the questions were approved and shown to attendees for upvoting.
Moderation options allow a host or organizer to approve questions before they are published.
They approved 2/3rds of the anonymous questions. The team also found that moderation allowed them to reduce the number of duplicate or highly related questions being asked.
The team checked the AMA daily and moderated questions regularly. Because they had a good rhythm in place, they leveraged the new notifications toggle to disable notifications for each new question. Our team is continuing to make more improvements to the , organizers, and attendees.
Invitation and notification options. Organizers and hosts can be sent a calendar invite and can receive notifications for new questions.
1-2 days before the event
There was on the AMA before the live portion of the event. The team could filter questions to the most upvoted questions. They then prepared to address those questions.
On the event’s AMA page, organizers can filter by most upvoted questions.
During the event
The live event was a broadcast viewed by attendees in the E+D community. There are several ways to produce live events in Viva Engage:
Using Teams, anyone can produce high-quality broadcasts using webcams and screen sharing. Learn more about producing an live event with Teams.
Rajesh’s team had access to a production team that used professional studio facilities to create the broadcast, streaming it using RTMP into the live event. Learn more about producing an event with an external encoder.
After the vision and update portion of the event, Rajesh and his team began answering questions from employees. They answered ALL questions that had been submitted in the AMA with more than 50 upvotes, delivering on their promise to address the questions that we’re truly top of mind for employees.
Live events in Viva Engage also support questions and conversation during the live event. Throughout this event they showcased the questions Rajesh was asking in real time in the event with Rajesh!
During the live event, Rajesh answered the most upvoted questions from employees.
Showcasing impact after the event
A post-event survey was sent out to those who attended to see how this new format worked in the days that followed the event. The feedback was clear—people really enjoyed the new Q&A powered by Viva Engage AMAs and were happy at how many questions Rajesh was able to answer.
The AMA insights panel assisted Rajesh and his team in evaluating the impact of this event compared to previous events.
After the event, analytics provide insights on activity and engagement.
Rajesh and his team look forward to continuing to leverage this format to engage his employees in upcoming Q&A events! In fact, they’ve committed to hosting AMA Town Hall events bi-monthly.
AMA + Live Event Communications Plan
Since the initial AMA, Rajesh’s team has hosted a few more AMAs and we’ve learned some best practices about communicating expectations about the event and how to provide the best guidance for employees. Here’s an example communications plan for this type of AMA + Live Event. We hope that this helps your teams make your first AMA event a success.
Timeline
Type
Highlights
2 weeks before the event
Calendar invite
The calendar invite has all relevant links to live event and AMA.
A week before event
Storyline Announcement from leader
A week before event an announcement to the leaders audience that describes the upcoming events and links to the AMA for gathers questions before hand. This communication also mentions how they will prioritize the most upvoted questions.
Day before event
Storyline Announcement from leader
The day prior, remind employees about the event and how to engage
Hour before the live event is host
Post an Announcement in the community where the Live Event
Reminder that the event starts soon and how to join the live event.
After the event
Event Summary
Share out recap and high level key points and event recording
Try it in your own network!
Try hosting an AMA alongside your next town hall or all hands.
Resources:
AMA events in Viva Engage – Microsoft Support
AMA playbook
Microsoft Tech Community – Latest Blogs –Read More

Understanding OneLake Architecture: The OneDrive for Data
As data engineers, we grapple with numerous challenges daily. Data is often scattered across various sources, residing in a multitude of file types with varying data quality. The time spent locating specific files—figuring out which tenant they belong to and deciphering access rights—can be exasperating. This is where OneLake steps in.
OneLake streamlines data management, breaks down silos, and ensures that your data resides in one unified home—just like OneDrive for files!
A Basic Setup would be;
What is OneLake?
OneLake is essentially the OneDrive for data within the Fabric ecosystem. Just like OneDrive, it’s automatically provisioned for every Fabric tenant, requiring no infrastructure management.
Key benefits of OneLake include:
Unified data storage across different domains and tenants.
Support for both managed and unmanaged data storage.
Full Delta support using VertiParq (a powerful feature for tracking changes in data).
Distributed ownership of data and security.
Integration with DirectLake, providing robust Power BI support
How does OneLake work?
The architecture of OneLake allows seamless connectivity to multiple cloud providers. Let’s explore the basics:
Symbolic links (Shortcuts): Using symbolic links, you can connect to both Azure and Amazon storage. These shortcuts enable data from these providers to be accessible within the same OneLake, without having to copy the data
Unified management: All personas—data engineers, real-time analysts, and BI developers—can directly access data stored in OneLake.
Delta file format: Data within OneLake uses the open-source delta file format, which optimizes storage for data engineering workflows. It supports efficient storage, versioning, schema enforcement, ACID transactions, and streaming.
Ingestion methods: You can get data into OneLake via Shortcuts or data pipelines. Shortcuts create symbolic links to external storage locations, simplifying navigation. Data pipelines, familiar to Data Factory or Synapse users, link external lakes into the managed tables area.
Managed Data: Tables
Tables play a crucial role in managing and organizing data within the lakehouse architecture. Once set up in the managed section of the lakehouse, you have several options:
Browse tables using the Lakehouse Explorer.
Query and analyze data efficiently.
Connecting External Data to Microsoft Fabric OneLake
Now that you’ve grasped how the oneLake works, let’s get some data from an External source into oneLake. For this, we will be using the Data Engineering Experience, feel free to choose any other Experience.
Create a workspace:
Begin by creating a workspace within your Microsoft Fabric environment. This workspace will serve as the container for your data-related activities.
Select lakehouse item from the drop-down menu and give it a name
Setup a Lakehouse:
Next, create a lakehouse item within your workspace by following the following steps;
Select the workspace into which you want to create the lakehouse.
In the open worspace, select new.
Select lakehouse item from the drop-down menu and give it a name.
3. Ingest the Data from an Extenal source into the Lakehouse.
Use any of the following options to create a shortcut, which is allows you to point to other storage locations, which can either be internal or external to oneLake.
That will launch up a shortcut wizard, select the source you want to pull your data from. For this demo select OneLake to create an internal shortcut.
Find and connect to the data you want to use with your shortcut. And click next. Your data will be loaded in the files section of your lakehouse
Preview the Loaded data by clicking on the files section
4. Transform the Data into Delta Tables
Once your data is in the Lakehouse, create a new notebook and associate it with the Lakehouse created. Drag and drop the file into the notebook.
5. Transform it into delta tables using Spark within the Fabric notebook. Delta tables provide efficient change tracking and management.
6. Build Reports and Analyze the Data
From the table view, click on Lakehouse and select SQL analytics endpoint.
From the SQL endpoint view, select new visual to create a simple visual
You can create the visuals manually, or let co-pilot do the magic for you.
Clean Up Resources: After completing the task, remember to clean up any temporary or test data.
Conclusion
OneLake aims to give you the most value possible out of a single copy of data without data movement or duplication. You no longer need to copy data just to use it with another engine or to break down silos so you can analyze the data with data from other sources.
Further Guides
Signup for the Microsoft Fabric Global AI Hack, a virtual event where you can learn, experiment, and hack together with the new Copilot and AI features in Microsoft Fabric!
Sign up for the Fabric Cloud Skills Challenge at https://aka.ms/fabric30dtli and complete all the modules to become eligible for a 50% discount on the DP-600 exam.
Learn how to use copilot in Microsoft Fabric, your data insights AI assistant.
Join the Fabric Community to stay updated on the latest About Microsoft Fabric
Consider joining the Fabric Career Hub so you won’t miss out on any Careers in Microsoft Fabric
Microsoft Tech Community – Latest Blogs –Read More

Activate Your Marketplace Selling Journey: Key Resources & Takeaways
In a recent session on Activating Your Marketplace Selling Journey our subject matter experts provide guidance on the resources, programs and incentives that are available to help you accelerate and grow your solution on marketplace.
If you are looking to accelerate your business through the commercial marketplace there are many resources available to help you in your journey:
Knowledge resources to help you as your build and sell your solution.
Tips and techniques to leverage marketplace features.
Incentives to recognize investment in marketplace.
Microsoft programs to enhance the Partner experience.
When building transactable solutions there are many knowledge resources available to you for reference and support in building your solution. Three key resources are:
Mastering the Marketplace: An on-demand learning library for building transactable offers on the Microsoft commercial marketplace. The content is created by the technical team providing videos, documentation, and code samples to help in the creation of your solution.
Marketplace Office Hours: Live and On-Demand Webinars from Marketplace essentials from build to go to market, helping you at any stage along your journey.
Marketplace Documents and MS Learn: Comprehensive documentation and learning modules to complete your marketplace journey. Find documentation on common questions and processes in the journey to marketplace.
Another way we strive to help you along your journey is by providing benefits and incentives along the way. Marketplace Rewards provides you access to marketing and sales incentives, including free Azure and in some cases technical incentives. It is designed to help move you from listing your solution and gaining awareness, to creating demand and increasing sales. There are incentives and benefits that change and increase as you move your solution from demand generation and co-selling, to lead development and sales enablement. Marketplace Rewards provides you with knowledge, benefits, and support, to grow your solution in the marketplace.
Learn about ISV Success, designed to drive success and to provide support through the Build, Publish, and Grow phases of developing and marketing your solutions on the Microsoft cloud. Benefits include free Azure credits, 1:1 consultations, and community events to expand your knowledge and get advice from Microsoft experts and peers to accelerate your progress. The eligibility criteria to enroll in ISV Success is below:
Have an app in development
B2B in focus
Intend to publish in the marketplace
Join Microsoft Cloud Partner Program
Check out ISV Success and see the benefits you can gain by joining and the assistance provided to you on your solution journey.
Once you start selling through Marketplace, you can start using a cloud focus Go to Market Strategy. As you start to unlock growth opportunities for your business, Co-Sell through Marketplace can assist in unlocking the power of up to 35,000 sellers. Through Co-Sell you can:
Access pre-committed spend
Accelerate deal validation
Simplify Sales
Earn Marketplace Rewards
Earn Incentives for Microsoft field sellers
Register to watch the full recording! For more takeaways and more detailed info on those takeaways listed above, register to watch the recording of the most recent session of Activate your marketplace selling journey.
Have follow up questions about this presentation’s content? Comment below to continue the conversation with our subject matter experts!
Microsoft Tech Community – Latest Blogs –Read More
Consistent DNS resolution in a hybrid hub spoke network topology
Introduction
DNS is one of the most essential networking services, next to IP routing. A modern hybrid cloud network may have various sources of DNS: Azure Private DNS Zones, public DNS, domain controllers, etc. Some organizations may also prefer to route their public Internet DNS queries through a specific DNS provider. Therefore, it is crucial to ensure consistent DNS resolution across the whole (hybrid) network.
This article describes how DNS Private Resolver can be leveraged to build such architecture.
This article assumes that the network topology was built using traditional networking. If you leverage AZURE Virtual WAN, the solution requires one adjustment, described in the Virtual WAN paragraph.
Architecture
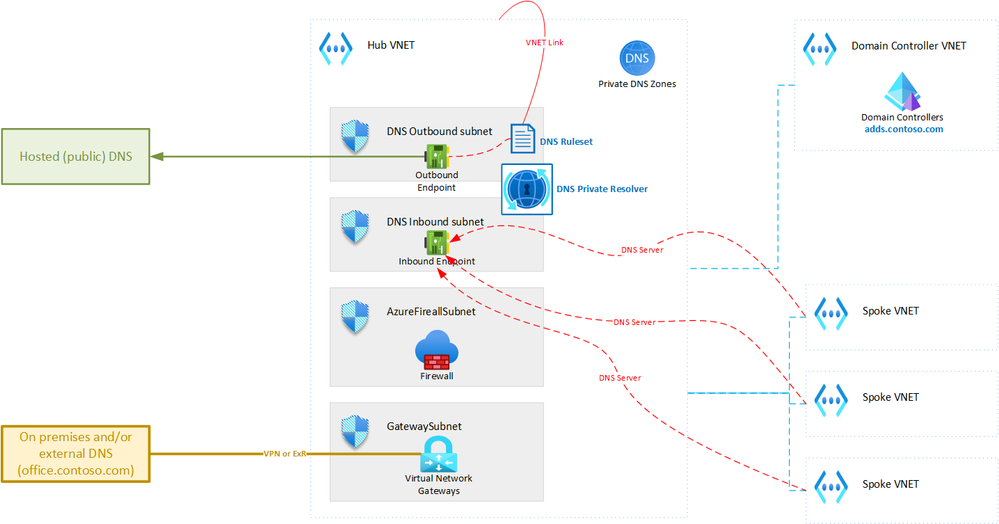
The diagram below shows the topology that we will be creating:
This document focuses on a single hub-spoke network topology. Often, the complete AZURE network includes multiple hub-spoke topologies connected in a mesh. The solution described here can easily be extended to support such meshed hub-spoke topology.
The solution described in this article is based on AZURE DNS Private Resolver deployed in the hub Virtual Network. This AZURE service allows combining multiple DNS sources seamlessly with AZURE DNS. However, in a hybrid hub spoke topology there are a couple of requirements and limitations that need to be considered. This is outlined further in this article.
Deploying the architecture
Step 1: Networking for DNS Private Resolver deployment
To deploy DNS Private Resolver in a Virtual Network, you need to dedicate two subnets to it: one for inbound endpoints and one for outbound endpoints. Both subnets should have a minimum size of /28. In a hub-spoke topology, the DNS Private Resolver must reside in the hub Virtual Network.
Therefore, you need to create two /28 subnets in the hub, as shown in the screenshot below (the subnets are named “pr-dns-inbound” and “pr-dns-outbound”).
Step 2: Deploying DNS Private Resolver
To deploy the DNS Private Resolver in the hub, it must reside in the same subscription as the hub VNET, but ideally in a different resource group. You also need to create both an inbound and an outbound endpoint, either during or after the deployment.
The inbound endpoint should be in the subnet you created earlier and have a static IP address. You can choose any IP address from the available ones in the subnet, but it is advisable to use the first one for optimal IP address utilization. The outbound endpoint only requires a name and association to the outbound subnet.
The next steps are thus to create a new resource group and a DNS Private Resolver in the subscription that has the hub VNET. First, create a new resource group in the subscription. Then, create a DNS Private Resolver in the new resource group and add one inbound endpoint (with a static IP address) and one outbound endpoint. Make sure to select the appropriate subnets that were created in the previous step for the endpoints.
Step 3: External DNS Systems
We will be integrating several DNS sources into the DNS Private Resolver. Hence, we need to ensure connectivity. The outbound interface of the DNS Private Resolver needs access to all “external” sources that need to be integrated.
Domain Controllers (AD DS or Entra ID DS)
You need to have IP connectivity from the DNS Private Resolver outbound subnet to your domain controller (deployed as IaaS or Entra ID DS) in AZURE. This involves both IP routing and NSG/firewalling. It is preferred to peer the Virtual Network that hosts your domain controller to the hub, if you haven’t done so already. Adhering to good security practices, the subnet containing the domain controllers should have a Network Security Group assigned. This one requires a rule that allows inbound traffic on port 53 (TCP and UDP) from the whole subnet for the DNS Private Resolver Outbound Endpoints. The destination should be the IP addresses of your domain controller.
On Premises DNS Servers – Outbound
To resolve the names hosted in the on-premises DNS servers, these need to be integrated. The first step is to ensure IP connectivity. Usually, the servers are connected through a hybrid connection like VPN or Express Route, which terminates at a gateway (Virtual Network Gateway or NVA) in the hub. Depending on your security requirements, the DNS traffic to and from the on-premises DNS servers could either go through a firewall in the hub or bypass it. This architecture assumes a fully functional hybrid hub-spoke, so this connectivity should already be enabled. You might need to add a firewall rule and/or a Network Security Group rule though.
Note that DNS servers hosted in other external systems (e.g. other cloud connected over a VPN or Express Route) follow the same model.
On Premises DNS Servers – Inbound
For consistent DNS resolution both on premises and in AZURE, the on premises DNS servers must connect to the DNS Private Resolver Inbound Endpoint. As mentioned earlier, this traffic can either go through the firewall or bypass it, depending on your needs. To enable this IP connectivity, the inbound endpoint’s IP address (or subnet CIDR range) must be announced over the hybrid connection to the on premises network.
To allow resolving names via the inbound endpoint, the on premises DNS servers, these need some configuration as well. Conditional forwarders must be configured for all domains integrated via the DNS Private Resolver, using the inbound endpoint IP address as target.
Note that DNS servers hosted in other external systems (e.g. other cloud connected over a VPN or Express Route) follow the same model.
Custom public DNS servers
AZURE provides a public DNS infrastructure to resolve public DNS entries by default. However, some scenarios may require a dedicated custom DNS infrastructure that performs additional validation on DNS requests. These servers are usually hosted on the public Internet. If you have such requirement, the DNS Private Resolver outbound endpoint needs access to the public Internet.
At the time of writing this article, the default outbound Virtual Network access is still available. However, this will be discontinued and is not a secure solution. Therefore, we recommend routing this traffic through the firewall in the hub. This requires a custom route in the outbound subnet route table that directs all traffic (0.0.0.0/0) to the firewall’s internal IP address. The following screenshot shows an example of such a route table (with the firewall IP address being 10.0.4.4):
The route table needs to be linked to outbound subnet used for the DNS Private Resolver.
A firewall rule is also necessary along with the route table. This rule should permit traffic from the outbound subnet CIDR range over UDP and TCP port 53 to the external DNS source. The following screenshot illustrates an example for an AZURE Firewall Policy (assuming the external system is hosted at 1.1.1.1):
All DNS requests to the external DNS system will have a the public IP address assigned to the firewall as source IP address (for AZURE Firewall, this could be different for 3rd party firewalls). Typically this IP address needs to be whitelisted in the external DNS system and serves as identification of the DNS request source.
Step 4: Private DNS Zones
All Private DNS Zones used in AZURE must be linked to the hub Virtual Network only. These should not be linked to any other Virtual Network.
Step 5: DNS Forwarding Ruleset
A DNS Forwarding Rulesets is a group of DNS forwarding rules (up to 1000) that can be applied to one or more outbound endpoints or linked to one or more virtual networks. For this setup, we need one ruleset, which we will associate with the outbound endpoint of the AZURE DNS Private Resolver and linked to the hub Virtual Network.
When you link a ruleset to a Virtual Network, you add the rules to the logic of the AZURE DNS endpoints for name resolution. The DNS endpoint in the Virtual Network uses this logic to resolve names with a linked ruleset:
If the name is defined in a Private DNS Zone, use that zone to resolve it.
If not, use the ruleset.
If the ruleset has no matching rule, use public DNS.
To set up this architecture, we need a DNS Forwarding Rule with these rules (the order does not matter):
The domain(s) hosted on the domain controllers must have a rule linked to all IP addresses used by the corresponding domain controllers (e.g. 2 instances when using Entra ID DS).
The domain names hosted on the on-prem or external DNS servers must be defined with the IP address(es) of the DNS servers.
When using a dedicated service to resolve public DNS names, a so called wildcard rule (dot or ‘.’ domain name) must be present, linking to the public IP addresses of this hosted service.
The screenshot below shows an example of such a ruleset:
This rule must now be linked to the hub Virtual Network, as shown in the screenshot below:
Step 6: Spoke DNS Configuration
The infrastructure for consistent DNS resolution is now set up. The last step is to assign all Virtual Networks the inbound endpoint IP address as DNS server (for use in the DCHP offer). This requires that the DNS Servers setting of every Virtual Network Spoke is set to “Custom” DNS Servers with the inbound endpoint IP address.
Once this is completed every resource (network interface) in the spoke Virtual Network needs to renew it’s DHCP lease to get the DNS server assigned.
Note: As can be read in this article several DNS zones (e.g. for Private Link) are excluded from wildcard rules. Therefore, it is impossible to resolve Private Endpoints from a DNS Forwarding Rule Set in a spoke. Hence, the DNS configuration for the spoke VNETs needs to use the inbound endpoint IP address as explained earlier.
Step 6: Testing
Now that everything is set up, the only thing left to do is testing.
Testing requires the following elements:
a virtual machine in a spoke Virtual Network
a virtual machine on-premises (or in each external network segment connected over VPN or Express Route)
a private endpoint integrated it the correct Private DNS Zone associated to the hub
From the virtual machine in the spoke:
Validate that the DNS server assigned via DHCP is the DNS Private Resolver Inbound Endpoint
Perform a NSLOOKUP for:
The DNS name of the PaaS service that the private endpoint is linked to. This should resolve to the private IP address of the private endpoint.
A DNS name hosted in each of the Domain Controllers. This should resolve to the IP addresses defined in the AD DS DNS configuration.
A DNS name hosted in each of the external (on premises, other cloud, …) DNS servers. This should resolve to the correct IP address defined in that DNS zone.
From the virtual machine located on premises or in the other cloud, execute the same NSLOOKUP commands. The IP addresses returned must be identical.
Virtual WAN
AZURE Virtual WAN uses the concept of a managed Virtual Hub. Deploying a DNS Private Resolver in this Virtual Hub is not possible. However, this architecture can still be leveraged with minor modifications:
The DNS Private Resolver should be deployed in a new spoke Virtual Network that gets connected to the Virtual Hub. All requirements for IP connectivity, firewalling or Network Security Groups remain identical.
The firewall in the Virtual Hub must be configured to use the DNS Private Resolver Inbound Endpoint as DNS server. The screenshot below shows how to configure this for an AZURE Firewall. For a third party firewall, this will depend on the vendor and type.
Each NVA deployed in the Virtual Hub needs to have it’s DNS server configured, similar to the firewall (point to the DNS Private Resolver Inbound Endpoint). How to do this, depends on the NVA type of course.
Q&A
Can this be leveraged in an topology with multiple hub-spokes?
Yes. When multiple hub-spoke topologies are created (e.g. in different regions), this architecture must be deployed into each hub.
Does this architecture support resiliency?
Yes, DNS Private Resolver leverages availability zones for resiliency (Resiliency in Azure DNS Private Resolver) by default. If you require region failover, you should deploy this architecture a second time, in a different region.
Microsoft Tech Community – Latest Blogs –Read More
APIs in Action: Unlocking the Potential of APIs in Today’s Digital Landscape
In today’s world, APIs (Application Programming Interfaces) are essential for connecting applications and services, driving digital innovation. But with the rise of hybrid and multi-cloud setups, effective API management becomes essential for ensuring security and efficiency. That’s where APIs in Action, a virtual event dedicated to unlocking the full potential of APIs, comes in.
Join us for a full-day virtual event focused on exploring API management for integration, hybrid and multi-cloud, and AI workloads. Learn from industry experts about the latest trends and best practices shaping the API landscape. Our immersive event delves deep into APIs and API management, highlighting innovative architectures that drive business growth. Our experts will guide you through transforming existing services and making your data easily accessible to developers, both internally and externally.
Whether you’re a seasoned professional or just starting out, APIs in Action equips you with the knowledge and tools to use APIs effectively in your hybrid and multi-cloud environment. Register now and join the conversation! Experience a day filled with insightful discussions, demos, and actionable insights that will empower you to navigate the evolving landscape of API management with confidence.
Session
Abstract
Speaker(s)
The role of API Management in Azure Integration Services
A successful integration platform developed with Azure Integration Services will find API Management at the heart of your solution. In this session we will discuss some of the common scenarios where you will find API Management used.
Mike Stephenson
API management for microservices in a hybrid and multi-cloud world
Microservices are on the cusp of becoming the dominant style of software architecture. This hands-on demonstration will show how enterprises can make the transition to API-first architectures and microservices in a hybrid, multi-cloud world.
Tom Kerkhove
Leveraging API Management for OpenAI Applications/Use Azure API Management (APIM) to manage, secure, and scale your LLM-based applications
This session navigates the intersection of APIM and OpenAI technologies, discussing how APIM enhances the deployment, security, and scalability of OpenAI-powered applications. Attendees will learn about APIM basics, OpenAI’s capabilities, integration strategies, security challenges, and real-world applications.
Elena Neroslavskaya, Chris Ayers
Azure API Management from a developer perspective
As organizations adopt an API-first mindset, the need for a good management of your APIs grows. This session will explain the benefits of Azure API Management (APIM) through the eyes of a developer. What’s in it for the developer and how can Azure APIM help to maximize the potential and security of your APIs?
Toon Vanhoutte
OpenAPI now vs. the future
Discover the essential role of OpenAPI in unlocking your API’s full potential and expanding your customer base. In this session, explore how OpenAPI is integral to the AI-driven future, providing crucial insights for staying ahead in the dynamic API landscape. Elevate your strategy and position your API for success by embracing OpenAPI.
Darrel Miller
API Design First with SwaggerHub and Azure API Management
Still designing in the dark ages with interface design documents and outdated documentation? Come see how SwaggerHub and Azure API Management can enable you to utilize the API Design First methodology to create live documentation that allows architects and stakeholders to design software together.
Joël Hébert
API DevEx
The developer experience for APIs can be difficult for new API developers and can add complexity to existing API projects due to new toolchains and evolving cloud services. In this session, we will demystify the API developer experience, leveraging tools like GitHub Copilot, Azure API Center, Azure API Management, and OpenAPI extensions.
Josh Garverick
Better API Governance with Azure API Center
An API catalog brings together the different roles involved in an API program and, by promoting the collaboration between them, it fosters API reuse, ensured compliance and better developer productivity. In this session we will explore what is Azure API Center and how to integrate it in your API design workflow.
Massimo Crippa
Leverage Postman to Collaboratively Test your APIs from design to deployment and beyond
Learn firsthand how to wield Postman effectively throughout the API Lifecycle, boosting your API implementation and fortifying security from the start with the right testing strategies.
Whether you’re in the business of creating or consuming APIs, discover how Postman and Azure API Management complement each other to enhance collaboration and streamline productivity.
Sandeep Murusupalli, Garrett London
Build a warp speed time-to-market API with DAB, APIM and Azure Container Apps
In this session will delve into how the Data API builder enables swift and secure database object exposure through REST or GraphQL endpoints allowing data access on any platform, language, or device. By combining DAB with Azure Container Apps and API Management we will build up and secure a serverless data API without writing a single line of code.
Massimo Crippa
Harnessing the Power of Azure API Management: Building Robust and Secure API
In this session, which combines theoretical knowledge with real-world scenarios, we will delve into the advanced features of Azure API Management, with a focus on building robust, secure, and scalable APIs. Attendees will learn about security best practices, policy management, and how to effectively use Azure’s tools to enhance API performance and security.
Hamida Rebai
Building a resilient API landscape with Azure API Management
Cloud service failure is inevitable. When building platforms, it is crucial to ensure that you will seamlessly handle failure and by being resilient to them. Learn how Azure API Management helps you mitigate and recover from failures by using built-in load balancing and circuit-breaking capabilities.
Tom Kerkhove
Enhance your API security posture with Microsoft Defender for APIs
Azure Defender for APIs brings security insights and ML-based detections to APIs that are exposed via Azure API Management. In this session we will see how to leverage Defender for APIs to enhance your security posture, which kind of scenarios are covered, and our learnings from observing production workloads.
Massimo Crippa
Gain Understanding of APIs and Integrations with Azure Application Insights
Use Application Insights to create a correlated, end to end view of integrations across APIM, Logic Apps and Functions. Learn how to record insights, including business data, then create queries to view the data and observe through dashboards. Through Workbooks we can create meaningful, insightful custom visuals allowing support and business teams to gain the insights they want.
Dave Phelps
GitOps for API-Management
In this talk, we will present our experience with a GitOps workflow for implementing and managing API-Management within an Integration Platform for an international corporation. We will describe how we automated infrastructure and deployment for the whole platform, addressing key aspects such as governance, permissions management, testing and documentation.
Christine Robinson, Maximiliane Ott
APIOps: Transforming Azure APIM Deployments with GitOps and DevOps Methodologies
This talk offers a deep dive into the principles and practices of automating and managing APIs in Azure API Management. Attendees will gain insights into how APIOps applies the concepts of GitOps and DevOps to API deployment. By using practices from these two methodologies, APIOps can enable everyone involved in the lifecycle of API design, development, and deployment with self-service and automated tools to ensure the quality of the specifications and APIs that they’re building.
Wael Kdouh
Microsoft Tech Community – Latest Blogs –Read More


