

Tag Archives: microsoft
Rehosting On-Prem Process Automation when migrating to Azure
Many enterprises seek to migrate on-premises IT infrastructure to cloud for cost optimization, scalability, and enhanced reliability. During modernization, key aspect is to transition automated processes from on-premises environments, where tasks are automated using scripts (PowerShell or Python) and tools like Windows Task Scheduler or System Center Service Management Automation (SMA).
This blog showcases successful transitions of customer automated processes to the cloud with Azure Automation, emphasizing script re-use and modernization through smart integrations with complementing Azure products. Using runbooks in PowerShell or Python, the platform supports PowerShell versions 5.1, and PowerShell 7.2. To learn more, click here.
Additionally, Azure Automation provides seamless certificate authentication with managed identity, eliminating the need to manage certificates and credentials while rehosting. Azure Automation safeguards the keys and passwords by wrapping the encryption key with the customer-managed key associated to key vault. Integration with Azure Monitor coupled with Automation’s native job logs equip the customers with advanced monitoring and error/failure management. Azure Automation platform efficiently manages long-running scripts in the cloud or on-premises with resource limits options with Hybrid runbook worker. Hybrid runbook worker also equips you to automate workloads off-Azure while utilizing the goodness of Azure Automation runbooks.
Rehosting on-premises operations with minimal effort covers scenarios listed below. Additional efforts involve modernizing scripts for cloud-native management of secrets, certificates, logging, and monitoring. –
State configuration management – Monitor state changes in the infrastructure and generate insights/alerts for subsequent actions.
Build, deploy and manage resources – Deploy virtual machines across a hybrid environment using runbooks. This is not entirely serverless and requires relatively higher manual effort in rehosting.
Periodic maintenance – to execute tasks that need to be performed at set timed intervals like
purging stale data or reindex a SQL database.
Checking for orphaned computer and users in Active Directory
Windows Update notifications
Respond to alerts – Orchestrate a response when cost-based (e.g. VM cost consumption), system-based, service-based, and/or resource utilization alerts are generated.
Specifically, here are some of the scenarios of managing state configuration of M365 suite where our customer rehosted the on-premises PowerShell script to cloud with Azure Automation
Scenarios for State Configuration Management of M365 Suite
User Permission & access control management
Mailbox alerts configuration
Configuring SharePoint sites availability
Synchronizing Office 365 with internal applications
Example: Rehosting User Permission & access control management in M365 mailboxes
Here is how one of the customers rehosted a heavy monolithic PowerShell script to Azure. The objective of the job was to identify –
List of shared mailboxes –> list of permissions existing for these mailboxes –> users & groups mapped to the mailboxes –> list of permissions granted (& modified overtime) to these users/groups –> Final output with a view of Mailbox Id, Groups, Users, Permissions provided, Permissions modified (with timestamps).
1. Shared mailboxes credentials
###########################################
# Get Shared Mailboxes
###########################################
$forSharedMailboxes = @{
Properties = “GrantSendOnBehalfTo”
RecipientTypeDetails = “SharedMailbox”
ResultSize = “Unlimited”
}
$sharedMailboxes = Get-EXOMailbox @forSharedMailboxes
2. Obtain shared Mailbox permissions
###########################################
# Get Shared Mailbox Permissions
###########################################
$sharedMailboxesPermissions = foreach ($sharedMailbox in $sharedMailboxes) {
# ——————————————————————————————————-
# Get Send As Permissions
# ——————————————————————————————————-
try {
$forTheSharedMailbox = @{
Identity = $sharedMailbox.Identity
ResultSize = “Unlimited”
}
$recipientPermissions = @(Get-EXORecipientPermission @forTheSharedMailbox)
$recipientPermissions = $recipientPermissions.Where({ $_.Trustee -ne “NT AUTHORITYSELF” })
$recipientPermissions = $recipientPermissions.Where({ $_.Trustee -notlike “S-1-5-21*” })
if ($recipientPermissions) {
foreach ($recipientPermission in $recipientPermissions) {
[SharedMailboxPermission]@{
MailboxDisplayName = $sharedMailbox.DisplayName
MailboxEmailAddresses = $sharedMailbox.EmailAddresses
MailboxId = $sharedMailbox.Id
MailboxUserPrincipalName = $sharedMailbox.UserPrincipalName
Permission = $recipientPermission.AccessRights
PermissionExchangeObject = $recipientPermission.Trustee
}
}
}
}
catch {
Write-Warning (“Getting send as permissions for $($sharedMailbox.Identity).”)
continue
}
3. User & groups mapped to the mailboxes
###########################################
# Get Entra and Exchange User Objects
###########################################
$forEntraAndExchangeUserObjects = @{
Connection = $forTheSharedMailboxGovernanceSite
Identity = $entraAndExchangeUserObjectListRelativeUrl
}
$userObjectsList = Get-PnPList @forEntraAndExchangeUserObjects
$fromTheEntraAndExchangeUserObjectsList = @{
Connection = $forTheSharedMailboxGovernanceSite
List = $userObjectsList
PageSize = 5000
}
$userObjectsListItems = (Get-PnPListItem @fromTheEntraAndExchangeUserObjectsList).FieldValues
###########################################
# Get Entra and Exchange Group Objects
###########################################
$forEntraAndExchangeGroupObjects = @{
Connection = $forTheSharedMailboxGovernanceSite
Identity = $entraAndExchangeGroupObjectListRelativeUrl
}
$groupObjectsList = Get-PnPList @forEntraAndExchangeGroupObjects
$fromTheEntraAndExchangeGroupObjectsList = @{
Connection = $forTheSharedMailboxGovernanceSite
List = $groupObjectsList
PageSize = 5000
}
$groupObjectsListItems = (Get-PnPListItem @fromTheEntraAndExchangeGroupObjectsList).FieldValues
4. List of permissions granted (& modified overtime) to these users/groups
# —————————————-
# Get Full Access Permissions
# ————————————-
try {
$forTheSharedMailbox = @{
Identity = $sharedMailbox.Identity
ResultSize = “Unlimited”
}
$mailboxPermissions = @(Get-EXOMailboxPermission @forTheSharedMailbox)
$mailboxPermissions = $mailboxPermissions.Where({ $_.User -ne “NT AUTHORITYSELF” })
$mailboxPermissions = $mailboxPermissions.Where({ $_.User -notlike “S-1-5-21*” })
if ($mailboxPermissions) {
foreach ($mailboxPermission in $mailboxPermissions) {
[SharedMailboxPermission]@{
MailboxDisplayName = $sharedMailbox.DisplayName
MailboxEmailAddresses = $sharedMailbox.EmailAddresses
MailboxId = $sharedMailbox.Id
MailboxUserPrincipalName = $sharedMailbox.UserPrincipalName
Permission = $mailboxPermission.AccessRights
PermissionExchangeObject = $mailboxPermission.User
}
}
}
}
catch {
Write-Warning (“Getting full access permissions for $($sharedMailbox.Identity).”)
continue
}
# ——————————————————————————————————-
# Get Send On Behalf Of Permissions
# ——————————————————————————————————-
$grantSendOnBehalfToPermissions = @($sharedMailbox.GrantSendOnBehalfTo)
$grantSendOnBehalfToPermissions = $grantSendOnBehalfToPermissions.Where({ $_ -notlike “S-1-5-21*” })
if ($grantSendOnBehalfToPermissions) {
foreach ($grantSendOnBehalfToPermission in $grantSendOnBehalfToPermissions) {
[SharedMailboxPermission]@{
MailboxDisplayName = $sharedMailbox.DisplayName
MailboxEmailAddresses = $sharedMailbox.EmailAddresses
MailboxId = $sharedMailbox.Id
MailboxUserPrincipalName = $sharedMailbox.UserPrincipalName
Permission = “SendOnBehalfOf”
PermissionExchangeObject = $grantSendOnBehalfToPermission
}
}
}
}
As the customer modernized from On-premises to Azure via Azure Automation, the following list captures the aspects that have to be updated. The changes were mostly an improvement in terms of experience offered by Azure Automation leveraging smart integrations with other Azure capabilities and little to no reliance on custom scripts.
Setup Logging & Monitoring methods – In On prem setup, customers authored custom scripts for logging, which was no more needed with Azure Automation. Customers utilized in-portal Azure Monitor integration to forward logs to Azure monitor, quey logs, and set up alerts for insights.
Handling certificate authentication – Managed Identity based authentication provides improved means to store secrets and passwords without doing regular updates to code credentials. Azure Automation supports both PS script and in-built portal experience to configure Managed Identity
Storing passwords and security keys – Key Vault integration with Azure Automation helped the customers to transition this on-prem experience seamlessly. The sample PS script below is recommended to enable Key Vault integration.
Install-Module -Name Microsoft.PowerShell.SecretManagement -Repository PSGallery -Force
Install-Module Az.KeyVault -Repository PSGallery -Force
Import-Module Microsoft.PowerShell.SecretManagement
Import-Module Az.KeyVault
$VaultParameters = @{
AZKVaultName = $vaultName
SubscriptionId = $subID
}
Register-SecretVault -Module Az.KeyVault -Name AzKV -VaultParameters $VaultParameters
If you are currently utilizing Azure Automation for rehosting such light weight environment agnostic operations from on-prem to cloud or want to know more details, please reach out to us on askazureautomation@microsoft.com.
Microsoft Tech Community – Latest Blogs –Read More
Partner Blog| Revisit expert insights from Ultimate Partner LIVE
Business leaders and decision-makers are increasingly grasping the vast potential of AI and the need to invest in this technology to remain competitive. As their trusted advisor, customers are looking to you for guidance on estimating the time to value of their AI investments and initiating their AI journey. Partners who embrace the economic opportunity to drive software innovation on the Microsoft platform and copilot ecosystem will create real value for their customers.
Maximizing this opportunity was top of mind for many partners attending the recent Ultimate Partner LIVE: The Americas Summit, a two-day event showcasing real-world insights, best practices, and key information to enable software and services solutions partners and their ecosystems to learn how to align their business with Microsoft.
Topics at the event ranged from the Microsoft commercial marketplace vision, to Small, Medium & Corporate (SMC) co-sell opportunities. Below are some highlights:
Continue reading here
Microsoft Tech Community – Latest Blogs –Read More

Enable GPT failover with Azure OpenAI and Azure API Management
The year is 2024. It is 2pm in New York City on a cold and gloomy Monday. The CTO of a Wall Street hedge fund is reviewing the go-live plan for her new GenAI application. It will allow the firm’s analysts to produce reports in a fraction of the time. At the same time in Palo Alto, a series A funded startup just made a breakthrough leveraging GenAI to improve the accuracy of medical diagnoses. 3 hours from now, a computer science student in London will launch a chatbot to help his classmates optimize their schedules.
Although they are on different paths, these three individuals have this in common that they will soon have to operate a GenAI application in production with demanding users who expect flawless uptime and high quality of service.
Things fail all the time: marriages, hard drives, power supplies, entire data centers… But failure is not the only thing to keep in mind when designing an application for high availability. Success is another. What if your application becomes so popular that it ends up being the victim of its own success? What if your users put so much stress on the Large Language Model (LLM) deployment that your application gets throttled? Wouldn’t it be nice to be able to catch these events and reroute requests to another deployment of the LLM seamlessly?
<ominous music> Enter Azure Open AI and Azure API Management. </ominous music>
Azure OpenAI Service provides REST API access to OpenAI‘s powerful language models including the GPT-4, GPT-4 Turbo with Vision, GPT-3.5-Turbo, and Embeddings model series. Azure API Management is a hybrid, multicloud management platform for APIs across all environments. Azure OpenAI and Azure API Management combined, allow builders to add routing and rerouting capabilities to their GPT backed applications. The use cases are numerous:
Quota increases above and beyond a single deployment
Provisioned Throughput Units (PTU) to Pay-as-you-go failover/spillover
Geo redundancy
Intelligent routing of requests to the most relevant model
To illustrate the concept, this blog post focuses on handling a throttling event sent by the Azure Open AI backend and rerouting the request to another Azure Open AI deployment seamlessly using Azure API Management.
Initial setup
The starting point for this exercise is an Azure Open AI deployment. In the console, I decided to create a deployment of gpt-35-turbo that I call “micro”; it can initially handle 40 thousand tokens per minute (TPM). I use Postman as my tool of choice to send API calls to my deployment but cURL or the SDK of your choice would be equally good choices. To prove that the initial setup is working properly, I sent a POST to my Azure Open AI deployment and as expected I received a 200 OK message with the content corresponding to my request. Everything is working.
I can also see that I consumed a little over 300 tokens with that call.
Now let’s go to our Azure Open AI deployment and lower our Tokens per Minute Rate Limit from 40k down to 1k.
We now have an API call that we know consumes about 300 tokens and a model that can process 1,000 tokens per minute.
I am no rocket scientist, but I will wager that if we make that same API call a couple times in a short period, we will likely get throttled. And indeed, instead of receiving the 200 OK message, we receive a 429 Too Many Requests message with an explicit body message stating:
“Requests to the ChatCompletions_Create Operation under Azure OpenAI API version 2023-07-01-preview have exceeded token rate limit […]”.
And with that, we have a great starting point. Let’s see how we can intercept that 429 error message and reroute our requests to a failover Azure Open AI deployment instead.
The failover Azure Open AI deployment
Keeping in mind that we called our primary deployment “micro”, let’s go ahead and create another deployment under the same Azure Open AI resource and call this one “35turbo”. Let’s set the Tokens per Minute Rate Limit to 40 thousand which should be more than enough to absorb the overflow requests should our 1k TPM primary deployment get overwhelmed. Let’s also keep in mind that because we use the same resource, our two deployments can conveniently share the same API key.
The API Management layer
Instead of calling our Azure Open AI endpoint directly, we will now call Azure API Management and configure that layer to monitor the response coming back from the “micro” backend. Should this response be a 429 error message, our configuration will dictate that a retry shall be sent to our “35turbo” backend.
We create a “test” API and within, we create a resource called “completions” which will accept the POST verb. This will allow us in Postman, to send our POST requests to https://<api-url>/completions.
We can now create a policy which will take the user’s incoming request and transform it before sending it to the backend. The url will be remapped to the one of our Azure Open AI “micro” deployment. At the very least, we also need to add the api version as a query parameter and the api key as a header.
The policies can be expressed as the below single XML document:
<policies>
<inbound>
<base />
<set-variable name=”primary” value=”https://romull.openai.azure.com/openai/deployments/micro/chat/” />
<set-variable name=”secondary” value=”https://romull.openai.azure.com/openai/deployments/35turbo/chat/” />
<set-header name=”Api-Key” exists-action=”override”>
<value><AOAI API KEY REDACTED></value>
</set-header>
<set-query-parameter name=”api-version” exists-action=”override”>
<value>2023-07-01-preview</value>
</set-query-parameter>
<set-backend-service base-url=”@((string)context.Variables[“primary”])” />
<retry condition=”@((context.Response.StatusCode == 429) && context.Request.OriginalUrl.Host.Equals(context.Variables[“primary”]))” count=”1″ interval=”1″ first-fast-retry=”true”>
<set-backend-service base-url=”@((string)context.Variables[“secondary”])” />
</retry>
</inbound>
<backend>
<forward-request />
</backend>
<outbound>
<base />
</outbound>
<on-error>
<base />
</on-error>
</policies>
The above policy states that upon receiving an inbound request, the query parameter and header be added. In addition, it declares two variables, one for each of our backend urls, named primary and secondary respectively. Furthermore, the policy states that the backend url should be set to the primary by default and should a 429 error be received, that a retry be sent to the secondary.
Testing
In Postman, I modify my request to now call the Azure API Management layer as opposed to the Azure Open AI backend directly; I can also remove my api version parameter and api key header since Azure API Management will act as a proxy as add those for me. Note that if Azure API Management is now in charge of authenticating calls to Azure Open AI, you are in turn responsible for authenticating calls to Azure API Management, otherwise you have just opened your Azure Open AI deployment to the world.
Let’s make a few back-to-back calls to our API in a short period of time.
Unlike with our previous setup, I am now unable to trigger the 429 error message. This leads me to think that we successfully implemented failover on throttling. Trust me. But verify. The tracing capabilities within Azure API Management allow us to follow the call flow step by step and in our case to see that the backend was successfully swapped from primary to secondary.
Conclusion
The Microsoft Azure platform provides powerful yet simple blocks that can be assembled to build fast, performant and resilient applications. This is why builders love it. If Azure Open AI is already the preferred cloud based GenAI service for many reasons, I hope that this post helps highlight how Azure API Management on top of Azure Open AI can unlock an even higher availability.
Much brotherly love to my colleague Brady Leavitt for his guidance and peer review
Microsoft Tech Community – Latest Blogs –Read More
Partner Blog| Revisit expert insights from Ultimate Partner LIVE
Business leaders and decision-makers are increasingly grasping the vast potential of AI and the need to invest in this technology to remain competitive. As their trusted advisor, customers are looking to you for guidance on estimating the time to value of their AI investments and initiating their AI journey. Partners who embrace the economic opportunity to drive software innovation on the Microsoft platform and copilot ecosystem will create real value for their customers.
Maximizing this opportunity was top of mind for many partners attending the recent Ultimate Partner LIVE: The Americas Summit, a two-day event showcasing real-world insights, best practices, and key information to enable software and services solutions partners and their ecosystems to learn how to align their business with Microsoft.
Topics at the event ranged from the Microsoft commercial marketplace vision, to Small, Medium & Corporate (SMC) co-sell opportunities. Below are some highlights:
Continue reading here
Microsoft Tech Community – Latest Blogs –Read More
Introducing Viva Glint: Ask the Experts series
Viva Glint is now hosting a monthly session in which you will have an opportunity to interact live with Glint experts! Designed for new Viva Glint customers, each session will introduce you to a foundational topic and discuss best practices around Viva Glint implementation. During this session, the team will also be available to answer questions that you may have as you’re launching your first Viva Glint programs.
The first session is scheduled for February 6, 2024. Be sure to register for the date here. Sessions will be monthly and recordings will be posted to the Viva Glint: Ask the Experts site.
What topics are you most interested in learning about as you start your Viva Glint journey? Leave us a note in the comments below.
Microsoft Tech Community – Latest Blogs –Read More
Embark on a Seamless Journey to Microsoft 365 with Our Latest Enhancements to Migration Manager
Migration Manager is a powerful tool, hosted within the setup page of the Microsoft 365 admin center, that helps seamlessly transfer data from various sources, such as BOX, Google Drive, Dropbox, and file shares, to Microsoft 365. We’re excited to share some enhancements to Migration Manager to make migrations simpler, more seamless and more secure.
Higher migration fidelity
Migrating data across diverse platforms presents challenges, including preserving data fidelity and permission inheritance. These differences may result in data and permission loss during the migration process.
The concerns have been significantly alleviated through expanded support for higher data fidelity and advanced permissions setting in Migration Manager. New enhancements now make it possible to migrate more scenarios with support for Google Forms migration, Google Sheets scan, advanced permission migration and Box Notes conversion.
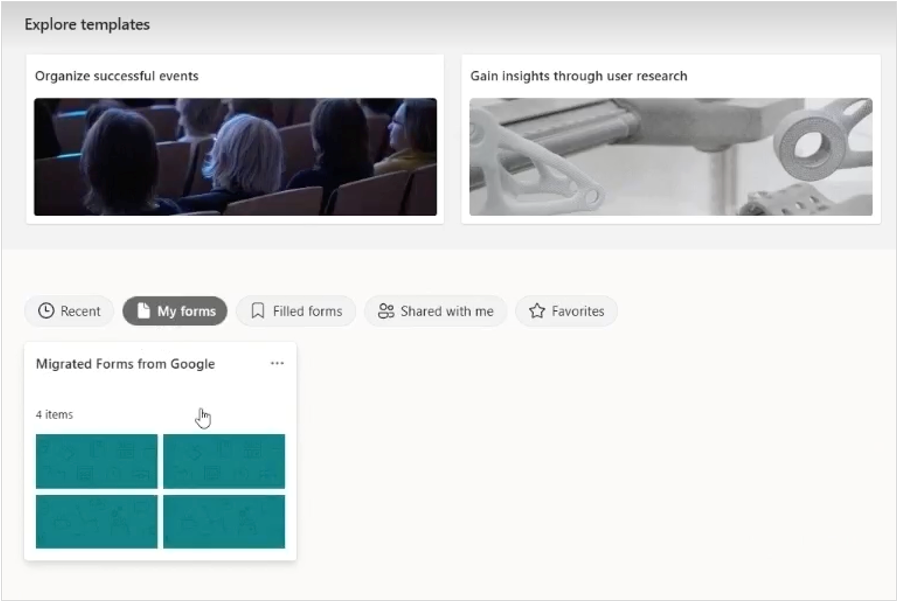
Google Forms Migration
Surveys are a great way to collect feedback from others – from organizations looking to connect with their customers to people looking to plan events, and everything in between. Google Drive customers typically use Google Forms to meet their survey needs. That’s why we’re thrilled to announce that Migration Manager now supports migrating Google Forms definitions and results to Microsoft Forms so that customers can preserve access to this important data on the Microsoft 365 platform. Migrated forms can be easily located in Microsoft Forms after migration.
Google Sheets Scan
While migrating content from Google Drive to Microsoft 365, Migration Manager is already able to convert Google Sheets spreadsheets into Microsoft Excel documents. However, some features in Google Sheets are not directly compatible with Microsoft Excel, such as certain types of formulas and embedded links. These types of data may be lost during the conversion process.
We’re now introducing the ability to identify incompatible formulas and invalid embedded links in Google Sheets during the migration scanning phase. When customers enable “Sheet scan” in the Migration Manager project settings, a deeper scan of Google Sheets will run during the general scan process. Customers can download the Sheet scan reports after the scanning is complete to review and mitigate the issues it identifies. The Microsoft 365 migration team will continue to explore further opportunities to preserve these types of data during the conversion process in the future.
Google Sheets Scan
Advanced Permission Migration
For most organizations, maintaining the correct permissions is a critical concern during any migration. Previously Migration Manager was able to support permissions applied at the folder level. However, this may not be sufficient for organizations that use more fine-grained permissions. Thanks to this customer feedback, we’re happy to announce that Migration Manager can now support permissions applied to individual files. Simply enable file-level permissions in the project settings to make sure migrated files are shared with the same users as before.
Advanced Permission Migration
Box Notes Conversion
To help you better migrate Box content, Migration Manager now supports the automatic conversion of Box Notes to Microsoft Word files during the migration process.
Easier to use
Moreover, you may often grapple with usability challenges during the migration journey. These usually include an intricate migration flow, perplexing reports, and limited customization options, among others.
To tackle the challenges head-on, we’ve streamlined the migration flow, ensuring a smoother and more intuitive user experience. With the introduction of new features such as multi-project support, guided first run experience, a migration time estimator, and flexible migration filters, you will have a refined user experience that empowers you throughout the migration process.
Multi-Project
Manage multiple migrations from the same source to simplify your merger and acquisition scenarios. You can create up to 5 projects per source type and switch between projects with ease to maintain oversight of ongoing migrations.
Multi-Project
Guided first run experience
An overview page provides a guided tour of the migration process, making it easier for both new and experienced users to initiate and manage migrations.
Guided first run experience
To further simplify your migrations, we have introduced the following features:
Estimated time to migrate: Support pre-migration / in-migration time estimation to help you plan your migration.
Estimated time to migrate
Filter migration content: Filter content for migration based on factors such as dates, file types, and invalid characters.
Filter migration content
Report improvements: The reports are now simpler and more actionable so you can troubleshoot issues faster and expedite your migrations.
Report improvements
Task status refinement: Refine all scan/migration statuses and overview modules for a consistent and clear task status experience.
Task status refinement
EU Data Boundary compliance: As of April 1, 2023, all new EU scans and migrations are processed within the European Union in compliance with European Union Data Boundary (EUDB) regulations.
Stay Tuned for What’s Coming
We’re committed to continually improving Migration Manager as your trusted cloud migration service. Stay tuned for the latest updates here.
We’re also interested in hearing your thoughts on migrating to Microsoft 365, so we’re planning to host an “Ask Me Anything” event soon. This will be a great opportunity to ask questions, share your feedback on existing features, and suggest new features you’d like to see directly with the product team. To sign up to receive more details about this upcoming event, please fill out this form: https://forms.microsoft.com/r/MUbyKybfuN
In the meantime, feel free to share your questions or comments here. Your insights are valuable, and we look forward to engaging with you in further discussion.
Microsoft Tech Community – Latest Blogs –Read More
How to Quickly and Easily Package, Deploy, and Serve ML Models to Edge Devices.
This post was written by Martin Bald, Senior Manager Developer Community from Wallaroo.AI , a Microsoft startup partner focusing on operationalizing AI. In this blog post, the first of a series of five, we’ll dive into best practices for productionizing ML models.
Introduction
Implemented correctly, model packaging helps streamline bringing ML models in production in various deployment environments such as cloud, multi-cloud/multi-region cloud, edge devices and on premises.
ML Model Packaging and the Production Process
The process of deploying machine learning models can sometimes take weeks or months. As Data Scientists and ML Engineers, you are experts in the ML field and you may be experiencing the frustration of struggling at the final hurdle to deploy the models into production despite a smooth pre-production stage of model testing and experimentation.
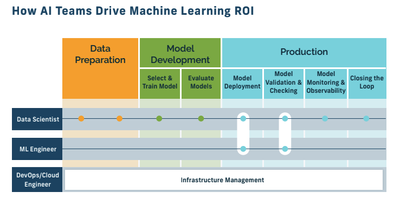
The image below depicts how production should be part and parcel of the entire end-to-end ML production process and not an afterthought. That is easier said than done, though, as developing and deploying ML models is not a trivial task.
Fig 1.
It involves many roles such as Data Scientists, ML Engineers, MLOps, DevOps etc.. It also requires a number of steps, such as data preprocessing, feature engineering, model training, evaluation, optimization, and inference. Moreover, each step may require different tools, libraries, frameworks, and environments. This makes the ML model development and deployment process complex, error-prone, and hard to reproduce. One way to address this challenge is to use ML model packaging.
What is ML Model Packaging
ML model packaging is the process of bundling all the necessary components of an ML model into a single package that can be easily distributed and deployed. A package may include the model itself, the dependencies and configurations required to run it, and the metadata that describes its properties and performance.
By using ML model packaging, we can ensure that the ML model is consistent, portable, scalable, and reproducible across different platforms and environments.
There are different ways to implement ML model packaging. Some of the common methods are:
Using containerization technologies, such as Docker or Kubernetes, to create isolated and lightweight environments that contain all the dependencies and configurations needed to run the ML model.
Using serialization formats, such as pickle or ONNX, to store the ML model in a binary or text file that can be loaded and executed by different frameworks and languages.
Using standardization protocols, such as PMML or PFA, to represent the ML model in a platform-independent and interoperable way that can be exchanged and executed by different systems.
Using specialized tools or platforms, such as MLflow or Seldon Core, to automate the ML model packaging process and provide additional features such as versioning, tracking, serving, etc.
Benefits of ML Model Packaging
The importance of investing the time to package your ML models can’t be understated as this will help set you up for an easy transition to production. There are a number of benefits for using ML model packaging. Some of them are:
Simplifying the ML model development and deployment process by reducing the complexity and variability of the components involved.
Improving the quality and reliability of the ML model by ensuring that it is tested and validated in a standardized way.
Enhancing the collaboration and communication among different stakeholders of the ML model, such as Data Scientists, ML Engineers, and other roles. .
Facilitating the reuse and sharing of the ML model by making it easy to access and consume by other applications and services.
Enabling the monitoring and management of the ML model by providing metrics and feedback on its performance and behavior.
Deploying ML Packaged Models To Production
Once your ML models are packaged the next step is to deploy the models to production. For this article we will use a retail store example for product monitoring for cashierless checkout where CV models will be deployed to edge environments such as cameras, and checkouts. For the Edge device we will emulate this using an Wallaroo.AI inference server running on Azure.
The first step for deployment is to upload our model into our Azure cluster, as shown in the code below.
model_name = ‘mobilenet’
mobilenet_model = wl.upload_model(model_name, “models/mobilenet.pt.onnx”, framework=Framework.ONNX).configure(tensor_fields=[‘tensor’],batch_config=”single”)
Next, we configure the hardware we want to use for deployment. In our code below we can define the type of architecture such as the number of ARM or x86 CPUs and/or GPUs needed. In the code example below we see that the edge device will use 1 CPU and 1 GB of memory.
deployment_config = wallaroo.DeploymentConfigBuilder()
.replica_count(1)
.cpus(1)
.memory(“1Gi”)
.build()
Then we can construct our pipeline object around the model and deploy.
deployment_config = wallaroo.DeploymentConfigBuilder()
.replica_count(1)
.cpus(1)
.memory(“1Gi”)
.build()
With our environment configured and pipeline object created we can test it by running a sample image through our pipeline. In our case products on a store shelf.
pipeline_name = ‘retail-inv-tracker-edge’
pipeline = wl.build_pipeline(pipeline_name)
.add_model_step(mobilenet_model)
.deploy(deployment_config = deployment_config)
Fig 2.
After that, we will convert this image to the expected format for 640×480 dimensions.
width, height = 640, 480
dfImage, resizedImage = utils.loadImageAndConvertToDataframe(‘data/images/input/example/dairy_bottles.png’, width, height)
Then we run our inference.
startTime = time.time()
infResults = pipeline.infer(dfImage)
endTime = time.time()
infResults
We can then examine the output results returned. (partial view below)
Fig 3.
Finally, we can use the output above to plot out inferences on top of the product image to examine results.
elapsed = 1.0
results = {
‘model_name’ : model_name,
‘pipeline_name’ : pipeline_name,
‘width’: width,
‘height’: height,
‘image’ : resizedImage,
‘inf-results’ : infResults,
‘confidence-target’ : 0.50,
‘inference-time’: (endTime-startTime),
‘onnx-time’ : int(elapsed) / 1e+9,
‘classes_file’: “models/coco_classes.pickle”,
‘color’: ‘BLUE’
}
image = utils.drawDetectedObjectsFromInference(results)
This produces an image like the one below with the product on the shelf identified with an average confidence of 72.5% for the objects that were detected.
Fig 4.
Now we have a model in production, ready to serve inferences. We can get the inference endpoint url from the pipeline with the following call:
pipeline.url()
Giving us the below output.
If we are deploying our packaged model to a cloud cluster then we are done at this point. We are live and in production with a working endpoint in the cloud. However, for this example we want to deploy and run our model on the in-store edge device(s), in our case these may be a small processing system in the back of a store.
Publishing the model to production to an edge environment is as quick and easy as it was for the cloud deployment above. Let’s go through this additional step.
Deploying our model to the edge device involves using the “publish” command to push to a preconfigured container registry. Remember that we made this easy for ourselves in the pre-production phase and packaged our model.
The output of this “publish” command contains the location of the docker container and helm chart that I can use for edge deployment. From there, we can add a device, which will also produce a device-specific token that will be used to send data back to the Ops Center.
First we run the “publish” command using the code below.
pub = pipeline.publish()
Next we deploy to our in store edge device. In this case our device is ‘camera-1’ in a store. If we are deploying to devices in multiple stores we would add those store numbers to the command.
pub.add_edge(“camera-1”)
Finally we will run a pipeline logs command so we can check the output of the inference details on the deployed edge devices.
pipeline.logs()
Fig 5.
Conclusion
We have seen that ML model packaging is a useful technique that can help streamline the ML model development and deployment process while also improving its quality and efficiency.
By using ML model packaging, you can create robust and reliable ML models that can be easily distributed and deployed across different platforms and environments. We have seen this through the retail store example where we deployed our model to the cloud and also to an in store edge environment and ran inferences for on-shelf product detection in a few short steps.
The next blog post in this series will cover testing our models in production using A/B testing and shadow deployment.
If you want to try the steps in these blog posts yourself, you can access the tutorials at this link and use the free inference servers available on the Azure Marketplace. Or you can download a free Wallaroo.AI Community Edition you can use with GitHub Codespaces.
Wallaroo.AI helps AI teams go from prototype to real-world results with incredible efficiency, flexibility, and ease – in the cloud, multi-cloud and at the edge.
Microsoft Tech Community – Latest Blogs –Read More
Public facing Azure Container Registry Reference Architecture
Host container images for secured on-demand delivery of customer’s application software and updates.
Restrict embargo countries/regions to download and deploy hosted container images.
Implement custom DNS solution for publicly accessible container registry.
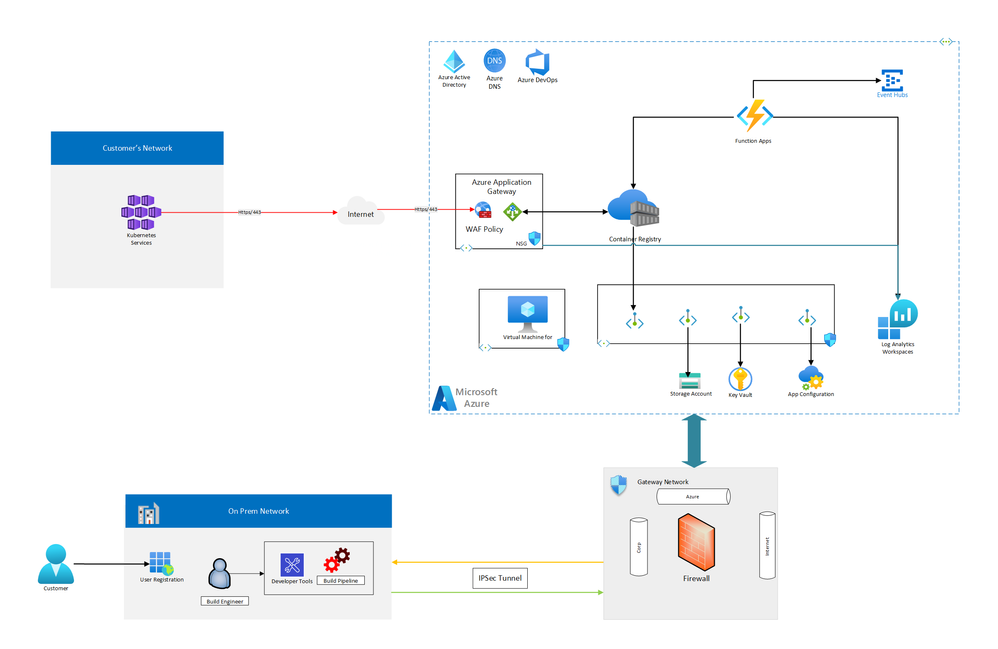
Architecture
Components
Azure Key Vault: Key Vault is provisioned for storing sensitive values and keys used specifically for on-premises systems like build pipeline and user registration application to access ACR API and function App to publish data to on-premises applications.
Azure App Gateway: Azure App Gateway with WAF v2 is used to load balance and route traffic to Azure Container registry and provide Layer 7 connectivity to authenticate/authorize customer applications and download container images.
Container registry: The container images for the workload are stored in a managed container registry. In this architecture, a single Azure Container Registry is used for all Kubernetes instances in the cluster. Geo-replication for Azure Container Registry enables replicating images to the selected Azure regions and providing continued access to images even if a region is experiencing an outage.
Log Analytics: Regional Log Analytics instances are used for storing regional networking metrics and diagnostic logs. Additionally, a shared Log Analytics instance is used to store metrics and diagnostic logs for the ACR instance.
Logging and threat detection: Microsoft Defender for Cloud built-in threat detection capability for Container Registry provides another layer of security intelligence. It detects unusual and potentially harmful attempts to access or exploit the Container Registry resources.
Azure Functions: Azure Functions serves as the processing engine to manage the life cycle of container images in ACR. These functions also process specific logs and monitor security events and notify security and monitoring operations control via Azure Event Hubs.
Kubernetes Cluster: Kubernetes Cluster is a consuming application cluster deployed by consumers of the hosted container images in Azure Container Registry.
Hybrid Cloud Networking: Host the applications and tools (DevOps) used by developers to create container images and publish them to Azure Container Registry. Gateway Network is implemented to provide a secure communication layer between on-premises applications and applications hosted in Azure.
Azure Resources Configuration
Azure Container Registry
Overview
Public access
Private access
Azure Application Gateway
Overview
App Gateway Frontend IP Configuration
App Gateway Backend pools
App Gateway Backend settings
App Gateway Health probes
App Gateway Listeners
App Gateway Rules
App Gateway Rewrites
Since ACR returns its own endpoints in various REST APIs, the application gateway’s “rewrite headers” capability is used to replace the ACR endpoints with App gateway endpoints.
Rewrite Location Header
Rewrite WWW-Authenticate Header
Rewrite Data Location Header
Rewrite Location Header:
Add a condition to evaluate whether the location header in the response contains the Azure Container Registry endpoint, contososecurepublicacr.azurecr.io in this example:
Rewrite WWW-Authenticate Header:
Rewrite Data Location Header:
Azure Web Application Firewall (WAF)
Overview
Azure Web Application Firewall (WAF) on Azure Application Gateway provides the ability to Geo-filter traffic, permitting or blocking access from certain countries/regions to applications. This feature serves to restrict access to embargoed countries/regions or IPs identified by customer teams.
Next Steps
This reference architecture depicts the integration of Azure Container Registry (ACR) and Azure Application Gateway with WAF policy to allow public access to the container images while keeping the ACR private. It also provides granular access control using the ACR’s token and scope map feature. This architecture can be further extended to using geo-replication enabled ACR for multiple regions, by deploying an app gateway instance in each geo-replicated region and setting up a performance-based traffic manager with multiple app gateway endpoints.
Related resources
Azure Container Registries Overview
ACR Authenticate with token
Azure Application Gateway Overview
Rewrite HTTP request and response headers with Azure Application Gateway
Azure Web Application Firewall (WAF) – Geomatch custom rules
Microsoft Tech Community – Latest Blogs –Read More
Azure Database for MySQL – 2023 Recap and 2024 Roadmap
Over the past year, we’ve continued to make major enhancements to the Azure Database for MySQL product experience and to make Azure the best choice for running MySQL workloads in the cloud. We released a number of key features across Security, Performance, Availability, Management, and Developer Experiences, as well as Migrations. This post provides a summary of all the newly released features, key announcements, and initiatives launched in 2023, together with a peek at the upcoming feature roadmap for 2024.
January 2024 Live Webinar
We also covered these updates in our recent Monthly Live Webinar on YouTube (Click here to subscribe to our YouTube channel!). Below is a link to the webinar:
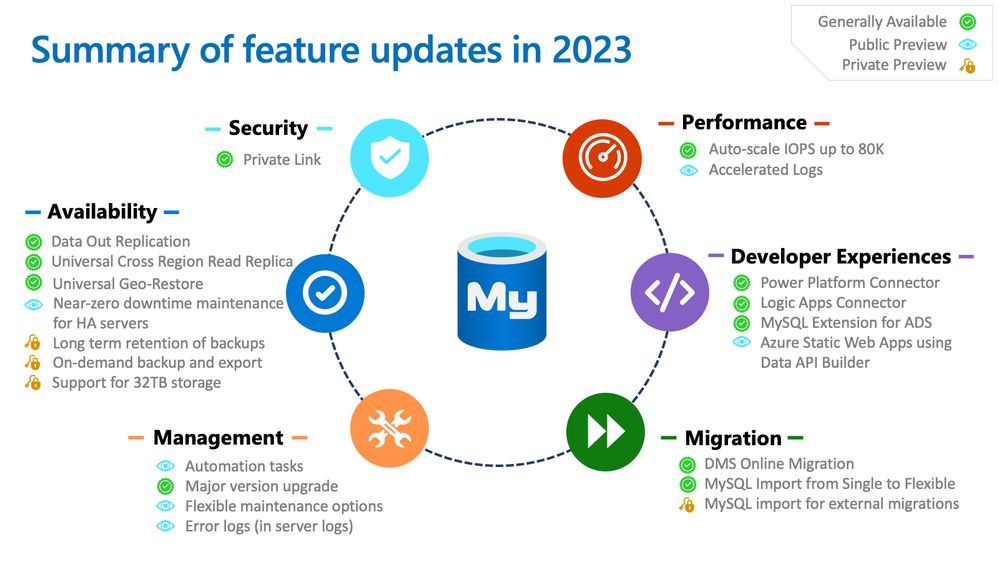
2023 Recap
Here is a pictorial summary of all the feature updates we released in 2023:
Security
Azure Private Link support – General Availability: Concepts | Tutorial | Demo video
Performance
Auto-scale IOPS up to 80K – General Availability: Concepts | Announcement blog | Demo video
Accelerated Logs – Public Preview: Concepts and Tutorial | Demo video
Availability
Data Out Replication – General Availability: Concepts | Tutorial
Universal Cross Region Read Replica – General Availability: Concepts | Tutorial
Universal Geo Restore – General Availability: Concepts | Tutorial
Near-zero downtime maintenance for HA servers – Public Preview: Concepts
Long term retention of backups – Private Preview: Concepts and Demo video
On-demand backup and export – Private Preview: This feature provides you with the ability to export at-moment physical backup of the server to an Azure storage account (Azure blob storage) using an Azure CLI command. After export, these backups can be used for data recovery, migration, data redundancy and availability, or auditing.
Support for 32TB storage – Private Preview: This feature provides you with the ability to expand the storage for your workloads using the Business-Critical service tier up to 32TB.
Management
Automation tasks – Public Preview: Tutorial | Demo video
Major version upgrade – General Availability: Tutorial | Demo video
Flexible maintenance options – Public Preview: Concepts | Tutorial | Demo video
Error logs (in server logs) – Public Preview: Concepts and Tutorial
Developer Experiences
Azure Database for MySQL Connector for Power Apps, Logic Apps and Power Automate – General Availability: Connector concepts | Quickstart – Power Apps | Quickstart – Logic Apps | Quickstart – Power Automate
Power BI integration – General Availability: Tutorial | Demo video
MySQL extension for Azure Data Studio – General Availability: Tutorial | GitHub repo | Demo video
Azure Static Web Apps integration using Data API Builder – Public Preview: Announcement blog | Demo video
Migration
Azure Database Migration Service (DMS) Online Migration – General Availability: Tutorial | Demo video
MySQL Import CLI for Single Server to Flexible Server migrations – General Availability: Tutorial | Demo video
MySQL Import CLI for migrations from external sources – Private Preview: Tutorial | Demo video
In-place auto-migration from Single Server to Flexible Server: Concepts
Other key announcements and initiatives
New benchmark study by Principled Technologies: Azure Database for MySQL is an industry leader (compared to AWS RDS, Aurora and GCP) in performance and price-performance! Learn more: https://aka.ms/AzureMySQLBenchmarkBlog
Azure Database for MySQL Contributor initiative: If you’re enthusiastic about Azure Database for MySQL and helping others to learn and do more with the service, join the Contributor initiative today and get recognized for your efforts through spotlights, collaboration opportunities and an exclusive badge! Learn more: https://aka.ms/mysql-contributors
Azure Database for MariaDB is being retired on 19 Sep 2025. Consider migrating to Azure Database for MySQL Flexible Server today! Learn more: https://aka.ms/mariadb-retirement
New troubleshooting video series on YouTube: Learn tips and tricks you can use to anticipate and address potential issues in problem areas such as low performance, connectivity issues, replication latency, and database corruption. https://aka.ms/mysql-troubleshooting-series
Roadmap for 2024
Feature
Description
Release status
Coming soon!
(Tentative*)
Error Logs (in Server Logs)
This feature allows you to maintain MySQL error log files under Server logs feature and download them for up to seven days. These error logs will help you efficiently identify and troubleshoot performance and reliability issues, and proactively detect and respond to unauthorized access attempts, failed login attempts and other security-related events. Learn more.
Public Preview
General Availability
in Q1 CY24
Long Term Retention of Backups
Previously, Azure Database for MySQL allowed for retaining automated backups and on-demand backups up to 35 days. With Long Term Retention, you can now retain the backups up to 10 years, further aiding your audit and compliance needs. Learn more.
Private Preview
Public Preview
in Q1 CY24
On-demand backup and export
This feature provides you with the ability to export at-moment physical backup of the server to an Azure storage account (Azure blob storage) using an Azure CLI command. After export, these backups can be used for data recovery, migration, data redundancy and availability, or auditing.
Private Preview
Public Preview
in Q1 CY24
Support for 32TB storage
This feature provides you with the ability to expand the storage for your workloads using the Business-Critical service tier up to 32TB.
Private Preview
General Availability
in Q1 CY24
Azure MySQL Import for external migrations
Azure MySQL Import enables you to migrate your MySQL on-premises or Virtual Machine (VM) workload seamlessly to Azure Database for MySQL – Flexible Server. It uses a user-provided physical backup file and restores the source server’s physical data files to the target server offering a simple and fast migration path. Based on user-inputs, it takes up the responsibility of provisioning your target Flexible Server and then restoring the user-provided physical backup of the source server stored in the Azure Blob storage account to the target Flexible Server instance. Learn more.
Private Preview
Public Preview
in Q1 CY24
MySQL Discovery & Assessment in Azure Migrate
With this functionality, you can use Azure Migrate to discover MySQL servers in your environment, assess them by identifying their compatibility for moving to Azure Database for MySQL, and receive compute and storage SKU recommendations along with their costs.
–
Private Preview
in Q1 CY24
Microsoft Defender for Cloud
Support for Azure Database for MySQL in Microsoft Defender for Cloud will enable you to easily detect anomalous activities indicating unusual and potentially harmful attempts to access or exploit databases, without the need for advanced security monitoring systems or security experts.
–
Public Preview
in Q1 CY24
Accelerated Logs
This feature, available with the Business Critical service tier and designed for mission-critical workloads, provides a significant performance boost by minimizing latency, which results in faster query execution and more responsive interactions. Take advantage of an impressive increase in throughput of up to two times (2x) for your applications at no additional cost! Learn more.
Public Preview
General Availability
in Q2 CY24
Flexible maintenance options
Building upon our existing system-managed and custom-managed maintenance windows, the following new flexible maintenance options aim to elevate user convenience and operational flexibility in server maintenance:
Reschedule window: Tailor maintenance schedules to suit your business rhythm.
On demand maintenance: Instantly initiate maintenance activities using the “Reschedule now” option.
Public Preview
General Availability
in Q2 CY24
Near-zero downtime maintenance for HA servers
This feature is designed to substantially reduce maintenance downtime for HA-enabled servers, ensuring that in most cases, maintenance downtime is expected to be between 40 to 60 seconds. This capability is pivotal for businesses that demand high availability and minimal interruption in their database operations. Learn more.
Public Preview
General Availability
in Q2 CY24
*The roadmap features and dates are tentative and are subject to changes. Please stay tuned for continuous updates.
Conclusion
As we continue to work on new features and functionalities, your feedback is very critical for our improvement. If you wish to enroll in Private Preview for any of the above features, or if you have any suggestions for or queries about the service, email us at AskAzureDBforMySQL@service.microsoft.com.
To learn more about what’s new with Flexible Server, see What’s new in Azure Database for MySQL – Flexible Server. Stay tuned for more updates and announcements by following us on social media: YouTube | LinkedIn | Twitter.
Microsoft Tech Community – Latest Blogs –Read More

Toll-free numbers for Microsoft Teams now supported on NCE
We have exciting news! New Commerce Experience (NCE) now supports the ability to acquire toll-free numbers for Microsoft Teams.
Please see the following guidance to share with customers on how to acquire toll-free numbers on NCE. Provisioning of toll-free numbers will be managed through the Teams admin center.
For your customers currently on NCE: No action needed. Unless the customer was previously on legacy and had enabled “Auto-recharge” for communications credits.
For your customers moving from legacy (Communications Credits) to NCE:
If the Communications Credit balance is zero, then the commerce system will automatically move the customer to postpaid and the new meter will be validated
If the customer has a positive balance for Communications Credits, the commerce tool will be able to automatically identify this and the remaining Communication Credits will be used for billing until the remaining balance is drained
Important note: Most customers have the “Auto-recharge” flag enabled within their account which will automatically refill their Communications Credit balance to whatever threshold they configured it as. They will need to disable this option if they wish to utilize the consumption meter, otherwise the Communications Credit balance will indefinitely refill itself, and the commerce system won’t switch to the post-pay mechanism. See screenshots below for how to disable.
Resources
Buy a pay-as-you-go calling plan for your Microsoft Teams subscription | Microsoft Learn
New commerce telco pay-as-you-go – Partner Center | Microsoft Learn
Add funds and manage Communications Credits – Microsoft Teams | Microsoft Learn
Microsoft Tech Community – Latest Blogs –Read More
Introducing Viva Glint: Ask the Experts series
Viva Glint is now hosting a monthly session in which you will have an opportunity to interact live with Glint experts! Designed for new Viva Glint customers, each session will introduce you to a foundational topic and discuss best practices around Viva Glint implementation. During this session, the team will also be available to answer questions that you may have as you’re launching your first Viva Glint programs.
The first session is scheduled for February 6, 2024. Be sure to register for the date here. Sessions will be monthly and recordings will be posted to the Viva Glint: Ask the Experts site.
What topics are you most interested in learning about as you start your Viva Glint journey? Leave us a note in the comments below.
Microsoft Tech Community – Latest Blogs –Read More
Introducing Viva Glint Ask the Expert series
Viva Glint is now hosting a monthly session in which you will have an opportunity to interact live with Glint experts! Designed for new Viva Glint customers, each session will introduce you to a foundational topic and discuss best practices around Viva Glint implementation. During this session, the team will also be available to answer questions that you may have as you’re launching your first Viva Glint programs.
The first session is scheduled for February 6, 2024. Be sure to register for the date here. Sessions will be monthly and recordings will be posted to the Viva Glint: Ask the Experts site.
What topics are you most interested in learning about as you start your Viva Glint journey? Leave us a note in the comments below.
Microsoft Tech Community – Latest Blogs –Read More
Persisting Data Volumes With .NET Aspire
This post is written against the .NET Aspire Preview 2 release, so it may change when the final version is released.
Recently, I’ve been building an app using .NET Aspire which I’m using PostgreSQL as the database and Azure Storage Blobs and Queues in.
.NET Aspire is awesome for this, as you can setup a developer inner loop super simply with the components that ship, and the nice thing about this is that locally PostgreSQL is run in a Docker container and Azure Storage uses the Azurite storage emulator (which also happens to run in a container).
The problem with this is that when you restart your app, you lose all the data in the database and storage emulator, since they are started fresh each time.
Turns out, it’s a pretty easy fix – all that you need to do is mount a volume into the container where it would store it’s data.
Here’s the PostgreSQL example:
IResourceBuilder<PostgresContainerResource> postgresContainerDefinition = builder.AddPostgresContainer();
if (builder.Environment.IsDevelopment())
{
postgresContainerDefinition
// Mount the Postgres data directory into the container so that the database is persisted
.WithVolumeMount(“./data/postgres”, “/var/lib/postgresql/data”, VolumeMountType.Bind);
}
And here’s the Azure Storage example:
IResourceBuilder<AzureStorageResource> storage = builder.AddAzureStorage(“azure-storage”);
if (builder.Environment.IsDevelopment())
{
storage.UseEmulator()
.WithAnnotation(new VolumeMountAnnotation(“./data/azurite”, “/data”, VolumeMountType.Bind));
}
With this I’m mounting the ./data/<service name> folder from within the AppHost project into the respective data paths, but also wrapping them with a builder.Environment.IsDevelopment() check so that it only happens when running locally (since you don’t want to mount volumes in production – we’ll use the Azure services for that).
Note: The Azure Storage emulator doesn’t have a WithVolumeMount method, so we have to use the WithAnnotation method, which is what the WithVolumeMount method wraps anyway. Also, due to this pull request it’s likely there’ll be an easier way come Preview 3, where you provide the ./data/azurite path as part of the UseEmulator method.
Now when I restart my app, the data is persisted, meaning I don’t have to rebuild state each time. Just make sure you put those paths in the .gitignore file so that you don’t accidentally commit them to source control!
Microsoft Tech Community – Latest Blogs –Read More

AI & Cloud Learning Space, by Students, for Students
As we introduced in a previous article on this blog, the Korea MLSA AI & Cloud Learning Hands-on Camp, an event where Korean Microsoft Learn Student Ambassadors (MLSA) and Microsoft MVPs teach students how to utilize Microsoft AI and cloud technologies, was held in July 2023. Following that, the second event (MLSA와 함께하는 대학생 AI & Cloud 러닝 핸즈온 캠프) took place in November 2023, where six MLSAs were involved in organizing the event, and hands-on AI sessions were conducted for 60 student participants.
At the beginning of this event, Soyoung Lee, the Community Program Manager in Korea, introduced the Azure OpenAI Service and Microsoft’s startup support initiative, Microsoft for Startups Founders Hub. Demonstrations were conducted with MVPs and MLSAs who develop their own services or apps through these services. Subsequently, Jaeseok Lee, a Business Applications MVP, held a session about immediately applicable AI in business.
After that, MLSAs led three divided sections, where participants could join the section they were most interested in and deepen their understanding through sessions and hands-on activities. The three themes of these sections are introduced below.
Aaron Roh introduced how to create projects that can be operated in a serverless environment using Azure Functions and the GitHub API. Additionally, he covered how to implement automated deployment of Azure Functions via GitHub Actions.
Minjin Park introduced methods for generating images using Generative Adversarial Networks (GAN) based Bing Image Creator and Stable Diffusion. She also presented how to create and assess the reliability of image diagnostic models using Azure AI Custom Vision.
Minseok Song, who studies Industrial Engineering, explained Azure Cognitive Search and Azure OpenAI using both Semantic Kernel and LangChain, based on his contributed technical blog, Teach ChatGPT to Answer Questions Based on PDF content Using Azure AI Search and Azure OpenAI.
Students who learned about the latest AI and cloud technologies in this 8-hour event will continue to learn and enhance their skills in technologies that interest them, sparked by this opportunity. Some might participate in the MLSA program and become educators themselves, while others might join the Microsoft for Startups program and become future entrepreneurs who launch better services.
Students who wish to participate in an opportunity to organize, learn, and grow together are encouraged to search for and attend events of interest organized by MLSAs in the future.
https://mvp.microsoft.com/en-US/search?target=Event&timeline=UPCOMING&host=MLSA
Microsoft Tech Community – Latest Blogs –Read More
From Chaos to Clarity: Simplifying Your Networking with Azure Container Apps
In this blog post, I will share my experience as an Azure architect who has consulted with customers on how to design and implement networking in Azure Container Apps environment. Azure Container Apps is a service that enables you to run containerized applications at scale, with minimal overhead and operational complexity. You can focus on your application logic, while Azure Container Apps takes care of the infrastructure, scaling, availability, and security. If you are confused about which service to select between AKS (Azure Kubernetes Service) and Azure Container Apps, please refer to my previous blog, ACA vs AKS: Which Azure Service Is Better for Running Containers? for more insights.
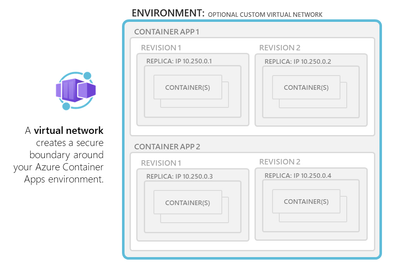
One of the key aspects of Azure Container Apps is the environment, which is a logical boundary that encapsulates one or more container apps or jobs. Each environment has its own virtual network (VNet) that provides network isolation and security. You can choose to use a generated VNet that is automatically created for you by Azure, or you can provide an existing VNet that you have already configured. Depending on your networking requirements, you can also decide whether your environment allows public ingress or ingress only from within your VNet.
In this post, I will cover the following topics:
– How to choose between external and internal environments
– How to configure custom VNet and subnet for your environment
– How to use network security groups (NSGs) and application gateway to control network access
– How to leverage DNS, ingress, WAF, and other features to optimize your network performance and security
Let’s get started!
Environment selection
———————
When you create an Azure Container App, you need to specify an environment, which is a logical grouping of one or more container apps or jobs that share a common virtual network (VNet). The environment defines the network boundary and isolation level for your applications.
You can choose between two types of environments: 1. Consumption only and 2. Workload profiles.
Consumption only environments are optimized for cost and scalability, and they support user defined routes (UDR) and egress through NAT Gateway. The minimum required subnet size for consumption only environments is /27. Consumption only environments are suitable for stateless applications that do not need to communicate with other resources in your VNet or use advanced networking features.
Workload profiles environments are optimized for performance and flexibility, and they support all the networking features that are available in Azure Container Apps, such as integration with Application Gateway, Network Security Groups, private endpoints, peering through a remote gateway, and custom egress. The minimum required subnet size for workload profiles environments is /23. Workload profiles environments are suitable for stateful applications that need to communicate with other resources in your VNet or use advanced networking features.
Accessibility levels
——————–
You can configure whether your container app allows public ingress or ingress only from within your VNet at the environment level. You can choose between two accessibility levels: external and internal.
External environments allow your container app to accept public requests over the internet. External environments are deployed with a virtual IP on an external, public facing IP address. You can use DNS names or custom domains to access your container app from outside your VNet.
Internal environments restrict your container app to accept requests only from within your VNet. Internal environments are deployed with a virtual IP mapped to an internal IP address. The internal endpoint is an Azure internal load balancer (ILB) and IP addresses are issued from the custom VNet’s list of private IP addresses. You can use DNS names or private DNS zones to access your container app from inside your VNet.
Very important to note that a managed public IP resource(created) handles outbound requests and management traffic, regardless if you have an external or internal environment.
User Defined Routes (UDR) and controlled egress through NAT Gateway are supported in the workload profiles environment. In the Consumption only environment, these features aren’t supported. You can create a UDR that routes all outbound traffic through the firewall.
Custom VNet configuration
————————-
By default, Azure Container Apps creates a VNet for your environment automatically, which is inaccessible to you as it is created in backend by Azure. However, if you want more control over your network configuration, you can provide an existing VNet when you create an environment. Once you create an environment with either a generated or existing VNet, the network type cannot be changed.
If you use your own VNet, you need to provide a subnet that is dedicated exclusively to the Container App environment you deploy. This subnet is not available to other services. Network addresses are assigned from a subnet range you define as the environment is created. You can define the subnet range used by the Container Apps environment.
When you use your own VNet, you can also leverage some of the Azure networking features that are not available with generated VNets, such as:
– Integration with Application Gateway: You can use Application Gateway as an ingress controller for your container apps, and benefit from its features such as SSL termination, URL-based routing, cookie-based session affinity, web application firewall (WAF), etc.
– Network Security Groups: You can use Network Security Groups (NSGs) to control the inbound and outbound traffic for your container apps at the subnet level. You can define rules to allow or deny traffic based on source and destination IP addresses, ports, protocols, etc.
– Communication with resources behind private endpoints: You can use private endpoints to securely connect your container apps to other Azure services such as Storage Accounts, Cosmos DB, etc., without exposing them to the internet.
– Peering through a remote gateway: You can use peering through a remote gateway to connect your container apps to other VNets or on-premises networks via VPN or ExpressRoute.
HTTP edge proxy behaviour
————————
Azure Container Apps uses Envoy as a network proxy for all HTTP requests. Envoy provides some capabilities such as:
– Scaling to zero: Envoy allows your container apps to scale to zero instances when there is no traffic, and scale up when there is demand. Envoy acts as a buffer between the clients and the container apps, and handles the cold start latency.
– HTTPS redirection: Envoy automatically redirects all HTTP requests to HTTPS, ensuring secure communication between the clients and the container apps.
– TLS termination: Envoy terminates the transport layer security (TLS) at the edge of the container app environment, and forwards the requests to the container apps over plain HTTP. This reduces the overhead of encryption and decryption for the container apps.
– Mutual TLS: Envoy supports mutual TLS (mTLS) when you use Dapr as a sidecar for your container apps. mTLS provides an additional layer of security by requiring both the client and the server to present valid certificates for authentication.
– Ingress controls: Envoy allows you to configure some ingress controls for your container apps, such as IP restrictions, CORS, WAF, etc.
Security
——–
Azure Container Apps provides several security features to protect your applications and data, such as:
– Encryption at rest: All data stored by Azure Container Apps is encrypted at rest using Microsoft-managed keys.
– Encryption in transit: All communication between Azure Container Apps and other Azure services is encrypted in transit using TLS.
– Private endpoints: You can use private endpoints to securely access Azure Container Apps from your VNet or on-premises network, without exposing it to the internet.
– Network security groups: You can use network security groups to control the inbound and outbound traffic for your container apps at the subnet level.
– Web application firewall: You can use web application firewall (WAF) to protect your container apps from common web attacks such as SQL injection, cross-site scripting, etc.
– DDOS protection: You can use Azure DDoS Protection for the Azure Container Apps Environment.
– Secure inbound connectivity: When publishing internet-facing services, use Azure Application Gateway (WAF_v2 SKU) or Azure Front Door (with Web Application Firewall) to secure inbound connectivity.
Summary
——-
In this blog post, I have explained some of the networking options and features that are available in Azure Container Apps, and how to use them effectively. Azure Container Apps provides a serverless and scalable way to run containerized applications, with different levels of network isolation and configuration. You can choose the environment type, accessibility level, and VNet configuration that best suits your application needs and requirements. You can also leverage Envoy as a network proxy to provide some capabilities such as scaling to zero, HTTPS redirection, TLS termination, mTLS, and ingress controls. Additionally, you can consider the security, and WAF aspects of Azure Container Apps to optimize your budget and protect your applications and data.
Microsoft Tech Community – Latest Blogs –Read More


