
Tag Archives: microsoft
Customer review: AnnounceBot connects teams by celebrating birthday and work anniversary events
AnnounceBot Automated and Personalized Greetings, a solution published to Microsoft AppSource, helps companies celebrate special occasions like birthdays, work anniversaries, and welcoming new hires. With minimal setup and no calendars or manual work, AnnounceBot increases engagement, collaboration, and retention.
Microsoft interviewed Stephen Cornell, Service Director, Protected Trust, to learn what he had to say about the app.
What do you like best about AnnounceBot?
We absolutely love how easy AnnounceBot is to use! It is user-friendly, and setting it up was quick. Before using AnnounceBot, social media was our only way to track birthdays, which means some folks got left out. And work anniversaries were out of the picture. Since we started using AnnounceBot, we have never missed a birthday or work anniversary. It’s all automatic now.
How has AnnounceBot helped your organization?
Keeping the team engaged became challenging when we transitioned into working remotely. AnnounceBot helped us rebuild team connections by providing a centralized system to celebrate special events. Now, everyone engages in birthday and work anniversary posts, makes jokes, and tells stories about times we were all together in an office. It is a small gesture that has made a big difference in our company culture.
How is customer service and support?
I wanted to know how to check birthdays that are getting tracked. The support team responded within an hour and provided the information I needed.
Any recommendations or insights for other users considering AnnounceBot?
My suggestion would be to set it up in a small team first, just to get the hang of it. Test it out there before you go big and use it for the whole organization.
On a scale from 1 to 5 (5 being the highest), what is your overall rating for this AnnounceBot?
I would give AnnounceBot a 4.5 only because I think they should support Microsoft Entra ID (formerly Azure Active Directory) integration to make birthdate and joining date collection even smoother.
Microsoft Tech Community – Latest Blogs –Read More
MAC address assignment strategies for tenant VMs running on Stack-HCI environment
Azure Stack HCI is a hyperconverged infrastructure (HCI) cluster solution consists of windows servers (Hyper-V), Storage Spaces Direct, and Azure-inspired SDN. All clustered servers share common configurations and resources by leveraging the Windows Server Failover Clustering feature. A Windows Failover Cluster consists of multiple windows servers running in a cluster to provide high availability i.e. If one server node goes down, then another node takes over. We can create multiple VMs on the failover cluster. VMs can be connected to different tenant networks. In this case we need to make sure VM connected on network ‘A’ with static ip should persist same network configuration even if it gets migrated from one node to another within a cluster. This is possible by assigning static MAC/static IP for the VM. But how to get free and unique MAC to assign to VM, there are different ways to solve this problem. In this article we will discuss some of them with pros and cons. (Note: solutions discussed in this article are just to suggestions, can not be considered optimal solutions)
Before this, lets understand first things required to create a tenant VM. To create tenant VM connected to tenant network in stack-hci following steps are performed.
1. Create a new VM with vm network adapter having static MAC assigned
2. Create a new network interface on network controller service(running on SDN) having same MAC and static IP assigned.
3. Associate created network adapter with network interface controller, to make vm gets tenant network connection.
Following powershell commands perform above steps logically.
# 1. vm creation with static MAC
New-VM -Generation 2 -Name “MyVM” -Path “C:VMsMyVM” -MemoryStartupBytes 4GB -VHDPath “C:VMsMyVMVirtual Hard DisksWindowsServer2016.vhdx” -SwitchName “SDNvSwitch”
Set-VM -Name “MyVM” -ProcessorCount 4
# Setting static MAC
Set-VMNetworkAdapter -VMName “MyVM” -StaticMacAddress “00-11-22-33-44-55”
# Creating network interface on networkcontroller with same mac/static IP
$vnet = Get-NetworkControllerVirtualNetwork -ConnectionUri $uri -ResourceId “Contoso_WebTier”
$vmnicproperties = New-Object Microsoft.Windows.NetworkController.NetworkInterfaceProperties
$vmnicproperties.PrivateMacAddress = “001122334455”
$vmnicproperties.PrivateMacAllocationMethod = “Static”
$vmnicproperties.IsPrimary = $true
$vmnicproperties.DnsSettings = New-Object Microsoft.Windows.NetworkController.NetworkInterfaceDnsSettings
$vmnicproperties.DnsSettings.DnsServers = @(“24.30.1.11”, “24.30.1.12”)
$ipconfiguration = New-Object Microsoft.Windows.NetworkController.NetworkInterfaceIpConfiguration
$ipconfiguration.resourceid = “MyVM_IP1”
$ipconfiguration.properties = New-Object Microsoft.Windows.NetworkController.NetworkInterfaceIpConfigurationProperties
$ipconfiguration.properties.PrivateIPAddress = “24.30.1.101”
$ipconfiguration.properties.PrivateIPAllocationMethod = “Static”
$ipconfiguration.properties.Subnet = New-Object Microsoft.Windows.NetworkController.Subnet
$ipconfiguration.properties.subnet.ResourceRef = $vnet.Properties.Subnets[0].ResourceRef
$vmnicproperties.IpConfigurations = @($ipconfiguration)
New-NetworkControllerNetworkInterface –ResourceID “MyVM_Ethernet1” –Properties $vmnicproperties –ConnectionUri $uri
$nic = Get-NetworkControllerNetworkInterface -ConnectionUri $uri -ResourceId “MyVM_Ethernet1”
#Do not change the hardcoded IDs in this section, because they are fixed values and must not change.
# 3. Finally make association of vm network adapter with nic created in last step
$FeatureId = “9940cd46-8b06-43bb-b9d5-93d50381fd56”
$vmNics = Get-VMNetworkAdapter -VMName “MyVM”
$CurrentFeature = Get-VMSwitchExtensionPortFeature -FeatureId $FeatureId -VMNetworkAdapter $vmNics
if ($CurrentFeature -eq $null) {
$Feature = Get-VMSystemSwitchExtensionPortFeature -FeatureId $FeatureId
$Feature.SettingData.ProfileId = “{$($nic.InstanceId)}”
$Feature.SettingData.NetCfgInstanceId = “{56785678-a0e5-4a26-bc9b-c0cba27311a3}”
$Feature.SettingData.CdnLabelString = “TestCdn”
$Feature.SettingData.CdnLabelId = 1111
$Feature.SettingData.ProfileName = “Testprofile”
$Feature.SettingData.VendorId = “{1FA41B39-B444-4E43-B35A-E1F7985FD548}”
$Feature.SettingData.VendorName = “NetworkController”
$Feature.SettingData.ProfileData = 1
Add-VMSwitchExtensionPortFeature -VMSwitchExtensionFeature $Feature -VMNetworkAdapter $vmNics
} else {
$CurrentFeature.SettingData.ProfileId = “{$($nic.InstanceId)}”
$CurrentFeature.SettingData.ProfileData = 1
Set-VMSwitchExtensionPortFeature -VMSwitchExtensionFeature $CurrentFeature -VMNetworkAdapter $vmNics
}
Get-VM -Name “MyVM” | Start-VM
To make sure VMs works fine even after migration in windows failover cluster, we need to assign static MAC and static IP. To get available and unique MAC is challenge here. We will see following ways to solve this problem with pros and cons.
Generating random MAC on node
Assign dedicated unique MAC address pool range for every Node in cluster and Generating free MAC from Node’s MAC address range pool.
Get free MAC from Network controller service and use same on VM
Lets discuss each approach in detailed-
1. Generating random MAC on node
This is very simple approach, where we will generate random MAC and same will be used. It includes below steps:
Generate valid MAC on node, where we need to create VM(or new network interface).
Set same MAC on vm network adapter as static
Set same MAC on network interface along with static IP
Following is powershell script performs same above logical steps:
New-VM -Name $vm_name -MemoryStartupBytes $vm_memory -BootDevice VHD -VHDPath $image_path -Path $vm_data_path -Generation $vm_generation -SwitchName $switch_name
Add-ClusterVirtualMachineRole -vmname $vm_name -Name $vm_name
Start-Sleep -Seconds 3
############## Random MAC address generation and assignment
# script block for mac address assingment kept in retry block
$mac_address = Retry-Command -ScriptBlock {
# do something
# found used in az-auto-setup
#$mac_address=(“{0:D12}” -f ( Get-Random -Minimum 0 -Maximum 99999 ))
$mac_address = (0..5 | ForEach-Object { ‘{0:x}{1:x}’ -f (Get-Random -Minimum 0 -Maximum 15), (Get-Random -Minimum 0 -Maximum 15) }) -join ‘-‘
write-host “Tring to set : $mac_address”
Set-VMNetworkAdapter -VMName $vm_name -StaticMacAddress “$mac_address”
write-host “Mac set succssfully: $mac_address”
Start-Sleep -Milliseconds 500
Write-host $( Get-VMNetworkAdapter -VMName $vm_name ).MacAddress
return $mac_address
}
write-host “Mac set succssfully: $mac_address”
Write-host ‘VM created..’
##########################################################################
# network configuration starts here..
# you can refer for more info: https://learn.microsoft.com/en-us/windows-server/networking/sdn/manage/create-a-tenant-vm#prerequisites
$vnet = Get-NetworkControllerVirtualNetwork -ConnectionUri $uri -ResourceId $vnet_name
$vmnicproperties = New-Object Microsoft.Windows.NetworkController.NetworkInterfaceProperties
# give same mac address below as created before..
$mac = -join($mac_address.split(“-“)).toupper()
$vmnicproperties.PrivateMacAddress = $mac
Write-host $mac
$vmnicproperties.PrivateMacAllocationMethod = “Static”
$vmnicproperties.IsPrimary = $true
$vmnicproperties.DnsSettings = New-Object Microsoft.Windows.NetworkController.NetworkInterfaceDnsSettings
#$vmnicproperties.DnsSettings.DnsServers = @(“192.168.1.254”, “8.8.8.8”)
$vmnicproperties.DnsSettings.DnsServers = $dns_server
$ipconfiguration = New-Object Microsoft.Windows.NetworkController.NetworkInterfaceIpConfiguration
$ipconfiguration.resourceid = $vm_name + “_IP1”
$ipconfiguration.properties = New-Object Microsoft.Windows.NetworkController.NetworkInterfaceIpConfigurationProperties
$ipconfiguration.properties.PrivateIPAddress = $ip_address
$ipconfiguration.properties.PrivateIPAllocationMethod = “Static”
$ipconfiguration.properties.Subnet = New-Object Microsoft.Windows.NetworkController.Subnet
# do: programatically decide subnet full ref, or form path directly
# $ipconfiguration.properties.subnet.ResourceRef = $vnet.Properties.Subnets[0].ResourceRef
$ipconfiguration.properties.subnet.ResourceRef = “/virtualNetworks/” + $vnet_name + “/subnets/” + $subnet_name
$vmnicproperties.IpConfigurations = @($ipconfiguration)
$NIC_name = $vm_name + “_Eth1”
New-NetworkControllerNetworkInterface -ResourceID $NIC_name -Properties $vmnicproperties -ConnectionUri $uri -Confirm:$false -force
Write-host ‘NIC config created..’
Start-Sleep -Seconds 8
$nic = Get-NetworkControllerNetworkInterface -ConnectionUri $uri -ResourceId $NIC_name
#########################################################################
#Do not change the hardcoded IDs in this section, because they are fixed values and must not change.
$FeatureId = “9940cd46-8b06-43bb-b9d5-93d50381fd56”
$vmNics = Get-VMNetworkAdapter -VMName $vm_name
$CurrentFeature = Get-VMSwitchExtensionPortFeature -FeatureId $FeatureId -VMNetworkAdapter $vmNics
if ($CurrentFeature -eq $null)
{
$Feature = Get-VMSystemSwitchExtensionPortFeature -FeatureId $FeatureId
$Feature.SettingData.ProfileId = “{$( $nic.InstanceId )}”
$Feature.SettingData.NetCfgInstanceId = “{56785678-a0e5-4a26-bc9b-c0cba27311a3}”
$Feature.SettingData.CdnLabelString = “TestCdn”
$Feature.SettingData.CdnLabelId = 1111
$Feature.SettingData.ProfileName = “Testprofile”
$Feature.SettingData.VendorId = “{1FA41B39-B444-4E43-B35A-E1F7985FD548}”
$Feature.SettingData.VendorName = “NetworkController”
$Feature.SettingData.ProfileData = 1
Add-VMSwitchExtensionPortFeature -VMSwitchExtensionFeature $Feature -VMNetworkAdapter $vmNics
}
else
{
$CurrentFeature.SettingData.ProfileId = “{$( $nic.InstanceId )}”
$CurrentFeature.SettingData.ProfileData = 1
Set-VMSwitchExtensionPortFeature -VMSwitchExtensionFeature $CurrentFeature -VMNetworkAdapter $vmNics
}
Write-host ‘finally applying setting..’
Start-Sleep -Seconds 5
Get-VM -Name $vm_name | Start-VM
But this approach has following problems :
There is possibility that two vms running on same cluster may got same MAC and it may create MAC conflict issue after migration.
Some specific MAC range is not allowed to be assigned, in this case we need to keep retrying random generation, which is not good.
Very difficult to keep track of used MAC addresses.
So this method is not reliable and not recommended.
2. Assign dedicated unique MAC address pool range for every Node in cluster and Generating free MAC from Node’s MAC address range pool.
We can preassign unique dedicated MAC address pool range to every node(hyper-v) in cluster, so whenever we need to create new network interface we will first get free MAC from the pool of node where vm will be running. Same MAC will be made static on vm network adapter and network interface followed by static ip. Following are logical steps need to perform:
1. Get free MAC from Node’s MAC pool range.
2. Assign same static MAC on VM network adapter
3. Set same MAC on network interface along with static IP
Following is an example of MAC pool range distribution plan for 255 clusters, 16 hosts each:
00-15-5D-[c1][c2]-[h1][v1]-[v2][v3]
field c1, c2: will indicate a cluster. 00 to FF : Max 255 clusters can be created.
field h1 – will be for host/node identification in a cluster. 0 to F = max 16 hosts in a cluster.
field v1,v2,v3 will be used for vms. 000 to FFF = 16*16*16 = total 4096 possible vms/network interfaces per node can be created.
But main challenge here is there is no api or command available to get free MAC from node pool. There is a workaround that to get MAC assigned from the pool, we need to create dummy network adapter with dynamic configuration and start vm for a moment to get free dynamic MAC assigned from node pool range. Then we need to stop vm and revert the change and using same MAC we need to create static one and same steps need to be followed. This is not good approach since this is just a workaround, where dummy resource need to create.
# creating new network adapter with dynamic MAC
Add-VMNetworkAdapter -VMName $vm_name -SwitchName $switch_name -Name $adapter_name
# starting and stopping vm to get free MAC from node pool
Start-VM -VMName $vm_name; Stop-VM -VMName $vm_name -Force
# reading assigned dynamic MAC
$mac_address = (Get-VMNetworkAdapter -VMName $vm_name -Name $adapter_name).MacAddress
# make same MAC as static
Set-VMNetworkAdapter -VMName $vm_name -Name $adapter_name -StaticMacAddress $mac_address
# rest steps are same for network interface creation
3. Get free MAC from Network controller service and use same on VM network adapter.
There is a dedicated centralized network controller service on every Stack-hci cluster, where we can setup global MAC address range pool at network controller service. When we create new network interface on network controller service with dynamic configuration, then it assign free MAC from the global free pool. It is very reliable solution since it is a centralized service. In this, we will follow below steps
Create a Network interface in Network controller service with dynamic MAC assignment config, to get assigned free MAC from global MAC range.
Read assigned MAC on network interface
Assign same MAC address to vm network adapter as static.
The following powershell commands perform above steps (Note: please use appropriate values in place of parameters):
# Creating network interface with dynamic MAC config on network controller
$vmnicproperties = New-Object Microsoft.Windows.NetworkController.NetworkInterfaceProperties
$vmnicproperties.PrivateMacAllocationMethod = “Dynamic”
$vmnicproperties.IsPrimary = $true
$vmnicproperties.DnsSettings = New-Object Microsoft.Windows.NetworkController.NetworkInterfaceDnsSettings
$vmnicproperties.DnsSettings.DnsServers = $dns_server
$ipconfiguration = New-Object Microsoft.Windows.NetworkController.NetworkInterfaceIpConfiguration
$ipconfiguration.resourceid = $vm_name + “_IP1”
$ipconfiguration.properties = New-Object Microsoft.Windows.NetworkController.NetworkInterfaceIpConfigurationProperties
$ipconfiguration.properties.PrivateIPAddress = $ip_address
$ipconfiguration.properties.PrivateIPAllocationMethod = “Static”
$ipconfiguration.properties.Subnet = New-Object Microsoft.Windows.NetworkController.Subnet
$ipconfiguration.properties.subnet.ResourceRef = “/virtualNetworks/” + $vnet_name + “/subnets/” + $subnet_name
$vmnicproperties.IpConfigurations = @($ipconfiguration)
$NIC_name = $vm_name + “_Eth1”
New-NetworkControllerNetworkInterface -ResourceID $NIC_name -Properties $vmnicproperties -ConnectionUri $uri -Confirm:$false -force
Write-host ‘NIC config created..’
Start-Sleep -Seconds 8
$nic = Get-NetworkControllerNetworkInterface -ConnectionUri $uri -ResourceId $NIC_name
# Read obtained free MAC from global pool
$mac_address = $nic.Properties.PrivateMacAddress -replace ‘..(?!$)’, ‘$&-‘
###### Vm creation flow starts from here. We will set static MAC here
New-VM -Name $vm_name -MemoryStartupBytes $vm_memory -BootDevice VHD -VHDPath $image_path -Path $vm_data_path -Generation $vm_generation -SwitchName $switch_name
Add-ClusterVirtualMachineRole -vmname $vm_name -Name $vm_name
Set-VMNetworkAdapter -VMName $vm_name -StaticMacAddress “$mac_address”
write-host “Mac set succssfully: $mac_address”
Conclusion:
The third/last approach discussed in this article seems to be easy and more reliable, since we are consuming MAC from centralized network controller service. We will never face problem of MAC conflicts incase VMs get migrated from one node to another.
Microsoft Tech Community – Latest Blogs –Read More

Smarter Azure Open AI Usage
Smart Azure Open AI Endpoints – “AI Central”
Many organizations are building Intelligent Applications built on Azure’s Open AI (AOAI) services. In the path to production the same set of questions are often raised
How many AOAI services should I have?
How do I monitor and log streaming quota usage?
How do I prioritize PTU based AOAI and fallback to PAYG?
How do I round-robin between multiple AOAI servers?
How do I handle Open AI rate-limiting errors?
How do I enforce local rate limiting to a cluster of AI services?
How do I enforce rate limiting to a backend AI service?
How do I present a group of AOAI services as a single endpoint, for a seamless shift to PTU?
How do I reduce risk by leveraging Open AI and Azure Open AI services but present a single endpoint to consumers?
How do I put a circuit breaker over an AI service that I’ve over-used, to fallback to others?
To help with some of these issues we can turn to services like API Management, Application Gateways, and Reverse Proxies. Each can provide a solution to a subset of the problems.
However, there are complexities hidden within these boxes that become difficult to solve
Prioritization and failover of groups of AOIA servers relies on custom code running in a Layer 7 Load Balancer.
Layer 7 load balancers lack real-time retry functionality and instead use asynchronous downstream health monitors.
Server-Side Events support makes it difficult to log quota whilst maintaining a streaming endpoint.
Switching between Azure Open AI, Open AI or other Open Source LLMs requires manipulation of HTTP requests.
Introducing AI Central – https://github.com/microsoft/AICentral
To help with these I have published a Reference Implementation of an intelligent AI Router, “AI Central”. AI Central lets you build configurable, extensible Pipelines allowing you to govern and observe access to your AI service.
AI Central is an extensible smart reverse proxy for Azure Open AI and Open AI services.
Out of the box it provides the following
Consumer local rate limiting
Endpoint local rate limiting and circuit breakers
Randomized endpoint selection from a cluster of AI services
Prioritized endpoint selector from a priority cluster, to a fallback cluster
Bulkhead to hold and throttle load to a cluster of servers
Consumer Entra JWT auth (using Microsoft.Identity) with Role Authorisation
Consumer Entra JWT pass-thru
Client Key auth
Prompt / Token usage logging to Azure Monitor (including Streaming Endpoints)
Open Telemetry metrics
Sample Scenarios
Here’s some scenarios where AI Central might help you:
Scenario 1: PTU failover
Preferred PTU AOAI service, but fallback PAYG AOAI service
A group of applications that need to access AOAI services
A requirement for Prompt logging for audit and governance
Streaming quota logging for chargeback
AI Central can construct a pipeline to manage this for you:
The pipeline listens on a host name expecting Azure Open AI like requests.
The AAD check confirms that the client is permitted access to the pipelines.
The Prioritized endpoint selector is configured to prioritize a PTU server.
It dispatches the request with a backoff / retry policy and circuit breaker.
If it fails to receive a request it falls back to the second group of PAYG servers
If the response from AOAI is detected to be a streaming response, it will stream the results back to the Client, using a Tokenizer to estimate quota usage
Finally, the Azure Monitor Logger asynchronously sends quota usage and prompt information to Azure Monitor.
Scenario 2: Token based rate limiting of streaming consumers, to an AOAI server
Single PTU service with models shared across multiple consumers
Streaming quota logging for chargeback purposes
Fair-use policy by restricting token use by consumer
The pipeline listens on a specific hostname
The AAD check confirms that the client is permitted access to the pipelines
The Token limit checks if the client (AAD identity) has reached their token limit
If not, the request is dispatched to a AOAI server
The AOAI response is re-streamed to the consumer
The return pathway logs the prompt, and updates the tokens consumed by the consumer
NB: Token counting does not use a distributed algorithm. It is local to an AI Central server. Consider this if running multiple AI Central Endpoints behind a load-balancer (for example in a PaaS like Azure Container Apps, Azure App Service, etc)
Try it out
The easiest way to start is to install into your own .NET API from the nuget packages.
#Create new project and bootstrap the AICentral nuget package
dotnet new web -o MyAICentral
cd MyAICentral
dotnet add package AICentral
#optional for logging: dotnet add package AICentral.Logging.AzureMonitor
#Program.cs
//Minimal API to configure AI Central
var builder = WebApplication.CreateBuilder(args);
builder.Services.AddAICentral(
builder.Configuration,
additionalComponentAssemblies:
[
typeof(AzureMonitorLoggerFactory).Assembly //for Azure Monitor logging
]);
);
var app = builder.Build();
app.UseAICentral();
app.Run();
You’ll need to add Configuration to define your pipelines.
The Github Repository has some good examples – https://github.com/microsoft/AICentral for a Quick Start, and https://github.com/microsoft/AICentral/blob/main/docs/configuration.md for some more complex examples.
Give it a go and let us know how you find it!
Microsoft Tech Community – Latest Blogs –Read More
How To Monitor Your Multi-Tenant Solution on Azure With Azure Monitor
1. Multi Tenant solution
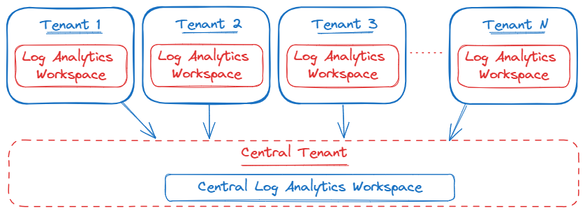
Often customers are operating using a multi-tenant architecture in Azure for several reasons: cost-effectiveness, scalability and security. However, this architecture will make it challenging to get an overview of the status of resources across the different tenants. E.g., an application with different instances of it running across multiple tenants. The person responsible for the performance and operational effectiveness of the application will have a hard time monitoring the status of each of these instances. In an ideal scenario, this person would be able to assess all this information from a single pane of glass instead of having to log into each tenant to retrieve this data.
Given the scenario above, it is not possible to send log data from resources in tenant A to a Log Analytics Workspace in tenant B. A possible solution to address this challenge is to use the Hybrid model when implementing your Log Analytics Workspace architecture.
“In a Hybrid model, each tenant has its own workspace. A mechanism is used to pull data into a central location for reporting and analytics. This data could include a small number of data types or a summary of the activity, such as daily statistics.”
In order to centralize the data in a multi-tenant solution, there are two options:
Create a central Log Analytics Workspace. To query and ingest the data into this location, one can use either the Query API and the logs Ingestion API or use Azure Logic Apps to centralize the data.
Using the integration between Log Analytics Workspace and Power BI by exporting the KQL query to PowerBI.
For the sake of this article, we will focus on the first option, namely creating a central Log Analytics Workspace by leveraging the Log Query and Ingestion API. However, as discussed above, there are different approaches one could choose from. A high level architecture of this approach would look like the following:
In the remainder of this article, we will provide a step by step tutorial on how this hybrid model can be implemented using Azure Services. Programming language used in the article is Python. However, other programming languages are supported as well, such as: .NET, Go, Java or JavaScript.
2. Practical implementation
The first step is to configure your centralized Log Analytics Workspace environment by setting up the following:
Create a new central Log Analytics Workspace
Create a Microsoft Entra application
Create a Data Collection Endpoint (DCE) and Data Collection Rule (DCR)
Create a custom table in the centralized Log Analytics Workspace
The steps outlined above are explained in the following tutorial:
In terms of authentication, take the following into account:
To gain access to the Log Analytics Workspace for querying data, here are the captivating steps:
– User Assigned Managed Identity: how to create a User Assigned Managed Identity
Note: make sure to add the Monitoring Metrics Publisher: Enables publishing metrics against Azure resources
Authenticate into the central Log Analytics Workspace for data ingestion with these possible authentication approaches:
– Azure Lighthouse: enables multitenant management with scalability, higher automation, and enhanced governance across resources
– Service Principal + App registration: as used in the tutorial
Both methods will accomplish the task; hence, it depends on the company’s security policies and requirements to decide which solution to use. However, in this article the Service Principal + App registration has been used.
After the central Log Analytics Workspace has been created and the right authentication method has been selected, the next step will be to start writing the script. From a high level point of view, the script will query the Log Analytics Workspace inside the tenant where it will be deployed. Next, it will take the results of the query and ingest them into the centralized Log Analytics Workspace created in previous steps.
As mentioned, the programming language used in this article is Python. The same goal can be achieved using different programming languages such as .NET, Go, Java, JavaScript.
A more detailed architecture would look like this:
3. Getting Started
Step 1: Required imports
import logging
import os
import sys
from datetime import datetime, timezone
import json
import pandas as pd
from azure.core.exceptions import HttpResponseError
from azure.identity import ManagedIdentityCredential, ClientSecretCredential
from azure.monitor.ingestion import LogsIngestionClient
from azure.monitor.query import LogsQueryClient, LogsQueryStatus
Step 2: Set variables required further in the script
# Get information from the centralized Log Analytics Worspace and DCR/DCE created
LOGS_WORKSPACE_ID = os.environ[‘LOGS_WORKSPACE_ID’]
DATA_COLLECTION_ENDPOINT = os.environ[‘DATA_COLLECTION_ENDPOINT’]
LOGS_DCR_RULE_ID = os.environ[‘LOGS_DCR_RULE_ID’]
LOGS_DCR_STREAM_NAME = os.environ[‘LOGS_DCR_STREAM_NAME’]
# Get information from the created Service Principal created
AZURE_CLIENT_ID = os.environ[‘AZURE_CLIENT_ID’]
AZURE_TENANT_ID = os.environ[‘AZURE_TENANT_ID’]
AZURE_CLIENT_SECRET = os.environ[‘AZURE_CLIENT_SECRET’]
# Get client ID from User Assigned Managed Identity (UA_MI)
AZURE_UA_MI_CLIENT_ID = os.environ[‘AZURE_UA_MI_CLIENT_ID’]
Step 3: Configure credentials
# Configure credentials
credential_mi = ManagedIdentityCredential(AZURE_UA_MI_CLIENT_ID)
credential = ClientSecretCredential(AZURE_TENANT_ID, AZURE_CLIENT_ID, AZURE_CLIENT_SECRET)
Step 4: Configure Query and Ingestion clients
# Create clients
logs_query_client = LogsQueryClient(credential_mi)
ingestion_client = LogsIngestionClient(endpoint=DATA_COLLECTION_ENDPOINT, credential=credential, logging_enable=True)
Step 5: Define the KQL query you want to run against the Log Analytics Workspace (results of this will be ingested into the centralized workspace)
# Define query and time span (example)
query = “””<Your KQL query>”””
start_time = datetime(2024, 1, 11, tzinfo=timezone.utc)
end_time = datetime(2024, 1, 20, tzinfo=timezone.utc)
Step 6: Query Log Analytics Workspace and put results into a list of JSON objects (which is required for the ingestion of the data)
# Query Log Analytics Workspace
response = logs_query_client.query_workspace(
LOGS_WORKSPACE_ID,
query=query,
timespan=(start_time, end_time)
)
if response.status == LogsQueryStatus.PARTIAL:
error = response.partial_error
data = response.partial_data
print(error)
elif response.status == LogsQueryStatus.SUCCESS:
data = response.tables
# Convert data to JSON list
json_list = []
for table in data:
df = pd.DataFrame(data=table.rows, columns=table.columns)
# Use f-string for string formatting
print(f”Dataframe:n{df}n”)
# Use list comprehension for creating list
json_list.extend([json.loads(row) for row in df.to_json(orient=”records”, lines=True).splitlines()])
# Use f-string for string formatting
print(f”JSON list:n{json_list}n”)
Step 7: Take the results and ingest them into the centralized Log Analytics Workspace
#Upload logs
ingestion_client.upload(rule_id=LOGS_DCR_RULE_ID, stream_name=LOGS_DCR_STREAM_NAME, logs=json_list)
print(“Upload done”)
The full script:
import logging
import os
import sys
from datetime import datetime, timezone
import json
import pandas as pd
from azure.core.exceptions import HttpResponseError
from azure.identity import ManagedIdentityCredential, ClientSecretCredential
from azure.monitor.ingestion import LogsIngestionClient
from azure.monitor.query import LogsQueryClient, LogsQueryStatus
# Get information from the centralized Log Analytics Worspace and DCR/DCE created
LOGS_WORKSPACE_ID = os.environ[‘LOGS_WORKSPACE_ID’]
DATA_COLLECTION_ENDPOINT = os.environ[‘DATA_COLLECTION_ENDPOINT’]
LOGS_DCR_RULE_ID = os.environ[‘LOGS_DCR_RULE_ID’]
LOGS_DCR_STREAM_NAME = os.environ[‘LOGS_DCR_STREAM_NAME’]
# Get information from the created Service Principal created
AZURE_CLIENT_ID = os.environ[‘AZURE_CLIENT_ID’]
AZURE_TENANT_ID = os.environ[‘AZURE_TENANT_ID’]
AZURE_CLIENT_SECRET = os.environ[‘AZURE_CLIENT_SECRET’]
# Get client ID from User Assigned Managed Identity (UA_MI)
AZURE_UA_MI_CLIENT_ID = os.environ[‘AZURE_UA_MI_CLIENT_ID’]
# Configure credentials
credential_mi = ManagedIdentityCredential(AZURE_UA_MI_CLIENT_ID)
credential = ClientSecretCredential(AZURE_TENANT_ID, AZURE_CLIENT_ID, AZURE_CLIENT_SECRET)
# Create clients
logs_query_client = LogsQueryClient(credential_mi)
ingestion_client = LogsIngestionClient(endpoint=DATA_COLLECTION_ENDPOINT, credential=credential, logging_enable=True)
# Define query and time span (example)
query = “””<Your KQL query>”””
start_time = datetime(2024, 1, 11, tzinfo=timezone.utc)
end_time = datetime(2024, 1, 20, tzinfo=timezone.utc)
try:
# Query Log Analytics Workspace
response = logs_query_client.query_workspace(
LOGS_WORKSPACE_ID,
query=query,
timespan=(start_time, end_time)
)
if response.status == LogsQueryStatus.PARTIAL:
error = response.partial_error
data = response.partial_data
print(error)
elif response.status == LogsQueryStatus.SUCCESS:
data = response.tables
# Convert data to JSON list
json_list = []
for table in data:
df = pd.DataFrame(data=table.rows, columns=table.columns)
# Use f-string for string formatting
print(f”Dataframe:n{df}n”)
# Use list comprehension for creating list
json_list.extend([json.loads(row) for row in df.to_json(orient=”records”, lines=True).splitlines()])
# Use f-string for string formatting
print(f”JSON list:n{json_list}n”)
# Upload logs
ingestion_client.upload(rule_id=LOGS_DCR_RULE_ID, stream_name=LOGS_DCR_STREAM_NAME, logs=json_list)
print(“Upload done”)
except HttpResponseError as e:
# Use f-string for string formatting
print(f”Upload failed: {e}”)
Step 8: Azure Functions
Once the script is written and runs locally, the next step will be to deploy this to the cloud and automate this. For this, multiple approaches are possible: Azure Logic Apps, Azure Functions, Azure Automation, PowerShell… In this article we deployed the script as an Azure Function and used the Timer Trigger in order to run the Function at a predefined interval (e.g., every 5 minutes). We deployed the function inside the tenant of the workspace we are going to query.
How to get started with Azure Functions:
Create a function in Azure that runs on a schedule | Microsoft Learn
Develop Azure Functions using Visual Studio | Microsoft Learn
Timer trigger for Azure Functions | Microsoft Learn
Continuously update function app code using Azure Pipelines | Microsoft Learn
Important: add the User Assigned Managed Identity created above to the identity settings of the Function App. This is required for the Function to be authenticated to Query the Log Analytics Workspace.
Step 9: (Optional) Visualization
After consolidating data from various resources in different tenants, creating visualizations could add an interesting dimension. Microsoft Azure offers multiple tools to do this:
PowerBI
Dashboards
Workbooks
Grafana
Step 10: (Optional) Create Log Alert Rules
Once the data has been centralized across different tenants, one could start to create Log Alert Rules. The alert rule is based on a log query that will run automatically at regular intervals. Based on the results of the query, Azure Monitor will determine if an alert — linked to the query — should be created and fired.
3. Security considerations
This solution relies on client secrets for authentication via the Service Principal and App Registration. To uphold robust security, our system enforces the expiration and periodic renewal of these critical credentials, mitigating potential vulnerabilities. It is essential to maintain vigilant monitoring to proactively detect and address any issues stemming from expired secrets, thereby avoiding disruptions to the solution’s functionality.
To streamline this process, we recommend integrating with Logic Apps, providing an automated and centralized solution for secret management. For further details on this integration, refer to following article:
This approach not only enhances security practices but also guarantees an efficient and proactive handling of sensitive information.
Microsoft Tech Community – Latest Blogs –Read More
Migrating from the Azure MMA to AMA Agent
I have another conversation about the sunset of the Microsoft Monitoring Agent (MMA). Back on November 13, 2023 I posted and article on how to do a bulk removal of the Azure MMA agent, but before you can remove the MMA agent you need to have the AMA agent ready to take over the work. Below are details to assist in this endeavor. *17
Just as my miniature schnauzer, Raven, loves to explore the backyard, sniffing out new scents and chasing after squirrels, so too must we venture into the world of Azure’s new AMA agent. Raven’s curiosity and adaptability are traits we can admire and emulate as we navigate this transition. She doesn’t shy away from the unfamiliar; instead, she embraces it with a wagging tail and an eager spirit. Similarly, we should approach the migration from Azure’s MMA agent to the AMA agent with the same enthusiasm and readiness for discovery.
Think of the DCR as a specific set of instructions or a recipe that you use when baking Raven’s favorite dog treats. This recipe precisely dictates what ingredients should go into the mix. Similarly, the DCR in the Azure environment defines what log components should be sent to Azure. Just as you wouldn’t add anything not listed in Raven’s treat recipe, the AMA agent only sends the log components specified by the DCR.
Now, installing the AMA agent alongside the MMA agent is like giving Raven a new bone while she still has her old one. However, the key is to ensure that the new bone is presented before the old one is taken away. Raven, being the smart dog she is, immediately takes to the new bone, forgetting all about the old one. Similarly, once the DCR definition has been pushed to the server, the new AMA agent becomes active, and the old MMA agent becomes redundant. It’s a seamless transition, just like Raven’s shift of attention from the old bone to the new one. This way, we ensure a smooth transition while avoiding redundancy, making our migration process more efficient and tailored to our needs.
This is a large article, so I have added a content listing to help.
Contents
Transitioning to the Azure Monitor Agent (AMA) when you are using the Log Analytics Agent (MMA/OMS).
What is the MMA agent (Also known as OMS or Log Analytics agent)?
What is the AMA agent?
Coexistence with other agents
When should I consider using/migrating from MMA to AMA?
Agent Installation
Creating a DCR for Windows machines
Using Azure Policy to install the Windows Azure Monitoring Agent (AMA)
Verify that the AMA Agent Install Policy was Assigned and Create a Remediation Task for Any Existing Windows Servers
Verify that the Windows AMA Agent Installation Remediation Worked
Using Azure Policy to install the Windows Data Collection Rule
Verify that the DCR Policy was Uploaded and Create a Remediation Task for Any Existing Windows Servers
Creating a DCR for Linux Machines
Using Azure Policy to install the Linux Azure Monitoring Agent
Using Azure Policy to install the Linux Data Collection Rules
Verify Policy Assignments Have Been Completed
Installation of the AMA agent and Push of the DCR Definition on Azure ARC Hosts
Using Azure Policy to install the Windows Azure Monitoring Agent for Azure ARC
Using Azure Policy to install the Windows Data Collection Rule for Azure ARC
Using Azure Policy to install the Linux Azure Monitoring Agent for Azure ARC
Using Azure Policy to install the Linux Data Collection Rule for Azure ARC
Verify Agents Are Communicating with Azure
Querying the Heartbeat Table
Find Out Which Agents are Loaded and Where
AMA Data Sources and Locations
MMA Gateway
MMA Agent Removal
References
Transitioning to the Azure Monitor Agent (AMA) when you are using the Log Analytics Agent (MMA/OMS).
What is the MMA agent (Also known as OMS or Log Analytics agent)? *1
The Azure Log Analytics agent collects telemetry from Windows and Linux virtual machines in any cloud, on-premises machines, and those monitored by System Center Operations Manager and sends collected data to your Log Analytics workspace in Azure Monitor. The Log Analytics agent also supports insights and other services in Azure Monitor such as VM insights, Microsoft Defender for Cloud, and Azure Automation.
The MMA collects ALL the data from the logs defined below, with limited ability to filter:
Data Source
Description
Information sent to the Windows event logging system.
Information sent to the Linux event logging system.
Numerical values measuring performance of different aspects of operating system and workloads.
Usage information for IIS web sites running on the guest operating system.
Events from text files on both Windows and Linux computers.
Regardless as to which O/S or installation method the installer will require the workspace ID and key for the Log Analytics workspace that the agent will connect to. This requirement is a key differentiator from the new AMA.
What is the AMA agent? *2
The Azure Monitor agent (AMA) collects monitoring data from the guest operating system of Azure virtual machines and delivers it to Azure Monitor solutions, including Log Analytics and products such as Microsoft Sentinel. The Azure Monitor agent is meant to replace the Log Analytics agent (also known as MMA and OMS) for both Windows and Linux machines.
NOTE: The Log Analytics agent will be deprecated on August 31, 2024, so if you are using the MMA, it’s a good idea to start planning your migration to AMA well ahead of time.
Eventually, the Azure Monitor agent will replace the following legacy monitoring agents that are currently used by Azure Monitor.
Log Analytics agent: Sends data to a Log Analytics workspace and supports VM insights and monitoring solutions.
Telegraf agent: Sends data to Azure Monitor Metrics (Linux only)
Diagnostics extension: Sends data to Azure Monitor Metrics (Windows only), Azure Event Hubs, and Azure Storage.
In addition to consolidating this functionality into a single agent, the Azure Monitor agent provides the following benefits over the existing agents:
Cost savings
Granular targeting via Data Collection Rules to collect specific data types from specific machines, as compared to the “all or nothing” mode that the MMA supports.
Security and performance
For authentication and security, it uses Managed Identity (for virtual machines) and AAD device tokens (for clients)
This agent performs better at higher EPS compared to legacy agents.
Simplified management of data collection
Management of dependent solutions or services
Coexistence with other agents
The Azure Monitor agent can coexist (run side by side on the same machine) with the legacy Log Analytics agents so that you can continue to use their existing functionality during evaluation or migration. For this reason, you can begin transition even with limitations, but you must review the following points carefully: *12
Be careful in collecting duplicate data because it could skew query results and affect downstream features like alerts, dashboards, or workbooks. For example, VM insights uses the Log Analytics agent to send performance data to a Log Analytics workspace. You might also have configured the workspace to collect Windows events and Syslog events from agents.
If you install the Azure Monitor agent and create a data collection rule for these same events and performance data, it will result in duplicate data. As a result, ensure you’re not collecting the same data from both agents. If you are, ensure they’re collecting from different machines or going to separate destinations.
Besides data duplication, this scenario would also generate more charges for data ingestion and retention.
Running two telemetry agents on the same machine would result in double the resource consumption, including but not limited to CPU, memory, storage space, and network bandwidth.
When should I consider using/migrating from MMA to AMA?
AMA is feature complete with MMA with reference to Windows Server. The exceptions are Windows Server 2008 R2, Windows 2008 Sp2, Windows 8 Enterprise and Pro and Windows 7 SP1. For the most up to date details please see *3 in the References section.
Agent Installation
The first set of steps will be to apply an Azure policy to deploy both the AMA agent and the Data Collection Rules. The use of Azure policy is no different, in their use, than other Azure policies you may have built and applied.
Before you begin to set up your new policies to migrate to the new AMA agent, be aware that if you run both agents at the same time, it can duplicate the data captured. So please take this into consideration and as you bring new AMA collection on board it is recommended to stop collecting the same data from the MMA process.
What are Data Collection Rules, you might ask?
“Data Collection Rules (DCRs) define the data collection process in Azure Monitor. DCRs specify what data should be collected, how to transform that data, and where to send that data. DCRs will be created and managed by Azure Monitor to collect a specific set of data to enable insights and visualizations. You may also create your own DCRs to define the set of data required for other scenarios.” *4
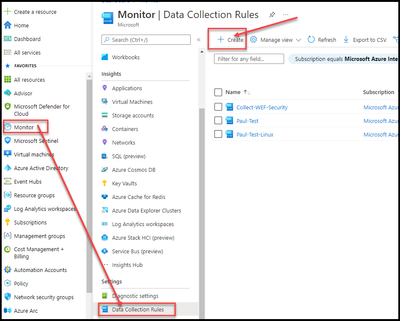
Creating a DCR for Windows machines
Browse to the Azure “Monitor” blade and select “Data Collection Rules”.
Select “Create.
Enter Rule Name.
Subscription.
Resource Group.
Region.
This needs to be in the same location as the Log Analytics Workspace.
Platform Type.
Select “Next: Resources >”.
Click on the “Add resources”.
Drill down through the subscription to find a resource. In this example I have selected a Resource Group (RG). The DCR rule created for this RG will be used to apply against all the machines that fall within the Azure Policy.
Click “Apply”.
Select “Next: Collect and deliver >”
Select “+ Add data source”.
Select “Data source type”.
In this example we will select “Windows Event Logs”.
At this point here is a key difference from the MMA agent. The data can now be filtered. For now the example shown will choose the complete set of Events from a log file, but they could be filtered using an XPath definition.
Before we continue on, I just wanted to show that if the “Custom” definition of logs is selected, it can be noted that there is no logs being collected. After we select the logs to collect, we will look at the “Custom” again to see the XPath generated by the system.
Choose custom.
Choose Basic
The “Information” type was selected to help gather more events but in reality, both “Information” and “Verbose” probably wouldn’t be selected.
Select all but “Verbose” as seen in the screen grab below.
Once these have all been selected, click on “Custom” to see what the XPath filter looks like for this selection.
Select “Next: Destination”.
Select “+ Add destination”.
Destination type = “Azure Monitor Logs »
Suscription = 999999999999999999999999999
Account or namespace = xxxxxxxxxxxxxxxxxxxxxxxxx
Limit event log data collection from VM’s via XPath Filters. *5
Select “Add data source”.
Select “Review + create”.
Select “Create”.
As can be seen, the new DCR has been created. This new DCR is the exact same definition as “Paul-Test” so from this point forward all examples will use “Paul-Test” since there has already been a deployment using this DCR.
Select the DCR to be used for the Azure policy.
Select “JSON view”
When the DCR rules “Resource ID” is needed, the “Copy to Clipboard” is all that will be needed.
Cancel out of here.
Using Azure Policy to install the Windows Azure Monitoring Agent
Note: Although the documentation doesn’t specifically call out that installing the agent on Windows 10/11 or later (Current documentation only states that the MSI) is supported, this is being amended to reflect that endpoint workstations are supported utilizing Azure policy. #18
Browse to the Azure Policy blade.
Select Definitions.
Click on the “Search” box.
Enter “Configure Windows virtual machines”.
Select “Configure Windows virtual machines to run Azure Monitor Agent using system-assigned managed identity”.
Note: You must have system-assigned managed identity enabled on each virtual machine before you deploy the agent.
To check to see if the virtual machine is configured for system assigned Identity:
Open up a new browser tab and browse to Azure Virtual Machines.
“System assigned” tab.
Settings > Identity.
Verify that the “Status” is set to “Enabled”.
The new tab can be closed.
Click on the ellipse (the three dots at the end of the Name) and select “Assign”.
Enter the correct “Scope”.
Enter any “Exclusions”, if needed.
Select “Next”.
There is nothing to be Configured in “Advanced”, so click “Next”.
There should be no “Parameters”, so click “Next.
If there are any resources that already exist a remediation task can be created once this “Policy Definition” has been completed. Ensure the following have been completed:
The “Create a Managed Identity” is selected.
Select “System assigned managed identity”.
If you want to use a “User assigned managed identity” then the policy needs to be “Configure Windows virtual machines to run Azure Monitor Agent using user-assigned managed identity”.
Select the location to where the system assigned identity should reside.
Select “Next”.
Enter any details required in the “Non-compliance message”.
Select “Next”.
The policy definition should look similar to below.
Select “Create”.
Verify that the AMA Agent Install Policy was Assigned and Create a Remediation Task for Any Existing Windows Servers
Browse to Policy > Authoring / Assignments.
Review the “Assignment name” column looking for the newly created Assignment.
For servers that already exist, a remediation task will need to be run to install the AMA agent. The following steps will create a remediation task to install the AMA agent on any servers in the scope defined.
Click on the newly created Policy Assignment
On the “New remediation task” window, click on “Applicable resource to remediate”.
Select a “Scope” to remediate.
Any servers that don’t have the AMA agent loaded should now appear under the “Name” column.
Click on “Remediate”.
A remediation task should now commence.
Verify that the Windows AMA Agent Installation Remediation Worked
Wait about 5 minutes…
Browse to Azure Virtual machines.
Click on “Extensions + applications”
On the “Extensions” tab, verify that the “AzureMonitorWindows Agent” is installed.
Select a VM that was to be remediated
Using Azure Policy to install the Windows Data Collection Rule
A policy must be made to link the DCR that was created earlier to the same scope as the assignment for the AMA agent.
Browse to the “Policy” blade, similar to before and select “Definitions”.
Click on the “Search” box.
Enter “Configure Windows virtual machines”.
To the right of “Configure Windows virtual machines to be associated with a Data Collection Rule or a Data Collection Endpoint”
Click on the ellipse (the three dots at the end of the Name) and select “Assign”.
Enter the correct “Scope”.
Enter any “Exclusions”, if needed.
Enter the “Assignment Name”.
Click “Next”.
There is nothing to configure on the “Advanced” tab.
Click on “Next”.
Open a new browser tab and browse to Azure Monitor.
Under “Settings”, select “Data Collection Rules”.
From the work earlier in this process, select the DCR rule created.
From the “Overview” blade, select the “JSON View”.
Click on the “Copy” at the end of the Resource ID”.
Switch back to the Policy browser tab.
On the “Parameters” tab, paste the “Resource Id” into the “Data Collection Rule Resource Id or Data Collection Endpoint Resource Id” entry box.
Select “Next”.
On the “Remediation” tab, leave as default and click Next.
On the “Non-compliance messages” tab, enter a message for out of compliance servers.
Click Next
The policy definition should look similar to below.
Select “Create”.
The Policy assignments for any new servers will have the DCR applied against the scope as defined in the policy settings. For any current servers, a Remediation task will need to be run to upload the DCR to any existing servers in “Scope”.
Verify that the DCR Policy was Uploaded and Create a Remediation Task for Any Existing Windows Servers
Browse to Policy > Authoring / Assignments.
Review the “Assignment name” column looking for the newly created Assignment.
For servers that already exist, a remediation task will need to be run to upload the DCR definition. The following steps will create a remediation task to upload the DCR definition any servers in the scope defined.
Click on the newly created Policy Assignment
Click on “Create remediation task”.
Click on the “Scope” within the “Applicable resources to remediate”.
Select the scope to remediate and click “Select”.
Click on “Remediate”.
Give the system about 10 minutes to push the DCR and data to start flowing, then you can verify that data is being uploaded to the Log Analytics Workspace (LAW) defined in the DCR. Open up a new browser tab and browse to the Log Analytics Workspace defined in the DCR.
Note: If the MMA agent is currently sending data, then query 2 below will be needed to ensure data is being sent by the AMA agent.
Click on “Logs”
Run the query below.
Search “Server Name”
| summarize count () by $table
Data from multiple tables should now be found.
To further ensure the data is coming specifically from the AMA agent run the following query. The “Category” column contains the agent that uploaded the data to the LAW.
Heartbeat
| project Computer, Category
Creating a DCR for Linux Machines
Browse to the Azure “Monitor” blade and select “Data Collection Rules”.
Select “Create.
Enter Rule Name.
Subscription.
Resource Group.
Region.
This needs to be in the same location as the Log Analytics Workspace.
Platform Type.
Select “Next: Resources >”.
Click on the “Add resources”.
Drill down through the subscription to find a resource. In this example I have selected a single host “Ubuntu-01”. The DCR rules created for this host will be used to apply against all the machines that fall within the Azure Policy.
Click “Apply”.
Select “Next: Collect and deliver >”.
Select “+ Add data source”.
Select “Data source type”.
In this example we will select “Linux syslog”.
At this point here is a key difference from the MMA agent. The data can now be filtered. For now, the example shown will choose the complete set of Event from a log file, but they could be filtered using an XPath definition.
Before we continue on, I just wanted to show that if the “Custom” definition of logs is selected, it can be noted that there are no logs being collected.
Review the level of logging to capture the logs for each “Facility”.
Select the “Destination” tab.
Select “Destination type”, “Subscription” and “Account or namespace”.
Click the “Add destination” button.
Select “Add data source”.
Select “Next: Review + Create >”.
Select “Create”.
Select “Go to Resource”.
From the “Overview” blade, select the “JSON View”.
In a later step you will need to copy the “Resource ID”.
Using Azure Policy to install the Linux Azure Monitoring Agent
Note: You must have system-assigned managed identity enabled on each virtual machine before you deploy the agent.
Open a new browser tab and browse to Azure Virtual machines.
Select a Linux vm that needs to have the AMA agent loaded on it.
Verify that the “Status” = “on”.
Select “Settings/Identity”.
Ensure you are on the “System assigned” tab.
Repeat the above for any machines that you are unclear if the System assigned status is enabled.
Browse to Azure Policy.
Select “Definitions”.
Click on the “Search” box.
Enter “Configure Linux virtual machines to”.
Select “Configure Linux virtual machines to run Azure Monitor Agent with System-assigned managed identity-based authentication”.
Click on the ellipse (the three dots at the end of the Name) and select “Assign policy”.
Enter the correct “Scope”.
Enter any “Exclusions”, if needed.
Enter a name for “Assignment name”.
Select “Next”.
There should be no “Advanced”, so click “Next.
There should be no “Parameters”, so click Next.
Select “Create a remediation task” and in the drop down box select “Configure Linux virtual machines to run Azure Monitor Agent using system-assigned managed identity”.
Select “System assigned managed identity”.
Select the location to where the system assigned identity should reside.
Select “Next”.
Enter free form in the “Non-compliance message”, if you so choose.
Select “Next”.
The policy definition should look similar to below.
Select “Create”.
Using Azure Policy to install the Linux Data Collection Rules
Now a policy will need to be created to assign the previously created DCR to the same scope as the assignment for the AMA agent.
Browse to the “Policy” blade, similar to before and select “Definitions”.
Click on the “Search” box.
Enter “Configure Linux virtual machines”.
Select “Configure Linux virtual machines to be associated with a Data Collection Rule”.
Click on the ellipse (the three dots at the end of the Name) and select “Assign”.
Enter the correct “Scope”.
Enter any “Exclusions”, if needed.
Enter a name for “Assignment name”.
Select “Next”.
There is nothing to do on the “Advanced” tab, click “Next”.
Browse back to the tab with the “Data Collection Rule.
Click on the “Copy” at the end of the Resource ID”.
Switch back to the Policy browser tab.
Paste the “Resource Id” into the “Data Collection Rule Resource Id”.
Select “Next”.
Select “Create a remediation task” and in the drop-down box select “Configure Linux virtual machines to be associated with a Data Collection Rule”.
Click “Create a Managed Identity”
Select “System assigned managed identity”.
If you want to use a “User assigned managed identity” then a User Managed Identity will be required.
Select the location to where the system assigned identity should reside.
Select “Next”.
Enter free form in the “Non-compliance message”, if so chosen.
Select “Next”.
The policy definition should look similar to below.
Select “Create”.
Verify Policy Assignments Have Been Completed
I would suggest taking a 5-minute break.
Browse to the Azure Policy “Compliance” blade.
Search for the Policies for Linux servers just created and click on both (one at a time), to verify the servers in scope have all had the policies applied.
Installation of the AMA agent and Push of the DCR Definition on Azure ARC Hosts
Using Azure Policy to install the Windows Azure Monitoring Agent for Azure ARC
Note: Although the documentation doesn’t specifically call out that installing the agent on Windows 10/11 or later (Current documentation only states that the MSI) is supported, this is being amended to reflect that endpoint workstations are supported utilizing Azure policy. #18
The assumption has been made that Azure ARC has been installed on the Windows and Linux servers that are to be managed in the following section. To verify is Azure ARC has been loaded on a server:
Browse to Azure > Azure Arc > Infrastructure / Machines
Review the names of the servers that are to have the AMA agent/DCR definition pushed to them.
Installing the Windows AMA ARC Agent is almost the same with the exception of the policy name. In the Policy “Search” enter “Configure windows ARC” and select “Configure Windows ARC-enabled machines to run Azure Monitor Agent”.
From this point forward, please follow the instructions defined in “Using Azure Policy to install the Windows Azure Monitoring Agent”.
Using Azure Policy to install the Windows Data Collection Rule for Azure ARC
Installing the Windows Data Collection Rule (DCR) is almost the same with the exception of the policy name. In the Policy “Search” enter “Configure windows ARC” and select “Configure Windows ARC Machines to be associated with a Data Collection Rule”.
From this point forward, please follow the instructions defined in “Using Azure Policy to install the Windows Data Collection Rule”.
Using Azure Policy to install the Linux Azure Monitoring Agent for Azure ARC
Installing the Linux AMA ARC Agent is almost the same with the exception of the policy name. In the Policy “Search” enter “Configure Linux ARC” and select “Configure Linux ARC-enabled machines to run Azure Monitor Agent”.
From this point forward, please follow the instructions defined in “Using Azure Policy to install the Linux Azure Monitoring Agent”.
Using Azure Policy to install the Linux Data Collection Rule for Azure ARC
Installing the Linux DCR definition is almost the same with the exception of the policy name. In the Policy “Search” enter “Configure Linux ARC” and select “Configure Linux ARC Machines to be associated with a Data Collection Rule”.
From this point forward, please follow the instructions defined in “Using Azure Policy to install the Linux Data Collection Rule”.
Verify Agents Are Communicating with Azure
Querying the Heartbeat Table
To verify that an agent was connected to your Log Analytics Workspace You can verify whether or not the machines are reporting to Log Analytics with the use of Kusto and querying the Heartbeat table.
The table “Heartbeat” is regularly sent a signal (every minute) from each server monitored. By simply using KQL to see if a heartbeat exists that is coming from each server, you can quickly verify that the servers are able to send Azure data.
Heartbeat
| where Category =~ “azure monitor agent”
| distinct Computer
Find Out Which Agents are Loaded and Where
There is a workbook that is available within Azure Monitor that will provide the details for every agent that is connected to the subscriptions selected within the workbook. The workbook name is “AMA Migration Helper”.
Open up the Azure portal and browse to Azure Monitor
Workbooks > Azure Monitor Essentials/AMA Migration Helper
Select the Subscription(s), Workspace(s) and TimeRange.
The findings should now be available in one of the 6 tabs in this workbook.
The full “Migration Status” can be found at the bottom of the blade.
Note in the example below it can be seen that both subscriptions have had all device migrated to the new AMA client.
Selecting the “Azure Virtual Machines” displays the number of servers found within Azure, for the selected location and time range.
Walk through all the tabs to get a complete list of assets and their status.
AMA Data Sources and Locations
The location of where log files are sent to can be found in the table below. *7
MMA Gateway
Some people might worry that the MMA gateway will disappear when the MMA agent retires. This is a valid point, but Microsoft will continue to support the gateway until they have a replacement or choose to retire it.
The steps below will explain how to continue to use the gateway and end use of the MMA agent’s data capture.
If the host that acts as a gateway is also collecting data with the MMA agent, make sure that the AMA agent is set up and a DCR definition has been sent to this host according to the information given earlier in this document.
Within the Azure portal browse to the Log Analytics Workspace.
Select the Workspace to manage.
Within each of the 5 tabs, remove any defined logs that are actively capturing data.
Windows event logs.
Windows performance counters.
Linux performance counters.
Syslog
IIS Logs
After the Logs definition for each of the capture tabs is cleared, the MMA agent will stop sending data to the Log Analytics Workspace. The AMA agent will be unaffected by this change, as its capture definition is based on the DCR.
MMA Agent Removal
The removal of the MMA agent from PowerShell can be done with a relatively simple (Example below) script.
################################################################################################
## This sample is not supported under any Microsoft standard support program or service.
## The script is provided AS IS without warranty of any kind. Microsoft further disclaims all
## implied warranties including, without limitation, any implied warranties of merchantability
## or of fitness for a particular purpose. The entire risk arising out of the use or performance
## of the sample and documentation remains with you. In no event shall Microsoft, its authors,
## or anyone else involved in the creation, production, or delivery of the script be liable for
## any damages whatsoever (including, without limitation, damages for loss of business profits,
## business interruption, loss of business information, or other pecuniary loss) arising out of
## the use of or inability to use the sample or documentation, even if Microsoft has been advised
## of the possibility of such damages, rising out of the use of or inability to use the sample
## script, even if Microsoft has been advised of the possibility of such damages.
################################################################################################
# Find the Microsoft Monitoring Agent (MMA)
$agent = Get-WmiObject -Query “SELECT * FROM Win32_Product WHERE (Name LIKE ‘Microsoft Monitoring Agent%’ OR Name LIKE ‘Microsoft Azure Log Analytics%’)”
# Check if the agent is installed
if ($agent -ne $null) {
# Uninstall the agent
$agent.Uninstall()
Write-Host “Azure Monitoring Agent has been uninstalled.”
} else {
Write-Host “Azure Monitoring Agent is not installed on this machine.”
}
The script above could be pushed via a management process to remove in bulk if the more formalized process defined in my blog linked below, isn’t the route you would like to take.
I have a blog posted on how to remove the MMA agent in bulk. *17
AMA Migration helper
“AMA Migration Helper is a workbook-based Azure Monitor solution that helps you discover what to migrate and track progress as you move from Log Analytics Agent to Azure Monitor Agent. Use this single pane of glass view to expedite and track the status of your agent migration journey.
Do not remove the legacy agents if being used by other Azure solutions or services. Use the migration helper to discover which solutions/services you use today.” *13
References
Log Analytics agent overview – Azure Monitor | Microsoft Docs
Azure Monitor agent overview – Azure Monitor | Microsoft Docs
Overview of the Azure monitoring agents – Azure Monitor | Microsoft Docs
Data Collection Rules in Azure Monitor – Azure Monitor | Microsoft Docs
Troubleshoot the Azure Monitor agent on Windows virtual machines and scale sets – Azure Monitor | Microsoft Docs
Manage the Azure Monitor agent – Azure Monitor | Microsoft Docs
Azure Monitor agent overview – Azure Monitor | Microsoft Docs
Monitor data from virtual machines with Azure Monitor agent – Azure Monitor | Microsoft Docs
Data collection transformations – Azure Monitor | Microsoft Docs
Azure Monitor agent overview – Azure Monitor | Microsoft Docs
Azure Monitor FAQ – Azure Monitor | Microsoft Docs
Azure Monitor agent overview – Azure Monitor | Microsoft Docs
Tools for migrating to Azure Monitor Agent from legacy agents – Azure Monitor | Microsoft Docs
XPath
Connect Microsoft Sentinel to Azure, Windows, and Microsoft services | Microsoft Docs
Tutorial – Editing Data Collection Rules – Azure Monitor | Microsoft Docs
Tutorial – Send data to Azure Monitor Logs using REST API (Resource Manager templates) – Azure Monitor | Microsoft Docs
Azure MMA Agent Bulk Removal – Microsoft Community Hub
Microsoft Tech Community – Latest Blogs –Read More
MAC address assignment strategies for tenant VMs running on Stack-HCI environment
Azure Stack HCI is a hyperconverged infrastructure (HCI) cluster solution consists of windows servers (Hyper-V), Storage Spaces Direct, and Azure-inspired SDN. All clustered servers share common configurations and resources by leveraging the Windows Server Failover Clustering feature. A Windows Failover Cluster consists of multiple windows servers running in a cluster to provide high availability i.e. If one server node goes down, then another node takes over. We can create multiple VMs on the failover cluster. VMs can be connected to different tenant networks. In this case we need to make sure VM connected on network ‘A’ with static ip should persist same network configuration even if it gets migrated from one node to another within a cluster. This is possible by assigning static MAC/static IP for the VM. But how to get free and unique MAC to assign to VM, there are different ways to solve this problem. In this article we will discuss some of them with pros and cons. (Note: solutions discussed in this article are just to suggestions, can not be considered optimal solutions)
Before this, lets understand first things required to create a tenant VM. To create tenant VM connected to tenant network in stack-hci following steps are performed.
1. Create a new VM with vm network adapter having static MAC assigned
2. Create a new network interface on network controller service(running on SDN) having same MAC and static IP assigned.
3. Associate created network adapter with network interface controller, to make vm gets tenant network connection.
Following powershell commands perform above steps logically.
# 1. vm creation with static MAC
New-VM -Generation 2 -Name “MyVM” -Path “C:VMsMyVM” -MemoryStartupBytes 4GB -VHDPath “C:VMsMyVMVirtual Hard DisksWindowsServer2016.vhdx” -SwitchName “SDNvSwitch”
Set-VM -Name “MyVM” -ProcessorCount 4
# Setting static MAC
Set-VMNetworkAdapter -VMName “MyVM” -StaticMacAddress “00-11-22-33-44-55”
# Creating network interface on networkcontroller with same mac/static IP
$vnet = Get-NetworkControllerVirtualNetwork -ConnectionUri $uri -ResourceId “Contoso_WebTier”
$vmnicproperties = New-Object Microsoft.Windows.NetworkController.NetworkInterfaceProperties
$vmnicproperties.PrivateMacAddress = “001122334455”
$vmnicproperties.PrivateMacAllocationMethod = “Static”
$vmnicproperties.IsPrimary = $true
$vmnicproperties.DnsSettings = New-Object Microsoft.Windows.NetworkController.NetworkInterfaceDnsSettings
$vmnicproperties.DnsSettings.DnsServers = @(“24.30.1.11”, “24.30.1.12”)
$ipconfiguration = New-Object Microsoft.Windows.NetworkController.NetworkInterfaceIpConfiguration
$ipconfiguration.resourceid = “MyVM_IP1”
$ipconfiguration.properties = New-Object Microsoft.Windows.NetworkController.NetworkInterfaceIpConfigurationProperties
$ipconfiguration.properties.PrivateIPAddress = “24.30.1.101”
$ipconfiguration.properties.PrivateIPAllocationMethod = “Static”
$ipconfiguration.properties.Subnet = New-Object Microsoft.Windows.NetworkController.Subnet
$ipconfiguration.properties.subnet.ResourceRef = $vnet.Properties.Subnets[0].ResourceRef
$vmnicproperties.IpConfigurations = @($ipconfiguration)
New-NetworkControllerNetworkInterface –ResourceID “MyVM_Ethernet1” –Properties $vmnicproperties –ConnectionUri $uri
$nic = Get-NetworkControllerNetworkInterface -ConnectionUri $uri -ResourceId “MyVM_Ethernet1”
#Do not change the hardcoded IDs in this section, because they are fixed values and must not change.
# 3. Finally make association of vm network adapter with nic created in last step
$FeatureId = “9940cd46-8b06-43bb-b9d5-93d50381fd56”
$vmNics = Get-VMNetworkAdapter -VMName “MyVM”
$CurrentFeature = Get-VMSwitchExtensionPortFeature -FeatureId $FeatureId -VMNetworkAdapter $vmNics
if ($CurrentFeature -eq $null) {
$Feature = Get-VMSystemSwitchExtensionPortFeature -FeatureId $FeatureId
$Feature.SettingData.ProfileId = “{$($nic.InstanceId)}”
$Feature.SettingData.NetCfgInstanceId = “{56785678-a0e5-4a26-bc9b-c0cba27311a3}”
$Feature.SettingData.CdnLabelString = “TestCdn”
$Feature.SettingData.CdnLabelId = 1111
$Feature.SettingData.ProfileName = “Testprofile”
$Feature.SettingData.VendorId = “{1FA41B39-B444-4E43-B35A-E1F7985FD548}”
$Feature.SettingData.VendorName = “NetworkController”
$Feature.SettingData.ProfileData = 1
Add-VMSwitchExtensionPortFeature -VMSwitchExtensionFeature $Feature -VMNetworkAdapter $vmNics
} else {
$CurrentFeature.SettingData.ProfileId = “{$($nic.InstanceId)}”
$CurrentFeature.SettingData.ProfileData = 1
Set-VMSwitchExtensionPortFeature -VMSwitchExtensionFeature $CurrentFeature -VMNetworkAdapter $vmNics
}
Get-VM -Name “MyVM” | Start-VM
To make sure VMs works fine even after migration in windows failover cluster, we need to assign static MAC and static IP. To get available and unique MAC is challenge here. We will see following ways to solve this problem with pros and cons.
Generating random MAC on node
Assign dedicated unique MAC address pool range for every Node in cluster and Generating free MAC from Node’s MAC address range pool.
Get free MAC from Network controller service and use same on VM
Lets discuss each approach in detailed-
1. Generating random MAC on node
This is very simple approach, where we will generate random MAC and same will be used. It includes below steps:
Generate valid MAC on node, where we need to create VM(or new network interface).
Set same MAC on vm network adapter as static
Set same MAC on network interface along with static IP
Following is powershell script performs same above logical steps:
New-VM -Name $vm_name -MemoryStartupBytes $vm_memory -BootDevice VHD -VHDPath $image_path -Path $vm_data_path -Generation $vm_generation -SwitchName $switch_name
Add-ClusterVirtualMachineRole -vmname $vm_name -Name $vm_name
Start-Sleep -Seconds 3
############## Random MAC address generation and assignment
# script block for mac address assingment kept in retry block
$mac_address = Retry-Command -ScriptBlock {
# do something
# found used in az-auto-setup
#$mac_address=(“{0:D12}” -f ( Get-Random -Minimum 0 -Maximum 99999 ))
$mac_address = (0..5 | ForEach-Object { ‘{0:x}{1:x}’ -f (Get-Random -Minimum 0 -Maximum 15), (Get-Random -Minimum 0 -Maximum 15) }) -join ‘-‘
write-host “Tring to set : $mac_address”
Set-VMNetworkAdapter -VMName $vm_name -StaticMacAddress “$mac_address”
write-host “Mac set succssfully: $mac_address”
Start-Sleep -Milliseconds 500
Write-host $( Get-VMNetworkAdapter -VMName $vm_name ).MacAddress
return $mac_address
}
write-host “Mac set succssfully: $mac_address”
Write-host ‘VM created..’
##########################################################################
# network configuration starts here..
# you can refer for more info: https://learn.microsoft.com/en-us/windows-server/networking/sdn/manage/create-a-tenant-vm#prerequisites
$vnet = Get-NetworkControllerVirtualNetwork -ConnectionUri $uri -ResourceId $vnet_name
$vmnicproperties = New-Object Microsoft.Windows.NetworkController.NetworkInterfaceProperties
# give same mac address below as created before..
$mac = -join($mac_address.split(“-“)).toupper()
$vmnicproperties.PrivateMacAddress = $mac
Write-host $mac
$vmnicproperties.PrivateMacAllocationMethod = “Static”
$vmnicproperties.IsPrimary = $true
$vmnicproperties.DnsSettings = New-Object Microsoft.Windows.NetworkController.NetworkInterfaceDnsSettings
#$vmnicproperties.DnsSettings.DnsServers = @(“192.168.1.254”, “8.8.8.8”)
$vmnicproperties.DnsSettings.DnsServers = $dns_server
$ipconfiguration = New-Object Microsoft.Windows.NetworkController.NetworkInterfaceIpConfiguration
$ipconfiguration.resourceid = $vm_name + “_IP1”
$ipconfiguration.properties = New-Object Microsoft.Windows.NetworkController.NetworkInterfaceIpConfigurationProperties
$ipconfiguration.properties.PrivateIPAddress = $ip_address
$ipconfiguration.properties.PrivateIPAllocationMethod = “Static”
$ipconfiguration.properties.Subnet = New-Object Microsoft.Windows.NetworkController.Subnet
# do: programatically decide subnet full ref, or form path directly
# $ipconfiguration.properties.subnet.ResourceRef = $vnet.Properties.Subnets[0].ResourceRef
$ipconfiguration.properties.subnet.ResourceRef = “/virtualNetworks/” + $vnet_name + “/subnets/” + $subnet_name
$vmnicproperties.IpConfigurations = @($ipconfiguration)
$NIC_name = $vm_name + “_Eth1”
New-NetworkControllerNetworkInterface -ResourceID $NIC_name -Properties $vmnicproperties -ConnectionUri $uri -Confirm:$false -force
Write-host ‘NIC config created..’
Start-Sleep -Seconds 8
$nic = Get-NetworkControllerNetworkInterface -ConnectionUri $uri -ResourceId $NIC_name
#########################################################################
#Do not change the hardcoded IDs in this section, because they are fixed values and must not change.
$FeatureId = “9940cd46-8b06-43bb-b9d5-93d50381fd56”
$vmNics = Get-VMNetworkAdapter -VMName $vm_name
$CurrentFeature = Get-VMSwitchExtensionPortFeature -FeatureId $FeatureId -VMNetworkAdapter $vmNics
if ($CurrentFeature -eq $null)
{
$Feature = Get-VMSystemSwitchExtensionPortFeature -FeatureId $FeatureId
$Feature.SettingData.ProfileId = “{$( $nic.InstanceId )}”
$Feature.SettingData.NetCfgInstanceId = “{56785678-a0e5-4a26-bc9b-c0cba27311a3}”
$Feature.SettingData.CdnLabelString = “TestCdn”
$Feature.SettingData.CdnLabelId = 1111
$Feature.SettingData.ProfileName = “Testprofile”
$Feature.SettingData.VendorId = “{1FA41B39-B444-4E43-B35A-E1F7985FD548}”
$Feature.SettingData.VendorName = “NetworkController”
$Feature.SettingData.ProfileData = 1
Add-VMSwitchExtensionPortFeature -VMSwitchExtensionFeature $Feature -VMNetworkAdapter $vmNics
}
else
{
$CurrentFeature.SettingData.ProfileId = “{$( $nic.InstanceId )}”
$CurrentFeature.SettingData.ProfileData = 1
Set-VMSwitchExtensionPortFeature -VMSwitchExtensionFeature $CurrentFeature -VMNetworkAdapter $vmNics
}
Write-host ‘finally applying setting..’
Start-Sleep -Seconds 5
Get-VM -Name $vm_name | Start-VM
But this approach has following problems :
There is possibility that two vms running on same cluster may got same MAC and it may create MAC conflict issue after migration.
Some specific MAC range is not allowed to be assigned, in this case we need to keep retrying random generation, which is not good.
Very difficult to keep track of used MAC addresses.
So this method is not reliable and not recommended.
2. Assign dedicated unique MAC address pool range for every Node in cluster and Generating free MAC from Node’s MAC address range pool.
We can preassign unique dedicated MAC address pool range to every node(hyper-v) in cluster, so whenever we need to create new network interface we will first get free MAC from the pool of node where vm will be running. Same MAC will be made static on vm network adapter and network interface followed by static ip. Following are logical steps need to perform:
1. Get free MAC from Node’s MAC pool range.
2. Assign same static MAC on VM network adapter
3. Set same MAC on network interface along with static IP
Following is an example of MAC pool range distribution plan for 255 clusters, 16 hosts each:
00-15-5D-[c1][c2]-[h1][v1]-[v2][v3]
field c1, c2: will indicate a cluster. 00 to FF : Max 255 clusters can be created.
field h1 – will be for host/node identification in a cluster. 0 to F = max 16 hosts in a cluster.
field v1,v2,v3 will be used for vms. 000 to FFF = 16*16*16 = total 4096 possible vms/network interfaces per node can be created.
But main challenge here is there is no api or command available to get free MAC from node pool. There is a workaround that to get MAC assigned from the pool, we need to create dummy network adapter with dynamic configuration and start vm for a moment to get free dynamic MAC assigned from node pool range. Then we need to stop vm and revert the change and using same MAC we need to create static one and same steps need to be followed. This is not good approach since this is just a workaround, where dummy resource need to create.
# creating new network adapter with dynamic MAC
Add-VMNetworkAdapter -VMName $vm_name -SwitchName $switch_name -Name $adapter_name
# starting and stopping vm to get free MAC from node pool
Start-VM -VMName $vm_name; Stop-VM -VMName $vm_name -Force
# reading assigned dynamic MAC
$mac_address = (Get-VMNetworkAdapter -VMName $vm_name -Name $adapter_name).MacAddress
# make same MAC as static
Set-VMNetworkAdapter -VMName $vm_name -Name $adapter_name -StaticMacAddress $mac_address
# rest steps are same for network interface creation
3. Get free MAC from Network controller service and use same on VM network adapter.
There is a dedicated centralized network controller service on every Stack-hci cluster, where we can setup global MAC address range pool at network controller service. When we create new network interface on network controller service with dynamic configuration, then it assign free MAC from the global free pool. It is very reliable solution since it is a centralized service. In this, we will follow below steps
Create a Network interface in Network controller service with dynamic MAC assignment config, to get assigned free MAC from global MAC range.
Read assigned MAC on network interface
Assign same MAC address to vm network adapter as static.
The following powershell commands perform above steps (Note: please use appropriate values in place of parameters):
# Creating network interface with dynamic MAC config on network controller
$vmnicproperties = New-Object Microsoft.Windows.NetworkController.NetworkInterfaceProperties
$vmnicproperties.PrivateMacAllocationMethod = “Dynamic”
$vmnicproperties.IsPrimary = $true
$vmnicproperties.DnsSettings = New-Object Microsoft.Windows.NetworkController.NetworkInterfaceDnsSettings
$vmnicproperties.DnsSettings.DnsServers = $dns_server
$ipconfiguration = New-Object Microsoft.Windows.NetworkController.NetworkInterfaceIpConfiguration
$ipconfiguration.resourceid = $vm_name + “_IP1”
$ipconfiguration.properties = New-Object Microsoft.Windows.NetworkController.NetworkInterfaceIpConfigurationProperties
$ipconfiguration.properties.PrivateIPAddress = $ip_address
$ipconfiguration.properties.PrivateIPAllocationMethod = “Static”
$ipconfiguration.properties.Subnet = New-Object Microsoft.Windows.NetworkController.Subnet
$ipconfiguration.properties.subnet.ResourceRef = “/virtualNetworks/” + $vnet_name + “/subnets/” + $subnet_name
$vmnicproperties.IpConfigurations = @($ipconfiguration)
$NIC_name = $vm_name + “_Eth1”
New-NetworkControllerNetworkInterface -ResourceID $NIC_name -Properties $vmnicproperties -ConnectionUri $uri -Confirm:$false -force
Write-host ‘NIC config created..’
Start-Sleep -Seconds 8
$nic = Get-NetworkControllerNetworkInterface -ConnectionUri $uri -ResourceId $NIC_name
# Read obtained free MAC from global pool
$mac_address = $nic.Properties.PrivateMacAddress -replace ‘..(?!$)’, ‘$&-‘
###### Vm creation flow starts from here. We will set static MAC here
New-VM -Name $vm_name -MemoryStartupBytes $vm_memory -BootDevice VHD -VHDPath $image_path -Path $vm_data_path -Generation $vm_generation -SwitchName $switch_name
Add-ClusterVirtualMachineRole -vmname $vm_name -Name $vm_name
Set-VMNetworkAdapter -VMName $vm_name -StaticMacAddress “$mac_address”
write-host “Mac set succssfully: $mac_address”
Conclusion:
The third/last approach discussed in this article seems to be easy and more reliable, since we are consuming MAC from centralized network controller service. We will never face problem of MAC conflicts incase VMs get migrated from one node to another.
Microsoft Tech Community – Latest Blogs –Read More
MAC address assignment strategies for tenant VMs running on Stack-HCI environment
Azure Stack HCI is a hyperconverged infrastructure (HCI) cluster solution consists of windows servers (Hyper-V), Storage Spaces Direct, and Azure-inspired SDN. All clustered servers share common configurations and resources by leveraging the Windows Server Failover Clustering feature. A Windows Failover Cluster consists of multiple windows servers running in a cluster to provide high availability i.e. If one server node goes down, then another node takes over. We can create multiple VMs on the failover cluster. VMs can be connected to different tenant networks. In this case we need to make sure VM connected on network ‘A’ with static ip should persist same network configuration even if it gets migrated from one node to another within a cluster. This is possible by assigning static MAC/static IP for the VM. But how to get free and unique MAC to assign to VM, there are different ways to solve this problem. In this article we will discuss some of them with pros and cons. (Note: solutions discussed in this article are just to suggestions, can not be considered optimal solutions)
Before this, lets understand first things required to create a tenant VM. To create tenant VM connected to tenant network in stack-hci following steps are performed.
1. Create a new VM with vm network adapter having static MAC assigned
2. Create a new network interface on network controller service(running on SDN) having same MAC and static IP assigned.
3. Associate created network adapter with network interface controller, to make vm gets tenant network connection.
Following powershell commands perform above steps logically.
# 1. vm creation with static MAC
New-VM -Generation 2 -Name “MyVM” -Path “C:VMsMyVM” -MemoryStartupBytes 4GB -VHDPath “C:VMsMyVMVirtual Hard DisksWindowsServer2016.vhdx” -SwitchName “SDNvSwitch”
Set-VM -Name “MyVM” -ProcessorCount 4
# Setting static MAC
Set-VMNetworkAdapter -VMName “MyVM” -StaticMacAddress “00-11-22-33-44-55”
# Creating network interface on networkcontroller with same mac/static IP
$vnet = Get-NetworkControllerVirtualNetwork -ConnectionUri $uri -ResourceId “Contoso_WebTier”
$vmnicproperties = New-Object Microsoft.Windows.NetworkController.NetworkInterfaceProperties
$vmnicproperties.PrivateMacAddress = “001122334455”
$vmnicproperties.PrivateMacAllocationMethod = “Static”
$vmnicproperties.IsPrimary = $true
$vmnicproperties.DnsSettings = New-Object Microsoft.Windows.NetworkController.NetworkInterfaceDnsSettings
$vmnicproperties.DnsSettings.DnsServers = @(“24.30.1.11”, “24.30.1.12”)
$ipconfiguration = New-Object Microsoft.Windows.NetworkController.NetworkInterfaceIpConfiguration
$ipconfiguration.resourceid = “MyVM_IP1”
$ipconfiguration.properties = New-Object Microsoft.Windows.NetworkController.NetworkInterfaceIpConfigurationProperties
$ipconfiguration.properties.PrivateIPAddress = “24.30.1.101”
$ipconfiguration.properties.PrivateIPAllocationMethod = “Static”
$ipconfiguration.properties.Subnet = New-Object Microsoft.Windows.NetworkController.Subnet
$ipconfiguration.properties.subnet.ResourceRef = $vnet.Properties.Subnets[0].ResourceRef
$vmnicproperties.IpConfigurations = @($ipconfiguration)
New-NetworkControllerNetworkInterface –ResourceID “MyVM_Ethernet1” –Properties $vmnicproperties –ConnectionUri $uri
$nic = Get-NetworkControllerNetworkInterface -ConnectionUri $uri -ResourceId “MyVM_Ethernet1”
#Do not change the hardcoded IDs in this section, because they are fixed values and must not change.
# 3. Finally make association of vm network adapter with nic created in last step
$FeatureId = “9940cd46-8b06-43bb-b9d5-93d50381fd56”
$vmNics = Get-VMNetworkAdapter -VMName “MyVM”
$CurrentFeature = Get-VMSwitchExtensionPortFeature -FeatureId $FeatureId -VMNetworkAdapter $vmNics
if ($CurrentFeature -eq $null) {
$Feature = Get-VMSystemSwitchExtensionPortFeature -FeatureId $FeatureId
$Feature.SettingData.ProfileId = “{$($nic.InstanceId)}”
$Feature.SettingData.NetCfgInstanceId = “{56785678-a0e5-4a26-bc9b-c0cba27311a3}”
$Feature.SettingData.CdnLabelString = “TestCdn”
$Feature.SettingData.CdnLabelId = 1111
$Feature.SettingData.ProfileName = “Testprofile”
$Feature.SettingData.VendorId = “{1FA41B39-B444-4E43-B35A-E1F7985FD548}”
$Feature.SettingData.VendorName = “NetworkController”
$Feature.SettingData.ProfileData = 1
Add-VMSwitchExtensionPortFeature -VMSwitchExtensionFeature $Feature -VMNetworkAdapter $vmNics
} else {
$CurrentFeature.SettingData.ProfileId = “{$($nic.InstanceId)}”
$CurrentFeature.SettingData.ProfileData = 1
Set-VMSwitchExtensionPortFeature -VMSwitchExtensionFeature $CurrentFeature -VMNetworkAdapter $vmNics
}
Get-VM -Name “MyVM” | Start-VM
To make sure VMs works fine even after migration in windows failover cluster, we need to assign static MAC and static IP. To get available and unique MAC is challenge here. We will see following ways to solve this problem with pros and cons.
Generating random MAC on node
Assign dedicated unique MAC address range for every Node in cluster and Generating free MAC from Node from pool of MAC address range.
Get free MAC from Network controller service and use same on VM
Lets discuss each approach in detailed-
1. Generating random MAC on node
This is very simple approach, where we will generate random MAC and same will be used. It includes below steps:
Generate valid MAC on node, where we need to create VM(or new network interface).
Set same MAC on vm network adapter as static
Set same MAC on network interface along with static IP
Following is powershell script performs same above logical steps:
New-VM -Name $vm_name -MemoryStartupBytes $vm_memory -BootDevice VHD -VHDPath $image_path -Path $vm_data_path -Generation $vm_generation -SwitchName $switch_name
Add-ClusterVirtualMachineRole -vmname $vm_name -Name $vm_name
Start-Sleep -Seconds 3
############## Random MAC address generation and assignment
# script block for mac address assingment kept in retry block
$mac_address = Retry-Command -ScriptBlock {
# do something
# found used in az-auto-setup
#$mac_address=(“{0:D12}” -f ( Get-Random -Minimum 0 -Maximum 99999 ))
$mac_address = (0..5 | ForEach-Object { ‘{0:x}{1:x}’ -f (Get-Random -Minimum 0 -Maximum 15), (Get-Random -Minimum 0 -Maximum 15) }) -join ‘-‘
write-host “Tring to set : $mac_address”
Set-VMNetworkAdapter -VMName $vm_name -StaticMacAddress “$mac_address”
write-host “Mac set succssfully: $mac_address”
Start-Sleep -Milliseconds 500
Write-host $( Get-VMNetworkAdapter -VMName $vm_name ).MacAddress
return $mac_address
}
write-host “Mac set succssfully: $mac_address”
Write-host ‘VM created..’
##########################################################################
# network configuration starts here..
# you can refer for more info: https://learn.microsoft.com/en-us/windows-server/networking/sdn/manage/create-a-tenant-vm#prerequisites
$vnet = Get-NetworkControllerVirtualNetwork -ConnectionUri $uri -ResourceId $vnet_name
$vmnicproperties = New-Object Microsoft.Windows.NetworkController.NetworkInterfaceProperties
# give same mac address below as created before..
$mac = -join($mac_address.split(“-“)).toupper()
$vmnicproperties.PrivateMacAddress = $mac
Write-host $mac
$vmnicproperties.PrivateMacAllocationMethod = “Static”
$vmnicproperties.IsPrimary = $true
$vmnicproperties.DnsSettings = New-Object Microsoft.Windows.NetworkController.NetworkInterfaceDnsSettings
#$vmnicproperties.DnsSettings.DnsServers = @(“192.168.1.254”, “8.8.8.8”)
$vmnicproperties.DnsSettings.DnsServers = $dns_server
$ipconfiguration = New-Object Microsoft.Windows.NetworkController.NetworkInterfaceIpConfiguration
$ipconfiguration.resourceid = $vm_name + “_IP1”
$ipconfiguration.properties = New-Object Microsoft.Windows.NetworkController.NetworkInterfaceIpConfigurationProperties
$ipconfiguration.properties.PrivateIPAddress = $ip_address
$ipconfiguration.properties.PrivateIPAllocationMethod = “Static”
$ipconfiguration.properties.Subnet = New-Object Microsoft.Windows.NetworkController.Subnet
# do: programatically decide subnet full ref, or form path directly
# $ipconfiguration.properties.subnet.ResourceRef = $vnet.Properties.Subnets[0].ResourceRef
$ipconfiguration.properties.subnet.ResourceRef = “/virtualNetworks/” + $vnet_name + “/subnets/” + $subnet_name
$vmnicproperties.IpConfigurations = @($ipconfiguration)
$NIC_name = $vm_name + “_Eth1”
New-NetworkControllerNetworkInterface -ResourceID $NIC_name -Properties $vmnicproperties -ConnectionUri $uri -Confirm:$false -force
Write-host ‘NIC config created..’
Start-Sleep -Seconds 8
$nic = Get-NetworkControllerNetworkInterface -ConnectionUri $uri -ResourceId $NIC_name
#########################################################################
#Do not change the hardcoded IDs in this section, because they are fixed values and must not change.
$FeatureId = “9940cd46-8b06-43bb-b9d5-93d50381fd56”
$vmNics = Get-VMNetworkAdapter -VMName $vm_name
$CurrentFeature = Get-VMSwitchExtensionPortFeature -FeatureId $FeatureId -VMNetworkAdapter $vmNics
if ($CurrentFeature -eq $null)
{
$Feature = Get-VMSystemSwitchExtensionPortFeature -FeatureId $FeatureId
$Feature.SettingData.ProfileId = “{$( $nic.InstanceId )}”
$Feature.SettingData.NetCfgInstanceId = “{56785678-a0e5-4a26-bc9b-c0cba27311a3}”
$Feature.SettingData.CdnLabelString = “TestCdn”
$Feature.SettingData.CdnLabelId = 1111
$Feature.SettingData.ProfileName = “Testprofile”
$Feature.SettingData.VendorId = “{1FA41B39-B444-4E43-B35A-E1F7985FD548}”
$Feature.SettingData.VendorName = “NetworkController”
$Feature.SettingData.ProfileData = 1
Add-VMSwitchExtensionPortFeature -VMSwitchExtensionFeature $Feature -VMNetworkAdapter $vmNics
}
else
{
$CurrentFeature.SettingData.ProfileId = “{$( $nic.InstanceId )}”
$CurrentFeature.SettingData.ProfileData = 1
Set-VMSwitchExtensionPortFeature -VMSwitchExtensionFeature $CurrentFeature -VMNetworkAdapter $vmNics
}
Write-host ‘finally applying setting..’
Start-Sleep -Seconds 5
Get-VM -Name $vm_name | Start-VM
But this approach has following problems :
There is possibility that two vms running on same cluster may got same MAC and it may create MAC conflict issue after migration.
Some specific MAC range is not allowed to be assigned, in this case we need to keep retrying random generation, which is not good.
Very difficult to keep track of used MAC addresses.
So this method is not reliable and not recommended.
2. Assign dedicated unique MAC address pool range for every Node in cluster and Generating free MAC from Node’s MAC address range pool.
We can preassign unique dedicated MAC address pool range to every node(hyper-v) in cluster, so whenever we need to create new network interface we will first get free MAC from the pool of node where vm will be running. Same MAC will be made static on vm network adapter and network interface followed by static ip. Following are logical steps need to perform:
1. Get free MAC from Node’s MAC pool range.
2. Assign same static MAC on VM network adapter
3. Set same MAC on network interface along with static IP
Following is an example of MAC pool range distribution plan for 255 clusters, 16 hosts each:
00-15-5D-[c1][c2]-[h1][v1]-[v2][v3]
field c1, c2: will indicate a cluster. 00 to FF : Max 255 clusters can be created.
field h1 – will be for host/node identification in a cluster. 0 to F = max 16 hosts in a cluster.
field v1,v2,v3 will be used for vms. 000 to FFF = 16*16*16 = total 4096 possible vms/network interfaces per node can be created.
But main challenge here is there is no api or command available to get free MAC from node pool. There is a workaround that to get MAC assigned from the pool, we need to create dummy network adapter with dynamic configuration and start vm for a moment to get free dynamic MAC assigned from node pool range. Then we need to stop vm and revert the change and using same MAC we need to create static one and same steps need to be followed. This is not good approach since this is just a workaround, where dummy resource need to create.
# creating new network adapter with dynamic MAC
Add-VMNetworkAdapter -VMName $vm_name -SwitchName $switch_name -Name $adapter_name
# starting and stopping vm to get free MAC from node pool
Start-VM -VMName $vm_name; Stop-VM -VMName $vm_name -Force
# reading assigned dynamic MAC
$mac_address = (Get-VMNetworkAdapter -VMName $vm_name -Name $adapter_name).MacAddress
# make same MAC as static
Set-VMNetworkAdapter -VMName $vm_name -Name $adapter_name -StaticMacAddress $mac_address
# rest steps are same for network interface creation
3. Get free MAC from Network controller service and use same on VM network adapter.
There is a dedicated centralized network controller service on every Stack-hci cluster, where we can setup global MAC address range pool at network controller service. When we create new network interface on network controller service with dynamic configuration, then it assign free MAC from the global free pool. It is very reliable solution since it is a centralized service. In this, we will follow below steps
Create a Network interface in Network controller service with dynamic MAC assignment config, to get assigned free MAC from global MAC range.
Read assigned MAC on network interface
Assign same MAC address to vm network adapter as static.
The following powershell commands perform above steps (Note: please use appropriate values in place of parameters):
# Creating network interface with dynamic MAC config on network controller
$vmnicproperties = New-Object Microsoft.Windows.NetworkController.NetworkInterfaceProperties
$vmnicproperties.PrivateMacAllocationMethod = “Dynamic“
$vmnicproperties.IsPrimary = $true
$vmnicproperties.DnsSettings = New-Object Microsoft.Windows.NetworkController.NetworkInterfaceDnsSettings
$vmnicproperties.DnsSettings.DnsServers = $dns_server
$ipconfiguration = New-Object Microsoft.Windows.NetworkController.NetworkInterfaceIpConfiguration
$ipconfiguration.resourceid = $vm_name + “_IP1”
$ipconfiguration.properties = New-Object Microsoft.Windows.NetworkController.NetworkInterfaceIpConfigurationProperties
$ipconfiguration.properties.PrivateIPAddress = $ip_address
$ipconfiguration.properties.PrivateIPAllocationMethod = “Static”
$ipconfiguration.properties.Subnet = New-Object Microsoft.Windows.NetworkController.Subnet
$ipconfiguration.properties.subnet.ResourceRef = “/virtualNetworks/” + $vnet_name + “/subnets/” + $subnet_name
$vmnicproperties.IpConfigurations = @($ipconfiguration)
$NIC_name = $vm_name + “_Eth1”
New-NetworkControllerNetworkInterface -ResourceID $NIC_name -Properties $vmnicproperties -ConnectionUri $uri -Confirm:$false -force
Write-host ‘NIC config created..’
Start-Sleep -Seconds 8
$nic = Get-NetworkControllerNetworkInterface -ConnectionUri $uri -ResourceId $NIC_name
# Read obtained free MAC from global pool
$mac_address = $nic.Properties.PrivateMacAddress -replace ‘..(?!$)’, ‘$&-‘
###### Vm creation flow starts from here. We will set static MAC here
New-VM -Name $vm_name -MemoryStartupBytes $vm_memory -BootDevice VHD -VHDPath $image_path -Path $vm_data_path -Generation $vm_generation -SwitchName $switch_name
Add-ClusterVirtualMachineRole -vmname $vm_name -Name $vm_name
Set-VMNetworkAdapter -VMName $vm_name -StaticMacAddress “$mac_address“
write-host “Mac set succssfully: $mac_address“
Conclusion:
The third/last approach discussed in this article seems to be easy and more reliable, since we are consuming MAC from centralized network controller service. We will never face problem of MAC conflicts incase VMs get migrated from one node to another.
Microsoft Tech Community – Latest Blogs –Read More
Secure Your Machine Learning Workspace with Virtual Network
Introduction
Machine learning (ML) is a branch of artificial intelligence that enables computers to learn from data and make predictions or decisions. ML applications often require access to large amounts of data, compute resources, and external services. To ensure the security and privacy of these resources, it is essential to isolate the ML workspace from unauthorized or malicious access. One way to achieve this is by using a virtual network (VNet).
What is a Virtual Network?
A virtual network is a logical representation of a network that is isolated from other networks. A VNet can have its own IP address space, subnets, routing tables, firewalls, and network security groups. A VNet can also connect to other VNets, on-premises networks, or the internet, depending on the configuration and permissions. A VNet allows the user to control the network traffic and access policies for the resources within the VNet.
Why Use a Virtual Network for Machine Learning?
Using a VNet for machine learning has several advantages, such as:
Enhanced security: A VNet can protect the ML workspace and its associated resources from unauthorized or malicious access. For instance, a VNet can restrict the access to the data sources, compute targets, and web services that are used by the ML workspace. A VNet can also prevent the leakage of sensitive data or intellectual property from the ML workspace to the internet or other networks.
Improved performance: A VNet can improve the performance of the ML workspace by reducing the latency and bandwidth consumption of the network traffic. For instance, a VNet can enable the ML workspace to access the data sources and compute targets within the same region or data centre, avoiding the cross-region or cross-premises network overhead. A VNet can also optimize the network routing and traffic management for the ML workspace.
Increased flexibility: A VNet can increase the flexibility of the ML workspace by allowing the user to customize the network configuration and policies. For instance, a VNet can enable the user to choose the IP address range, subnet size, firewall rules, and network security groups for the ML workspace. A VNet can also enable the user to integrate the ML workspace with other VNets, on-premises networks, or the internet, depending on the business needs and compliance requirements.
What is a Microsoft Managed Virtual Network Workspace?
A Microsoft managed virtual network workspace is a type of ML workspace that is created and managed by Microsoft on behalf of the user. A Microsoft managed virtual network workspace uses an isolated and dedicated VNet that is automatically configured and secured by Microsoft. A Microsoft managed virtual network workspace provides the following benefits:
Simplified setup: A Microsoft managed virtual network workspace does not require the user to create or manage the VNet, subnets, routing tables, firewalls, or network security groups. The user only needs to provide the name and region of the ML workspace, and Microsoft will create and manage the VNet for the ML workspace.
Optimized security: A Microsoft managed virtual network workspace uses a VNet that is isolated from other networks and has strict access policies. The VNet only allows the ML workspace and its associated resources to communicate with each other and blocks any external or internal access. The VNet also encrypts the network traffic and data within the VNet.
Seamless integration: A Microsoft managed virtual network workspace supports the integration with other VNets, on-premises networks, or the internet, using the Azure Private Link service. The Azure Private Link service enables the user to securely connect the ML workspace and its associated resources with other resources, without exposing them to the public internet or other networks.
Reduced Dependency: A Microsoft managed virtual network workspace reduces the dependency on the customer to provide an IP address range for the VNet for the workspace. This is because the VNet is automatically configured and secured by Microsoft, which simplifies the setup process and reduces the burden on the customer. As a result, the customer can focus on their machine learning tasks without worrying about the complexities of VNet configuration.
Conclusion
A VNet can provide enhanced security, improved performance, and increased flexibility for the ML workspace and its components. The user can opt for a Microsoft managed virtual network workspace, which simplifies the setup, optimizes the security, and enables the seamless integration of the ML workspace with a VNet.
Microsoft Tech Community – Latest Blogs –Read More
How to Secure Your Machine Learning Workspace with Virtual Network
Introduction
Machine learning (ML) is a branch of artificial intelligence that enables computers to learn from data and make predictions or decisions. ML applications often require access to large amounts of data, compute resources, and external services. To ensure the security and privacy of these resources, it is essential to isolate the ML workspace from unauthorized or malicious access. One way to achieve this is by using a virtual network (VNet).
What is a Virtual Network?
A virtual network is a logical representation of a network that is isolated from other networks. A VNet can have its own IP address space, subnets, routing tables, firewalls, and network security groups. A VNet can also connect to other VNets, on-premises networks, or the internet, depending on the configuration and permissions. A VNet allows the user to control the network traffic and access policies for the resources within the VNet.
Why Use a Virtual Network for Machine Learning?
Using a VNet for machine learning has several advantages, such as:
Enhanced security: A VNet can protect the ML workspace and its associated resources from unauthorized or malicious access. For instance, a VNet can restrict the access to the data sources, compute targets, and web services that are used by the ML workspace. A VNet can also prevent the leakage of sensitive data or intellectual property from the ML workspace to the internet or other networks.
Improved performance: A VNet can improve the performance of the ML workspace by reducing the latency and bandwidth consumption of the network traffic. For instance, a VNet can enable the ML workspace to access the data sources and compute targets within the same region or data centre, avoiding the cross-region or cross-premises network overhead. A VNet can also optimize the network routing and traffic management for the ML workspace.
Increased flexibility: A VNet can increase the flexibility of the ML workspace by allowing the user to customize the network configuration and policies. For instance, a VNet can enable the user to choose the IP address range, subnet size, firewall rules, and network security groups for the ML workspace. A VNet can also enable the user to integrate the ML workspace with other VNets, on-premises networks, or the internet, depending on the business needs and compliance requirements.
What is a Microsoft Managed Virtual Network Workspace?
A Microsoft managed virtual network workspace is a type of ML workspace that is created and managed by Microsoft on behalf of the user. A Microsoft managed virtual network workspace uses an isolated and dedicated VNet that is automatically configured and secured by Microsoft. A Microsoft managed virtual network workspace provides the following benefits:
Simplified setup: A Microsoft managed virtual network workspace does not require the user to create or manage the VNet, subnets, routing tables, firewalls, or network security groups. The user only needs to provide the name and region of the ML workspace, and Microsoft will create and manage the VNet for the ML workspace.
Optimized security: A Microsoft managed virtual network workspace uses a VNet that is isolated from other networks and has strict access policies. The VNet only allows the ML workspace and its associated resources to communicate with each other and blocks any external or internal access. The VNet also encrypts the network traffic and data within the VNet.
Seamless integration: A Microsoft managed virtual network workspace supports the integration with other VNets, on-premises networks, or the internet, using the Azure Private Link service. The Azure Private Link service enables the user to securely connect the ML workspace and its associated resources with other resources, without exposing them to the public internet or other networks.
Reduced Dependency: A Microsoft managed virtual network workspace reduces the dependency on the customer to provide an IP address range for the VNet for the workspace. This is because the VNet is automatically configured and secured by Microsoft, which simplifies the setup process and reduces the burden on the customer. As a result, the customer can focus on their machine learning tasks without worrying about the complexities of VNet configuration.
Conclusion
Using a VNet for machine learning is a trade-off between security, performance, flexibility, complexity, cost, and compatibility. A VNet can provide enhanced security, improved performance, and increased flexibility for the ML workspace and its components, but it can also introduce increased complexity, additional cost, and potential compatibility issues. Therefore, the user should carefully evaluate the advantages and drawbacks of using a VNet for machine learning and choose the best option for their specific scenario and needs. Alternatively, the user can opt for a Microsoft managed virtual network workspace, which simplifies the setup, optimizes the security, and enables the seamless integration of the ML workspace with a VNet.
Microsoft Tech Community – Latest Blogs –Read More
Auto Rollout of Conditional Access Policies in Microsoft Entra ID
The linked blog post was originally published on the Microsoft Security Blog on November 6th, 2023. We are sharing it again on the SMB Tech Community blog channel to ensure that all of our partners, who manage customer tenants and their conditional access policies, are informed about the upcoming policy changes.
Microsoft announced the automatic rollout of Conditional Access polices in Entra ID back in November 2023.
This feature automatically creates new Conditional Access policies in report-only mode for eligible customers of Microsoft Entra ID P1/P2 (M365 E3/M365 E5/M365 Business Premium). Between November 9th, 2023, and December 31st, 2023, policies were created in all eligible tenants. Customers will have at least 90 days to review the policy’s impact, manage exclusions, turn the policy on, or turn it off if necessary.
This 90-day period is ending soon, and enforcement will begin on a rolling basis in February and March 2024.
Recommended actions
To avoid any potential disruption to users’ access and to ensure these policies meet your organization’s needs, take the following actions within 90 days of their creation, before they’re moved to the On state:
Read the original blog announcement By Alex Weinert, Vice President, Identity Security
Review the effects and benefits of the new policies. If you don’t want us to enable them automatically, set them to Off. Or, you may set them to On at any time.
Customize these policies according to your specific needs, such as excluding emergency access accounts. If you require more extensive customizations, you can clone a policy and then make as many changes as you want.
Verify that all users covered by these policies have enabled and registered at least one multifactor authentication method. If necessary, run a registration campaign to set up the Authenticator app.
Microsoft Tech Community – Latest Blogs –Read More
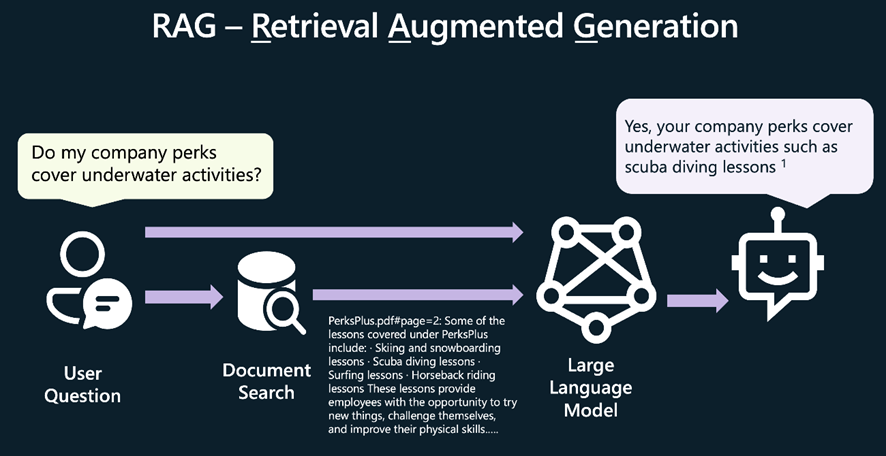
Únete a nosotros para el Hackatón de Aplicaciones de Chat de IA
En los últimos seis meses, hemos conocido a cientos de desarrolladores que están utilizando Python para crear aplicaciones de chat de IA en sus propios campos de conocimiento, utilizando RAG (Recuperación Aumentada de Generación) para enviar fragmentos de información a un modelo de LLM junto con la pregunta del usuario.
También hemos escuchado a muchos desarrolladores que les gustaría aprender a crear sus propias aplicaciones de chat con RAG, pero no saben por dónde empezar. Por eso, estamos organizando un hackathon virtual para ayudarte a aprender a construir tu propia aplicación de chat con RAG en Python.
Del 29 de enero al 12 de febrero, realizaremos transmisiones en vivo en inglés y los días 31 de enero y 2 de febrero en español, donde te mostraremos cómo construir en nuestro repositorio de ejemplo de chat con RAG más popular, al mismo tiempo que explicamos los conceptos clave detrás de todas las aplicaciones de chat con RAG modernas. Los temas de las transmisiones en vivo incluirán búsqueda vectorial, control de acceso, GPT-4 con visión y más.
Mantente conectado a tus sesiones locales de Reactor. Esperamos involucrar a desarrolladores de todo el mundo, así que también tendremos transmisiones en vivo en español, portugués y chino. Habrá premios para las mejores aplicaciones e incluso un premio para el miembro más útil de la comunidad. ¡Mantente atento a tus sesiones locales de Reactor!
Para obtener más información, visita la página de Reactor para sintonizar tu evento local y visita la página AI Chat App Hack, donde podrás seguir los pasos para registrarte y unirte a la comunidad. ¡Te esperamos ya!
Más recursos de RAG para desarrolladores de Python:
• Tutorial: Introducción al ejemplo de chat corporativo en Python utilizando RAG
• Recursos de IA de Azure para desarrolladores Python
• Utilizando Llamaindex con Azure AI Search
Microsoft Tech Community – Latest Blogs –Read More
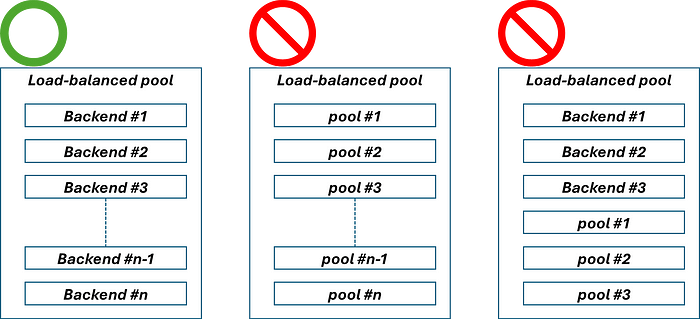
Leverage Azure API Management to distribute API traffic to multiple backend services
This is a summarized edition of the following original articles, both of which were published in Japanese. This is a memo as of 27 January 2024.
Azure API Managementのバックエンドプール – Logico Inside (logico-jp.io)
Azure API Managementのバックエンドでサーキットブレーカーを構成する – Logico Inside (logico-jp.io)
Circuit breaker and load balanced pool features have recently been added to the API Management backend. Both are in public preview as of 27 January 2024.
Azure API Management backends | Microsoft Learn
In public preview, we must use either Bicep, ARM, or REST APIs (2023-05-01-preview or later) to configure circuit breakers and load-balanced pools. There is no command for either CLI or PowerShell and there is no dedicated configuration page in Azure Portal.
Backend – REST API (Azure API Management) | Microsoft Learn
Load-balanced pool
Previously a backend could only contain one endpoint of a backend service. If we need to distribute traffic to multiple backend services, we need to provision and deploy an L4/L7 load balancer in front of the backend services. Load-balanced pool allows us to distribute request traffic to multiple backend services without managed/unmanaged load balancer. This feature has already been included in other API gateway products, but finally this comes to Azure API Management.
Limitation
There are some limitations as of 27 January 2024.
Round-robin is the only load balancing option. (We hope that other load balancing methods will be implemented in GA.)
As mentioned in the documentation, an API Management instance with Developer and Premium SKUs deployed in an internal virtual network may throw HTTP 500 BackendConnectionFailure errors when the gateway endpoint URL and backend URL are the same. Please refer to the following URL for more details.
Azure API Management backends | Microsoft Learn
Nested load-balanced pools are not supported.
Circuit breaker
Another feature, circuit breaker, is a common pattern for preventing an application from repeatedly trying to perform an operation that’s likely to fail. Previously we had to implement a circuit breaker in backend service(s) by ourselves, but we don’t have to implement this feature.
Circuit Breaker pattern – Azure Architecture Center | Microsoft Learn
Limitation
Some limitations are found as of January 27, 2024.
Backend circuit breaker is not supported in the API Management Consumption SKU.
“Half-open” state of circuit breaker is not supported.
Please refer to “NOTE” in the document for more details.
Azure API Management backends | Microsoft Learn
Configuration
Preparation
The following endpoints will be used for the backend.
<URL1>/api/test
<URL2>/api/test
For the API frontend, we use the following configuration.
<APIM’s URL>/suffix/foo
In this case, requests will normally be routed to the following URL, unless no change is made to the routing endpoint in inbound section.
<URL1 or URL2>/api/test/foo
Circuit breakers
To configure a circuit breaker for backend, the following JSON is published via REST API. Needless to say, we can configure the circuit breaker with ARM and Bicep.
{
“type”: “Microsoft.ApiManagement/service/backends”,
“apiVersion”: “2023-05-01-preview”,
“name”: “test1”,
“properties”: {
“description”: “backend (test1)”,
“type”: “Single”,
“protocol”: “http”,
“url”: “<URL1>/api/test”,
“circuitBreaker”: {
“rules”: [
{
“failureCondition”: {
“count”: “3”,
“errorReasons”: [
“Server errors”
],
“interval”: “PT5M”,
“statusCodeRanges”: [
{
“min”: “500”,
“max”: “599”
}
]
},
“name”: “myBreakerRule”,
“tripDuration”: “PT10M”
}
]
}
}
}
Regarding properties.circuitBreaker.rules.failureCondition.interval and properties.circuitBreaker.rules.tripDuration, both should follow ISO8601 duration specification. In case of the example above, interval (duration to collect the number of errors) is 5 minutes, and tripDuration (duration during which circuit breaker is tripped) is 10 minutes.
A same configuration should be made for test2.
Load-balanced pool
We will use the two backends configured in the last section to configure the load-balanced pool. Although, properties.url is mandatory, specified URL is meaningless. In this case, it is okay to specify http://localhost to properties.url. Also note that Pool should be specified in properties.type, instead of Single. The following JSON is then posted via REST API. As I mentioned in the last section, we can also use ARM and Bicep.
{
“type”: “Microsoft.ApiManagement/service/backends”,
“apiVersion”: “2023-05-01-preview”,
“name”: “backendPool”,
“properties”: {
“description”: “Load balanced backends”,
“type”: “Pool”,
“protocol”: “http”,
“url”: “http://localhost”,
“pool”: {
“services”: [
{
“id”: “/backends/test1”
},
{
“id”: “/backends/test2”
}
]
}
}
}
That’s it. Now it is time to test.
Let’s try it.
In this example, the backend test2 always returns HTTP 503 (Service Unavailable). I called the API every 5 seconds to observe behaviours using the APIM request tracing feature.
Tutorial – Debug APIs in Azure API Management using request tracing | Microsoft Learn
After 6 API calls, the circuit breaker is tripped since test2 returns HTTP 503 (Service Unavailable) error 3 times.
At the 7th or 8th call, the API request would normally be routed to the backend test2 in the load-balanced pool, but the request is only routed to the backend test1 because APIM detects that the circuit breaker of the backend test2 is tripped. 10 minutes later, the circuit breaker stops tripping, and the normal state is resumed; the load-balanced pool is distributing API requests to the one of backends in the pool.
How about using these features with retry policy?
If we use a load-balanced pool and a circuit breaker with retry policy in backend section, we can configure the routing of API requests in a more sophisticated way. As I wrote in the following entry, we can configure fallback more easily, similar to configuring with L7 load balancer.
If we use both features introduced to backends with retry policy, all we need to do is slightly modify the original policy configuration in the URL above, which is for request distribution to one of the Azure OpenAI Service instances, to use load-balanced pool and specify it as a backend service. Here is the example of policy configuration.
<!– retryCount is specified in Named Values. –>
<!– Load-balanced pool “backendPool4AOAI” is already configured –>
<policies>
<inbound>
<base />
<set-backend-service backend-id=”backendPool4AOAI” />
<set-variable name=”retryCount” value=”@(int.Parse(” {{retryCount}}”))” />
<set-variable name=”maxRetryCount” value=”@((int)context.Variables[” retryCount”] -1)” />
<authentication-managed-identity resource=”https://cognitiveservices.azure.com”
output-token-variable-name=”msi-access-token”ignore-error=”false” />
<set-header name=”Authorization” exists-action=”override”>
<value>@(“Bearer ” + (string)context.Variables[“msi-access-token”])</value>
</set-header>
</inbound>
<backend>
<retry condition=”@(context.Response.StatusCode >= 300)” count=”@((int)context.Variables[” maxRetryCount”])”
interval=”1″ max-interval=”10″ delta=”1″ first-fast-retry=”false”>
<!– forward request and request body is stored for retry –>
<forward-request buffer-request-body=”true” />
</retry>
</backend>
<outbound>
<base />
</outbound>
<on-error>
<base />
</on-error>
</policies>
This policy configuration meets the requirements shown below.
Conclusion
Previously backends did not have load balancing or circuit breaker functionality, but now both of them have been added to Azure API Management. We hope that both will reach GA soon and we will be able to route API requests to backends in a more sophisticated way.
Microsoft Tech Community – Latest Blogs –Read More

Announcing Public Preview of Migration plugin for WordPress on App Service
We are excited to announce that we have launched the public preview of the App Service migration plugin for WordPress.
If you want to move your WordPress website from any hosting platform to App Service, this plugin is for you. The plugin copies all your content from your existing site to a new WordPress site in App Service without impacting the existing site, so that you can verify and test your new site before making it available to visitors.
In this article, we will learn how to use the migration plugin to move your WordPress site to App Service.
Prerequisites:
The source site. This is the site which has the content that needs to be migrated. For this example, we will use https://thegourmetkitchen.online/
The destination site. You need a new WordPress on App Service site to get started. We will use https://destinationsite.azurewebsites.net/
To create a WordPress site on App Service step by step, follow the instructions here: https://techcommunity.microsoft.com/t5/apps-on-azure-blog/how-to-set-up-a-new-wordpress-website-on-azure-app-service/ba-p/3729150
Now let’s start!
Step 1: Download the migration plugin in ZIP format from the link below:
Step 2: Install and activate the plugin in both the source site and the destination site.
Step 3: Go to the destination site. Navigate to Azure App Service Migration (Preview) > Auth Token
Step 4: Click on Generate Token and copy the token.
Step 5: Go to the source site. Navigate to Azure App Service Migration (Preview) > Migrate
Step 6: Select the options if you wish to exclude any item from the migration.
Do not export post revisions: Only the latest versions of the blog posts will be transferred. The past revisions will not be transferred.
Do not export media library: The media files (images and videos) will be skipped.
Do not export themes: All installed themes will be excluded from migration.
Do not export must-use plugins: Must-use plugins will not be transferred. Learn more about must-use plugins, click here: Must Use Plugins – Advanced Administration Handbook
Do not export plugins (files): The entire plugin directory (all installed plugins) will be excluded from the migration.
Step 7: Enter the destination URL. Ensure that the destination URL is in the correct format and contains only the base URL of your WordPress website.
Step 8: Enter the destination site token. Paste the token copied in step 4.
Step 9: You can choose to use the advanced options for migration.
The migration plugin packs the source site’s data and transfers it in chunks of ‘Data transfer chunk size’. The plugin then waits for each chunk to successfully transfer before going to the next chunk. If the time taken for transferring a chunk is greater than ‘server timeout’, it will result in migration failures.
The default values of ‘Data transfer chunk size’ is 5000 KB and ‘Server timeout’ is 60 s. This should work for most migration scenarios. If migration fails due to slow internet speed, you can decrease the chunk size until the issue resolves.
Step 10: Click on Migrate
Step 11: Warning: Please read this carefully.
Note that during the migration process:
The source site and the destination site will be under maintenance mode. Users will not be able to access these sites.
If you leave this page during migration, the migration process will continue in the backend. Please do not restart the migration until the migration is successfully completed.
Please proceed only if you accept to these terms. Click on Migrate.
Step 12: Please wait until the migration process is complete. You can also choose to stop the migration by clicking on ‘Cancel Migration’.
Step 13: Now your site has successfully migrated!
Next steps: The next step will be to map the domain name to the destination site. In this case ‘thegourmetkitchen.online’. Follow instructions here: How to use Custom Domains with WordPress on App Service
Note: The migration plugin is currently in public preview. We are excited to know about your experience with the plugin. Please write your reviews in the comments section below or reach out to us at wordpressonazure@microsoft.com
Support and Feedback
In case you need any support, you can open a support request at New support request – Microsoft Azure.
If you have any ideas about how we can make WordPress on Azure App Service better, please post your ideas at Post idea · Community (azure.com)
or you could email us at wordpressonazure@microsoft.com to start a conversation.
Microsoft Tech Community – Latest Blogs –Read More
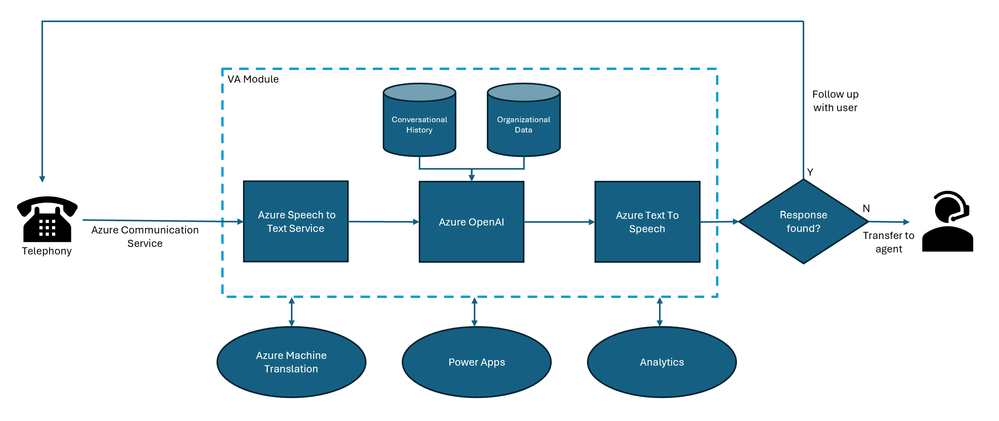
Revolutionizing Businesses with Virtual AI Agents
If you want to provide a better customer experience, you might consider using a virtual AI agent. This is a software application that can talk to your customers on the phone, using natural language. It can understand what they want, give them the right answer, or do something for them. And if it can’t handle the situation, it can transfer the call to a human agent. A virtual AI agent can help you save money, make your customers happier, and boost your reputation. But how do you create one?
In this article, we will show you how to use Azure AI services to build a virtual AI agent for your business. You will also see how Yellow.ai, a leading conversational AI platform, used this solution to create amazing virtual AI agents for their clients.
Architecture of the solution
The key components of a Virtual AI agent solution typically include:
Telephony integration enables communication between the customer and the virtual AI agent over a phone call.
Azure Communication Services is an offering from Microsoft that can help connect telephony infrastructure with the Azure AI services. It provides easy APIs and SDKs for voice and video calling, chat, and SMS. It can also serve as the orchestrator to handle key operations such as hand-off between the Virtual agent and Human agent. It is available in these countries.
Azure AI services: This is the component that powers the core functionalities of the virtual AI agent, such as Speech, Azure OpenAI, Language, Document Intelligence, and others.
Human agent: Handles the customer queries that the virtual AI agent cannot resolve, or if the customer so chooses. In such a case, the human agent receives the call from the virtual AI agent and a summary of the conversation so far.
The following diagram illustrates the architecture of the solution:
Creating a virtual AI agent using Azure AI services
To create a virtual AI agent using Azure AI services, you will need to follow these steps:
Choose your telephony infrastructure.
Create your speech recognition: You can use the Azure Speech service to convert speech to text, enabling your virtual AI agent to understand what the customer is saying. You can perform speech recognition in real-time or batch mode and in various languages and dialects. You can also customize the speech recognition model to suit your specific domain and vocabulary.
Create your natural language generation model: You can use the Azure OpenAI service to generate natural language responses or actions based on the customer’s intent and context. You can leverage the power of generative AI models, such as GPT-4 Turbo, to create realistic and relevant dialogues for your virtual AI agent. You can also fine-tune the models to match your business goals and scenarios.
Create your text-to-speech model: You can use the Azure Text-to-Speech service to convert text to speech, enabling your virtual AI agent to speak to the customer. You can synthesize natural and expressive voices in various languages and styles. You can also customize the voice and emotion of your virtual AI agent to suit your brand identity and customer preferences. Additionally Azure Speech now also offers a suite of new super-realistic voices which are designed for conversations. The voice used in the demo above is one such voice. There are already multiple such voices available for use, and more are on the way.
Create your other AI functionalities: Depending on your business needs, you may also need to create other AI functionalities, such as Azure Cognitive Search, Document Intelligence, CLU, Question Answering, etc., to enhance the capabilities and functionalities of your virtual AI agent.
Test and deploy your virtual AI agent: You can use the Azure Bot Service to manage and monitor your virtual AI agent. Once you are satisfied with the performance and quality of your virtual AI agent, you can deploy it to your telephony infrastructure and start serving your customers.
Measuring impact
To evaluate the effectiveness and impact of your virtual AI agent, you can measure and analyze various metrics, such as customer satisfaction, operational efficiency, and cost savings. You can use Azure OpenAI to generate surveys and feedback forms, Azure Text Analytics to analyze sentiment and emotion, Azure Speech to measure the accuracy and latency of speech recognition, and Azure OpenAI to measure the relevance and quality of natural language generation.
Yellow.AI Case Study
Yellow.ai is an online B2B platform that helps businesses create powerful AI-driven bots for customer support. The platform allows businesses to connect bot users to human agents, run campaigns, manage bots on multiple channels, integrate with third-party applications, and measure bot performance. With Yellow.ai’s Dynamic Automation Platform (DAP), businesses can use conversational AI tools to create no-code solutions for automating repetitive tasks and processes. The platform leverages generative AI to provide voice and text automation for customer and employee interactions, resulting in lower operational costs. Yellow.ai is using Azure OpenAI and Azure Speech and Translation to power these intelligent bots and provide greater user value.
“The accuracy provided by Azure AI models for Indian languages is far better than other products that we have tried. The ease of integration, enterprise-grade security, and extensive language support make it the perfect choice for our global audience.” – Abhimanyu Singh, Associate Director of Product – Voice AI, Yellow.ai
Microsoft Tech Community – Latest Blogs –Read More