

Tag Archives: microsoft
Azure SQL DB license-free standby replica | Data Exposed
Learn more about the License-free HADR replica in Azure SQL DB in this episode of Data Exposed with Anna Hoffman and Rajesh Setlem.
Resources:
To learn more and get started: https://aka.ms/sqldbstandby
Microsoft Tech Community – Latest Blogs –Read More
SDN: Migrating from Rest Name to Static IP | Remove worries of DNS!
[Special Thanks to Adam Rudell, our Sr. Support Escalation Engineer, for putting together an excellent video and tutorial]
Hello SDN Community!
Today, when you deploy Software Defined Networking via SDNExpress or Windows Admin Center (WAC), you must provide a REST DNS name. This is often referred to as a Dynamic DNS deployment. The northbound API endpoint (REST DNS name) is used for all of our clients and management experience. For example, if the replica moves from one Network Controller (NC) VM to another, the API service will perform a DNS registration to update the northbound API record. In some instances, additional security hardening or third-party integration could cause issues with the DNS registration.
Introducing Static IP configuration for Network Controller REST!
With a Static IP configuration, when a replica moves to another NC VM, the API service simply programs a secondary IP with no DNS registration call. This provides fault tolerance and relaxes the DNS registration requirements of SDN.
Static IP can be used with a new SDN deployment OR existing SDN deployments! Check out the video that Adam Rudell, our Sr. Support Escalation Engineer, for an in-depth walk through of configuring this on a new SDN deployment, an existing SDN deployment, and then even moving back to a Dynamic DNS configuration! Also, ICYMI, we launched a new YouTube channel focused entirely on Microsoft SDN across our Edge portfolio – be sure to Like, Subscribe, and Follow as we continue to post more content!
Microsoft Tech Community – Latest Blogs –Read More

QTip: Connect to Azure SQL DB using Entra SPN (service principal)
Testing steps required to connect to Azure SQL DB using Entra SPN with SSMS and Powershell
In this guide, I am going to outline the steps on how to connect to an Azure SQL database using Entra SPN with tools such as SSMS and PowerShell. This demo covers detailed steps for using an existing user when the token is received correctly. Additionally, the steps cover creating a new user from scratch in case there are issues with the existing user.
Requirements:
Run latest powershell version as administrator
SQL Server Management Studio latest version
Entra SPN to be used
Go to Microsoft Entra -> App registrations and select user to use to connect
Get information required
and secret value
Test if token is received …
Open powershell as administrator and Install module (this is needed only once)
Install-Module -Name MSAL.PS
Is possible to get token? …
Import-Module MSAL.PS
$tenantId = “…917” # tenantID (Azure Directory ID) were AppSP resides
$clientId = “779c12a9-dbd1-4c8a-838e-aa4c20d3071b” # AppID also ClientID for AppSP
$clientSecret = “..9” # Client secret for AppSP
$scopes = “https://database.windows.net/.default” # The end-point do not modify
$result = Get-MsalToken -RedirectUri $uri -ClientId $clientId -ClientSecret (ConvertTo-SecureString $clientSecret -AsPlainText -Force) -TenantId $tenantId -Scopes $scopes
$Tok = $result.AccessToken
Write-host “token”
$Tok
Token received
Next step is to register display name of SPN and assign required roles …
* Close SSMS if is opened sometimes if changes are being applied fails to create user
Connect to SSMS using Entra user otherwise is not possible to create user
Drop user if exists
— first drop user if previously was created is not possible to update information
drop user [demosqlspn]
Create user and assign role
CREATE USER [demosqlspn] FROM EXTERNAL PROVIDER;
ALTER ROLE db_datareader ADD MEMBER [demosqlspn];
ALTER ROLE db_datawriter ADD MEMBER [demosqlspn];
Confirm that user is created
SELECT name, type, type_desc, CAST(CAST(sid as varbinary(16)) as uniqueidentifier) as appId
from sys.database_principals WHERE name = ‘demosqlspn’
Go back to powershell and test if is possible to connect adding code to connect to Azure SQL DB and run a basic query list of databases from sys.databases
Import-Module MSAL.PS
$tenantId = “…99917” # tenantID (Azure Directory ID) were AppSP resides
$clientId = “779c12a9-dbd1-4c8a-838e-aa4c20d3071b” # AppID also ClientID for AppSP
$clientSecret = “…~cq9” # Client secret for AppSP
$scopes = “https://database.windows.net/.default” # The end-point do not modify
$result = Get-MsalToken -RedirectUri $uri -ClientId $clientId -ClientSecret (ConvertTo-SecureString $clientSecret -AsPlainText -Force) -TenantId $tenantId -Scopes $scopes
$Tok = $result.AccessToken
Write-host “token”
$Tok
# test connection to Azure SQL DB using tocken
$AccessToken = $tok
$SqlConnection = New-Object System.Data.SqlClient.SqlConnection
$SqlConnection.ConnectionString = “Data Source =[servername].database.windows.net;Initial Catalog=demodataperf; Encrypt=True;”
$SqlConnection.AccessToken = $AccessToken
$SqlConnection.Open()
$SqlCmd = New-Object System.Data.SqlClient.SqlCommand
$SqlCmd.CommandText = “SELECT name, database_id, physical_database_name FROM sys.databases”
$SqlCmd.Connection = $SqlConnection
$SqlAdapter = New-Object System.Data.SqlClient.SqlDataAdapter
$SqlAdapter.SelectCommand = $SqlCmd
$DataSet = New-Object System.Data.DataSet
$SqlAdapter.Fill($DataSet) | Out-Null
$DataSet.tables
*Remember press enter after paste script
Now is working , doublecheck using SSMS …
*Remember to set default database because is not administrator
Now is connected as appid@tenantid
More information
Tutorial: Create Microsoft Entra users using Microsoft Entra applications
Microsoft Entra service principal with Azure SQL
Microsoft Tech Community – Latest Blogs –Read More

How licensing works for work and school accounts in the new Outlook for Windows
The new Outlook for Windows is bringing a wave of innovation to the next version of Outlook. As we continue on our journey, we’ve received several questions about how licensing works for work and school accounts in the new Outlook for Windows. This post will answer these questions and provide details about a recent improvement which updates the new Outlook to match the behavior of classic Outlook for multi-account scenarios.
Using Outlook in single account scenarios
To use the Outlook for Windows desktop app (either the classic or new version) with a Microsoft 365 organizational email address, you need to purchase a plan that includes the desktop versions of the Microsoft 365 apps. We offer various different pricing options for Small Businesses, Enterprises, Schools and Governments, either directly on our website or through partners. Using the Microsoft 365 plans for small business as an example, a Business Standard or Business Premium plan provides access to a Microsoft 365 email address and the desktop versions of Outlook (and the rest of the Microsoft 365 apps). The Business Basic plan provides access to our productivity tools through the web and mobile versions of Outlook and Microsoft 365.
Using Outlook in multiple ‘work or school’ account scenarios
Some organizations choose to provide multiple email addresses with different licenses to their users. In the classic Outlook for Windows today, users could install and activate the desktop app with an initial account that was properly licensed for desktop use (e.g. Business Standard, Enterprise E3). Once Outlook was properly licensed by that initial account, users could add additional accounts like Business Basic and Enterprise E1 as secondary accounts.
Previously, the new Outlook for Windows didn’t allow adding accounts with Business Basic and Enterprise E1 license as secondary accounts, regardless of what other accounts were added to the app. We recognized this would be a temporary gap for the new Outlook, which is why we’ve focused on giving users and organizations the choice of when to toggle back and forth between classic and new version of Outlook. We prioritized this work alongside the various other important requests from users, and are excited to share that the update rolling out now will update the new Outlook to match the behavior of classic Outlook. Thank you for your patience and understanding while we got there!
How multi-account licensing will work in the new Outlook going forward
When you add your first account to the new Outlook for Windows, this account will be set as your primary account. This account is currently used for storing app-wide settings like theme and layout, diagnostic data, connected experiences, and policies configured by an administrator. With this update, the primary account will now also be used for determining the license that applies when adding additional secondary accounts.
Figure 1: Option to set account as primary in Settings > Accounts > Email accounts.
For example, if you have a Business Standard account (which includes a license for desktop apps) added as your primary account, that license will apply, and you can now add any secondary email accounts regardless of licensing status (e.g. Business Basic). This also applies to personal accounts with a Microsoft 365 Personal or Family, as these plans include the license rights to the Microsoft 365 applications for desktop. Once one of these accounts is set as the primary account, you can add Business Basic, E1 or similar accounts as secondary accounts.
FAQ
When will I see the capability change in the new Outlook for Windows?
We began rolling out these improvements on February 1st, 2024. They should reach all users by the middle of February.
What if the first account I add is a free personal email address like Outlook.com or Gmail?
The new Outlook provides a free, ad-supported version of the app for use with personal email addresses. At any time, you can add a Microsoft 365 work or school email address with rights to the Outlook desktop apps, or a personal email with a subscription to Microsoft 365 Personal or Family to upgrade to the premium version of Outlook adding additional features and removing ads.
If you would like to add other Microsoft 365 commercial accounts with web and mobile access only, you’ll first need to set one of the other accounts that have rights to desktop apps as the Primary Account.
Which commercial and personal licenses provide the rights to use the Outlook desktop applications on Windows and Mac, when set as the Primary Account?
Home:
Microsoft 365 Personal, Microsoft 365 Family
Work or school:
SMB: Microsoft 365 Business Standard, Microsoft 365 Business Premium, Microsoft 365 Apps for business
Enterprise: Office 365 E3, Office 365 E5, Microsoft 365 E3, Microsoft 365 E5, Microsoft 365 Apps for enterprise
Education: Office 365 A3, Office 365 A5, Microsoft 365 A3, Microsoft 365 A5, Microsoft 365 Apps for education
Government: Office 365 G3, Office 365 G5, Microsoft 365 G3, Microsoft 365 G5, Microsoft 365 Apps for enterprise
How do I add a Microsoft Account that was created with a non-Microsoft email address to the new Outlook for Windows?
When you create a Microsoft Account, you have the choice of creating an Outlook.com email address or using your existing non-Microsoft email as your username (e.g. Gmail, Yahoo). Currently, the new Outlook for Windows only supports adding Microsoft Accounts with an Outlook.com email address. You can do this in Settings > Accounts > Email Accounts, or by clicking the “Add Account” button in the bottom of the folder list.
If you purchased a Microsoft 365 Personal or Family subscription with a Microsoft Account that was created with a non-Microsoft email address, you will need to add an Outlook.com alias in order to connect it to Outlook. To do so, follow the instructions here: How to add an email address or phone number to your Microsoft account – Microsoft Support.
We hope this update makes managing the new Outlook for Windows easier and, please, let us know if you have any feedback in the comments.
Microsoft Tech Community – Latest Blogs –Read More
SDN: Migrating from Rest Name to Static IP | Remove worries of DNS!
[Special Thanks to Adam Rudell, our Sr. Support Escalation Engineer, for putting together an excellent video and tutorial]
Hello SDN Community!
Today, when you deploy Software Defined Networking via SDNExpress or Windows Admin Center (WAC), you must provide a REST DNS name. This is often referred to as a Dynamic DNS deployment. The northbound API endpoint (REST DNS name) is used for all of our clients and management experience. For example, if the replica moves from one Network Controller (NC) VM to another, the API service will perform a DNS registration to update the northbound API record. In some instances, additional security hardening or third-party integration could cause issues with the DNS registration.
Introducing Static IP configuration for Network Controller REST!
With a Static IP configuration, when a replica moves to another NC VM, the API service simply programs a secondary IP with no DNS registration call. This provides fault tolerance and relaxes the DNS registration requirements of SDN.
Static IP can be used with a new SDN deployment OR existing SDN deployments! Check out the video that Adam Rudell, our Sr. Support Escalation Engineer, for an in-depth walk through of configuring this on a new SDN deployment, an existing SDN deployment, and then even moving back to a Dynamic DNS configuration! Also, ICYMI, we launched a new YouTube channel focused entirely on Microsoft SDN across our Edge portfolio – be sure to Like, Subscribe, and Follow as we continue to post more content!
Microsoft Tech Community – Latest Blogs –Read More
New Microsoft Teams bulk installer is now available for Windows
We are happy to share that the new Microsoft Teams bulk installer is now available for Windows.
We shared the news of the general availability of new Microsoft Teams in this blog post, and we have also made available tools that help admins to install the new Teams app. More details can be found in Bulk deploy the new Microsoft Teams desktop client.
Online deployment: Download and install the latest new Teams app machine wide:
Command (Run with admin privilege): teamsbootstrapper.exe -p
During online deployment, the bootstrapper app detects the CPU architecture of the system and downloads the corresponding installer of most recently released new Teams client and installs the client machine wide.
Offline deployment: Install pre-downloaded new Teams client MSIX package machine wide: Download Microsoft Teams Desktop and Mobile Apps
For admins concerned with network bandwidth usage of online deployment, offline deployment mode is a great alternative. Admins can download the client only once and use the bootstrapper to bulk deploy machines in their tenant.
Command for local path (Run with admin privilege): teamsbootstrapper.exe -p -o “c:pathtoteams.msix”
Command for UNC path (Run with admin privilege): teamsbootstrapper.exe -p -o “uncpathtoteams.msix”
During offline deployment, the bootstrapper app installs the admin specified package from either local system or UNC path. Please make sure the correct version of new Teams client is downloaded.
Bulk remove new Teams:
Command for deleting every occurrence of new Teams installation: teamsbootstrapper.exe -x
If you choose the bulk removal option, it will uninstall both the machine level and the user level installations. New Teams app instances that are running will be stopped.
We advise admins to use the bulk installer tool to install new Teams client for their tenants.
There are separate new Teams installer files depending on the target system’s CPU architecture: X64/X86/AMR64. The bootstrapper automatically detects the system architecture and downloads the appropriate installer file to avoid performance.
Online mode automatically downloads the most recent released version of the new Teams app. This prevents the problem of outdated versions of the app being installed over and over, which can increase network usage (outdated app versions will update to the newest release right after installation), and slow down essential feature or security updates.
The bootstrapper can be deployed by admins using the deployment tools they already have for example intune/sccm.
Upcoming features and bug fixes:
Auto start support – Create a new command line option that launches the new Teams app for all users on the machine after provisioning.
Microsoft Tech Community – Latest Blogs –Read More
Save money with Arc SQL Server licensing – what you need to know | Data Exposed
If you are used to traditional licensing options and pay for software assurance, you may wonder why you would ever use pay-as-you-go billing. In this episode of Data Exposed with Anna Hoffman and Sasha Nosov, we’ll cover how to use our new PayG model and understand how you can use Extended Security Updates.
Resources:
SQL Server enabled by Azure Arc – SQL Server | Microsoft Learn
View/share our latest episodes on Microsoft Learn and YouTube!
Microsoft Tech Community – Latest Blogs –Read More
Observability on Azure Container Apps
What is Observability
Our systems can sometimes be a black box. We toss a request into it and get something back, but what goes on inside? Cutting through the tech jargon, observability is a measure of how well we understand the system from the outside looking in.
You might wonder, isn’t that monitoring? Well, not quite. Monitoring tells you when something is wrong, like if your CPU is overloaded or if there’s a glitch slowing things down (that’s the “What”). Observability, on the other hand, is like being a detective. It helps you understand the story behind the problem (the “Why”).
Let’s say an app is responding slowly. We might have all these cool charts and graphs showing us the problem, but do they tell us why it’s happening? Not always.
That’s where solid observability comes in, giving us better visibility into our systems, which in turn solves problems faster. And when we solve problems faster, our customers are happier because they get a smoother, more reliable experience.
What to Measure
Let’s break down what we really need to measure to get a good grip on what’s happening inside our system, without all the fancy terms.
Think of observability as our way of understanding the system from the outside. To do that, we need data, right? So, what kind of data should we collect?
There are three main things, often called the pillars of observability:
Metrics: These are the numbers that tell us something specific, like how much memory is left or how hard the CPU is working. It’s like checking the speedometer and fuel gauge in your car.
Logs: Ever written a simple program and used a print statement to see what’s going on? That’s logging in a nutshell. It’s a record of events, in words. People still to this day (me, to be precise), still debug by adding print statements in their code.
Traces: Tracing is about tracking a request’s route through your system. As the request moves through the system, it generates logs & metrics at each step (remember, we still want to collect these). The crucial part of tracing is that each request has a Trace ID — a tag that sticks with it from beginning to end. This Trace ID is important because it ties every piece of data — all logs and metrics — back to that particular request, no matter where it wanders off to in your system. When a request sets off other actions or calls out to more processes, these offspring processes get their own ID, known as a Parent ID. The Parent ID serves as a reminder of where it came from, linking it to the initial request. The Trace ID is the glue that keeps the entire journey in check, while Parent IDs map out the family tree, showing how each subprocess is part of the larger operation. With this setup, you can follow a request’s entire trip from when it knocks on the door to when it leaves your system.
Observability Strategy
A robust observability strategy involves several key components:
Instrumentation: Instrumentation is the process of capturing telemetry (metrics, logs, and traces) in your code, and is arguably the part that requires the biggest investment. There are many SDKs (libraries) and even codeless (agent based) tools out there that do that automatically (more on that later).
Export: You need to have the capability to gather all this telemetry data, whether it’s from the application itself or the operating system, and then send it off to a specific place.
Centralized Repository: A repository that can store logs, metrics, and link all these together by taking into consideration the traces we instrumented.
Visualize and Query: This is about having the tools to look at the data in your centralized repository and make sense of it. You should be able to search through it and see it in a way that’s easy to understand.
Take Action: This is the proactive part of the strategy. When the data shows that certain limits are being hit or surpassed, your system should either automatically adjust itself (like increasing resources if the CPU is overworked) or ping the engineers to take a look and decide what to do.
One key requirement in a good observability strategy: Every part of your system should be measured. That is easier said than done, but there are tools that can help.
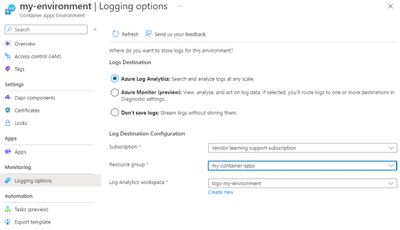
Azure Monitor Overview
This blog will get too long if I delve deep into Azure Monitor, but I’ll provide a high level summary.
Azure Monitor is an Azure native observability tool which allows you to collect metrics & logs from various resources (applications, Azure resources, Activity logs, etc.), stores them in a centralized repository like Azure Log Analytics, and give you the capability to configure alerts.
Using instrumentation libraries provided by Azure Monitor, we can also collect traces from our applications.
Azure Container Apps Observability Overview
To recap, we want to collect metrics, logs, and traces and we need to meet the requirement of having every part of our system measured. Thankfully, Azure Container Apps, makes it easy to meet that requirement.
With Azure Container Apps, we can collect:
Application Level Logs, metrics, and traces: Application level logs using Open Telemetry SDK. Collecting things such as request/response times, exceptions, etc and can be sent to a centralized repository (Azure Log Analytics).
Container Level Logs: Your containers will generate logs (outside of the application), known as stout & sterr.
System Logs: The Container Apps resource itself, generates logs to inform you of “service level” events. Things such as volume mounts, traffic splits, etc. Anything you do at the resource level.
Note: While Container Level Logs & Sytem Logs are collected & streamed automatically (and can be viewed in near real time), you can choose to route them to Azure Log Analytics (for querying purpose), or you can leverage Diagnostic Settings to send the logs to an Azure Storage Account, or Event Hub (to be then consumed by a third party app).
4. Resource Metrics: Every Azure resource emits metrics automatically, known as standard metrics. In Azure Container Apps, these include things like CPU usage, Requests, Network in (measured in bytes), etc. You can then use Metrics explorer to view these metrics.
Instrumentation with OpenTelemetry & Azure Application Insights (Application Level)
OpenTelemetry stands out in the cloud-native scene as a go-to choice for instrumentation. It’s a community-powered, open-source project aimed at standardizing how we collect and handle telemetry data, which includes logs, metrics, and traces.
What makes OpenTelemetry stand out is its vendor-agnostic nature, which means you’re not tied down to any specific platform; you can gather your telemetry data and send it off to any destination. For instance, in the scenario we’re discussing, the data could be sent to Azure Monitor (Azure Application Insights) or anywhere else.
Microsoft, being a major contributor to Open Source, supports an OpenTelemetry-specific SDK and actually suggests opting for this SDK over the classical Azure Application Insights SDK. While it’s possible to set up an OpenTelemetry (OTEL) collector on your own and direct it to Azure Application Insights, Microsoft doesn’t back this method. They endorse using Azure’s own OTEL SDKs because they come with Microsoft’s support and additional capabilities like Live Metrics (coming soon), Microsoft Entra authentication, and standard Application Insights metrics. You can even customize the SDK to send it to a second destination simultaneously. There isn’t a very good reason to use native Open Telemetry especially if you’re using Azure Container Apps anyway.
Example Application Overview with Dapr
Our application is simple, it will retrieve a collection of Products with the properties of name & amount/stock. Behind the scenes, however, I deliberately overcomplicated it to simulate a distributed system communicating asynchronously. Technically though, this is all synchronous communication as we will build our own dummy event bus.
We will have 3 main services:
Product Service: Responsible for returning back a list of all products with their associated inventory.
Inventory Service: Responsible for tracking & updating inventory of products created by Product Service.
Events Service: Responsible for acting as an event bus.
The services will talk to each other through events. If inventory is updated for a specific product, an event is emitted by the inventory service, gets sent to the Events service, and Events service will push that to the Products Service to display the correct amount of inventory.
We are using Dapr for service-service invocation. Again, outside of buzzwords, Dapr offloads common logic such as service-service communication, network retries, error handling, state management, and many others into a container running side by side with your main application container (hence, called, sidecar container). With common functionalities handled by the sidecar, your application becomes easier to maintain and update, as changes to these functionalities can often be made without altering your application code. In your code, you can focus on business logic.
Example Application Setup
The repo can be found on: AbdullahAbuHassann/ACA-Observability: Azure Container Apps Observability with Open Telemetry (github.com)
Prerequisites
Create an Azure Log Analytics Workspace, an Azure Application Insights Resource an Azure Container Registry resource. Make sure when you create the Application Insights resource, you pick the same Log Analytics resource that you created.
Take note of Azure Application Insights Connection String on the overview page in the portal.
Create a Resource Group, and take note of the name.
Ensure Docker is installed locally on your machine.
Setup
Login to Azure (make sure Azure CLI is installed)
az login
2. Authenticate to the Azure Container Registry (you might need to provide credentials, which you can get from the portal)
az acr login –name myregistry
3. Clone the repository locally
git clone https://github.com/AbdullahAbuHassann/ACA-Observability.git
4. Configure Products Service
Navigate to /products. In the config.ts file, replace the connection string property with your connection string noted in the Prerequisites section.
const options: AzureMonitorOpenTelemetryOptions = {
azureMonitorExporterOptions: {
connectionString: “REPLACE_WITH_CONNECTION_STRING”,
}
};
Now, we will build a docker container from the provided Dockerfile, replace ACRName below as appropriate (make sure you are inside /products).
docker build -t <ACRName>.azurecr.io/products:v1 .
Push the container to Azure
docker push <ACRName>.azurecr.io/products:v1 .
Repeat step 4 with /inventory and /events (ensure different image names are used)
5. Setup Bicep Template
Navigate to /infra/appinsights.bicep and replace fill in appInsightsName and workspaceResourceId
param location string = ‘westeurope’ // You can change the location as needed
param appInsightsName string = ‘<App Insights Resource Name>’ // Provide a unique name for the Application Insights resource
param workspaceResourceId string = ‘<Resource ID of the Log Analytics workspace>’ // Provide the resource ID of the Log Analytics workspace
resource appInsights ‘Microsoft.Insights/components@2020-02-02-preview’ = {
name: appInsightsName
location: location
kind: ‘web’
properties: {
Application_Type: ‘web’
WorkspaceResourceId: workspaceResourceId
}
}
Navigate to /infra/aca.bicep and adjust environmentName, acrName, Log Analytics Workspace Id & Key, Image names, RG Name for the scope of the user managed identity, and daprAIConnectionString
param environmentName string = ‘<ACA Environment Name>’ // Provide an Azure Container Apps Environment unique name
param acrName string = ‘<ACR Name>’ // Your Azure Container Registry name
// Assuming the managed environment is in the same resource group and subscription
var environmentId = resourceId(‘Microsoft.App/managedEnvironments’, environmentName)
param location string = ‘westeurope’ // Change as needed
param logAnalyticsCustomerId string = ‘<Workspace ID>’// Provide Log Analytics Workspace Customer ID
param logAnalyticsSharedKey string = ‘<Workspace Key>’ // Provide Log Analytics Workspace Shared Key
param inventoryImage string = ‘<Image Name>’ // Provide the image name without the ACR name prefix, example: ‘inventory:v1’
param eventsImage string = ‘<Image Name>’ // Provide the image name without the ACR name prefix, example: ‘events:v1’
param productsImage string = ‘<Image Name>’ // Provide the image name without the ACR name prefix, example: ‘products:v1’
// Assign AcrPull permission
module roleAssignment ‘roleassignment.bicep’ = {
name: ‘container-registry-role-assignment’
scope: resourceGroup(‘<RG Name>’) //Replace Value
params: {
roleId: ‘7f951dda-4ed3-4680-a7ca-43fe172d538d’ // AcrPull
principalId: userManagedIdentity.properties.principalId
registryName: acrName
}
}
// Azure Container Apps Environment
resource containerAppEnvironment ‘Microsoft.App/managedEnvironments@2023-05-01’ = {
name: environmentName
location: location
properties: {
appLogsConfiguration: {
destination: ‘log-analytics’
logAnalyticsConfiguration: {
customerId: logAnalyticsCustomerId
sharedKey: logAnalyticsSharedKey
}
}
daprAIConnectionString: ‘<App Insights Connection String>’
}
}
6. Deploy Bicep template
Ensure you are on /infra and run (replace with your resource group name you created previously):
az deployment group create –resource-group <RG_Name> –template-file aca.bicep
To tidy up, delete the resource group later on
az group delete –n <RG_Name> –yes
7. Test the Application
You should now have 3 Azure Container Apps running each with their unique URL.
Use Postman or any HTTP/s client to simulate these requests:
1. Getting a list of Products: GET /
2. Updating a specific product Inventory (with ID 1 in this example): POST /1/inventory {“amount”: “2”}
Analysis
You should now be able to view the collected logs, metrics, and traces on Azure Application Insights (leveraging Azure Log Analytics under the hood). Here’s an overview of what you can leverage
Azure Application Map: Remember, there’s a reason we’re collecting traces from our applications. It’s because with services like Azure Application Map looking at trace IDs, it can map out the entire journey of the request. We can easily identify where the bottleneck is.
2. Investigating Failures: This is a view that takes advantage of the logs, metrics, and traces we collect and focuses on failures (400s & 500s status codes) & exceptions.
3. Investigating Performance: A view focused on performance, grouping requests by duration.
4. Querying collected telemetry:
5. Setting up Availability Tests:
6. Setting up Alerts
Practical Example of Finding the Root Cause on Azure Container Apps
We’ve done the hard work and set everything up. How do we now, moving forward, practically find the root cause assuming we’re facing an issue?
Here’s a straightforward guide to follow:
Alert fired: First off, it’s key to have your alerts set up correctly. Make sure you’ve defined clearly what situations should trigger an alert.
Dashboards: When an alert goes off, it’s just a starting point. Let’s say it’s about slow response times. Our users are experiencing delays, but in a complex system, where do we start troubleshooting? This is where well-designed dashboards come into play. Begin with dashboards that focus on customer experience — how they interact with your services, what works, and what doesn’t. This is the kind of dashboard you’d share with your business team. Then, drill down to the system’s entry points like the UI or frontend, and then to the backend. Azure Monitor provides pre-built dashboards through Azure Workbooks: Azure Workbooks overview — Azure Monitor | Microsoft Learn
Application Map: With the insights gained from the dashboards about the alert, it’s time to leverage the traces we’ve collected. The Application Map, which shows how services communicate with each other, will pinpoint exactly where the issue lies.
Specific Logs & Metrics: Once we’ve identified the problematic component or service, we focus on its specific logs and metrics, moving beyond the general dashboards. Logs offer a deeper dive than metrics, providing more layers of information (known as dimensions). They allow us to dissect the data through queries for more precise analysis.
Conclusion
To wrap things up, it’s crucial to have a solid observability strategy for Azure Container Apps. This approach arms your engineers with the necessary insights to quickly address customer issues, leading to happier customers.
Remember, observability doesn’t have to be a complex affair. There are tools available to simplify the process, but the key is having the right strategy. Hopefully, this blog post has provided you with a solid foundation to develop your observability strategy for Azure Container Apps.
Microsoft Tech Community – Latest Blogs –Read More
Monthly news – February 2024
Microsoft Defender XDR
Monthly news
February 2024 Edition
This is our monthly “What’s new” blog post, summarizing product updates and various new assets we released over the past month across our Defender products. In this edition, we are looking at all the goodness from January 2023.
Legend:
Product videos
Webcast (recordings)
Docs on Microsoft
Blogs on Microsoft
GitHub
External
Improvements
Previews / Announcements
Microsoft Defender XDR
Protect faster with Microsoft Defender XDR’s latest UX enhancements. To help SOC teams protect faster, we are excited to share the general availability (GA) of the most recent user experience (UX) enhancements within Microsoft Defender XDR to improve efficiency and deliver an intuitive, smooth experience throughout the incident triage, investigation, and threat hunting processes for the SOC teams.
This includes the following enhancements:
New functionality in the incident queue’s available filters is now generally available. Prioritize incidents according to your preferred filters by creating filter sets and saving filter queries. Learn more about incident queue filters in Available filters.
Defender for Cloud alerts integration with Defender XDR is now generally available. .
Activity log is now available within an incident page. Use the activity log to view all audits and comments, and add comments to the log of an incident. For details, see Activity log.
(Preview) Query history in advanced hunting is now available. You can now rerun or refine queries you have run recently. Up to 30 queries in the past 28 days can be loaded in the query history pane.
(Preview) Additional features you can use to drill down further from your query results in advanced hunting are now available.
Effective January 15th, 2024, the integration of multi-cloud alerts, signals, and asset information from Microsoft Defender for Cloud into Microsoft Defender XDR has been made generally available (GA). Learn more about the integration in Microsoft Defender for Cloud in Microsoft Defender XDR
Microsoft Defender Threat Intelligence: Introducing Automatic File and URL (Detonation) Analysis. New enhancements to the file and URL analysis (detonation) capabilities in the threat intelligence blade within the Defender XDR user interface.
Microsoft Security Experts
Defender Experts for XDR now lets you receive managed response notifications and updates using Teams. You can also chat with Defender Experts regarding incidents where managed response is issued. Fore more information visit our documentation.
Experience Defender Experts newest updates. This blog highlights our newest updates that enable you to experience Defender Experts above the fold, giving you more visibility into what our experts are doing on your behalf.
Security Analyst Profile: Arlette Umuhire Sangwa. In our ongoing Defender Experts for XDR blog series, in this post we introduce you to Arlette Umuhire Sangwa, a dedicated and insightful analyst on the Defender Experts for XDR team. Arlette’s role involves analyzing and recommending remediations to customers, leveraging the extensive telemetry from various Microsoft Defender suites of products.
Test your configurations and experience Defender Experts Notifications early.
We have released the Sample Defender Experts Notification feature which will enable customers to:
Get the Defender Experts Notification experience earlier than when the actual Defender Experts Notification is sent by our experts upon detecting malicious activities in their environment.
Test the email notifications configuration done by customers for Defender Experts Notifications.
Test the playbooks/rules set up in SIEM/SOC tools for Defender Experts Notifications.
Defender Experts’ recommendations for impactful security posture management. This blog post discusses some of the security controls and configurations the Defender Experts’ find most impactful in the real world.
Microsoft Defender for Endpoint
Dynamic rules for tagging devices is now generally available. This feature enables security teams to create and manage rules that automatically assign and remove tags from devices based on user-defined criteria directly in the Microsoft Defender portal.
Revised Device Control Documentation and Samples. This repository contains samples and resources for Defender for Endpoint Device Control for Windows and Defender for Endpoint Device Control for Mac
Microsoft Defender for Identity
Identity in focus: Exploring the new ITDR experience within Microsoft Defender. This blog discusses some new enhancements to how our customers can find and engage with their Identity security capabilities.
ITDR Dashboard
Introducing the new PowerShell Module designed to help further simplify the deployment and configuration of Defender for Identity. This tool will make it easier than ever to protect your organization from identity-based cyber-threats. Stay tuned, we will cover this topic in one of the upcoming Ninja Show episodes!
In this video John Savil explores bring signals in from our Active Directory into our complete Identity Threat Detection and Response solution!
You can now view Active Directory group entity-related activities and alerts from the last 180 days in Microsoft Defender XDR, such as group membership changes, LDAP queries and so on.
To access the group timeline page, select Open timeline on the group details pane.
For more information, see Investigation steps for suspicious groups.
Microsoft Defender for Cloud Apps
Defender for Cloud Apps now supports SaaS security posture management (SSPM) across multiple instances of the same app. For example, if you have multiple instances of AWS, you can configure Secure Score recommendations for each instance individually. Each instance will show up as a separate item on the App Connectors page.
For more information, see our documentation: SaaS security posture management (SSPM).
All public preview customers will no longer be able to toggle off the automatic redirection from Defender for Cloud Apps classic portal to Microsoft Defender XDR portal. Learn more here.
Defender for Cloud Apps Webinar | App Governance in Defender for Cloud Apps: What You Need to Know to Enhance Your Cloud Security Posture
(Preview) Limitation removed for the number of files that can be controlled for uploading in session policies. Session policies now support control over uploading folders with more than 100 files, with no limit to the number of files that can be included in the upload.
For more information, see Protect apps with Defender for Cloud Apps Conditional Access App Control.
Microsoft Defender for Office 365
Train your users to be more resilient against QR code phishing. In partnership with Fortra’s Terranova Security, we have launched two new QR code phishing training modules aimed at educating users against QR code-based phishing attacks.
Printed QR Codes on a poster
The Attack Simulation Training Write API functionality is now generally available (GA).
Learn more about LinkedIn Smart Link Phish Campaigns. Microsoft Defender for Office 365 security research team has observed a rise in the LinkedIn Smart Link phishing campaign. LinkedIn Smart Links are used by LinkedIn business accounts to deliver content and track user content engagements through the LinkedIn Sales Navigator. In this post you can learn more about TPT (Tactics, Techniques and Procedure) behind these LinkedIn Smart link phishing campaigns.
Providing intent while submitting is now generally available: Admins can identify if they’re submitting an item to Microsoft for a second opinion or they’re submitting the message because it’s malicious and was missed by Microsoft. With this change, Microsoft analysis of admin submitted messages (email and Microsoft Teams), URLs, and email attachments is further streamlined and results in a more accurate analysis. Learn more.
Microsoft Defender Vulnerability Management
Vulnerable Components Inventory now in public preview. We are introducing a dedicated inventory that lists known vulnerable software components found in the organization. This inventory, along with a new security recommendation, improves visibility of vulnerabilities found within software components, such as open-source libraries. Also more information in our docs.Vulnerable Components Inventory
Blogs on Microsoft Security
Midnight Blizzard: Guidance for responders on nation-state attack. The Microsoft security team detected a nation-state attack on our corporate systems on January 12, 2024, and immediately activated our response process to investigate, disrupt malicious activity, mitigate the attack, and deny the threat actor further access. The Microsoft Threat Intelligence investigation identified the threat actor as Midnight Blizzard, the Russian state-sponsored actor also known as NOBELIUM.
Join us at InfoSec Jupyterthon 2024. We’re inviting the community of analysts and engineers to join us at InfoSec Jupyterthon 2024. This online event, to be held on February 15-16, 2024, serves as an opportunity for infosec analysts and engineers to meet and engage with security practitioners using notebooks in their daily work. It is organized by our friends at Open Threat Research, together with folks from the Microsoft Threat Intelligence community.
New TTPs observed in Mint Sandstorm campaign targeting high-profile individuals at universities and research orgs. Since November 2023, Microsoft has observed a distinct subset of Mint Sandstorm (PHOSPHORUS) targeting high-profile individuals working on Middle Eastern affairs at universities and research organizations in Belgium, France, Gaza, Israel, the United Kingdom, and the United States. In this campaign, Mint Sandstorm used bespoke phishing lures in an attempt to socially engineer targets into downloading malicious files. In a handful of cases, Microsoft observed new post-intrusion tradecraft including the use of a new, custom backdoor called MediaPl.
Microsoft Threat Analytics Reports (access to the Defender XDR portal needed)
Activity profile: New TTPs observed in ongoing Mint Sandstorm campaign. In this campaign, Mint Sandstorm used bespoke phishing lures in an attempt to socially engineer targets into downloading malicious files. In a handful of cases, Microsoft observed new post-intrusion tradecraft including the use of a new, custom backdoor called MediaPl.
Actor profile: Ruby Sleet. The actor that Microsoft tracks as Ruby Sleet (CERIUM) is a nation-state threat actor based out of North Korea. Ruby Sleet is known to primarily target defense-related organizations as well as IT service providers to access downstream targets.
Technique profile: Malicious scheduled task creation. Threat actors take advantage of living-off-the-land binaries (LOLBins) to manipulate scheduled tasks by using schtasks.exe. While scheduled tasks are most often used to maintain persistence on a compromised device, threat actors also leverage scheduled tasks to elevate privileges and permissions by running a malicious process under a different account.
Activity profile: Smoke Sandstorm new lures used to deliver SnailResin and SlugResin. Since January 2024, Microsoft has observed Smoke Sandstorm, an Iranian nation state actor, posing as members of the Bring Them Home Now campaign, a movement advocating for the return of individuals taken hostage by Hamas. In this campaign, Smoke Sandstorm attempted to deliver a SnailResin loader followed by SlugResin, a new variant of the BassBreaker backdoor, to Israelis working for organizations in the global payment systems, oil and energy, IT, and semiconductors sectors.
Actor profile: Opal Sleet. The threat actor Microsoft tracks as Opal Sleet (OSMIUM) is based out of North Korea and targets organizations and individuals with an interest in or connection to North Korea since 2014. Opal Sleet is known for using spear phishing attacks against specific individuals affiliated with diplomacy and international relations, non-government organizations, universities, and government partnerships by sending weaponized documents related to Korean Peninsula activities or geopolitical issues.
Actor profile: Jade Sleet. The threat actor Microsoft tracks as Jade Sleet (formerly Storm-0954) is a threat actor operating on behalf of North Korea that primarily targets organizations and individuals managing cryptocurrency for financial gain. Jade Sleet has also been observed compromising Russian targets for cyberespionage or corporate theft, and conducting social engineering campaigns targeting the personal accounts of employees at blockchain, cryptocurrency, cybersecurity, or online gambling companies.
Technique profile: Kerberos attacks. Kerberos authentication is a widely used methodology designed to secure access to network resources. However, threat actors often seek to manipulate such protection measures to conduct attacks.
Microsoft Tech Community – Latest Blogs –Read More


