

Tag Archives: microsoft
Partner Blog | What’s new for Microsoft Partners: January 2024 edition
Written by Andrew Smith, General Manager, Partner Program Management
AI and other emerging technologies continue to revolutionize our industry, pushing the boundaries of what is possible and surfacing new customer priorities. As you strategize for the year ahead, membership in the Microsoft AI Cloud Partner Program connects you to tools, resources, and potential collaborators to advance your business in the direction of your goals. Stay up to date on the latest program offerings with this summary of the top stories from the past few months:
Continue reading here
Microsoft Tech Community – Latest Blogs –Read More
Customer review: AnnounceBot connects teams by celebrating birthday and work anniversary events
AnnounceBot Automated and Personalized Greetings, a solution published to Microsoft AppSource, helps companies celebrate special occasions like birthdays, work anniversaries, and welcoming new hires. With minimal setup and no calendars or manual work, AnnounceBot increases engagement, collaboration, and retention.
Microsoft interviewed Stephen Cornell, Service Director, Protected Trust, to learn what he had to say about the app.
What do you like best about AnnounceBot?
We absolutely love how easy AnnounceBot is to use! It is user-friendly, and setting it up was quick. Before using AnnounceBot, social media was our only way to track birthdays, which means some folks got left out. And work anniversaries were out of the picture. Since we started using AnnounceBot, we have never missed a birthday or work anniversary. It’s all automatic now.
How has AnnounceBot helped your organization?
Keeping the team engaged became challenging when we transitioned into working remotely. AnnounceBot helped us rebuild team connections by providing a centralized system to celebrate special events. Now, everyone engages in birthday and work anniversary posts, makes jokes, and tells stories about times we were all together in an office. It is a small gesture that has made a big difference in our company culture.
How is customer service and support?
I wanted to know how to check birthdays that are getting tracked. The support team responded within an hour and provided the information I needed.
Any recommendations or insights for other users considering AnnounceBot?
My suggestion would be to set it up in a small team first, just to get the hang of it. Test it out there before you go big and use it for the whole organization.
On a scale from 1 to 5 (5 being the highest), what is your overall rating for this AnnounceBot?
I would give AnnounceBot a 4.5 only because I think they should support Microsoft Entra ID (formerly Azure Active Directory) integration to make birthdate and joining date collection even smoother.
Microsoft Tech Community – Latest Blogs –Read More

How to create linked servers from SQL managed instance using Entra Authentication (part 1)
Lately, we have seen some customers interested on the options available to use linked servers from Managed Instance and using Entra Authentication (formerly Azure Active Directory). It is certainly possible to create Linked Servers on SQL Managed instance (SQL MI) to connect to other PaaS databases such as other SQL MIs, Azure SQL Databases or Synapse databases using Entra Authentication.
At the time of writing, we support 2 specific use cases. Here you will find the official article. These scenarios are the following.
SQL Managed Instance linked server with managed identity Microsoft Entra authentication.
SQL Managed Instance linked server with pass-through Microsoft Entra authentication.
Let’s explore the first option in this article. We will explore the other scenario in a future one.
I will use a SQL managed instance named “azuresqlmi2” and an Azure SQL Server named “lacsql”
Using Managed Identity. Here are the steps on the official documentation.
One of the prerequisites that we will need is to create a managed identity on our source SQL Managed Instance. So, we can go to the SQL MI blade on the Azure portal and activate the system managed identity. You can also perform this step with Azure PowerShell or Azure CLI.
In my scenario, I will create a linked server to an Azure SQL Database.
Another prerequisite is that I will need to allow outbound traffic on my SQL MI’s network security group (NSG). I will use the Azure SQL service tag to simplify this task. You can read more about service tags here.
Another prerequisite is to ensure that the SQL MI has configured an Entra Admin.
First, I created a contained user on the Azure SQL database that points to the managed identity of the SQL MI managed identity. I chose a contained user that makes my DB more portable in case I need to move it to a different server. In my case the user database is named “epdb2”.
CREATE USER [azuresqlmi2] FROM EXTERNAL PROVIDER;
The next step is to execute the sp_addlinkedserver store procedure to create the linked server. One of the critical arguments for this SP is the “provstr” parameter. This is basically the connection string to our SQL Database. In this case I will add the Database keyword to the connection string to make a direct connection to the Azure SQL database and not to the Azure SQL (logical) server. As we are mostly interested in querying data for a particular database. In my case the DB is named “epdb2”.
EXEC master.dbo.sp_addlinkedserver
@server = N’MSILinkedServer’,
@srvproduct = N”,
@Provider = N’MSOLEDBSQL’,
@provstr = N’Server=lacsql.database.windows.net,1433;Database=epdb2;Authentication=ActiveDirectoryMSI;’;
The name of my linked server is “MSILinkedServer” and it is using the OLEDB provider. Notice how I also specified the Authentication keyword and set its value to “ActiveDirectoryMSI”.
The next step is to create a mapping of a login on the SQL Managed Instance (source) and the user account I created on my SQL Database (target). We do this by executing the store procedure sp_addlinkedsrvlogin. The documentation states that “Consider optionally using @locallogin = NULL to allow all local logins”.
I was interested to explore more on how that option works. I decided to first test this option setting a specific login “lu***@microsoft.com” that existed on my SQL MI which has a membership on the sysadmin server role. “Useself” is a parameter that has to be set to false when using managed identity authentication.
EXEC master.dbo.sp_addlinkedsrvlogin
@rmtsrvname = N’MSILinkedServer’,
@useself = N’False’,
@locallogin = N’lu***@microsoft.com’;
The next thing was to test the linked server. So, I connected to my SQL MI login as the account lu***@microsoft.com and tested the linked server.
Then I decided to log into the SQL MI using a different account and I tried to use the linked server. I received the following error when using a SQL authentication account named “miadmin”.
Why did we receive an error?
Remember that when we ran the sp_addlinkedsrvlogin stored procedure we did a hard coded mapping of lu***@microsoft.com as the local login. Then I decided to recreate the linked server but this time as the documentation mentions I will set the locallogin parameter to NULL to allow all local logins to use the linked server.
EXEC master.dbo.sp_addlinkedsrvlogin
@rmtsrvname = N’MSILinkedServer’,
@useself = N’False’,
@locallogin = NULL;
I logged into my SQL MI using the SQL authentication account that I used previously and this time the query execution was successful.
I executed the query below on my Azure SQL Database to identify the session id that was created to run the remote the remote query.
SELECT
s.session_id,
auth_scheme,
client_net_address,
login_time,
[host_name],
client_interface_name,
nt_domain AS [TenantID],
nt_user_name AS [ApplicationId],
login_time,
connection_id
FROM
sys.dm_exec_connections AS c
INNER JOIN sys.dm_exec_sessions AS s ON c.session_id = s.session_id
WHERE
program_name = ‘Microsoft SQL Server’
AND
auth_scheme != ‘SQL’
On the next installment of this short series, we will explore more about how to use the pass-through Microsoft Entra authentication.
Microsoft Tech Community – Latest Blogs –Read More

Partner Spotlight: Harnessing the Power of AI to Unlock Growth, with AffableBPM
As part of the Microsoft #BuildFor2030 Initiative, in support of the United Nations Sustainable Development Goals, we’re continuing to highlight solutions that are enabling broader societal impact, and our partners’ journeys growing their business on the marketplace. In this edition, I sat down with AffableBPM Founder and CEO Rajashree Varma to learn more about their story and partner journey. AffableBPM is a winner of the “Rising B2B Startup” award by Women in Cloud (WIC), and Rajashree has also been recognized as a WICxTop100 Founder.
About Gena: Gena Goh is the Partner Advisory & Inclusive Growth Senior Strategy Lead with the Global Partner Solutions business at Microsoft. She focuses on developing strategies that elevate the voice of partner and enable partners to innovate and build solutions toward a more inclusive economy, including leading the Microsoft #BuildFor2030 Initiative. Gena is also a professionally trained co-active coach and enjoys helping people and organizations chart new paths to purpose and impact.
About Rajashree: Raj is a serial entrepreneur with 20+ years of deep passion for technology and business leadership who brings proven track record of success in all aspects of business formation, innovative solutions, sales, strategic channels, operation, finance, management, fund raising, acquisition and exit strategies.
___________________________________________________________________________________________________________________________________
[GG]: Tell us about AffableBPM and its mission. What inspired the founding?
[RV]: AffableBPM is an AI-enabled SaaS solution that automates manual processes for healthcare back-offices, that increases efficiency, minimizes compliance risks, and improves decision-making with unified data in the cloud. We help to reduce the huge cost involved in back office administrative processes, delivering faster ROI for our customers, and ultimately influencing the cost of patient care in the USA We are a HIPAA compliant solution on Microsoft Azure, that provides secure digital transformation to our customers.
I love leveraging technology to solve business problems. I come with my Microsoft experience and background, and also previously owned a consulting business focused on Microsoft stack and Cosell. Following its acquisition by Xoriant, we grew the Microsoft Cosell business into a double-digit multi-million-dollar venture. I then co-founded this company with Linda Roberson and Linda brings with her extensive executive experience in healthcare. Together, we contribute complementary skills to AffableBPM.
[GG]: Can you tell us a bit about the application(s) you have available on the marketplace? How does it work?
[RV]: AffableBPM provides two versions, AffableBPM Enterprise and AffableBPM Express, catering to organizations of all sizes for streamlined business process automation. AffableBPM Enterprise is designed for larger enterprises requiring customizable workflows, while AffableBPM Express is ideal for small businesses seeking to automate specific workflows. Additionally, AffableBPM offers AI-enabled plugins to enhance accuracy in data entry for documents like contracts and invoices, ultimately boosting efficiency.
These offerings are conveniently accessible on the Microsoft Azure Marketplace as transactable offers. By choosing Microsoft’s marketplace for AffableBPM purchases, customers gain access to a trusted platform that seamlessly integrates with AffableBPM’s offerings. This ensures security, compliance, and efficient licensing and billing capabilities. Opting for Microsoft’s marketplace not only expands AffableBPM’s global reach but also provides you with straightforward options to manage subscriptions, licenses, and payments effortlessly.
[GG]: How has Microsoft supported you along your marketplace journey through ISV Success?
[RV]: ISV Success helped us understand various options available to publish our solutions on marketplace. The benefits provided like Azure credits and development tool licenses came handy in conducting POC on various Azure Services we had planned to evaluate. Overall, the support received through tools and consultations helped us expedite publishing our solutions to the marketplace. Adding AI makes the workflow automation even more efficient and productive to really help our clients. It can speed up our growth as well as our clients. We achieve this by using tools like Azure Form Recognizer, Copilot, and ChatGPT in our solution. That brings power of AI to our healthcare customers. Being in ISV Success has given us technical guidance from Microsoft experts, enabling us to effectively use AI technologies. This support has been crucial in resolving any challenges during our development and in building an AI-enabled team for us.
[GG]: What was your experience publishing a transactable app on the marketplace and what benefits did it bring?
[RV]: Initially, setting up transactable offers, particularly through the marketplace, seemed overwhelming. However, with valuable assistance from Microsoft ISV Success consultants, we successfully streamlined the technical integration process. This involved utilizing accelerators such as Mona, the Marketplace Onboarding Accelerator. Mona is designed to facilitate the rapid onboarding of transactable SaaS solutions to Azure Marketplace and AppSource for ISV partners. Mona incorporates lightweight, reusable code modules deployed in our Azure subscription, along with low/no-code integration templates featuring Azure Logic Apps. The transactable offer significantly improved the management of billing for our SaaS customers. Additionally, the provided APIs played a crucial role in automating the provisioning process by capturing changes in subscription status and add-ons. This collaborative effort ensured a smoother and more efficient set-up for our transactable offers.
[GG]: What Microsoft cloud products did you use in your app development, and how did you decide to use those products?
[RV]: AffableBPM’s SaaS solution, developed on the complete Microsoft stack, allows us to leverage cross-cloud products, ensuring a customer-centric approach and address diverse customer use-cases. We utilize Azure services such as Azure App Service, Azure Virtual Machine, Azure Application Gateway, Azure AI services (Document Intelligence), Azure Logic Apps, Azure BCDR, Azure HIPAA Blueprint and Power BI. To assess the cloud products available, we conducted Proof of Concepts. The ISV Success teams offered valuable technical consultations, enabling us to grasp best practices and pitfalls of these products. This guidance helped us identify the most suitable options for our business use case. We are further in evaluation to assess integration with Microsoft Teams and Dynamics 365. By leveraging the Microsoft stack, we don’t have to do everything on our own and can go to market faster. Partnering with a hyperscaler like Microsoft is a great way to boost sales, leveraging their credibility to expand our business.
[GG]: AffableBPM was recognized as a Women in Cloud WICxTop 100 Founder and your support for ESG efforts. Can you share how you’re aligning your business and solutions with the UN SDGs?
[RV]: We’re a proud member of Women in Cloud and appreciate its recognition as a WICxTop100 Founder and Rising B2B Startup. Our company is committed to bring scalability and reliability to corporates to support long-term resource efficiency and sustainability of business processes in support of the UN SDGs. AffableBPM can help make an impact on several areas of UN SDGs aligned to sustainability and industry innovation, such as Goal 9: Industry Innovation and Infrastructure (Goal 9.4: increasing resource-use efficiency and sustainable industrial processes).
AffableBPM offers healthcare back-offices an opportunity to optimize their processes digitally, eliminating inefficiencies and reducing the carbon footprint by storing the data in a centralized location on the cloud. Our solution facilitates digital hosting of documents, seamless remote collaboration, and rapid contractual processes, all contributing to enhanced resource efficiency and reduction of waste.
Beyond digitalization of manual back-office processes, AffableBPM ensures a HIPAA compliant environment, and delivers prompt ROI using its AI enabled capabilities. Currently, the platform manages contracts worth over multibillion USD, drawing insights, saving costs, and elevating ROI, which supports reducing the cost of patient care.
Additionally, we believe that AI could be just the ticket to accelerate digital transformation in healthcare. Enabling AI in our core SaaS solution brings higher efficiency and productivity to our customers in the healthcare Industry to free up their valuable time to focus on providing patient care instead of manual administrative processes. While AffableBPM is currently serving many esteemed nonprofit healthcare providers and educational institutes, it has applicability across multiple industries, due to its flexible architecture for automating backend office operations.
[GG]: Indeed, we’re excited for how AI can help accelerate digital transformation across industries. How is AffableBPM leveraging or planning to leverage AI in app development to enhance the value of your product?
[RV]: We are excited to be developing multiple product features leveraging AI services:
AffableBPM Data Importer: This feature utilizes the Document Intelligence module in Azure AI services, automating metadata recognition in documents such as invoices and insurance policies. By leveraging the Document Intelligence module, the solution ensures accurate extraction of key information, reducing errors, and streamlining processes. It also seamlessly integrates with Lexmark printers and is certified for co-selling with Lexmark.
Guardian Chatbot Copilot for Help Docs: The company is exploring the use of Azure OpenAI Copilot with generative AI and prompt flow to develop an integrated help chatbot. In collaboration with Microsoft ISV Services, this chatbot aims to streamline access to relevant product-related help and currently, a Proof of Concept (POC) is underway.
AffableBPM Data Simplifyer: Developing a generative AI for data format matching, we leverage Azure NLP to further simplify data, particularly in standardizing claim data. Future plans involve converting or obtaining HL7 data for mapping into Azure Health Data Services, ensuring adherence to standard formats like FHIR.
AffableBPM Process Mining: In alignment with our AI strategy, we utilize Power Automate process mining to uncover relationships between different customer-created business process workflows. This approach aims to extract higher business-centric analytics, bridging the gap between independently operating workflows for enhanced business insights.
[GG]: Collaboration across the industry and Microsoft partner ecosystem is so valuable in addressing customer needs. Can you share more about your business partnerships? How are these partnerships beneficial to accelerating app adoption?
[RV]: Within the Microsoft ecosystem, Lexmark is a significant player, and AffableBPM has established a strategic partnership with Lexmark to integrate the AffableBPM Data Importer solution into their smart multi-function printers. In such instances, we are considering the implementation of Multi-Party-Offer (MPO) to facilitate transactions through the Azure Marketplace. Furthermore, AffableBPM collaborates with non-Microsoft Managed Service Providers (MSP) or resellers who actively refer leads to us. These referrals contribute to MPO deals via the marketplace, expanding our reach beyond Microsoft affiliations. This approach ensures a diverse network of partnerships and transactions, enhancing the accessibility and adoption of the AffableBPM solution in various business ecosystems.
Microsoft Tech Community – Latest Blogs –Read More

Scan Microsoft Fabric Items in Microsoft Purview
Previously we have announced the Public preview for Microsoft Fabric Items in Microsoft Purview and starting from December 13th 2023, scanning Fabric tenants registered with the Fabric data source in Microsoft Purview will capture metadata and lineage from Fabric items including Power BI. The new feature is available in all Microsoft Purview public cloud regions.
There are no additional configuration steps needed to enable scanning Fabric items besides Power BI for existing scans. To create a new scan, the experience of registering a Fabric tenant and setting up the scan is similar to the Power BI tenant and shared among all Fabric items. You can start by registering your Fabric tenant by following the guidance Connect to your Microsoft Fabric tenant in the same tenant as Microsoft Purview (Preview) or Connect to your Microsoft Fabric tenant from Microsoft Purview in a different tenant (Preview).
Figure 1: Example of registering a data source
Figure 2: Searching for demos in Microsoft Purview
Figure 3: Example of a demo report
Supported Fabric items in scan
Experiences
Fabric items available in scan
Real-Time Analytics
KQL Database
KQL Queryset
Data Science
Experiment
ML Model
Data Factory
Data pipeline
Dataflow Gen2
Data Engineering
Lakehouse
Notebook
Spark Job Definition
SQL analytics endpoint
Data Warehouse
Warehouse
Power BI
Dashboard
Dataflow
Datamart
Semantic model (Dataset)
Report
Paginated report
Known limitations
For all Fabric items besides Power BI:
Only item-level metadata and lineage will be captured, scanning metadata and lineage of sub-level items like Lakehouse tables or files isn’t supported.
Scanning with a self-hosted integration runtime isn’t supported.
Additional Resources:
Learn more about how to get lineage from Microsoft Fabric items into Microsoft Purview
Microsoft Tech Community – Latest Blogs –Read More
Generally Available: VMware Cloud Director Availability for Azure VMware solution with Run commands
Generally Available: VMware Cloud Director Availability for Azure VMware solution with Run commands
Today we are announcing the general availability for VMware Cloud Director Availability, a Disaster Recovery as a Service (DRaaS) solution on Azure VMware Solution.
An added benefit is the simplicity it brings to the deployment. Customers can effortlessly deploy and configure VMware Cloud Director Availability in the Azure VMware Solution cloud site using Run commands, streamlining the process with full automation, and eliminating the need for manual intervention.
VMware Cloud Director Availability can be used to migrate and protect virtual machines, vApps and templates to and from Azure VMware Solution Cloud Director Service site. Azure VMware solution integrates with the classic Data Engine of VMware Cloud Director Availability. This Host-based replication engine not only supports migration but also caters to Disaster Recovery scenarios, making it a comprehensive solution for various use cases.
This blog delves into key aspects of VMware Cloud Director Availability integration with Azure VMware Solution and its role in enhancing disaster recovery and workload migration.
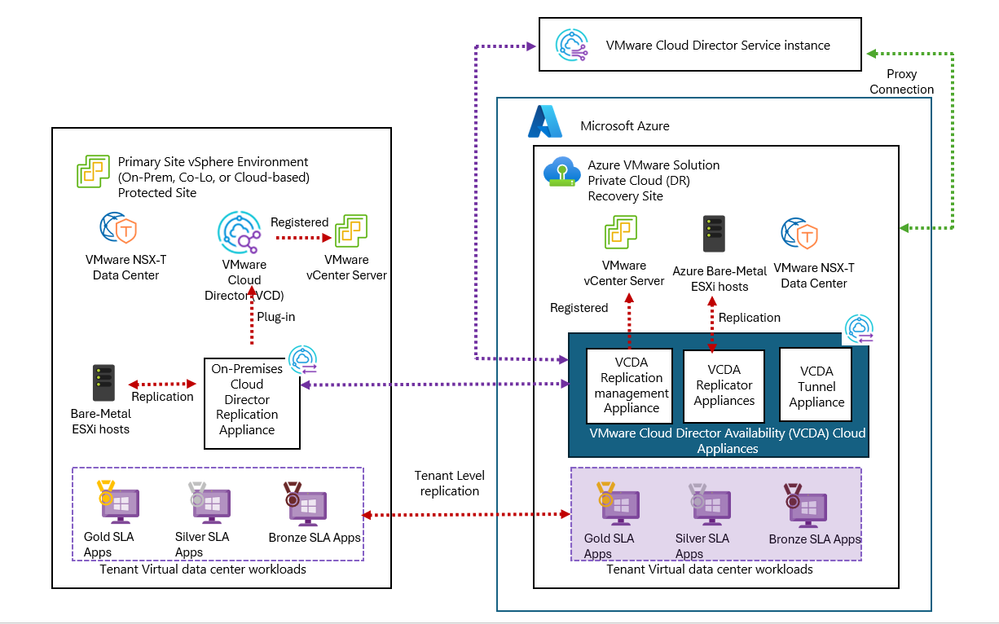
Architecture of VMware Cloud Director Availability in Azure VMware Solution
The VMware Cloud Director Availability installation in Azure VMware Solution cloud site consists of one Replication management appliance (Manager), one Tunnel Appliance, and two Replicator Appliances. You can deploy additional replicator virtual machines by using Run command for adding replicator.
Replication Manager is responsible for communication with VMware Cloud Director, identifying resources like Organization Virtual Datacenter, storage policies, datastores, and networks. It also plays a pivotal role in determining eligible vApps/VMs and facilitating UI/API interfaces.
Cloud Replicator is responsible for transferring replication data to/from ESXi hosts in the cloud.
Tunnel appliance serving as the single-entry point for managing traffic. It handles both data and management traffic and forwards it respectively to cloud replicators and manager.
The On-Premises Cloud Director Replication Appliance is deployed in the tenant’s on-premises data center, this appliance establishes a pairing relation with VMware Cloud Director Availability in the cloud. It enables the protection and migration of VMs between on-premises and the cloud.
Below is an architecture diagram showing the On-Premises Cloud Director Replication Appliance paired with VMware Cloud Director Availability instance in Azure VMware Solution. For simplicity, two replicator appliance instances on the Azure VMware Solution site are depicted as a unified entity.
Figure showing VMware Cloud Director Availability appliances deployed in cloud and on-premises site.
Run commands for VMware Cloud Director Availability
Run commands in Azure VMware Solution let you perform operations that would normally require elevated privileges through a collection of PowerShell cmdlets.
In Azure VMware Solution, providers now have the capability to execute VMware Cloud director Run commands for various actions, including the installation or deletion of a VMware Cloud Director Availability instance, taking, and deleting appliance snapshots, repairing the Replicator Appliance or the vCenter Server Lookup service, and resetting passwords for the service account or the root user of the appliances. Run command empowers administrators to perform a range of administrative actions seamlessly within the VMware Cloud Director Availability instance in Azure VMware Solution.
To learn how to use each run command, see VMware Cloud Director Availability Run command glossary
How to Install and configure VMware Cloud Director Availability in Azure VMware Solution
In Azure VMware Solution, providers can deploy and configure VMware Cloud Director Availability using Run commands. This approach gives them a fully automated way to deploy and configure VMware Cloud Director Availability appliances in the cloud site.
Below are high-level steps of the installation:
Ensure you have met all the prerequisites as documented.
Login to your Azure portal and navigate to Azure private cloud.
Under Run command, navigate to run command package “VMware.VCDA.AVS” to deploy VMware Cloud Director Availability.
Initialize the VMware Cloud Director Availability cloud site by using the Run command “Initialize-AVSSite”.
Wait for the command to complete successfully. You should see message “Operation completed successfully. “.
Install VMware Cloud Director Availability appliances using “Install-VCDAAVS.”
Fill all required parameters in the run command as shown in the example below.
For detailed information on each of the parameters follow the Installation guide.
Wait for Run command to complete successfully.
Upon successful completion of the Run command, VMware Cloud Director Availability is installed and configured in your Azure VMware Solution private cloud. This includes the setup of essential components such as the Replication Manager, Tunnel Appliance, and two Replicator Appliances.
It’s as simple as this!
Next, you can login to VMware Cloud Director Availability appliances admin UI using SSO authentication with your ‘cloudadmin@vsphere.local’ credentials provided under VMware credentials in Azure portal.
To set up site pairing and start replications, access VMware Cloud Director Availability endpoint and using your Cloud Director Service credentials.
Conclusion
The integration of VMware Cloud Director Availability in Azure VMware Solution through Azure Run commands represents a significant leap forward in the automation of disaster recovery and workload migration solutions. By following the outlined steps and adhering to the prerequisites, enterprise customers can harness the full potential of VMware Cloud Director Availability, bringing a new level of simplicity and efficiency to their cloud strategies.
Learn more
Deploy VMware Cloud Director Availability in Azure VMware Solution – Azure VMware Solution | Microsoft Learn
VMware Cloud Director Availability™ in Azure VMware® Solution
VMware Cloud Director Availability Run command glossary
VMware Cloud Director Availability | Disaster Recovery & Migration | DRaaS
VMware Cloud Director Availability documentation
Concepts – Run Command in Azure VMware Solution (Preview) – Azure VMware Solution | Microsoft Learn
Author Bio
Rosy Dutt, a seasoned Senior Technical Program Manager within Microsoft’s Azure VMware Solution product group, brings a wealth of expertise across enterprise, public cloud, and service provider domains. With a track record of driving digital innovation and mastering business complexities, she navigates the intricate landscape of enterprise and technology architectures. Holding double VCP certifications in data center virtualization and network virtualization, she excels as a Cloud Provider Specialist, demonstrating specialized proficiency in this domain.
Microsoft Tech Community – Latest Blogs –Read More

Using Azure API Management Circuit Breaker and Load balancing with Azure OpenAI Service
Load balance requests to multiple instances of the Azure OpenAI Service using the round-robin load balancing technique. This can help you distribute the load across different resources and regions and increase the availability and performance of your service.
Implement the circuit breaker pattern to protect your backend service from being overwhelmed by excessive requests. This can help you prevent cascading failures and improve the stability and resiliency of your service. You can configure the circuit breaker property in the backend resource, and define rules for tripping the circuit breaker, such as the number or percentage of failure conditions within a defined time interval and a range of status codes indicating failures.
Circuit breaker pattern
name: ‘aoai-backend-1
properties: {
url: ‘https://<openai endpoint>’
protocol: ‘http’
circuitBreaker: {
rules: [
{
failureCondition: {
count: 1
errorReasons: [
‘Server errors’
]
interval: ‘PT10S’
statusCodeRanges: [
{
min: 429
max: 429
}
]
}
name: ‘myBreakerRule’
tripDuration: ‘PT10S’
}
]
}
}
}
Load balance requests to multiple instances of the Azure OpenAI Service
name: ‘aoai-lb-pool’
properties: {
description: ‘Load balance openai instances’
type: ‘Pool’
protocol: ‘https’
url: ‘https://does-not-matter
pool: {
services: [
{
id: ‘/backends/aoai-backend-1’
}
{
id: ‘/backends/aoai-backend-2’
}
]
}
}
}
Limitations
Microsoft Tech Community – Latest Blogs –Read More
How to use Azure Open AI to Enhance Your Data Analysis in Power BI
Data is the new currency of the modern world, and to succeed in this competitive field, you need to master data concepts and tools.
This blog will show you how artificial intelligence (AI), especially Azure Open AI, can transform your data decision-making process within Power BI. Azure Open AI is a cloud-based AI service that uses pre-trained models to generate new content. You can pay for the service with tokens and benefit from features like cloud security and identity management.
Azure Open AI has many applications, including content generation, sentiment analysis, machine translations, and automation. Whether you are a business analyst, a researcher, or a data enthusiast, Azure Open AI can help you achieve your data goals. Join us as we dive into these fantastic possibilities in the next section.
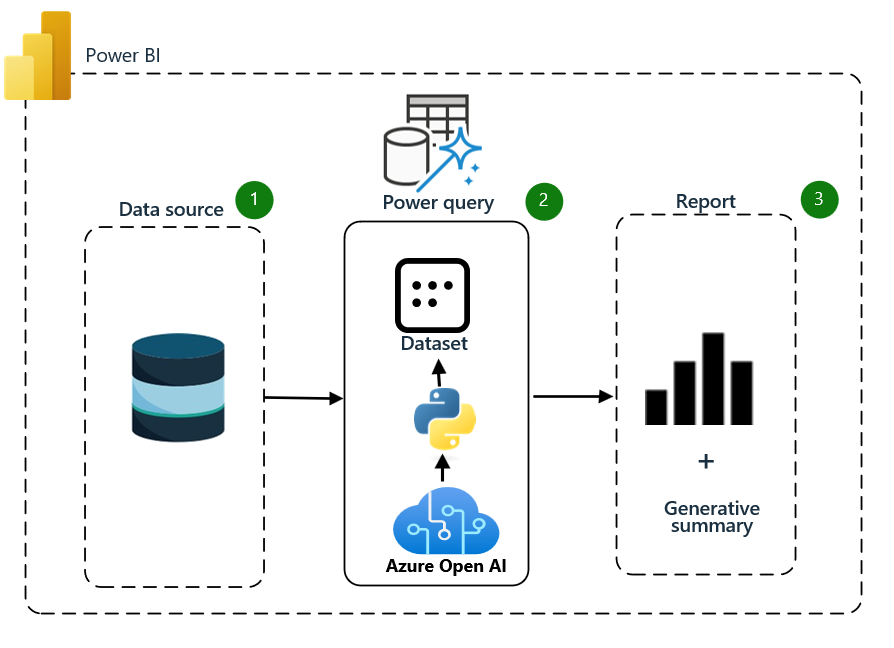
1. Architecture
2. Azure Open AI creation
Creating Azure OpenAI involves a series of steps that build on the principles of Cloud Native architecture. Here’s a simplified guide on how to create Azure OpenAI:
Set up Azure Cloud: Start creating an Azure account if you haven’t already. Sign in to the Azure portal using your Azure account credentials.
Create a Resource: To deploy an Azure service, you must create a resource. A resource represents a service or component in Azure, such as a virtual machine, a storage account, or a database. Click on the “Create a resource” button in the Azure portal.
Select Azure OpenAI Service: You’ll see a list of available Azure services in the resource creation wizard. Choose Azure OpenAI Service by browsing the categories or searching the search bar.
Configure the Resource: Once you’ve selected Azure OpenAI Service, you’ll be taken to a configuration page where you can specify the settings for the resource. Fill in the required information, such as resource name, region, pricing tier, and other relevant settings.
Review and Create: After configuring the resource, review the settings to ensure they are correct. Once satisfied, click the “Review + Create” button.
Validation and Deployment: Azure will validate the configuration settings and check for potential issues. If everything is in order, click the “Create” button to initiate the deployment process.
Monitor the Deployment: Azure will start provisioning the resources based on your configuration. You can monitor the deployment progress in the Azure portal. The deployment may take a few minutes to complete, depending on the service.
Access and Manage the Deployed Service: Once the deployment is finished, you can access and manage the deployed service through the Azure portal. You can view its properties, make changes to its configuration, monitor its performance, and perform other administrative tasks as needed.
3. Azure OpenAI Service Building Blocks
The Azure OpenAI Service Building Blocks are the core components and tools for creating and managing generative AI solutions. They include:
Visual Interfaces: Azure OpenAI Studio and Playground offer user-friendly interfaces for testing, customizing, and deploying AI models without coding.
Development Interfaces: APIs and SDKs enable the integration of Azure OpenAI’s advanced capabilities into any application.
Management Features: Deployments, Content Filters, Models, Data Files, and Quotas, which provide users with control over various aspects of their AI implementations.
In this blog, we will focus on using the Visual Interfaces of the Azure OpenAI Service, namely Azure OpenAI Studio and Playground, which offer user-friendly interfaces for testing, customizing, and deploying AI models without coding.
3.1. Azure OpenAI Studio and Playground
Azure OpenAI Playgrounds are applications within the service that let users interact and customize various AI models, including chat-based models like ChatGPT, non-chat language models, and image generation models. These interfaces simplify generative AI models, especially for non-technical users.
You can access each Playground (and their related management features) from the left panel of the Studio or visit them directly by following URLs linked in the following sections.
3.2. Chat Playground
The Chat Playground is a feature within the Azure OpenAI Studio. It provides an interactive interface for users to test and configure the behavior of the chat-based AI models.
The main components of the Chat Playground include:
Assistant Setup: This area allows users to configure the chatbot’s behavior. Users can choose from templates or create their custom system messages.
Chat Session: The main interaction point between the user and the chatbot. Users can type their queries here, and the chatbot responds accordingly.
Deploy to: This option allows users to deploy their chatbot to a specific platform or environment. Azure OpenAI Studio enables direct deployments of both Azure Web Apps
and Power Virtual Agents.
Configuration: This area provides options to access deployment and session settings. Users can also clear the chat history and manage parameters related to the chatbot’s deployment.
This Playground is handy for developing and refining chatbot applications, as it allows users to test and adjust the chatbot’s performance and responses iteratively.
3.3. Deployments
Deployments provide endpoints to the Azure OpenAI base models, or your fine-tuned models, configured with settings to meet your needs, including the content moderation model, version handling, and deployment size. You can view your deployments from this page, edit them, and create new ones.
4. Retrieve key and endpoint.
You need an endpoint and a key to make a call successfully against Azure OpenAI.
Variable name
Value
ENDPOINT
This value can be found in the Keys & Endpoint section when examining your resource from the Azure portal. Alternatively, you can find the value in the Azure OpenAI Studio > Playground > Code View. An example endpoint is https://xxxxxxxxxx.openai.azure.com/.
5. Python script
We can copy the Python code from the Playground to use our model API in our Python code (JSON and CURL are also available). This code will import the required library and export our parameter settings.
We will also create a Power BI report and use Azure Open AI to generate insights from the data. Before we begin, we need to complete some steps:
Install Python and enable Python in Power BI:
First, install Python if you have not done so already. Please visit the official website (https://www.python.org/downloads/) to download it. We recommend versions 3.9 and 3.10.
Once Python has been installed, enable Python scripting in Power BI. To do so, open Power BI Desktop. Then, click File > Options and go to Settings > Options > Python scripting. Select the checkbox and click OK.
Next, set the Python path in Power BI. Go to File > Options and Settings > Options > Python scripting. Here, click Detect. This selects the Python installation path automatically. You can do this manually by clicking the ellipsis (…) and selecting the Python executable file.
Restart Power BI Desktop for the changes you made to take effect.
Install the SDK with a package manager such as pip:
Pip install openai
2. Now, we need to create a dataset to analyze. Follow these steps:
1. Import your data and choose Transform Data
2. You can check the column quality to see if there is something wrong with data quality or empty cells, which can lead to false insight
3. Add Run Python script to the Applied Steps section.
4. Now, we can run the code in the next section directly into Power BI.
1. To start, import the necessary Python libraries
# Import Libraries
import os
import openai
# Set OpenAI API for Azure
openai.api_type = “azure”
openai.api_base = “https://xxxxxxxxxx.openai.azure.com/”
openai.api_version = “2023-07-01-preview”
openai.api_key = “xxxxxxxxxxxxxxxxxxxxxx”
# Loop through each row in Renamed Columns & concatenate the data into a single string. Pass resulting string to the API
for index, row in Renamed_Columns.iterrows():
messages = [
{
“role”: “system”,
“content”: “For each company, I will give you the followwing information: Company, Price to Earnings, Price to Book, Return to Equity%, Debt to Equity, Current Ratio, Gross Margin%. Then, I will analyze the ratios and write a brief summary using the company name “
},
{
“role”: “user”,
“content”: ”.join([str(col) for col in row])
}
]
# Make a chat completion Request for the API
chat = openai.ChatCompletion.create(
engine = “GPT-35-turbo”,
messages = messages,
temperature = 0.7,
max_tokens = 800,
top_p = 0.95,
frequency_penalty = 0,
presence_penalty = 0
)
# Process the response from API
reply = chat.choices[0].message.content
# Write the response Back to the Report
Renamed_Columns.at[index, “reslt”] = reply
This script runs a Python code that iterates over the Power BI table rows and builds a prompt for ChatGPT using the report data. The prompt is sent to ChatGPT, and the API response is returned to the Power BI DataFrame and table for each row (company).
2. Expanding the table means turning a column with tables inside it into multiple columns and rows. This can help you flatten your data and make it easier to analyze.
6. Build the report with Power BI
In the Power BI desktop, you can use the slicer visual to select the company and the table visual to view the generative insight of the data according to the field you choose.
Congratulations on completing this tutorial blog on How to use Azure Open AI to Enhance Your Data Analysis in Power BI; you have learned how to use Azure Open AI to enrich your data analysis in Power BI. You have discovered how Azure Open AI can create new content based on the dataset using a Python script. Azure Open AI is a versatile tool that can help you leverage your data and make smarter decisions. Whether you are a business analyst, a researcher, or a data enthusiast, Azure Open AI can help you gain data skills and insights. We hope you found this blog helpful and informative.
7. Ressources
Azure OpenAI Service fine-tuning gpt-3.5-turbo – Azure OpenAI | Microsoft Learn
Run Python scripts in Power BI Desktop – Power BI | Microsoft Learn
Visualization types in Power BI – Power BI | Microsoft Learn
Microsoft Tech Community – Latest Blogs –Read More
Customer review: AnnounceBot connects teams by celebrating birthday and work anniversary events
AnnounceBot Automated and Personalized Greetings, a solution published to Microsoft AppSource, helps companies celebrate special occasions like birthdays, work anniversaries, and welcoming new hires. With minimal setup and no calendars or manual work, AnnounceBot increases engagement, collaboration, and retention.
Microsoft interviewed Stephen Cornell, Service Director, Protected Trust, to learn what he had to say about the app.
What do you like best about AnnounceBot?
We absolutely love how easy AnnounceBot is to use! It is user-friendly, and setting it up was quick. Before using AnnounceBot, social media was our only way to track birthdays, which means some folks got left out. And work anniversaries were out of the picture. Since we started using AnnounceBot, we have never missed a birthday or work anniversary. It’s all automatic now.
How has AnnounceBot helped your organization?
Keeping the team engaged became challenging when we transitioned into working remotely. AnnounceBot helped us rebuild team connections by providing a centralized system to celebrate special events. Now, everyone engages in birthday and work anniversary posts, makes jokes, and tells stories about times we were all together in an office. It is a small gesture that has made a big difference in our company culture.
How is customer service and support?
I wanted to know how to check birthdays that are getting tracked. The support team responded within an hour and provided the information I needed.
Any recommendations or insights for other users considering AnnounceBot?
My suggestion would be to set it up in a small team first, just to get the hang of it. Test it out there before you go big and use it for the whole organization.
On a scale from 1 to 5 (5 being the highest), what is your overall rating for this AnnounceBot?
I would give AnnounceBot a 4.5 only because I think they should support Microsoft Entra ID (formerly Azure Active Directory) integration to make birthdate and joining date collection even smoother.
Microsoft Tech Community – Latest Blogs –Read More
MAC address assignment strategies for tenant VMs running on Stack-HCI environment
Azure Stack HCI is a hyperconverged infrastructure (HCI) cluster solution consists of windows servers (Hyper-V), Storage Spaces Direct, and Azure-inspired SDN. All clustered servers share common configurations and resources by leveraging the Windows Server Failover Clustering feature. A Windows Failover Cluster consists of multiple windows servers running in a cluster to provide high availability i.e. If one server node goes down, then another node takes over. We can create multiple VMs on the failover cluster. VMs can be connected to different tenant networks. In this case we need to make sure VM connected on network ‘A’ with static ip should persist same network configuration even if it gets migrated from one node to another within a cluster. This is possible by assigning static MAC/static IP for the VM. But how to get free and unique MAC to assign to VM, there are different ways to solve this problem. In this article we will discuss some of them with pros and cons. (Note: solutions discussed in this article are just to suggestions, can not be considered optimal solutions)
Before this, lets understand first things required to create a tenant VM. To create tenant VM connected to tenant network in stack-hci following steps are performed.
1. Create a new VM with vm network adapter having static MAC assigned
2. Create a new network interface on network controller service(running on SDN) having same MAC and static IP assigned.
3. Associate created network adapter with network interface controller, to make vm gets tenant network connection.
Following powershell commands perform above steps logically.
# 1. vm creation with static MAC
New-VM -Generation 2 -Name “MyVM” -Path “C:VMsMyVM” -MemoryStartupBytes 4GB -VHDPath “C:VMsMyVMVirtual Hard DisksWindowsServer2016.vhdx” -SwitchName “SDNvSwitch”
Set-VM -Name “MyVM” -ProcessorCount 4
# Setting static MAC
Set-VMNetworkAdapter -VMName “MyVM” -StaticMacAddress “00-11-22-33-44-55”
# Creating network interface on networkcontroller with same mac/static IP
$vnet = Get-NetworkControllerVirtualNetwork -ConnectionUri $uri -ResourceId “Contoso_WebTier”
$vmnicproperties = New-Object Microsoft.Windows.NetworkController.NetworkInterfaceProperties
$vmnicproperties.PrivateMacAddress = “001122334455”
$vmnicproperties.PrivateMacAllocationMethod = “Static”
$vmnicproperties.IsPrimary = $true
$vmnicproperties.DnsSettings = New-Object Microsoft.Windows.NetworkController.NetworkInterfaceDnsSettings
$vmnicproperties.DnsSettings.DnsServers = @(“24.30.1.11”, “24.30.1.12”)
$ipconfiguration = New-Object Microsoft.Windows.NetworkController.NetworkInterfaceIpConfiguration
$ipconfiguration.resourceid = “MyVM_IP1”
$ipconfiguration.properties = New-Object Microsoft.Windows.NetworkController.NetworkInterfaceIpConfigurationProperties
$ipconfiguration.properties.PrivateIPAddress = “24.30.1.101”
$ipconfiguration.properties.PrivateIPAllocationMethod = “Static”
$ipconfiguration.properties.Subnet = New-Object Microsoft.Windows.NetworkController.Subnet
$ipconfiguration.properties.subnet.ResourceRef = $vnet.Properties.Subnets[0].ResourceRef
$vmnicproperties.IpConfigurations = @($ipconfiguration)
New-NetworkControllerNetworkInterface –ResourceID “MyVM_Ethernet1” –Properties $vmnicproperties –ConnectionUri $uri
$nic = Get-NetworkControllerNetworkInterface -ConnectionUri $uri -ResourceId “MyVM_Ethernet1”
#Do not change the hardcoded IDs in this section, because they are fixed values and must not change.
# 3. Finally make association of vm network adapter with nic created in last step
$FeatureId = “9940cd46-8b06-43bb-b9d5-93d50381fd56”
$vmNics = Get-VMNetworkAdapter -VMName “MyVM”
$CurrentFeature = Get-VMSwitchExtensionPortFeature -FeatureId $FeatureId -VMNetworkAdapter $vmNics
if ($CurrentFeature -eq $null) {
$Feature = Get-VMSystemSwitchExtensionPortFeature -FeatureId $FeatureId
$Feature.SettingData.ProfileId = “{$($nic.InstanceId)}”
$Feature.SettingData.NetCfgInstanceId = “{56785678-a0e5-4a26-bc9b-c0cba27311a3}”
$Feature.SettingData.CdnLabelString = “TestCdn”
$Feature.SettingData.CdnLabelId = 1111
$Feature.SettingData.ProfileName = “Testprofile”
$Feature.SettingData.VendorId = “{1FA41B39-B444-4E43-B35A-E1F7985FD548}”
$Feature.SettingData.VendorName = “NetworkController”
$Feature.SettingData.ProfileData = 1
Add-VMSwitchExtensionPortFeature -VMSwitchExtensionFeature $Feature -VMNetworkAdapter $vmNics
} else {
$CurrentFeature.SettingData.ProfileId = “{$($nic.InstanceId)}”
$CurrentFeature.SettingData.ProfileData = 1
Set-VMSwitchExtensionPortFeature -VMSwitchExtensionFeature $CurrentFeature -VMNetworkAdapter $vmNics
}
Get-VM -Name “MyVM” | Start-VM
To make sure VMs works fine even after migration in windows failover cluster, we need to assign static MAC and static IP. To get available and unique MAC is challenge here. We will see following ways to solve this problem with pros and cons.
Generating random MAC on node
Assign dedicated unique MAC address pool range for every Node in cluster and Generating free MAC from Node’s MAC address range pool.
Get free MAC from Network controller service and use same on VM
Lets discuss each approach in detailed-
1. Generating random MAC on node
This is very simple approach, where we will generate random MAC and same will be used. It includes below steps:
Generate valid MAC on node, where we need to create VM(or new network interface).
Set same MAC on vm network adapter as static
Set same MAC on network interface along with static IP
Following is powershell script performs same above logical steps:
New-VM -Name $vm_name -MemoryStartupBytes $vm_memory -BootDevice VHD -VHDPath $image_path -Path $vm_data_path -Generation $vm_generation -SwitchName $switch_name
Add-ClusterVirtualMachineRole -vmname $vm_name -Name $vm_name
Start-Sleep -Seconds 3
############## Random MAC address generation and assignment
# script block for mac address assingment kept in retry block
$mac_address = Retry-Command -ScriptBlock {
# do something
# found used in az-auto-setup
#$mac_address=(“{0:D12}” -f ( Get-Random -Minimum 0 -Maximum 99999 ))
$mac_address = (0..5 | ForEach-Object { ‘{0:x}{1:x}’ -f (Get-Random -Minimum 0 -Maximum 15), (Get-Random -Minimum 0 -Maximum 15) }) -join ‘-‘
write-host “Tring to set : $mac_address”
Set-VMNetworkAdapter -VMName $vm_name -StaticMacAddress “$mac_address”
write-host “Mac set succssfully: $mac_address”
Start-Sleep -Milliseconds 500
Write-host $( Get-VMNetworkAdapter -VMName $vm_name ).MacAddress
return $mac_address
}
write-host “Mac set succssfully: $mac_address”
Write-host ‘VM created..’
##########################################################################
# network configuration starts here..
# you can refer for more info: https://learn.microsoft.com/en-us/windows-server/networking/sdn/manage/create-a-tenant-vm#prerequisites
$vnet = Get-NetworkControllerVirtualNetwork -ConnectionUri $uri -ResourceId $vnet_name
$vmnicproperties = New-Object Microsoft.Windows.NetworkController.NetworkInterfaceProperties
# give same mac address below as created before..
$mac = -join($mac_address.split(“-“)).toupper()
$vmnicproperties.PrivateMacAddress = $mac
Write-host $mac
$vmnicproperties.PrivateMacAllocationMethod = “Static”
$vmnicproperties.IsPrimary = $true
$vmnicproperties.DnsSettings = New-Object Microsoft.Windows.NetworkController.NetworkInterfaceDnsSettings
#$vmnicproperties.DnsSettings.DnsServers = @(“192.168.1.254”, “8.8.8.8”)
$vmnicproperties.DnsSettings.DnsServers = $dns_server
$ipconfiguration = New-Object Microsoft.Windows.NetworkController.NetworkInterfaceIpConfiguration
$ipconfiguration.resourceid = $vm_name + “_IP1”
$ipconfiguration.properties = New-Object Microsoft.Windows.NetworkController.NetworkInterfaceIpConfigurationProperties
$ipconfiguration.properties.PrivateIPAddress = $ip_address
$ipconfiguration.properties.PrivateIPAllocationMethod = “Static”
$ipconfiguration.properties.Subnet = New-Object Microsoft.Windows.NetworkController.Subnet
# do: programatically decide subnet full ref, or form path directly
# $ipconfiguration.properties.subnet.ResourceRef = $vnet.Properties.Subnets[0].ResourceRef
$ipconfiguration.properties.subnet.ResourceRef = “/virtualNetworks/” + $vnet_name + “/subnets/” + $subnet_name
$vmnicproperties.IpConfigurations = @($ipconfiguration)
$NIC_name = $vm_name + “_Eth1”
New-NetworkControllerNetworkInterface -ResourceID $NIC_name -Properties $vmnicproperties -ConnectionUri $uri -Confirm:$false -force
Write-host ‘NIC config created..’
Start-Sleep -Seconds 8
$nic = Get-NetworkControllerNetworkInterface -ConnectionUri $uri -ResourceId $NIC_name
#########################################################################
#Do not change the hardcoded IDs in this section, because they are fixed values and must not change.
$FeatureId = “9940cd46-8b06-43bb-b9d5-93d50381fd56”
$vmNics = Get-VMNetworkAdapter -VMName $vm_name
$CurrentFeature = Get-VMSwitchExtensionPortFeature -FeatureId $FeatureId -VMNetworkAdapter $vmNics
if ($CurrentFeature -eq $null)
{
$Feature = Get-VMSystemSwitchExtensionPortFeature -FeatureId $FeatureId
$Feature.SettingData.ProfileId = “{$( $nic.InstanceId )}”
$Feature.SettingData.NetCfgInstanceId = “{56785678-a0e5-4a26-bc9b-c0cba27311a3}”
$Feature.SettingData.CdnLabelString = “TestCdn”
$Feature.SettingData.CdnLabelId = 1111
$Feature.SettingData.ProfileName = “Testprofile”
$Feature.SettingData.VendorId = “{1FA41B39-B444-4E43-B35A-E1F7985FD548}”
$Feature.SettingData.VendorName = “NetworkController”
$Feature.SettingData.ProfileData = 1
Add-VMSwitchExtensionPortFeature -VMSwitchExtensionFeature $Feature -VMNetworkAdapter $vmNics
}
else
{
$CurrentFeature.SettingData.ProfileId = “{$( $nic.InstanceId )}”
$CurrentFeature.SettingData.ProfileData = 1
Set-VMSwitchExtensionPortFeature -VMSwitchExtensionFeature $CurrentFeature -VMNetworkAdapter $vmNics
}
Write-host ‘finally applying setting..’
Start-Sleep -Seconds 5
Get-VM -Name $vm_name | Start-VM
But this approach has following problems :
There is possibility that two vms running on same cluster may got same MAC and it may create MAC conflict issue after migration.
Some specific MAC range is not allowed to be assigned, in this case we need to keep retrying random generation, which is not good.
Very difficult to keep track of used MAC addresses.
So this method is not reliable and not recommended.
2. Assign dedicated unique MAC address pool range for every Node in cluster and Generating free MAC from Node’s MAC address range pool.
We can preassign unique dedicated MAC address pool range to every node(hyper-v) in cluster, so whenever we need to create new network interface we will first get free MAC from the pool of node where vm will be running. Same MAC will be made static on vm network adapter and network interface followed by static ip. Following are logical steps need to perform:
1. Get free MAC from Node’s MAC pool range.
2. Assign same static MAC on VM network adapter
3. Set same MAC on network interface along with static IP
Following is an example of MAC pool range distribution plan for 255 clusters, 16 hosts each:
00-15-5D-[c1][c2]-[h1][v1]-[v2][v3]
field c1, c2: will indicate a cluster. 00 to FF : Max 255 clusters can be created.
field h1 – will be for host/node identification in a cluster. 0 to F = max 16 hosts in a cluster.
field v1,v2,v3 will be used for vms. 000 to FFF = 16*16*16 = total 4096 possible vms/network interfaces per node can be created.
But main challenge here is there is no api or command available to get free MAC from node pool. There is a workaround that to get MAC assigned from the pool, we need to create dummy network adapter with dynamic configuration and start vm for a moment to get free dynamic MAC assigned from node pool range. Then we need to stop vm and revert the change and using same MAC we need to create static one and same steps need to be followed. This is not good approach since this is just a workaround, where dummy resource need to create.
# creating new network adapter with dynamic MAC
Add-VMNetworkAdapter -VMName $vm_name -SwitchName $switch_name -Name $adapter_name
# starting and stopping vm to get free MAC from node pool
Start-VM -VMName $vm_name; Stop-VM -VMName $vm_name -Force
# reading assigned dynamic MAC
$mac_address = (Get-VMNetworkAdapter -VMName $vm_name -Name $adapter_name).MacAddress
# make same MAC as static
Set-VMNetworkAdapter -VMName $vm_name -Name $adapter_name -StaticMacAddress $mac_address
# rest steps are same for network interface creation
3. Get free MAC from Network controller service and use same on VM network adapter.
There is a dedicated centralized network controller service on every Stack-hci cluster, where we can setup global MAC address range pool at network controller service. When we create new network interface on network controller service with dynamic configuration, then it assign free MAC from the global free pool. It is very reliable solution since it is a centralized service. In this, we will follow below steps
Create a Network interface in Network controller service with dynamic MAC assignment config, to get assigned free MAC from global MAC range.
Read assigned MAC on network interface
Assign same MAC address to vm network adapter as static.
The following powershell commands perform above steps (Note: please use appropriate values in place of parameters):
# Creating network interface with dynamic MAC config on network controller
$vmnicproperties = New-Object Microsoft.Windows.NetworkController.NetworkInterfaceProperties
$vmnicproperties.PrivateMacAllocationMethod = “Dynamic”
$vmnicproperties.IsPrimary = $true
$vmnicproperties.DnsSettings = New-Object Microsoft.Windows.NetworkController.NetworkInterfaceDnsSettings
$vmnicproperties.DnsSettings.DnsServers = $dns_server
$ipconfiguration = New-Object Microsoft.Windows.NetworkController.NetworkInterfaceIpConfiguration
$ipconfiguration.resourceid = $vm_name + “_IP1”
$ipconfiguration.properties = New-Object Microsoft.Windows.NetworkController.NetworkInterfaceIpConfigurationProperties
$ipconfiguration.properties.PrivateIPAddress = $ip_address
$ipconfiguration.properties.PrivateIPAllocationMethod = “Static”
$ipconfiguration.properties.Subnet = New-Object Microsoft.Windows.NetworkController.Subnet
$ipconfiguration.properties.subnet.ResourceRef = “/virtualNetworks/” + $vnet_name + “/subnets/” + $subnet_name
$vmnicproperties.IpConfigurations = @($ipconfiguration)
$NIC_name = $vm_name + “_Eth1”
New-NetworkControllerNetworkInterface -ResourceID $NIC_name -Properties $vmnicproperties -ConnectionUri $uri -Confirm:$false -force
Write-host ‘NIC config created..’
Start-Sleep -Seconds 8
$nic = Get-NetworkControllerNetworkInterface -ConnectionUri $uri -ResourceId $NIC_name
# Read obtained free MAC from global pool
$mac_address = $nic.Properties.PrivateMacAddress -replace ‘..(?!$)’, ‘$&-‘
###### Vm creation flow starts from here. We will set static MAC here
New-VM -Name $vm_name -MemoryStartupBytes $vm_memory -BootDevice VHD -VHDPath $image_path -Path $vm_data_path -Generation $vm_generation -SwitchName $switch_name
Add-ClusterVirtualMachineRole -vmname $vm_name -Name $vm_name
Set-VMNetworkAdapter -VMName $vm_name -StaticMacAddress “$mac_address”
write-host “Mac set succssfully: $mac_address”
Conclusion:
The third/last approach discussed in this article seems to be easy and more reliable, since we are consuming MAC from centralized network controller service. We will never face problem of MAC conflicts incase VMs get migrated from one node to another.
Microsoft Tech Community – Latest Blogs –Read More

Smarter Azure Open AI Usage
Smart Azure Open AI Endpoints – “AI Central”
Many organizations are building Intelligent Applications built on Azure’s Open AI (AOAI) services. In the path to production the same set of questions are often raised
How many AOAI services should I have?
How do I monitor and log streaming quota usage?
How do I prioritize PTU based AOAI and fallback to PAYG?
How do I round-robin between multiple AOAI servers?
How do I handle Open AI rate-limiting errors?
How do I enforce local rate limiting to a cluster of AI services?
How do I enforce rate limiting to a backend AI service?
How do I present a group of AOAI services as a single endpoint, for a seamless shift to PTU?
How do I reduce risk by leveraging Open AI and Azure Open AI services but present a single endpoint to consumers?
How do I put a circuit breaker over an AI service that I’ve over-used, to fallback to others?
To help with some of these issues we can turn to services like API Management, Application Gateways, and Reverse Proxies. Each can provide a solution to a subset of the problems.
However, there are complexities hidden within these boxes that become difficult to solve
Prioritization and failover of groups of AOIA servers relies on custom code running in a Layer 7 Load Balancer.
Layer 7 load balancers lack real-time retry functionality and instead use asynchronous downstream health monitors.
Server-Side Events support makes it difficult to log quota whilst maintaining a streaming endpoint.
Switching between Azure Open AI, Open AI or other Open Source LLMs requires manipulation of HTTP requests.
Introducing AI Central – https://github.com/microsoft/AICentral
To help with these I have published a Reference Implementation of an intelligent AI Router, “AI Central”. AI Central lets you build configurable, extensible Pipelines allowing you to govern and observe access to your AI service.
AI Central is an extensible smart reverse proxy for Azure Open AI and Open AI services.
Out of the box it provides the following
Consumer local rate limiting
Endpoint local rate limiting and circuit breakers
Randomized endpoint selection from a cluster of AI services
Prioritized endpoint selector from a priority cluster, to a fallback cluster
Bulkhead to hold and throttle load to a cluster of servers
Consumer Entra JWT auth (using Microsoft.Identity) with Role Authorisation
Consumer Entra JWT pass-thru
Client Key auth
Prompt / Token usage logging to Azure Monitor (including Streaming Endpoints)
Open Telemetry metrics
Sample Scenarios
Here’s some scenarios where AI Central might help you:
Scenario 1: PTU failover
Preferred PTU AOAI service, but fallback PAYG AOAI service
A group of applications that need to access AOAI services
A requirement for Prompt logging for audit and governance
Streaming quota logging for chargeback
AI Central can construct a pipeline to manage this for you:
The pipeline listens on a host name expecting Azure Open AI like requests.
The AAD check confirms that the client is permitted access to the pipelines.
The Prioritized endpoint selector is configured to prioritize a PTU server.
It dispatches the request with a backoff / retry policy and circuit breaker.
If it fails to receive a request it falls back to the second group of PAYG servers
If the response from AOAI is detected to be a streaming response, it will stream the results back to the Client, using a Tokenizer to estimate quota usage
Finally, the Azure Monitor Logger asynchronously sends quota usage and prompt information to Azure Monitor.
Scenario 2: Token based rate limiting of streaming consumers, to an AOAI server
Single PTU service with models shared across multiple consumers
Streaming quota logging for chargeback purposes
Fair-use policy by restricting token use by consumer
The pipeline listens on a specific hostname
The AAD check confirms that the client is permitted access to the pipelines
The Token limit checks if the client (AAD identity) has reached their token limit
If not, the request is dispatched to a AOAI server
The AOAI response is re-streamed to the consumer
The return pathway logs the prompt, and updates the tokens consumed by the consumer
NB: Token counting does not use a distributed algorithm. It is local to an AI Central server. Consider this if running multiple AI Central Endpoints behind a load-balancer (for example in a PaaS like Azure Container Apps, Azure App Service, etc)
Try it out
The easiest way to start is to install into your own .NET API from the nuget packages.
#Create new project and bootstrap the AICentral nuget package
dotnet new web -o MyAICentral
cd MyAICentral
dotnet add package AICentral
#optional for logging: dotnet add package AICentral.Logging.AzureMonitor
#Program.cs
//Minimal API to configure AI Central
var builder = WebApplication.CreateBuilder(args);
builder.Services.AddAICentral(
builder.Configuration,
additionalComponentAssemblies:
[
typeof(AzureMonitorLoggerFactory).Assembly //for Azure Monitor logging
]);
);
var app = builder.Build();
app.UseAICentral();
app.Run();
You’ll need to add Configuration to define your pipelines.
The Github Repository has some good examples – https://github.com/microsoft/AICentral for a Quick Start, and https://github.com/microsoft/AICentral/blob/main/docs/configuration.md for some more complex examples.
Give it a go and let us know how you find it!
Microsoft Tech Community – Latest Blogs –Read More
How To Monitor Your Multi-Tenant Solution on Azure With Azure Monitor
1. Multi Tenant solution
Often customers are operating using a multi-tenant architecture in Azure for several reasons: cost-effectiveness, scalability and security. However, this architecture will make it challenging to get an overview of the status of resources across the different tenants. E.g., an application with different instances of it running across multiple tenants. The person responsible for the performance and operational effectiveness of the application will have a hard time monitoring the status of each of these instances. In an ideal scenario, this person would be able to assess all this information from a single pane of glass instead of having to log into each tenant to retrieve this data.
Given the scenario above, it is not possible to send log data from resources in tenant A to a Log Analytics Workspace in tenant B. A possible solution to address this challenge is to use the Hybrid model when implementing your Log Analytics Workspace architecture.
“In a Hybrid model, each tenant has its own workspace. A mechanism is used to pull data into a central location for reporting and analytics. This data could include a small number of data types or a summary of the activity, such as daily statistics.”
In order to centralize the data in a multi-tenant solution, there are two options:
Create a central Log Analytics Workspace. To query and ingest the data into this location, one can use either the Query API and the logs Ingestion API or use Azure Logic Apps to centralize the data.
Using the integration between Log Analytics Workspace and Power BI by exporting the KQL query to PowerBI.
For the sake of this article, we will focus on the first option, namely creating a central Log Analytics Workspace by leveraging the Log Query and Ingestion API. However, as discussed above, there are different approaches one could choose from. A high level architecture of this approach would look like the following:
In the remainder of this article, we will provide a step by step tutorial on how this hybrid model can be implemented using Azure Services. Programming language used in the article is Python. However, other programming languages are supported as well, such as: .NET, Go, Java or JavaScript.
2. Practical implementation
The first step is to configure your centralized Log Analytics Workspace environment by setting up the following:
Create a new central Log Analytics Workspace
Create a Microsoft Entra application
Create a Data Collection Endpoint (DCE) and Data Collection Rule (DCR)
Create a custom table in the centralized Log Analytics Workspace
The steps outlined above are explained in the following tutorial:
In terms of authentication, take the following into account:
To gain access to the Log Analytics Workspace for querying data, here are the captivating steps:
– User Assigned Managed Identity: how to create a User Assigned Managed Identity
Note: make sure to add the Monitoring Metrics Publisher: Enables publishing metrics against Azure resources
Authenticate into the central Log Analytics Workspace for data ingestion with these possible authentication approaches:
– Azure Lighthouse: enables multitenant management with scalability, higher automation, and enhanced governance across resources
– Service Principal + App registration: as used in the tutorial
Both methods will accomplish the task; hence, it depends on the company’s security policies and requirements to decide which solution to use. However, in this article the Service Principal + App registration has been used.
After the central Log Analytics Workspace has been created and the right authentication method has been selected, the next step will be to start writing the script. From a high level point of view, the script will query the Log Analytics Workspace inside the tenant where it will be deployed. Next, it will take the results of the query and ingest them into the centralized Log Analytics Workspace created in previous steps.
As mentioned, the programming language used in this article is Python. The same goal can be achieved using different programming languages such as .NET, Go, Java, JavaScript.
A more detailed architecture would look like this:
3. Getting Started
Step 1: Required imports
import logging
import os
import sys
from datetime import datetime, timezone
import json
import pandas as pd
from azure.core.exceptions import HttpResponseError
from azure.identity import ManagedIdentityCredential, ClientSecretCredential
from azure.monitor.ingestion import LogsIngestionClient
from azure.monitor.query import LogsQueryClient, LogsQueryStatus
Step 2: Set variables required further in the script
# Get information from the centralized Log Analytics Worspace and DCR/DCE created
LOGS_WORKSPACE_ID = os.environ[‘LOGS_WORKSPACE_ID’]
DATA_COLLECTION_ENDPOINT = os.environ[‘DATA_COLLECTION_ENDPOINT’]
LOGS_DCR_RULE_ID = os.environ[‘LOGS_DCR_RULE_ID’]
LOGS_DCR_STREAM_NAME = os.environ[‘LOGS_DCR_STREAM_NAME’]
# Get information from the created Service Principal created
AZURE_CLIENT_ID = os.environ[‘AZURE_CLIENT_ID’]
AZURE_TENANT_ID = os.environ[‘AZURE_TENANT_ID’]
AZURE_CLIENT_SECRET = os.environ[‘AZURE_CLIENT_SECRET’]
# Get client ID from User Assigned Managed Identity (UA_MI)
AZURE_UA_MI_CLIENT_ID = os.environ[‘AZURE_UA_MI_CLIENT_ID’]
Step 3: Configure credentials
# Configure credentials
credential_mi = ManagedIdentityCredential(AZURE_UA_MI_CLIENT_ID)
credential = ClientSecretCredential(AZURE_TENANT_ID, AZURE_CLIENT_ID, AZURE_CLIENT_SECRET)
Step 4: Configure Query and Ingestion clients
# Create clients
logs_query_client = LogsQueryClient(credential_mi)
ingestion_client = LogsIngestionClient(endpoint=DATA_COLLECTION_ENDPOINT, credential=credential, logging_enable=True)
Step 5: Define the KQL query you want to run against the Log Analytics Workspace (results of this will be ingested into the centralized workspace)
# Define query and time span (example)
query = “””<Your KQL query>”””
start_time = datetime(2024, 1, 11, tzinfo=timezone.utc)
end_time = datetime(2024, 1, 20, tzinfo=timezone.utc)
Step 6: Query Log Analytics Workspace and put results into a list of JSON objects (which is required for the ingestion of the data)
# Query Log Analytics Workspace
response = logs_query_client.query_workspace(
LOGS_WORKSPACE_ID,
query=query,
timespan=(start_time, end_time)
)
if response.status == LogsQueryStatus.PARTIAL:
error = response.partial_error
data = response.partial_data
print(error)
elif response.status == LogsQueryStatus.SUCCESS:
data = response.tables
# Convert data to JSON list
json_list = []
for table in data:
df = pd.DataFrame(data=table.rows, columns=table.columns)
# Use f-string for string formatting
print(f”Dataframe:n{df}n”)
# Use list comprehension for creating list
json_list.extend([json.loads(row) for row in df.to_json(orient=”records”, lines=True).splitlines()])
# Use f-string for string formatting
print(f”JSON list:n{json_list}n”)
Step 7: Take the results and ingest them into the centralized Log Analytics Workspace
#Upload logs
ingestion_client.upload(rule_id=LOGS_DCR_RULE_ID, stream_name=LOGS_DCR_STREAM_NAME, logs=json_list)
print(“Upload done”)
The full script:
import logging
import os
import sys
from datetime import datetime, timezone
import json
import pandas as pd
from azure.core.exceptions import HttpResponseError
from azure.identity import ManagedIdentityCredential, ClientSecretCredential
from azure.monitor.ingestion import LogsIngestionClient
from azure.monitor.query import LogsQueryClient, LogsQueryStatus
# Get information from the centralized Log Analytics Worspace and DCR/DCE created
LOGS_WORKSPACE_ID = os.environ[‘LOGS_WORKSPACE_ID’]
DATA_COLLECTION_ENDPOINT = os.environ[‘DATA_COLLECTION_ENDPOINT’]
LOGS_DCR_RULE_ID = os.environ[‘LOGS_DCR_RULE_ID’]
LOGS_DCR_STREAM_NAME = os.environ[‘LOGS_DCR_STREAM_NAME’]
# Get information from the created Service Principal created
AZURE_CLIENT_ID = os.environ[‘AZURE_CLIENT_ID’]
AZURE_TENANT_ID = os.environ[‘AZURE_TENANT_ID’]
AZURE_CLIENT_SECRET = os.environ[‘AZURE_CLIENT_SECRET’]
# Get client ID from User Assigned Managed Identity (UA_MI)
AZURE_UA_MI_CLIENT_ID = os.environ[‘AZURE_UA_MI_CLIENT_ID’]
# Configure credentials
credential_mi = ManagedIdentityCredential(AZURE_UA_MI_CLIENT_ID)
credential = ClientSecretCredential(AZURE_TENANT_ID, AZURE_CLIENT_ID, AZURE_CLIENT_SECRET)
# Create clients
logs_query_client = LogsQueryClient(credential_mi)
ingestion_client = LogsIngestionClient(endpoint=DATA_COLLECTION_ENDPOINT, credential=credential, logging_enable=True)
# Define query and time span (example)
query = “””<Your KQL query>”””
start_time = datetime(2024, 1, 11, tzinfo=timezone.utc)
end_time = datetime(2024, 1, 20, tzinfo=timezone.utc)
try:
# Query Log Analytics Workspace
response = logs_query_client.query_workspace(
LOGS_WORKSPACE_ID,
query=query,
timespan=(start_time, end_time)
)
if response.status == LogsQueryStatus.PARTIAL:
error = response.partial_error
data = response.partial_data
print(error)
elif response.status == LogsQueryStatus.SUCCESS:
data = response.tables
# Convert data to JSON list
json_list = []
for table in data:
df = pd.DataFrame(data=table.rows, columns=table.columns)
# Use f-string for string formatting
print(f”Dataframe:n{df}n”)
# Use list comprehension for creating list
json_list.extend([json.loads(row) for row in df.to_json(orient=”records”, lines=True).splitlines()])
# Use f-string for string formatting
print(f”JSON list:n{json_list}n”)
# Upload logs
ingestion_client.upload(rule_id=LOGS_DCR_RULE_ID, stream_name=LOGS_DCR_STREAM_NAME, logs=json_list)
print(“Upload done”)
except HttpResponseError as e:
# Use f-string for string formatting
print(f”Upload failed: {e}”)
Step 8: Azure Functions
Once the script is written and runs locally, the next step will be to deploy this to the cloud and automate this. For this, multiple approaches are possible: Azure Logic Apps, Azure Functions, Azure Automation, PowerShell… In this article we deployed the script as an Azure Function and used the Timer Trigger in order to run the Function at a predefined interval (e.g., every 5 minutes). We deployed the function inside the tenant of the workspace we are going to query.
How to get started with Azure Functions:
Create a function in Azure that runs on a schedule | Microsoft Learn
Develop Azure Functions using Visual Studio | Microsoft Learn
Timer trigger for Azure Functions | Microsoft Learn
Continuously update function app code using Azure Pipelines | Microsoft Learn
Important: add the User Assigned Managed Identity created above to the identity settings of the Function App. This is required for the Function to be authenticated to Query the Log Analytics Workspace.
Step 9: (Optional) Visualization
After consolidating data from various resources in different tenants, creating visualizations could add an interesting dimension. Microsoft Azure offers multiple tools to do this:
PowerBI
Dashboards
Workbooks
Grafana
Step 10: (Optional) Create Log Alert Rules
Once the data has been centralized across different tenants, one could start to create Log Alert Rules. The alert rule is based on a log query that will run automatically at regular intervals. Based on the results of the query, Azure Monitor will determine if an alert — linked to the query — should be created and fired.
3. Security considerations
This solution relies on client secrets for authentication via the Service Principal and App Registration. To uphold robust security, our system enforces the expiration and periodic renewal of these critical credentials, mitigating potential vulnerabilities. It is essential to maintain vigilant monitoring to proactively detect and address any issues stemming from expired secrets, thereby avoiding disruptions to the solution’s functionality.
To streamline this process, we recommend integrating with Logic Apps, providing an automated and centralized solution for secret management. For further details on this integration, refer to following article:
This approach not only enhances security practices but also guarantees an efficient and proactive handling of sensitive information.
Microsoft Tech Community – Latest Blogs –Read More
Migrating from the Azure MMA to AMA Agent
I have another conversation about the sunset of the Microsoft Monitoring Agent (MMA). Back on November 13, 2023 I posted and article on how to do a bulk removal of the Azure MMA agent, but before you can remove the MMA agent you need to have the AMA agent ready to take over the work. Below are details to assist in this endeavor. *17
Just as my miniature schnauzer, Raven, loves to explore the backyard, sniffing out new scents and chasing after squirrels, so too must we venture into the world of Azure’s new AMA agent. Raven’s curiosity and adaptability are traits we can admire and emulate as we navigate this transition. She doesn’t shy away from the unfamiliar; instead, she embraces it with a wagging tail and an eager spirit. Similarly, we should approach the migration from Azure’s MMA agent to the AMA agent with the same enthusiasm and readiness for discovery.
Think of the DCR as a specific set of instructions or a recipe that you use when baking Raven’s favorite dog treats. This recipe precisely dictates what ingredients should go into the mix. Similarly, the DCR in the Azure environment defines what log components should be sent to Azure. Just as you wouldn’t add anything not listed in Raven’s treat recipe, the AMA agent only sends the log components specified by the DCR.
Now, installing the AMA agent alongside the MMA agent is like giving Raven a new bone while she still has her old one. However, the key is to ensure that the new bone is presented before the old one is taken away. Raven, being the smart dog she is, immediately takes to the new bone, forgetting all about the old one. Similarly, once the DCR definition has been pushed to the server, the new AMA agent becomes active, and the old MMA agent becomes redundant. It’s a seamless transition, just like Raven’s shift of attention from the old bone to the new one. This way, we ensure a smooth transition while avoiding redundancy, making our migration process more efficient and tailored to our needs.
This is a large article, so I have added a content listing to help.
Contents
Transitioning to the Azure Monitor Agent (AMA) when you are using the Log Analytics Agent (MMA/OMS).
What is the MMA agent (Also known as OMS or Log Analytics agent)?
What is the AMA agent?
Coexistence with other agents
When should I consider using/migrating from MMA to AMA?
Agent Installation
Creating a DCR for Windows machines
Using Azure Policy to install the Windows Azure Monitoring Agent (AMA)
Verify that the AMA Agent Install Policy was Assigned and Create a Remediation Task for Any Existing Windows Servers
Verify that the Windows AMA Agent Installation Remediation Worked
Using Azure Policy to install the Windows Data Collection Rule
Verify that the DCR Policy was Uploaded and Create a Remediation Task for Any Existing Windows Servers
Creating a DCR for Linux Machines
Using Azure Policy to install the Linux Azure Monitoring Agent
Using Azure Policy to install the Linux Data Collection Rules
Verify Policy Assignments Have Been Completed
Installation of the AMA agent and Push of the DCR Definition on Azure ARC Hosts
Using Azure Policy to install the Windows Azure Monitoring Agent for Azure ARC
Using Azure Policy to install the Windows Data Collection Rule for Azure ARC
Using Azure Policy to install the Linux Azure Monitoring Agent for Azure ARC
Using Azure Policy to install the Linux Data Collection Rule for Azure ARC
Verify Agents Are Communicating with Azure
Querying the Heartbeat Table
Find Out Which Agents are Loaded and Where
AMA Data Sources and Locations
MMA Gateway
MMA Agent Removal
References
Transitioning to the Azure Monitor Agent (AMA) when you are using the Log Analytics Agent (MMA/OMS).
What is the MMA agent (Also known as OMS or Log Analytics agent)? *1
The Azure Log Analytics agent collects telemetry from Windows and Linux virtual machines in any cloud, on-premises machines, and those monitored by System Center Operations Manager and sends collected data to your Log Analytics workspace in Azure Monitor. The Log Analytics agent also supports insights and other services in Azure Monitor such as VM insights, Microsoft Defender for Cloud, and Azure Automation.
The MMA collects ALL the data from the logs defined below, with limited ability to filter:
Data Source
Description
Information sent to the Windows event logging system.
Information sent to the Linux event logging system.
Numerical values measuring performance of different aspects of operating system and workloads.
Usage information for IIS web sites running on the guest operating system.
Events from text files on both Windows and Linux computers.
Regardless as to which O/S or installation method the installer will require the workspace ID and key for the Log Analytics workspace that the agent will connect to. This requirement is a key differentiator from the new AMA.
What is the AMA agent? *2
The Azure Monitor agent (AMA) collects monitoring data from the guest operating system of Azure virtual machines and delivers it to Azure Monitor solutions, including Log Analytics and products such as Microsoft Sentinel. The Azure Monitor agent is meant to replace the Log Analytics agent (also known as MMA and OMS) for both Windows and Linux machines.
NOTE: The Log Analytics agent will be deprecated on August 31, 2024, so if you are using the MMA, it’s a good idea to start planning your migration to AMA well ahead of time.
Eventually, the Azure Monitor agent will replace the following legacy monitoring agents that are currently used by Azure Monitor.
Log Analytics agent: Sends data to a Log Analytics workspace and supports VM insights and monitoring solutions.
Telegraf agent: Sends data to Azure Monitor Metrics (Linux only)
Diagnostics extension: Sends data to Azure Monitor Metrics (Windows only), Azure Event Hubs, and Azure Storage.
In addition to consolidating this functionality into a single agent, the Azure Monitor agent provides the following benefits over the existing agents:
Cost savings
Granular targeting via Data Collection Rules to collect specific data types from specific machines, as compared to the “all or nothing” mode that the MMA supports.
Security and performance
For authentication and security, it uses Managed Identity (for virtual machines) and AAD device tokens (for clients)
This agent performs better at higher EPS compared to legacy agents.
Simplified management of data collection
Management of dependent solutions or services
Coexistence with other agents
The Azure Monitor agent can coexist (run side by side on the same machine) with the legacy Log Analytics agents so that you can continue to use their existing functionality during evaluation or migration. For this reason, you can begin transition even with limitations, but you must review the following points carefully: *12
Be careful in collecting duplicate data because it could skew query results and affect downstream features like alerts, dashboards, or workbooks. For example, VM insights uses the Log Analytics agent to send performance data to a Log Analytics workspace. You might also have configured the workspace to collect Windows events and Syslog events from agents.
If you install the Azure Monitor agent and create a data collection rule for these same events and performance data, it will result in duplicate data. As a result, ensure you’re not collecting the same data from both agents. If you are, ensure they’re collecting from different machines or going to separate destinations.
Besides data duplication, this scenario would also generate more charges for data ingestion and retention.
Running two telemetry agents on the same machine would result in double the resource consumption, including but not limited to CPU, memory, storage space, and network bandwidth.
When should I consider using/migrating from MMA to AMA?
AMA is feature complete with MMA with reference to Windows Server. The exceptions are Windows Server 2008 R2, Windows 2008 Sp2, Windows 8 Enterprise and Pro and Windows 7 SP1. For the most up to date details please see *3 in the References section.
Agent Installation
The first set of steps will be to apply an Azure policy to deploy both the AMA agent and the Data Collection Rules. The use of Azure policy is no different, in their use, than other Azure policies you may have built and applied.
Before you begin to set up your new policies to migrate to the new AMA agent, be aware that if you run both agents at the same time, it can duplicate the data captured. So please take this into consideration and as you bring new AMA collection on board it is recommended to stop collecting the same data from the MMA process.
What are Data Collection Rules, you might ask?
“Data Collection Rules (DCRs) define the data collection process in Azure Monitor. DCRs specify what data should be collected, how to transform that data, and where to send that data. DCRs will be created and managed by Azure Monitor to collect a specific set of data to enable insights and visualizations. You may also create your own DCRs to define the set of data required for other scenarios.” *4
Creating a DCR for Windows machines
Browse to the Azure “Monitor” blade and select “Data Collection Rules”.
Select “Create.
Enter Rule Name.
Subscription.
Resource Group.
Region.
This needs to be in the same location as the Log Analytics Workspace.
Platform Type.
Select “Next: Resources >”.
Click on the “Add resources”.
Drill down through the subscription to find a resource. In this example I have selected a Resource Group (RG). The DCR rule created for this RG will be used to apply against all the machines that fall within the Azure Policy.
Click “Apply”.
Select “Next: Collect and deliver >”
Select “+ Add data source”.
Select “Data source type”.
In this example we will select “Windows Event Logs”.
At this point here is a key difference from the MMA agent. The data can now be filtered. For now the example shown will choose the complete set of Events from a log file, but they could be filtered using an XPath definition.
Before we continue on, I just wanted to show that if the “Custom” definition of logs is selected, it can be noted that there is no logs being collected. After we select the logs to collect, we will look at the “Custom” again to see the XPath generated by the system.
Choose custom.
Choose Basic
The “Information” type was selected to help gather more events but in reality, both “Information” and “Verbose” probably wouldn’t be selected.
Select all but “Verbose” as seen in the screen grab below.
Once these have all been selected, click on “Custom” to see what the XPath filter looks like for this selection.
Select “Next: Destination”.
Select “+ Add destination”.
Destination type = “Azure Monitor Logs »
Suscription = 999999999999999999999999999
Account or namespace = xxxxxxxxxxxxxxxxxxxxxxxxx
Limit event log data collection from VM’s via XPath Filters. *5
Select “Add data source”.
Select “Review + create”.
Select “Create”.
As can be seen, the new DCR has been created. This new DCR is the exact same definition as “Paul-Test” so from this point forward all examples will use “Paul-Test” since there has already been a deployment using this DCR.
Select the DCR to be used for the Azure policy.
Select “JSON view”
When the DCR rules “Resource ID” is needed, the “Copy to Clipboard” is all that will be needed.
Cancel out of here.
Using Azure Policy to install the Windows Azure Monitoring Agent
Note: Although the documentation doesn’t specifically call out that installing the agent on Windows 10/11 or later (Current documentation only states that the MSI) is supported, this is being amended to reflect that endpoint workstations are supported utilizing Azure policy. #18
Browse to the Azure Policy blade.
Select Definitions.
Click on the “Search” box.
Enter “Configure Windows virtual machines”.
Select “Configure Windows virtual machines to run Azure Monitor Agent using system-assigned managed identity”.
Note: You must have system-assigned managed identity enabled on each virtual machine before you deploy the agent.
To check to see if the virtual machine is configured for system assigned Identity:
Open up a new browser tab and browse to Azure Virtual Machines.
“System assigned” tab.
Settings > Identity.
Verify that the “Status” is set to “Enabled”.
The new tab can be closed.
Click on the ellipse (the three dots at the end of the Name) and select “Assign”.
Enter the correct “Scope”.
Enter any “Exclusions”, if needed.
Select “Next”.
There is nothing to be Configured in “Advanced”, so click “Next”.
There should be no “Parameters”, so click “Next.
If there are any resources that already exist a remediation task can be created once this “Policy Definition” has been completed. Ensure the following have been completed:
The “Create a Managed Identity” is selected.
Select “System assigned managed identity”.
If you want to use a “User assigned managed identity” then the policy needs to be “Configure Windows virtual machines to run Azure Monitor Agent using user-assigned managed identity”.
Select the location to where the system assigned identity should reside.
Select “Next”.
Enter any details required in the “Non-compliance message”.
Select “Next”.
The policy definition should look similar to below.
Select “Create”.
Verify that the AMA Agent Install Policy was Assigned and Create a Remediation Task for Any Existing Windows Servers
Browse to Policy > Authoring / Assignments.
Review the “Assignment name” column looking for the newly created Assignment.
For servers that already exist, a remediation task will need to be run to install the AMA agent. The following steps will create a remediation task to install the AMA agent on any servers in the scope defined.
Click on the newly created Policy Assignment
On the “New remediation task” window, click on “Applicable resource to remediate”.
Select a “Scope” to remediate.
Any servers that don’t have the AMA agent loaded should now appear under the “Name” column.
Click on “Remediate”.
A remediation task should now commence.
Verify that the Windows AMA Agent Installation Remediation Worked
Wait about 5 minutes…
Browse to Azure Virtual machines.
Click on “Extensions + applications”
On the “Extensions” tab, verify that the “AzureMonitorWindows Agent” is installed.
Select a VM that was to be remediated
Using Azure Policy to install the Windows Data Collection Rule
A policy must be made to link the DCR that was created earlier to the same scope as the assignment for the AMA agent.
Browse to the “Policy” blade, similar to before and select “Definitions”.
Click on the “Search” box.
Enter “Configure Windows virtual machines”.
To the right of “Configure Windows virtual machines to be associated with a Data Collection Rule or a Data Collection Endpoint”
Click on the ellipse (the three dots at the end of the Name) and select “Assign”.
Enter the correct “Scope”.
Enter any “Exclusions”, if needed.
Enter the “Assignment Name”.
Click “Next”.
There is nothing to configure on the “Advanced” tab.
Click on “Next”.
Open a new browser tab and browse to Azure Monitor.
Under “Settings”, select “Data Collection Rules”.
From the work earlier in this process, select the DCR rule created.
From the “Overview” blade, select the “JSON View”.
Click on the “Copy” at the end of the Resource ID”.
Switch back to the Policy browser tab.
On the “Parameters” tab, paste the “Resource Id” into the “Data Collection Rule Resource Id or Data Collection Endpoint Resource Id” entry box.
Select “Next”.
On the “Remediation” tab, leave as default and click Next.
On the “Non-compliance messages” tab, enter a message for out of compliance servers.
Click Next
The policy definition should look similar to below.
Select “Create”.
The Policy assignments for any new servers will have the DCR applied against the scope as defined in the policy settings. For any current servers, a Remediation task will need to be run to upload the DCR to any existing servers in “Scope”.
Verify that the DCR Policy was Uploaded and Create a Remediation Task for Any Existing Windows Servers
Browse to Policy > Authoring / Assignments.
Review the “Assignment name” column looking for the newly created Assignment.
For servers that already exist, a remediation task will need to be run to upload the DCR definition. The following steps will create a remediation task to upload the DCR definition any servers in the scope defined.
Click on the newly created Policy Assignment
Click on “Create remediation task”.
Click on the “Scope” within the “Applicable resources to remediate”.
Select the scope to remediate and click “Select”.
Click on “Remediate”.
Give the system about 10 minutes to push the DCR and data to start flowing, then you can verify that data is being uploaded to the Log Analytics Workspace (LAW) defined in the DCR. Open up a new browser tab and browse to the Log Analytics Workspace defined in the DCR.
Note: If the MMA agent is currently sending data, then query 2 below will be needed to ensure data is being sent by the AMA agent.
Click on “Logs”
Run the query below.
Search “Server Name”
| summarize count () by $table
Data from multiple tables should now be found.
To further ensure the data is coming specifically from the AMA agent run the following query. The “Category” column contains the agent that uploaded the data to the LAW.
Heartbeat
| project Computer, Category
Creating a DCR for Linux Machines
Browse to the Azure “Monitor” blade and select “Data Collection Rules”.
Select “Create.
Enter Rule Name.
Subscription.
Resource Group.
Region.
This needs to be in the same location as the Log Analytics Workspace.
Platform Type.
Select “Next: Resources >”.
Click on the “Add resources”.
Drill down through the subscription to find a resource. In this example I have selected a single host “Ubuntu-01”. The DCR rules created for this host will be used to apply against all the machines that fall within the Azure Policy.
Click “Apply”.
Select “Next: Collect and deliver >”.
Select “+ Add data source”.
Select “Data source type”.
In this example we will select “Linux syslog”.
At this point here is a key difference from the MMA agent. The data can now be filtered. For now, the example shown will choose the complete set of Event from a log file, but they could be filtered using an XPath definition.
Before we continue on, I just wanted to show that if the “Custom” definition of logs is selected, it can be noted that there are no logs being collected.
Review the level of logging to capture the logs for each “Facility”.
Select the “Destination” tab.
Select “Destination type”, “Subscription” and “Account or namespace”.
Click the “Add destination” button.
Select “Add data source”.
Select “Next: Review + Create >”.
Select “Create”.
Select “Go to Resource”.
From the “Overview” blade, select the “JSON View”.
In a later step you will need to copy the “Resource ID”.
Using Azure Policy to install the Linux Azure Monitoring Agent
Note: You must have system-assigned managed identity enabled on each virtual machine before you deploy the agent.
Open a new browser tab and browse to Azure Virtual machines.
Select a Linux vm that needs to have the AMA agent loaded on it.
Verify that the “Status” = “on”.
Select “Settings/Identity”.
Ensure you are on the “System assigned” tab.
Repeat the above for any machines that you are unclear if the System assigned status is enabled.
Browse to Azure Policy.
Select “Definitions”.
Click on the “Search” box.
Enter “Configure Linux virtual machines to”.
Select “Configure Linux virtual machines to run Azure Monitor Agent with System-assigned managed identity-based authentication”.
Click on the ellipse (the three dots at the end of the Name) and select “Assign policy”.
Enter the correct “Scope”.
Enter any “Exclusions”, if needed.
Enter a name for “Assignment name”.
Select “Next”.
There should be no “Advanced”, so click “Next.
There should be no “Parameters”, so click Next.
Select “Create a remediation task” and in the drop down box select “Configure Linux virtual machines to run Azure Monitor Agent using system-assigned managed identity”.
Select “System assigned managed identity”.
Select the location to where the system assigned identity should reside.
Select “Next”.
Enter free form in the “Non-compliance message”, if you so choose.
Select “Next”.
The policy definition should look similar to below.
Select “Create”.
Using Azure Policy to install the Linux Data Collection Rules
Now a policy will need to be created to assign the previously created DCR to the same scope as the assignment for the AMA agent.
Browse to the “Policy” blade, similar to before and select “Definitions”.
Click on the “Search” box.
Enter “Configure Linux virtual machines”.
Select “Configure Linux virtual machines to be associated with a Data Collection Rule”.
Click on the ellipse (the three dots at the end of the Name) and select “Assign”.
Enter the correct “Scope”.
Enter any “Exclusions”, if needed.
Enter a name for “Assignment name”.
Select “Next”.
There is nothing to do on the “Advanced” tab, click “Next”.
Browse back to the tab with the “Data Collection Rule.
Click on the “Copy” at the end of the Resource ID”.
Switch back to the Policy browser tab.
Paste the “Resource Id” into the “Data Collection Rule Resource Id”.
Select “Next”.
Select “Create a remediation task” and in the drop-down box select “Configure Linux virtual machines to be associated with a Data Collection Rule”.
Click “Create a Managed Identity”
Select “System assigned managed identity”.
If you want to use a “User assigned managed identity” then a User Managed Identity will be required.
Select the location to where the system assigned identity should reside.
Select “Next”.
Enter free form in the “Non-compliance message”, if so chosen.
Select “Next”.
The policy definition should look similar to below.
Select “Create”.
Verify Policy Assignments Have Been Completed
I would suggest taking a 5-minute break.
Browse to the Azure Policy “Compliance” blade.
Search for the Policies for Linux servers just created and click on both (one at a time), to verify the servers in scope have all had the policies applied.
Installation of the AMA agent and Push of the DCR Definition on Azure ARC Hosts
Using Azure Policy to install the Windows Azure Monitoring Agent for Azure ARC
Note: Although the documentation doesn’t specifically call out that installing the agent on Windows 10/11 or later (Current documentation only states that the MSI) is supported, this is being amended to reflect that endpoint workstations are supported utilizing Azure policy. #18
The assumption has been made that Azure ARC has been installed on the Windows and Linux servers that are to be managed in the following section. To verify is Azure ARC has been loaded on a server:
Browse to Azure > Azure Arc > Infrastructure / Machines
Review the names of the servers that are to have the AMA agent/DCR definition pushed to them.
Installing the Windows AMA ARC Agent is almost the same with the exception of the policy name. In the Policy “Search” enter “Configure windows ARC” and select “Configure Windows ARC-enabled machines to run Azure Monitor Agent”.
From this point forward, please follow the instructions defined in “Using Azure Policy to install the Windows Azure Monitoring Agent”.
Using Azure Policy to install the Windows Data Collection Rule for Azure ARC
Installing the Windows Data Collection Rule (DCR) is almost the same with the exception of the policy name. In the Policy “Search” enter “Configure windows ARC” and select “Configure Windows ARC Machines to be associated with a Data Collection Rule”.
From this point forward, please follow the instructions defined in “Using Azure Policy to install the Windows Data Collection Rule”.
Using Azure Policy to install the Linux Azure Monitoring Agent for Azure ARC
Installing the Linux AMA ARC Agent is almost the same with the exception of the policy name. In the Policy “Search” enter “Configure Linux ARC” and select “Configure Linux ARC-enabled machines to run Azure Monitor Agent”.
From this point forward, please follow the instructions defined in “Using Azure Policy to install the Linux Azure Monitoring Agent”.
Using Azure Policy to install the Linux Data Collection Rule for Azure ARC
Installing the Linux DCR definition is almost the same with the exception of the policy name. In the Policy “Search” enter “Configure Linux ARC” and select “Configure Linux ARC Machines to be associated with a Data Collection Rule”.
From this point forward, please follow the instructions defined in “Using Azure Policy to install the Linux Data Collection Rule”.
Verify Agents Are Communicating with Azure
Querying the Heartbeat Table
To verify that an agent was connected to your Log Analytics Workspace You can verify whether or not the machines are reporting to Log Analytics with the use of Kusto and querying the Heartbeat table.
The table “Heartbeat” is regularly sent a signal (every minute) from each server monitored. By simply using KQL to see if a heartbeat exists that is coming from each server, you can quickly verify that the servers are able to send Azure data.
Heartbeat
| where Category =~ “azure monitor agent”
| distinct Computer
Find Out Which Agents are Loaded and Where
There is a workbook that is available within Azure Monitor that will provide the details for every agent that is connected to the subscriptions selected within the workbook. The workbook name is “AMA Migration Helper”.
Open up the Azure portal and browse to Azure Monitor
Workbooks > Azure Monitor Essentials/AMA Migration Helper
Select the Subscription(s), Workspace(s) and TimeRange.
The findings should now be available in one of the 6 tabs in this workbook.
The full “Migration Status” can be found at the bottom of the blade.
Note in the example below it can be seen that both subscriptions have had all device migrated to the new AMA client.
Selecting the “Azure Virtual Machines” displays the number of servers found within Azure, for the selected location and time range.
Walk through all the tabs to get a complete list of assets and their status.
AMA Data Sources and Locations
The location of where log files are sent to can be found in the table below. *7
MMA Gateway
Some people might worry that the MMA gateway will disappear when the MMA agent retires. This is a valid point, but Microsoft will continue to support the gateway until they have a replacement or choose to retire it.
The steps below will explain how to continue to use the gateway and end use of the MMA agent’s data capture.
If the host that acts as a gateway is also collecting data with the MMA agent, make sure that the AMA agent is set up and a DCR definition has been sent to this host according to the information given earlier in this document.
Within the Azure portal browse to the Log Analytics Workspace.
Select the Workspace to manage.
Within each of the 5 tabs, remove any defined logs that are actively capturing data.
Windows event logs.
Windows performance counters.
Linux performance counters.
Syslog
IIS Logs
After the Logs definition for each of the capture tabs is cleared, the MMA agent will stop sending data to the Log Analytics Workspace. The AMA agent will be unaffected by this change, as its capture definition is based on the DCR.
MMA Agent Removal
The removal of the MMA agent from PowerShell can be done with a relatively simple (Example below) script.
################################################################################################
## This sample is not supported under any Microsoft standard support program or service.
## The script is provided AS IS without warranty of any kind. Microsoft further disclaims all
## implied warranties including, without limitation, any implied warranties of merchantability
## or of fitness for a particular purpose. The entire risk arising out of the use or performance
## of the sample and documentation remains with you. In no event shall Microsoft, its authors,
## or anyone else involved in the creation, production, or delivery of the script be liable for
## any damages whatsoever (including, without limitation, damages for loss of business profits,
## business interruption, loss of business information, or other pecuniary loss) arising out of
## the use of or inability to use the sample or documentation, even if Microsoft has been advised
## of the possibility of such damages, rising out of the use of or inability to use the sample
## script, even if Microsoft has been advised of the possibility of such damages.
################################################################################################
# Find the Microsoft Monitoring Agent (MMA)
$agent = Get-WmiObject -Query “SELECT * FROM Win32_Product WHERE (Name LIKE ‘Microsoft Monitoring Agent%’ OR Name LIKE ‘Microsoft Azure Log Analytics%’)”
# Check if the agent is installed
if ($agent -ne $null) {
# Uninstall the agent
$agent.Uninstall()
Write-Host “Azure Monitoring Agent has been uninstalled.”
} else {
Write-Host “Azure Monitoring Agent is not installed on this machine.”
}
The script above could be pushed via a management process to remove in bulk if the more formalized process defined in my blog linked below, isn’t the route you would like to take.
I have a blog posted on how to remove the MMA agent in bulk. *17
AMA Migration helper
“AMA Migration Helper is a workbook-based Azure Monitor solution that helps you discover what to migrate and track progress as you move from Log Analytics Agent to Azure Monitor Agent. Use this single pane of glass view to expedite and track the status of your agent migration journey.
Do not remove the legacy agents if being used by other Azure solutions or services. Use the migration helper to discover which solutions/services you use today.” *13
References
Log Analytics agent overview – Azure Monitor | Microsoft Docs
Azure Monitor agent overview – Azure Monitor | Microsoft Docs
Overview of the Azure monitoring agents – Azure Monitor | Microsoft Docs
Data Collection Rules in Azure Monitor – Azure Monitor | Microsoft Docs
Troubleshoot the Azure Monitor agent on Windows virtual machines and scale sets – Azure Monitor | Microsoft Docs
Manage the Azure Monitor agent – Azure Monitor | Microsoft Docs
Azure Monitor agent overview – Azure Monitor | Microsoft Docs
Monitor data from virtual machines with Azure Monitor agent – Azure Monitor | Microsoft Docs
Data collection transformations – Azure Monitor | Microsoft Docs
Azure Monitor agent overview – Azure Monitor | Microsoft Docs
Azure Monitor FAQ – Azure Monitor | Microsoft Docs
Azure Monitor agent overview – Azure Monitor | Microsoft Docs
Tools for migrating to Azure Monitor Agent from legacy agents – Azure Monitor | Microsoft Docs
XPath
Connect Microsoft Sentinel to Azure, Windows, and Microsoft services | Microsoft Docs
Tutorial – Editing Data Collection Rules – Azure Monitor | Microsoft Docs
Tutorial – Send data to Azure Monitor Logs using REST API (Resource Manager templates) – Azure Monitor | Microsoft Docs
Azure MMA Agent Bulk Removal – Microsoft Community Hub
Microsoft Tech Community – Latest Blogs –Read More
MAC address assignment strategies for tenant VMs running on Stack-HCI environment
Azure Stack HCI is a hyperconverged infrastructure (HCI) cluster solution consists of windows servers (Hyper-V), Storage Spaces Direct, and Azure-inspired SDN. All clustered servers share common configurations and resources by leveraging the Windows Server Failover Clustering feature. A Windows Failover Cluster consists of multiple windows servers running in a cluster to provide high availability i.e. If one server node goes down, then another node takes over. We can create multiple VMs on the failover cluster. VMs can be connected to different tenant networks. In this case we need to make sure VM connected on network ‘A’ with static ip should persist same network configuration even if it gets migrated from one node to another within a cluster. This is possible by assigning static MAC/static IP for the VM. But how to get free and unique MAC to assign to VM, there are different ways to solve this problem. In this article we will discuss some of them with pros and cons. (Note: solutions discussed in this article are just to suggestions, can not be considered optimal solutions)
Before this, lets understand first things required to create a tenant VM. To create tenant VM connected to tenant network in stack-hci following steps are performed.
1. Create a new VM with vm network adapter having static MAC assigned
2. Create a new network interface on network controller service(running on SDN) having same MAC and static IP assigned.
3. Associate created network adapter with network interface controller, to make vm gets tenant network connection.
Following powershell commands perform above steps logically.
# 1. vm creation with static MAC
New-VM -Generation 2 -Name “MyVM” -Path “C:VMsMyVM” -MemoryStartupBytes 4GB -VHDPath “C:VMsMyVMVirtual Hard DisksWindowsServer2016.vhdx” -SwitchName “SDNvSwitch”
Set-VM -Name “MyVM” -ProcessorCount 4
# Setting static MAC
Set-VMNetworkAdapter -VMName “MyVM” -StaticMacAddress “00-11-22-33-44-55”
# Creating network interface on networkcontroller with same mac/static IP
$vnet = Get-NetworkControllerVirtualNetwork -ConnectionUri $uri -ResourceId “Contoso_WebTier”
$vmnicproperties = New-Object Microsoft.Windows.NetworkController.NetworkInterfaceProperties
$vmnicproperties.PrivateMacAddress = “001122334455”
$vmnicproperties.PrivateMacAllocationMethod = “Static”
$vmnicproperties.IsPrimary = $true
$vmnicproperties.DnsSettings = New-Object Microsoft.Windows.NetworkController.NetworkInterfaceDnsSettings
$vmnicproperties.DnsSettings.DnsServers = @(“24.30.1.11”, “24.30.1.12”)
$ipconfiguration = New-Object Microsoft.Windows.NetworkController.NetworkInterfaceIpConfiguration
$ipconfiguration.resourceid = “MyVM_IP1”
$ipconfiguration.properties = New-Object Microsoft.Windows.NetworkController.NetworkInterfaceIpConfigurationProperties
$ipconfiguration.properties.PrivateIPAddress = “24.30.1.101”
$ipconfiguration.properties.PrivateIPAllocationMethod = “Static”
$ipconfiguration.properties.Subnet = New-Object Microsoft.Windows.NetworkController.Subnet
$ipconfiguration.properties.subnet.ResourceRef = $vnet.Properties.Subnets[0].ResourceRef
$vmnicproperties.IpConfigurations = @($ipconfiguration)
New-NetworkControllerNetworkInterface –ResourceID “MyVM_Ethernet1” –Properties $vmnicproperties –ConnectionUri $uri
$nic = Get-NetworkControllerNetworkInterface -ConnectionUri $uri -ResourceId “MyVM_Ethernet1”
#Do not change the hardcoded IDs in this section, because they are fixed values and must not change.
# 3. Finally make association of vm network adapter with nic created in last step
$FeatureId = “9940cd46-8b06-43bb-b9d5-93d50381fd56”
$vmNics = Get-VMNetworkAdapter -VMName “MyVM”
$CurrentFeature = Get-VMSwitchExtensionPortFeature -FeatureId $FeatureId -VMNetworkAdapter $vmNics
if ($CurrentFeature -eq $null) {
$Feature = Get-VMSystemSwitchExtensionPortFeature -FeatureId $FeatureId
$Feature.SettingData.ProfileId = “{$($nic.InstanceId)}”
$Feature.SettingData.NetCfgInstanceId = “{56785678-a0e5-4a26-bc9b-c0cba27311a3}”
$Feature.SettingData.CdnLabelString = “TestCdn”
$Feature.SettingData.CdnLabelId = 1111
$Feature.SettingData.ProfileName = “Testprofile”
$Feature.SettingData.VendorId = “{1FA41B39-B444-4E43-B35A-E1F7985FD548}”
$Feature.SettingData.VendorName = “NetworkController”
$Feature.SettingData.ProfileData = 1
Add-VMSwitchExtensionPortFeature -VMSwitchExtensionFeature $Feature -VMNetworkAdapter $vmNics
} else {
$CurrentFeature.SettingData.ProfileId = “{$($nic.InstanceId)}”
$CurrentFeature.SettingData.ProfileData = 1
Set-VMSwitchExtensionPortFeature -VMSwitchExtensionFeature $CurrentFeature -VMNetworkAdapter $vmNics
}
Get-VM -Name “MyVM” | Start-VM
To make sure VMs works fine even after migration in windows failover cluster, we need to assign static MAC and static IP. To get available and unique MAC is challenge here. We will see following ways to solve this problem with pros and cons.
Generating random MAC on node
Assign dedicated unique MAC address pool range for every Node in cluster and Generating free MAC from Node’s MAC address range pool.
Get free MAC from Network controller service and use same on VM
Lets discuss each approach in detailed-
1. Generating random MAC on node
This is very simple approach, where we will generate random MAC and same will be used. It includes below steps:
Generate valid MAC on node, where we need to create VM(or new network interface).
Set same MAC on vm network adapter as static
Set same MAC on network interface along with static IP
Following is powershell script performs same above logical steps:
New-VM -Name $vm_name -MemoryStartupBytes $vm_memory -BootDevice VHD -VHDPath $image_path -Path $vm_data_path -Generation $vm_generation -SwitchName $switch_name
Add-ClusterVirtualMachineRole -vmname $vm_name -Name $vm_name
Start-Sleep -Seconds 3
############## Random MAC address generation and assignment
# script block for mac address assingment kept in retry block
$mac_address = Retry-Command -ScriptBlock {
# do something
# found used in az-auto-setup
#$mac_address=(“{0:D12}” -f ( Get-Random -Minimum 0 -Maximum 99999 ))
$mac_address = (0..5 | ForEach-Object { ‘{0:x}{1:x}’ -f (Get-Random -Minimum 0 -Maximum 15), (Get-Random -Minimum 0 -Maximum 15) }) -join ‘-‘
write-host “Tring to set : $mac_address”
Set-VMNetworkAdapter -VMName $vm_name -StaticMacAddress “$mac_address”
write-host “Mac set succssfully: $mac_address”
Start-Sleep -Milliseconds 500
Write-host $( Get-VMNetworkAdapter -VMName $vm_name ).MacAddress
return $mac_address
}
write-host “Mac set succssfully: $mac_address”
Write-host ‘VM created..’
##########################################################################
# network configuration starts here..
# you can refer for more info: https://learn.microsoft.com/en-us/windows-server/networking/sdn/manage/create-a-tenant-vm#prerequisites
$vnet = Get-NetworkControllerVirtualNetwork -ConnectionUri $uri -ResourceId $vnet_name
$vmnicproperties = New-Object Microsoft.Windows.NetworkController.NetworkInterfaceProperties
# give same mac address below as created before..
$mac = -join($mac_address.split(“-“)).toupper()
$vmnicproperties.PrivateMacAddress = $mac
Write-host $mac
$vmnicproperties.PrivateMacAllocationMethod = “Static”
$vmnicproperties.IsPrimary = $true
$vmnicproperties.DnsSettings = New-Object Microsoft.Windows.NetworkController.NetworkInterfaceDnsSettings
#$vmnicproperties.DnsSettings.DnsServers = @(“192.168.1.254”, “8.8.8.8”)
$vmnicproperties.DnsSettings.DnsServers = $dns_server
$ipconfiguration = New-Object Microsoft.Windows.NetworkController.NetworkInterfaceIpConfiguration
$ipconfiguration.resourceid = $vm_name + “_IP1”
$ipconfiguration.properties = New-Object Microsoft.Windows.NetworkController.NetworkInterfaceIpConfigurationProperties
$ipconfiguration.properties.PrivateIPAddress = $ip_address
$ipconfiguration.properties.PrivateIPAllocationMethod = “Static”
$ipconfiguration.properties.Subnet = New-Object Microsoft.Windows.NetworkController.Subnet
# do: programatically decide subnet full ref, or form path directly
# $ipconfiguration.properties.subnet.ResourceRef = $vnet.Properties.Subnets[0].ResourceRef
$ipconfiguration.properties.subnet.ResourceRef = “/virtualNetworks/” + $vnet_name + “/subnets/” + $subnet_name
$vmnicproperties.IpConfigurations = @($ipconfiguration)
$NIC_name = $vm_name + “_Eth1”
New-NetworkControllerNetworkInterface -ResourceID $NIC_name -Properties $vmnicproperties -ConnectionUri $uri -Confirm:$false -force
Write-host ‘NIC config created..’
Start-Sleep -Seconds 8
$nic = Get-NetworkControllerNetworkInterface -ConnectionUri $uri -ResourceId $NIC_name
#########################################################################
#Do not change the hardcoded IDs in this section, because they are fixed values and must not change.
$FeatureId = “9940cd46-8b06-43bb-b9d5-93d50381fd56”
$vmNics = Get-VMNetworkAdapter -VMName $vm_name
$CurrentFeature = Get-VMSwitchExtensionPortFeature -FeatureId $FeatureId -VMNetworkAdapter $vmNics
if ($CurrentFeature -eq $null)
{
$Feature = Get-VMSystemSwitchExtensionPortFeature -FeatureId $FeatureId
$Feature.SettingData.ProfileId = “{$( $nic.InstanceId )}”
$Feature.SettingData.NetCfgInstanceId = “{56785678-a0e5-4a26-bc9b-c0cba27311a3}”
$Feature.SettingData.CdnLabelString = “TestCdn”
$Feature.SettingData.CdnLabelId = 1111
$Feature.SettingData.ProfileName = “Testprofile”
$Feature.SettingData.VendorId = “{1FA41B39-B444-4E43-B35A-E1F7985FD548}”
$Feature.SettingData.VendorName = “NetworkController”
$Feature.SettingData.ProfileData = 1
Add-VMSwitchExtensionPortFeature -VMSwitchExtensionFeature $Feature -VMNetworkAdapter $vmNics
}
else
{
$CurrentFeature.SettingData.ProfileId = “{$( $nic.InstanceId )}”
$CurrentFeature.SettingData.ProfileData = 1
Set-VMSwitchExtensionPortFeature -VMSwitchExtensionFeature $CurrentFeature -VMNetworkAdapter $vmNics
}
Write-host ‘finally applying setting..’
Start-Sleep -Seconds 5
Get-VM -Name $vm_name | Start-VM
But this approach has following problems :
There is possibility that two vms running on same cluster may got same MAC and it may create MAC conflict issue after migration.
Some specific MAC range is not allowed to be assigned, in this case we need to keep retrying random generation, which is not good.
Very difficult to keep track of used MAC addresses.
So this method is not reliable and not recommended.
2. Assign dedicated unique MAC address pool range for every Node in cluster and Generating free MAC from Node’s MAC address range pool.
We can preassign unique dedicated MAC address pool range to every node(hyper-v) in cluster, so whenever we need to create new network interface we will first get free MAC from the pool of node where vm will be running. Same MAC will be made static on vm network adapter and network interface followed by static ip. Following are logical steps need to perform:
1. Get free MAC from Node’s MAC pool range.
2. Assign same static MAC on VM network adapter
3. Set same MAC on network interface along with static IP
Following is an example of MAC pool range distribution plan for 255 clusters, 16 hosts each:
00-15-5D-[c1][c2]-[h1][v1]-[v2][v3]
field c1, c2: will indicate a cluster. 00 to FF : Max 255 clusters can be created.
field h1 – will be for host/node identification in a cluster. 0 to F = max 16 hosts in a cluster.
field v1,v2,v3 will be used for vms. 000 to FFF = 16*16*16 = total 4096 possible vms/network interfaces per node can be created.
But main challenge here is there is no api or command available to get free MAC from node pool. There is a workaround that to get MAC assigned from the pool, we need to create dummy network adapter with dynamic configuration and start vm for a moment to get free dynamic MAC assigned from node pool range. Then we need to stop vm and revert the change and using same MAC we need to create static one and same steps need to be followed. This is not good approach since this is just a workaround, where dummy resource need to create.
# creating new network adapter with dynamic MAC
Add-VMNetworkAdapter -VMName $vm_name -SwitchName $switch_name -Name $adapter_name
# starting and stopping vm to get free MAC from node pool
Start-VM -VMName $vm_name; Stop-VM -VMName $vm_name -Force
# reading assigned dynamic MAC
$mac_address = (Get-VMNetworkAdapter -VMName $vm_name -Name $adapter_name).MacAddress
# make same MAC as static
Set-VMNetworkAdapter -VMName $vm_name -Name $adapter_name -StaticMacAddress $mac_address
# rest steps are same for network interface creation
3. Get free MAC from Network controller service and use same on VM network adapter.
There is a dedicated centralized network controller service on every Stack-hci cluster, where we can setup global MAC address range pool at network controller service. When we create new network interface on network controller service with dynamic configuration, then it assign free MAC from the global free pool. It is very reliable solution since it is a centralized service. In this, we will follow below steps
Create a Network interface in Network controller service with dynamic MAC assignment config, to get assigned free MAC from global MAC range.
Read assigned MAC on network interface
Assign same MAC address to vm network adapter as static.
The following powershell commands perform above steps (Note: please use appropriate values in place of parameters):
# Creating network interface with dynamic MAC config on network controller
$vmnicproperties = New-Object Microsoft.Windows.NetworkController.NetworkInterfaceProperties
$vmnicproperties.PrivateMacAllocationMethod = “Dynamic”
$vmnicproperties.IsPrimary = $true
$vmnicproperties.DnsSettings = New-Object Microsoft.Windows.NetworkController.NetworkInterfaceDnsSettings
$vmnicproperties.DnsSettings.DnsServers = $dns_server
$ipconfiguration = New-Object Microsoft.Windows.NetworkController.NetworkInterfaceIpConfiguration
$ipconfiguration.resourceid = $vm_name + “_IP1”
$ipconfiguration.properties = New-Object Microsoft.Windows.NetworkController.NetworkInterfaceIpConfigurationProperties
$ipconfiguration.properties.PrivateIPAddress = $ip_address
$ipconfiguration.properties.PrivateIPAllocationMethod = “Static”
$ipconfiguration.properties.Subnet = New-Object Microsoft.Windows.NetworkController.Subnet
$ipconfiguration.properties.subnet.ResourceRef = “/virtualNetworks/” + $vnet_name + “/subnets/” + $subnet_name
$vmnicproperties.IpConfigurations = @($ipconfiguration)
$NIC_name = $vm_name + “_Eth1”
New-NetworkControllerNetworkInterface -ResourceID $NIC_name -Properties $vmnicproperties -ConnectionUri $uri -Confirm:$false -force
Write-host ‘NIC config created..’
Start-Sleep -Seconds 8
$nic = Get-NetworkControllerNetworkInterface -ConnectionUri $uri -ResourceId $NIC_name
# Read obtained free MAC from global pool
$mac_address = $nic.Properties.PrivateMacAddress -replace ‘..(?!$)’, ‘$&-‘
###### Vm creation flow starts from here. We will set static MAC here
New-VM -Name $vm_name -MemoryStartupBytes $vm_memory -BootDevice VHD -VHDPath $image_path -Path $vm_data_path -Generation $vm_generation -SwitchName $switch_name
Add-ClusterVirtualMachineRole -vmname $vm_name -Name $vm_name
Set-VMNetworkAdapter -VMName $vm_name -StaticMacAddress “$mac_address”
write-host “Mac set succssfully: $mac_address”
Conclusion:
The third/last approach discussed in this article seems to be easy and more reliable, since we are consuming MAC from centralized network controller service. We will never face problem of MAC conflicts incase VMs get migrated from one node to another.
Microsoft Tech Community – Latest Blogs –Read More


