

Category: Microsoft
Category Archives: Microsoft
Why Azure Image Builder – Getting Started
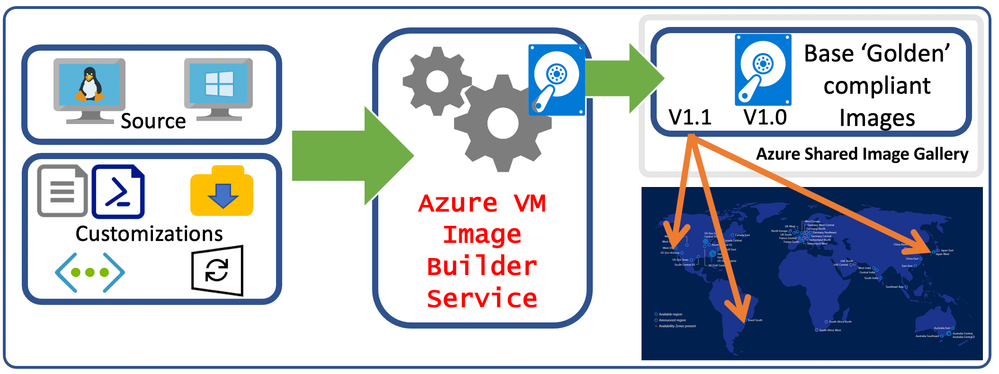
You might be familiar with building golden images or templates for use on-premises. Back in the olden days we used to “ghost” machines and now you may use a VM template with sysprep. Azure offers the managed service Azure Image Builder so you can configure your image as a template for reuse within your cloud. Golden or base images are usually built upon governance, standards and best practices within your organization. These images especially come into play if you have immutable infrastructure, servers or virtual machines that will not be modified after deployment. To ensure consistency and speed up deployment, you can create golden images or templates.
Azure Image Builder lets you transfer your image customization pipeline to Azure without changing your scripts, commands, and processes. VM Image Builder works with any base operating system image from the Azure Marketplace and uses an automation config for the build process. Your VM image build artifacts are stored as Azure resources. This feature eliminates the need for offline definitions and the risk of environment drifts due to accidental deletions or updates.
Side note – Azure Image Builder is based on Packer, so you can reuse your existing Packer shell provisioner scripts with it.
Resource: https://learn.microsoft.com/en-us/azure/virtual-machines/image-builder-overview?tabs=azure-powershell
Scenarios
Build, tailor and update “Base” virtual machine images and distribute them globally.
Image creation for Azure Virtual Desktop.
Access files in an Azure storage account or scripts from GitHub
Have your build pipeline trigger automatic image creation based on specific criteria.
Create images for both Azure and Azure Stack.
Integrate with existing build pipelines using Azure VM Image Builder DevOps Task.
Optimize Windows and Linux VM images.
Deploy your image building pipeline on Azure faster by connecting to existing virtual networks that have configuration servers (DSC, Puppet, Chef), file shares, or any other servers or services that can be routed.
Many of these scenarios have code and quickstarts to get you going on the AZ VM Image builder Github repository.
I encourage you to check it out and you can contribute as well.
What’s New
Auto-Image Creation, also known as “triggers”, is a feature that enhances developer productivity by automatically initiating image builds for new base images. This feature allows customers to streamline their image building process by setting up ‘triggers’ for the images they want to update automatically. Azure Image Builder also helps internal teams to ensure the security of their images through automation, reducing the manual work required to patch 1P images.
Isolated Image Builds. A feature of Azure Image Builder (AIB) is the ability to customize and validate VM images using dedicated Azure Container Instances (ACI) resources in your subscription. This provides compute and network isolation from shared infrastructure.
Azure VM Image Builder service DevOps task (preview). Create a virtual machine (VM) image with your application and operating system installed and configured, using the build artifacts.
Azure Portal. Users have been using CLI/PowerShell to create Azure Image templates but now that availability is in the Azure Portal.
The Azure Image Builder portal functionality allows the customer to explore the features of Azure Image Builder easily, without spending time on learning how to make a JSON template from the documentation. You can create an Azure Image from Bicep or an ARM template using JSON
Getting Started
Permissions
No matter which route you take, using the Portal or using command line you have to grant permissions for the service to work. The VM Image Builder service needs permissions to create, manage, and delete a staging resource group, which has the prefix IT_*. This resource group contains any resources that the image build requires. You can add these resources after you register for the service successfully. The service creates a service principal name in your subscription when you register.
To distribute images to either the managed images or Compute Gallery, you must create an Azure user-assigned identity that can read and write images. To access Azure Storage, you need permissions to read both private and public containers.
Register providers
If you haven’t already done so, register the following resource providers to use with your Azure subscription:
Microsoft.Compute
Microsoft.KeyVault
Microsoft.Storage
Microsoft.Network
Microsoft.VirtualMachineImages
Microsoft.ManagedIdentity
Microsoft.ContainerInstance
I’ll go over registering the providers and granting permissions in this first video below.
PowerShell Scripts I used:
#Set Subscription
Set-AzContext -SubscriptionId “Your Subscription”
#Register Providers
Get-AzResourceProvider -ProviderNamespace Microsoft.Compute, Microsoft.KeyVault, Microsoft.Storage, Microsoft.VirtualMachineImages, Microsoft.Network, Microsoft.ManagedIdentity |
Where-Object RegistrationState -ne Registered |
Register-AzResourceProvider
# Destination image resource group name
$imageResourceGroup = ‘myWinImgBuilderRG’
# Azure region
$location = ‘WestUS2’
# Name of the image to be created
$imageTemplateName = ‘myWinImage’
# Distribution properties of the managed image upon completion
$runOutputName = ‘myDistResults’
# Your Azure Subscription ID
$subscriptionID = (Get-AzContext).Subscription.Id
Write-Output $subscriptionID
##Create Resource Group
New-AzResourceGroup -Name $imageResourceGroup -Location $location
#Create variables for the role definition and identity names. These values must be unique.
[int]$timeInt = $(Get-Date -UFormat ‘%s’)
$imageRoleDefName = “Azure Image Builder Image Def $timeInt”
$identityName = “myIdentity$timeInt”
#Create a user identity
New-AzUserAssignedIdentity -ResourceGroupName $imageResourceGroup -Name $identityName -Location $location
#Store the identity resource and principal IDs in variables
$identityNameResourceId = (Get-AzUserAssignedIdentity -ResourceGroupName $imageResourceGroup -Name $identityName).Id
$identityNamePrincipalId = (Get-AzUserAssignedIdentity -ResourceGroupName $imageResourceGroup -Name $identityName).PrincipalId
#Downlaod JSON config file to assign permissions to the identity
$myRoleImageCreationUrl = ‘https://raw.githubusercontent.com/azure/azvmimagebuilder/master/solutions/12_Creating_AIB_Security_Roles/aibRoleImageCreation.json’
$myRoleImageCreationPath = “myRoleImageCreation.json”
Invoke-WebRequest -Uri $myRoleImageCreationUrl -OutFile $myRoleImageCreationPath -UseBasicParsing
#update role definition template
$Content = Get-Content -Path $myRoleImageCreationPath -Raw
$Content = $Content -replace ‘<subscriptionID>’, $subscriptionID
$Content = $Content -replace ‘<rgName>’, $imageResourceGroup
$Content = $Content -replace ‘Azure Image Builder Service Image Creation Role’, $imageRoleDefName
$Content | Out-File -FilePath $myRoleImageCreationPath -Force
#Create role definition
New-AzRoleDefinition -InputFile $myRoleImageCreationPath
#Grant the role definition to the VM Image Builder service principal
$RoleAssignParams = @{
ObjectId = $identityNamePrincipalId
RoleDefinitionName = $imageRoleDefName
Scope = “/subscriptions/$subscriptionID/resourceGroups/$imageResourceGroup”
}
New-AzRoleAssignment @RoleAssignParams
In the next post we will go over using the Azure portal to build a golden image and build from it.
Thanks for reading and feel free to comment with any questions.
Amy Colyer
Microsoft Tech Community – Latest Blogs –Read More
Learn more about LinkedIn Smart Link Phish Campaigns
Microsoft Defender for Office 365 security research team has observed a rise in the LinkedIn Smart Link phishing campaign. LinkedIn Smart Links are used by LinkedIn business accounts to deliver content and track user content engagements through the LinkedIn Sales Navigator. A typical Smart Link uses the LinkedIn domain followed by a ‘code’ parameter with an eight-alphanumeric character ID that may contain underscores and dashes.
However, malicious Smart Links can include other parts of information, such as obfuscated victim emails. Smart Links have proven to bypass security email gateways (SEGs) and other email security suites due to the link using a trusted domain. Threat actors are actively using Slinks in a new form of campaigns identified by Microsoft Defender for 365 Security Research team.
It is important to note that slinks are not inherently malicious. They are a legitimate feature used by LinkedIn business accounts to track user engagement with content. However, as with any feature, they can be abused by threat actors to carry out phishing campaigns.
Let us learn more on TPT (Tactics, Techniques and Procedure) behind these LinkedIn Smart link phishing campaigns.
Following is the standard Slink format provided by the LinkedIn Sales Navigator.
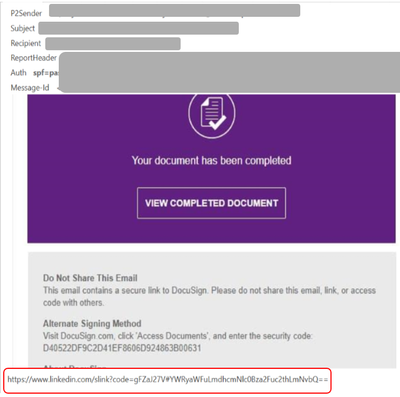
https://www.linkedin.com/slink
From our LinkedIn Smart link campaign investigation, we observed that the smart links, instead of “scode” parameter containing alphanumeric characters, were containing obfuscated target emails. Upon clicking the malicious LinkedIn Smart Link, the user will be sent directly or through a series of redirects to the phishing website. The phishing kit will read the victim’s email from the Smart Link to autofill the malicious form, adding to the illusion of legitimacy that the victim has landed on the legitimate Microsoft sign-in page.
Following are some of the popular brands that were impersonated by the LinkedIn Smart Link campaigns.
DocuSign Campaign template
Microsoft Impersonation Template
SharePoint Campaign template
The observed pattern from these Smart Link Campaigns are outlined below.
Emails employ a generic subject line to mimic benign behaviour
Email body features a single image with a LinkedIn Smart Link embedding.
Multiple redirections are employed before presenting the Phishing page to evade detection systems.
Following are the insights the research team observed from the Smart Links campaign data from Nov ‘23 to Dec ‘23.
Recommendations
It is important to be vigilant and cautious while opening emails, especially those that contain links. It is advisable to verify the authenticity of the email and the sender before clicking on any links or downloading any attachments. Especially when commonly used brands are part of email body that triggers the uses to click on the URLs, the users need to pay extra attention on the logo, content, redirection and the final landing URL legitimacy.
Organizations are highly recommended to use email security gateways like Microsoft Defender for Office 365 to reduce the exposure of such campaigns to their employees. Security teams are also recommended to train their users to stay resistant to such vulnerable emails by deploying advanced Simulation trainings through MDO attack and simulation capabilities.
If you are already using MDO, we encourage your SOC/Security teams to report any such suspicious emails landing in the inboxes of your employees so that we can investigate in case of any policy overrides or sophisticated scenarios used by the threat actors.
Microsoft Tech Community – Latest Blogs –Read More
How to get ready for Copilot for Microsoft 365 | Updates for 2024
Microsoft Copilot for Microsoft 365 is now available for organizations of all sizes with Microsoft 365 and Office 365 — without a minimum license count.
In this video, Jeremy Chapman from the Microsoft 365 team demonstrates new security, compliance, and privacy updates in the experience. You’ll also see what’s possible to achieve the right level of file permissions for Zero Trust, just enough access search across Microsoft 365 and with Copilot information retrieval. Beyond data security, we explain prerequisites, administrative controls in the Microsoft 365 admin center, the wizard-based Copilot for Microsoft 365 setup guide, and tools to drive adoption.
Get ready for Copilot.
See how security and privacy with Copilot for Microsoft 365 works.
Protect data with sensitivity labels and policies.
Get the most from Copilot for Microsoft 365. Check it out.
Fine-tune policy and configuration settings for Copilot.
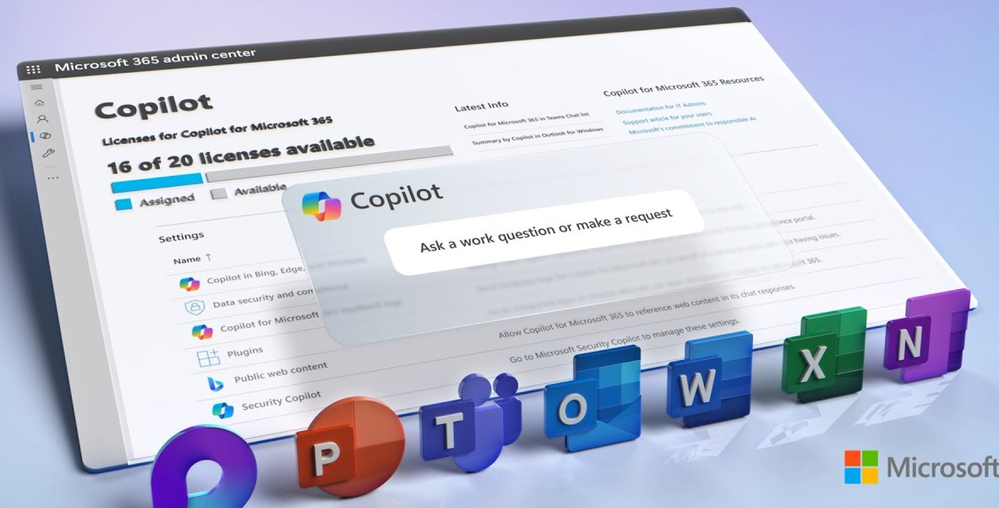
Manage license assignments, configure settings, and review user activity and feedback in the Microsoft 365 admin center. Get started.
Watch our video here:
QUICK LINKS:
00:00 What is Copilot for Microsoft 365 and how does it work?
01:09 What are the data security controls for Microsoft Copilot?
03:06 How to set up data protections for Microsoft Copilot
05:47 Are Microsoft Copilot activities logged and auditable?
06:27 Microsoft Copilot data residency and where it’s processed
07:11 Admin configurations for Copilot in the Microsoft 365 admin center
08:10 Microsoft Copilot prerequisites, setup, and licensing
09:16 How to drive Microsoft Copilot readiness and adoption with end users
Link References:
Find the full Microsoft Copilot playlist at https://aka.ms/M365CopilotMechanics
For more information about Copilot adoption, check out https://adoption.microsoft.com/copilot
Use the Microsoft 365 Apps admin center configure a monthly update channel for Copilot features to light up, go to https://config.office.com
Unfamiliar with Microsoft Mechanics?
As Microsoft’s official video series for IT, you can watch and share valuable content and demos of current and upcoming tech from the people who build it at Microsoft.
Subscribe to our YouTube: https://www.youtube.com/c/MicrosoftMechanicsSeries
Talk with other IT Pros, join us on the Microsoft Tech Community: https://techcommunity.microsoft.com/t5/microsoft-mechanics-blog/bg-p/MicrosoftMechanicsBlog
Watch or listen from anywhere, subscribe to our podcast: https://microsoftmechanics.libsyn.com/podcast
Keep getting this insider knowledge, join us on social:
Follow us on Twitter: https://twitter.com/MSFTMechanics
Share knowledge on LinkedIn: https://www.linkedin.com/company/microsoft-mechanics/
Enjoy us on Instagram: https://www.instagram.com/msftmechanics/
Loosen up with us on TikTok: https://www.tiktok.com/@msftmechanics
Video Transcript:
-How is your data protected when using Microsoft Copilot, and how do you get ready for it? Well, in the next few minutes, with Copilot for Microsoft 365, now more broadly available to organizations of all sizes, I’ll unpack how you can securely take advantage of generative AI across Microsoft 365 app experiences.
-And I’ll also go through the steps and resources to deploy it at scale. Now, if you’re new to Copilot for Microsoft 365, it lets you use natural language prompts to interact with your organization’s data and generate personalized content and responses with relevant insights that are unique to your work context.
-While you only see the generated response in your original prompt, behind the scenes Copilot for Microsoft 365 interprets your request, and if necessary, will find information you have access to within your organization from your work files sitting in SharePoint and OneDrive, as well as email and calendar via the Microsoft Graph. And it presents this information as additional context along with your original prompt to the large language model to generate a personalized and informed response.
-And even though none of this information is retained by the large language model, to securely take full advantage of generative AI, you can and should protect data at every stage from the information contained in the user prompt to the information retrieved based on user access permissions, and the generated response itself so that sensitive data is not inadvertently exposed when it shouldn’t be.
-And the good news is controls for security and privacy over your data exist at every stage, and will leverage the sensitivity labels and the corresponding policies that you’ve already got in place.
-Now, I’ll start by showing you a couple of examples of the benefits of these data protection controls in action, and then I’ll show you how to configure them yourself as an admin.
-In this case, I’m using Copilot in microsoft365.com. I’ll prompt it to list the key points from the Contoso purchase agreement, and the information that was retrieved shows the sensitive label for the document that it referenced. Now to be clear, this is a file that I have explicit access to. And if I move over to the source document itself, you can also see the confidential sensitivity label was previously applied to it.
-So you saw how Copilot was able to inform me of the sensitivity of the document that it retrieved all as part of its response. Now, let’s see how it works for content generation using Microsoft Word. So here I’m going to prompt Copilot in Word to generate a confirmation letter that’s based on the same purchase agreement with the sensitivity label that we saw before.
-And right after I referenced that protected document, you’ll see that with this shield icon here, it immediately recognizes this as a sensitive file. So now I’m going to hit generate, and it will author a draft confirmation letter for the purchase agreement.
-Notice that when it’s completed the confirmation letter, because the originating document has a confidential label, that same label is automatically applied to the generated file as shown in the information bar above the document.
-So the protection is inherited from the labeled source material. So as an admin, what are the steps then it takes to protect your data? Well, it all starts by looking at your data access permissions and applying the principles of just enough access as well as least privileged for information across your entire data estate.
-And one of the first recommended steps that you can take as a Microsoft 365 administrator is to review SharePoint site access, prioritizing the sites containing the most sensitive information. Now, here you can start by looking for sites that have their privacy set to public, which means that all employees can discover and access them.
-And from there, you can require that site owners verify ownership as well as who should be members or visitors of these sites to limit access. Then for content classification and labeling, one of the simplest controls to put in place is to classify files automatically saved to sensitive locations, as you can see here with the site owner controls for this document library.
-Now, that means that any content created in that location will get the label applied automatically and corresponding policies can lock files down to the right people. Then for another easy test to see you can use Search and Microsoft 365 you can use Search and Microsoft 365 even before you deploy Copilot to evaluate whether different users can discover and access sites or files that they should not have access to.
-The labels and classifications applied in those locations are configured and managed using Microsoft Purview. In fact, let me show you those controls as well as additional more advanced controls to protect your data using its auto labeling and data loss prevention capabilities. The labels you apply in Microsoft Purview can automatically help you discover, limit the sharing radius, and apply encryption directly using policies.
-These can also be applied based on the content within the documents using data loss prevention or DLP policies with sensitive information types. So here for example, I’ve started a DLP policy for personally identifiable information, and I’ve added a few sensitive information types already. And I can add even more with over 300 options here for things like banking numbers, addresses, identification types, tax information, and more.
-Additionally, using trainable classifiers, there are dozens of built-in document types that I can choose from, including source code, healthcare, HR, and more to auto apply labels. Then moving on to device restrictions, I can also set up endpoint DLP policies to prevent users from copying sensitive data to their clipboards and then, for example, into unapproved AI assistance sites.
-Next, beyond data protection policies, let me explain how Copilot for Microsoft 365 activities can all be audited. Using content search in Microsoft Purview, all activity from Copilot for Microsoft 365 is discoverable as you can see here. Retention policies can also be used to retain content and prompts and responses, and then retained based on your requirements. E-discovery is also supported for Copilot interactions as you can see here with this case example.
-And communication and compliance will likewise flag any content with established policy matches like the one you see here for codename Obsidian. Of course, another important consideration is how data is processed and where it resides when using Microsoft Copilot services. Microsoft hosts and operates large language model instances in Microsoft data centers and will never use your data to train large language models.
-And data residency with Microsoft Copilot is consistent with Microsoft 365 and the locations where your data is already stored and processed today. Which means that if your organization is based in the European Union, Copilot data is likewise stored and processed within the EU data boundary like the rest of your data.
-Additionally, the Microsoft Copilot copyright commitment means that content generated using Copilot also comes with legal protections for Microsoft. Now, let’s move on to how you can fine tune policy settings and configurations for Copilot as an admin. And for that, we’ve added new controls in Microsoft 365’s admin center, including links to many of the tools and concepts I’ve shown today.
-So here you can see the status of your Copilot assignments as well as the latest information on Copilot. Under settings, you can find what you need to manage Microsoft Copilot experiences found in Bing, the Edge browser, and in Windows, as well as deep links to many of the data security and compliance controls.
-Next, admin controls to submit feedback about Copilot for Microsoft 365 services on behalf of users, then configurations for plugins and their permissions from the integrated apps page, as well as tenant wide controls to allow the public web to be used as grounding data in Copilot for Microsoft 365 and more. Now, with the right protections and configurations in place, you can take full advantage of generative AI and start deploying Copilot for Microsoft 365 services at scale.
-Now, this starts with ensuring that you’ve got the right Microsoft 365 services in place. And recently this was expanded to organizations of all sizes with Microsoft 365 Business and Enterprise Suites, as well as faculty members for Microsoft 365 Academic suites.
-Next, for Copilot capabilities to light up in Microsoft 365 apps, using the Microsoft 365 apps admin center at config.office.com, you’ll want to deploy either monthly enterprise, current channel, or current channel preview. From there, from the Microsoft 365 admin center under setup, you can use the “Get ready for Microsoft Copilot for Microsoft 365” setup guide to configure any remaining items, and it walks you through many of the steps I just presented to prepare your organization.
-From here, you can even assign Copilot licenses to users and groups in scope for your deployment and send a welcome email to help them get started with Copilot. And with services deployed, a best practice for driving and improving adoption is to establish an internal community of Microsoft Copilot users. And the Copilot hub at adoption.microsoft.com/copilot gives you additional resources by role to help users learn about and get the most from Copilot.
-So that was an overview of how security and privacy with Copilot for Microsoft 365 works, and how you can get ready for Copilot in your organization. For more deep dives on other Microsoft Copilot tech, checkout aka.ms/M365CopilotMechanics, And keep checking back for the latest AI updates Thanks for watching.
Microsoft Tech Community – Latest Blogs –Read More

Healio – Healthcare Chatbot using C# Semantic Kernel, planner and Azure OpenAI
Healio – Healthcare Chatbot: Access information from different data sources and create its own plan using C# Semantic Kernel, planner and Azure OpenAI
In this article we will go through a business use case of developing Healio – Healthcare Chatbot: Access information from different data sources and create its own plan using C# Semantic Kernel, planner and Azure OpenAI. You might be familiar with the fact that Retrieval Augmented Generation (RAG) pattern is an easy and efficient way to allow Azure OpenAI to “talk to your data”. This pattern lets you query your data with Azure Cognitive Search (a search engine), find pertinent pieces of information from your data, then include that extra information to your prompts to the Azure OpenAI service to reply in a natural language.
This isn’t always enough
However, the RAG pattern has some limitations when you examine how it is implemented. It relies on a single data source (Cognitive Search). Cognitive Search can index many kinds of data sources (PDFs, Word docs, etc). It excels at searching unstructured data. Also, I need to copy the results from the Cognitive Search and add them to the prompt by myself in code. I had to process the results of Cognitive Search by myself in code.
This leads to several questions:
What if I want to use multiple data sources to retrieve the data necessary to answer the user’s question?
What if I don’t know or don’t want to hard-code the order of operation for calling multiple data sources?
What if I don’t want to write the parsing code for calling multiple data sources with disparate data formats?
How can I let AI “orchestrate” the API calls to answer questions & pull together data that I couldn’t predict beforehand?
To solve these more complex issues, I need more than the RAG pattern.
More complex example
Pretend that you are building the healthcare chatbot to help answer common customer support questions about health-related information, advice, and support to patients, visitors, and staff. They can also help with booking appointments, checking symptoms, and accessing medical records. Here are some common data sources that customer support uses to answer customer questions.
Administrative data: This data is generated from claims, encounter, enrollment, and providers systems. It includes information such as type of service, diagnosis and procedure codes, location of service, and amount billed and reimbursed. This data can be used to answer questions about billing, insurance, and utilization of services.
Patient medical records: This data is documentation of a patient’s medical history and care. It contains rich clinical detail such as diagnoses, treatments, medications, lab results, and outcomes. This data can be used to answer questions about a patient’s health condition, treatment plan, and progress.
Patient surveys: This data is collected from survey instruments that capture self-reported information from patients about their health care experiences. It covers aspects such as satisfaction, quality, access, and outcomes of care. This data can be used to answer questions about a patient’s feedback, preferences, and expectations.
Hospital databases: This data is available from various sources, such as individual hospitals, Doctor’s schedule, hospital associations, state and regional data organizations, health departments, and federal agencies,. It includes information such as hospital characteristics, performance measures, quality indicators, and patient outcomes. This data can be used to answer questions about a hospital’s reputation, accreditation, services, and achievements.
Complex user questions could be answered by combining these data sources. These data sources could be used in different systems, each with varying authorization needs, varying languages, varying protocols, etc.
We have to tell the OpenAI service when it should use our external data sources, what type of input data to give them & what type of data to get back. These instructions need to be in terms that humans can understand, since that is what the big language model is using.
Example complex user query
“How can I schedule an appointment with Dr. Smith, who performed my surgery last month, for a follow-up checkup next week and look availability of doctor in nearest hospital in my network?”
Let’s break this question down.
We need to know the availability of Dr. Smith. Just looking the past record of patient (as a simple RAG implementation would do) couldn’t answer this question and there is no guarantee that Dr. Smith is still working in same shift or with same hospital. We need to look the hospital’s database and check his schedule and availability.
Next, we have to find out the patient’s previous medical history. We already checked the doctor’s schedule, so we have the patient and doctor information.
In this case, we want to know the type of care service, cost, billing and which hospital for next week. A good chatbot would ask for more information about where “exactly” the user was planning to visit e.g. nearest hospital in network.
The next step is to make AI come up with a plan to access the different data sources that we mentioned above. It has to access them in the correct order (connected all the dots), interpret the output (because each API will give different data and is not aware of the other APIs) and finally create a response.
Enter Semantic Kernel
Semantic Kernel is a free SDK (C#, Java, Python, JavaScript) that can help you integrate the Azure OpenAI service into your application. It lets you access the Azure OpenAI endpoints for “chat” and “embedding” functions. With Semantic Kernel, you can avoid making direct REST API calls to the service.
To go further, the Semantic Kernel SDK has a feature called a “planner”. The planner coordinates multiple calls to the Azure OpenAI service to create a plan to answer the user’s questions. You can then follow the plan.
With Semantic Kernel, you can also make “plugins“, which are ways to invoke native code. These native plugins can perform mathematical calculations, read/write files or make API calls.
A lot of the effort in creating this kind of application will be in the “prompt engineering” of trying to tell the Semantic Kernel when to use your plugin and what arguments to give it.
In part 2, I will explain how I built a sample app that does this and implement our use case to develop Healthcare Chatbot – Healio.
Microsoft Tech Community – Latest Blogs –Read More
Interpreting Script activity output json with Azure Data FactorySynapse analytics
Script activity in Azure Data Factory Synapse analytics is very helpful to run queries against data sources mentioned here in this document.
When we use two or more queries in the script activity, it is important to understand the output json of script activity to write expressions based on the output in the subsequent activities.
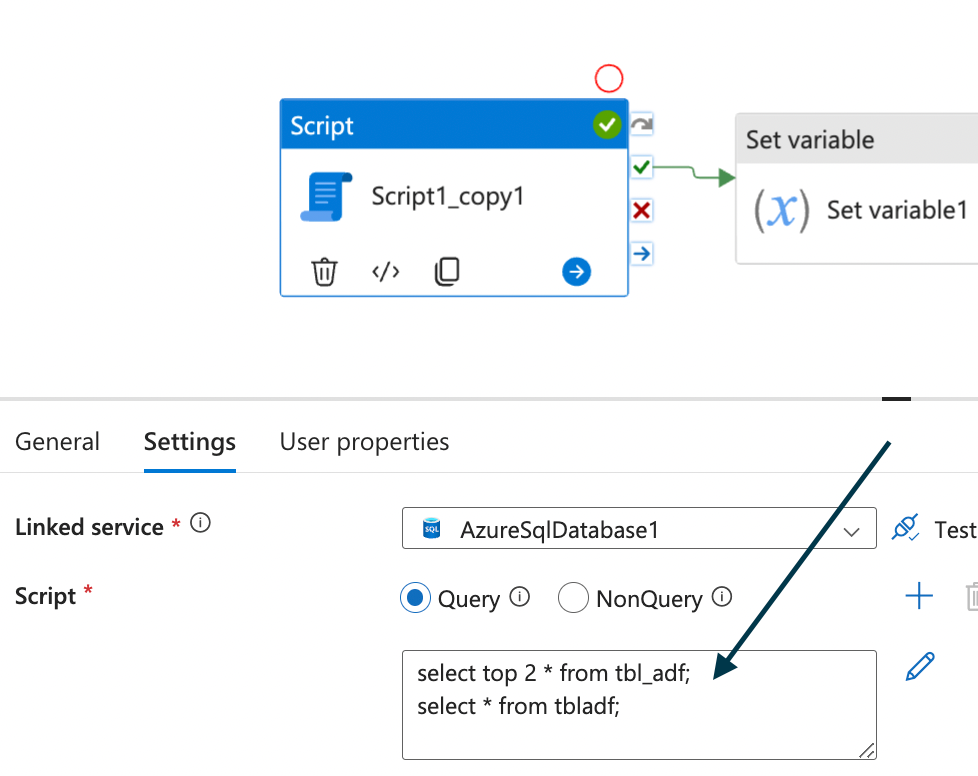
Consider the below Pipeline design:
We have two select queries as follows in script activity, and each of which will give a resultSet.
select top 2 * from tbl_adf;
Select * from tbladf
When debugged, it will give output as below.
{
“resultSetCount”: 2,
“recordsAffected”: 0,
“resultSets”: [
{
“rowCount”: 2,
“rows”: [
{
“Order Date”: null,
“Order ID”: “271735084”,
“Ship Date”: “2020-01-24T00:00:00Z”,
“Region”: “AUSTRALIA AND OCEANIA”,
“Unit Cost”: “524.96”,
“Total Revenue”: “849829.05”
},
{
“Order Date”: null,
“Order ID”: “252502572”,
“Ship Date”: “2018-12-29T00:00:00Z”,
“Region”: “MIDDLE EAST AND NORTH AFRICA”,
“Unit Cost”: “152.58”,
“Total Revenue”: “1522290.66”
}
]
},
{
“rowCount”: 1,
“rows”: [
{
“lastmodified”: “2024-01-12T08:29:48.1508043Z”
}
]
}
]
So, as per line #2, resultSet count =2. It is because, we have two select queries in the script activity.
In case we want to get the Total Revenue value from Row#1, we have to write below expression.
@activity(‘Script1_copy1’).output.resultSets[0].rows[0][‘Total Revenue’]
where, resultSets[0]: First select query result
rows[0]: first row in resultSets[0]
Same way, if we want to get the Total Revenue value from Row#2, we have to write below expression.
@activity(‘Script1_copy1’).output.resultSets[0].rows[1][‘Total Revenue’]
where, resultSets[0]: First select query result
rows[1]: second row in resultSets[0]
And, the below expression gets the rowcount from each resultset.
@activity(‘Script1_copy1’).output.resultSets[0].RowCount
@activity(‘Script1_copy1’).output.resultSets[1].RowCount
So, by understanding the structure of output json, we are able to write expressions to access individual elements of the output of any activity in ADFSynapse.
Microsoft Tech Community – Latest Blogs –Read More
Unlock the Power of Video at Work and School: 6 Features to Use in Microsoft Stream
Microsoft Stream is a powerful video platform that allows you to create, share, and view videos securely at work or school. What’s more, Stream powers the video experience across Microsoft 365, letting you add or view videos directly in the apps you use every day. With features such as sharing, captions, transcriptions, translations, chapters, search, and comments, and embedded forms Stream makes it easy to quickly convey or extract information from video.
There are many ways that organizations use Stream. For example, schools use Stream to share orientation information or for lecture capture, while businesses use it to create and share leadership updates, how-to videos, and onboarding videos. Your journey with video begins at the Stream start page where you can view, search, or create videos. However you use video in your organization, it’s always good to know some of the fundamental features that make working with video simple and productive. Here are six tips for using video at work or school:
Share videos with anyone
Whether you just created a video or viewed one on the Stream start page, you can share it with people both inside and outside your organization. To share internally, simply tap the share button, copy the link and drop it into an email or Teams chat. If your organization has external file sharing enabled, you can change your link type to “anyone with the link” and send the link to anyone. The sharing feature makes it easy to send videos or communicate on a personal level inside and outside of your organization.
Know what’s working with video analytics
Once you have created and shared a video you may want to understand how well it’s performing. Using video analytics you can see visitors over time, trends in views, and even which parts of the video are hot spots. Analytics can also show you which type of content performs best within your organization. To view analytics for videos you own, or have edit access to, open the video and select the Analytics tab in the right-hand pane. This feature helps you understand how your audience is engaging with your video content. Learn more.
Find video content with Microsoft Search
Finding a video within your organization is simple. Just go to office.com, enter your terms in the top search bar, then select Videos in the refinement bar under the search bar. This will return all the video content in your organization that matches the search terms and that you have access to. You can also search on the Stream start page or anywhere else across Microsoft 365. This feature makes it easy to find and access the videos you need. Learn more.
Use chapters to help viewers navigate within videos
With Stream, you can add chapters to your videos to help viewers easily see a breakdown of the content in the video and navigate to the parts they want to view. Adding chapters to a video also helps your video to show up in search for the specific terms used in your chapter names. Chapters are simple and they help your viewers quickly get the information they need from your video. Learn more.
Create playlists to organize and share video collections
Creating video playlists at work has two significant benefits. First, it lets you organize video content into categories or groups making it easier for you and viewers to see related content in one place. Second, it increases the discoverability of the videos in the playlist. And just like you can with individual videos, you can share playlists or embed them into SharePoint pages. This feature helps you organize and share related video content. Learn more.
Add video content to your docs, files, chat and emails
Did you know that you can copy and paste a video in many of the Microsoft 365 apps you use every day, including: Teams, Loop, OneNote, PowerPoint, Word, Viva Engage, SharePoint, and Whiteboard? Just copy the link to the video and paste it into your file. It’s that simple. Additionally, you can send video messages to people directly using Teams video clip and soon you’ll be able to record video messages directly in Outlook while composing an email. These features put video into the flow of everyday work, allowing you to create and view video directly in the files and apps you’re working in.
These are just six of the many ways you can use video at work and school to improve your productivity and collaboration. Interested in creating your first video on Stream? Watch How to make a video using Microsoft Stream.
Feedback
We welcome your feedback. Jump in and join the community:
• Add feature suggestions, ideas, and votes: https://aka.ms/StreamIdeas
• Get questions answered and connect with other in the community in our forum: https://aka.ms/StreamForum
• Sign up for Stream Insiders for opportunities to participate in user research about video in M365: https://ux.microsoft.com/Panel/StreamInsiders
• Sign up for customer office hours to ask questions to Stream product team: https://aka.ms/StreamConnect
Microsoft Tech Community – Latest Blogs –Read More
Enable your key business needs within Microsoft Sentinel with step-by-step guidance
Modernize your security operations center (SOC) with Microsoft Sentinel. Uncover sophisticated threats and respond decisively with an intelligent, comprehensive security information and event management (SIEM) solution for proactive threat detection, investigation, and response.
This lightweight guide quickly walks you through business needs related to modernizing your SOC. It helps you make the most of Microsoft security solutions by pointing you to specific training and technical documentation so you can:
Protect the digital estate
Detect issues quickly
Focus on what matters
Investigate with full context
Automate responses
Hunt and identify threats
Once you have reviewed the trainings available, we encourage you to take your learnings one step further by participating in the following:
Complete the 30 Days to Learn It Challenge for Security Operation Analyst
This learning journey has been designed to equip you with the necessary skills for effectively incorporating AI-driven security within your organization. In about 34 hours, you’ll learn how to minimize risks by swiftly addressing active attacks, suggesting threat protection improvements, and reporting policy violations to stakeholders. If you complete the challenge in 30 days, you will receive a discount voucher towards a certification.
Earn a credential with the new Applied Skill
Skill up for in-demand technical scenarios to demonstrate proficiency in specific, scenario-based skill sets so you can make a bigger impact on every project, at your organization, and in your career. To earn the credential, you must show the ability to set up and configure Microsoft Sentinel.
Take full advantage of the key resources by downloading the Modern SOC training guide to enhance your threat protection and response systems.
Microsoft Tech Community – Latest Blogs –Read More


