

Category: News
Migrate
Hello
Please i need your help on this issue.
I forgot to migrate my other USER.
Do I need to provide an additional licensed (MS Exchange Online Plan 1) ? OR can this be done at the time of migration?
Hello Please i need your help on this issue. I forgot to migrate my other USER. Do I need to provide an additional licensed (MS Exchange Online Plan 1) ? OR can this be done at the time of migration? Read More
Outlook iOS Advanced Setup Config Bug/Issue
I come across a bug/issue with how the “advanced setup” section is setup. I use Exchange for work and it goes to our personal mail server. So setting show as follows:
Email: Example.domain.com
Password
Description: Example
Server Mail.domain.com
Domain (for my case has to be this) domainusername
Username (Needs to be blank or it will not work)
That all being said, it stopped working recently because I needed to change my password on my local pc which is also the password to that domain email. Once prompted for new credentials for my iOS app Outlook, I enter and it fails. I believe with little doubt this is due to the “Username” Section on the app that is REQUIRED, to proceed. In my case it has to be blank, with the user name included in the “Domain field” as shown above.
Please Advise,
Tyler J
I come across a bug/issue with how the “advanced setup” section is setup. I use Exchange for work and it goes to our personal mail server. So setting show as follows: Email: Example.domain.comPasswordDescription: ExampleServer Mail.domain.comDomain (for my case has to be this) domainusernameUsername (Needs to be blank or it will not work) That all being said, it stopped working recently because I needed to change my password on my local pc which is also the password to that domain email. Once prompted for new credentials for my iOS app Outlook, I enter and it fails. I believe with little doubt this is due to the “Username” Section on the app that is REQUIRED, to proceed. In my case it has to be blank, with the user name included in the “Domain field” as shown above. Please Advise, Tyler J Read More

Learn how to apply Microsoft’s Generative AI technologies to your business
Get ready to dive deep into the world of Generative AI, explore the extensive Microsoft Copilot Ecosystem, and delve into the models and capabilities of Azure AI!
AI Visionaries Circle proudly presents:
“Unlocking Infinite Potential with Microsoft Generative AI”
Boost Your Productivity, Efficiency, and Creativity with Generative AI, Azure AI Models, and Discover Microsoft’s Copilot Ecosystem
Join us for an enlightening series of sessions by registering through the link below:
April 23rd at 9:00am PST
May 8th at 9:00am PST
June 25th at 9:00am PST
Discover how Microsoft’s Generative AI technologies can transform your business, enhancing productivity, efficiency, and fostering creativity. Throughout these sessions, we’ll delve into Azure AI Studio, our product offerings, multi-modal capabilities, the Azure AI model catalog, and provide an overview of Microsoft’s Copilot Ecosystem.
What you can expect:
Inspirational Insights: Witness how Generative AI is reshaping industries and learn how to integrate AI into your business, product, or sector.
Comprehensive Exploration of Microsoft’s Copilot Ecosystem: Uncover the potential of creating your own Copilots, understanding existing Copilots within Microsoft, and the vast opportunities they offer for you and your business.
Azure AI Showcase: Discover the diverse array of models in our model catalog within Azure AI Studio and gain hands-on experience with various Azure AI models to elevate your projects.
Interactive Q&A Session: Engage with our experts and inquire about anything related to Microsoft Generative AI!
Thank you for your interest! We look forward to your participation!
__________________________________________________________________________________________________________________________________________________
What is the AI Visionaries Circle?
The AI Visionaries Circle is an exclusive community that brings together Digital Natives, ISVs (Independent Software Vendors), and Startups. It’s your gateway to explore the cutting-edge Azure AI technologies and stay ahead of the curve.
Microsoft Tech Community – Latest Blogs –Read More
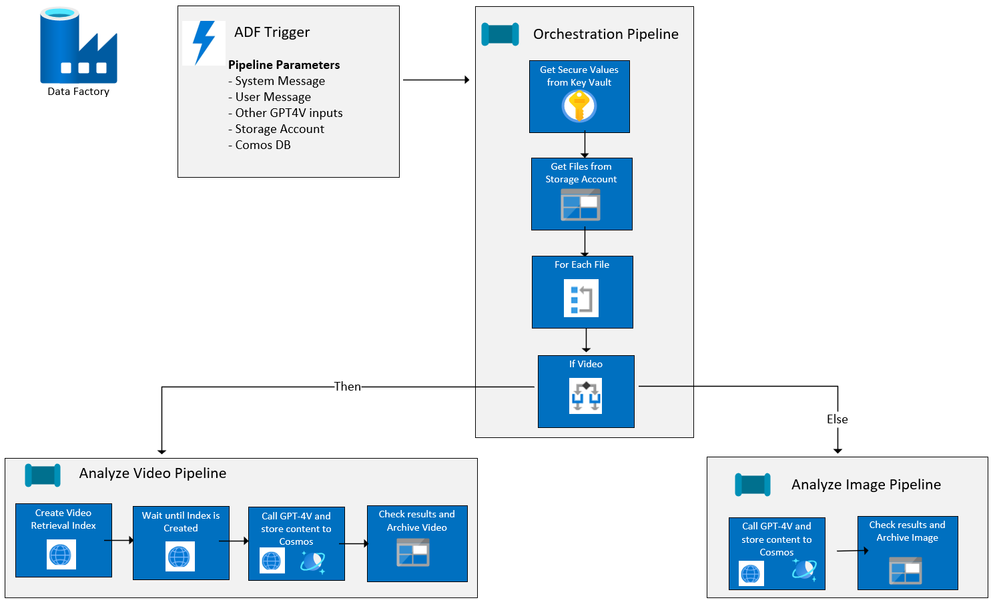
Image Analysis with Azure Open AI GPT-4V and Azure Data Factory
Earlier this year, I published an article on building a solution with Azure Open AI GPT-4 Turbo with Vision (GPT4-V) to analyze videos with chat completions, all orchestrated with Azure Data Factory. Azure Data Factory is a great framework for making calls to Azure Open AI deployments since ADF offers:
A low-code solution without having to write and deploy apps or web services
Easy and secure integration with other Azure resources with Managed Identities
Features which aid in parameterization making a single data factory reuseable for many different scenarios (for example, an insurance company could use the same data factory to analyze videos or images for car damage as well as for fire damage, storm damage, etc. )
Since the first article was published, I have added image analysis to the ADF solution and have made it easy to deploy to your Azure Subscription from our Github repo, AI-in-a-Box, using azd. Below is the current flow of the ADF solution:
Solution resources and workflow
If you read the original blog, you will see that the Azure resources deployed are exactly the same as this solution. The only thing that has changed are the ADF pipelines. The resources used are:
Azure Key Vault for holding API keys as secrets
Azure Open AI with a GPT-4V Deployment (Preview)
Check here for available models and regions for deployment
Azure Computer Vision with Image Analysis 4.0 (Preview)
Follow the prerequisites in the above link and note the region availability and supported video formats
Azure Data Factory for orchestration
Azure Blob Storage for holding images and videos to be processed
This must be in the same region as your Azure Open AI resource
Azure Cosmos DB Account (NoSQL API), database and container for logging GPT-4V completion response
ADF/GPT-4V for Image and Video Processing – Orchestrator Pipeline
An orchestrator pipeline is the main pipeline that is called by event or at a scheduled time, executing all the activities to be performed, including running other pipelines. The orchestration pipeline has changed slightly since the original article was written. It now includes image processing along with telling GPT-4V to return the results in a Json format.
Takes in the specified parameters for the system message, user message, image and/or video storage account, and Cosmos DB account and database information.
Though GPT-4V does not support resource-format Json at this time, you can still return a string result in a Json format.
In the system_message parameter on the Orchestration Pipeline, specify that the results should be formatted in Json:
The system message says:
Your task is to analyze vehicles for damage. You will be presented videos or images of vehicles. Each video or image will only show a portion of the vehicle and there may be glare on the video or image. You need to inspect the video or image closely and determine if there is any damage to the vehicle, such as dents, scratches, broken lights, broken windows, etc. You will provide the following information in JSON format: {“summary”:””, “damage_probability”:””,”damage_type”:””,”damage_location”:””}. Do not return as code block. The definitions for each JSON field are as follows: summary = a description of the vehicle and and damage found; damage_probability = a value between 1 and 10 where 1 is no damage found, 5 is some likelyhood of damage, and 10 is obvious damage; damage_type = the type of damage on the vehicle, such as scratches, chips, dents, broken glass; damage_location = the location of the damage on the vehicle such as passenger front door, rear bumper.
At the end of this post, you will see how easy it is to query the results and return the content as a Json object.
2. Get the secrets from key vault and store them as return variables
3. Set a variable which contains the name/value pair for temperature. The parameter above for temperature returns “temperature” : 0.5
4. Set a variable which contains the name/value pair for top_p. The parameter above is not set so it will be blank.
5. Gets a list of the videos and/or images in the storage account
6. Then for each video or image, checks the file type and executes the appropriate pipeline depending on whether it is a video or image, passing in the appropriate file details and other values for parameters.
Video Ingestion/GPT-4V with Pipeline childAnalyzeVideo
The core logic for this pipeline has not changed from the first article. The childAnalyzeVideo pipeline is called from the Orchestrator Pipeline for each file that is a video rather than a image. It creates a video retrieval index with Azure AI Vision Image Analysis 4.0 and passes that along with the link to the video to GPT-4V, returning the completion results to Cosmos DB. Please refer to first article if you want more details.
Image Ingestion/GPT-4V with Pipeline childAnalyzeImage
The childAnalyzeImage pipeline is called from the orchestrator pipeline for each file that is an image rather than a video. Below are the details:
Input parameters for the pipeline. Note that the ‘Secure input’ on subsequent pipeline activities that use API keys or SAS tokens so their values will not be exposed in the pipeline output
filename – the image to be analyzed
computer_vision_url – url to your Azure AI Vision resource
vision_api_key – Azure AI Vision token
gpt_4v_deployment_name – deployment name of GPT-4V model
open_ai_key– url to your Azure Open AI resource
openai_api_base – url to your Azure Open AI resource
sys_message – initial instructions to the model about the task GPT-4V is expected to perform
user_prompt – the query to be answered by GPT-4V
sas_token – Shared Access Signature token
storageaccounturl – endpoint for the storage account
storageaccountfolder – the container/file that contains the images
temperature – formatted temperature value
top_p – formatted top_p value
cosmosaccount – Azure Cosmos DB endpoint
cosmosdb – Azure Cosmos DB name
cosmoscontainer – Azure Cosmos DB container name
temperaturevalue – value between 0 and 2 where 0 is the most accurate and consistent result and 2 is the most creative
top_pvalue – value between 0 and 1 to consider a subset of tokens
Call GPT-4V with inputs including system message and user prompt and store results in Cosmos DB
Copy Data Activity, General settings– note that Secure Input is checked
Copy Data Source settings – REST API Linked Service to GPT-4V Deployment. Check out Use Vision enhancement with images, and Chat Completion API Reference for more detail
Additional columns with pipeline information were added to the source:
Sink to Cosmos DB
Mapping tab includes GPT-4V completion content, number of prompt and completion tokens plus the additional fields:
3. Perform lookup to get Damage Probability
4. Get Damaged Probability value to set the value for the processfolder variable
5. Move the file from the Source folder to the appropriate Sink folder with using a binary integration dataset:
Source Settings:
Sink Settings:
That’s it!
Query in Cosmos DB:
After running the solution, we can query the results from Cosmos DB. Since we specified to format the results as a Json string, we can run a simple query to convert the content field from a string to an object:
SELECT c.filename, c.fileurl, c.shortdate,
StringToObject(c.content) as results
FROM c
Deploying the Image and Video Solution in your environment
You can easily deploy this solution, including all the Azure resources cited earlier in this article plus all the Azure Data Factory Pipelines and code, in your own environment!
First, your subscription must be enabled to GPT-4 Turbo with Vision. If it isn’t already, you can go here to apply. This usually takes just a few days.
Then go Image and Video Analysis-Azure Open AI in-a-box and follow the simple instructions to deploy either from your local Git repo or from Azure Cloud shell.
Test it out using the videos and images at the end of this article. Or better yet – upload your own videos and images to the Storage Account and change the system and user message parameters to do analysis for your own use cases!
And of course, since you have the entire AI-in-a-Box repo deployed locally or in Azure Cloudshell, check out the other insightful and easy to deploy solutions including chat bots, AI assistants, semantic kernel solutions and more. Follow the instructions and deploy into your subscription to learn, test, and adapt for your own use cases!
Resources:
Azure/AI-in-a-Box (github.com)
How to use the GPT-4 Turbo with Vision model – Azure OpenAI Service | Microsoft Learn
What is Image Analysis? – Azure AI services | Microsoft Learn
Microsoft Tech Community – Latest Blogs –Read More
Azure Cosmos Db Materialized View general availability
Hi Azure Cosmos DB Team,
Can you please confirm if materialized view for Cosmos Db is general available now and can be recommended for production workloads? Also lag for materialized view to catchup is dependent on SKU allocation and provisioned RU in source and destination container only? Does consistency have any impact when querying the materialized view query or for the materialized view catcup in case of heavy writes and updates in source container? If the account is set up with bounded staleness consistency materialized view querying will also have bounded staleness consistency associated with them when using cosmos JAVA sdk for querying? We are using SQL API.
With Regards,
Nitin Rahim
Hi Azure Cosmos DB Team, Can you please confirm if materialized view for Cosmos Db is general available now and can be recommended for production workloads? Also lag for materialized view to catchup is dependent on SKU allocation and provisioned RU in source and destination container only? Does consistency have any impact when querying the materialized view query or for the materialized view catcup in case of heavy writes and updates in source container? If the account is set up with bounded staleness consistency materialized view querying will also have bounded staleness consistency associated with them when using cosmos JAVA sdk for querying? We are using SQL API. With Regards,Nitin Rahim Read More
“gettype()” function in KQL – “double” result
“double” is supposedly not a datatype in Kusto (Copilot says it is a synonym for “real”), but the gettype function will return it as a value…
gettype(123.45) -> “real”
gettype(cm.total) -> “double”
(where cm was a container of measurements used to contain a number of C# double values)
MS should either return “real” or mention “real” in the gettype documentation so programmers writing switch statements will realize that “double” is a possible value that should be handled.
”double” is supposedly not a datatype in Kusto (Copilot says it is a synonym for “real”), but the gettype function will return it as a value…gettype(123.45) -> “real”gettype(cm.total) -> “double”(where cm was a container of measurements used to contain a number of C# double values) MS should either return “real” or mention “real” in the gettype documentation so programmers writing switch statements will realize that “double” is a possible value that should be handled. Read More
Identifying PTT of ECG and PPG signals
I’m trying to detect the pulse transit time between ecg and ppg signals. I have the ecg and ppg signals filtered and normalised around 1. Here is my code so far
clc;
clear;
close all;
All_Data = {}; % set up cell array for all workbook data
Plotted_Data_ECG_PPG = {}; % Set up cell array for ECG and PPG plotted data
% Parameters for moving average filter
windowSize = 2;
ecgThreshold = 0.375;
ppgThreshold = 0.1;
for i = 1:1 % set up loop to run for 11 iterations (no. of workbooks)
filename = sprintf(‘%03d.xlsx’, i); % set up each filename 001-011 to be read on each iteration
opt = detectImportOptions(filename); % import data from filename
sheets = sheetnames(filename); % retrieve names of sheets
for j = 1:numel(sheets) % iterate over each sheet within a workbook
tBC = readtable(filename, opt, ‘Sheet’, sheets{j}); % extract sheets from workbooks
Time_Data = tBC{:, ‘Var4’}; % extract time data from column 4
% Remove invalid rows from table (corresponding to NaN’s in Time_Data
rows2delete = isnan(Time_Data);
tBC(rows2delete,:) = [];
Time_Data = tBC{:, ‘Var4’}; % extract time data from column 4
% Fit a polynomial p of 1st degree to the first points of each staircase (top curve)
xx = (1:numel(Time_Data))’;
dTime_Data = diff(Time_Data);
ind = 1+find(dTime_Data>max(dTime_Data)/100);
ind = ind(2:end); % in some cases the first point is too much off trend and we prefer not to use it.
p = polyfit(xx(ind),Time_Data(ind),1);
% Evaluate the fitted polynomial p and plot:
Time_Data_new = polyval(p,xx);
% % debug plots (to double check)
% figure(j)
% plot(xx,Time_Data,xx,Time_Data_new);
ECG_Data = tBC{:, ‘Var6’}; % extract ECG data from column 6
PPG_Data = tBC{:, ‘Var8’}; % extract PPG data from column 8
SYS_Data = tBC{:, ‘Var10’}; % extract reference systolic pressure data from column 10
DIA_Data = tBC{:, ‘Var12’}; % extract reference diastolic pressure data from column 12
% Filter ECG and PPG data
ECG_Data_smoothed = movmean(ECG_Data, windowSize);
PPG_Data_smoothed = movmean(PPG_Data, windowSize);
% Normalize ECG and PPG data around 0
ECG_Data_normalized = ECG_Data_smoothed – mean(ECG_Data_smoothed);
PPG_Data_normalized = PPG_Data_smoothed – mean(PPG_Data_smoothed);
% Fnd peaks for ECG and PPG data above thresholds
[ecgPeaks, ecgPeakIdx] = findpeaks(ECG_Data_normalized, ‘MinPeakHeight’, ecgThreshold);
[ppgPeaks, ppgPeakIdx] = findpeaks(PPG_Data_normalized, ‘MinPeakHeight’, ppgThreshold);
Time_Formatted = datestr(Time_Data_new, ‘HH:MM:SS:fff’); % Format time data with milliseconds
t = datetime(Time_Formatted,’InputFormat’,’HH:mm:ss:SSS’);
t.Format = ‘HH:mm:ss.SSS’;
Date_Number = datenum(t);
t_plot = datetime(Date_Number, ‘ConvertFrom’, ‘datenum’);
t_plot.Format = ‘HH:mm:ss.SSS’;
%Plotting ECG and PPG Data on the same graph
figure;
plot(t_plot,ECG_Data_normalized, ‘b’, t_plot(ecgPeakIdx), ecgPeaks, ‘ro’, …
t_plot, PPG_Data_normalized, ‘r’, t_plot(ppgPeakIdx), ppgPeaks, ‘go’);
xlabel(‘time’);
ylabel(‘Normalized Data’);
title([‘ECG and PPG Data vs Time – Workbook ‘, num2str(i), ‘sheet’, sheets{j}]);
legend(‘ECG’, ‘ecgPeaks’, ‘PPG’, ‘PPG Peaks’);
% Store the figure handle for later reference if needed
Plotted_Data_ECG_PPG{i,j} = gcf;
Time_Data_Cell = num2cell(Time_Data);
ECG_Data_Cell = num2cell(ECG_Data);
PPG_Data_Cell = num2cell(PPG_Data);
SYS_Data_Cell = num2cell(SYS_Data);
DIA_Data_Cell = num2cell(DIA_Data);
% Place the formatted time data and numerical data in the first row
All_Data{i,j} = [cellstr(Time_Formatted), ECG_Data_Cell, PPG_Data_Cell, SYS_Data_Cell, DIA_Data_Cell];
end
endI’m trying to detect the pulse transit time between ecg and ppg signals. I have the ecg and ppg signals filtered and normalised around 1. Here is my code so far
clc;
clear;
close all;
All_Data = {}; % set up cell array for all workbook data
Plotted_Data_ECG_PPG = {}; % Set up cell array for ECG and PPG plotted data
% Parameters for moving average filter
windowSize = 2;
ecgThreshold = 0.375;
ppgThreshold = 0.1;
for i = 1:1 % set up loop to run for 11 iterations (no. of workbooks)
filename = sprintf(‘%03d.xlsx’, i); % set up each filename 001-011 to be read on each iteration
opt = detectImportOptions(filename); % import data from filename
sheets = sheetnames(filename); % retrieve names of sheets
for j = 1:numel(sheets) % iterate over each sheet within a workbook
tBC = readtable(filename, opt, ‘Sheet’, sheets{j}); % extract sheets from workbooks
Time_Data = tBC{:, ‘Var4’}; % extract time data from column 4
% Remove invalid rows from table (corresponding to NaN’s in Time_Data
rows2delete = isnan(Time_Data);
tBC(rows2delete,:) = [];
Time_Data = tBC{:, ‘Var4’}; % extract time data from column 4
% Fit a polynomial p of 1st degree to the first points of each staircase (top curve)
xx = (1:numel(Time_Data))’;
dTime_Data = diff(Time_Data);
ind = 1+find(dTime_Data>max(dTime_Data)/100);
ind = ind(2:end); % in some cases the first point is too much off trend and we prefer not to use it.
p = polyfit(xx(ind),Time_Data(ind),1);
% Evaluate the fitted polynomial p and plot:
Time_Data_new = polyval(p,xx);
% % debug plots (to double check)
% figure(j)
% plot(xx,Time_Data,xx,Time_Data_new);
ECG_Data = tBC{:, ‘Var6’}; % extract ECG data from column 6
PPG_Data = tBC{:, ‘Var8’}; % extract PPG data from column 8
SYS_Data = tBC{:, ‘Var10’}; % extract reference systolic pressure data from column 10
DIA_Data = tBC{:, ‘Var12’}; % extract reference diastolic pressure data from column 12
% Filter ECG and PPG data
ECG_Data_smoothed = movmean(ECG_Data, windowSize);
PPG_Data_smoothed = movmean(PPG_Data, windowSize);
% Normalize ECG and PPG data around 0
ECG_Data_normalized = ECG_Data_smoothed – mean(ECG_Data_smoothed);
PPG_Data_normalized = PPG_Data_smoothed – mean(PPG_Data_smoothed);
% Fnd peaks for ECG and PPG data above thresholds
[ecgPeaks, ecgPeakIdx] = findpeaks(ECG_Data_normalized, ‘MinPeakHeight’, ecgThreshold);
[ppgPeaks, ppgPeakIdx] = findpeaks(PPG_Data_normalized, ‘MinPeakHeight’, ppgThreshold);
Time_Formatted = datestr(Time_Data_new, ‘HH:MM:SS:fff’); % Format time data with milliseconds
t = datetime(Time_Formatted,’InputFormat’,’HH:mm:ss:SSS’);
t.Format = ‘HH:mm:ss.SSS’;
Date_Number = datenum(t);
t_plot = datetime(Date_Number, ‘ConvertFrom’, ‘datenum’);
t_plot.Format = ‘HH:mm:ss.SSS’;
%Plotting ECG and PPG Data on the same graph
figure;
plot(t_plot,ECG_Data_normalized, ‘b’, t_plot(ecgPeakIdx), ecgPeaks, ‘ro’, …
t_plot, PPG_Data_normalized, ‘r’, t_plot(ppgPeakIdx), ppgPeaks, ‘go’);
xlabel(‘time’);
ylabel(‘Normalized Data’);
title([‘ECG and PPG Data vs Time – Workbook ‘, num2str(i), ‘sheet’, sheets{j}]);
legend(‘ECG’, ‘ecgPeaks’, ‘PPG’, ‘PPG Peaks’);
% Store the figure handle for later reference if needed
Plotted_Data_ECG_PPG{i,j} = gcf;
Time_Data_Cell = num2cell(Time_Data);
ECG_Data_Cell = num2cell(ECG_Data);
PPG_Data_Cell = num2cell(PPG_Data);
SYS_Data_Cell = num2cell(SYS_Data);
DIA_Data_Cell = num2cell(DIA_Data);
% Place the formatted time data and numerical data in the first row
All_Data{i,j} = [cellstr(Time_Formatted), ECG_Data_Cell, PPG_Data_Cell, SYS_Data_Cell, DIA_Data_Cell];
end
end I’m trying to detect the pulse transit time between ecg and ppg signals. I have the ecg and ppg signals filtered and normalised around 1. Here is my code so far
clc;
clear;
close all;
All_Data = {}; % set up cell array for all workbook data
Plotted_Data_ECG_PPG = {}; % Set up cell array for ECG and PPG plotted data
% Parameters for moving average filter
windowSize = 2;
ecgThreshold = 0.375;
ppgThreshold = 0.1;
for i = 1:1 % set up loop to run for 11 iterations (no. of workbooks)
filename = sprintf(‘%03d.xlsx’, i); % set up each filename 001-011 to be read on each iteration
opt = detectImportOptions(filename); % import data from filename
sheets = sheetnames(filename); % retrieve names of sheets
for j = 1:numel(sheets) % iterate over each sheet within a workbook
tBC = readtable(filename, opt, ‘Sheet’, sheets{j}); % extract sheets from workbooks
Time_Data = tBC{:, ‘Var4’}; % extract time data from column 4
% Remove invalid rows from table (corresponding to NaN’s in Time_Data
rows2delete = isnan(Time_Data);
tBC(rows2delete,:) = [];
Time_Data = tBC{:, ‘Var4’}; % extract time data from column 4
% Fit a polynomial p of 1st degree to the first points of each staircase (top curve)
xx = (1:numel(Time_Data))’;
dTime_Data = diff(Time_Data);
ind = 1+find(dTime_Data>max(dTime_Data)/100);
ind = ind(2:end); % in some cases the first point is too much off trend and we prefer not to use it.
p = polyfit(xx(ind),Time_Data(ind),1);
% Evaluate the fitted polynomial p and plot:
Time_Data_new = polyval(p,xx);
% % debug plots (to double check)
% figure(j)
% plot(xx,Time_Data,xx,Time_Data_new);
ECG_Data = tBC{:, ‘Var6’}; % extract ECG data from column 6
PPG_Data = tBC{:, ‘Var8’}; % extract PPG data from column 8
SYS_Data = tBC{:, ‘Var10’}; % extract reference systolic pressure data from column 10
DIA_Data = tBC{:, ‘Var12’}; % extract reference diastolic pressure data from column 12
% Filter ECG and PPG data
ECG_Data_smoothed = movmean(ECG_Data, windowSize);
PPG_Data_smoothed = movmean(PPG_Data, windowSize);
% Normalize ECG and PPG data around 0
ECG_Data_normalized = ECG_Data_smoothed – mean(ECG_Data_smoothed);
PPG_Data_normalized = PPG_Data_smoothed – mean(PPG_Data_smoothed);
% Fnd peaks for ECG and PPG data above thresholds
[ecgPeaks, ecgPeakIdx] = findpeaks(ECG_Data_normalized, ‘MinPeakHeight’, ecgThreshold);
[ppgPeaks, ppgPeakIdx] = findpeaks(PPG_Data_normalized, ‘MinPeakHeight’, ppgThreshold);
Time_Formatted = datestr(Time_Data_new, ‘HH:MM:SS:fff’); % Format time data with milliseconds
t = datetime(Time_Formatted,’InputFormat’,’HH:mm:ss:SSS’);
t.Format = ‘HH:mm:ss.SSS’;
Date_Number = datenum(t);
t_plot = datetime(Date_Number, ‘ConvertFrom’, ‘datenum’);
t_plot.Format = ‘HH:mm:ss.SSS’;
%Plotting ECG and PPG Data on the same graph
figure;
plot(t_plot,ECG_Data_normalized, ‘b’, t_plot(ecgPeakIdx), ecgPeaks, ‘ro’, …
t_plot, PPG_Data_normalized, ‘r’, t_plot(ppgPeakIdx), ppgPeaks, ‘go’);
xlabel(‘time’);
ylabel(‘Normalized Data’);
title([‘ECG and PPG Data vs Time – Workbook ‘, num2str(i), ‘sheet’, sheets{j}]);
legend(‘ECG’, ‘ecgPeaks’, ‘PPG’, ‘PPG Peaks’);
% Store the figure handle for later reference if needed
Plotted_Data_ECG_PPG{i,j} = gcf;
Time_Data_Cell = num2cell(Time_Data);
ECG_Data_Cell = num2cell(ECG_Data);
PPG_Data_Cell = num2cell(PPG_Data);
SYS_Data_Cell = num2cell(SYS_Data);
DIA_Data_Cell = num2cell(DIA_Data);
% Place the formatted time data and numerical data in the first row
All_Data{i,j} = [cellstr(Time_Formatted), ECG_Data_Cell, PPG_Data_Cell, SYS_Data_Cell, DIA_Data_Cell];
end
end ptt, blood pressure MATLAB Answers — New Questions
How to check the remaining size of recoverable items folder of a mailbox using powershell
Set-ExecutionPolicy RemoteSigned #changes PowerShell execution policies for Windows computers
Install-Module exchangeonlinemanagement #Install exchange online modules
Import-Module exchangeonlinemanagement #Import exchange online modules
Connect-ExchangeOnline #connect to exchange online service
Get-MailboxFolderStatistics -Identity “use UPN” -FolderScope RecoverableItems | Format-Table Name, FolderAndSubfolderSize, ItemsInFolderAndSubfolders -Auto
Set-ExecutionPolicy RemoteSigned #changes PowerShell execution policies for Windows computersInstall-Module exchangeonlinemanagement #Install exchange online modulesImport-Module exchangeonlinemanagement #Import exchange online modulesConnect-ExchangeOnline #connect to exchange online serviceGet-MailboxFolderStatistics -Identity “use UPN” -FolderScope RecoverableItems | Format-Table Name, FolderAndSubfolderSize, ItemsInFolderAndSubfolders -Auto Read More
How do I interpolate and smoothen ndvi time series?
I have ununiformly distributed noisey ndvi time series. I want to interpolate and smoothen it using matlab. I am attaching the sample ndvi file and request you to please suggest me how to achieve it using matlab. I would appreciate your kind cooperation and help.
JyotiI have ununiformly distributed noisey ndvi time series. I want to interpolate and smoothen it using matlab. I am attaching the sample ndvi file and request you to please suggest me how to achieve it using matlab. I would appreciate your kind cooperation and help.
Jyoti I have ununiformly distributed noisey ndvi time series. I want to interpolate and smoothen it using matlab. I am attaching the sample ndvi file and request you to please suggest me how to achieve it using matlab. I would appreciate your kind cooperation and help.
Jyoti how do i interpolate and smoothen ndvi time series MATLAB Answers — New Questions
new to teams
I would like to know if Team has anything that is comparable to Monday.com for both individual and group planning?
Thanks
steve
I would like to know if Team has anything that is comparable to Monday.com for both individual and group planning?Thankssteve Read More
Create an array of distinct objects of handle class
I want to store objects of a handle class in an array.
When using
for i=1:2
arr(i) = uilabel;
end
arrFor(1).Text = "textFor 1";
arr(2).Text = "textFor 2";
the objects in the array are distinct.
When using
arrDir(1:2) = uilabel;
arrDir(1).Text = "textDir 1";
arrDir(2).Text = "textDir 2";
both text will change to "textDir 2" which makes sense because uilabel is a handle class.
What is the syntax to avoid the for loop and diretly crating an array of distinct objects of a handle class?I want to store objects of a handle class in an array.
When using
for i=1:2
arr(i) = uilabel;
end
arrFor(1).Text = "textFor 1";
arr(2).Text = "textFor 2";
the objects in the array are distinct.
When using
arrDir(1:2) = uilabel;
arrDir(1).Text = "textDir 1";
arrDir(2).Text = "textDir 2";
both text will change to "textDir 2" which makes sense because uilabel is a handle class.
What is the syntax to avoid the for loop and diretly crating an array of distinct objects of a handle class? I want to store objects of a handle class in an array.
When using
for i=1:2
arr(i) = uilabel;
end
arrFor(1).Text = "textFor 1";
arr(2).Text = "textFor 2";
the objects in the array are distinct.
When using
arrDir(1:2) = uilabel;
arrDir(1).Text = "textDir 1";
arrDir(2).Text = "textDir 2";
both text will change to "textDir 2" which makes sense because uilabel is a handle class.
What is the syntax to avoid the for loop and diretly crating an array of distinct objects of a handle class? handles, class, arrays MATLAB Answers — New Questions
Voice Overlay in Microsoft Teams calls/meetings similar to Xbox [Game Bar] party chat
When using Microsoft Teams for a 1:1 call or in a meeting, there is no functionality to indicate if anyone is broadcasting audio, who is broadcasting audio, or even if you are broadcasting audio. I think there is already a solution implemented within the Xbox Game Bar when using Xbox party chat. If the Party chat box is pinned to the overlay, with transparency turned up, the result is a nice overlay that tells you exactly who is speaking as well as shows whether or not you are broadcasting audio. I think this would fit perfectly within a Teams call or meeting and should be implemented in some fashion.
When using Microsoft Teams for a 1:1 call or in a meeting, there is no functionality to indicate if anyone is broadcasting audio, who is broadcasting audio, or even if you are broadcasting audio. I think there is already a solution implemented within the Xbox Game Bar when using Xbox party chat. If the Party chat box is pinned to the overlay, with transparency turned up, the result is a nice overlay that tells you exactly who is speaking as well as shows whether or not you are broadcasting audio. I think this would fit perfectly within a Teams call or meeting and should be implemented in some fashion. Read More
Extract a figure from a pdf file
pdfFile = "example.pdf" % String
function extractImagePDF(pdfFile)
import java.io.*
import javax.imageio.ImageIO.*
import org.apache.pdfbox.*
filename = fullfile(pwd,pdfFile);
jFile = File(filename);
document = pdmodel.PDDocument.load(jFile);
catalog = document.getDocumentCatalog();
pages = catalog.getPages();
iter = pages.iterator();
% look for image objects on each page of the PDF
while (iter.hasNext())
page = iter.next();
resources = page.getResources();
pageImages = resources.getXObjectNames;
if ~isempty(pageImages)
imageIter = pageImages.iterator();
i = 1;
% extract each image object from page and write to destination folder
while (imageIter.hasNext())
key = imageIter.next();
if (resources.isImageXObject(key))
xObject = resources.getXObject(key);
img = xObject.getImage();
outputfile = File("Img_"+i +".jpg");
write(img, "jpg", outputfile);
end
i = i+1;
end
end
end
document.close();
endpdfFile = "example.pdf" % String
function extractImagePDF(pdfFile)
import java.io.*
import javax.imageio.ImageIO.*
import org.apache.pdfbox.*
filename = fullfile(pwd,pdfFile);
jFile = File(filename);
document = pdmodel.PDDocument.load(jFile);
catalog = document.getDocumentCatalog();
pages = catalog.getPages();
iter = pages.iterator();
% look for image objects on each page of the PDF
while (iter.hasNext())
page = iter.next();
resources = page.getResources();
pageImages = resources.getXObjectNames;
if ~isempty(pageImages)
imageIter = pageImages.iterator();
i = 1;
% extract each image object from page and write to destination folder
while (imageIter.hasNext())
key = imageIter.next();
if (resources.isImageXObject(key))
xObject = resources.getXObject(key);
img = xObject.getImage();
outputfile = File("Img_"+i +".jpg");
write(img, "jpg", outputfile);
end
i = i+1;
end
end
end
document.close();
end pdfFile = "example.pdf" % String
function extractImagePDF(pdfFile)
import java.io.*
import javax.imageio.ImageIO.*
import org.apache.pdfbox.*
filename = fullfile(pwd,pdfFile);
jFile = File(filename);
document = pdmodel.PDDocument.load(jFile);
catalog = document.getDocumentCatalog();
pages = catalog.getPages();
iter = pages.iterator();
% look for image objects on each page of the PDF
while (iter.hasNext())
page = iter.next();
resources = page.getResources();
pageImages = resources.getXObjectNames;
if ~isempty(pageImages)
imageIter = pageImages.iterator();
i = 1;
% extract each image object from page and write to destination folder
while (imageIter.hasNext())
key = imageIter.next();
if (resources.isImageXObject(key))
xObject = resources.getXObject(key);
img = xObject.getImage();
outputfile = File("Img_"+i +".jpg");
write(img, "jpg", outputfile);
end
i = i+1;
end
end
end
document.close();
end extraction of an image MATLAB Answers — New Questions
Mixed mode content download warning
After the recent update to v124 in Stable, all of a sudden we had a bunch of internal sites start throwing mixed mode content download warnings which blocked file downloads. I was able to bypass this by adding the download URLs into the “allow insecure content on specified sites” policy, but I can’t find any information as to why this all of a sudden changed in the latest version. There was nothing in the changelog that I saw that would affect this. Any ideas? Has anyone else experienced this issue?
After the recent update to v124 in Stable, all of a sudden we had a bunch of internal sites start throwing mixed mode content download warnings which blocked file downloads. I was able to bypass this by adding the download URLs into the “allow insecure content on specified sites” policy, but I can’t find any information as to why this all of a sudden changed in the latest version. There was nothing in the changelog that I saw that would affect this. Any ideas? Has anyone else experienced this issue? Read More
Updating channel settings – field descriptions via python
I’m trying to update my channel settings via a PUT request using Python and the Requests library. I’m following the example and guidance that’s shown here: Mathworks-WriteSettings.
Following the example URL as a guide I get a URL parameter string that appears to meet the requirements, however I get the following error mesage: {"status":"401","error":{"error_code":"error_auth_required","message":"Authorization Required","details":"Please provide proper authentication details."}}
I have found a couple posts with similar issues and the fix action guidance was to ensure that the channel ID and API write keys are correct and match each other (i.e. the right write key for the right channel). I have double-checked mine a dozen times and I’m successfully sending actual data to the channel using the same key, so I’m pretty confident those parameters are correct.
In the documentation, the example URL is shown in two ways — one way has ".json" appended to the primary URL (before the ? parameters). There’s another example further down the page that shows the URL without .json appended.
If I remove the .json from my request, I do actually get a response that says I’ve successfully updated the channel, such as:
{‘api_key’: ‘<the_actual_api_key’, ‘field1’: ‘Air Temp’, etc……..}
Field names updated successfully!
However, no updates actually appear in the channel settings! As I understand it, the only purpose of the .json tag is to let ThingSpeak know whether to provide its response in json format as opposed to html (which appears to be the default response format).
I can post the entire python code if useful but it mostly it just creates the api_url shown below.
Any and all suggestions welcome — thank you!!
Python code:
% # This passes authentication, returns 200 – but doesn’t effect any actual settings changes…
api_url = ‘https://api.thingspeak.com/channels/2475657?api_key=<actual_key>&field7=AirTemp’
% # This returns 401
api_url = ‘https://api.thingspeak.com/channels/2475657.json?api_key=<actual_key>&field7=AirTemp’I’m trying to update my channel settings via a PUT request using Python and the Requests library. I’m following the example and guidance that’s shown here: Mathworks-WriteSettings.
Following the example URL as a guide I get a URL parameter string that appears to meet the requirements, however I get the following error mesage: {"status":"401","error":{"error_code":"error_auth_required","message":"Authorization Required","details":"Please provide proper authentication details."}}
I have found a couple posts with similar issues and the fix action guidance was to ensure that the channel ID and API write keys are correct and match each other (i.e. the right write key for the right channel). I have double-checked mine a dozen times and I’m successfully sending actual data to the channel using the same key, so I’m pretty confident those parameters are correct.
In the documentation, the example URL is shown in two ways — one way has ".json" appended to the primary URL (before the ? parameters). There’s another example further down the page that shows the URL without .json appended.
If I remove the .json from my request, I do actually get a response that says I’ve successfully updated the channel, such as:
{‘api_key’: ‘<the_actual_api_key’, ‘field1’: ‘Air Temp’, etc……..}
Field names updated successfully!
However, no updates actually appear in the channel settings! As I understand it, the only purpose of the .json tag is to let ThingSpeak know whether to provide its response in json format as opposed to html (which appears to be the default response format).
I can post the entire python code if useful but it mostly it just creates the api_url shown below.
Any and all suggestions welcome — thank you!!
Python code:
% # This passes authentication, returns 200 – but doesn’t effect any actual settings changes…
api_url = ‘https://api.thingspeak.com/channels/2475657?api_key=<actual_key>&field7=AirTemp’
% # This returns 401
api_url = ‘https://api.thingspeak.com/channels/2475657.json?api_key=<actual_key>&field7=AirTemp’ I’m trying to update my channel settings via a PUT request using Python and the Requests library. I’m following the example and guidance that’s shown here: Mathworks-WriteSettings.
Following the example URL as a guide I get a URL parameter string that appears to meet the requirements, however I get the following error mesage: {"status":"401","error":{"error_code":"error_auth_required","message":"Authorization Required","details":"Please provide proper authentication details."}}
I have found a couple posts with similar issues and the fix action guidance was to ensure that the channel ID and API write keys are correct and match each other (i.e. the right write key for the right channel). I have double-checked mine a dozen times and I’m successfully sending actual data to the channel using the same key, so I’m pretty confident those parameters are correct.
In the documentation, the example URL is shown in two ways — one way has ".json" appended to the primary URL (before the ? parameters). There’s another example further down the page that shows the URL without .json appended.
If I remove the .json from my request, I do actually get a response that says I’ve successfully updated the channel, such as:
{‘api_key’: ‘<the_actual_api_key’, ‘field1’: ‘Air Temp’, etc……..}
Field names updated successfully!
However, no updates actually appear in the channel settings! As I understand it, the only purpose of the .json tag is to let ThingSpeak know whether to provide its response in json format as opposed to html (which appears to be the default response format).
I can post the entire python code if useful but it mostly it just creates the api_url shown below.
Any and all suggestions welcome — thank you!!
Python code:
% # This passes authentication, returns 200 – but doesn’t effect any actual settings changes…
api_url = ‘https://api.thingspeak.com/channels/2475657?api_key=<actual_key>&field7=AirTemp’
% # This returns 401
api_url = ‘https://api.thingspeak.com/channels/2475657.json?api_key=<actual_key>&field7=AirTemp’ write channel settings MATLAB Answers — New Questions

Anyone with the link option is greyed out
Hello
Please i need your help on this issue.
I have created a few SharePoint sites and want to be able to share documents on these sites with customers.
The anyone link is greyed out no matter what setting I change in any admin centers. I am the admin. I have followed all articles and suggestions online. This works fine for us for OneDrive.
Hello Please i need your help on this issue. I have created a few SharePoint sites and want to be able to share documents on these sites with customers. The anyone link is greyed out no matter what setting I change in any admin centers. I am the admin. I have followed all articles and suggestions online. This works fine for us for OneDrive. Read More
SharePoint folder duplication issue.
Hello
We are having an issue with SharePoint folder duplication issue.
Hello We are having an issue with SharePoint folder duplication issue. Read More
Build Intelligent RAG For Multimodality and Complex Document Structure
The advent of Retrieval-Augmented Generation (RAG) models has been a significant milestone in the field of Natural Language Processing (NLP). These models combine the power of information retrieval with generative language models to produce answers that are not just accurate but also contextually enriched. However, as the digital universe expands beyond textual data, incorporating image understanding and hierarchical document structure analysis into RAG systems is becoming increasingly crucial. This article explores how these two elements can significantly enhance the capabilities of RAG models.
Understanding RAG Models
Before diving into the nuances of image understanding and document analysis, let’s briefly touch upon the essence of RAG models. These systems work by first retrieving relevant documents from a vast corpus and then using a generative model to synthesize information into a coherent response. The retrieval component ensures that the model has access to accurate and up-to-date information, while the generative component allows for the creation of human-like text.
Image Understanding and Structure Analysis
The Challenge
One of the most significant limitations of traditional RAG models is their inability to understand and interpret visual data. In a world where images accompany textual information ubiquitously, this represents a substantial gap in the model’s comprehension abilities. Documents are not just strings of text; they have structure — sections, subsections, paragraphs, and lists — all of which convey semantic importance. Traditional RAG models often overlook this hierarchical structure, potentially missing out on understanding the document’s full meaning.
The Solution
To bridge this gap, RAG models can be augmented with Computer Vision (CV) capabilities. This involves integrating image recognition and understanding modules that can analyze visual data, extract relevant information, and convert it into a textual format that the RAG model can process. Incorporating hierarchical document structure analysis involves teaching RAG models to recognize and interpret the underlying structure of documents.
Implementation
Visual Feature Extraction: Use pre-trained neural networks to identify objects, scenes, and activities in images.
Visual Semantics: Develop algorithms that can understand the context and semantics of the visual content.
Multimodal Data Fusion: Combine the extracted visual information with textual data to create a multimodal context for the RAG system.
Structure Recognition: Implement algorithms to identify different levels of hierarchy in documents, such as titles, headings, and bullet points.
Semantic Role Labeling: Assign semantic roles to different parts of the document, understanding the purpose of each section.
Structure-Aware Retrieval: Enhance the retrieval process by considering the hierarchical structure of documents, ensuring that the most relevant sections are used for generation.
In this blog we will look at how do we implement this using Azure Document Intelligence, LangChain and Azure OpenAI.
Prerequisites
Before we implement this we will require some prerequisites
GPT-4-Vision-Preview model deployed
GPT-4–1106-Preview model deployed
text-ada-embedding model deployed
Azure Document Intelligence deployed
Once we have the above information , lets get started !!
Let’s import the required libraries.
import os
from dotenv import load_dotenv
load_dotenv(‘azure.env’)
from langchain import hub
from langchain_openai import AzureChatOpenAI
#from langchain_community.document_loaders import AzureAIDocumentIntelligenceLoader
from doc_intelligence import AzureAIDocumentIntelligenceLoader
from langchain_openai import AzureOpenAIEmbeddings
from langchain.schema import StrOutputParser
from langchain.schema.runnable import RunnablePassthrough
from langchain.text_splitter import MarkdownHeaderTextSplitter
from langchain.vectorstores.azuresearch import AzureSearch
from azure.ai.documentintelligence.models import DocumentAnalysisFeature
Now we are going to write some custom function on top of LangChain Document Loader which can help us Load the PDF document. First thing we do is using Azure Document Intelligence which has the this beautiful feature of converting Image to Markdown format. Lets use the same.
import logging
from typing import Any, Iterator, List, Optional
import os
from langchain_core.documents import Document
from langchain_community.document_loaders.base import BaseLoader
from langchain_community.document_loaders.base import BaseBlobParser
from langchain_community.document_loaders.blob_loaders import Blob
logger = logging.getLogger(__name__)
class AzureAIDocumentIntelligenceLoader(BaseLoader):
“””Loads a PDF with Azure Document Intelligence”””
def __init__(
self,
api_endpoint: str,
api_key: str,
file_path: Optional[str] = None,
url_path: Optional[str] = None,
api_version: Optional[str] = None,
api_model: str = “prebuilt-layout”,
mode: str = “markdown”,
*,
analysis_features: Optional[List[str]] = None,
) -> None:
“””
Initialize the object for file processing with Azure Document Intelligence
(formerly Form Recognizer).
This constructor initializes a AzureAIDocumentIntelligenceParser object to be
used for parsing files using the Azure Document Intelligence API. The load
method generates Documents whose content representations are determined by the
mode parameter.
Parameters:
———–
api_endpoint: str
The API endpoint to use for DocumentIntelligenceClient construction.
api_key: str
The API key to use for DocumentIntelligenceClient construction.
file_path : Optional[str]
The path to the file that needs to be loaded.
Either file_path or url_path must be specified.
url_path : Optional[str]
The URL to the file that needs to be loaded.
Either file_path or url_path must be specified.
api_version: Optional[str]
The API version for DocumentIntelligenceClient. Setting None to use
the default value from `azure-ai-documentintelligence` package.
api_model: str
Unique document model name. Default value is “prebuilt-layout”.
Note that overriding this default value may result in unsupported
behavior.
mode: Optional[str]
The type of content representation of the generated Documents.
Use either “single”, “page”, or “markdown”. Default value is “markdown”.
analysis_features: Optional[List[str]]
List of optional analysis features, each feature should be passed
as a str that conforms to the enum `DocumentAnalysisFeature` in
`azure-ai-documentintelligence` package. Default value is None.
Examples:
———
>>> obj = AzureAIDocumentIntelligenceLoader(
… file_path=”path/to/file”,
… api_endpoint=”https://endpoint.azure.com”,
… api_key=”APIKEY”,
… api_version=”2023-10-31-preview”,
… api_model=”prebuilt-layout”,
… mode=”markdown”
… )
“””
assert (
file_path is not None or url_path is not None
), “file_path or url_path must be provided”
self.file_path = file_path
self.url_path = url_path
self.parser = AzureAIDocumentIntelligenceParser(
api_endpoint=api_endpoint,
api_key=api_key,
api_version=api_version,
api_model=api_model,
mode=mode,
analysis_features=analysis_features,
)
def lazy_load(
self,
) -> Iterator[Document]:
“””Lazy load given path as pages.”””
if self.file_path is not None:
yield from self.parser.parse(self.file_path)
else:
yield from self.parser.parse_url(self.url_path)
Now lets define the Document Parser for the same. This document Parser will internally call the intended to load and parse PDF files using Azure’s Document Intelligence service (formerly known as Azure Forms Recognizer). This service uses machine learning models to extract text, key-value pairs, and tables from documents.
“””Loads a PDF with Azure Document Intelligence
(formerly Forms Recognizer).”””
def __init__(
self,
api_endpoint: str,
api_key: str,
api_version: Optional[str] = None,
api_model: str = “prebuilt-layout”,
mode: str = “markdown”,
analysis_features: Optional[List[str]] = None,
):
from azure.ai.documentintelligence import DocumentIntelligenceClient
from azure.ai.documentintelligence.models import DocumentAnalysisFeature
from azure.core.credentials import AzureKeyCredential
kwargs = {}
if api_version is not None:
kwargs[“api_version”] = api_version
if analysis_features is not None:
_SUPPORTED_FEATURES = [
DocumentAnalysisFeature.OCR_HIGH_RESOLUTION,
]
analysis_features = [
DocumentAnalysisFeature(feature) for feature in analysis_features
]
if any(
[feature not in _SUPPORTED_FEATURES for feature in analysis_features]
):
logger.warning(
f”The current supported features are: “
f”{[f.value for f in _SUPPORTED_FEATURES]}. “
“Using other features may result in unexpected behavior.”
)
self.client = DocumentIntelligenceClient(
endpoint=api_endpoint,
credential=AzureKeyCredential(api_key),
headers={“x-ms-useragent”: “langchain-parser/1.0.0”},
features=analysis_features,
**kwargs,
)
self.api_model = api_model
self.mode = mode
assert self.mode in [“single”, “page”, “markdown”]
def _generate_docs_page(self, result: Any) -> Iterator[Document]:
for p in result.pages:
content = ” “.join([line.content for line in p.lines])
d = Document(
page_content=content,
metadata={
“page”: p.page_number,
},
)
yield d
def _generate_docs_single(self, file_path: str, result: Any) -> Iterator[Document]:
md_content = include_figure_in_md(file_path, result)
yield Document(page_content=md_content, metadata={})
def lazy_parse(self, file_path: str) -> Iterator[Document]:
“””Lazily parse the blob.”””
blob = Blob.from_path(file_path)
with blob.as_bytes_io() as file_obj:
poller = self.client.begin_analyze_document(
self.api_model,
file_obj,
content_type=”application/octet-stream”,
output_content_format=”markdown” if self.mode == “markdown” else “text”,
)
result = poller.result()
if self.mode in [“single”, “markdown”]:
yield from self._generate_docs_single(file_path, result)
elif self.mode in [“page”]:
yield from self._generate_docs_page(result)
else:
raise ValueError(f”Invalid mode: {self.mode}”)
def parse_url(self, url: str) -> Iterator[Document]:
from azure.ai.documentintelligence.models import AnalyzeDocumentRequest
poller = self.client.begin_analyze_document(
self.api_model,
AnalyzeDocumentRequest(url_source=url),
# content_type=”application/octet-stream”,
output_content_format=”markdown” if self.mode == “markdown” else “text”,
)
result = poller.result()
if self.mode in [“single”, “markdown”]:
yield from self._generate_docs_single(result)
elif self.mode in [“page”]:
yield from self._generate_docs_page(result)
else:
raise ValueError(f”Invalid mode: {self.mode}”)
If you look at this LangChain document parser I have included a method called include_figure_in_md. This method goes through the markdown content and look for all figures and replace each figure with the description of the same.
Before the same please lets write some utility method which can help you crop image from the document PDF/Image.
from PIL import Image
import fitz # PyMuPDF
import mimetypes
import base64
from mimetypes import guess_type
# Function to encode a local image into data URL
def local_image_to_data_url(image_path):
# Guess the MIME type of the image based on the file extension
mime_type, _ = guess_type(image_path)
if mime_type is None:
mime_type = ‘application/octet-stream’ # Default MIME type if none is found
# Read and encode the image file
with open(image_path, “rb”) as image_file:
base64_encoded_data = base64.b64encode(image_file.read()).decode(‘utf-8’)
# Construct the data URL
return f”data:{mime_type};base64,{base64_encoded_data}”
def crop_image_from_image(image_path, page_number, bounding_box):
“””
Crops an image based on a bounding box.
:param image_path: Path to the image file.
:param page_number: The page number of the image to crop (for TIFF format).
:param bounding_box: A tuple of (left, upper, right, lower) coordinates for the bounding box.
:return: A cropped image.
:rtype: PIL.Image.Image
“””
with Image.open(image_path) as img:
if img.format == “TIFF”:
# Open the TIFF image
img.seek(page_number)
img = img.copy()
# The bounding box is expected to be in the format (left, upper, right, lower).
cropped_image = img.crop(bounding_box)
return cropped_image
def crop_image_from_pdf_page(pdf_path, page_number, bounding_box):
“””
Crops a region from a given page in a PDF and returns it as an image.
:param pdf_path: Path to the PDF file.
:param page_number: The page number to crop from (0-indexed).
:param bounding_box: A tuple of (x0, y0, x1, y1) coordinates for the bounding box.
:return: A PIL Image of the cropped area.
“””
doc = fitz.open(pdf_path)
page = doc.load_page(page_number)
# Cropping the page. The rect requires the coordinates in the format (x0, y0, x1, y1).
bbx = [x * 72 for x in bounding_box]
rect = fitz.Rect(bbx)
pix = page.get_pixmap(matrix=fitz.Matrix(300/72, 300/72), clip=rect)
img = Image.frombytes(“RGB”, [pix.width, pix.height], pix.samples)
doc.close()
return img
def crop_image_from_file(file_path, page_number, bounding_box):
“””
Crop an image from a file.
Args:
file_path (str): The path to the file.
page_number (int): The page number (for PDF and TIFF files, 0-indexed).
bounding_box (tuple): The bounding box coordinates in the format (x0, y0, x1, y1).
Returns:
A PIL Image of the cropped area.
“””
mime_type = mimetypes.guess_type(file_path)[0]
if mime_type == “application/pdf”:
return crop_image_from_pdf_page(file_path, page_number, bounding_box)
else:
return crop_image_from_image(file_path, page_number, bounding_box)
Next we write a method where image can be passed to GPT-4-Vision model and get the description of this image.
from openai import AzureOpenAI
aoai_api_base = os.getenv(“AZURE_OPENAI_ENDPOINT”)
aoai_api_key= os.getenv(“AZURE_OPENAI_API_KEY”)
aoai_deployment_name = ‘gpt-4-vision’ # your model deployment name for GPT-4V
aoai_api_version = ‘2024-02-15-preview’ # this might change in the future
MAX_TOKENS = 2000
def understand_image_with_gptv(image_path, caption):
“””
Generates a description for an image using the GPT-4V model.
Parameters:
– api_base (str): The base URL of the API.
– api_key (str): The API key for authentication.
– deployment_name (str): The name of the deployment.
– api_version (str): The version of the API.
– image_path (str): The path to the image file.
– caption (str): The caption for the image.
Returns:
– img_description (str): The generated description for the image.
“””
client = AzureOpenAI(
api_key=aoai_api_key,
api_version=aoai_api_version,
base_url=f”{aoai_api_base}/openai/deployments/{aoai_deployment_name}”
)
data_url = local_image_to_data_url(image_path)
response = client.chat.completions.create(
model=aoai_deployment_name,
messages=[
{ “role”: “system”, “content”: “You are a helpful assistant.” },
{ “role”: “user”, “content”: [
{
“type”: “text”,
“text”: f”Describe this image (note: it has image caption: {caption}):” if caption else “Describe this image:”
},
{
“type”: “image_url”,
“image_url”: {
“url”: data_url
}
}
] }
],
max_tokens=2000
)
img_description = response.choices[0].message.content
return img_description
Now once we have the utilities method set we can just import the Document Intelligence Loader and load the document.
from langchain_community.document_loaders import AzureAIDocumentIntelligenceLoader
loader = AzureAIDocumentIntelligenceLoader(file_path=’sample.pdf’,
api_key = os.getenv(“AZURE_DOCUMENT_INTELLIGENCE_KEY”),
api_endpoint = os.getenv(“AZURE_DOCUMENT_INTELLIGENCE_ENDPOINT”),
api_model=”prebuilt-layout”,
api_version=”2024-02-29-preview”,
mode=’markdown’,
analysis_features = [DocumentAnalysisFeature.OCR_HIGH_RESOLUTION])
docs = loader.load()
Semantic chunking is a powerful technique used in natural language processing that involves breaking down large pieces of text into smaller, thematically consistent segments or “chunks” that are semantically coherent. The primary goal of semantic chunking is to capture and preserve the inherent meaning within the text, allowing each chunk to contain as much semantically independent information as possible. This process is critically important for various language model applications, such as embedding models and retrieval-augmented generation (RAG), because it helps overcome limitations associated with processing long sequences of text. By ensuring that the data fed into language models (LLMs) is thematically and contextually coherent, semantic chunking enhances the model’s ability to interpret and generate relevant and accurate responses.
Additionally, it improves the efficiency of information retrieval from vector databases by enabling the retrieval of highly relevant information that aligns closely with the user’s intent, thereby reducing noise and maintaining semantic integrity. In essence, semantic chunking serves as a bridge between large volumes of text data and the effective processing capabilities of advanced language models, making it a cornerstone of efficient and meaningful natural language understanding and generation.
Lets look at the Markdown Header Splitter to split the document based on the header.
# Split the document into chunks base on markdown headers.
headers_to_split_on = [
(“#”, “Header 1”),
(“##”, “Header 2”),
(“###”, “Header 3”),
(“####”, “Header 4”),
(“#####”, “Header 5”),
(“######”, “Header 6”),
(“#######”, “Header 7”),
(“########”, “Header 8”)
]
text_splitter = MarkdownHeaderTextSplitter(headers_to_split_on=headers_to_split_on)
docs_string = docs[0].page_content
docs_result = text_splitter.split_text(docs_string)
print(“Length of splits: ” + str(len(docs_result)))
Lets initialize the model of both Azure OpenAI GPT and Azure OpenAI Embedding.
from langchain_openai import AzureOpenAIEmbeddings
from langchain_community.vectorstores import FAISS
from langchain_openai import AzureChatOpenAI
from langchain import hub
from langchain_core.output_parsers import StrOutputParser
from langchain_core.runnables import RunnablePassthrough
llm = AzureChatOpenAI(api_key = os.environ[“AZURE_OPENAI_API_KEY”],
api_version = “2023-12-01-preview”,
azure_endpoint = os.environ[“AZURE_OPENAI_ENDPOINT”],
model= “gpt-4-1106-preview”,
streaming=True)
aoai_embeddings = AzureOpenAIEmbeddings(
api_key=os.getenv(“AZURE_OPENAI_API_KEY”),
azure_deployment=”text-embedding-ada-002″,
openai_api_version=”2023-12-01-preview”,
azure_endpoint =os.environ[“AZURE_OPENAI_ENDPOINT”]
)
Now lets create an index and store the embeddings into AI Search.
from langchain_community.vectorstores.azuresearch import AzureSearch
from langchain_openai import AzureOpenAIEmbeddings, OpenAIEmbeddings
index_name: str = “langchain-vector-demo”
vector_store: AzureSearch = AzureSearch(
azure_search_endpoint=vector_store_address,
azure_search_key=vector_store_password,
index_name=index_name,
embedding_function=aoai_embeddings.embed_query,
)
Finally lets create our RAG Chain. Here I have used a simple Retrieval but you can make complex Retrieval as well to Retrieve both Image and Text.
def format_docs(docs):
return “nn”.join(doc.page_content for doc in docs)
retriever_base = index.as_retriever(search_type=”similarity”,search_kwargs = {“k” : 5})
rag_chain_from_docs = (
{
“context”: lambda input: format_docs(input[“documents”]),
“question”: itemgetter(“question”),
}
| prompt
| llm
| StrOutputParser()
)
rag_chain_with_source = RunnableMap(
{“documents”: retriever_base, “question”: RunnablePassthrough()}
) | {
“documents”: lambda input: [doc.metadata for doc in input[“documents”]],
“answer”: rag_chain_from_docs,
}
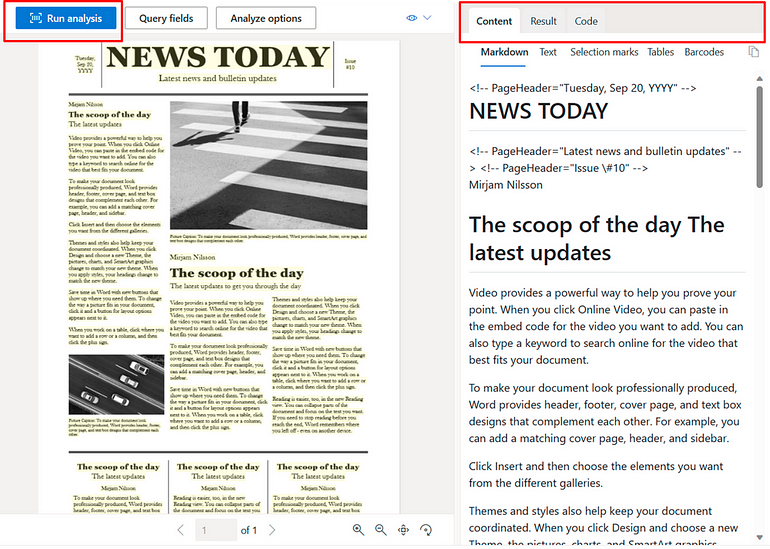
Now lets make into action, lets take the below PDF example and ask question from Plot.
Here I will ask a question from the Plot from this page. As you see i get the correct response along with citations too.
Hope you like the blog. Please clap and follow me if you like to read more such blogs coming soon.
Microsoft Tech Community – Latest Blogs –Read More

Join the Microsoft Developers AI Learning Hackathon and Win Up to $10K in Prizes!
Join the Microsoft Developers AI Learning Hackathon for a chance to hone your AI skills, build an AI copilot with Azure Cosmos DB for MongoDB, and compete for up to $10,000 in prizes.
This global online event runs from April 15th to June 17th and welcomes developers of all levels Register NOW. By participating, you’ll get practical experience with essential database technologies that drive innovations like OpenAI’s ChatGPT. Plus, you’ll earn an exclusive badge to display your newfound AI expertise.
Don’t miss out on this opportunity to kickstart your AI journey on Azure. Register now and explore the capabilities of Azure Cosmos DB, the fully managed, serverless, distributed database designed for modern app development. With its SLA-backed performance, instant scalability, and support for popular APIs like PostgreSQL, MongoDB, and Apache Cassandra, Azure Cosmos DB is the perfect platform to power your AI applications. Try it for free and follow the latest updates to stay ahead in the world of app development.
What is the Microsoft Developers AI Learning Hackathon?
The Microsoft Developers AI Learning Hackathon is a global online event where you can learn fundamental AI skills, build your own AI copilot with Azure Cosmos DB for MongoDB, and compete for up to $10K in prizes. The hackathon runs from April 15th – June 17th and is open to developers of all levels and backgrounds.
Why should I participate?
Get hands-on with foundational database technologies, powering innovations like OpenAI’s ChatGPT. Use Azure Cosmos DB for MongoDB in real-world AI scenarios and compete for up to $10,000 in prizes! Plus, participants will earn an exclusive badge to showcase their new AI skills. Don’t miss this chance to learn, build, and get started with your AI learning journey on Azure!
About Azure Cosmos DB
Azure Cosmos DB is a fully managed and serverless distributed database for modern app development, with SLA-backed speed and availability, automatic and instant scalability, and support for open-source PostgreSQL, MongoDB, and Apache Cassandra. Try Azure Cosmos DB for free here. To stay in the loop on Azure Cosmos DB updates, follow us on X, YouTube, and LinkedIn.
Microsoft Tech Community – Latest Blogs –Read More

MidDay Café Episode 53 – Frank Talk on Challenges in Corporate Communications & Employee Engagement
In this MidDay Café Tyrelle Barnes and I have a frank, no holds barred, discussion around some of the issues facing Corporate Communications and Employee Engagement today. I address the large, expensive, monolithic Intranet updates that many embark upon (DON’T!), why it’s a bad, and unnecessary idea that is out of date before the effort begins. We also discuss what works and demonstrate modern modes of communication and engagement that are what end users expect.
Don’t fall into the trap of building something users don’t want! Tune in to this podcast to learn about the pitfalls to avoid and the approach you should be looking at. Warning: If you have a fixed set of thinking around this area you may have your ideas directly refuted (I do that a few times in this session). But don’t worry, on May 15th we will have a Lunch and Learn webinar where you can bring your questions and objections. It should be fun!
Resources:
Microsoft Viva | Microsoft Learn
Microsoft Viva – Microsoft Adoption
SharePoint look book (microsoft.com)
Overview: Viva Connections | Microsoft Learn
Overview of Microsoft Viva Amplify | Microsoft Learn
Introducing Microsoft Viva Engage | Microsoft Learn
Thanks for visiting!
Tyrelle Barnes LinkedIn : Michael Gannotti LinkedIn
Microsoft Tech Community – Latest Blogs –Read More


