

Month: January 2024
Data MVPs and Microsoft Fabric Super Users in the Era of AI | Data Exposed: MVP Edition
Taking a step back in this episode of Data Exposed: MVP Edition to dive into the Microsoft MVP program and learn what Fabric Super Users are.
Resources:
Microsoft Fabric Learn Together
Become a Fabric Analytics Engineer
View/share our latest episodes on Microsoft Learn and YouTube!
Microsoft Tech Community – Latest Blogs –Read More
Data MVPs and Fabric Super Users | Data Exposed: MVP Edition
Taking a step back in this episode of Data Exposed: MVP Edition to dive into the Microsoft MVP program and learn what Fabric Super Users are.
Resources:
Microsoft Fabric Learn Together
Become a Fabric Analytics Engineer
View/share our latest episodes on Microsoft Learn and YouTube!
Microsoft Tech Community – Latest Blogs –Read More
Partner Blog | Unlock productivity with Jira Cloud plugin for Microsoft Copilot for Microsoft 365
By Srini Raghavan,VP, Microsoft Teams Ecosystem
There’s little doubt that AI is transforming the way we work across entire enterprise processes and the day-to-day digital experiences of employees. But what about the business value it represents?
According to a recent global study from IDC, organizations are quickly realizing rapid return on investment and significant increases to customer satisfaction, productivity, and market share that results from AI integration—especially when coupled with 40 percent of organizations reporting implementation times of less than six months and 92 percent of AI deployments taking 12 months or less.*
Continue reading here
Microsoft Tech Community – Latest Blogs –Read More
What’s new in Microsoft Teams (free) | January 2024
Read more about the latest feature updates and improvements in Microsoft Teams (free) in the recent blog post on the Teams Insider Blog:
https://insider.teams.com/blog/whats-new-in-microsoft-teams-free-jan-2024/
Microsoft Tech Community – Latest Blogs –Read More
Get started with Azure partner-led offerings: Azure Migrate and Modernize, and Azure Innovate.
With Microsoft Azure, you have access to a portfolio of products, resources, and offerings to help you meet evolving customer opportunities and join a community of partners committed to leading the way in the era of AI. With Azure, you can meet faster application delivery times, achieve significant cost savings, and access funding through Azure Migrate and Modernize and Azure Innovate. Formerly the Azure Migration and Modernization Program, Azure Migrate and Modernize is an expanded offering for customer migration and modernization scenarios across apps, data, and infrastructure that includes more workloads support, streamlined access to specialized partners, incentives to offset migration costs, and security guidance built into every engagement. Azure Innovate is our newest offering to build new solutions and modernize existing ones on Azure to meet the demand for AI transformation and begin the next wave of growth for your business.
Azure specialized partners and qualified ISVs have access to assessments, pilot POCs, tooling, funding, and Microsoft expert guidance when you need it – all designed to help you accelerate the cloud journey and drive growth and impact. At Microsoft, we recognize that what you need to succeed is unique to your business model, size, and stage of growth. That’s why we’re investing in these two comprehensive offerings that are built for all.
We are setting the pace in 2024 with the latest announcements effective January 1:
Extra small engagement sizes are now available for all scenarios
ISV partners can now nominate strategics in Azure Migrate and Modernize
Top Tier partners can access Azure Migrate and Modernize partner-led for ISVs if they satisfy the IP co-sell top tier criteria
And multiple nominations for the same customer will be available for the same engagement type
Learn more and nominate today!
Microsoft Tech Community – Latest Blogs –Read More

Preview of Distributed Tracing V2 for Durable Functions
We released Distributed Tracing V2 for Durable Functions to help improve observability!
Durable Functions enables you to write long-running, reliable, event-driven, and stateful logic on the Azure Functions platform using everyday imperative code.
Distributed Tracing allows you to correlate operations together and track requests between services. This is especially useful for Durable Functions apps as they coordinate work across multiple services and VMs.
Distributed Tracing V2 Improvements
The first implementation of Distributed Tracing supported only the .NET in-process model and the Azure Storage backend. The V1 implementation is still in an experimental state. Distributed Tracing V2, on the other hand, is not an experimental feature and supports all Durable Functions language SDKs, including .NET Isolated, and all Durable Functions backends: Azure Storage, MSSQL, and Netherite. It also provides more information about the spans.
This image above shows a trace where site content is backed up. The orchestration first calls an activity to get the files to backup and then all of those files are copied.
Limitations
Currently, Distributed Tracing V2 does not give traces for Durable Entities operations.
Try it out!
Step 1: Check the Durable Functions version
You’ll need Durable Functions Extension 2.12.0 or above. If you are using extension bundles, please follow these instructions to get the required Durable Functions version.
Step 2: Set up host.json
To set up Distributed Tracing V2, add the following settings to the application’s host.json:
“durableTask”: {
“tracing”: {
“DistributedTracingEnabled”: true,
“Version”: “V2”
}
}
If you are using Distributed Tracing V1, you will have to update your host.json to explicitly use V2.
Step 3: Create an Application Insights resource
If there’s no existing Application Insights resource configured with your Function app, then you will also need to create an Application Insights resource and configure it to connect to the Function app.
Other than the aforementioned configuration changes, no other code changes are required.
A getting started sample can be found here.
For more information, refer to Diagnostics in Durable Functions – Azure | Microsoft Learn.
Compatibility with Durable Task Framework
Distributed Tracing is also compatible with apps using the Durable Task Framework, the underlying C# OSS framework that powers Durable Functions.
You’ll need DurableTask.Core version >=2.16.0. More information can be found here.
Give us feedback!
Try it out and let us know how you like it! If you have any feedback regarding Distributed Tracing v2 for Durable Functions, please open an issue in the durable extension repo; for feedback regarding Durable Task Framework, use the durabletask repo.
Microsoft Tech Community – Latest Blogs –Read More
What’s New in Microsoft EDU webinar – February 2024
Join us on Tuesday, February 6th, 2024 for our latest “What’s New in Microsoft EDU” webinar! This webinar will also be recapping the big announcements we made at the Bett conference in London in late January. These 30 minute webinars are put on by the Microsoft Education Product Management group and happen once per month, this month both 8:00am Pacific Time and 4:00pm Pacific time to cover as many global time zones as possible around the world. And don’t worry – we’ll be recording these and posting on our Microsoft Education YouTube channel in the new “What’s New in Microsoft EDU” playlist, so you’ll always to able to watch later or share with others!
Here is our February 2024 webinar agenda:
What’s New in AI
What’s new in Microsoft Teams for EDU
What’s new in Microsoft 365 EDU
AMA – Ask Microsoft EDU Anything (Q&A)
How to sign up
OPTION 1: February 6th, Tuesday @ 8:00am Pacific Tim Register here
OPTION 2: February 6th, Tuesday @ 4:00pm Pacific Time: Register here
Send us your questions ahead of time by adding yours into this form: WNIEDUWebinarFeb24QnA
This is what the webinar portal will look like when you register:
Microsoft Tech Community – Latest Blogs –Read More

CAST – Modernizing your .NET apps to Windows containers on Azure Kubernetes Services
This blog post has been co-authored by Microsoft and Damien Santé and Emmanuelle Castaings at CAST.
Windows Containers have reached a great level of maturity, allowing customers to run production grade workloads with limited code refactoring. Though, specific compatibility checks are highly recommended for .NET applications, for example, to avoid discovering blockers hidden in source code during the migration, triggering unplanned fixes in urgency, additional time and costs.
To ensure an effective migration, a rapid portfolio analysis using CAST Highlight can be performed. It will automatically provide insights from custom source code, including the list of containerization blockers and indicative effort estimates to remediate. CAST Highlight will also automatically show a path to modernization post containerization leveraging Azure PaaS services. CAST Highlight is an automated solution where hundreds of custom applications can be analyzed within a few days, with no source code disclosed and no intrusion on production systems.
Since 2019, CAST has been working alongside Microsoft to automate the migration and modernization of custom applications for hundreds of clients worldwide, addressing a large variety of old and new languages such as C#, C++, VB.NET, Java, JavaScript, Python, Cobol and more, and various application types among Windows, mainframes, monoliths, databases and others.
This blog will cover the following sections:
CAST Highlight overview
How to use CAST for Windows container apps on AKS
Common containerization blockers, and CAST recommendations
Optimize further and prepare the modernization, using CAST
Illustrative case study on eShop applications & Customer Case Studies
CAST Highlight Overview
CAST Highlight provides a rapid analysis of the entire portfolio of custom applications, bringing data and facts to your modernization journey. CAST Highlight analysis is a rapid 3-steps process scanning hundreds of applications in a week.
CAST Highlight acts as a Control Tower for the tens or hundreds of applications in your portfolio helping you make informed decisions on governance, open-source risk control, greener software, and cloud modernization:
Cloud Maturity: 5Rs segmentation, roadmap to PaaS, containerization and cloud blockers, removal effort estimates
Software Health: resiliency, agility, complexity, technical debt
Open-source risks: security vulnerabilities, obsolescence, legal IP risks
Green Software: code deficiencies, recommendations with respect to industry good practices
CAST + Windows on Azure Kubernetes Service
Get actionable recommendations on containerization blockers
CAST Highlight shines a light on specific Cloud patterns that are blockers for containerization of applications, a subset of our 400+ existing patterns. Those patterns are agnostic to the target container, for instance, if an application is using DLLs, as part of the containerization tasks, the container definition (.dockerfile) should copy these required libraries and execute their registration if needed.
Nota Bene: CAST Highlight will not generate the Dockerfile but recommend the best options to be utilized. See here more details on how to optimize the Dockerfile configuration.
CAST Highlight lists in a dedicated tab all the containerization blockers and related details:
Documentation pop-up for each blocker with rationale, level of criticality, impact on containerization tasks
Technology/language triggering the blocker and number of occurrences in the code (roadblocks)
Estimated remediation effort based on customizable abacus.
At the portfolio level: list of applications where the blocker was found and at application level: list of files where the blocker occurred.
Common containerization blockers, and CAST recommendations
CAST Highlight provides the rationale for each containerization blocker categorized in three types of impact:
Blockers impacting the container only.
Blockers impacting the application code.
Blockers impacting the application architecture.
Blockers impacting the container only.
Registry Settings – Using Windows registry to store Application Settings
The problem: Legacy applications often use Windows registry to store application settings. The good practice consists of avoiding OS-specific storage such as Windows Registry, as in the container the operating system is not guaranteed to be the same.
The solution: CAST Highlight lists all your code files declaring registry dependencies so you can create a .reg file containing all the entries required by the application then edit the Dockerfile to copy it inside the container on creation and add the registry entries.
CAST Highlight detects other blockers that impact the container configuration such as usage of a temporary local file or directory, applications using other configuration files than web configuration, applications using system DLLs or COM Components, etc.
The figure below illustrates the description of the blocker in CAST Highlight with criticality, impact, rationale and references.
Blockers impacting the application code.
Temporary Files – Access to environment variable
The problem: applications accessing environment variables. This blocker impacts the application code, architecture, and the target container.
The solution: CAST Highlight provides the list of files for which an environment variable needs to be set up, so you can ensure it will exist in your container. It also gives the effort estimate to remediate the issue in the code. There are two ways this information can be passed down to the container. You can use the –e option in the run command of your docker container. It is adequate when the number of variables is low. However, as soon as we have more than a handful of variables, it can quickly become cumbersome and error prone. Another option is preferred where you can specify the file where to read values from, called an env_file.
CAST Highlight detects other blockers requiring changes in the application code such as stateful sessions, hardcoded credentials, network IP address (IPV4, IPV6) or unsecure network protocols (HTTP, FTP).
Blockers impacting the application architecture
Security & User Authentication- Using Webform Authentication
The problem: Applications using Webform Authentication which requires that user accounts and passwords be created and managed in a storage such as a database. This mechanism does not offer the flexibility of claims-based authentication and should not be used in Cloud applications. This is blocker which impacts the application architecture and code.
The solution: Use the CAST Highlight output listing all your code files declaring Webform Authentication dependencies. Review the dependencies in each file. Refactor the app to be AD-integrated and leverage Active Directory domain identities to support your authentication scenario. To achieve this, you can configure a Windows container to run with a group Managed Service Account (gMSA), which is a special type of service account introduced in Windows Server 2012 designed to allow multiple computers to share an identity without needing to know its password.
CAST Highlight also detects code performing file or directory manipulation, which creates files or folders on the local file system (C: or D: drives), or applications using a middleware application such as asynchronous messaging middleware.
Illustrative case study on eShop applications
This section describes the analysis performed on eShop applications, focusing on a legacy version of the code base (eShopLegacy) and a version that has been modernized (eShopModernized). We then review the results of analysis as it relates to containerization and identify key findings and recommendations.
Repository overview
The eShopModernizing repository contains 6 applications with a total of 91 000 lines of code in mainly C#, ASP.Net and JavaScript languages:
The first group is composed of 3 applications called “eShopLegacy*” containing the code before the containerization.
eShopLegacyMVC is a traditional Web app ASP.NET WebForms and MVC in .NET Framework.
eShopLegacyNTier is an N-Tier app based on a WCF service.
eShopLegacyWebforms is a client WinForms desktop app.
The second group is composed of the modernized version of the above 3 applications after containerization to Windows Containers and Azure Cloud.
Containerization insights
In total, the 6 eShop applications show 5 containerization blockers.
Three blockers impact the container configuration:
Access to environment variable 6 occurrences found in Ruby files.
Using other configuration files than Web configuration 6 occurrences in C# code.
Using connection strings for database connection: 4 occurrences in C# code of eShopModernized* apps.
Two blockers impact the applications architecture found in C# code:
Using file system: 3 occurrences found
Perform File Manipulation: 15 occurrences found.
The figure below illustrates the containerization insights collected by CAST Highlight: in which application, with estimated effort to remediate them, number of occurrences found for each blocker (roadblocks), technology involved and impact (Container only, Architecture, Code).
Remediating those blockers would take roughly:
0.36 person-day effort on the eShopLegacy* applications
0.52 person-day effort on the eShopModernized* applications
The estimated remediation effort only concerns the changes in the code, it must be added to surrounding tasks such as regression testing, project management, etc.
Why addressing the blockers in the code prior to containerization
In summary, we would spend less effort to fix the blockers before migrating the eShopLegacy* applications, compared to the effort spent on remediating the same applications after containerization.
For the eShopCase, the analysis of both versions of the codebase indicates that the best approach would have been to first address the blockers found in the legacy version prior to containerization. This approach required less effort than addressing the blockers after containerization. In fact, additional files were created in the modernized version to accommodate the new platform which added new issues and blockers.
Sample blockers details: “Using direct Database Access through Connection Strings”
Database connection strings are very sensitive data in a Cloud application as they protect access to data storage or other application services. As a result, connection strings must be protected to prevent data theft. It is recommended to store this kind of sensitive data in a secured cloud-based storage such (e.g. Azure Key Vault). This blocker impacts the container configuration, a documentation and references with the patterns detected in the code are available for each of the blockers in CAST Highlight:
This blocker has been found in 2 eShopModernized* applications: eShopModernizedMVCSolution eShopModernizedWebFormsSolution. This blocker was not detected in any Legacy application.
CAST Highlight detects 15 other blockers for containerization, find them all here: doc.casthighlight.com/cloudreadypatterns/ (refer to the ‘Containerization’ column).
Third-Party compliance
Third-party frameworks may not all be supported since Microsoft doesn’t specifically certify or support the use of non-Microsoft frameworks on Windows Containers. For each framework, you need to check that the vendor or application supports the policy for Windows containers, a frequent example being dependencies to Crystal Reports.
CAST Highlight makes an inventory of all third-party and open-sources components used by the application, either from dependencies declared in configuration files or directly in the code, or through physical libraries (JARs, DLLs) allowing you in one click to visualize all components used in your application portfolio. CAST Highlight also detects Common Vulnerabilities and Exposures (CVEs), obsolescence and licenses embedded in the 3rd-Party and Open-Sources Software components and generates a Software Bill of Materials.
On eShop applications, a few 3rd-Party frameworks such as ANTLR, autofac, log4net, owin or Pipelines.Sockets may require to use a docker image, a pre-installed SDK or publish a self-contained app including all the dependencies. Additionally, 8 high level CVEs were detected which may require an update to ensure maximum security on the container.
The figure below illustrates the CAST Highlight Software Composition insights including the Bill of Materials.
Modernizing further
Identify “noisy neighbors.”
An additional value of CAST Highlight are insights on the portfolio Health indicating how your applications comply with programming good practices that impact resiliency, agility, complexity or technical debt.
Insights from CAST Highlight can help act proactively to avoid potential “noisy neighbors” in a large application portfolio for which you may not have a precise knowledge of each application.
Applications showing a very low resiliency score in CAST Highlight would need special attention. For example, they may cause memory overflow, which, when containerized, will impact the computing resources consumption on the node. Neighboring containers will suffer unless resource management is enabled thanks to Azure Kubernetes Services through the Set Limits and Set Namespace Quotas directives. Eventually, the orchestrator would terminate the container or the pod, rather than firing another one, resulting into irrelevant additional costs and resources!
The figure below illustrates the application Resiliency by application in CAST Highlight, each application is represented by a bubble.
Modernize towards PaaS.
Once eShop applications are containerized on Windows AKS, it does not mean they are ready for PaaS.
CAST Highlight Portfolio Advisor for Cloud indicates that opportunities for modernization could be considered on eShop applications for an estimated effort of less than 2 person-days, allowing to benefit from Azure Cloud Services such as Azure Storage or Azure Batch. Parallelly, other services could be leveraged immediately such as Azure Monitor.
On eShop Applications, CAST Highlight detected 2 PaaS blockers. Firstly, hardcoded URLs using the HTTP protocol (HTTP/HTTPS) which would need to be replaced by the new resource’s URL during the refactoring. Secondly, use of Log4Net for application logs management which should be replaced by Azure Application Insights.
See live here in more details how CAST Highlight helps on the Migration to PaaS journey.
Transform the Architecture Design.
Going further in modernization, eShop applications could be ported to a more modern design on .NET 6 and the legacy UI components such as ASP.NET/MVC could be refactored to Blazor. CAST Imaging helps accelerate such modernization initiatives by providing architecture blueprints of applications and automatically creating a comprehensive knowledge repository.
Application teams are enabled to rapidly discover the as-is architecture design in detail and prepare the transformation project whether refactoring to PaaS, implementing technical improvements, or engaging in a deep re-architecture. See CAST Imaging live here.
Customer Case Studies
Below selected customer cases leveraging CAST for containerization:
Auto tech firm assesses cloud readiness of apps 5x faster with CAST Highlight : The client compared the time it took to manually assess a few well understood apps with CAST Highlight’s automated approach; the latter was five times faster with the same accuracy. CAST Highlight analyzed all 134 apps in under two days and produced insights including the cloud readiness of each app, specific blockers that needed to be remediated within the code par app, per move group, per business unit. CAST Highlight results were crucial for the many apps that did not have dedicated teams. Within five weeks, the client containerized 40 of their apps and developed a plan to complete the process for the rest of the portfolio with recommendations on cloud services that each app could adopt once migrated.
Head of Engineering at Major Asian e-commerce company engaged in containerizing ~300 applications (core and web/micro-services) declared that CAST helped reduce the dependencies identification in code to 3-4 weeks instead of 3-4 months and to 1.5-2 months to execute the migration instead of 3-4 months. CAST helped accelerate the onboarding i.e. shifting-left Annual Recurring Revenue.
Global media firm cuts cloud migration planning time in half with CAST Highlight : Thanks to well-understood apps, average app assessment time was cut in half when using the CAST Highlight’s automation versus manual code reviews. They progressed to less familiar apps and the time savings become even more significant: up to 5 times faster with CAST. It also identified nearly 50% of the applications that were good refactoring candidates for PaaS, enabling adoption of a cloud-native approach sooner than expected, even further reducing cloud consumption costs. Ultimately, the architect team was able to focus their efforts on high-value infrastructure and integration initiatives instead of manual code and framework reviews.
Conclusion
Migrating .NET applications on Windows Containers with Azure Kubernetes Service provides significant value but demands preliminary checks, especially for custom applications. CAST products help throughout the journey to Azure, from planning the containerization to the succeeding modernization once on Azure. CAST Highlight provides actionable insights at application and at portfolio level, 2 to 4 times faster than a manual approach, including blockers to be remediated. CAST Highlight acts as a control tower for the portfolio. CAST Imaging offers deep insights into application code, allowing you to confidently execute the modernization acting as a knowledge base of your software.
With CAST and Microsoft Azure as partners on the cloud journey, IT Leaders have the right solutions and expertise to retrieve knowledge of their custom applications, unblock the typical “discovery paralysis” in cloud migrations, then reach the full potential of their applications on Azure with less U-turns, higher responsiveness to business requests and better team efficiency while executing the transformation.
Next steps
For more details on CAST for cloud migration & modernization, please visit https://learn.castsoftware.com/faster-modernization-and-cloud-migration and https://www.castsoftware.com/highlight on CAST Highlight specifically.
If you wish to have your application(s) analyzed on CAST Highlight or CAST Imaging for migration to Azure, you may be eligible to Microsoft-funded CAST analysis through the Microsoft Solution Assessment program. Please contact your Microsoft representative or reach out to CAST on microsoft.contact-me@castsoftware.com.
Alternatively, you can purchase a CAST Highlight SaaS subscription on the Azure Marketplace to run the analysis by your own.
For any questions, please contact microsoft.contact-me@castsoftware.com.
Microsoft Tech Community – Latest Blogs –Read More

Decorate your background in Microsoft Teams Premium, now available
At Ignite 2023 we announced Decorate your background, a new generative background effect in Teams that makes meetings more fun and personal by using AI to spruce up your meeting background. Today we’re excited to announce the general availability of Decorate your background to our Teams Premium customers.
As we adapted to the evolving landscape of hybrid work, virtual meetings became a staple of our daily lives, playing a crucial role in maintaining effective team collaboration. Many of us transformed our home workspaces, sometimes going as far as creating professional backdrops in our homes specifically for virtual meetings. This shift has allowed us to get a glimpse into each other’s personal work environments, fostering a unique way to express our personalities and strengthen connections with colleagues. For those times when we needed more privacy—be it an untidy space or less-than-ideal setting—virtual backgrounds have been our trusty go-to solution. While we’ve enriched the background image options over the years, we’re excited to push the boundaries even further.
Now, with the latest advancements in generative AI, you can seamlessly blend your physical and digital spaces, enabling you to revamp what’s seen of your physical meeting space for each call. This technology allows for effortless room clean-ups, adding virtual plants, or festive decorations for special events, all without the need for a frequent interior designer consultation.
Decorate your background uses AI-powered image to image processing to take a snapshot of your video feed and generate a new image that is based on the foundational elements of your physical room, while transforming its overall look by infusing decorations and reimagining it in a new style.
Let’s dive more into this new experience and how to use Decorate your background in Microsoft Teams Premium.
Decorate your background is found in the ‘Video effects’ and ‘Backgrounds’ pane and can be applied at either the pre-join screen or during a meeting. To apply Decorate your background at the pre-join screen, ensure your camera is turned on and select ‘Effects and avatars,’ then select the new ‘Decorate’ option from the ‘Video effects’ tab. Alternatively you can select the ‘More video effects’ option to open the full ‘Video effects’ pane on the right-hand side.
Once you select the ‘Decorate’ button you can start choosing which theme you would like to apply. Here is an overview of the available themes:
Clean up- Designed to tidy up your surroundings, this theme removes clutter and creates a more streamlined and minimalistic aesthetic, elevating your room’s professional appearance.
Fancy- Enhances your space by incorporating lavish and traditional decorative elements to give your room a more elegant and adorned appearance.
Greenhouse- Adds plants and greenery into your space, infusing your room with a natural and lush ambiance.
Celebration- Includes festive decorations like balloons, streamers, lighting, and other elements, livening up your space for celebratory moments.
Surprise me- Cycles through a variety of styles to transform your space including 2D animation theme, underwater theme, a block-style design reminiscent of Minecraft, and a space shuttle theme, offering a new experience with every click.
Once you’ve chosen a theme, select ‘Generate backgrounds,’ this will generate two image options per theme. Select one of the two options or select ‘Generate backgrounds’ again to generate two more options of the same theme.
To apply the chosen background image, select ‘Apply and save background.’ Once you select ‘Apply and save background’, it is saved to your background image library so you can use it again for future meetings—or generate a new background every time, up to you!
To use Decorate your background during a meeting, select ‘More’ from the top bar of the meeting, then select ‘Effects and Avatars,’ then ‘Video effects’ and then ‘Decorate.’ Or you can use the new camera fly-out, which is the downward arrow next to the camera button to easily access the ‘Decorate’ button.
Decorate your background can create a more engaging and personal meeting experience, while allowing users an added layer of customization to their virtual presence. To try Decorate your background ask your IT admin about acquiring a Microsoft Teams Premium license.
Get started with Teams Premium today
Get started for free for 30 days or buy before June 30, 2024, for just USD7 per user per month—30 percent off the standard USD10 pricing.
Try or buy Teams Premium today
Microsoft Tech Community – Latest Blogs –Read More

Drug Details in Doctor’s Prescriptions: A Named Entity Recognition Approach using Prompt Flow
This article shows how to identify important information like drug details from doctor’s prescription, which is called Named Entity Recognition (NER). Entities are words that represent specific concepts or objects in a text. You can use any example to find the important information from the text. Below is the sample doctor’s prescription and we need to identify the drugs e.g. ibuprofen and pseudoephedrine.
Large Language Models (LLMs) e.g. GPT 3.5, GPT4 can be used to perform NER. To create an application that takes a text as input and outputs entities, we can create a flow that uses a LLM node with prompt flow.
To know how to implement the solution, we need to first learn the basic concept of Prompt flow.
Prompt Flow – For creating, evaluating, adjusting, and running LLM applications, you can use prompt flow, which is available in the Azure Machine Learning studio and the Azure AI Studio (preview). Using prompt flow we can develop, test, tune and deploy LLM applications.
To learn how to use prompt flow, we need to first examine the stages of developing an application that uses a Large Language Model (LLM).
Below is the lifecycle of large language model
Initialization: Identify the use case and plan the solution.
Experiment: Create a flow and run it with a small dataset.
Evaluation and Refinement: Check the flow with a larger dataset.
Production: Launch and track the flow and application.
Understand a flow – Prompt flow is a function in the Azure AI Studio that lets you create flows. Flows are workflows that can be run and usually have three components:
Inputs: Represent data passed into the flow. Can be different data types like strings, integers, or Boolean, In below screenshot you can see I have provided two inputs drug’s name as entity type and doctor’s prescription as text.
Nodes: Represent tools that perform data processing, task execution, or algorithmic operations. In below screenshot I have two nodes DRUG_IDENTITY_LLM and DATA_CLEANSING where I am passing entity_type and text as argument to LLM connection.
Outputs: Represent the data produced by the flow. In below screenshot you can see out which shows the final results (e.g. drug’s name). We can get output in desired format like JSON or TEXT.
Tools available in prompt flow – Three common tools are:
LLM tool: Enables custom prompt creation utilizing Large Language Models.
Python tool: Allows the execution of custom Python scripts.
Prompt tool: Prepares prompts as strings for complex scenarios or integration with other tools.
Types of Flow – There are three different types of flows you can create with prompt flow:
Standard flow: Ideal for general LLM-based application development, offering a range of versatile tools.
Chat flow: Designed for conversational applications, with enhanced support for chat-related functionalities.
Evaluation flow: Focused on performance evaluation, allowing the analysis and improvement of models or applications through feedback on previous runs.
Connections
To access data from an external source, service, or API, your flow needs permission to interact with that external service. When you set up a connection, you establish a secure link between prompt flow and external services, enabling smooth and secure data exchange. In below screenshot you can see the connection is Default_AzureOpenAI which is automatically created by system when you setup deployment, you will learn about it more in next steps.
Runtimes
You need to set up the connections your tools use and create your flow before you can run it. You also need compute, which prompt flow gives you through runtimes. You can see in below screenshot how runtime defined in my solution, you will learn more about it in upcoming steps.
Variants
Prompt flow variants are different versions of a tool node with unique settings. Variants are only available in the LLM tool right now, where a variant can have a different prompt content or connection setting. Variants let users tailor their method for specific tasks, like, summarizing news articles. In below screenshot you can see the default variant is variant_0, you can clone a another new one and change your settings and run them independently.
Deploy your flow to endpoint
You can deploy your flow to an online endpoint when you are happy with how it works. Endpoints are URLs that you can use from any application. When you use an online endpoint with an API call, you can get a (near) instant response.
When you put your flow on an online endpoint, prompt flow creates a URL and key for you to securely connect your flow with other applications or business processes. When you use the endpoint, a flow runs and the output comes back in real-time. This way, you can use endpoints to create chat or copilot responses that you want to use in another application. In the below screenshot you can see a sample deployment setup for this solution.
Evaluation Metrics
Prompt flow requires tracking evaluation metrics to assess how well your LLM application performs, how it matches real-world expectations and how it produces correct results. The main metrics used for evaluation in prompt flow are Groundedness, Relevance, Coherence, Fluency and Similarity.
Implementation of Drug identification Solution – Step by Step
In this exercise, you’ll use Azure AI Studio’s prompt flow to create an LLM application that expects an entity type (e.g. drug’s name) and text (e.g. doctor’s prescription) as input. It calls a GPT model from Azure OpenAI through a LLM node to extract the required entity from the given text, cleans the result and outputs the extracted entities.
You first need to create a project in the Azure AI Studio to create the necessary Azure resources. Then, you can deploy a GPT model with the Azure OpenAI service. Once you have the necessary resources, you can create the flow. Finally you’ll run the flow to test it and view the sample output.
Create a project in the Azure AI Studio
You start by creating an Azure AI Studio project and the Azure AI resources to support it.
In a web browser, open https://ai.azure.com and sign in using your Azure credentials.
Select the Build page, then select + New project.
In the Create a new project wizard, create a project with the following settings:
Project name: A unique name for your project (e.g. Prescribed_Drug_Identification)
Azure AI resource: Create a new resource with the following settings:
Resource name: A unique name
Subscription: Your Azure subscription
Resource group: A new resource group
Location: Choose a location near you
Review your configuration and create your project.
Wait 5-10 minutes for your project to be created.
Deploy a GPT model
To use a LLM model in prompt flow, you need to deploy a model first. The Azure AI Studio allows you to deploy OpenAI models that you can use in your flows.
In the navigation pane on the left, under Components, select the Deployments page.
In Azure OpenAI Studio, navigate to the Deployments page.
Create a new deployment of the gpt-35-turbo model with the following settings:
Model: gpt-35-turbo
Model version: Leave the default value
Deployment name: gpt-35-turbo
Set the Advanced options to use the default content filter and to restrict the tokens-per-minute (TPM) to 5K.
Now that you have your LLM model deployed, you can create a flow in Azure AI Studio that calls the deployed model.
Create and run a flow in the Azure AI Studio
Now that you have all necessary resources provisioned, you can create a flow.
Create a new flow
To create a new flow with a template, you can select one of the types of flows you want to develop.
In the navigation pane on the left, under Tools, select Prompt flow.
Select + Create to create a new flow.
Create a new Standard flow and enter drug-recognition as folder name.
A standard flow with one input, two nodes, and one output is created for you. You’ll update the flow to take two inputs, extract entities, clean up the output from the LLM node, and return the entities as output.
Start the automatic runtime
To test your flow, you need compute. The necessary compute is made available to you through the runtime.
After creating the new flow that you named drug-recognition, the flow should open in the studio.
Select the Select runtime field from the top bar.
In the Automatic runtime list, select Start to start the automatic runtime.
Wait for the runtime to start.
Configure the inputs
The flow you’ll create will take two inputs: a text and the type of entity you want to extract from the text.
Under Inputs, one input is configured named topic of type string. Change the existing input and update with the following settings:
Name: entity_type
Type: string
Value: drug’s name
Select Add input.
Configure the second input to have the following settings:
Name: text
Type: string
Value: “Patient Name: _________
Prescription:
Take ibuprofen (400mg) 3 times a day for 7 days to reduce fever and muscle aches.
Take pseudoephedrine (60mg) 3 times a day for 7 days as needed for congestion and sinus pressure.
Use a saline nasal spray to help relieve congestion.
Drink plenty of fluids and get plenty of rest.
Avoid activities that may worsen symptoms.
Follow up with your doctor if symptoms worsen or persist.
Signed,
Dr. ___________”
Configure the LLM node
The standard flow already includes a node that uses the LLM tool. You can find the node in your flow overview. The default prompt asks for a joke. You’ll update the LLM node to extract entities based on the two inputs specified in the previous section.
Navigate to the LLM node named joke.
Replace the name with DRUGS_IDENTIFY_LLM
For Connection, select the Default_AzureOpenAI connection.
For deployment_name, select the gpt-35-turbo model you deployed.
Replace the prompt field with the following code:
CodeCopy
{% raw %}
system:
Your task is to find entities of a certain type from the given text content.
If there’re multiple entities, please return them all with comma separated, e.g. “entity1, entity2, entity3”.
You should only return the entity list, nothing else.
If there’s no such entity, please return “None”.
user:
Entity type: {{entity_type}}
Text content: {{text}}
Entities:
{% endraw %}
Select Validate and parse input.
Within the LLM node, in the Inputs section, configure the following:
For entity_type, select the value ${inputs.entity_type}.
For text, select the value ${inputs.text}.
Your LLM node will now take the entity type and text as inputs, include it in the prompt you specified and send the request to your deployed model.
Configure the Python node
To extract only the key information from the result of the model, you can use the Python tool to clean up the output of the LLM node.
Navigate to the Python node named echo.
Replace the name with DATA_CLEANSING.
Replace the code with the following:
CodeCopy
from typing import List
from promptflow import tool
@tool
def cleansing(entities_str: str) -> List[str]:
# Split, remove leading and trailing spaces/tabs/dots
parts = entities_str.split(“,”)
cleaned_parts = [part.strip(” t.““) for part in parts]
entities = [part for part in cleaned_parts if len(part) > 0]
return entities
Select Validate and parse input.
Within the Python node, in the Inputs section, set the value of entities_str to ${ DRUGS_IDENTIFY_LLM.output}.
Configure the output
Finally, you can configure the output of the whole flow. You only want one output to your flow, which should be the extracted entities.
Navigate to the flow’s Outputs.
For Name, enter entities.
For Value, select ${DATA_CLEANSING.output}.
Run the flow
Now that you’ve developed the flow, you can run it to test it. Since you’ve added default values to the inputs, you can easily test the flow in the studio.
Select Run to test the flow.
Wait until the run is completed.
Select View outputs. A pop-up should appear showing you the output for the default inputs. Optionally, you can also inspect the logs.
Summary: This article has taught us these things so far. Prompt flow lets you make flows, which are the order of actions or steps that you take to do a certain task or function. A flow shows the whole process or pipeline that uses the interaction with the LLM to solve a specific use case. The flow covers the entire journey from taking input to producing output or doing a wanted action.
The steps involved in making LLM applications.
What a flow means in prompt flow.
The main elements when using prompt flow.
A developed a small solution drug identification solution using standard flow.
Microsoft Tech Community – Latest Blogs –Read More

Announcing HCIBox support for Azure Stack HCI 23H2
Microsoft Tech Community – Latest Blogs –Read More

Skill up on Modern Work: What you may have missed in 2023…
Note from the editor: This blog is guest-authored by Jeremy Chapman, former IT professional and long-time technical expert on the Microsoft 365 product team.
2023 will go down as the year the world was broadly introduced to generative AI. Experiences from OpenAI’s ChatGPT and Microsoft Copilot were significant in both technology and even non-technology conversations. Beyond the user experiences, many of the core concepts were more deeply explained, including how generative AI can offer more personalized responses by incorporating your files and data as part of the orchestration process to respond to your prompts.
Before I go any deeper into the mechanics of generative AI and retrieval augmented generation, since this is about Modern Work skilling overall, let me start by sharing a few highlights spanning Microsoft 365, Windows, and others that you may have missed. The good news is that you can get to everything right now on demand and for free. These resources span online and in-person events, videos, documentation, and structured learning, so whatever modality you prefer, we’ve got your covered!
Here are 7 recommended resources
Microsoft Technical Takeoff with deep Windows, Windows 365, and Microsoft Intune went live in November and hosted more than 30 deeper-dive 300-level sessions, which didn’t make it into the agenda of Microsoft Ignite.
Microsoft Ignite’s Modern Work track included 37 technical sessions spanning Microsoft 365, Teams, Copilot and more – with exclusive and deep dive updates across products and services – so you can find information on your specific areas of focus and interest.
Microsoft Mechanics went deep across 10 Modern Work topics since June, not just for Microsoft Copilot, but also announcements like the new Windows App, Microsoft Loop general availability, and more.
New Copilot for Microsoft 365 Learning Paths, starting with basic concepts and going all the way to what you and your organization can do to prepare for generative AI
Microsoft Copilot end user skilling site with even more of the basics covered for how to work with Copilot, tips for authoring prompts, demonstrations and more.
If instructor-led training is your preference, there are 7 unique Virtual Training Days that have been running for months and you can now sign up for future deliveries.
My final recommendation is to use Microsoft Copilot to find and summarize the skilling content you want – and because it’s grounded using current web content, those recommendations will always be up to date.
Sharing one of my 2023 skilling journeys: Learning the core mechanics of generative AI apps and orchestration
So now, let me get back to the topic of how generative AI experiences can safely work with your data to create more personalized responses. You may know me from Microsoft Mechanics, where we dig into trending technical topics at Microsoft and as the name suggests, explain the mechanics behind them. And because we cover topics on Mechanics from several areas across Microsoft, including Azure AI, developer tools, and data security, as well as Modern Work, I have a unique cross-product perspective. This extends to generative AI solutions with retrieval-augmented generation, and how their underlying orchestration patterns work. I’d like to share some highlights from my own personal skilling journey to demystify a few of the core concepts. And to be clear, you will likely need a basic understanding of generative AI concepts, to follow everything I’ll write and show below.
The mechanics of copilot-style apps
First, you may have seen this architecture representing Copilot for Microsoft 365, either in product documentation or a Microsoft Ignite session that I helped present in November:
Copilot for Microsoft 365 architecture
If you follow the lines and numbered steps in the diagram, it walks through the mechanics of what happens behind the scenes when you submit a prompt. I won’t describe every step in the architecture, but there are a few concepts in there that I learned a bit more deeply about while building recent shows like our deep dive on building custom apps using Azure AI Studio, along with the many topics before that in our broader generative AI video playlist. And unless you are a developer, there’s a good chance that you might have missed these details, so let me break down at a very high level a few of the shared core concepts you’d use to build your own copilot-style app. I’ll use the Azure AI Studio as visual representations for a few of the steps that I initially had not fully understood.
Pre-processing. This refers to a broader set of steps occurring immediately after you submit a prompt. In Azure AI Studio, as well as most common generative AI architectures, one of the first concepts used for pre-processing is called a System Message, but it’s sometimes also referred to as a “System Prompt” or “Meta Prompt” as highlighted below. These are appended to all user prompts behind the scenes to provide additional context for how a large language model should respond. The example is simple system message, and you will see these used to ensure for example that responses are friendly, helpful, voiced in a certain tone, factual, and cite information sources used for a response.
Grounding with data. This refers to data that can later be presented to a large language model along with your prompt and system message to help generate an informed response. This process uses information that the large language model did not have access to as part of its training set. Any data used for retrieval is limited to what the user has permission to access.
Below, the integrated data is represented in my example by a dataset of owner manuals for outdoor products from a fictitious online retailer. In Copilot for Microsoft 365, this would include the Microsoft Graph and the information it can programmatically access in places like SharePoint, OneDrive, email, calendar, and others. This can also include any information you have extended your organization’s instance of the Microsoft Graph with using Graph connectors or plugins to connect programmatically and in real-time via APIs to read information external to Microsoft 365. Information on the web can also optionally be used to retrieve up-to-date public information as part of the grounding process.
These retrieval steps can optionally use semantic search – or what’s often referred to as vector search – in addition to keyword search. Semantic search retrieves similar information based on the derived intent of the user prompt, without matching keywords, keyword synonyms, or keyword misspellings. An example of semantic search would be if you described “the app with numbers, tables, and formulas” in a prompt; semantic search could derive that you are referring to Microsoft Excel, even though neither “Microsoft” or “Excel” were used to describe it as keywords. To find out more about how semantic search works with keyword search and the benefits of combining the two concepts, I’d encourage you to watch this show about vector and keyword search on Mechanics.
Orchestration. All of the steps shown in the architecture diagram are referring to orchestration, or the things that happen between submitting your prompt and receiving the response. There is a lot that goes on there. In the Azure AI Studio, the orchestration used is called a prompt flow. This does everything described in the high-level steps 1-6 in the architecture diagram above. And using Azure AI Studio and prompt flows, can get a little higher fidelity on what can happen, such as determining and extracting intent, formatting the retrieved information so that it can be efficiently presented to the large language model, and later formatting the reply so that it matches the interface and expectation of the user in your app.
Responsible AI. Responsible AI is often abbreviated as RAI, like in the architecture diagram above, but what does it mean programmatically? Microsoft has an entire site devoted to describing what responsible AI means. Azure AI Studio also has the concept of Content Safety using content filters for both user inputs and response outputs (model completions) using a few high-level categories. These are only a few components used as part of orchestration and inferencing with generative AI, and you can get an idea of the types of things that are filtered.
Post-processing. Again, the post processing comprises a larger number of steps, including formatting the output of a response for a particular app or interface. This is also where data security and compliance controls can come into play, as described in the architecture diagram. For example, the response here can include data labels of referenced content for confidentiality or automatically apply sensitivity labels of generated content if sensitive information was retrieved to generate the response.
Then, once all of these and other steps are completed, the orchestration returns its informed response back to the user in the app they are using with generative AI.
Hopefully, this helps demystify a few of the core concepts for these types of apps. This is by no means an exhaustive description of every step in the process (or for that matter, everything I’ve learned in 2023 :)). For me, with a background in deployment and process automation, these steps were very helpful in my personal skilling journey to understand how everything works, and even helped me to build a few simple copilot style apps using the Azure AI Studio.
Of course, there is a lot more that you can explore. I’d recommend starting with a few of the items listed in the beginning. If you’re looking for something not on my list, that’s where Microsoft Copilot can help. Just remember to be specific with your prompt for best results.
Thanks for reading this far and best wishes for 2024!
Microsoft Tech Community – Latest Blogs –Read More

Network provider connectivity attribution in the Microsoft 365 admin center
When you think of Microsoft 365 services and network recommendations from Microsoft, the first thing that comes to mind is Microsoft’s network connectivity principles. These principles are the guidelines to follow when it comes to designing enterprise network connectivity for accessing Microsoft 365.
The Health | Network Connectivity page in the Microsoft 365 admin center is where you can view network connectivity assessment results for your users, which is represented as an aggregate at your tenant level and location level. “Location level” refers to your Office locations that are automatically discovered or defined by you.
You can find complete product documentation at https://aka.ms/networkproviders, but we wanted to share some details on how the new experience works.
In Health | Network Connectivity, you can find network insights to help you improve your assessment results, by understanding factors in your enterprise network design that don’t align with the network connectivity principles.
For example: Backhauled network egress has been detected at Location X and we recommend using a closer egress point.
Network provider devices are affecting your network, we detected proxy servers or firewalls between your users’ devices and Microsoft 365 endpoints.
The common feedback we heard was to improve the quality of actionable information provided through these network insights: “Don’t just tell me I am backhauling network traffic, tell me what I need to do to rectify the situation.”
Here are other examples where actionable information is missing today:
“How are the network devices affecting my network and what are the steps I can take to prevent it?”
“Are there better network connectivity providers that I can explore for my users network connectivity?”
We listened and have been working hard to improve your admin experience with Health | Network Connectivity, today we are thrilled to announce that the following features are generally available for all tenants in the Microsoft 365 admin center:
Network Providers in use for your tenant users, shown at the tenant level and location level.
Network connectivity Performance and Availability assessment results for your network providers.
Network Provider details impacting performance assessment results.
The Network Provider Index chart shows top performing network providers at a given location (for the USA only, coming soon for rest of the world).
These features have been in limited public preview since June 2023. We have more than 170 enterprise customers enrolled in the public preview and provide direct feedback to improve product quality. Go to Health | Network Connectivity today to experience the new features. You can sign up for the preview of upcoming features at https://aka.ms/networkpreview.
How can I access the new features?
The new features are under Health | Network Connectivity in Microsoft 365 admin center. To access them you must be assigned the Network Administrator or Global Administrator role. You can view the Network Traffic tab, which shows you your network providers at the tenant level. You can also view the table of network providers by location on the Locations tab.
How can I view network providers in use for my users at my tenant level?
You can view this in the Overview tab of Network Connectivity, where there is a widget that shows the top five network providers in use for your tenant users.
Widget for Top five network providers for the tenant
You can also see this on the Network Traffic tab, which contains all the information about network providers used by your users.
Network traffic tab in network connectivity page
What do you mean by Overlay and ISP?
We classify network providers as ISP, Overlay, Corporate, or Satellite. This identifies the type of solution or service offered by the network provider. For example, a VPN solution or cloud proxy service is classified as Overlay, and an Internet link is classified as ISP or Satellite depending on the delivery of the service (terrestrial or satellite). Some organizations have their own ASN or network infrastructure and this is classified as Corporate.
How can I view network providers in use for my users at my Office location level?
When you go to the Locations tab, you should see the list of Office locations that were automatically discovered or added by an admin. If you do not see any discovered or added locations, jump to the next question.
In the list of locations, you should see a Network Providers column that shows you the network providers used at each location.
List of office locations along with network providers in Locations tab
Click on a Location, and then scroll to the end on the Summary tab to see the list of network providers in use at that location.
List of network providers used at a specific location
How can I filter my list of locations for a particular network provider?
In the Network Traffic tab where you see the list of providers at the tenant level, you can click on any network provider and a flyout panel appears with an option to View Locations that you can click to view the list of automatically filtered locations for this provider.
Flyout panel for network provider along with the view locations link
When you click on View Locations, you will be taken to a filtered list of locations for the provider.
List of locations automatically filtered for a network provider
Why do I not see the View Locations option in the flyout panel?
View Locations is not shown when we can’t identify the office locations where the network provider is used. This could be because you do not have any or some of your office locations have not been discovered or added.
Why do I not see any locations discovered or added in the locations tab?
We depend on location information from Windows Location Services (WLS) to discover your location, it’s possible that WLS is not enabled on your user’s devices, or you chose to not share the location information with Microsoft in the Settings for Network Connectivity in Microsoft 365 admin center.
Some admins define their locations manually using the Add Location option in Locations tab, or the Manage multiple locations option, to import their locations using a csv or tsv file or the building data file exported from Call Quality Dashboard.
If you have not shared location information with us or defined locations manually, you will not see any locations for your tenant. Go to the next question to sign up for an alternative option to automatically discover your locations without sharing your location information.
How can I get my Locations discovered automatically without sharing my location information or using WLS?
If you prefer not to share location information with us or do not have the information required to define locations manually, you can use a new option we are introducing to discover your locations based on the network telemetry. In the network telemetry we have information like your LAN Subnet ID, Egress IP address that enables us to show all your locations from where your users are connecting to Microsoft 365. You can sign up for the public preview at https://aka.ms/networkpreview to explore this new option and provide us feedback.
When defining locations manually, can I use supernets instead of specific LAN subnets?
Yes, we now support supernets when you add locations using LAN subnets. For example, You added a location using /20 LAN subnet, we received a LAN subnet attribute containing /24 (if part of the supernet you defined uses /20 and there is no other specific match for the /24 subnet) in the network assessment, we will map this network assessment to the location based on the /20 supernet definition.
I have too many locations, how can I manage the view to prioritize?
You can filter the list of locations using location type (automatically discovered vs admin added), work type (onsite or remote). You can also select multiple locations and hide them by using the Hide option.
Can I edit the location by adding more details?
Yes, you can edit the location by selecting it and using the Edit option. In fact, this is a great way to build on the automatically discovered locations by adding LAN subnets or egress IP’s or both to make the location view more accurate or scoped to your needs.
If my network provider’s performance is low, where can I view details that will help improve performance?
From the list of locations, you can click on a location to go to its Summary tab. If you scroll down to the end of the Summary tab you will see the list of network providers used at this location.
List of network providers used at a specific location
From this list of providers, you can click on a specific provider to view the Summary and Details for that provider. For example, I can click Fabrikam to view the flyout with summary and details for Fabrikam.
Summary for network provider Fabrikam
In the Details tab there is information that typically affects provider performance. For example, we detect network provider device interference between your users and Microsoft 365.
Here are the types of device interference we can detect.
SSL break and inspect test: This detects a private or unknown certificate presented by a network device to your users for data path connections to Microsoft 365, a private certificate is typically used when the network device intends to perform break and inspect operation at the SSL or TLS layer for those connections. We may not be able to show you the detected certificate issuer names due to privacy reasons.
Incorrect destination IP address detected: This indicates that the destination endpoint representing Microsoft 365 endpoints have incorrect or unfamiliar IP addresses assigned to them. Typically, this means there is an intermediate network device acting as a proxy and we will show you the incorrect or unfamiliar IP address detected.
VPN or tunneling detected: This indicates that the network taken to connect to Microsoft 365 endpoints involves a VPN or traffic tunnelling. A VPN or traffic tunnelling may cause backhaul of network traffic and lead to network performance issues that impacts user experience.
If no device interference is detected, the implementation is considered to be aligned with our network connectivity principles.
Interference details like SSL break and inspect, Incorrect destination IP address and VPN tunneling detected for a network provider
NPI
The Network Provider Index (NPI) chart is a monthly index that can be viewed by office location. It lists network providers with the highest performance used by Microsoft 365 customers in the same country/region and state as your office. We include availability and performance information attributed to these providers. This index also shows a target baseline that shows the best performance observed in the same country/region and state.
Network provider index chart for a location
How can I use the NPI chart?
You can use the NPI chart to find top performing network providers and view their performance assessment at a given location, such as your office location or any other location from where users connect to Microsoft 365. Note that the index is provided at the State level and not City level.
You can also use the NPI chart to determine the best performance observed at a particular location. This is referred to as the Target baseline. For example, sometimes the best performance assessment observed 80 points out of 100, this means you are unlikely to find a network provider who can deliver better performance at this location.
— The Microsoft 365 Network Engineering team
Microsoft Tech Community – Latest Blogs –Read More
Introducing More Granular Certificate-Based Authentication Configuration in Conditional Access
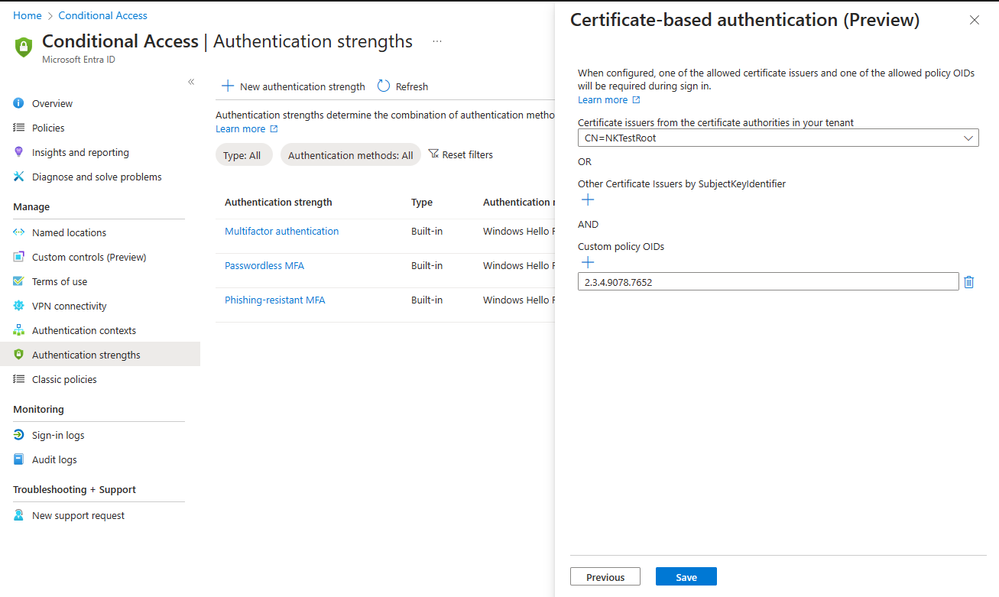
I’m thrilled to announce the public preview of advanced certificate-based authentication (CBA) options in Conditional Access, which provides the ability to allow access to specific resources based on the certificate Issuer or Policy Object Identifiers (OIDs) properties.
Our customers, particularly those in highly regulated industries and government, have expressed the need for more flexibility in their CBA configurations. Using the same certificate for all Entra ID federated applications is not always sufficient. Some resources may require access with a certificate issued by specific issuers, while other resources require access based on a specific policy OIDs.
For instance, a company like Contoso may issue three different types of multifactor certificates via Smart Cards to employees, each distinguished by properties such as Policy OID or issuer. These certificates may correspond to different levels of security clearance, such as Confidential, Secret, or Top Secret. Contoso needs to ensure that only users with the appropriate multifactor certificate can access data of the corresponding classification.
Figure 1: Authentication strength – advanced CBA options
With the authentication strength capability in Conditional Access, customers can now create a custom authentication strength policy, with advanced CBA options to allow access based on certificate issuer or policy OIDs. For external users whose multifactor authentication (MFA) is trusted from partners’ Entra ID tenant, access can also be restricted based on these properties.
This adds flexibility to CBA, in addition to the recent updates we shared in December. We remain committed to enhancing phishing-resistant authentication to all our customers and helping US Gov customers meet Executive Order 14028 on Improving the Nation’s Cybersecurity.
To learn more about this new capability check authentication strength advanced options.
Thanks, and let us know what you think!
Alex Weinert
Learn more about Microsoft Entra:
See recent Microsoft Entra blogs
Dive into Microsoft Entra technical documentation
Learn more at Azure Active Directory (Azure AD) rename to Microsoft Entra ID
Join the conversation on the Microsoft Entra discussion space and Twitter
Learn more about Microsoft Security
Microsoft Tech Community – Latest Blogs –Read More


